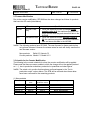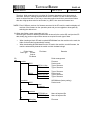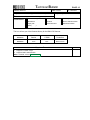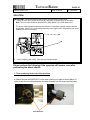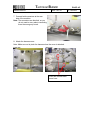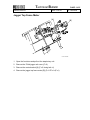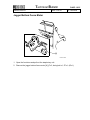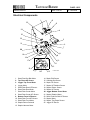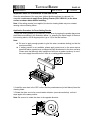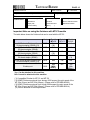
1
Technical Bulletin
PAGE: 1/4
Reissued: 19-Mar-03
Model: General RTB
Date: 4-Feb-03
No.: RGene013b
RTB Reissue
The items in bold italics have been corrected or updated.
Subject: Service remarks at installation
Prepared by: T. Itoh
From: Technical Service Sec. Service Planning Dept.
Classification:
Troubleshooting
Part information
Action required
Mechanical
Electrical
Service manual revision
Paper path
Transmit/receive
Retrofit information
Other (Specification change)
Please note the following change in counter specification. Although a production line
modification will not be applied to some products, the action described in 4. Important
Notes for Installation below must be taken for all products at installation.
Overview:
Electronic counters will now be set to 0 when released from the factory, instead of being
set to a negative value.
Background:
Previously, counters were set to a negative value when shipped from the factory, and later
set to “0” at installation, following installation test copies/prints. However this may cause
confusion among some customers as to why the counter value at the commencement of
the contract is “0”, even though some installation test copies have already been made.
Details:
1. Specification Change
Current
New
Specification
• The initial value of the electrical counter is negative when products
are shipped from the factory.
Note: After making test samples at installation, the negative counter
value can be set to “0” with SP mode.
• The initial value of the electrical counter is “0” when products are
shipped from the factory.
Note: After making test samples at installation, the (positive) counter
value cannot be set back to “0” with SP mode.
Technical Bulletin
PAGE: 2/4
Reissued: 19-Mar-03
Model: General RTB
Date: 4-Feb-03
No.: RGene013b
2. Firmware Modification
Due to the counter modification, SP5-849 has also been changed as follows for products
that have this SP mode (listed below).
Current
New
SP mode name:
Specification:
Counter Clear
• When the electrical counter is changed from a
Day
negative value to 0, the machine recognizes this
as the counter clear day and stores this date in the
NVRAM.
Installation Date • When the electrical counter reaches a value of
20, the machine recognizes this as the installation
date and stores this date in the NVRAM.
NOTE: The following products have SP5-849. The new firmware for these products has
not yet been released. However the release notes for each will clearly mention the
new firmware version.
New products:
Bellini-C2, Adonis C3
Current products: Martini C1, Model-U C1
3. Schedule for the Counter Modification
The following is the current schedule for when the counter modification will be applied.
Please note that there are some models to which the change will not be applied (marked
as “---“), due to production schedules, production lot quantities and sales figures.
NOTE: The actual cut-in months that have been confirmed appear in the “Cut-in
production month” column below. This RTB will be reissued when these dates
have been confirmed for the remaining products.
(1) New products
Product Name
Bellini C2
Adonis C3
Model J-P2
Model J-P2 CF
Model AR- P1
Model K-C1a
Product
Code
B070
B079/82
G080
G367
G081/92
B120
Target cut-in
production month
2003.03
2003.03
2003.03
2003.03
2003.03
2003.03
Cut-in production month
April ’03 production
First mass production lot
March ’03 production
March ’03 production
March ’03 production
March ’03 production
Technical Bulletin
PAGE: 3/4
Reissued: 19-Mar-03
Model: General RTB
Date: 4-Feb-03
No.: RGene013b
(2) Current products
Product Name
Product
Code
Digital B&W Copiers
Bellini C1
A294
Martini C1
B064/65
Model M-C2b
B098
Adonis C2
B003/04/06/07
Russian C2
B022/27/31
Model K-C1
B039/40/43
Stella C1
B044/45/46/49
Digital WF Copiers
Dolphin
B010
Analog Copiers
All products
J2SS-C3
B047/48
Whale
A174
Color Copiers
Model I2
B018
Model L2
B017
Model C2
B023
Model U-C1
B051/52
Color Printers
Model J-P1
G060
Model J-P1 CF
G570
Model U-P1
G071
Pomelo P3
G063
Target cut-in
production month
Cut-in production month
--2003.03
2003.03
--2003.03
2003.03
2003.03
--April ’03 production (see Note)
March ’03 production
--February ’03 production
March ’03 production
March ’03 production
2003.03
March ’03 production
--(See Note)
--March ’03 production
March ’03 production
----2003.02
2003.03
----February ’03 production
April ’03 production
----2003.03
2003.03
----March ’03 production
March ’03 production
NOTE: The counter change will be applied as a running change to production units only.
For machines already shipped out or in the field, please be sure to take the action
described below in Section 4.
NOTE: For Martini-C1 mainframes assembled in Japan, the counter change will be
applied from the first unit of April ’03 production. For mainframes assembled
at REI, the change will be applied midway through April production. These
cut-in serial numbers will be announced as soon as they have been
confirmed.
NOTE: The change will also be applied to analog models J2SS-C3 and Whale, as
production will continue for a while. However, as these models use only
mechanical counters, the initial value when shipped from the factory will be
1 or 2 (not 0), following the 1 or 2 factory test copies.
Technical Bulletin
PAGE: 4/4
Reissued: 19-Mar-03
Model: General RTB
Date: 4-Feb-03
No.: RGene013b
4. Important Notes for Machine Installation – All Products
Please be sure to perform the following at machine installation:
1. If the product is from before the counter modification, i.e. the counter is at a negative
value, be sure to set the counter value to 0 first, then make the installation test
samples.
Digital products
Analog products
Set the electrical counter to 0 with SP mode.
Set the mechanical counter to 0 with a reset key (tool).
2. If the product is modified, i.e. the counter is already at 0 (or above 0 following preinstallation at a service depot), simply make the installation test samples.
3. After completing the installation, make sure to record the counter value. This is very
important, as this value will be used for billing with Meter Click contracts. Also, inform
the customer of the value along with the reason why the counter does not start from
“0”.
Technical Bulletin
Model: Bellini-C2
Date: 7-Apr-03
Subject: SC672 etc
PAGE: 1/4
No.: RB070001
Prepared by: M. Matsuda
From: 2nd Tech Support Sec. Service Support Dept.
Classification:
Troubleshooting
Part information
Action required
Mechanical
Electrical
Service manual revision
Transmit/receive
Retrofit information
Paper path
Other (
)
The Bellini-C2 firmware has been modified to solve the following:
SYMPTOM
1. SC672 (controller start-up error)
2. NetWare printing error
The machine will not accept print jobs after a certain amount have been sent via NetWare.
3. Words missing (French/Spanish)
Some words are not displayed in French (missing from wording lists).
4. Printing speed with Standard TCP/IP Port is too slow
CAUSE
The software was not designed to prevent the above.
SOLUTION
The following firmware has been modified and applied from March 5th ‘03 production.
1. SC672 (controller start-up error).
Solution: Controller, LCDC and Bios firmware modifications.
Note: There are a total of 9 separate causes that can trigger SC672. To cover all
possible causes, it is necessary to modify all the firmware listed above.
2. NetWare printing error
Solution: NIC firmware modification.
3. Words missing (French/Spanish):
Solution: LCDC firmware modification.
4. Printing speed with Standard TCP/IP Port is too slow
Solution: NIC firmware modification.
Technical Bulletin
Model: Bellini-C2
PAGE: 2/4
Date: 7-Apr-03
No.: RB070001
Cut-in Serial Numbers
RCL (Japan) Production (B070/B071)
MODEL NAME
Ricoh Aficio 2090
Savin 4090
Gestetner 9002
Lanier LD 090
Gestetner 9002
Nashatec 9005
Rex Rotary 9008
Lanier LD 090
IS 2090
Ricoh Aficio 2090
Ricoh Aficio 2105
Savin 40105
Gestetner 10512
Lanier LD 0105
Gestetner 10512
Nashatec 10515
Rex Rotary 10518
Lanier LD 0105
IS 2105
Ricoh Aficio 2105
V/Hz
208 - 240V/60Hz
DESTINATION
USA, Canada.
South America
CODE
B070-17
SERIAL NO.
J7030300126
220 - 240V/50,60Hz
Europe, etc.
B070-22
J7030300123
220 - 240V/50,60Hz
220 - 240V/50,60Hz
220 - 240V/50,60Hz
208 - 240V/60Hz
Europe
Europe, etc.
Europe etc.
USA, Canada,
South America
B070-24
B070-26
B070-27
B071-17
L1363030007
5Q70330001
J7030300208
J7130300161
220 - 240V/50,60Hz
Europe, etc.
B071-22
J7130300058
220 - 240V/50,60Hz
220 - 240V/50,60Hz
220 - 240V/50,60Hz
Europe
Europe, etc.
Europe, etc.
B071-24
B071-26
B071-27
L1363010010
5Q80330031
J7130300160
Technical Bulletin
Model: Bellini-C2
Date: 7-Apr-03
PAGE: 3/4
No.: RB070001
ACTION REQUIRED
Please perform the firmware upgrade on machines made before March 5th 2003
production. (Refer to the above table for machine cut-in serial numbers.)
!
!
!
!
Controller: B0705734B: V.1.04.4
NIC: B0705735B: V.4.03
BIOS: B0705742D: K02EL00O
LCDC: B0705371B (NA): V.2.07
B0705372B (EU): V.2.07
Note: Please update the above firmware at the same time.
<< Firmware Update Procedure >>
1. Turn the main switch OFF.
2. Insert the SD card into the C3 slot on the right side of the controller box.
3. Turn the main switch ON.
Note: The machine automatically displays the firmware update screen.
4. Select “Network Support”, “System”, “Ope Panel. NA(or EU)” and “BIOS” on the
operation panel at the same time.
Note: With some machines, “BIOS” is not displayed at this point. In this case, continue to
the next step for the first three firmware types, and then repeat the procedure for
BIOS.
Note: NA: USA version, EU: Europe version.
Technical Bulletin
Model: Bellini-C2
Date: 7-Apr-03
PAGE: 4/4
No.: RB070001
5. Press the “Update (#)” key.
The firmware update will then begin, and the progress bar (*****___) will be displayed on
the operation panel.
The machine performs the firmware update in the following order:
“Network Support” # “System” # “BIOS” # “Ope Panel”
Note:
! While the “Ope panel” firmware is being updated, the panel display will be blank
(progress bar not displayed). Also, the Power ON LED will flash as follows:
- During the update: LED flashes on and off at 0.5s intervals.
- After the update is completed: LED flashes on and off at 3s intervals.
!
It takes about 4 to 4.5 minutes to complete the “Ope panel” firmware update. The total
time for all four updates is about 8.45 minutes.
6.
7.
8.
9.
Turn the main switch OFF.
Remove the SD card from the C3 slot.
Turn the main switch ON.
Enter SP mode:
1. Press the Clear Modes key
.
2. Press !"# on the operational panel keypad.
3. Hold down the Clear key
for more than 3 seconds.
4. Press Copy SP.
10.Check the firmware version to confirm that the firmware has been successfully
downloaded (SP7801):
! Controller: B0705734B: V.1.04.4
! NIC: B0705735B: V.4.03
! BIOS: B0705742D: K02EL00O
! LCDC: B0705371B (NA), B0705372B (EU): V.2.07
Note: As mentioned above under Step 4, if the BIOS firmware could not be updated at the
same time (was not displayed), please repeat the above procedure to update the BIOS.
Important:
If the customer does not use a NetWare server, please change the “NetWare”
setting to “Invalid” in the User Tools.
User Tool --> System Setting --> Interface Setting --> Effective Protocol NetWare –>
Select “Invalid” –> Exit –> Main SW off/on
Technical Bulletin
Model: Bellini-C2
Date: 21-Apr-03
Subject: SD Card Information
PAGE: 1/8
No.: RB070002
Prepared by: S.Orita
From: 2nd Tech Support Sec. Service Support Dept.
Classification:
Troubleshooting
Part information
Action required
Mechanical
Electrical
Service manual revision
Transmit/receive
Retrofit information
Paper path
Other (
)
We are releasing the SD Card as a new service tool from Bellini-C2.
The detailed information is as follows:
1. Introduction
1-1 Objective
Although flash memory cards have been used on Ricoh products for service activities in the
field, some products require several flash memory cards to update all types of firmware. To
save time and servicing costs for firmware and data uploading and downloading, Ricoh GW
products will now use SD cards as the new memory media.
1-2 Introduction of the SD Card
The Bellini-C2 is the first product released that uses an SD card instead of a ROM DIMM. The
SD card will be used on all future GW products (except for some such as the Model-A C3 and
Model-J P2). The Service Launching Guide for each product will mention whether or not the
SD card is used.
2. Service Concepts
The following benefits for service activities can be expected with the SD card:
•
Maximizing service efficiency, minimizing servicing time, data back-up
SD cards have enough memory to store all types of firmware and/or data, saving servicing
costs and time.
•
Unlike flash memory cards, the swap box and/or PC application software tools are not
required. Firmware can be easily stored, copied, or deleted using Windows Explorer.
Technical Bulletin
Model: Bellini-C2
Date: 21-Apr-03
PAGE: 2/8
No.: RB070002
3. Service Information
When issuing an FPR (Field Problem Report), the print data and/or debug log data captured
by the SD card should be included with the report depending on the type of problem, as it is
very useful for analyzing the problem and developing a solution. Please see Section 4-3 below
for a detailed description of the functions for the SD card.
The debug log data and/or print file data attached to the FPR sent to Ricoh Japan are used for
the following types of problem analyses. Please refer to the Service Manual for the detailed
procedures on how to retrieve this information from the machine.
Data
Debug log
•
•
Print data (captured file) •
•
•
Problem Type
Problems with unknown causes (SC code, paper jam, other
abnormal machine operation).
Problems that occur intermittently.
Font problems
Image data missing
Image problems which cannot be duplicated when printing
test patterns from the printer
4. System Overview
4-1 SD Card Type
There are two types of SD cards: The service SD card, and the application SD card.
1
SD Card
Type
Application •
•
•
2
Service
•
•
•
Description
The cards are provided as an option for expanding features,
depending on the model.
The card contains ID encryption to protect against illegal
duplication.
The cards are provided with application firmware already
included, and have varying memory capacities depending on the
content.
The cards are registered as service parts and can contain
firmware for multiple products.
The cards contain no encryption; therefore, firmware or data in
the card can be duplicated.
The memory capacity is 64MB.
4-2 SD Card Adapters
All models that support the SD card contain SD card slot(s) for direct uploading and
downloading of firmware and other data (see below) between the card and machine. When
transferring firmware and data between the card and a PC, an adapter is required (PCMCIA
adapter or USB reader/writer).
For the specifications of the PCMCIA adapter and USB reader/writer, please refer to section 7
below “System Requirements”.
Technical Bulletin
Model: Bellini-C2
PAGE: 3/8
Date: 21-Apr-03
No.: RB070002
4-3 Features of the Service SD Card
The following are the features for the Service SD card at the time this document was issued.
Please refer to the Service Manual for the detailed procedures on how to update the firmware
or retrieve the data from the machine.
1
Feature
Firmware
update
•
•
•
2
Data upload
and download
The following data can be transferred
between the NVRAM and the SD card:
•
•
•
3. Debug log
4. Card Save
Description
Firmware upgrade or downgrade.
Firmware for any supported product can
be stored in the card.
The machine automatically scans the
content of the card and can recognize
what model the firmware is for. The
machine will only download firmware for
the same model as itself.
SP data (such as factory settings)
Logging Data
User settings (e.g. network, fax and mail
addresses).
Remarks
Please refer to
section 4-4 below
for guidelines on
how to store the
firmware and data in
the SD card.
Firmware cannot be
uploaded from the
machine to the SD
card.
Transferable data
can vary from
product to product.
Please refer to the
Service Manual for
each model for
details.
The machine operation log can be captured
when a problem (e.g. SC codes, paper
jams) occurs. This data is very useful in
determining the cause of a problem.
New SP modes have been added to capture
the debug log data to the HDD or SD card.
Print data (files) can be stored directly to the
SD card without printing out.
4-4 Storing Firmware and Data in the SD Card
(1) Firmware (folder name: romdata):
When the SD card is inserted into the machine slot for firmware update, the machine
automatically scans the firmware in the “romdata” folder and checks the firmware headers,
which indicate the model. If the model is the same as the machine, the transfer is authorized.
NOTE: The firmware should always be in the “romdata” folder. If not, the machine cannot find the
firmware.
Technical Bulletin
Model: Bellini-C2
PAGE: 4/8
Date: 21-Apr-03
No.: RB070002
Therefore, folder arrangement is not critical for firmware downloads, since this process is
automatic. However, creating separate folders under “romdata” for each model will make it
easier to delete files later on. An easy to remember method would be to name these folders
after the 4-digit product code for each model, e.g. B070, then store the firmware here.
NOTE: Even if different versions of a firmware are stored in the SD card, the machine displays all
versions of the firmware on the operation panel and you can upgrade or downgrade by
selecting the desired one.
(2) Other data (folder names: nvramdata, prt, log):
Different types of data for different products can be stored in the service SD card (such as SP
data, debug log), and so unique folder names are required for each type of data.
•
When inserting a blank SD card to upload NVRAM data from the machine to the card, the
folder for that model is automatically created.
•
When downloading NVRAM data from the SD card to the machine, as with firmware, the
machine automatically detects the model to which the data belongs.
Folder Name
Data Type
Product
Code or
File Name
File Name
SD
card
Remarks
Folder arrangement:
romdata
B070
B0701111.fwu
B0701111a.fw
u
B0702222.fwu
BXXX
BXXX1111.fwu
BXXX2222.fwu
nvramdata
Firmware
Product code
Type of firmware
Type of firmware
Type of firmware
Product code
Type of firmware
Type of firmware
NVRAM data (factory setting)
Product code
B070
serial
number.nv
prt
cardsave
PRT00000.prn
PRT00001.prn
Name of captured file
Name of captured file
log
debuglog
File name
Technical Bulletin
Model: Bellini-C2
Date: 21-Apr-03
PAGE: 5/8
No.: RB070002
4-5 FIRMWARE DESTRIBUTION
Firmware will continue to be provided through the existing route (global server). The .exe file
will consist of the firmware and related folders, as shown below.
4-6 HOW TO DUPLICATE A SERVICE SD CARD
The following is an example of the contents of an extracted .exe file. Please copy the
necessary files/folders onto the SD card, depending on what information already exists in the
card.
For example:
PC (when extracting the exe. File)
romdata
B070
B0701111.fwu
Case1: Blank SD card
If the SD card is blank, copy the entire “romdata” folder onto the SD card.
Case 2: Card only contains the “romdata” folder
If the card already contains the “romdata” folder, copy the “B070” folder onto the card.
Case 3: Card contains up to the “B070” folder
If the card already contains folders up to “B070”, simply copy the necessary firmware files
(B0701111.fwu) into this folder.
When transferring firmware or data between the SD card and a PC, one of the following adaptors
is necessary, both of which have been registered as service parts (see below).
PCMCIA Adaptor
Required environment: Windows 9x or later
New Service Tools
PC
Fl
ash
MCard
em ory
C ard
Adapter
Laptop com puter
USB Reader/Writer
Required environment: Windows 98 or later
SD
64MB
Technical Bulletin
Model: Bellini-C2
PAGE: 6/8
Date: 21-Apr-03
No.: RB070002
5. Special Tools
The following special tools have been registered as service parts to support products in the
field that use SD cards. However when using SD cards, adapters or reader/writers procured as
supply goods locally, please be sure to use tools produced by the same manufacturers listed
below. This is because products from these vendors were used for the official product
evaluations.
Unique/Common
U: Unique for this model
C: Common with Iris/Lilac
Item
Part Number
1
B6455010
Description
SD Card Kit
Q’ty
1
Unique or
Common
U
Manufacturer
Toshiba /
Panasonic*
2
B6456700
PCMCIA Card Adapter
1
U
Panasonic
3
B6456800
USB Reader/Writer
1
U
Panasonic
“*”: Service SD cards supplied from Ricoh are produced by Toshiba, and application SD cards by Panasonic
(standard/option).
The SD Card Kit (#B6455010) contains the following parts:
•
•
•
SD Card
SD Card Plastic Case
Label (see Note)
NOTE: The kit contains a blank label for the SD card for writing down the card’s contents. Please
make sure that the label is affixed in the correct position on the card, as this is essential to
ensure that the card fits into the card slot and adaptors properly. Please also be sure to
completely remove the old label whenever affixing a new one.
Technical Bulletin
Model: Bellini-C2
Date: 21-Apr-03
PAGE: 7/8
No.: RB070002
7. System Requirements
7-1 SD CARD
Please read over the important notes described below regarding the handling of the SD card. If
these points are not followed carefully, it may cause the card to be damaged or data to be lost.
Important Notes:
• Do not directly touch the card contacts or bring them into contact with a metallic
substance.
•
Do not bend, drop or apply any force or shock to the card.
•
Keep the card dry at all times, avoiding high-humidity environments and making sure
condensation does not form on the card. The environmental requirements for operation
and storage are as follows:
Temperature
Humidity
During operation:
0 to 55oC
20 to 85%RH
Storage:
-20 to 65oC
5 to 85%RH
•
Do not remove the card or turn the power off while reading or writing data.
•
All SD cards come preformatted. However, if reformatting the card later on for some
purpose, always be sure to confirm the contents of the card before doing so, as all data
will be lost when the card is reformatted.
•
Do not attempt to duplicate or reformat an application SD card.
Other:
•
The power should always be OFF before the card is inserted in or removed from the
machine (see Service Manual for details).
•
The SD card should always be kept in the plastic case to protect it from damage.
•
No labels should be affixed to the card except for the ones packaged together with the
card. This label must be affixed in the correct position, and must always be removed
when attaching a new label (labels must not be stacked).
•
If writing on the label, always do so before affixing it to the card.
•
Before inserting either the service or application SD card, always make sure that the card
switch is unlocked, as using them in the locked condition will cause an error.
•
Since the application SD card is formatted in a different way from the service SD card, the
application card cannot be used as a service tool.
Technical Bulletin
Model: Bellini-C2
Date: 21-Apr-03
PAGE: 8/8
No.: RB070002
7-2 PCMCIA CARD ADAPTOR / USB READER WRITER
Manufacturer
Product Code
PC
Host Interface
OS
Dimensions
PCMCIA Card Adapter
USB Reader Writer
Panasonic
BN-SDAA BN-SDAA2
BN-SDCA BM-SDCE2
IBM PC-AT compatible computer
PCMCIA slot
USB port
Win98 SE or later
85.6x54x5mm
92x56x15mm
NOTE:
1. Swap Box for the flash memory (IC) card cannot be used for uploading firmware to the SD card.
2. If the USB Reader Writer is used with Win98, a USB Reader Writer driver is required.
Technical Bulletin
Model: Bellini-C2
Date: 24-Apr-03
Subject: Firmware update for “0” counter & SMTP
PAGE: 1/5
No.: RB070003
Prepared by: M.Matsuda
Authentication
From: 2nd Tech Support Sec. Service Support Dept.
Classification:
Troubleshooting
Part information
Mechanical
Electrical
Service manual revision
Paper path
Transmit/receive
Retrofit information
Other (
Action required
)
Important:
Before installing the firmware in the table below, the following LCDC and BIOS
versions must already be installed.
! LCDC (NA): V.2.07 (B0705371B)
! LCDC (EU): V.2.07 (B0705372B)
! BIOS: V.K02EL00O (B0705742D)
Note: These versions were released as a countermeasure for SC672. (Refer to RTB
RB070001)
The following firmware has been released for the 0 counter and SMTP Authentication
modifications.
Mainframe (B070/B071)
Software
Software P/N
Version
Note
NCS (NIB)
B0705755
V4.11
*1
*2
Netfile
B0705756
V2.11.3
*1
*2
System
B0705754
V2.12.7
*1, *4
*2, *4
Webdocbox
B0705758
V1.06
*1, *4
*2, *4
Websys
B0705757
V2.00
*1, *4
*2, *4
LCDC (NA)
B0705374
V2.09
LCDC (EU)
B0705375
V2.09
Printer/Scanner (B580)
Printer
B5806515
V1.13
*3
*2
Scanner
B5806520
V2.00
*3
*2
Technical Bulletin
Model: Bellini-C2
Date: 24-Apr-03
PAGE: 2/5
No.: RB070003
Note:
*1. These must be updated together as a set for the 0 counter modification.
*2. These must be updated together as a set for the SMTP modification.
*3. If installing the P/S Kit, for the 0 counter modification, printer v1.13 and scanner
v2.00 are necessary in addition to the mainframe versions listed above.
*4. System firmware v2.12.7 must be installed first, before the Webdocbox or
Websys.
Cut-in Serial Numbers
RCL (Japan) Production (B070/B071)
MODEL NAME
V/Hz
DESTINATION
CODE
SERIAL NO.
Ricoh Aficio 2090
208 - 240V/60Hz
USA, Canada.
B070-17
J7030400001
Savin 4090
South America
Gestetner 9002
Lanier LD 090
220 - 240V/50,60Hz
Europe, etc.
B070-22
J7030400059
Gestetner 9002
Nashatec 9005
Rex Rotary 9008
Lanier LD 090
220 - 240V/50,60Hz
Europe
B070-24
Not fixed
IS 2090
220 - 240V/50,60Hz
Europe, etc.
B070-26
5Q70430001
Ricoh Aficio 2090
220 - 240V/50,60Hz
Europe etc.
B070-27
J7030400014
208 - 240V/60Hz
USA, Canada,
B071-17
Not fixed
Ricoh Aficio 2105
South America
Savin 40105
Gestetner 10512
Lanier LD 0105
Gestetner 10512
220 - 240V/50,60Hz
Europe, etc.
B071-22
J7130400036
Nashatec 10515
Rex Rotary 10518
Lanier LD 0105
220 - 240V/50,60Hz
Europe
B071-24
Not fixed
IS 2105
220 - 240V/50,60Hz
Europe, etc.
B071-26
5Q80430001
Ricoh Aficio 2105
220 - 240V/50,60Hz
Europe, etc.
B071-27
J7130400001
Note: The cut-in serial number for B070-24, B071-17, B071-24 does not fixed. We will announce them when
they are fixed.
1. The 0 Counter modification
General RTB Rgene013 has been issued regarding this modification, so please refer to
this RTB for details.
Technical Bulletin
Model: Bellini-C2
Date: 24-Apr-03
PAGE: 3/5
No.: RB070003
2. The SMTP Authentication modification
<< SP Modes for the SMTP Authentication>>
The following SP modes are added for SMTP authentication after updating to the firmware
versions listed above (5852-002 is an existing SP mode).
Important:
!
Make sure to print out the NIB Summary Report before updating the firmware.
!
Make sure to do the update with the procedure described below, which includes
manually inputting the defaults for the new SP modes.
5852
SMTP
002
Port Number
003
Authorization
004
005
006
User Name
Password
SMTP Auth. Encryption
Simple Mail Transfer Protocol. The
protocol for communication between
Internet main MTAs (Message Transfer
Agents)
Sets the port number
[1~65535 / 25 / 1]
Validates the SMTP function. SMTP
(Simple Mail Transfer Protocol) is the
protocol for communication between
Internet main MTAs (Message Transfer
Agents).
[ON/OFF]
ON: Enables SMTP
OFF: Disables SMTP
Sets the SMTP user name.
Sets the SMTP password.
Sets encryption method for the transfer
password in SMTP validation.
[0~2 / 0 / 1]
0: Auto. Allows three methods for
encryption in SMTP validation:
LOGIN, PLAIN, or CRAM-MD5.
1: Off. Allows two methods for SMTP
validation: LOGIN, PLAIN.
2: On. Allows only one method for
SMTP validation: CRAM-MD5.
Technical Bulletin
Model: Bellini-C2
5852
Date: 24-Apr-03
PAGE: 4/5
No.: RB070003
007
POP before SMTP
A flag that determines whether the POP
server is connected before connecting to
the SMTP server.
[0~1 / 0 / 1]
POP
0: OFF
1: On
Post Office Protocol (POP) servers are
computers that receive mail using SMTP.
The mail includes a setting to ensure that it
is directed to the POP server. POP servers
are used when the user is not permanently
connected to the Internet.
008
009
POP Server Name
POP Port Number
Sets the POP server name.
Sets the POP port number.
010
011
012
POP User Name
POP Password
POP Auth. Encryption
Sets the POP user name.
Sets the POP password.
Sets the encryption method for the
password when 5852 POP Before SMTP
is in use.
[0~2 / 0 / 1]
0: Auto. Allows two methods for
encryption: APOP and normal
encryption to match the settings of
the POP server.
1: Off. Allows only normal encryption.
2: On. Allows only APOP encryption.
013
Time out Setting for POP
Sets the wait time after POP validation
until the SMTP mail is sent.
[0~10000/ 300 /1 ms]
[1~65535/110/1]
<< Procedure for Firmware Update and Manual Input of New SP Defaults >>
After updating the firmware, it is necessary to manually set some of the new SP modes to
their new defaults. This is necessary not only to enable SMTP authentication, but also to
prevent errors that can occur with the Scan to e-mail function while the values above are
still at “0”.
To set SP5852-003 to 013 to their new defaults:
1. Print out the NIB summary report (SP5-990-007).
2. Update the firmware to the versions specified above.
3. Check that the SMTP server name displayed in the following screen is the same as
the name on the NIB summary report:
User Tools # System Settings # File transfer Tab.
Technical Bulletin
Model: Bellini-C2
Date: 24-Apr-03
PAGE: 5/5
No.: RB070003
4. Check or change the SP value in accordance with the following table.
SP Number
5852-002
Check / Change
Check: The port number should be the same as the port number on the NIB
summary report. If they are different, change the port number in this SP to the
number on the NIB summary report.
Note: This is just a confirmation, as the firmware update itself will not change the
SMTP port number.
5852-003
Change: to 0
5852-004
Check: Should be blank.
5852-005
Check: Should be blank.
5852-006
Check: Should be 0.
5852-007
Check: Should be 0.
5852-008
Check: Should be blank.
5852-009
Change: to 110
5852-010
Check: Should be blank.
5852-011
Check: Should be blank.
5852-012
Check: Should be 0.
5852-013
Change: to 300
5. Print out the NIB summary report again and confirm the above SP settings.
Note: For security purposes, the user name and password do not appear on the list.
Technical Bulletin
Model: Bellini-C2
Date: 26-May-03
Subject: Service Manual Revision
PAGE: 1/16
No.: RB070004
Prepared by: M.Matsuda
From: 2nd Tech Support Sec. Service Support Dept.
Classification:
Troubleshooting
Part information
Action required
Mechanical
Electrical
Service manual revision
Transmit/receive
Retrofit information
Paper path
Other (
)
What This Document Contains
This document summarizes the corrections in the Service Manual for “Model B-C2
(Machine Code: B070/B071).
The tables show the locations of the corrections.
• Please revise your service manuals using the bold items in the New column
• Comments in italics tell what action was taken (a page deletion, etc.) or direct your
attention to full text presented below under the “Old” and “New” headings.
• The revisions are presented in their order of appearance by page numbering in the
original Service Manual, under the appropriate headings of the Service Manual (“1.
Installation”, etc.)
• These revisions have also been applied to the service manual file posted to the RISSN
server.
!
1. Installation
Pg.
1-20
1-20, 2, 2)
1-86
Old
Initializing Toner Supply
1) Use the keys displayed on the
screen to enter the developer lot no.,
then press !.
256 MB Memory Kit (B585)
1-87
1.12.7 Copier Connection Kit (B328)
New/Action
Initializing Developer Supply
1) Use the keys displayed on the screen and the
numeric keys on the LCD to enter the
developer Lot No., then press !.
Deleted this page. (The same information is
included in the Printer/Scanner Kit
Installation)
Deleted this page, replaced with 5 new pages
(see below).
<< New >>
1.12.7 Copier Connection Kit (B328)
Accessories
Check the quantity and condition of the accessories in the box against the following list:
1
3
2
4
7
Description
6
5
T03040801.WMF
Q’ty
Interface Cable 1394.................................................................. 3
Repeater Hub 1394.................................................................... 2
Connection PCB .................................................................... 2
Power Repeater Cable .......................................................... 2
“Other Function” Keytops (NA, EU 1 ea.)................................... 2
“Printer/Other Function” Keytops (NA, EU 1 ea.) ....................... 2
SDRAM DIMM 64 MB ............................................................... 2
Preparation
Before you begin the installation procedure, you must first:
• Determine the distance between the machines to be connected.
• Determine whether the printer/scanner option is installed on the machines.
• Measure the distance between the machines, then decide how many cables and
repeater hubs are required.
DISTANCE
Up to 4.5 m
(14.8 ft.)
4.5 ~ 9.0 m
(14.8 ~ 29.5 ft)
9.0 ~ 13.5 m
(29.5 ~ 112.5 ft.
POWER REPEATER HUBS
INTERFACE CABLES
None
1
1
2
2
3
Two sets of keytops (2 per set, 1 for NA, 1 for EU) are provided for each machine, but you
need to install only one keytop on each machine.
• Install the key labeled “Printer/Other Function” (or its equivalent symbol keytop for EU)
on a machine with the printer/scanner option installed
• Install the key labeled “Other Function” (or its equivalent symbol keytop for EU) on a
machine without the printer/scanner option.
–1–
Installation Procedure
"CAUTION
Switch the machine off and unplug the machine before starting the
following procedure.
[B]
[C]
[A]
T03040802.WMF
1. Switch the main power switch off.
2. Remove the controller box cover. (! x7)
3. Remove the cover [A] from slot A2.
4. Align the PCB with the bottom groove, and push the connection PCB [B] into the slot.
NOTE: Make sure that the edge of the PCB is in the groove before you push the card
into the machine.
5. Fasten the PCB with the attached screws [C].
–2–
[A]
[C]
[E]
[D]
[F]
[B]
T03040803.WMF
6. Connect the power repeater cable [A] to the mother board at CN149.
7. Connect the other end of the power repeater cable to the connection PCB [B].
8. Insert the 64 MB SDRAM DIMM [C] into the slot on the mother board.
• Set the edge connector at a 45 degree angle with the slot on the edge connector
[D] aligned with the post below.
• Press down slightly then push the DIMM toward the mother board until it snaps into
place.
• Make sure that the notches on both sides of the DIMM [E] [F] engage the pawls of
the spring loaded arms so that the DIMM is perpendicular.
9. Re-attach the controller box cover.
10. Repeat Steps 1 to 9 to install the connection PCB and 64 MB DIMM on the slave
machine.
–3–
[A]
[D]
[E]
[B]
[C]
T03040804.WMF
11. Insert one end of the interface cable [A] to the connection PCB inserted in slot A2.
12. If additional interface cables are required, connect the cables [B] with the repeater
hubs [C].
13. On the operation panel of both machines, remove the second cover (or Printer key)
from the bottom [D].
14. Install an appropriate key for each machine:
Attach the “Printer/Other Function” key [E] (or its equivalent symbol keytop for EU) if
the printer/scanner option is installed in the machine.
-orAttach the “Other Function” key [E] (or its equivalent symbol keytop for EU) if the
printer/scanner option is not installed in the machine.
15. Attach the other end of the connection cable to the connection PCB installed in the
other machine.
**********************************************************************************************
–4–
3. REPLACEMENT AND ADJUSTMENT
Pg.
3-125
Old
7. Energize the toner bank
motor and toner supply coil
clutch for 2 minutes with
SP5804 070 and 071 to
remove all of the toner in the
supply path.
New/Action
7. Switch on the machine and execute
SP2226 to discharge toner from the
toner bank.
–5–
4. TROUBLESHOOTING
Pg.
4-1
Old
Remove the old definition table. See
below.
New/Action
Add the new definition table. See below.
<< Old >>
There are 4 levels of service call conditions.
Level
A
B
C
D
Definition
To prevent the machine from being damaged,
the SC can only be reset by a service
representative (see the note below). The
copier cannot be operated at all.
The SC can be reset by turning the main
power switch off and on if the SC was caused
by incorrect sensor detection.
The copier can be operated as usual except
for the unit related to the service call.
The SC history is updated. The machine can
be operated as usual.
Reset Procedure
Enter SP mode, then turn the
main power switch off and on.
Turn the operation switch or main
power switch off and on.
A level B’ SC can only be reset by
turning the main power switch off
and on.
Turn the operation switch off and
on.
The SC will not be displayed.
All that happens is that the SC
history is updated.
<< New >>
There are 4 levels of service call conditions.
Level
A
B
C
D
Definition
Fusing SCs displayed on the operation panel.
The machine is disabled. The user cannot
reset the SC.
SCs that disable only the features that use the
defective item. Although these SCs are not
shown to the user under normal conditions,
they are displayed on the operation panel only
when the defective feature is selected.
SCs that are not shown on the operation
panel. They are internally logged.
Turning the operation switch or main power
switch off then on resets SCs. Displayed on
the operation panel. These are re-displayed if
the error occurs again.
–6–
Reset Procedure
Enter SP mode, then turn the
main power switch off/on.
Turn power off/on.
Logging only.
Turn the operation switch or main
power switch off and on.
Pg.
4-28
Old
SC593 is not mentioned.
New/Action
Added SC593. See below.
<< New >>
SC593: Replace the Toner Suction Motor
Definition [B]
The operation time of the motor is over 600 hours.
Possible Cause
• Service life of the toner suction motor is finished.
Note: A near-end message is displayed in the LCD when the operation time exceeds 570
hours.
–7–
5. Service Tables
Pg.
5-23
SP3903
5-24
5-25
5-49
SP5857 002
5-128 to 133
Old
New/Action
Adjusts the starting point for the VD
Correction. Displays whether the
VD correction is being performed.
The target value for VD correction
is “the value of SP2-001-7 + 50”.
[0~999 / 200 / 1 K copies] DFU
Adjusts the starting point for the VD
Correction. Displays whether the VD
correction is being performed. The target
value for VD correction is “the value of SP2001-7 + 50”.
[0~999 / 200 / 1 K copies] (Not DFU)
SP number for “Scanner Free Run” is
not mentioned.
SP number for “SP4013 Scanner
Speed Adjustment” is incorrect.
Under normal conditions, select “3”.
Use “2” only if the HDDs have been
removed.
Deleted “Using the Debug Log”
SP4013 Scanner Free Run
SP4015 Scanner Speed Adjustment
Deleted the description.
Completely revised and replaced based on
new information. Please refer to the new text
below.
<< New >>
5.16 Using the Debug Log
This machine provides a Save Debug Log feature that allows the Customer Engineer to
save and retrieve error information for analysis.
Every time an error occurs, debug information is recorded in volatile memory but this
information is lost when the machine is switched off and on.
The Save Debug Log feature provides two main features:
• Switching on the debug feature so error information is saved directly to the HDD for later
retrieval.
• Copying the error information from the HDD to an SD card.
When a user is experiencing problems with the machine, follow the procedure below to set
up the machine so the error information is saved automatically to the HDD.
5.16.1 Switching On and Setting Up the Save Debug Log function
The debug information cannot be saved the until the “Save Debug Log” function has been
switched on and a target has been selected.
1. Enter the SP mode and switch the Save Debug Log feature on.
• Press # then use the 10-key pad to enter $%&.
• Press and hold down ' for more than 3 seconds.
• Touch “Copy SP”.
• On the LCD panel, open SP5857.
–8–
2. Under “5857 Save Debug Log”, touch “1 On/Off”.
COPY : SP-5-857-001
Save Debug Log
On/Off (1:ON 0:OFF)
_1_
Initial 0
3. On the control panel keypad, press “1” then press !. This switches the Save Debug
Log feature on.
NOTE: The default setting is “0” (OFF). This feature must be switched on in order for
the debug information to be saved.
–9–
4. Next, select the target destination where the debug information will be saved. Under
“5857 Save Debug Log”, touch “2 Target”, enter “2” with the operation panel key to
select the hard disk as the target destination, then press !.
COPY : SP-5-857-002
Save Debug Log
Target (2:HDD 3:SD Card)
_2_
Initial 2
NOTE: Select “3 SD Card” to save the debug information directly to the SD card if it is
inserted in the service slot.
5. Now touch “5858” and specify the events that you want to record in the debug log.
SP5858 (Debug Save When) provides the following items for selection.
1
Engine SC Error
2
Controller SC Error
3
Any SC Error
4
Jam
Saves data when an engine-related
SC code is generated.
Saves debug data when a controllerrelated SC Code is generated.
Saves data only for the SC code that
you specify by entering code number.
Saves data for jams.
NOTE: More than one event can be selected.
Example 1: To Select Items 1, 2, 4
Touch the appropriate items(s). Press “ON” for each selection. This example shows
“Engine SC Error” selected.
COPY : SP-5-858-001
Debug Save When
Engine SC Error
__OFF__
__ON__
Example 2: To Specify an SC Code
Touch “3 Any SC Error”, enter the 3-digit SC code number with the control panel
number keys, then press !. This example shows an entry for SC670.
COPY : SP-5-858-001
Debug Save When
Any SC Error
__670
NOTE: For details about SC code numbers, please refer to the SC tables in Section “4.
Troubleshooting”.
– 10 –
6. Next, select the one or more memory modules for reading and recording debug
information. Touch “5859”.
Under “5859” press the appropriate key item for the module that you want to record.
Enter the appropriate 4-digit number, then press !.
NOTE: Refer to the two tables below for the 4-digit numbers to enter for each key.
The example below shows “Key 1” with “2222” entered.
COPY : SP-5-859-001
Debug Save Key No.
Key 1
___2222
The following keys can be set with the corresponding numbers. (The initials in
parentheses indicate the names of the modules.)
4-Digit Entries for Keys 1 to 10
KEY NO.
1
2
3
4
5
6
7
8
9
10
COPY
4848 (COPY)
2224 (BCU)
PRINTER
SCANNER
2222 (SCS)
2223 (SRM)
256 (IMH)
1000 (ECS)
1025 (MCS)
4400 (GPS)
5375 (Scan)
4500 (PDL)
5682 (NFA)
4600 (GPS-PM)
3000 (NCS)
2000 (NCS)
2000 (NCS)
2224 (BCU)
WEB
5682 (NFA)
6600 (WebDB)
3300 (PTS)
6666 (WebSys)
2000 (NCS)
NOTE: The default settings for Keys 1 to 10 are all zero (“0”).
Key to Acronyms
Acronym
ECS
GPS
GSP-PM
IMH
MCS
Meaning
Engine Control Service
GW Print Service
GW Print Service – Print Module
Image Memory Handler
Memory Control Service
Acronym
NFA
PDL
PTS
SCS
SRM
NCS
Network Control Service
WebDB
Meaning
Net File Application
Printer Design Language
Print Server
System Control Service
System Resource
Management
Web Document Box
(Document Server)
The machine is now set to record the debugging information automatically on the HDD
(the target selected with SP5-857-002) for the events that you selected SP5-858 and
the memory modules selected with SP5-859.
– 11 –
Please keep the following important points in mind when you are doing this setting:
• Note that the number entries for Keys 1 to 5 are the same for the Copy, Printer, Scanner,
and Web memory modules.
• The initial settings are all zero.
• These settings remain in effect until you change them. Be sure to check all the settings,
especially the settings for Keys 6 to 10. To switch off a key setting, enter a zero for that
key.
• You can select any number of keys from 1 to 10 (or all) by entering the corresponding 4digit numbers from the table.
• You cannot mix settings for the groups (COPY, PRINTER, etc.) for 006~010. For
example, if you want to create a PRINTER debug log you must select the settings from
the 9 available selections for the “PRINTER” column only.
• One area of the disk is reserved to store the debug log. The size of this area is limited to
4 MB.
– 12 –
5.16.2 Retrieving the Debug Log from the HDD
Retrieve the debug log by copying it from the hard disk to an SD card.
1. Insert the SD card into the service slot of the copier.
2. Enter the SP mode and execute SP5857 009 (Copy HDD to SD Card (Latest 4 MB)) to
write the debugging data to the SD card.
3. After you return to the service center, use a card reader to copy the file and send it for
analysis to Ricoh by email, or just send the SD card by mail.
5.16.3 Recording Errors Manually
Since only SC errors and jams are recorded to the debug log automatically, for any other
errors that occur while the customer engineer is not on site, please instruct customers to
perform the following immediately after occurrence to save the debug data. Such problems
would include a controller or panel freeze.
NOTE: In order to use this feature, the customer engineer must have previously switched
on the Save Debug Feature (SP5857-001) and selected the hard disk as the save
destination (SP5857-002).
1. When the error occurs, on the operation panel, press
(Clear Modes).
2. On the control panel, enter “01” then hold down ( for at least 3 sec. until the
machine beeps then release. This saves the debug log to the hard disk for later
retrieval with an SD card by the service representatives.
3. Switch the machine off and on to resume operation.
The debug information for the error is saved on the hard disk so the service
representatives can retrieve it on their next visit by copying it from the HDD to an SD
card.
**********************************************************************************************
– 13 –
6. Details
Pg.
6-11
6-66
6-66
6-68
6-68
6-68
Old
“S54 Drum Temperature Sensor”
4.
Readout from the drum potential
sensor is used to adjust:
•Development bias (Vb)
•
Grid voltage (Vg)
•
Laser diode (LD) power.
NOTE: These calibrations are used to
determine toner supply, so it is very
important that the developer be
initialized with SP2801 (TD Sensor
Initialization) at installation and when
the developer is replaced.
3. Vd should be –800 ± 20V. If it is
within this range, the current value
of Vg will be used for copying. If it
is not within this range, - (Vd +
800)V is added to Vg, and the
process starts again from Step 1.
4. If Vd cannot be adjusted to this
standard within 5 attempts, Vg is fixed
to –1,000V and SC312 (Potential
Sensor Calibration Error 3) is logged.
The calibrated ID sensor output will be
used for calibrating the TD sensor
(described below).
New/Action
Deleted this item.
4. Readout from the drum potential sensor is
used to adjust:
•
•
Grid voltage (Vg)
Laser diode (LD) power
Deleted this NOTE
3. Vd should be –800 ± 20V. If it is within this
range, the current value of Vg will be used
for copying. If it is not within this range, (Vd + 800)V is added to Vg, and the
process starts again from Step 1.
Note: VD Correction - As the development
sleeve accumulates toner over time, the
gap between VD and VB decreases, which
makes it easier for dirty background to
occur. To compensate for this, the machine
±20V
increases the target VD value to -850±
when the number of copies exceeds the
value set with SP3903: VD Correction
Counter (default: 200K). As a result, VD
increases and the VD-VB gap is maintained.
4. If Vd cannot be adjusted to this standard
within 5 attempts, Vg is set to the value of
SP2001-001 (default: –900V) and SC315
(Potential Sensor Calibration Error 3) is logged.
Deleted this sentence
– 14 –
Technical Bulletin
Model: Bellini-C2
Date: 29-May-03
Subject: Installation Procedure For Copy Connection Kit
PAGE: 1/8
No.: RB070005
Prepared by: M. Matsuda
From: 2nd Tech Support Sec. Service Support Dept.
Classification:
Troubleshooting
Part information
Action required
Mechanical
Electrical
Service manual revision
Transmit/receive
Retrofit information
Paper path
Other (
)
The following is the revised version of the Installation Procedure (S/M pg. 1-86) for the
Bellini-C2 Copier Connection Kit Type 2105 (machine code B328). The necessary
firmware for both machines is listed on the last page of this bulletin.
Note: The following revisions (except for the firmware versions) have also been applied to
the Service Manual file posted to the RISSN server.
Copier Connection Kit B328
(Machine Code: B070/B071)
Subject to change
Ricoh Technical Service
May 2003
Connection Kit B328
Introduction
The B070 (90 cpm)/B071 (105 cpm) machines can be connected with the new
Copier Connection Kit B328 to increase the rate of copying. The copy rate doubles
after both machines start printing.
The copiers can be used for copy jobs only, not print jobs. However, documents
stored on the document server beforehand can be printed with the connected
copiers.
Specifications
Copy Speed
B070 (90 cpm)
B071 (105 cpm)
Operation
Master Machine
2 Connected:
2 Connected
180 cpm
210 cpm
Prints simultaneously with scanning, same as a stand-alone
machine.
Slave Machine
Starts printing after the 2nd set is printed on the master
machine.
Note: Start time may be slower, due to sizes of images.
Document Server (Printing)
Master Machine
Press the Start key to begin printing, same as a stand-alone
machine.
Slave Machine
Connection Cables
Length (x1)
Length (x2)
Length (x3)
Starts printing after the 2nd set is printed on the master
machine.
Note: Start time may be slower, due to sizes of images.
4. 5 m
9m
13.5 m
1 cable, no repeater hub
2 cables, 1 repeater hub for connection.
3 cables, 2 repeater hubs for connection.
1-1
Installation
Accessories
Check the quantity and condition of the accessories in the box against the following
list:
1
3
2
4
7
6
Description
5
T03040801E.WMF
Q’ty
1. Interface Cable 1394............................................................. 3
2. Repeater Hub 1394............................................................... 2
3. Connection PCB ................................................................... 2
4. Power Repeater Cable ......................................................... 2
5. “Other Function” Keytops (NA, EU 1 ea.).............................. 2
6. “Printer/Other Function” Keytops (NA, EU 1 ea.) .................. 2
7. SDRAM DIMM 64 MB .......................................................... 2
1-2
Preparation
Before you begin the installation procedure, you must first:
• Determine the distance between the machines to be connected.
• Determine whether the printer/scanner option is installed on the machines.
Measure the distance between the machines, then decide how many cables and
repeater hubs are required.
DISTANCE
Up to 4.5 m
(14.8 ft.)
4.5 ~ 9.0 m
(14.8 ~ 29.5 ft)
9.0 ~ 13.5 m
(29.5 ~ 112.5 ft.
POWER REPEATER HUBS
INTERFACE CABLES
None
1
1
2
2
3
Two sets of keytops (2 per set, 1 for NA, 1 for EU) are provided for each machine,
but you need to install only one keytop on each machine.
• Install the key labeled “Printer/Other Function” (or its equivalent symbol keytop
for EU) on a machine with the printer/scanner option installed
• Install the key labeled “Other Function” (or its equivalent symbol keytop for EU)
on a machine without the printer/scanner option.
1-3
Installation Procedure
!CAUTION
Switch the machine off and unplug the machine before starting the
following procedure.
[B]
[C]
[A]
T03040802.WMF
1. Switch the main power switch off.
2. Remove the controller box cover. (! x7)
3. Remove the cover [A] from slot A2.
4. Align the PCB with the bottom groove, and push the connection PCB [B] into
the slot.
NOTE: Make sure that the edge of the PCB is in the groove before you push
the card into the machine.
5. Fasten the PCB with the attached screws [C].
1-4
[A]
[C]
[E]
[D]
[F]
[B]
T03040803.WMF
6. Connect the power repeater cable [A] to the mother board at CN149.
7. Connect the other end of the power repeater cable the connection PCB [B].
8. Insert the 64 MB SDRAM DIMM [C] into the slot on the mother board.
• Set the edge connector at a 45 degree angle with the slot on the edge
connector [D] aligned with the post below.
• Press down slightly then push the DIMM toward the mother board until it
snaps into place.
• Make sure that the notches on both sides of the DIMM [E] [F] engage the
pawls of the spring loaded arms so the DIMM is perpendicular.
9. Re-attach the controller box cover.
10. Repeat Steps 1 to 9 to install the connection PCB and 64 MB DIMM on the
slave machine.
1-5
[A]
[D]
[E]
[C]
[B]
T03040804.WMF
11. Insert one end of the interface cable [A] to the connection PCB inserted in slot
A2.
12. If additional interface cables are required, connect the cables [B] with the
repeater hubs [C]. (☛1.3.2)
13. On the operation panel of the both machines, remove the second cover (or
Printer key) from the bottom [D].
14. Install an appropriate key for each machine:
Attach the “Printer/Other Function” key [E] (or its equivalent symbol keytop for
EU) if the printer/scanner option is installed in the machine.
-orAttach the “Other Function” key [E] (or its equivalent symbol keytop for EU) if
the printer/scanner is not installed in the machine.
15. Attach the other end of the connection cable to the connection PCB installed in
the other machine.
16. The following software must be downloaded onto both the master and slave
machine.
• SYSTEM Ver. V3.04.1(install first) or later
• NCS (NIB) Ver. 4.13.3 or later
• NetFile Ver. 3.04.2 or later
• BCU (Engine) V4.01.1 or later
• LCDC (NA, EU) Ver. 2.09 or later
NOTE: For details about downloading procedures, see Section “5. Service
Tables” of the Service Manual.
1-6
Technical Bulletin
Model: Bellini-C2
Date: 26-Jun-03
Subject: Installation Procedure for MLB
PAGE: 1/1
No.: RB070006
Prepared by: M. Matsuda
From: 2nd Tech Support Sec. Service Support Dept.
Classification:
Troubleshooting
Part information
Action required
Mechanical
Electrical
Service manual revision
Transmit/receive
Retrofit information
Paper path
Other (
)
The following is the revised version of the Installation Procedure (S/M pg. 1-89) for the
Bellini-C2 MLB (File Format Converter Type B, machine code B609). The necessary
firmware versions for both machines are listed in Step 4 below.
Note: The following revisions will also be applied to the Service Manual file posted to the
RISSN server.
MLB (File Format Converter) - B609
Accessories
Description
Q’ty
MLB Board (File Format Converter)............................................ 1
Installation
[B]
[A]
B580I111.WMF
1. Make sure the following firmware versions are already installed:
! LCDC (NA): v2.09 (B0705374) or later
! LCDC (EU): v2.09 (B0705375) or later
! BIOS: VK02EL00O (B0705742D) or later
! Printer: v1.13 (B5806515) or later
! Scanner: v2.00 (B5806520) or later
! WebSystem: v2.00 (B0705757) or later
2. Turn OFF the main switch.
3. Remove the cover [A] for Slot B1 (! x 2).
4. Insert the File Format Converter [B] into Slot B1 and fasten the screws in place.
5. Turn ON the main switch.
1
6. Install the following firmware together as a set:
#
#
#
#
NCS (NIB): (B0705755B)
Netfile: (B0705756B)
System: (B0705754B)
Webdoxbox: (B0705758B)
v.4.15
v3.07.2
v4.01.4
v1.08
Important: The MLB functions will not work properly unless all versions above are
installed together.
7. After successfully installing the firmware above, turn the main switch OFF/ON.
8. Set the following SP modes to the values shown:
SP No.
SP5-836 001
SP5-836 002
SP5-836 072
SP5-836 073
Setting
0
0
0
0
SP No.
SP5-836 085
SP5-836 086
SP5-836 091
2
Setting
1
2
50
9. Set the following SP modes as necessary, in accordance with the customer’s
needs.
SP No.
SP5-836 094
Setting
2
0
SP-5836 098
1
0
Comments
Sets JPEG2000 (J2K) as the file format for documents
copied from the Document Server to Palm2.
Note: Files backed up to Palm2 in J2K format cannot be
edited by other software applications.
Sets TIFF as the file format for documents copied from the
Document Server to Palm2.
Note: Use this setting for customers who wish to use other
software applications to edit or apply OCR or other
processing to backed-up files, and who do not mind the loss
in image quality.
Applies a correction for dots, rear-side image catching and
background to files copied to Palm2, in order to minimize
the size of the file down to its essential parts.
Note: This is applied to both J2K and TIFF files, but is
particularly useful for customers who wish to copy J2K
documents quickly, as they are normally larger, and who do
not mind the slight loss in image reproduction.
Does not apply the above correction to files copied to
Palm2.
Note: Use this setting for customers who wish to preserve
the original reproduction level, especially with J2K files, and
do not mind the time and disk space required for copying.
3
Technical Bulletin
PAGE: 1/4
Reissued: 2-Jul-03
Model: Bellini-C2
Date: 26-Jun-03
No.: RB070006a
RTB Reissue
Step 8 has been added to the following procedure.
Subject: Installation Procedure for MLB
Prepared by: M. Matsuda
From: 2nd Tech Support Sec. Service Support Dept.
Classification:
Troubleshooting
Part information
Mechanical
Electrical
Service manual revision
Paper path
Transmit/receive
Retrofit information
Other (
Action required
)
The following is the revised version of the Installation Procedure (S/M pg. 1-89) for the
Bellini-C2 MLB (File Format Converter Type B (machine code B609)). The necessary
firmware versions for both machines are listed in Step 4 below.
Note: The following revisions will also be applied to the Service Manual file posted to the
RISSN server.
MLB (File Format Converter) - B609
Accessories
Description
Q’ty
MLB Board (File Format Converter)............................................ 1
Installation
[B]
[A]
B580I111.WMF
1. Make sure the following firmware versions are already installed:
! LCDC (NA): v2.09 (B0705374) or later
! LCDC (EU): v2.09 (B0705375) or later
! BIOS: VK02EL00O (B0705742D) or later
! Printer: v1.13 (B5806515) or later
! Scanner: v2.00 (B5806520) or later
! WebSystem: v2.00 (B0705757) or later
2. Turn OFF the main switch.
3. Remove the cover [A] for Slot B1 (! x 2).
4. Insert the File Format Converter [B] into Slot B1 and fasten the screws in place.
5. Turn ON the main switch.
1
6. Install the following firmware together as a set:
#
#
#
#
NCS (NIB): (B0705755B)
Netfile: (B0705756B)
System: (B0705754B)
Webdoxbox: (B0705758B)
v.4.15
v3.07.2
v4.01.4
v1.08
Important: The function will not work properly unless all versions above are
installed together.
7. After successfully installing the firmware above, turn the main switch OFF/ON.
8. Set SP5836-003 to a value of 1, which will enable the print back-up feature.
9. Set the following SP modes to the values shown:
SP No.
SP5-836 001
SP5-836 002
SP5-836 072
SP5-836 073
Setting
0
0
0
0
SP No.
SP5-836 085
SP5-836 086
SP5-836 091
Setting
1
2
50
10. Set the following SP modes as necessary, in accordance with the customer’s
needs.
SP No.
SP5-836 094
Setting
2
0
SP-5836 098
1
Comments
Sets JPEG2000 (J2K) as the file format for documents
copied from the Document Server to Palm2.
Note: Files backed up to Palm2 in J2K format cannot be
edited by other software applications.
Sets TIFF as the file format for documents copied from the
Document Server to Palm2.
Note: Use this setting for customers who wish to use other
software applications to edit or apply OCR or other
processing to backed-up files, and who do not mind the loss
in image quality.
Applies a correction for dots, rear-side image catching and
background to files copied to Palm2, in order to minimize
the size of the file down to its essential parts.
Note: This is applied to both J2K and TIFF files, but is
particularly useful for customers who wish to copy J2K
documents quickly, as they are normally larger, and who do
not mind the slight loss in image reproduction.
2
SP No.
Setting
0
Comments
Does not apply the above correction to files copied to
Palm2.
Note: Use this setting for customers who wish to preserve
the original reproduction level, especially with J2K files, and
do not mind the time and disk space required for copying.
3
Technical Bulletin
Model: Bellini-C2
PAGE: 1/5
Date: 3-Jul-03
Subject: Auto Process Control Summary for Bellini-C2
No.: RB070007
Prepared by: M.Matsuda
From: 2nd Tech Support Sec. Service Support Dept.
Classification:
Troubleshooting
Part information
Action required
Mechanical
Electrical
Service manual revision
Transmit/receive
Retrofit information
Paper path
Other (
)
The following is a summary of Auto Process Control on the Bellini-C2.
Please note the following abbreviations:
Vsp
ID sensor output when reading the solid image areas of the ID sensor pattern.
Vsg
ID sensor output when reading the bare drum around the ID sensor pattern.
Vt
TD sensor output
VL
Drum potential sensor output when reading the solid image exposed areas on the
drum.
VH
Drum potential sensor output when reading the halftone exposed areas on the drum.
VD
Drum potential sensor output when reading the unexposed areas on the charged
drum
VG
Grid voltage (charge voltage)
VB
Development bias
Vref
The threshold value used for supplying toner to the development unit.
General Principle:
Summarized, the purpose of Auto Process Control is to calibrate the ID and drum potential
sensors and update the values of Vref, VG and LD light intensity so that the machine is
able to maintain the proper image density during normal operation.
Auto Process Control: Bellini-C2
Note: The following explanation applies to the B-C2 and B-C1a/b/c/d, except for the values that differ from model to model mentioned in
Section 4.
! Execution Conditions
There are three separate cases in which the machine performs Auto Process Control:
1. When it is executed manually from SP2962 (Auto Process Control Execution).
2. When SP3901-001 (Auto Process Control Setting) has been set to ON, and the fusing
temperature is detected at 100oC or less at power up.
Note: If the fusing temperature is higher than 100oC at this time, the previous auto process
control data is used.
3. When all of the following conditions have been met:
a) SP2966 (Periodical Auto Process Control) has been set to ON
b) 24hrs has passed since the last time Auto Process Control was performed
c) The main power has been ON during this 24hr period
* Auto Process Control is then performed at the end of the job following the 24hr mark.
1
" What Happens During Auto Process Control
Auto Process Control is performed in the following order (Steps 1–5).
Step
Item
Purpose
1
Drum potential
sensor
calibration
2
ID sensor
adjustment
To calibrate the
drum potential
sensor so that it
will correctly
detect VD and
VH in Steps 3
and 4.
To adjust Vsg to
within the target
range for Vref
calculation in
Step 5.
What Happens
The machine applies –200V then –700V to
the OPC surface, and the drum potential
sensor takes readings both times.
Adjusts Vsg to within 4±0.2V.
2
SC Issued If
Fails
SC310, 311
Related Display
SP
SP3902-7: VM200
SP3902-8: VM700
Reference
Manual Page
P6-67
SC353, 354
SP3001-1: ID
Sensor PWM
Setting
SP3103-2: Vsg
Initial
P6-68
Comments
Step
3
Item
Purpose
VG adjustment
To determine
the VG (grid
voltage) that will
be used during
copying\printing.
4
LD power
adjustment
5
ID pattern
creation,
detection
This is
necessary as
the sensitivity of
the OPC surface
can change
when not used
for an extended
period, and
because the
charge casing
and grid plate
can become
dirtied.
To determine
the LD light
intensity that will
be used for
halftone areas
during
copying/printing.
To update Vref
for accurate
toner density
control.
SC Issued If
Fails
SC312, 313,
315
Related Display
SP
SP3902-2: VD
SP3902-4: VG
SP3902-9: VD
Correction
Reference
Manual Page
P6-68
Adjusts the LD light intensity until VH falls
within 260±20V.
SC314, 316
SP3902-3: VH
SP3902-5: LD
Power (Correction)
P6-68
An ID sensor pattern is created on the drum
surface (exposed and developed). The ID
sensor then checks the image density of the
developed areas (output=Vsp) and bare
drum (output=Vsg), and the TD sensor
checks the toner concentration in the
developer (output=Vt). Vref is then
recalculated based on these values.
SC350, 351,
352, 340
SP3902-6: V ID
SP3103-1: Vsg
SP3103-3: Vsp
SP2223: Vt
Display
P6-69
What Happens
Adjusts VG until VD falls within -800±20V.
3
Comments
VD target value is
the value of
SP2001-7 (default:
800), plus 50V
when VD
correction is
applied. (See Note
below)
Note on VD correction:
As the development sleeve accumulates toner over time, the gap between VD and VB decreases, which makes it easier for dirty background to
occur. To compensate for this, the machine increases the target VD value to -850±20V when the number of copies exceeds the value set with
SP3903-1: VD Correction Counter, (default: 200K). As a result, VD increases and the VD-VB gap is maintained. This value is cleared when the
developer is replaced and initialized.
# Confirming the Success or Failure of Process Control
Use SP3902-1 (Process Control Data Display – Auto Process Control) to
determine whether automatic process control has succeeded or failed:
• If this SP returns a “0” (OFF), auto process control has failed.
• If this SP returns a “1” (ON), auto process control has succeeded.
! Values that differ among Bellini models
Please note the following differences in the target values for process control parameters:
SP Mode
Bellini-C1a, b
Bellini-C1c, d
Bellini-C2
SP2001-7: VD
-970
-850
-800
SP2201-1: VB
-530
-650
-550
SP2201-3: Development bias for
OHP transparencies
-530
-650
-400
SP2201-4: VBp (development bias
used when creating the ID sensor
pattern)
-280
-280
-240
-290±20
-290±20
-260±20
Target VH
4
Technical Bulletin
Model: Bellini-C2
PAGE: 1/1
Date: 9-Jul-03
Subject: Firmware History (Bellini-C2 BIOS)
No.: RB070008
Prepared by: M. Matsuda
From: 2nd Tech Support Sec. Service Support Dept.
Classification:
Troubleshooting
Part information
Action required
Mechanical
Electrical
Service manual revision
Transmit/receive
Retrofit information
Paper path
Other (
)
This is to inform you of the firmware history for the Bellini-C2 BIOS.
B0705742
Version
C.SUM
Production
C
K02EL00L
K02EL00O
K02EL00S
86B9
1813
1st Mass Prod.
March Prod 03’
May Prod 03’
D
E
Symptom Corrected
1. SC672 (controller start-up error).
Suffix
D
2. NetWare printing error: The machine will not accept print jobs after a certain amount have been sent via
NetWare.
3. Words missing (French/Spanish): Some words not displayed in French (missing from wording lists).
4. Slow printing speed with Standard TCP/IP port.
IMPORTANT: To ensure the above symptoms do not occur, it is also necessary to update to the
following firmware versions or newer:
!
Controller: B0705734B: V.1.04.4
!
NIC: B0705735B: V.4.03
!
LCDC: B0705371B (NA): V.2.07
B0705372B (EU): V.2.07
Note: For details, refer to RTB RB070001.
The 128MB memory is misdetected as 64MB.
E
Technical Bulletin
Model: Bellini-C2
PAGE: 1/2
Date: 9-Jul-03
Subject: Firmware History (Bellini-C2 NCS(NIB))
No.: RB070009
Prepared by: M. Matsuda
From: 2nd Tech Support Sec. Service Support Dept.
Classification:
Troubleshooting
Part information
Action required
Mechanical
Electrical
Service manual revision
Transmit/receive
Retrofit information
Paper path
Other (
)
This is to inform you of the firmware history for the Bellini-C2 NCS (NIB).
B0705735
Version
C.SUM
Production
A
B
B0705755
A
B
V4.01
V4.02
V4.03
V4.11
V4.13.3
V4.15
0CDB
20B5
AAE6
6E90
301D
1st Mass Prod.
February Prod 03’
March Prod 03’
April Prod 03’
May Prod 03’
June Prod 03’
Symptom Corrected
1. SC672 (controller start-up error).
Suffix
B
2. NetWare printing error: The machine will not accept print jobs after a certain amount have been sent
via NetWare.
3. Words missing (French/Spanish): Some words not displayed in French (missing from wording lists).
4. Slow printing speed with Standard TCP/IP port.
IMPORTANT: To ensure the above symptoms do not occur, it is also necessary to update to the
following firmware versions or newer:
!
BIOS: B0705742D: K02EL00O
!
Controller: B0705734B: V.1.04.4
!
LCDC: B0705371B (NA): V.2.07
B0705372B (EU): V.2.07
Note: For details, refer to RTB RB070001.
1.
Supports 0-counter change
B0705755
2. Supports SMTP Authentication
Note: For details, refer to RTB RB070003.
1. Not possible to access the NIB from SmartNetMonitor (IPX environments only).
2. Not possible to access the network when an NVRAM clear is performed with the IEEE1394
board installed.
3. The NIB is not able to limit access from the WebImageMonitor document server or
DeskTopBinder V2 Professional in accordance with the Access Control ranges specified in
WebImageMonitor (only when these settings have been specified).
4. Modified for use with the Copy Connector Kit.
A
Technical Bulletin
Model: Bellini-C2
Date: 9-Jul-03
PAGE: 2/2
No.: RB070009
Symptom Corrected
1. Modified for use with the MLB option (File Format Converter).
2. The hop count was mistakenly set at 4, making it impossible to obtain an auto IP address
when there are four or more routers between the unit and the DHCP server (Hop count
corrected to 64).
Suffix
B
Technical Bulletin
Model: Bellini-C2
PAGE: 1/1
Date: 9-Jul-03
Subject: Firmware History (Bellini-C2 Netfile)
No.: RB070010
Prepared by: M.Matsuda
From: 2nd Tech Support Sec. Service Support Dept.
Classification:
Troubleshooting
Part information
Action required
Mechanical
Electrical
Service manual revision
Transmit/receive
Retrofit information
Paper path
Other (
)
This is to inform you of the firmware history for the Bellini-C2 Netfile.
B0705736
B0705756
A
B
Version
C.SUM
Production
V1.01
V2.11.3
V3.04.2
V3.07.2
BF73
45DA
79ED
1st Mass Prod.
April Prod 03’
May Prod 03’
June Prod 03’
Symptom Corrected
1st mass production firmware
1.
Supports 0-counter change
Suffix
B0705736
B0705756
2. Supports SMTP Authentication
Note: For details, refer to RTB RB070003.
1. Modified for use with the Copy Connector Kit.
1. Modified for use with the MLB option (File Format Converter).
A
B
Technical Bulletin
Model: Bellini-C2
PAGE: 1/2
Date: 9-Jul-03
Subject: Firmware History (Bellini-C2 System)
No.: RB070011
Prepared by: M. Matsuda
From: 2nd Tech Support Sec. Service Support Dept.
Classification:
Troubleshooting
Part information
Action required
Mechanical
Electrical
Service manual revision
Transmit/receive
Retrofit information
Paper path
Other (
)
This is to inform you of the firmware history for the Bellini-C2 System.
B0705734
Version
C.SUM
Production
A
B
V1.02.1
V1.04.2
V1.04.4
V2.12.7
V3.04.1
V4.01.4
V4.02.1
8C1D
180D
B6C1
C258
EE90
7065
1st Mass Prod.
February Prod 03’
March Prod 03’
April Prod 03’
May Prod 03’
June Prod 03’
July Prod 03’
B0705754
A
B
C
Symptom Corrected
1. SC672 (controller start-up error).
Suffix
B
2. NetWare printing error: The machine will not accept print jobs after a certain amount have been sent
via NetWare.
3. Words missing (French/Spanish): Some words not displayed in French (missing from wording lists).
4. Slow printing speed with Standard TCP/IP port.
IMPORTANT: To ensure the above symptoms do not occur, it is also necessary to update to the
following firmware versions or newer:
!
BIOS: B0705742D: K02EL00O
!
NIC: B0705735B: V.4.03
!
LCDC: B0705371B (NA): V.2.07
B0705372B (EU): V.2.07
Note: For details, refer to RTB RB070001.
1.
Supports 0-counter change
B0705754
2. Supports SMTP Authentication
Note: For details, refer to RTB RB070003
1. Modified for use with the Copy Connector Kit.
2. SC997/SC998 occurs with frequent use of New Job.
3. The Printer function is given priority when the Copier is set as the priority function.
4. Modified to further minimize multifeeds for certain paper types.
5. Paper is stacked in shift tray 2 when center stapling is disabled and the job resumed
following a center staple End condition.
A
Technical Bulletin
Model: Bellini-C2
Date: 9-Jul-03
PAGE: 2/2
No.: RB070011
Symptom Corrected
1.
2.
3.
4.
5.
6.
7.
8.
9.
10.
11.
12.
13.
14.
Modified for use with the MLB option (File Format Converter).
New default value for SP5-836-098 (Back Projection Removal): 1
“Please Wait” display does not clear when turning the power ON after installing a new
HDD.
“Please Wait” display does not clear during warm-up.
Key sound and subsequent screen change for Designate key is slow.
Incorrect PM interval: cleaning blade, cleaning brush, feed roller, fusing roller cleaning felt
(EU).
If the finisher tray reaches capacity at the completion of a New Job, the next New Job in
the queue will not start, even when the copies are removed from the tray.
New Jobs cannot be programmed up to specification maximum on either the main or sub
Copy Connection machines.
It was possible to clear SC861 (HDD failure) with the operation switch.
Copy Connection: Job may not be performed correctly if initiated while the sub machine is
in Night Mode.
SC818 sometimes occurs on one Copy Connection machine if the power is turned off on
the other machine while both contain New Jobs filled up to capacity.
Thumbnails are not created for some files when storing/capturing 2500 Printer files into
the Document Server at once.
SC995 sometimes occurs with large-volume printer jobs or when the machine receives
simultaneous job requests from multiple machine functions.
Image is not printed out correctly if Interrupt Copy is used while printing out a Document
Server file.
Specification change:
Estimated job completion times added to New Job table for the Printer function.
1. Modified for use with the EB-105EX controller (EFI).
2. Error in storing debug log data when the function is set for engine log storage (2224) of
paper jams.
Suffix
B
C
Technical Bulletin
Model: Bellini-C2
PAGE: 1/1
Date: 9-Jul-03
Subject: Firmware History (Bellini-C2 Webdocbox)
No.: RB070012
Prepared by: M. Matsuda
From: 2nd Tech Support Sec. Service Support Dept.
Classification:
Troubleshooting
Part information
Action required
Mechanical
Electrical
Service manual revision
Transmit/receive
Retrofit information
Paper path
Other (
)
This is to inform you of the firmware history for the Bellini-C2 Webdocbox.
B0705738
Version
C.SUM
Production
-
V1.03
V1.06
V1.07
V1.08
1329
D8B3
9E5E
1st Mass Prod.
April Prod 03’
May Prod 03’
June Prod 03’
B0705758
A
B
Symptom Corrected
Suffix
B0705738
1.
Supports 0-counter change
B0705758
2. Supports SMTP Authentication
Note: For details, refer to RTB RB070003.
If the machine shifts from night mode to off mode at the same time the document server is
being accessed from a PC, after that it is not possible to access the document server from the
PC.
A
1.
2.
B
Modified for use with the MLB option (File Format Converter).
The Document Server file list cannot be displayed from the client station if there are
Scanner files stored on the server, due to a mainframe memory leak that occurs when
attempting to display the screen.
Technical Bulletin
Model: Bellini-C2
PAGE: 1/1
Date: 9-Jul-03
Subject: Firmware History (Bellini-C2 Websystem)
No.: RB070013
Prepared by: M. Matsuda
From: 2nd Tech Support Sec. Service Support Dept.
Classification:
Troubleshooting
Part information
Action required
Mechanical
Electrical
Service manual revision
Transmit/receive
Retrofit information
Paper path
Other (
)
This is to inform you of the firmware history for the Bellini-C2 Websystem.
B0705737
Version
C.SUM
Production
B0705757
V1.02
V2.00
5759
1st Mass Prod.
April Prod 03’
Symptom Corrected
1st Mass Production
1.
Supports 0-counter change
2. Supports SMTP Authentication
Note: For details, refer to RTB RB070003.
Suffix
B0705737
B0705757
Technical Bulletin
Model: Bellini-C2
PAGE: 1/1
Date: 9-Jul-03
Subject: Firmware History BCU
No.: RB070014
Prepared by: M. Matsuda
From: 2nd Tech Support Sec. Service Support Dept.
Classification:
Troubleshooting
Part information
Action required
Mechanical
Electrical
Service manual revision
Transmit/receive
Retrofit information
Paper path
Other (
)
This is to inform you of the firmware history for the Bellini-C2 BCU.
B0705254
Version
C.SUM
Production
A
B
V3.02
V4.01.1
V4.05
3359
19E9
5BAB
1st Mass Prod.
May Prod 03’
July Prod 03’
Symptom Corrected
Suffix
1st mass production firmware
-
1. Copy speed returns to normal after performing forced process control in SP mode, even while
low speed mode is enabled.
2. Paper remaining in the duplex unit cannot be exited by forced feed.
3. SC990 is displayed when the front door is opened/closed following jam recovery.
4. "Waste toner bottle full" display cannot be cleared.
5. SC670 occurs or the panel display freezes when the development bias is set to its maximum
value.
6. Staple jam occurs at second set with Mixed Sizes/Stapling.
7. Changed the step interval for SP1907 from 100 to 10.
8. Modified for use with Copy Connector Kit.
A
1. Lower toner bottle cap motor remains ON, even after power Off/On following motor output
check with the upper and lower bottles removed.
2. Display for remaining sheets in left tandem tray remains at full, even when transferring the
sheets to the right tray.
3. V-jam alert for the Bypass tray (jam at feed sensor) is not cleared after the paper is removed
and the tray slide is opened/closed, but is cleared when the mainframe right door is
opened/closed.
4. Modified for use with the EB-105EX controller (EFI).
B
Technical Bulletin
Model: Bellini-C2
PAGE: 1/1
Date: 9-Jul-03
Subject: Firmware History (Bellini-C2 LCDC)
No.: RB070015
Prepared by: M. Matsuda
From: 2nd Tech Support Sec. Service Support Dept.
Classification:
Troubleshooting
Part information
Action required
Mechanical
Electrical
Service manual revision
Transmit/receive
Retrofit information
Paper path
Other (
)
This is to inform you of the firmware history for the Bellini-C2 LCDC.
B0705371 (NA)
B0705372 (EU)
A
B
Version
C.SUM
Production
V2.06
V2.07
1st Mass Prod.
February Prod 03’
B0705374 (NA)
B0705375 (EU)
A
V2.09
851E (NA)
31A3 (EU)
5267 (NA)
C9D1 (EU)
1E50 (NA)
544B (EU)
V2.12
April Prod 03’
July Prod 03’
Symptom Corrected
1. SC672 (controller start-up error).
Suffix
B
2. NetWare printing error: The machine will not accept print jobs after a certain amount have been sent
via NetWare.
3. Words missing (French/Spanish): Some words not displayed in French (missing from wording lists).
4. Slow printing speed with Standard TCP/IP port.
IMPORTANT: To ensure the above symptoms do not occur, it is also necessary to update to the
following firmware versions or newer:
!
Controller: B0705734B: V.1.04.4
!
BIOS: B0705742D: K02EL00O
!
NIC: B0705735B: V.4.03
Note: For details, refer to RTB RB070001.
1.
Supports 0-counter change
2. Supports SMTP Authentication
Note: For details, refer to RTB RB070003.
1. Modified for use with the EB-105EX controller (EFI).
B0705374
(NA)
B0705375
(EU)
A
Technical Bulletin
Model: Bellini-C2
PAGE: 1/1
Date: 9-Jul-03
Subject: Firmware History Language
No.: RB070016
Prepared by: M. Matsuda
From: 2nd Tech Support Sec. Service Support Dept.
Classification:
Troubleshooting
Part information
Action required
Mechanical
Electrical
Service manual revision
Transmit/receive
Retrofit information
Paper path
Other (
)
This is to inform you of the firmware history for the Bellini-C2 Language.
B0705350
Version
C.SUM
Production
A
V2.99
V3.02
D92D
1473
1st Mass Prod.
July Prod 03’
Symptom Corrected
1st mass production firmware
Modified for use with the EB-105EX controller (EFI).
Suffix
A
Technical Bulletin
Model: Bellini-C2
PAGE: 1/1
Date: 9-Jul-03
Subject: Firmware History (Bellini-C2 Scanner)
No.: RB070017
Prepared by: M. Matsuda
From: 2nd Tech Support Sec. Service Support Dept.
Classification:
Troubleshooting
Part information
Action required
Mechanical
Electrical
Service manual revision
Transmit/receive
Retrofit information
Paper path
Other (
)
This is to inform you of the firmware history for the Bellini-C2 Scanner.
B5806420
B5806520
Version
C.SUM
Production
V1.02
V2.00
4982
1st Mass Prod.
March Prod 03’
Symptom Corrected
1.
Supports 0-counter change
2. Supports SMTP Authentication
Note: For details, refer to RTB RB070003.
Suffix
B5806520
Technical Bulletin
PAGE: 1/1
Reissued: 10-Jul-03
Model: Bellini-C2
Date: 9-Jul-03
No.: RB070018a
MB Correction
The items in bold italics have been corrected or added.
Prepared by: M. Matsuda
Subject: ROM History for SR840
From: 2nd Tech Support Sec. Service Support Dept.
Classification:
Troubleshooting
Part information
Mechanical
Electrical
Service manual revision
Paper path
Transmit/receive
Retrofit information
Other (
Action required
)
This is to inform you of the ROM history for the SR840 (VICTORIA-B).
ROM No
B4785103
B4785105
B4785106
B4785107
B4785108
B4785109
Main PCB No
B4785120
B4785130
B4785131
B4785132
B4785133
B4785134
Version
V1.30
V1.373
V1.382
V1.41
V 1.42
V1.441
C.SUM
5F58
7EE3
4684
ACC8
6AAD
97E5
Production
1st Mass Prod.
Nov Prod 02’
Dec Prod 02’
Dec Prod 02’
Mar Prod 03’
May Prod 03’
1st mass production firmware
Symptom Corrected
ROM No
B4785103
Supports the one-spot punch unit used on the SR810.
B4785105
The stapler moves past the stapling position and does not stop when printing onto 7.25 x
10.5 paper, rear/diagonal stapling.
1. Modified for use with the Bellini-C2.
Note: The 3 previous versions above can only be used with the Martini-C1.
2. Paper exit jam caused by poor paper exit stacking to the stapler tray when the
machine switches back from low to standard engine speed (from line speed 350mm/s
to 450, 500mm/s).
3. Jam occurs when the pre-stack switching solenoid does not switch back to its original
position (Off).
The finisher does not come back on line after clearing a cover feeder jam (paper removed,
condition cleared).
The machine will not begin printing due to a false tray-full condition triggered after
connecting the Plockmatic SR90 center-stapling booklet maker.
B4785106
B4785107
B4785108
B4785109
Cut-in Serial Numbers
ROM No
B4785103
B4785105
B4785106
B4785107
B4785108
B4785109
B478-17
J4920900001
J4921000551
No Production
No Production
No Production
No Production
B478-26
9P31020001
9P31120001
No Production
No Production
No Production
No Production
B478-57
No Production
No Production
No Production
J4930100001
J4930300334
J4930500393
B478-66
No Production
No Production
No Production
9R20130001
9R20430001
9R20630001
Technical Bulletin
Model: Bellini-C2
PAGE: 1/1
Date: 04-Aug-06
RTB Reissue
The items in bold italics have been added.
Subject: Firmware History (Bellini-C2 PS3)
No.: RB070019a
Prepared by: S.Ishizu
From: Technical Services sec. Service Planning Dept.
Classification:
Troubleshooting
Part information
Action required
Mechanical
Electrical
Service manual revision
Paper path
Transmit/receive
Retrofit information
Other (
)
This is to inform you of the firmware history for the Bellini-C2 PS3.
B6136470
A
B6137470
B6137470A
Version
V1.00
V1.01
V1.03
V1.04
C.SUM
D7DA
FE4E
8DD0
Production
1st Mass Prod.
July Prod 03’
March Prod 04’
Jul Prod 06’
Symptom Corrected
Suffix
1st mass production
-
Specification Change:
Band access method for Postscript changed to synchronous band access to further improve
printing speed (GFPR # RC03050013).
A
Fixed: When the Plockmatic finisher (SR90) is connected, PS jobs are not printed at all. (GFPR
# RE03060024)
Cannot print Thai/Latin characters using the PS driver.
B6137470
B6137470A
Technical Bulletin
Model: Bellini-C2
PAGE: 1/1
Date: 9-Jul-03
Subject: Firmware History (Bellini-C2 Printer)
No.: RB070020
Prepared by: M. Matsuda
From: 2nd Tech Support Sec. Service Support Dept.
Classification:
Troubleshooting
Part information
Action required
Mechanical
Electrical
Service manual revision
Transmit/receive
Retrofit information
Paper path
Other (
)
This is to inform you of the firmware history for the Bellini-C2 Printer.
B5806415
Version
C.SUM
Production
B5806515
V1.00
V1.13
2D42
1st Mass Prod.
April Prod 03’
Symptom Corrected
1.
0 counter
2. SMTP Authentication
Note: For details, refer to RTB RB070003
Suffix
B5806515
Technical Bulletin
PAGE: 1/2
Reissued: 16-Jul-03
Model: Bellini-C2
Date: 9-Jul-03
No.: RB070018b
MB Correction
The items in bold italics have been corrected or added.
Subject: ROM History for SR840
Prepared by: M. Matsuda
From: 2nd Tech Support Sec. Service Support Dept.
Classification:
Troubleshooting
Part information
Mechanical
Electrical
Service manual revision
Paper path
Transmit/receive
Retrofit information
Other (
Action required
)
This is to inform you of the ROM history for the SR840 (VICTORIA-B).
ROM No
B4785103
B4785105
B4785106
B4785107
B4785108
B4785109
B4785110
Main PCB No
B4785120
B4785130
B4785131
B4785132
B4785133
B4785134
B4785135
Version
V1.30
V1.373
V1.382
V1.41
V 1.42
V1.441
V1.464
C.SUM
5F58
7EE3
4684
ACC8
6AAD
97E5
3EB0
Production
1st Mass Prod.
Nov Prod 02’
Dec Prod 02’
Dec Prod 02’
Mar Prod 03’
May Prod 03’
Aug Prod 03’
1st mass production firmware
Symptom Corrected
ROM No
B4785103
Supports the one-spot punch unit used on the SR810.
B4785105
Stapler moves past the stapling position and does not stop when printing onto 7.25 x 10.5
paper, rear/diagonal stapling.
1. Modified for use with the Bellini-C2.
Note: The 3 previous versions above can only be used with the Martini-C1.
2. Paper exit jam caused by poor paper exit stacking to the stapler tray when the
machine switches back from low to standard engine speed (from line speed 350mm/s
to 450, 500mm/s).
3. Jam occurs when the pre-stack switching solenoid does not switch back to its original
position (Off).
Finisher does not come back on line after clearing a cover feeder jam (paper removed,
condition cleared).
Machine will not begin printing due to a false tray-full condition triggered after connecting
the Plockmatic SR90 center-stapling booklet maker.
1. Exit jam when the machine receives two stapling jobs within 2 seconds of each
other with the following number of sheets, respectively: 4 or more ! 3,
3 or more ! 2.
Note: This occurs with the Bellini-C2 only.
2. Paper remaining in the staple tray is not detected at power on when the
Plockmatic booklet maker is installed.
B4785106
B4785107
B4785108
B4785109
B4785110
Technical Bulletin
PAGE: 2/2
Reissued: 16-Jul-03
Model: Bellini-C2
Date: 9-Jul-03
No.: RB070018b
Cut-in Serial Numbers
ROM No
B4785103
B4785105
B4785106
B4785107
B4785108
B4785109
B4785110
B478-17
J4920900001
J4921000551
No Production
No Production
No Production
No Production
No Production
B478-26
9P31020001
9P31120001
No Production
No Production
No Production
No Production
No Production
B478-57
No Production
No Production
No Production
J4930100001
J4930300334
J4930500393
J4930800001
B478-66
No Production
No Production
No Production
9R20130001
9R20430001
9R20630001
9R20830001
Technical Bulletin
Model: Bellini-C2
PAGE: 1/2
Date: 24-Jul-03
Subject: Notes for EB-105EX Installation
No.: RB070021
Prepared by: Chisato Tsuji
From: 1st Tech. Support Sec. Service Support Dept.
Classification:
Troubleshooting
Part information
Action required
Mechanical
Electrical
Service manual revision
Transmit/receive
Retrofit information
Paper path
Other (
)
This Technical Bulletin contains important notes concerning the installation of the printer
controller EB-105EX for the Bellini-C2.
Necessary firmware
Connection with the EB-105EX controller is supported on the B-C2 from the following
firmware versions:
•
•
•
•
•
•
•
•
•
Language: V.3.02 (B0705350A) or newer
BCU: V4.05 (B0705254B) or newer
System: V4.02.1 (B0705754C) or newer
LCDC (NA): V2.12 (B0705374A) or newer
LCDC (EU): V2.12 (B0705375A) or newer
NCS (NIB): V4.15 (B0705755B) or newer
Netfile: V.3.07.2 (B0705756B) or newer
BIOS: VK02EL00S (B0705742E) or newer
SR840 (B478): V.1.464 (B4785110) or newer
Necessary EPROM for use with the SR840 finisher (B478)
A small box containing EPROM V1.464 will be packaged together with EB-105EX
controllers produced up and through November 2003, which will allow this controller to be
used with the SR840 finisher.
Therefore when installing the controller in machines using an SR840 finisher, please install
EPROM V1.464 or newer on the finisher main board if the ROM version is older than this.
The ROM version can be confirmed by accessing SP7-801 and checking the
corresponding ROM P/N:
EPROM P/N
B4785103
B4785105
B4785106
B4785107
B4785108
B4785109
B4785110
Version
V1.30
V1.373
V1.382
V1.41
V 1.42
V1.441
V.1.464
Production
1st Mass Prod.
Nov Prod 02’
Dec Prod 02’
Dec Prod 02’
Mar Prod 03’
May Prod 03’
Aug Prod 03’
Note: EPROM V1.464 will be applied to SR840 mass production from August 2003.
Technical Bulletin
Model: Bellini-C2
Date: 24-Jul-03
PAGE: 2/2
No.: RB070021
Future use with the SR860 booklet finisher (B468)
At present, the EB105EX controller does not support use with the SR860 booklet finisher
due to paper jams that sometimes occur with the current system software.
The patch file is currently being created to support this finisher. However, until the official
release please do not install this controller on machines using the SR860.
Important notes for EB-105EX installation
Input Voltage
As mentioned in the Service Manual, before connecting the AC power cord to the
EB105EX controller, be sure to check that the 115V/230V switch on the rear of the unit
has been set to the proper input voltage. If it has not, use a screwdriver to change the
setting. Please note that if this setting is not checked, the controller power supply unit can
be damaged.
Service code display at installation
Please perform the following if SC919, SC955, or SC990 is triggered during installation.
1. Turn the B-C2 main power OFF, then the controller power OFF. Next, turn the B-C2
main power ON, then the controller power ON.
2. If the SC is not cleared, make sure that the interface cable, video board and
extension card have been installed properly.
3. If the SC is still not cleared, re-install the system software.
4. If the SC is still not cleared, replace the interface cable, video board or extension
card, and if necessary the controller unit.
Information regarding the system software CD
The system software begins from V1.01, and is available on CD-ROM as a service part
(P/N #G3536781). Please use this version whenever re-installing the system software.
Note: Unlike previous models, the system software on the EB105EX is updated by CD, as
network and parallel port installation are not supported on this model.
Technical Bulletin
Model: Bellini-C2
Date: 20-Aug-03
Subject: New SP (SP6903/6120)
PAGE: 1/1
No.: RB070022
Prepared by: Y.Urushihara
From: 1st Tech. Support Sec. Service Support Dept.
Classification:
Troubleshooting
Part information
Action required
Mechanical
Electrical
Service manual revision
Transmit/receive
Retrofit information
Paper path
Other (
)
Please be sure to see the firmware requirements.
1. SP6120 (Staple Jogger Adjustment)
Firmware requirements
The following firmware combinations are required to activate the SP modes:
•
•
•
BCU (B0705254A) 4.01.1 or later
GW (B0705754A) 3.04.1 or later
EP- ROM (B4685132 or later)
Technical Bulletin
Date: 28-Aug-03
Model: Bellini-C2
Subject: LD Unit Adjustment Procedure
PAGE: 1/2
No.: RB070023
Prepared by: M. Matsuda
From: 2nd Tech Support Sec. Service Support Dept.
Classification:
Troubleshooting
Part information
Action required
Mechanical
Electrical
Service manual revision
Transmit/receive
Retrofit information
Paper path
Other (
)
Important note regarding LD unit spacer replacement
The following shows the P/N (location) and color for the four spacers attached to the
bottom of the LD unit.
! Whenever replacing the LD unit, please be sure and remove the spacers from the old
unit and attach them to the same positions on the new unit.
! However, if any of the spacers are misplaced or the positions/quantities of spacers
becomes unclear at unit replacement, follow the procedure on the next page to realign
the LD unit and eliminate variations in image density.
Part No
B0701921
B0701922
B0701923
B0701924
Description
Spacer: Laser Diode
Unit: 25
Spacer: Laser Diode
Unit: 50
Spacer: Laser Diode
Unit: 75
Spacer: Laser Diode
Unit: 100
Thickness
25µm
Color
Dark brown
50µm
Black
75µm
Clear
100µm
Milk-white
Technical Bulletin
Model: Bellini-C2
Date: 28-Aug-03
PAGE: 2/2
No.: RB070023
LD Unit Adjustment Procedure
Please perform the following if the spacers attached to the bottom of the LD unit are
misplaced or their original positions become unclear at LD unit replacement. This
adjustment is necessary to ensure ID variations along the main scan direction do not occur,
which result from beam pitch variations along the sub-scan direction.
Important: Always make sure to turn the machine main power OFF before inserting the
spacers into the LD unit.
1. Print out the SP2902-3 No.22 test pattern without any Mylar spacers attached.
Perform the following two steps until the ID variation along the main scan direction is not
visible on the test chart:
2. Attach one 100μm (milk white) spacer in the rear of the unit. Print out the pattern
again and compare with the sample from Step 1.
!
If the ID variation along the main scan direction decreases (improves) but is still
visible, attach another 100μm spacer in the same position.
!
If the ID variation gets worse, go on to Step 3.
3. Attach one 100μm spacer in the front of the unit. Print out the pattern again and
compare this with the sample from Step 2.
!
If the ID variation along the main scan direction decreases (improves) but is still
visible, attach another 100μm spacer in the same position.
Rear
Front
Technical Bulletin
Model: Bellini-C2
Date: 1-Sep-03
Subject: File Format Converter supports DTB V2 from
PAGE: 1/1
No.: RB070024
Prepared by: K. Ichihara
v3.0.0.0, error message unclear
From: NS Support Sec. Service Support Dept.
Classification:
Troubleshooting
Part information
Action required
Mechanical
Electrical
Service manual revision
Paper path
Transmit/receive
Retrofit information
Other (Infomation)
Please note the following regarding File Format Converter and DeskTopBinder
compatibility:
The File Format Converter supports DeskTopBinder V2 Lite/Professional from ver3.0.0.0.
If previous versions of DTB V2 Lite are used with the File Format Converter, the
“Insufficient Memory Error” will be displayed.
Technical Bulletin
Model: Bellini-C2
PAGE: 1/1
Date: 12-Sep-03
Subject: Patch Release for EB-105EX (1-AKVJG)
No.: RB070025
Prepared by: Chisato Tsuji
From: 1st Tech. Support Sec. Service Support Dept.
Classification:
Troubleshooting
Part information
Action required
Mechanical
Electrical
Service manual revision
Transmit/receive
Retrofit information
Paper path
Other (
)
This is a release note for a patch file for printer controller EB-105EX.
Patch File
1-AKVJG
•
•
•
•
•
•
•
Issue(s)
SR860 Support
When printing more than 16 sheets in booklet stapling mode with
Finisher2500, “SC990” may occur.
If the EB-105EX is powered on before the mainframe power is turned
on, the EB-105EX may not boot correctly. (Because of this limitation,
the manual states that the mainframe should always be powered on
first.)
When printing with booklet and staple selected with the PCL5e/PCL6
driver and the Plockmatic, the prints will be fed out to the finisher
proof tray.
When printing jobs stored in the Document Server, the prints may be
rotated 180 degrees in some conditions.
Problems with the User Code counter -- When the User Code mode
is set to the “Auto Program” mode, a print job sent from an
unregistered user may be wrongly treated, resulting in the counter of
a different registered-user counting-up.
When paper runs out while printing with both the booklet and stapling
modes, the staple setting will be automatically canceled for the rest
of the job (after paper is replenished).
Patch Procedure for 1-AKVJG:
1. Download the patch file (1-AKVJG.ps) to the Print queue by using the “Fiery
Downloader”.
2. Wait for more than 60 seconds. (Very important)
3. Reboot the system.
(Access the Fiery menu, select “Shut Down” and then “Reboot System”.)
4. When the EB-105EX becomes idle, print the configuration sheet.
5. Check if you can see the patch number “1-AKVJG.ps” in the "Update
Information" section on the configuration sheet.
Technical Bulletin
Model: Bellini-C2
PAGE: 1/1
Date: 3-Oct-03
Subject: Firmware History BCU
No.: RB070026
Prepared by: C. Tsuji
From: 2nd Tech Support Sec. Service Support Dept.
Classification:
Troubleshooting
Part information
Action required
Mechanical
Electrical
Service manual revision
Transmit/receive
Retrofit information
Paper path
Other (
)
This is to inform you of the firmware history for the Bellini-C2 BCU.
B0705254
Version
C.SUM
Production
A
B
C
V3.02
V4.01.1
V4.05
V.4.10
3359
19E9
5BAB
1st Mass Prod.
May Prod 03’
July Prod 03’
October Prod 03’
77C6
Symptom Corrected
1st mass production firmware
Suffix
-
1. Copy speed returns to normal after performing forced process control in SP mode, even while
low speed mode is enabled.
2. Paper remaining in the duplex unit cannot be exited by forced feed.
3. SC990 is displayed when the front door is opened/closed following jam recovery.
4. "Waste toner bottle full" display cannot be cleared.
5. SC670 occurs or the panel display freezes when the development bias is set to its maximum
value.
6. Staple jam occurs at second set with Mixed Sizes/Stapling.
7. Changed the step interval for SP1907 from 100 to 10.
8. Modified for use with Copy Connector Kit.
A
1. Lower toner bottle cap motor remains ON, even after power Off/On following motor output
check with the upper and lower bottles removed.
2. Display for remaining sheets in left tandem tray remains at full, even when transferring the
sheets to the right tray.
3. V-jam alert for the Bypass tray (jam at feed sensor) is not cleared after the paper is removed
and the tray slide is opened/closed, but is cleared when the mainframe right door is
opened/closed.
4. Modified for use with the EB-105EX controller (EFI).
A misfeed of three sheets or more sometimes triggers Jam Code 53 when LT paper is fed LEF
from the 1st tandem tray. The pick-off solenoid On timing (feed timing of the next sheet) has been
delayed to prevent the jam.
Note:
B
1. Jam code 53: Feed sensor for the 1st tandem tray detects the presence of paper after the
predetermined interval has expired.
2. This symptom only occurs under the conditions specified above, i.e. it does not occur with any
other tray or paper size.
C
Technical Bulletin
Model: Bellini-C2
PAGE: 1/1
Date: 10-Oct-03
Subject: Firmware History (Bellini-C2 Netfile)
No.: RB070027
Prepared by: C.Tsuji
From: 2nd Tech Support Sec. Service Support Dept.
Classification:
Troubleshooting
Part information
Action required
Mechanical
Electrical
Service manual revision
Transmit/receive
Retrofit information
Paper path
Other (
)
This is to inform you of the firmware history for the Bellini-C2 Netfile.
B0705736
B0705756
A
B
D
Version
C.SUM
Production
V1.01
V2.11.3
V3.04.2
V3.07.2
V.3.08
BF73
45DA
79ED
D929
1st Mass Prod.
April Prod 03’
May Prod 03’
June Prod 03’
Sep Prod 03’
Symptom Corrected
1.
Suffix
1st mass production firmware
B0705736
Supports 0-counter change
B0705756
2. Supports SMTP Authentication
Note: For details, refer to RTB RB070003.
1. Modified for use with Copy Connector Kit.
1. Modified for use with the MLB option (File Format Converter).
IMPORTANT: To ensure the symptoms below do not occur, it is also necessary to update to the
following firmware versions or newer:
•
System Ver. V.4.03.3 (B0705754D)
1. Image data to which a new section has been added, does not appear correctly
after sending the data to the MFP HDD from Desk Top Editor for Production.
2. Excel data set at 1200 dpi does not appear correctly after being retrieved from the
MFP HDD to Desk Top Editor for Production.
3. A device error occurs when sending data that contains Printer document and
Copier document to the MFP HDD from Desk Top Editor for Production.
A
B
D
Technical Bulletin
Model: Bellini-C2
PAGE: 1/2
Date: 10-Oct-03
Subject: Firmware History (Bellini-C2 System)
No.: RB070028
Prepared by: C.Tsuji
From: 2nd Tech Support Sec. Service Support Dept.
Classification:
Troubleshooting
Part information
Action required
Mechanical
Electrical
Service manual revision
Transmit/receive
Retrofit information
Paper path
Other (
)
This is to inform you of the firmware history for the Bellini-C2 System.
B0705734
Version
C.SUM
Production
A
B
V1.02.1
V1.04.2
V1.04.4
V2.12.7
V3.04.1
V4.01.4
V4.02.1
V.4.03.3
8C1D
180D
B6C1
C258
EE90
7065
1B79
1st Mass Prod.
February Prod 03’
March Prod 03’
April Prod 03’
May Prod 03’
June Prod 03’
July Prod 03’
Sep Prod 03’
B0705754
A
B
C
D
Symptom Corrected
1. SC672 (controller start-up error).
Suffix
B
2. NetWare printing error: Machine will not accept print jobs after a certain amount have been sent via
NetWare.
3. Words missing (French/Spanish): Some words not displayed in French (missing from wording lists).
4. Slow printing speed with Standard TCP/IP port.
IMPORTANT: To ensure the above symptoms do not occur, it is also necessary to update to the
following firmware versions or newer:
!
BIOS: B0705742D: K02EL00O
!
NIC: B0705735B: V.4.03
!
LCDC: B0705371B (NA): V.2.07
B0705372B (EU): V.2.07
Note: For details, refer to RTB RB070001.
1.
Supports 0-counter change
B0705754
2. Supports SMTP Authentication
Note: For details, refer to RTB RB070003
1. Modified for use with Copy Connector Kit.
2. SC997/SC998 occurs with frequent use of New Job.
3. The Printer function is given priority when the Copier is set as the priority function.
4. Modified to further minimize multifeeds for certain paper types.
5. Paper is stacked in shift tray 2 when center stapling is disabled and the job resumed
following a center staple End condition.
A
Technical Bulletin
Model: Bellini-C2
Date: 10-Oct-03
PAGE: 2/2
No.: RB070028
Symptom Corrected
1.
2.
3.
4.
5.
6.
7.
8.
9.
10.
11.
12.
13.
14.
Modified for use with the MLB option (File Format Converter).
New default value for SP5-836-098 (Back Projection Removal): 1
“Please Wait” display does not clear when turning the power ON after installing a new
HDD.
“Please Wait” display does not clear during warm-up.
Key sound and subsequent screen change for Designate key is slow.
Incorrect PM interval: cleaning blade, cleaning brush, feed roller, fusing roller cleaning felt
(EU).
If the finisher tray reaches capacity at the completion of a New Job, the next New Job in
the queue will not start, even when the copies are removed from the tray.
New Jobs cannot be programmed up to specification maximum on either the main or sub
Copy Connection machines.
It was possible to clear SC861 (HDD failure) with the operation switch.
Copy Connection: Job may not be performed correctly if initiated while the sub machine is
in Night Mode.
SC818 sometimes occurs on one Copy Connection machine if the power is turned off on
the other machine while both contain New Jobs filled up to capacity.
Thumbnails are not created for some files when storing/capturing 2500 Printer files into
the Document Server at once.
SC995 sometimes occurs with large-volume printer jobs or when the machine receives
simultaneous job requests from multiple machine functions.
Image is not printed out correctly if Interrupt Copy is used while printing out a Document
Server file.
Specification change:
Estimated job completion times added to New Job table for the Printer function.
1. Modified for use with the EB-105EX controller (EFI).
2. Error in storing debug log data when the function is set for engine log storage (2224) of
paper jams.
1. The image is sometimes positioned incorrectly when printing a file from the
Document Server to custom-sized paper using Double Copies and
Centering/Cornering.
2. 32k bytes of a scanned image is sometimes lost at the trailing edge.
3. The image is sometimes printed in the wrong orientation when Reserve Job is set
to “Previous Job” and the paper type for the selected tray is set to “Tab Stock”.
4. The “Please Wait” display does not clear if the HDD installed is defective.
5. SC819 sometimes occurs with Copier Connector mode.
6. 1200dpi image data sometimes does not appear correctly after being transferred
from the MFP hard drive to Desk Top Editor for Production (or vice-versa).
IMPORTANT: To ensure these symptoms do not occur, it is also necessary to update to the
following firmware versions or newer:
! Netfile V.3.08 (B0705756D)
Suffix
B
C
D
Technical Bulletin
Model: Bellini-C1/C2
Date: 31-Oct-03
Subject: Toner Scattering at rear side of the machine
PAGE: 1/7
No.: RB070029
Prepared by: M. Matsuda
From: 2nd Tech Support Sec. Service Support Dept.
Classification:
Troubleshooting
Part information
Action required
Mechanical
Electrical
Service manual revision
Transmit/receive
Retrofit information
Paper path
Other (
)
SYMPTOM
1. Toner scattering in the rear of the machine
2. Toner scattering from the filters of the toner hopper
CAUSE
1. Toner scattering in the rear of the machine
a) Poor shielding at the connecting part between the drum cleaning unit and the toner
recycling case.
b) The opening in the toner recycling case that joins with the toner collection pipe of
the transfer unit is not an airtight connection.
2. Toner scattering from the filters of the toner hopper
a) Poor shielding at the connecting part between the cylinder case and the toner
transport coil tube.
b) Toner clogs in the tube located between the toner hopper and the cylinder case.
Technical Bulletin
Model: Bellini-C1/C2
PAGE: 2/7
Date: 31-Oct-03
No.: RB070029
SOLUTION
IMPORTANT: Check the following items before performing the solution below.
1. Check the toner filter [A] and drum filter [B], and clean or replace them as necessary.
Note: The toner filter should be replaced every 300k (Bellini-C1) or 350k (Bellini-C2).
The above cleaning/replacements are also effective in maintaining proper machine internal
temperature, which is key in minimizing scattering since slight rises in temperature can cause
scattering to occur more easily.
(B)
(A)
2. If toner scattering still occurs, clean the toner transport path.
Please perform the following if the symptom still occurs, even after
performing the above checks.
1. Toner scattering in the rear of the machine
a) Attach the new seal (B0703617) to the drum cleaning unit pipe as shown below, in
order to seal the connection between the drum cleaning unit and toner recycling case.
Seal: B0703617
Technical Bulletin
Model: Bellini-C1/C2
Date: 31-Oct-03
PAGE: 3/7
No.: RB070029
b) Attach the Mylar (B0703618) to the top of the toner recycling case as shown below.
This will prevent toner scattering at the connection between the transfer unit toner
collection pipe and recycling case.
Attaching position: Rear side view
Attach the Mylar here
Technical Bulletin
Model: Bellini-C1/C2
PAGE: 4/7
Date: 31-Oct-03
No.: RB070029
c) Attach the new seal (B0703619) as shown below to the opening in the rear side
plate. This will prevent toner scattering in the fusing and duplex areas.
Rear side view
Cover this opening with the seal
Seal (B0703619)
Technical Bulletin
Model: Bellini-C1/C2
PAGE: 5/7
Date: 31-Oct-03
No.: RB070029
2. Toner scattering from the filters of the toner hopper
a) The material of the cylinder case seal (A2943476) has been changed to one
with higher reliability (from Aug ’02 production).
Note: It is easier to replace the entire cylinder case (A2943485).
b) Clean the tube (A2943071) between the toner hopper and the cylinder case
(procedure below).
Tube: A2943071
Technical Bulletin
Model: Bellini-C1/C2
Date: 31-Oct-03
PAGE: 6/7
No.: RB070029
Tube Cleaning Procedure
1. Remove the development unit.
2. Remove the right upper cover and cylinder case bracket.
3. Disconnect the tube (A2943071) from the cylinder case.
4. Remove any clogged toner through the upper hole of the tube joint using a
vacuum cleaner.
Technical Bulletin
Model: Bellini-C1/C2
PAGE: 7/7
Date: 31-Oct-03
No.: RB070029
Cut-in Serial Numbers
TBA
RCL (Japan) Production (B070/B071)
MODEL NAME
Ricoh Aficio 2090
Savin 4090
Gestetner 9002
Lanier LD 090
Gestetner 9002
Nashatec 9005
Rex Rotary 9008
Lanier LD 090
IS 2090
Ricoh Aficio 2090
Ricoh Aficio 2105
Savin 40105
Gestetner 10512
Lanier LD 0105
Gestetner 10512
Nashatec 10515
Rex Rotary 10518
Lanier LD 0105
IS 2105
Ricoh Aficio 2105
V/Hz
208 - 240V/60Hz
DESTINATION
USA, Canada.
South America
CODE
B070-17
SERIAL NO.
J7030900139
220 - 240V/50,60Hz
Europe, etc.
B070-22
J7031000078
220 - 240V/50,60Hz
220 - 240V/50,60Hz
220 - 240V/50,60Hz
208 - 240V/60Hz
Europe
Europe, etc.
Europe etc.
USA, Canada,
South America
B070-24
B070-26
B070-27
B071-17
L1363100001
5Q70930001
J7031000105
J7130900066
220 - 240V/50,60Hz
Europe, etc.
B071-22
J7130900035
220 - 240V/50,60Hz
220 - 240V/50,60Hz
220 - 240V/50,60Hz
Europe
Europe, etc.
Europe, etc.
B071-24
B071-26
B071-27
L1373110001
5Q80930001
J7130900037
Technical Bulletin
Model: Bellini-C2
PAGE: 1/1
Date: 6-Nov-03
Subject: EB-105EX Service Manual Correction
No.: RB070030
Prepared by: Chisato Tsuji
From: 2nd Tech Support Sec. Service Support Dept.
Classification:
Troubleshooting
Part information
Action required
Mechanical
Electrical
Service manual revision
Transmit/receive
Retrofit information
Paper path
Other (
)
Please correct your EB-105EX service manual as follows:
Page
Incorrect
Correct
Note
1-8
6. Insert the extension card 6. Insert the extension card The illustration for
[B] into the right upper
[B] into the left upper
this procedure is
slot and fasten it …
slot and fasten it …
correct.
7-1
168-pin SDRAM: PC100,
CL2, NonECC
168-pin SDRAM: PC133,
CL3, NonECC
7-2
Dimensions (W x D x H):
Dimensions (W x H x D):
Technical Bulletin
Model: Bellini-C2
Date: 7-Nov-03
Subject: Installation Procedure For Tray Heater Kit
PAGE: 1/5
No.: RB070031
Prepared by: M. Matsuda
From: 2nd Tech Support Sec. Service Support Dept.
Classification:
Troubleshooting
Part information
Action required
Mechanical
Electrical
Service manual revision
Transmit/receive
Retrofit information
Paper path
Other (
)
This bulletin describes the installation procedure for the tray heater kit for the Bellini-C2
mainframe.
Preparation
The following kits and parts are needed:
•
•
•
Upper Tray Heater Kit (B0706291): 1 pcs
Lower Tray Heater Kit (B0706295): 1 pcs
Philips Tapping Screw (04514008B): 5 pcs
< B0706291 >
< B0706295 >
Technical Bulletin
Model: Bellini-C2
Date: 7-Nov-03
Installation Procedure
CAUTION: Make sure to turn the machine OFF before installation
1. Remove all trays, middle rail for
tandem tray and harness cover as shown
2. Open the controller box. Then
remove the lower rear cover and PSU.
3. Attach the lower tray heater
with 3 screws.
PAGE: 2/5
No.: RB070031
Technical Bulletin
Model: Bellini-C2
Date: 7-Nov-03
PAGE: 3/5
No.: RB070031
4. Attach the upper tray heater kit to the
middle rail for the tandem tray with
2 screws.
5. Install the middle rail and upper tray heater kit into the main frame
Front Side: Fixed with 3 screws
Rear Side: Fixed with 2 screws
Insert the hook of the
heat sink here!!
6. Place the harness for upper and lower heaters as shown
Note: Clamp the harness for the upper heater at 2 points.
Technical Bulletin
Model: Bellini-C2
Date: 7-Nov-03
7. Connect both connectors at the rear
side of the machine.
Note: The connectors are identical, so you
do not need to worry about connecting
them the wrong way round.
8. Attach the harness cover.
Note: Make sure not to pinch the harness when the cover is attached.
Front view
Rear view
Insert the harness hook
cover here.
PAGE: 4/5
No.: RB070031
Technical Bulletin
Model: Bellini-C2
Date: 7-Nov-03
PAGE: 5/5
No.: RB070031
9. Plug in the connector for the anti-condensation heater to the AC drive board as shown
in Fig.1.
!CAUTION
All anti-condensation heaters are disconnected from the AC drive board
before shipping. Before plugging in the AC harness connector, make sure
that the main switch of the copier is switched off and the power cord
unplugged.
Note 1: The connector is hung on the clamp under the AC drive board.
Note 2: The tray heater is ON when the machine is in Auto Off Mode. (Main or operation
SW is OFF)
Fig.1
Fig.2
If you want the tray heater ON for 24 hours, disconnect the relay connector and set the
anti-condensation heater connector as shown in Fig.2
CAUTION: At this time, the heater is always ON when the power plug is connected with
the power source. Use caution when you do machine maintenance.
Technical Bulletin
Model: Bellini-C2
PAGE: 1/2
Date: 11-Nov-03
Subject: Jam Code 53
No.: RB070032
Prepared by: M. Matsuda
From: 2nd Tech Support Sec. Service Support Dept.
Classification:
Troubleshooting
Part information
Action required
Mechanical
Electrical
Service manual revision
Transmit/receive
Retrofit information
Paper path
Other (
)
Please also see page 2 below for more details on the following.
SYMPTOM
Jam code 53 sometimes occurs when LT LEF is fed from the tandem tray.
Note:
! Jam code 53: The tandem tray paper feed sensor detects the presence of paper past the
predetermined time period (a certain number of ms after detecting the paper’s leading edge).
! This symptom only occurs under the conditions described above, and not with any other
paper sizes or feed trays.
CAUSE
The paper sometimes slips and does not clear the paper feed sensor in time, allowing the next
sheet fed to catch up with it and cause the jam.
SOLUTION
Update the BCU firmware to v4.10 (released in October 2003).
Technical Bulletin
Model: Bellini-C2
Date: 11-Nov-03
PAGE: 2/2
No.: RB070032
Tandem Tray Paper Feed Sensor Jam
# Symptom: Feed sensor jam from mis-feed of 3 or more sheets.
Before the trailing edge of the first sheet clears the feed/reverse rollers, the pickup roller, (already rotating) from
drive supplied through the feed roller, lowers and begins feeding the next sheet. Then the trailing edge of the first
sheet crosses with the leading edge of the next sheet around the area of the feed sensor.
Bellini-C2 Jam Code 53 Timing Chart (LT LEF - Tray 1)
Pick-up SOL turns ON once
predetermined interval expires (since LE
detected by feed sensor).
Pick-up Solenoid
Paper Feed Clutch
Paper Feed Sensor
2nd Sheet
1st Sheet
If the multifeed occurs, the 1st
multifed sheet is already at the
paper feed sensor area. (Even with
the feed clutch off, the paper
reaches the feed sensor via the
inertia of the feed roller).
Countermeasure:
Pick-up solenoid ON timing delayed
(10mm worth of time), to allow leway
for the previous sheet even if it should
slip.
With multi-feeds of 3 sheets or more, the previous sheet stops at the registration section and then the next
sheet (blue) is fed to the feed sensor via the inertia of the feed roller. The paper feed sensor then turns ON,
followed by the pick-up solenoid a certain number of ms later. If the paper slips at all on the way to the grip
roller, it can collide with the previous sheet around the feed sensor (which detects the presence of paper and
triggers a jam).
Note: This symptom occurs only for LT LEF fed from Tray 1.
Registration roller
NOTE:
# Pickup solenoid ON/OFF timing
(ON: pickup roller contacts paper,
OFF: separates):
-The solenoid turns OFF when the
paper's leading edge reaches the
feed sensor.
Grip Roller
Pickup SOL OFF.
Feed Sensor
-The solenoid turns ON X ms after
the paper has reached the feed
sensor (extended 10 mm worth).
Technical Bulletin
Model: Bellini-C2
PAGE: 1/3
Date: 26-Nov-03
Subject: Firmware History (Bellini-C2 System)
No.: RB070033
Prepared by: C.Tsuji
From: 2nd Tech Support Sec. Service Support Dept.
Classification:
Troubleshooting
Part information
Action required
Mechanical
Electrical
Service manual revision
Transmit/receive
Retrofit information
Paper path
Other (
)
This is to inform you of the firmware history for the Bellini-C2 System.
B0705734
Version
C.SUM
Production
A
B
V1.02.1
V1.04.2
V1.04.4
V2.12.7
V3.04.1
V4.01.4
V4.02.1
V.4.03.3
V.4.04.1
8C1D
180D
B6C1
C258
EE90
7065
1B79
7B40
1st Mass Prod.
February Prod 03’
March Prod 03’
April Prod 03’
May Prod 03’
June Prod 03’
July Prod 03’
Sep Prod 03’
Nov Prod 03’
B0705754
A
B
C
D
E
Symptom Corrected
1. SC672 (controller start-up error).
Suffix
B
2. NetWare printing error: Machine will not accept print jobs after a certain amount have been sent via
NetWare.
3. Words missing (French/Spanish): Some words not displayed in French (missing from wording lists).
4. Slow printing speed with Standard TCP/IP port.
IMPORTANT: To ensure the above symptoms do not occur, it is also necessary to update to the following
firmware versions or newer:
!
BIOS: B0705742D: K02EL00O
!
NIC: B0705735B: V.4.03
!
LCDC: B0705371B (NA): V.2.07
B0705372B (EU): V.2.07
Note: For details, refer to RTB RB070001.
1.
Supports 0-counter change
2. Supports SMTP Authentication
Note: For details, refer to RTB RB070003
B0705754
Technical Bulletin
Model: Bellini-C2
Date: 26-Nov-03
PAGE: 2/3
No.: RB070033
Symptom Corrected
1. Modified for use with Copy Connector Kit.
2. SC997/SC998 occurs with frequent use of New Job.
3. The Printer function is given priority when the Copier is set as the priority function.
4. Modified to further minimize multifeeds for certain paper types.
Suffix
A
5. Paper is stacked in shift tray 2 when center stapling is disabled and the job resumed following
a center staple End condition.
1. Modified for use with the MLB option (File Format Converter).
2. New default value for SP5-836-098 (Back Projection Removal): 1
3. “Please Wait” display does not clear when turning the power ON after installing a new HDD.
4. “Please Wait” display does not clear during warm-up.
5. Key sound and subsequent screen change for Designate key is slow.
6. Incorrect PM interval: cleaning blade, cleaning brush, feed roller, fusing roller cleaning felt
(EU).
7. If the finisher tray reaches capacity at the completion of a New Job, the next New Job in the
queue will not start, even when the copies are removed from the tray.
8. New Jobs cannot be programmed up to specification maximum on either the main or sub
Copy Connection machines.
9. It was possible to clear SC861 (HDD failure) with the operation switch.
10. Copy Connection: Job may not be performed correctly if initiated while the sub machine is
in Night Mode.
11. SC818 sometimes occurs on one Copy Connection machine if the power is turned off on
the other machine while both contain New Jobs filled up to capacity.
12. Thumbnails are not created for some files when storing/capturing 2500 Printer files into the
Document Server at once.
13. SC995 sometimes occurs with large-volume printer jobs or when the machine receives
simultaneous job requests from multiple machine functions.
14. Image is not printed out correctly if Interrupt Copy is used while printing out a Document
Server file.
Specification change:
Estimated job completion times added to New Job table for the Printer function.
1. Modified for use with the EB-105EX controller (EFI).
2. Error in storing debug log data when the function is set for engine log storage (2224) of
paper jams.
1. Modified for simultaneous use of the EB-105EX with Desk Top Editor for Production.
2. The image is sometimes positioned incorrectly when printing a file from the Document
Server to custom-sized paper using Double Copies and Centering/Cornering.
3. 32k bytes of a scanned image is sometimes lost on the trailing edge.
4. The image is sometimes printed in the wrong orientation when Reserve Job is set to
“Previous Job” and the paper type for the selected tray is set to “Tab Stock”.
5. The “Please Wait” display does not clear if the HDD installed is defective.
6. SC819 sometimes occurs with Copier Connector mode.
7. 1200dpi image data sometimes does not appear correctly after being transferred from the
MFP hard drive to Desk Top Editor for Production (or vice-versa).
IMPORTANT: To ensure the above do not occur, it is also necessary to update to the following firmware
versions or newer:
! Netfile V.3.08 (B0705756D)
B
C
D
Technical Bulletin
Model: Bellini-C2
Date: 26-Nov-03
PAGE: 3/3
No.: RB070033
Symptom Corrected
1. Modified for use of the EB-105EX in combination with Desk Top Editor for
Production.
2. SC955 may occur when printing out a Document Server file from the operation
panel in Magazine mode if the file 1) contains blank page(s), and 2) was originally
stored to the Document Server via a GW controller.
3. SC672 may occur on units with an MLB installed when storing a file containing
blank page(s) to the Document Sever via a GW controller.
4. When retrieving a stored copier document at the same time as sending a print
job, an SC955 error occurs.
5. Sometimes, JPEG 2000 images cannot be retrieved by the Desk Top Editor for
Production from the MFP HDD.
6. The EB-105EX stalls if turned Off/On more than 100 times while the Bellini-C2
main power is on (memory control related).
IMPORTANT: To ensure the above do not occur, it is also necessary to update to the following
firmware versions or newer:
• Netfile V.3.09 (B0705756E)
Suffix
E
Technical Bulletin
Model: Bellini-C2
PAGE: 1/1
Date: 26-Nov-03
Subject: Firmware History (Bellini-C2 Netfile)
No.: RB070034
Prepared by: C.Tsuji
From: 2nd Tech Support Sec. Service Support Dept.
Classification:
Troubleshooting
Part information
Action required
Mechanical
Electrical
Service manual revision
Transmit/receive
Retrofit information
Paper path
Other (
)
This is to inform you of the firmware history for the Bellini-C2 Netfile.
B0705736
B0705756
A
B
D
E
Version
C.SUM
Production
V1.01
V2.11.3
V3.04.2
V3.07.2
V.3.08
V.3.09
BF73
45DA
79ED
D929
33C9
1st Mass Prod.
April Prod 03’
May Prod 03’
June Prod 03’
Sep Prod 03’
Nov Prod 03’
Symptom Corrected
1.
Suffix
1st mass production firmware
B0705736
Supports 0-counter change
B0705756
2. Supports SMTP Authentication
Note: For details, refer to RTB RB070003.
1. Modified for use with Copy Connector Kit.
1. Modified for use with the MLB option (File Format Converter).
A
B
D
IMPORTANT: To ensure the below symptoms do not occur, it is also necessary to update to the
following firmware versions or newer:
•
System Ver. V.4.03.3 (B0705754D)
1. Image data to which a new section has been added, does not appear correctly after
sending the data to the MFP HDD from Desk Top Editor for Production.
2. Excel data set at 1200 dpi does not appear correctly after being retrieved from the MFP
HDD to Desk Top Editor for Production.
3. A device error occurs when send the data that contains Printer document and Copier
document to the MFP HDD from Desk Top Editor for Production.
E
IMPORTANT: To ensure the below symptoms do not occur, it is also necessary to update to the
following firmware versions or newer:
•
System Ver. V.4.04.1 (B0705754E)
1.
Modified for use of the EB-105EX in combination with Desk Top Editor for
Production.
2.
Cannot retrieve a 1200dpi document from the HDD to Desktop Editor for Production using
TIFF 100% if the file contains blank page(s).
Technical Bulletin
Model: Bellini-C1/C2
Date: 5-Dec-03
Subject: Seal Improvement in Toner Bank Unit
PAGE: 1/4
No.: RB070035
Prepared by: M. Matsuda
From: 2nd Tech Support Sec. Service Support Dept.
Classification:
Troubleshooting
Part information
Action required
Mechanical
Electrical
Service manual revision
Transmit/receive
Retrofit information
Paper path
Other (
)
SYMPTOM
The following sometimes occur:
1. Misdetection of the waste toner bottle full condition
2. Toner bottle cannot be pulled out from the toner bank unit
CAUSE
1. Misdetection of the waste toner bottle full condition
Toner may scatter to the outer portion of the toner bank unit when the toner bottle chuck
opens the bottle. The split toner covers the detection area of the toner overflow sensor,
causing it to mis-detect the waste toner bottle full condition.
2. Toner bottle cannot be pulled out from the toner bank unit
When toner is supplied to the toner bank unit, it may leak out from the bottle and gradually
accumulate in the chuck area, eventually preventing the bottle-holding mechanism on the
chuck from releasing the bottle.
Technical Bulletin
Model: Bellini-C1/C2
Date: 5-Dec-03
PAGE: 2/4
No.: RB070035
SOLUTION
The following solutions have been applied from October ’03 production.
1. Misdetection of the waste toner bottle Full condition
1. A toner catcher has been added to the toner bank case as shown below.
Toner Catcher
2. A seal has been added to the toner bank base plate, preventing toner from scattering
out of this area.
- P/N: B0703364 (Shield: Bracket Chuck)
- Attachment position: Refer to Parts Catalog, pg. 78
B0703364
Technical Bulletin
Model: Bellini-C1/C2
PAGE: 3/4
Date: 5-Dec-03
No.: RB070035
2. Toner bottle cannot be pulled out from the toner bank unit
Two kinds of the shields have been added to ensure toner does not leak out from the toner
bottle.
- P/N: B0703293 (Shield Slider), B0703294 (Shield Slider Short)
- Attachment position:
B0703294
B0703293
Side view:
B0703293
B0703294
Technical Bulletin
Model: Bellini-C1/C2
PAGE: 4/4
Date: 5-Dec-03
No.: RB070035
RCL (Japan) Production (B070/B071)
MODEL NAME
Ricoh Aficio 2090
Savin 4090
Gestetner 9002
Lanier LD 090
Gestetner 9002
Nashatec 9005
Rex Rotary 9008
Lanier LD 090
IS 2090
Ricoh Aficio 2090
Ricoh Aficio 2105
Savin 40105
Gestetner 10512
Lanier LD 0105
Gestetner 10512
Nashatec 10515
Rex Rotary 10518
Lanier LD 0105
IS 2105
Ricoh Aficio 2105
V/Hz
208 - 240V/60Hz
DESTINATION
USA, Canada.
South America
CODE
B070-17
SERIAL NO.
J7031000183
220 - 240V/50,60Hz
Europe, etc.
B070-22
J7031000104
220 - 240V/50,60Hz
220 - 240V/50,60Hz
220 - 240V/50,60Hz
208 - 240V/60Hz
Europe
Europe, etc.
Europe etc.
USA, Canada,
South America
B070-24
B070-26
B070-27
B071-17
L1363100001
5Q71030001
J7031000105
J7131000062
220 - 240V/50,60Hz
Europe, etc.
B071-22
J7131000001
220 - 240V/50,60Hz
220 - 240V/50,60Hz
220 - 240V/50,60Hz
Europe
Europe, etc.
Europe, etc.
B071-24
B071-26
B071-27
L1373110001
5Q81030001
J7131000010
Technical Bulletin
Model: Bellini-C2
PAGE: 1/1
Date: 18-Dec-03
Subject: Patch Release for EB-105EX (1-9ZUYT)
No.: RB070036
Prepared by: Chisato Tsuji
From: 1st Tech. Support Sec. Service Support Dept.
Classification:
Troubleshooting
Part information
Action required
Mechanical
Electrical
Service manual revision
Transmit/receive
Retrofit information
Paper path
Other (
)
The following is a patch file release note for the EB-105EX printer controller.
Patch File
1-9ZUYT
Symptom Corrected
A paper jam sometimes occurs with the last sheet when printing out to the
SR860, if all of the following conditions are met:
1. System v1.01 is installed with patch ”1-AKVJG.ps”.
2. The Booklet Finishing option is selected.
3. The total number of sheets printed out = (a multiple of 15) + 1.
Patch Procedure for 1-9ZUYT
Important Note:
This patch file is for application to System v1.01 containing the 1-AKVJG.ps patch.
1. Confirm that the 1-AKVJG.ps patch is already installed by checking to see if it is listed
in the “Update Information” section of the configuration sheet. If it is not, apply this
patch before going on to Step 2.
2. Download the new 1-9ZUYT.ps patch listed above to the Print queue using the Fiery
Downloader.
3. Wait at least 60 seconds.
Note: It is very important to wait at least this long before continuing.
4. Reboot the system (Fiery Menu ! Shut Down ! Reboot System).
5. Print out the configuration sheet once the EB-105EX has completely warmed up and
reached ready status.
6. Confirm that the 1-9ZUYT.ps patch has been successfully installed by checking to see
that it is listed in the “Update Information” section of the configuration sheet.
Technical Bulletin
Model: Bellini-C2
Date: 23-Jan-04
Subject: Protection Seal
PAGE: 1/2
No.: RB070037
Prepared by: M. Matsuda
From: 2nd Tech Support Sec. Service Support Dept.
Classification:
Troubleshooting
Part information
Action required
Mechanical
Electrical
Service manual revision
Transmit/receive
Retrofit information
Paper path
Other (
)
CHANGE, BACKGROUND
In order to further ensure working safety, a protective cover has been added to the
positioning bracket on the controller box (see the photo on the next page).
SOLUTION
Permanent
A protective cover will be added to the entire area surrounding the bracket from the end of
January 2004 production.
Note: This part will be registered as a service part and its P/N announced by MB, along
with the cut-in production S/N.
Temporary Solution for MIF
Install a temporary protective seal at the next service visit (see the next page for the
attachment position).
Note: This seal is different from the permanent seal mentioned above to be applied to
production (no service P/N).
Technical Bulletin
Model: Bellini-C2
PAGE: 2/2
Date: 23-Jan-04
Controller Box Positioning Bracket
Attachment Position for the Temporary Protective Seal
Front View
Rear View
No.: RB070037
Technical Bulletin
Model: Bellini-C2
Date: 4-Feb-04
Subject: Information for Bellini-C2 Enhanced Version
PAGE: 1/15
No.: RB070038
Prepared by: M. Matsuda
From: 2nd Tech Support Sec. Service Support Dept.
Classification:
Troubleshooting
Part information
Action required
Mechanical
Electrical
Service manual revision
Transmit/receive
Retrofit information
Paper path
Other (
)
This bulletin describes the differences between the Bellini-C2 and the Bellini-C2e (BelliniC2 Enhanced Version), which will be mass-produced from March 2004.
Note: The model name, machine code and EDP code are the same for these models.
Technical Bulletin
Model: Bellini-C2
PAGE: 2/15
Date: 4-Feb-04
No.: RB070038
Major Differences Between the Bellini-C2 and Bellini-C2e
I. OPC Drum (Production Line)
The OPC layer of the drum has been thickened, so the lifetime of the OPC drum has been
increased. The following drum is fitted in C2e mainframes on the production line, but as
service parts, it can also be used on C2 MIF (see point 5) below).
1) C2e Drum P/N: B0709510
2) Lot No. on the drum flange: __L__XXXXXXXXX
Space
Note: The C2 production drum lot number has 12 digits (XXXXXXXXXXXX).
3) Identifying the new C2e drum:
A red, circular seal is attached to the C2e OPC drum stay at the factory.
Red circular seal attachment area
Drum Stay
Technical Bulletin
Model: Bellini-C2
PAGE: 3/15
Date: 4-Feb-04
No.: RB070038
4) Setting Powder (P/N 54429101) for the new C2e drum:
This drum surface setting powder should be applied whenever installing the service
parts C2e drum in the field. Please be sure to see pg. 2 of RTB #RA294064 for the
application procedure and related notes.
5) Installing the new C2e drum on Bellini-C2 MIF:
The following is the procedure for installing the new C2e drum on C2 mainframes in
the field, but please note that this drum cannot be installed on the C1.
a) Apply the setting powder to the new drum and complete the replacement in
accordance with the procedure and important notes in RTB #RA294064.
b) Change the following SP modes to the values shown below.
SP No.
Description
Change to:
90cpm
105cpm
990
990
-
-
-1 1st Copy Side
100
110
-2 Thick Paper
100
110
-4 Translucent Sheet
100
110
-5 2nd Copy Side
100
110
-
-
-1 Tray 1
100
110
-2 Tray 2
100
110
-3 Tray 3
100
110
-4 Tray 4
100
110
-5 Tray 5
100
110
-6 Tray 6
100
110
-7 Tray 7
100
110
-8 Duplex Tray
100
110
SP3903
VD Correction Counter
SP2301
Transfer Current Adjustment
SP2940
Leading Edge Transfer Current
II. New Z-Folding Unit
1) Important Notes:
! To install the new Z-Folding Unit Type 2105 on the C2e mainframe, it is necessary to
first install the new 3000 Sheet Finisher (SR841).
! To install the unit on C2 MIF, in addition to the above, it is also necessary to update to
several specific firmware versions. These details will be announced as a re-issue of
this bulletin as soon as they become available.
Technical Bulletin
Model: Bellini-C2
Date: 4-Feb-04
PAGE: 4/15
No.: RB070038
2) Service Manual/Parts Catalog
a) Z-Folding Unit
Service Manual: Released to the RISSN Server in early Feb ‘04 as an insert version.
Parts Catalog: Released to the RISSN Server in mid-Feb ‘04 as an insert version.
b) 3000-Sheet Finisher
Service Manual: (see Appendix below).
Parts Catalog: Released to the RISSN Server in mid-Feb ‘04 as an insert version.
3) New SP modes for the Z-Folding Unit:
a) Z-fold Position Adjustment: SP6122.
[D]
[A]
L1
[B]
A
[C]
B660S901.WMF
SP6122 001-008
Fine Adjustment – 1st Fold Position
[-4 ~ +4/0/ 0.2 mm]
Adjusts the position of the first fold [A] to decrease or increase
the distance (A) between the leading edge [B] and the crease of
the 2nd fold [C].
SP6122 009-016
Fine Adjustment – 2nd Fold Position
[-4 ~ +4/0/ 0.2 mm]
Adjusts the position of the 2nd fold [C] to decrease or increase
the length (L1) of the sheet between the trailing edge [D] and the
2nd fold.
Technical Bulletin
Model: Bellini-C2
PAGE: 5/15
Date: 4-Feb-04
No.: RB070038
b) Finisher Input Check: SP6117.
The sensors in bold have been added.
Class Bit
3
No.
No.
7
6
5
4
3
6
2
1
0
Reading
Description
Not Used
Shift Tray Full Sensor – Z-folding
Bottom Fence HP Sensor
Top Fence HP Sensor
Emergency Stop Switch
Shift Jogger Lift HP Sensor
(Optional Jogger Unit)
Shift Jogger HP Sensor (Optional
Jogger Unit)
Optional Jogger Unit Connection
0
1
Not full
Not home position
Not home position
Not pressed
Full
Home position
Home position
Pressed
Home position
Not home position
Not home position
Home position
Connected
Not connected
c) Finisher Output Check: SP6118
The motors in bold have been added.
26
27
Jogger Top Fence Motor
Jogger Bottom Fence Motor
III. Other SP Modes
1) Pre-transfer Lamp (PTL)
The following SP modes have been newly added for PTL settings.
Note: This PTL is intended to as a countermeasure for poor drum separation. But as a
side effect, blurred images may appear on the leading edge of the paper. The
default of the PTL setting is therefore “Switch Off.”
SP2602
PTL Settings
001
Front – On/Off Setting
002
Front – Off Timing Adj.
Switches the PTL on and off for the front side of the
paper passing through the fusing unit at normal speed.
Note: When feeding thick paper or OHP
transparencies, this setting is always off.
[0~1/0/1]
0: Off
1: On
PTL timing can be adjusted with SP2602 002.
This SP adjusts the length of the space from the
leading edge where the PTL quenching is applied to the
front side at normal speed. For example, if you set +5,
5 mm from the leading edge will be quenched.
[-5~10/2/0.1 mm]
Technical Bulletin
Model: Bellini-C2
003
Back – On/Off Setting
004
Back – On/Off Timing Adj.
005
Front – On/Off Setting:
Low Speed Mode
006
Front – Off Timing Adj.:
Low Speed Mode
007
Back– On/Off Setting:
Low Speed Mode
008
Back – Off Timing Adj.:
Low Speed Mode
Date: 4-Feb-04
PAGE: 6/15
No.: RB070038
Switches the PTL on and off for the rear side of the
paper passing through the fusing unit in the duplex
mode at normal speed.
[0~1/0/1]
0: Off
1: On
Note:
• When this setting is switched on, make sure that the
setting of SP2940 008 is the same as the default
setting of SP2940 001.
• When feeding thick paper or OHP transparencies,
this setting is always off.
This SP adjusts the length of the space from the
leading edge where the PTL quenching is applied to the
rear side at normal speed. For example, if you set +5, 5
mm from the leading edge will be quenched.
[-5~10/2/0.1 mm]
Switches the PTL on and off for the front side of the
paper passing through the fusing unit in the low speed
mode.
Note: When feeding thick paper or OHP
transparencies, this setting is always off.
[0~1/0/1]
0: Off
1: On
This SP adjusts the length of the space from the
leading edge where the PTL quenching is applied to the
front side in low speed mode. For example, if you set
+5, 5 mm from the leading edge will be quenched.
[-5~10/2/0.1 mm]
Switches the PTL on and off for the rear side of the
paper passing through the fusing unit in the duplex
mode in low speed mode.
[0~1/0/1]
0: Off
1: On
Note:
• When this setting is switched on, make sure that the
setting of SP2940 016 is the same as the default
setting of SP2940 009.
• When feeding thick paper or OHP transparencies,
this setting is always off.
This SP adjusts the length of the space from the
leading edge where the PTL quenching is applied to the
rear side in slow speed mode. For example, if you set
+5, 5 mm from the leading edge will be quenched.
[-5~10/2/0.1 mm]
Technical Bulletin
Model: Bellini-C2
PAGE: 7/15
Date: 4-Feb-04
No.: RB070038
2) LD Units:
SP2115-007 has been newly added to increase the accuracy of the LD beam pitch. To
activate this SP mode, it is necessary to manually input the value shown at the bottom
right of the label (see below) when replacing the LD unit.
New value for SP2115-007
manual input
New decal on the LD unit
<LD Unit Lot No.>
SP2115 001/SP2115 002/SP2115 003
PS2115 004/SP2115 005/SP2115 006/SP2115 007
B070R978.WMF
3) Fusing Temperature:
The adjustable range for the fusing temperature has been changed as follows.
SP
Old Function/[Setting]
New Function/[Setting]
SP1105-001
B070: [168~178/ 168/ 1 deg]
B071: [168~178 / 173 / 1 deg]
B070: [120~178/ 168/ 1 deg]
B071: [120~178 / 173 / 1 deg]
SP1105-002
B070: [148~158 / 148 / 1 deg]
B071: [148~158 / 153/ 1 deg]
B070: [100~158 / 148 / 1 deg]
B071: [100~158 / 153/ 1 deg]
Technical Bulletin
Model: Bellini-C2
Date: 4-Feb-04
PAGE: 8/15
No.: RB070038
APPENDIX
SR841 Service Manual Differences
The following is a summary of the differences between the SR840 and SR841 (all other
sections are identical). The revised sections appear from the following page.
Installation
Auxiliary trays and their holders have been added to the accessory list.
Note: As mentioned in the Operating Instructions, auxiliary trays should be attached on
top of the proof/shift tray to ensure proper stacking.
Replacement and Adjustment
The replacement procedures for new components have been added.
Details
Explanations for the Z-folding stapling mechanism and new electrical components have
been added.
Technical Bulletin
Model: Bellini-C2
PAGE: 9/15
Date: 4-Feb-04
No.: RB070038
Installation
Accessory Check
Check the quantity and condition of the accessories in the box against the following list:
Description
Q’ty
1. Cushion ............................................................................... 1
2. Table Extension................................................................... 1
3. Leveling Shoes.................................................................... 4
4. Rear Joint Bracket ............................................................... 1
5. Front Joint Bracket .............................................................. 1
6. Entrance Guide Plate .......................................................... 1
7. Grounding Plate .................................................................. 1
8. Auxiliary Tray Holder ........................................................ 1
9. Auxiliary Tray - Proof ........................................................ 1
10. Auxiliary Tray - Shift ....................................................... 1
11. Tapping Screws - M4 x 8................................................... 2
12. Tapping Screws - M3 x 6................................................... 4
13. Tapping Screws - M3 x 8................................................... 4
14. Phillips Screws w/washer - M4 x 14 .................................. 4
15. Shift Tray ........................................................................... 1
16. Installation Procedure........................................................ 1
2
3
1
4
15
5
14
13
12
6
11
7
10
9
8
B706I201.WMF
Technical Bulletin
Model: Bellini-C2
PAGE: 10/15
Date: 4-Feb-04
Replacement and Adjustment
Z-Fold Jogger unit Cover
[B]
[A]
B706R101.WMF
1. Open the front door.
2. Pull out the stapler tray unit [A].
3. Remove the Z-fold jogger unit cover [B] (! x2)
No.: RB070038
Technical Bulletin
Model: Bellini-C2
Date: 4-Feb-04
PAGE: 11/15
No.: RB070038
Jogger Top Fence Motor
[A]
[B]
B706R102.WMF
1. Open the front door and pull out the stapler tray unit.
2. Remove the Z-fold jogger unit cover (! x2)
3. Remove the motor bracket [A] (! x2, timing belt x1)
4. Remove the jogger top fence motor [B] (! x2 " x1 # x1)
Technical Bulletin
Model: Bellini-C2
PAGE: 12/15
Date: 4-Feb-04
No.: RB070038
Z-Fold Jogger Unit
[A]
B706R103.WMF
1. Open the front door and pull out the stapler tray unit.
2. Remove the Z-fold jogger unit cover (! x2)
3. Remove the Z-fold jogger unit [A] (! x4, " x4, # x2)
Technical Bulletin
Model: Bellini-C2
PAGE: 13/15
Date: 4-Feb-04
No.: RB070038
Jogger Bottom Fence Motor
[A]
B706R104.WMF
1. Open the front door and pull out the stapler tray unit.
2. Remove the jogger bottom fence motor [A] (! x2, timing belt x1, " x1, # x1).
Technical Bulletin
Model: Bellini-C2
PAGE: 14/15
Date: 4-Feb-04
No.: RB070038
Details
Stapling Z-Folded Paper
⑥
⑦
⑧
B674D004.WMF
B674D005.WMF
Here is the operation sequence for jogging and stapling Z-folded sheets:
①
The lower jogger fence lifts to receive the Z-folded sheets.
②
The top fence moves down, to the horizontal position.
③
A sheet of paper goes into the stapler tray.
④
The positioning roller turns when each sheet is fed to the stapler tray.
⑤
Each sheet is fed down against the lower jogger fence to align the bottom edge.
⑥
After the set number of sheets come in, the jogger top-fence motor switches on and
lowers the top fence against the top of the stack. This aligns the stack for stapling.
⑦
The bottom fence motor lowers the aligned stack to the stapling position.
⑧
The stapler staples the stack.
Technical Bulletin
Model: Bellini-C2
PAGE: 15/15
Date: 4-Feb-04
No.: RB070038
Electrical Components
2
1
25
3
24
4
23
22
5
21
6
7
20
8
19
9
18
17
10
11
12
16
15
1.
2.
3.
4.
5.
6.
7.
8.
9.
10.
11.
12.
13.
Stack Feed Out Belt Motor
Top Fence HP Sensor
Jogger Top Fence Motor
Jogger Motor
Stack Plate Rear HP Sensor
Stack Plate Rear Motor
Stack Plate Center Motor
Stack Plate Center HP Sensor
Bottom Fence HP Sensor
Stack Plate Front HP Sensor
Stack Plate Front Motor
Stapler Return Solenoid
Stapler Hammer Motor
14
13
14.
15.
16.
17.
18.
19.
20.
21.
22.
23.
24.
25.
B706S502.WMF
Staple End Sensor
Cartridge Set Sensor
Staple HP Sensor
Stapler HP Rotation Sensor
Stapler Return Sensor
Stapler HP Sensor
Jogger Bottom Fence Motor
Stapler Rotation Motor
Stack Feed-Out Belt HP Sensor
Stapler Motor
Stapler Tray Paper Sensor
Jogger HP Sensor
Technical Bulletin
Model: Bellini-C1
Date: 23-Jan-04
Subject: OPC Drum Change/ Drum Setting Powder
PAGE: 1/2
No.: RA294064
Prepared by: M.Matsuda
From: 2nd Tech Support Sec. Service Support Dept.
Classification:
Troubleshooting
Part information
Action required
Mechanical
Electrical
Service manual revision
Transmit/receive
Retrofit information
Paper path
Other (
)
Important Note:
The OPC drum has been changed as follows, which requires the application of
setting powder at drum installation. The drum yield and SP mode setting have not
been changed.
Change, Background
As of the end of January 2004 (Japan production) and September 2004 (RPL production),
the organic solvent dichloromethane will no longer be used for OPC drum production as
part of Ricoh’s ongoing efforts, through the expanding application of in-house
environmental management standards, to eliminate the use of environmentally sensitive
materials in the manufacturing process.
Affected Drums and Models
To distinguish the drums from before and after this change, the drum lot numbers and
service parts numbers will be changed as follows.
Lot Number Change:
Old: XXXXXXXXXXXX (12 digits)
New: __S__XXXXXXXXX
Space
Service P/N Change:
Old P/N
A2949510
New P/N
A2959510
New Drum Production Cut-in Dates
Japan Production
RPL Production
(NA/Asia):
(Europe):
End of January 04’
Early September 04’
*See Note below
New Drum Service
Parts Available:
End of February 04’ or
later (US/Asia)
End of September 04’ or
later (EU) *See Note below
Note: As the service parts OPC drum from ESPC is produced at RPL, the actual outflow of
the new drum to the European market will be from the end of September 2004. The
current drum (A2949510) will available for ordering until this time.
Technical Bulletin
Model: Bellini-C1
Date: 23-Jan-04
PAGE: 2/2
No.: RA294064
Important Note for Installation of the New Drum
Since the smoothness of the new drum (without dichloromethane) is reduced, it is
essential to make sure to apply Drum Setting Powder (P/N: 54429101) to the drum
surface as shown below before installing.
Note: If the setting powder is not applied, the drum’s cleaning blade may turn outward,
causing a drum cleaning failure.
Application Procedure for Drum Setting Powder
1. Apply the setting powder (P/N 54429101) to the drum by tapping the powder bag across
the surface area shown in the illustration below, i.e. spanning the entire length of the drum
but covering about a 45-90 degree portion (up to 1/4) of the total surface.
Note:
!
Be sure to apply enough powder to give the area a moderate dusting (so that the
area turns white).
!
If setting powder is not available, please apply waste toner in the same manner
described above (waste toner is charged and will be attracted to the drum surface).
Please note that although dirty background will have a greater tendency to occur,
be sure to apply the waste toner if there is no setting powder available.
2. Install the new drum in the OPC unit so that the powdered area (in bold below) faces the
cleaning blade.
3. Rotate the drum once in its normal rotation direction (arrow shown below), so that it
stops again at the same position.
Note: Be sure not to rotate the drum in the opposite direction.
Technical Bulletin
Model: Bellini-C2
PAGE: 1/1
Date: 28-Apr-04
Subject: Firmware Update Remarks
No.: RB070039
Prepared by: M. Matsuda
From: 2nd Tech Support Sec. Service Support Dept.
Classification:
Troubleshooting
Part information
Action required
Mechanical
Electrical
Service manual revision
Transmit/receive
Retrofit information
Paper path
Other (
)
Important Notes Regarding Firmware Installation for the Bellini-C2e
As detailed in RTB RB070038, the Bellini-C2e is an enhanced version of the Bellini-C2,
and requires an update to all the firmware versions listed below.
Please Note:
•
When updating a Bellini-C2 field machine to the Bellini-C2e, update to all of the
following firmware versions together as a set.
- Use the following procedure to update to the Bellini-C2e:
1. First, install the ”System” firmware only.
2. After successfully installing the “System” firmware, turn the machine main power
Off/On and confirm that the machine boots up to Ready status normally.
3. Install the remaining firmware simultaneously.
•
Change the value for SP5165-001 to 008 to 2.5(NA), 2.0(EU)
Firmware for the Bellini-C2E
Software
Software P/N
Version
System
B0705774
V5.04.2
NCS (NIB)
B0705775
V4.51
Netfile
B0705776
V4.00
Websystem
B0705777
V2.04
Webdocbox
B0705778
V2.03
LCDC (NA or EU)
B0705374B (NA) or
V2.18
B0705375B (EU)
Language
B0705350B
V3.10
BCU (Engine)
B0705254D
V5.14:34
Printer
B5806516
V2.07
Scanner
B5806521
V3.02
Technical Bulletin
Model: Bellini-C2
PAGE: 1/1
Date: 28-Apr-04
Subject: Error Code: E32, E44 Appeared
No.: RB070040
Prepared by: M. Matsuda
From: 2nd Tech Support Sec. Service Support Dept.
Classification:
Troubleshooting
Part information
Action required
Mechanical
Electrical
Service manual revision
Transmit/receive
Retrofit information
Paper path
Other (
)
SYMPTOM
Error codes E32 and E44 are sometimes displayed when several types of firmware are
installed at the same time.
Note: This cannot be cleared with main power Off/On.
CAUSE
A firmware transmission error may occur when installing several types of firmware
simultaneously. Since the error data is saved to the NVRAM, the machine is unable to
boot up normally, even after the main switch is turned Off/On.
SOLUTION
Clear the error code as follows and install the firmware again.
1. Press !"# (“1”, “4”, “3” key) on the operation panel when the error codes appear.
2. Press
C
(“Clear” key) three times.
Once the error is cleared, the machine will indicate this with a beep.
$ Important Notice
To ensure the above error codes do not occur, please be sure to follow the procedure
below whenever installing several kinds of firmware at the same time:
1. First, install the “System” firmware only.
2. After successfully installing the “System” firmware, turn the machine main power
Off/On and confirm that the machine boots up to Ready status normally.
3. Install the remaining firmware simultaneously.
Technical Bulletin
Model: Bellini-C2
PAGE: 1/2
Date: 14-May-04
Subject: EB-105EX suddenly drops off the network.
No.: RB070041
Prepared by: C.Tsuji
From: 2nd Tech Support Sec. Service Support Dept.
Classification:
Troubleshooting
Part information
Action required
Mechanical
Electrical
Service manual revision
Transmit/receive
Retrofit information
Paper path
Other (
)
SYMPTOM
The EB-105EX suddenly drops off the network.
This problem may happen when the EB-105EX is connected to a 10-BaseT network and in addition when
the network traffic is heavy.
or
multiple print jobs are sent to the EB-105EX.(= network traffic becomes heavy)
CAUSE
The EPROM on the motherboard, which uses an Intel chip, had a bug.
AFFECTED UNITS
Please refer to the serial number list, which is included at the bottom of this RTB.
SOLUTION
“LAN UPDATE PROGRAM for EB-105EX V.1.0.0” should be used to remove the bug.
- The program runs automatically, so there is no need to use a keyboard.
- The update procedure is written on the instruction sheet, which is attached to the CD.
The instructions can also be found on the CD as a binary document file.
- The procedure can be done with or without the controller connected to the copier mainframe.
SERIAL NUMBER LIST
•
Q06353XXXXX
•
Q0635400001 - Q0635400025
•
Q0635400027 - Q0635400134
•
Q0635400136 - Q0635400167
•
Q0635400169 - Q0635400178
•
Q0635400181 - Q0635400182
•
Q0635400188 - Q0635400190
•
Q0635400192 - Q0635400242
•
Q0635500028
•
Q0635500031
•
Q0635500034 - Q0635500058
•
Q0635500060 - Q0635500062
•
Q0635500065 - Q0635500067
•
Q0635500069 - Q0635500071
•
Q0635500073 - Q0635500093
•
Q0635500095 - Q0635500099
•
Q0635500101 - Q0635500102
•
Q0635500104 - Q0635500105
•
Q0635500107
•
Q0635500109 - Q0635500130
Technical Bulletin
Model: Bellini-C2
PAGE: 2/2
Date: 14-May-04
No.: RB070041
Q0635600001
Q0635600021
Q0635700004
Q0635700026
Q0635800032
Q0635900057
Q0635600002
Q0635600028
Q0635700005
Q0635800004
Q0635800056
Q0635900066
Q0635600003
Q0635600030
Q0635700006
Q0635800019
Q0635800061
Q0635900067
Q0635600006
Q0635600032
Q0635700007
Q0635800020
Q0635900043
Q0635900083
Q0635600013
Q0635600033
Q0635700008
Q0635800021
Q0635900049
Q0635600017
Q0635700003
Q0635700025
Q0635800027
Q0635900051
Technical Bulletin
Model: Bellini-C2
PAGE: 1/1
Date: 14-May-04
Subject: Patch Release for EB-105EX (1-CX7BV)
No.: RB070042
Prepared by: Chisato Tsuji
From: 1st Tech. Support Sec. Service Support Dept.
Classification:
Troubleshooting
Part information
Action required
Mechanical
Electrical
Service manual revision
Transmit/receive
Retrofit information
Paper path
Other (
)
This is a release note for a patch file for printer controller EB-105EX.
Patch File
1-CX7BV
•
Issue(s)
When the Fuser Cleaning Web becomes near empty, the controller
cannot start to print a job.
Note: This patch is for EB-105EX system version 1.01.
Please make sure that patches “1-AKVJG” and “1-9ZUYT” have already been applied to
System version 1.01 before installing this new patch.
Patch Procedure for 1-9ZUYT:
1. Download the patch file (1-CX7BV.ps) to the Print queue by using the “Fiery
Downloader”.
2. Wait at least 60 seconds (this is very important).
3. Reboot the system.
(Access the Fiery menu, select “Shut Down” and then “Reboot System”.)
4. Once the EB-105EX becomes idle, print out the configuration sheet.
5. Check to make sure that the patch number “1-CX7BV.ps” appears in the
Update Information section on the configuration sheet.
Technical Bulletin
Model: Bellini-C2
PAGE: 1/1
Date: 14-May-04
Subject: Patch Release for EB-105EX (1-D3C5T)
No.: RB070043
Prepared by: Chisato Tsuji
From: 1st Tech. Support Sec. Service Support Dept.
Classification:
Troubleshooting
Part information
Action required
Mechanical
Electrical
Service manual revision
Transmit/receive
Retrofit information
Paper path
Other (
)
This is a release note for a patch file for printer controller EB-105EX.
Patch File
1-D3C5T
•
Issue(s)
WebDownloader will not work correctly when Dutch is set as the
system language.
Note: This patch is for EB-105EX system version 1.01.
Please make sure that patches “1-AKVJG”, “1-9ZUYT”, and “1-CX7BV” have already been
applied to System version 1.01 before installing this new patch.
Patch Procedure for 1-D3C5T:
1. Download the patch file (1-D3C5T.ps) to the Print queue by using the “Fiery
Downloader”.
2. Wait at least 60 seconds (this is very important).
3. Reboot the system.
(Access the Fiery menu, select “Shut Down” and then “Reboot System”.)
4. Once the EB-105EX becomes idle, print out the configuration sheet.
5. Check to make sure that the patch number “1-D3C5T.ps” appears in the
Update Information section on the configuration sheet.
Technical Bulletin
Model: Bellini-C2
PAGE: 1/1
Date: 14-May-04
Subject: Patch Release for EB-105EX (1-B952E_1-
No.: RB070044
Prepared by: Chisato Tsuji
BWIKW)
From: 2nd Tech Support Sec. Service Support Dept.
Classification:
Troubleshooting
Part information
Action required
Mechanical
Electrical
Service manual revision
Transmit/receive
Retrofit information
Paper path
Other (
)
This is a release note for a patch file for printer controller EB-105EX.
Patch File
1-B952E_1BWIKW
Issue(s)
This patch will correct the following errors when the Plockmatic finisher
is connected.
• Pages are output in the incorrect order when selecting Booklet
Staple in the PCL driver and printing out to the Plockmatic finisher.
• The rear side on some sheets is not printed if the Cover Inserter
used with the Plockmatic reaches the paper end condition.
• The print job sometimes cannot be completed if the Cover Inserter
used with the Plockmatic reaches the paper end condition.
Note: This patch is for EB-105EX system version 1.01.
Please make sure that patches “1-AKVJG”, “1-9ZUYT”, “1-CX7BV” and “1-D3C5T”are
already applied to the System version 1.01 before this patch is applied.
Patch Procedure for 1-B952E_1-BWIKW:
1. Download the patch file (1-B952E_1-BWIKW.ps) to the Print queue by using
the “Fiery Downloader”.
2. Wait for more than 60 seconds. (Very important)
3. Reboot the system.
(Access the Fiery menu, select “Shut Down” and then “Reboot System”.)
4. When the EB-105EX becomes idle, print the configuration sheet.
5. Check if you can see the patch number “1-B952E_1-BWIKW.ps” in the
"Update Information" section on the configuration sheet.
Technical Bulletin
PAGE: 1/1
Reissued: 29-Jun-04
Model: Bellini-C2
Date: 24-Jun-04
Subject: Patch Release for EB-105EX (1-DBI62)
No.: RB070045a
Prepared by: Chisato Tsuji
From: 2nd Tech Support Sec. Service Support Dept.
Classification:
Troubleshooting
Part information
Action required
Mechanical
Electrical
Service manual revision
Paper path
Transmit/receive
Retrofit information
Other (
)
RTB Reissue
Procedure step 2 has been corrected. The patch should be downloaded to the “Direct”
queue.
This is a release note for a patch file for printer controller EB-105EX.
Patch File
Issue(s)
1-DBI62
This patch corrects the following:
• The stapler unit does not shift to the front for staple
replenishing if the finisher runs out of staples while printing out
multiple copies.
Important Note:
This patch file is for application to the EB-105EX System v1.01.
Patch Procedure for 1-DBI62
1. Confirm that the following patches are already installed by checking to see if it is listed
in the “Update Information” section of the configuration sheet. If it is not, apply this
patch before going on to Step 2.
!
Patches: “1-AKVJG”, “1-9ZUYT”, “1-CX7BV”, “1-D3C5T”, “1-B952E_1-BWIKW +
1-DPK09”
2. Download the new 1-DBI62.ps patch listed above to the Direct queue using the Fiery
Downloader.
3. Wait at least 60 seconds.
Note: It is very important to wait at least this long before continuing.
4. Reboot the system (Fiery Menu # Shut Down # Reboot System).
5. Print out the configuration sheet once the EB-105EX has completely warmed up and
reached ready status.
6. Confirm that the 1-DBI62.ps patch has been successfully installed by checking to see
that it is listed in the “Update Information” section of the configuration sheet.
Technical Bulletin
PAGE: 1/2
Reissued: 16-Sep-04
Model: Bellini-C2
Date: 21-Jul-04
No.: RB070046a
RTB Correction
The items in bold italics have been corrected or added.
Prepared by: M. Matsuda
Subject: LCDC Firmware Update Failure
From: 2nd Tech Support Sec. Service Support Dept.
Classification:
Troubleshooting
Part information
Action required
Mechanical
Electrical
Service manual revision
Paper path
Transmit/receive
Retrofit information
Other (
)
Please use the following to bring the machine back on line if an error occurs during the
LCDC firmware update.
Important: A common cause of firmware update failures is when the main power is turned
off during the update. Please make sure to wait until the Main Power ON Key flashes at
intervals of about 3 seconds, and then turn the main power off (see Service Manual
section 5.10.4).
SYMPTOM
The LCDC firmware update stops, and the following message appears.
Warning
Install failure of operation panel program
Turn machine off
Set SD card of operation panel and turn on
CAUSE
1. A service representative turns off the main power before the LCDC update is
completed.
2. The main power turns off by itself.
SOLUTION
1. Make sure technicians know about the Important note above, which is also mentioned
in section 5.10.4 of the Service Manual.
2. If the above symptom occurs, use the procedure below to perform a firmware recovery.
Note: The recovery program is protected and usually works fine, even if the firmware
program is damaged.
Technical Bulletin
PAGE: 2/2
Reissued: 16-Sep-04
Model: Bellini-C2
Date: 21-Jul-04
No.: RB070046a
LCDC Recovery Procedure
IMPORTANT: If you are updating the machine from a Bellini-C2 to a Bellini-C2e
(enhanced model), this recovery procedure will not work. In this case, replace the
LCDC board.
Reason: The recovery program is overwritten only when you update from the BC2 to the B-C2e.
See RTB RB070039 for details about the B-C2e firmware.
1. Insert an SD card which contains the LCDC firmware.
2. Turn the main power ON. The operation panel will display the following message:
Warning
Install failure of operation panel program
Turn machine off
Set SD card of operation panel and turn on
3. Make sure to wait for the update to begin. This will take about one minute.
As mentioned at the top of this RTB:
Important:
A common cause of firmware update failures is when the main power is turned off
during the update. Please make sure to wait until the Main Power ON Key flashes at
intervals of about 3 seconds, and then turn the main power off (see Service Manual
section 5.10.4).
Technical Bulletin
PAGE: 1/15
Reissued: 15-Apr-05
Model: General RTB
Date: 15-Nov-04
No.: RGene019a
RTB Correction
The items in bold italics have been corrected or added.
Prepared by: H. Someya
Subject: Remote Firmware Update
From: 1st Tech. Support Sec. Service Support Dept.
Classification:
Troubleshooting
Part information
Action required
Mechanical
Electrical
Service manual revision
Paper path
Transmit/receive
Retrofit information
Other (
)
1. OVERVIEW
The remote firmware update function (referred to as RFU) is used to update the
firmware remotely. Service representatives do this over the network. Note that this
information is intended for service representatives only and not for end users.
2. SUPPORTED MODELS AND FIRMWARE
The models supporting RFU and the types of firmware that can be updated are shown
in Fig. 1:
“04A”: Autumn 2004
Printers
Group
System
Network
WebSys
Printer
Engine
Model J-P2
Model
Before 04A
OK
OK
---
OK
OK
Model J-P2CF
Before 04A
OK
OK
---
OK
OK
Model K-P3
Before 04A
OK
OK
OK
OK
OK
Model C-P1
Before 04A
OK
OK
OK
Model J-P3
Before 04A
OK
OK
OK
OK
OK
Model PL-P1
Before 04A
OK
OK
OK
OK
NG
Model G-P1
04A and later
OK
OK
OK
OK
OK
Model C-P2
04A and later
OK
OK
OK
OK
OK
Model K-P4
04A and later
OK
OK
OK
OK
OK
Group
System
Network
WebSys
Printer
PS
Engine
Model A-C3e/f
Before 04A
OK
OK
OK
OK
OK
OK
Model R-C3
Before 04A
OK
OK
OK
OK
OK
OK
Model K-C2
Before 04A
OK
OK
OK
OK
OK
OK
Model S-C2
Before 04A
OK
OK
OK
OK
OK
OK
Model B-C2e
Before 04A
OK
OK
OK
OK
OK
OK
Model J-C1
Before 04A
OK
OK
OK
OK
OK
OK
04A and later
OK
OK
OK
OK
OK
OK
MFPs
Model
Model MT-C2
Fig. 1 Models supporting RFU
OK: Remote firmware update via the network is possible.
NG: Remote firmware update via the network is not possible.
Technical Bulletin
PAGE: 2/15
Reissued: 15-Apr-05
Model: General RTB
Date: 15-Nov-04
No.: RGene019a
The following models do not support RFU:
•
Printers:
Model K-P1/P2, Model J-P1, Model A-P3, Model U-P1, Model AR-P1, and not GW
products
•
MFPs:
Model A-C2/C3, Model R-C2, Model U-C1, Model MT-C1, and not GW products
3. SYSTEM REQUIREMENTS
Network Interface:
• 10 Base-T or faster Ethernet LAN
• IEEE1284 (Centronics) (A setting must be changed in SP mode.)
Note: IEEE1284 does not support error recovery after a power loss.
For Recovery Mode:
• 10 Base-T or faster Ethernet LAN – the note above says that only 1284 doesn’t
support it.
Protocols:
For RFU Mode & Recovery Mode:
• FTP (The port must be open)
Operating System:
• Windows Server 2003
• Windows XP
• Windows 2000
• Windows NT 4.0
• Windows 9x/Me
• Mac OS
• UNIX/Linux (Any version)
Note: RFU is available for any OS from which FTP is possible.
Unsupported environments:
• IPP
• SMB over TCP/IP
• Direct port
• AutoNet (169.254.x.x) with DHCP
Technical Bulletin
PAGE: 3/15
Reissued: 15-Apr-05
Model: General RTB
Date: 15-Nov-04
No.: RGene019a
Ftp settings and commands:
• User name (default):
Before 04A:
rsysupdate
04A and later:
admin
•
Password (default):
Before 04A:
password
04A and later:
(no password)
Note: These default passwords are the same as the administrator passwords.
•
•
Transfer mode: binary
FTP commands supported:
binary (Transfer data in binary mode)
dir (List files and directories)
put “file name”
get version.txt - (Obtain the version.txt file and display its contents.)
get errlog.txt - (Obtain the errlog.txt file and display its contents.)
4. STATUS OF UNUPDATEABLE MACHINE
If the printer is in any of the following statuses, RFU will not work.
• Print job in progress (copier, printer, fax, network)
• Scan job in progress (copier, scanner, fax)
• Receiving a print image from the network
• Operation panel is in use
• Incoming/Outgoing fax message
• SC condition
You can check the status of the target machine using WebImageMonitor or
SmartDeviceMonitor.
Technical Bulletin
PAGE: 4/15
Reissued: 15-Apr-05
Model: General RTB
Date: 15-Nov-04
No.: RGene019a
5. UPDATING PROCEDURE
Recommendation:
It is strongly recommended that RFU be performed on-site, to minimize the chances of a
power-down during RFU.
5.1 Auto Rebooting
After receiving new firmware, the machine firmware is updated and the machine is
automatically rebooted using the updated firmware. Fig.2 shows the kind of reboot
required after the firmware is updated.
Printers
Model
Model J-P2
Model J-P2CF
Model K-P3
Model C-P1
Model J-P3
Model PL-P1
Model G-P1
Model C-P2
Model K-P4
System Network
Auto
Auto
Auto
Auto
Auto
Auto
Auto
Auto
Auto
Auto
Auto
Auto
Auto
Auto
Auto
Auto
WebSys
----Auto
Auto
Auto
Auto
Auto
Auto
Auto
Printer
Auto
Auto
Auto
Auto
Auto
Auto
Auto
Auto
Auto
Engine
Auto
Auto
Auto
Auto
Auto
N/A
Auto
Auto
Auto
MFPs
Model
Model A-C3e/f
Model R-C3
Model K-C2
Model S-C2
Model B-C2e
Model J-C1
Model MT-C2
System
Auto
Auto
Auto
Auto
Auto
Auto
Auto
Network
Auto
Auto
Auto
Auto
Auto
Auto
Auto
WebSys
Printer
Auto
Auto
Auto
Auto
Auto
Auto
Auto
Auto
Auto
Auto
Auto
Auto
Auto
Auto
Fig. 2 Reboot Method
PS
Auto
Auto
Auto
Auto
Auto
Auto
Auto
Engine
Manual
Manual
Auto
Auto
Auto
Auto
Auto
Auto: Automatically rebooted after updating the firmware.
Manual: The machine must be manually rebooted after updating the firmware.
Technical Bulletin
PAGE: 5/15
Reissued: 15-Apr-05
Model: General RTB
Date: 15-Nov-04
No.: RGene019a
5.2 Preparation
Before you update the firmware by RFU, carry out three items as shown below.
5.2.1 Checking the IP address
For a machine with static IP address:
•
•
•
•
Search for the IP address using SmartDeviceMonitor for Admin or Web
SmartDeviceMonitor.
If the hostname of the machine is registered in a DNS server, use the nslookup
command with the machines hostname. This can also be used for dynamic IP
addresses if you are using DDNS.
If the computer name of the machine is registered in a WINS server use the
<……..> command.
For a machine with a dynamic IP address:
•
•
Print the config sheet or the SMC for the machine.
Check the IP address in the DHCP server.
5.2.2 Firmware
•
Please download firmware (*.rru or *.rfu files) from our support site and store it in
a folder on a local PC to be used for RFU.
5.2.3 Checking the machine status
•
Please check the status of the target machine using WebImageMonitor or
SmartDeviceMonitor.
Technical Bulletin
PAGE: 6/15
Reissued: 15-Apr-05
Model: General RTB
Date: 15-Nov-04
5.3 RFU for Windows
1. Open a command prompt.
o [Start]-[Program]-[Accessories]-[Command Prompt]
2. Logon to the machine using ftp.
C:\> ftp xxx.xxx.xxx.xxx
Specify the machine's IP address
Connected to xxx.xxx.xxx.xxx.
220 (Product name) FTP server (1.00)ready.
User (IP address:(none)):
3. Enter the user name.
User (IP address:(none)):rsysupdate
User name
331 Password required for rsysupdate.
Password:
4. Enter the password.
Password:xxxxx
230 User rsysupdate logged in.
Login successful.
ftp>
5. Enter "dir" to check that version.txt exists.
ftp> dir
200 PORT command successful.
150 Opening ASCII mode data connection for '/'.
-r--r--r--root root 200 Jan 1 01:08 help
-r--r--r--root root 200 Jan 1 01:08 info
-r--r--r--root root 200 Jan 1 01:08 install
-r--r--r--root root 200 Jan 1 01:08 prnlog
-r--r--r--root root 200 Jan 1 01:08 stat
-r--r--r--root root 200 Jan 1 01:08 syslog
-r--r--r--root root 200 Jan 1 01:08 version.txt
-r--r--r--root root 200 Jan 1 01:08 errlog.txt
226 Transfer complete.
ftp:372 bytes received in n.nn Seconds n.nn Kbytes/sec.
ftp>
No.: RGene019a
Technical Bulletin
PAGE: 7/15
Reissued: 15-Apr-05
Model: General RTB
Date: 15-Nov-04
No.: RGene019a
6. Enter "get version.txt -" to check the machine's firmware version.f
200 PORT command successful.
150 Opening ASCII mode data connection for 'version.txt'.
PartNo.
Module Name
Version
Module ID
---------------------------------------------------------------------------------------------G0000000
os & copy
0.20
XXXXXX_copy
G0000000
os & pf
0.20
XXXXXX_system
G570xxxx
Onboard Scn
2.04
XXXXXX_scn
G5705387A
OptDIMM Fax
1.07
XXXXXX_fax
G5700000
printer
0.19
XXXXXX_printer
G5705383D
Network DocBox
2.00
XXXXXX_netfile
G0805920A
Network
0.71
XXXXXX_net
G0805601
ENGINE
R0.14 :06
XXXXXX_eplot
...
---------------------------------------------------------------------------------------------226 Transfer complete.
ftp>
7. Enter "binary" to set the file transfer mode to binary.
ftp> binary
200 Type set to I.
ftp>
8. Navigate to the directory on your PC containing the file xxx.rru.
9. Transmit the firmware module file (*.rru or *.rfu) using the "put" command.
ftp> put xxx.rru
200 PORT command successful.
150 Opening BINARY mode data connection for 'xxx.rru'.
226 Transfer complete.
ftp:nnnnnn bytes sent in s.ss Seconds pp.pp Kbytes/sec.
ftp>
Note: Do not turn off the power of the machine while updating the firmware.
Technical Bulletin
PAGE: 8/15
Reissued: 15-Apr-05
Model: General RTB
Date: 15-Nov-04
No.: RGene019a
When the machine starts to receive the file, the following message appears on the
machine's control panel and normal machine functions are disabled.
o
Display panel (MFPs)
o
Display (Printers)
ROM Update
Receiving Data
10. Once the machine has received the entire firmware module file, the firmware update
starts automatically.
The following message appears:
o
Display panel (MFPs)
o
Display (Printers)
Updating...
***____________
Note: If the controller firmware is being updated, this message is displayed in
English only.
Technical Bulletin
PAGE: 9/15
Reissued: 15-Apr-05
Model: General RTB
Date: 15-Nov-04
No.: RGene019a
11. After the firmware has been updated, the machine must restart. This may be
automatic depending on the firmware and model.
12. Enter "bye" to exit ftp.
ftp> bye
C:\>
13. Check the firmware version as shown in step 6.
14. Update all required firmware by repeating steps 1 to 13 as necessary.
5.4 RFU for UNIX(LINUX)
1. Logon to the machine using ftp.
host% ftp “ip address”
User (“ip address”): User Name (for Administrator)
230 User xxxx logged in.
331 Password required for rsysupdate.
Password: Password (for Administrator)
230 User xxxx logged in.
Connected to “ip address”
Remote system type is UNIX.
Using binary mode to transfer files.
2. Change to binary mode.
ftp> binary
200 Type set to I.
3. Send the firmware data (*.rru or *.rfu) to the machine.
ftp> put “File Name of Firmware”
200 PORT command successful.
150 Opening BINARY mode data connection for “File Name of Firmware”.
226 Transfer complete.
ftp: nnnnnn bytes sent in s.ss Seconds pp.p Kbytes/sec.
ftp>
4. Close the ftp session.
ftp> bye
host%
Technical Bulletin
PAGE: 10/15
Reissued: 15-Apr-05
Model: General RTB
Date: 15-Nov-04
No.: RGene019a
5.5 Firmware Update for Centronics (IEEE1284)
Note:
• Firmware update via a centronics interface does not require a password.
• The only method of recovery available via a centronics interface is an IC or SD
card.
1. Check the target firmware version by printing out the SMC sheet with SP5-990-4.
2. Set SP5-856-2 to a value of 1. This will configure the machine for firmware update
via the Centronics I/F.
3. Send the firmware to the target machine with the copy command.
C:\>copy/b “file name”
4. Cycle the machine’s power (off then on).
5. Confirm the firmware version as shown in step 1.
6. Update all required firmware by repeating steps 1 to 5 as necessary.
Technical Bulletin
PAGE: 11/15
Reissued: 15-Apr-05
Model: General RTB
Date: 15-Nov-04
No.: RGene019a
5.6 Checking the Result of the Update
Check that the firmware has been updated.
Note:
• After transmitting the firmware file from the computer, it takes approximately 3 to 5
minutes for updating to complete and the machine to restart.
• To check the result, you need to logon to the machine again using ftp. However,
you cannot log on during the update process, so you are unable to check that the
update has completed until the machine has restarted.
If the update was successful
•
Once the firmware has been updated successfully, the system automatically
restarts using the new firmware.
After the restart, verify that the firmware has been updated to the new version.
Check that the error code in the error data file (errlog.txt) is "0" by performing
procedure 7.1 “Checking the error status” (below).
If an error occurs
•
If an error occurs during the update, the system automatically restarts, the
message shown below appears, and the machine waits to receive the firmware
file again. If the update is interrupted by a power failure, the same thing happens
once the power is restored.
Log on to the machine again using ftp and then resend the firmware file to the
machine.
The following message appears for Type 1 firmware:
o
Display panel (MFPs)
o
Display (Printers)
ROM Update
Waiting for Data_
⇔
xxx.xxx.xxx.xxx
Technical Bulletin
PAGE: 12/15
Reissued: 15-Apr-05
Model: General RTB
Date: 15-Nov-04
No.: RGene019a
6. ERROR RECOVERY
There are three ways to recover from a loss of power during RFU.
6.1 Recovery Procedure
There are three types for recovery after a power loss during RFU. (This will depend on
the firmware and model). Procedures for types 1, 2 and 3 are on the next page.
Find the firmware and model you are downloading to, and begin with the type shown
in the table below.
Recommendation:
As mentioned in 5. Updating Procedure, it is strongly recommended that RFU be
performed on-site, to minimize the chances of a power-down during RFU.
Printers
Model
System Network WebSys
Printer
Engine Card Type
Type1
Type1
---
Type1
Type1
IC
Model J-P2CF Type1
Type1
---
Type1
Type1
IC
Type1
Type1
Type1
Type1
Type1
Type1
IC
IC
Model J-P2
Model K-P3
Model C-P1
Type1
Type1
Model J-P3
Model PL-P1
Type1
Type1
Type3
Type1
Type3
Type1
Type3
Type1
Type1
N/A
SD
SD
Model G-P1
Model C-P2
Type1
Type1
Type1
Type1
Type1
Type1
Type1
Type1
Type1
Type1
SD
SD
Model K-P4
Type1
Type1
Type1
Type1
Type1
SD
MFPs
System Network WebSys
Printer
PS
Model A-C3e/f
Model
Type2
Type2
Type2
Type2
Type2
Type1
IC
Model R-C3
Model K-C2
Type2
Type1
Type2
Type1
Type2
Type1
Type2
Type3
Type2
Type3
Type1
Type3
IC
SD
Model S-C2
Type1
Type1
Type1
Type3
Type3
Type1
SD
Model B-C2e
Type2
Type2
Type2
Type3
Type3
Type3
SD
Model J-C1
Model MT-C2
Type1
Type2
Type1
Type2
Type1
Type1
Type3
Type1
Type3
Type1
Type1
Type1
SD
SD
Fig. 3 Recovery Method
Engine Card Type
Technical Bulletin
PAGE: 13/15
Reissued: 15-Apr-05
Model: General RTB
Date: 15-Nov-04
No.: RGene019a
Important: Do not turn the main power off while you perform any of the procedures.
Procedure for type 1:
1. Restore power to the machine. The machine will wait for the operator to start the
update.
2. Connect to the machine by FTP and upload the *.rru or *.rfu files.
Procedure for type 2:
1. Try ‘Procedure for type 1’.
2. If this does not work, restore power to the machine.
3. Upload the firmware from an SD card or IC card.
Procedure for type 3:
1. Try ‘Procedure for type 1’.
2. If this does not work, try ‘Procedure for type 2’.
3. If this does not work, replace the internal SD card or circuit board.
Technical Bulletin
PAGE: 14/15
Reissued: 15-Apr-05
Model: General RTB
7.
Date: 15-Nov-04
No.: RGene019a
TROUBLESHOOTING
7.1 Checking the error status
You can check the error status using ftp.
Check whether an error occurred by viewing errlog.txt. This file is in the same
directory as version.txt.
1. Logon to the machine using ftp.
2. Enter "dir" to check that errlog.txt exists.
ftp> dir
200 PORT command successful.
150 Opening ASCII mode data connection for '/'.
-r--r--r-- root root 200 Jan 1 01:08 help
-r--r--r-- root root 200 Jan 1 01:08 syslog
-r--r--r-- root root 200 Jan 1 01:08 version.txt
-r--r--r-- root root 200 Jan 1 01:08 errlog.txt
226 Transfer complete.
ftp: 191 bytes received in n.nn Seconds n.nn Kbytes/sec.
ftp>
3. Enter "get errlog.txt -" to check the error code.
ftp> get errlog.txt 200 PORT command successful.
150 Opening ASCII mode data connection for 'errlog.txt'.
Module ID: xxxxxxxx
Error Code: 51
226 Transfer complete.
ftp: 31 bytes received in n.nn Seconds n.nn Kbytes/sec.
ftp>
The information in errlog.txt consists of the module IDs of the firmware modules
that caused errors and the corresponding error codes.
For what the error codes mean and how to respond to them, see section 7.2
(below).
4. Enter "bye" to exit ftp.
ftp> bye
C:\>
Technical Bulletin
PAGE: 15/15
Reissued: 15-Apr-05
Model: General RTB
Date: 15-Nov-04
No.: RGene019a
7.2 Error Code List
Error
Code
51
52
53
Description/Causes
The machine cannot be updated.
•
The machine is processing a print
job.
•
The machine is processing a scan
job.
•
The machine is receiving image data
from the network.
•
The control panel is in use.
•
The machine is sending or receiving
a fax.
•
The machine has detected a
problem corresponding to an SC
(service call) number (SC640 to
SC649, SC670 to SC679, SC691,
SC818, SC819, SC820 to SC839,
and SC990).
The file contains erroneous data.
•
The data is too large or too small.
•
The CRC (cyclic redundancy check)
value and the checksum do not
match.
•
The firmware does not match the
target machine.
•
The firmware was not completely
uploaded or is corrupt.
An error occurred while updating.
•
The machine is off.
Solutions
Check that the machine is idle, and then try
updating again.
If an SC number appears, contact your
service representative.
Download the correct file from the website,
and then try updating again.
If using a DNS server, the machine's IP
address might have been changed.
Check the IP address, and then try
updating again.
Technical Bulletin
Model: Bellini-C2
PAGE: 1/1
Date: 21-Sep-04
Subject: ROM History for SR841
No.: RB070047
Prepared by: M. Matsuda
From: 2nd Tech Support Sec. Service Support Dept.
Classification:
Troubleshooting
Part information
Action required
Mechanical
Electrical
Service manual revision
Transmit/receive
Retrofit information
Paper path
Other (
)
This is to inform you of the ROM history for the SR841 (VICTORIA-D).
ROM No
B7065105
B7065106
Main PCB No
B7065130
B7065131
Version
V1.10
V1.11
C.SUM
3208
7899
Production
1st Mass Prod.
*See below 4
B7065106
1.Symptom:
The Bellini-C2e does not detect the Plockmatic (SR90), which is connected via the Victoria-D.
2.Cause:
Some signal-control codes for communication with the Plockmatic were missing from the Victoria-D
EPROM firmware.
3.Solution:
The firmware was modified (coding error corrected).
4. *Serial numbers for Victoria-D with P/N B7065105
Model
B706-26
Serial Number
Qty.
Model
Serial Number
Qty.
From
To
K3140300001 K3140300004
4
From
5C30440001
To
5C30440012
12
5C30440014
5C30540001
5C30440040
5C30540049
27
49
K3140300005 K3140300272 268
K3140400001 K3140400354 354
Total
88
K3140500158 K3140500161
4
K3140500168
-
1
K3140500180
-
1
K3140500182
-
1
K3140500186
-
1
K3140500188
K3140500191
-
1
1
B706-17
K3140500193 K3140500230 38
Total
674
Technical Bulletin
Model: Bellini-C2
PAGE: 1/1
Date: 5-Oct-04
Subject: Patch Release for EB-105EX (1-DWZRP)
No.: RB070048
Prepared by: Chisato Tsuji
From: 2nd Tech Support Sec. Service Support Dept.
Classification:
Troubleshooting
Part information
Action required
Mechanical
Electrical
Service manual revision
Transmit/receive
Retrofit information
Paper path
Other (
)
This is a release note for a patch file for printer controller EB-105EX.
Patch File
Issue(s)
1-DWZRP
This patch corrects the following:
• CWS: When printing certain PDF files from Import Job, SC919
occurs
Important Note:
This patch file is for application to the EB-105EX System v1.01.
Patch Procedure for 1-DWZRP.ps
1. Confirm that the following patches are already installed by checking to see if it is listed
in the “Update Information” section of the configuration sheet. If it is not, apply these
patches before going on to Step 2.
!
Patches: “1-AKVJG”, “1-9ZUYT”, “1-CX7BV”, “1-D3C5T”, “1-B952E_1-BWIKW +
1-DPK09”, “1-DBI62”.
2. Download the new 1-DWZRP.ps patch listed above to the Direct queue using the
Fiery Downloader.
3. Wait at least 60 seconds.
Note: It is very important to wait at least this long before continuing.
4. Reboot the system (Fiery Menu # Shut Down # Reboot System).
5. Print out the configuration sheet once the EB-105EX has completely warmed up and
reached ready status.
6. Confirm that the 1-DWZRP.ps patch has been successfully installed by checking to see
that it is listed in the “Update Information” section of the configuration sheet.
Technical Bulletin
Model: Bellini-C2
PAGE: 1/1
Date: 5-Oct-04
Subject: Patch Release for EB-105EX (1-EG91P)
No.: RB070049
Prepared by: Chisato Tsuji
From: 2nd Tech Support Sec. Service Support Dept.
Classification:
Troubleshooting
Part information
Action required
Mechanical
Electrical
Service manual revision
Transmit/receive
Retrofit information
Paper path
Other (
)
This is a release note for a patch file for printer controller EB-105EX.
Patch File
1-EG91P
Issue(s)
This patch corrects the following:
• When repeatedly canceling jobs on CWS, SC919 happens.
Important Note:
This patch file is for application to the EB-105EX System v1.01.
Patch Procedure for 1-EG91P.ps
1. Confirm that the following patches are already installed by checking to see if it is listed
in the “Update Information” section of the configuration sheet. If it is not, apply these
patches before going on to Step 2.
!
Patches: “1-AKVJG”, “1-9ZUYT”, “1-CX7BV”, “1-D3C5T”, “1-B952E_1-BWIKW +
1-DPK09”, “1-DBI62”, “1DWZRP”.
2. Download the new 1-EG91P.ps patch listed above to the Direct queue using the Fiery
Downloader.
3. Wait at least 60 seconds.
Note: It is very important to wait at least this long before continuing.
4. Reboot the system (Fiery Menu # Shut Down # Reboot System).
5. Print out the configuration sheet once the EB-105EX has completely warmed up and
reached ready status.
6. Confirm that the 1-EG91P.ps patch has been successfully installed by checking to see
that it is listed in the “Update Information” section of the configuration sheet.
Technical Bulletin
Model: Bellini-C2
Date: 18-Oct-04
Subject: SR850, SR860 Stapler Harness Damage
PAGE: 1/2
No.: RB070050
Prepared by: M. Matsuda
From: 2nd Tech Support Sec. Service Support Dept.
Classification:
Troubleshooting
Part information
Action required
Mechanical
Electrical
Service manual revision
Transmit/receive
Retrofit information
Paper path
Other (
)
SYMPTOM
The outside of the stapler harness is damaged in the area shown in the photo. In some
cases, a short circuit occurs in the damaged area.
CAUSE
The stapler harness rubs against the finisher rear plate when the stapler unit is pulled out
or pushed in.
Technical Bulletin
Model: Bellini-C2
PAGE: 2/2
Date: 18-Oct-04
No.: RB070050
SOLUTION
Permanent Solution
The shape of the rear plate has been changed so that it does not touch the stapler
harness (the cut-in serial number is in the table below).
Action In The Field
For machines produced before the cut-in serial numbers:
Attach a piece of insulating tape to the area of the rear plate shown in the photo (red mark).
Attach the tape here
Cut-in Serial Numbers
MODEL NAME
SR860
SR850
DESTINATION
USA, Canada.
South America,
Russia, Europe,
etc.
DANKA (Infotec)
USA, Canada.
South America,
Russia, Europe,
etc.
DANKA (Infotec)
CODE
B468-57
SERIAL NO.
J4531200001
B468-66
B469-17
9R30140001
J4631200301
B469-26
8P30140001
Technical Bulletin
Model: Bellini-C2
Date: 5-Nov-04
Subject: ROM History for SR840
PAGE: 1/2
No.: RB070051
Prepared by: S. Ishizu
From: 2nd Tech Support Sec. Service Support Dept.
Classification:
Troubleshooting
Part information
Action required
Mechanical
Electrical
Service manual revision
Transmit/receive
Retrofit information
Paper path
Other (
)
This is to inform you of the ROM history for the SR840 (VICTORIA-B).
ROM No
B4785103
B4785105
B4785106
B4785107
B4785108
B4785109
B4785110
B4785111
B4785112
Main PCB No
B4785120
B4785130
B4785131
B4785132
B4785133
B4785134
B4785135
B4785136
B4785137
Version
V1.30
V1.373
V1.382
V1.41
V 1.42
V1.441
V1.464
V1.475
V1.481
C.SUM
5F58
7EE3
4684
ACC8
6AAD
97E5
3EB0
9DF0
DB62
Production
1st Mass Prod.
Nov Prod 02’
Dec Prod 02’
Dec Prod 02’
Mar Prod 03’
May Prod 03’
Aug Prod 03’
Dec Prod 03’
Apr Prod 04’
1st mass production firmware
Symptom Corrected
ROM No
B4785103
Supports the one-spot punch unit used on the SR810.
B4785105
Stapler moves past the stapling position and does not stop when printing onto 7.25 x 10.5
paper, rear/diagonal stapling.
1. Modified for use with the Bellini-C2.
Note: The 3 previous versions above can only be used with the Martini-C1.
2. Paper exit jam caused by poor paper exit stacking to the stapler tray when the
machine switches back from low to standard engine speed (from line speed 350mm/s
to 450, 500mm/s).
3. Jam occurs when the pre-stack switching solenoid does not switch back to its original
position (Off).
Finisher does not come back on line after clearing a cover feeder jam (paper removed,
condition cleared).
Machine will not begin printing due to a false tray-full condition triggered after connecting
the Plockmatic SR90 center-stapling booklet maker.
1. Exit jam when the machine receives two stapling jobs within 2 seconds of each other
with the following number of sheets, respectively: 4 or more ! 3,
3 or more ! 2.
Note: This occurs with the Bellini-C2 only when sending with the EFI controller.
2. Paper remaining in the staple tray is not detected at power on when the Plockmatic
booklet maker is installed.
1. Poor stacking sometimes occurs when printing out large stapling sets (e.g. 100 sheets)
to the shift tray using small paper sizes (e.g. A4Y).
2. Poor stacking in the staple tray due to home position error with the stacking roller.
3. Jam 29 occurs if A4T/LTT is used as the copy paper in the first job performed after
power on as well as the previous job, and the last sheet fed from the cover feeder is
A3T/DLTT.
B4785106
B4785107
B4785108
B4785109
B4785110
B4785111
Technical Bulletin
Model: Bellini-C2
Date: 5-Nov-04
PAGE: 2/2
No.: RB070051
Symptom Corrected
4. Poor stack sorting of individual N-jobs that use stapling/sorting.
5. The “Add more staples” display is not cleared even after loading new staples following
a stapler-end.
1. Paper in the stacking unit is not lined up correctly.
Conditions:
- 2 A3 originals copied to 3 sets or more in Sorting mode
- Occurs from the second sheet of the second set
ROM No
B4785112
2. The jam alert stays displayed after the operator clears a Plockmatic jam.
Cut-in Serial Numbers
ROM No
4785103
B4785105
B4785106
B4785107
B4785108
B4785109
B4785110
B4785111
B4785112
B478-17
J4920900001
J4921000551
No Production
No Production
No Production
No Production
No Production
No Production
No Production
B478-26
9P31020001
9P31120001
No Production
No Production
No Production
No Production
No Production
No Production
No Production
B478-57
No Production
No Production
No Production
J4930100001
J4930300334
J4930500393
J4930700467
J4931100067
J4940500081
B478-66
No Production
No Production
No Production
9R20130001
9R20430001
9R20630001
9R20730001
9R21230013
9R20840001
Technical Bulletin
Model: Bellini-C2
PAGE: 1/4
Date: 8-Dec-04
Subject: EB-105EX System Ver.1.2 Release
No.: RB070052
Prepared by: Chisato Tsuji
From: 2nd Tech Support Sec. Service Support Dept.
Classification:
Troubleshooting
Part information
Action required
Mechanical
Electrical
Service manual revision
Paper path
Transmit/receive
Product Safety
Other (
Retrofit information
)
EB-105EX version 1.2 has been released.
Note: See MB070043 for more details on the new system CD and the changes made.
This RTB includes the following information:
•
New features and symptoms fixed with V1.2
•
Firmware versions you need to use V1.2 with the Bellini-C2
•
Video board compatibility
•
Overview on the V1.01 to V1.2 firmware upgrade procedure
1. Major New Features of System V1.2
•
Supports the Z-folding unit
•
Multiple LPI
Selectable screen mode was added (Text/Graphic)
•
Supports PCL Job Separation.
The EB-105EX shifts the pages between jobs (at the job separation commands).
•
Supports SADF mode with LCD scanning
From V1.2, the SADF can be used with LCD scanning. When the DF finishes scanning 100 originals, you
can load more originals and continue the same job.
Note: With V.1.01, the job finished when 100 originals were scanned.
•
Supports 11.6 x 17 scanning
•
Supports Windows Server 2003
•
IP filtering
The IP Filter feature allows you to restrict connections to the EB-105EX from certain IP addresses.
You can set up filters for certain IP addresses to control their connection privileges.
•
Port blocking
IP Port Setup allows you to restrict connections over certain ports on the EB-105EX.
•
Supports PDF V.1.4/V.1.5
•
Supports MacOS 10.3
Technical Bulletin
Model: Bellini-C2
Date: 8-Dec-04
PAGE: 2/4
No.: RB070052
•
Supports Adobe PS Interpreter 3016
•
Fiery WebSpooler is not supported anymore.
Please use the Command WorkStation (Windows users) or Fiery Spooler (Macintosh users).
•
Supports Secure Print from copier
With this feature, you can add a password to the print job when you send it to the EB-105EX from the
Postscript printer driver. The job will stay in the copier until the password is input.
•
Mac Print Center Plug-ins
The Mac OS X (Native Mode) printer driver supports the following print options:
Secure Print
Group Name
Group Password
Notes
Instructions
User ID
User Code
Document Server File Name
Document Server User Name
Document Server Password
2. Improvements, Symptoms Fixed
•
•
•
•
•
•
•
•
•
•
[Fixed]: The Tray Lock Icon was not indicated on the printer panel.
[Fixed]: When the system timer is set to "UK English", the order of the time and date is incorrect
[Fixed]: When overriding the print quantity of the jobs in the Hold queue, it will start to rip again.
[Fixed]: Sometimes, during a print job, the print progress information (printed quantity i.e. "4 of 10") on the
operation panel may suddenly disappear.
[Fixed]: If the printer runs out of paper while multiple jobs are being printed, the alert may be delayed.
[Improved]: LCD scan preset feature (UI improvement)
[Improved]: The Preset feature will be added for LCD scan. This new Preset feature allows you to store
frequently used scan options and destinations into memory, and recall these settings. By using this feature, you
can reduce the number of operation steps (from 19 steps to 9 steps) compared with V.1.01.
[Improved]: The time for printing jobs to the document server has been reduced.
[Improved]: Scan margin has been reduced (32 bit boundary -> 8 bit boundary)
Patches for V.1.01 are included in this system
1-AKVJG: Refer to RTB #RB0700025
1-9ZUYT: Refer to RTB #RB0700036
1-CX7BV: Refer to RTB #RB0700042
1-D3C5T: Refer to RTB #RB0700043
1-B952E_1-BKIKW: Refer to RTB #RB0700044
1-DBI62: Refer to RTB #RB0700045a
1-DWZRP: Refer to RTB #RB0700048
1-EG91P: Refer to RTB #RB0700049
Technical Bulletin
Model: Bellini-C2
PAGE: 3/4
Date: 8-Dec-04
No.: RB070052
3. Firmware Versions Required to Use System V1.2 with the Bellini-C2
To use System V1.2, make sure to install the following firmware:
Language:
BCU:
SYSTEM:
LCDC (NA):
LCDC (EU):
NIC (NIB):
Netfile:
WebSystem:
WebDocbox:
BIOS:
Finisher SR841:
Finisher SR860:
Z-folding unit:
V.3.10 (B0705350B) or newer
V. 5.16.34 (B0705254E) or newer
V. 5.04.2 (G0705774) or newer
V. 2.18 (B0705374B) or newer
V. 2.18 (B0705375B) or newer
V.4.51 (B0705775) or newer
V.4.00 (B0705776) or newer
V.2.04 (B0705777) or newer
V.2.03 (B0705778) or newer
VK02EL002 (B0705742E) or newer
V.1.11 (B7065106) or newer
V.3.00 (B4685133) or newer
V.1.16 (B6605501) or newer
4. Video Board/System V1.2 Compatibility
The program for the FPGA (chip on the video board) was changed to 1f. As a result,
the FPGA revision and video board P/N were changed.
The FPGA was changed to enable 8-bit boundary scanning with System software
V1.2 (see the table below).
See MB070044 for details on the video board change (P/N, S/N, etc).
Important:
To use the video board with Ver1.2, make sure the FPGA revision is 1f.
You can install FPGA revision 1f with the FPGA update CD, which is included in
the “Version Up Kit.”
See the next page for an overview on how to check the FPGA version and install
FPGA revision 1f.
System Software V.1.2 does not support FPGA v01.
If you use these two together, the scanner images will be corrupted.
Video Board
Part Number
5K416002
5K416010
FPGA Revision
01
Scanning with System
Software V.1.01
32-bit boundary
1f
32-bit boundary
Scanning with System
Software V.1.2
Not supported
(corrupted scanner
images)
8-bit boundary
Technical Bulletin
Model: Bellini-C2
Date: 8-Dec-04
PAGE: 4/4
No.: RB070052
4. Overview of the V1.01 to V1.2 System Upgrade Procedure
1) Check the contents of the kit.
-
User Software CD-ROM V1.2.1
PCL driver CD-ROM V2.00
Document CD-ROM V1.20
Release Note
*System Software CD-ROM V1.2.0
*FPGA Update Patch Rev. 1f CD-ROM
Version-Up Instructions
[G3536671C]
[G3536691D]
[G3536681D]
[G3536731B]
[G3536981A]
[G3538921]
[G3538911]
Note* These CDs should be used by service personnel only.
2) Follow the “Version-UP Instructions” and update the System software to V1.2.
3) Print a configuration sheet and check the FPGA revision. If the FPGA revision is 01,
apply the FPGA update patch. (Follow the “Version-Up Instructions” for details)
4) Give the following items to the customer or site administrator.
-
User Software CD-ROM V1.2.1
PCL driver CD-ROM V2.00
Document CD-ROM V1.20
Release Note
[G3536671C]
[G3536691D]
[G3536681D]
[G3536731B]
5) Instruct the customer to do the following:
1) Uninstall the old drivers and utilities on their client PCs
2) Install the new drivers and utilities on their client PCs
Note: See the User Addendum for more details on the new features of System V1.2. The
User Addendum is included in the User Software CD-ROM.
Technical Bulletin
Model: Bellini-C2
PAGE: 1/2
Date: 9-Dec-04
Subject: Boot SD Card for Bellini-C2
No.: RB070053
Prepared by: M. Matsuda
From: 2nd Tech Support Sec. Service Support Dept.
Classification:
Troubleshooting
Part information
Action required
Mechanical
Electrical
Service manual revision
Transmit/receive
Retrofit information
Paper path
Other (
)
THE BELLINI-C2 BOOT SD C ARD
A boot SD card was released as a service tool for the Bellini-C2 (P/N B6456080). This
RTB explains the background and important notes for when you use this card in the field.
Background
Up until now, if the boot area on the controller board is damaged (see Important), the
machine cannot boot up and the controller board must be replaced. The boot SD card
was developed as a solution to this.
Important: Make sure NOT to turn the main power OFF during a firmware update,
because this is what damages the boot area.
What you can do with the boot SD card
You can use the boot SD card to boot up the machine if the boot area on the
controller board is damaged. You do not have to replace the controller board.
In most cases, you only need to do this once. After that, the machine can boot
up without the boot SD card.
This will increase both machine uptime and service efficiency.
Note: Keep in mind that this boot SD card does not solve every kind of boot-up failure.
How to use the boot SD card
1. Insert the boot SD card into the C1 slot.
2. Turn controller board DIP SW4 #2 and #6 ON (lower position).
Note: DIP SW4 #2 is usually ON (lower position).
3. Turn the main power ON.
Note: After the machine boots up, it will install the firmware stored on the boot SD
card. This firmware is the newest B-C2 a/b version (not the enhanced version).
4. Turn the main power OFF.
5. Remove the boot SD card from the C1 slot.
Technical Bulletin
Model: Bellini-C2
Date: 9-Dec-04
PAGE: 2/2
No.: RB070053
6. Return the DIP SW4 #6 to the upper position.
7. Install the newest B-C2 enhanced firmware.
Note: See RTB #RB070039 for details on the B-C2e.
Important Notes
1. DO NOT delete or move the files stored on the boot SD card.
These files are written to the boot SD card by a special factory device.
If the files are changed in any way (deleted, moved, copied, etc):
1) The illegally copied SD card will not work, and
2) Ricoh cannot guarantee the original SD card anymore.
2. Boot SD card #B6456080 only works on the Bellini-C2 only.
P/N, Other Details
Part Number: B6456080
Description: Boot SD Card Type2105
Note: The label in this photo is attached to the boot SD card.
Technical Bulletin
Model: Bellini-C2
PAGE: 1/1
Date: 16-Dec-04
Subject: Patch Release for EB-105EX V.1.2 (1-FY60I)
No.: RB070054
Prepared by: Chisato Tsuji
From: 2nd Tech Support Sec. Service Support Dept.
Classification:
Troubleshooting
Mechanical
Paper path
Other (
Part information
Electrical
Transmit/receive
Action required
Service manual revision
Retrofit information
)
This RTB is the release note for Patch File 1-FY60I for EB-105EX printer controller System
V1.2.
Patch File
1-FY60I
Issue(s)
WebTools 4.6.60/WebScan 1.1.42:
Cannot retrieve multi-page tiff scanning jobs (the "All" option is grayed-out).
Note: The temporary workaround was to use Fiery Remote Scan to retrieve
multi-page tiff jobs.
Note: This patch is only for EB-105EX System Version 1.2.
Patch Update Procedure
1. Use the Fiery Downloader to download the patch file (1-FY60I.ps) to the Direct queue.
2. Wait at least 60 seconds.
Note: This is very important.
3. Reboot the EB-105EX.
“Fiery” menu
“Shut Down”
“Reboot System”
4. Wait until “EB-105EX” is displayed on the EB-105EX LCD panel.
5. Reboot the EB-105EX again.
Note: This step is necessary to apply the new patch.
6. Wait until “EB-105EX” is displayed on the EB-105EX LCD panel.
7. Print out the Configuration Sheet.
8. Make sure that patch number 1-FY60I is listed in the “Update Information” section of the
Configuration Sheet.
Technical Bulletin
Model: Bellini-C2
PAGE: 1/1
Date: 16-Dec-04
Subject: Patch Release for EB-105EX V.1.2 (1-FH7LW)
No.: RB070055
Prepared by: Chisato Tsuji
From: 2nd Tech Support Sec. Service Support Dept.
Classification:
Troubleshooting
Part information
Action required
Mechanical
Electrical
Service manual revision
Transmit/receive
Retrofit information
Paper path
Other (
)
This RTB is the release note for Patch File 1-FW7LW for EB-105EX printer controller
System V1.2.
Patch File
1-FH7LW
Issue(s)
Fiery cannot find an AppleTalk zone in an AppleTalk network with a very
large network number range.
Note: This patch is only for EB-105EX System Version 1.2.
Patch Update Procedure
1. Use the Fiery Downloader to download the patch file (1-FH7LW.ps) to the Direct queue.
2. Wait at least 60 seconds.
Note: This is very important.
3. Reboot the EB-105EX.
“Fiery” menu
“Shut Down”
“Reboot System”
4. Wait until “EB-105EX” is displayed on the EB-105EX LCD panel.
5. Reboot the EB-105EX again.
Note: This step is necessary to apply the new patch.
6. Wait until “EB-105EX” is displayed on the EB-105EX LCD panel.
7. Print out the Configuration Sheet.
8. Make sure that patch number 1-FH7LW is listed in the “Update Information” section of
the Configuration Sheet.
Technical Bulletin
Model: Bellini-C2
PAGE: 1/1
Date: 7-Jan-05
Subject: Patch Release for EB-105EX V.1.2 (1-GRRLM)
No.: RB070056
Prepared by: Chisato Tsuji
From: 2nd Tech Support Sec. Service Support Dept.
Classification:
Troubleshooting
Part information
Action required
Mechanical
Electrical
Service manual revision
Transmit/receive
Retrofit information
Paper path
Other (
)
This RTB is the release note for Patch File 1-GRRLM for EB-105EX printer controller
System V1.2.
Patch File
1-GRRLM
Issue(s)
Every sheet is offset when a job is printed using the tab setting.
Note: This patch is only for EB-105EX System Version 1.2.
Please make sure that the patch “1-FY60I” has already been applied to System V.1.2
before installing this new patch.
Patch Update Procedure
1. Use the Fiery Downloader to download the patch file (1-GRRLM.ps) to the Direct
queue.
2. Wait at least 60 seconds.
Note: This is very important.
3. Reboot the EB-105EX.
“Fiery” menu
“Shut Down”
“Reboot System”
4. Wait until “EB-105EX” is displayed on the EB-105EX LCD panel.
5. Reboot the EB-105EX again.
Note: This step is necessary to apply the new patch.
6. Wait until “EB-105EX” is displayed on the EB-105EX LCD panel.
7. Print out the Configuration Sheet.
8. Make sure that patch number 1-GRRLM is listed in the “Update Information” section of
the Configuration Sheet.
Technical Bulletin
Model: Bellini-C2
PAGE: 1/1
Date: 7-Jan-05
Subject: Patch Release for EB-105EX V.1.2 (1-GYWYK)
No.: RB070057
Prepared by: Chisato Tsuji
From: 2nd Tech Support Sec. Service Support Dept.
Classification:
Troubleshooting
Part information
Action required
Mechanical
Electrical
Service manual revision
Transmit/receive
Retrofit information
Paper path
Other (
)
This RTB is the release note for Patch File 1-GYWYK for EB-105EX printer controller
System V1.2.
Patch File
1-GYWYK
Issue(s)
When doing Rip & Hold for some multiple copy data to print, the
printing process never completes.
Note: This patch is only for EB-105EX System Version 1.2.
Please make sure that patches “1-FY60I” and “1-GRRLM” have already been applied to
System V.1.2 before installing this new patch.
Patch Update Procedure
1. Use the Fiery Downloader to download the patch file (1-GYWYK.ps) to the Direct
queue.
2. Wait at least 60 seconds.
Note: This is very important.
3. Reboot the EB-105EX.
“Fiery” menu
“Shut Down”
“Reboot System”
4. Wait until “EB-105EX” is displayed on the EB-105EX LCD panel.
5. Reboot the EB-105EX again.
Note: This step is necessary to apply the new patch.
6. Wait until “EB-105EX” is displayed on the EB-105EX LCD panel.
7. Print out the Configuration Sheet.
8. Make sure that patch number 1-GYWYK is listed in the “Update Information” section of
the Configuration Sheet.
Technical Bulletin
Model: Martini-C2
PAGE: 1/1
Date: 6-Jan-05
Subject: Information on using the finishers with MT-C2
No.: RB140024
Prepared by: S. Watanabe
From: 2nd Tech Support Sec. Service Support Dept.
Classification:
Troubleshooting
Part information
Action required
Mechanical
Electrical
Service manual revision
Paper path
Transmit/receive
Product Safety
Other (
Retrofit information
)
Important Note on using the finishers with MT-C2 models
The table below shows the finishers that can be used with the MT-C2.
Model
MT-C2
Yes
(*2)
N/A
Model
MT-C1
Yes
Model
B-C2E
N/A
Yes
N/A
N/A
Yes
B468
Yes
(*3)
N/A
Yes
B674
Yes
Yes
Yes
(*4)
N/A
Yes
(With
SR861)
N/A
B660
Items
Code
3,000 sheets Finisher with
50 sheets stapler (SR850) (*1)
3,000 sheets Finisher with
100 sheets stapler (SR840)
3,000 sheets Finisher with
100 sheets stapler (SR841)
3,000 sheets Booklet Finisher with
50 sheets stapler (SR860)
3,000 sheets Booklet Finisher with
50 sheets stapler (SR861) (*1)
B469
Z-folding unit
B478
B706
Yes
(With
SR841)
Yes: Can be attached to this machine.
N/A: Cannot be attached to this machine.
(*1) Compatible Finisher for MT-C1 and MT-C2
(*2) SR850 Finishers produced from January 2004 support the print speed of the
MT-C2a (51cpm) and MT-C2b (60cpm). (Please refer to RTB #RB140022.)
(*3) SR841 Finishers produced from August 2004 support the print speed of the
MT-C2a (51cpm) and MT-C2b (60cpm). (Please refer to RTB #RB140014.)
(*4) Can be attached to the 90cpm model.
Technical Bulletin
Model: Bellini-C2
PAGE: 1/1
Date: 25-Mar-05
Subject: Patch Release for EB-105EX V.1.2 (1-HG4WZ)
No.: RB070058
Prepared by: Chisato Tsuji
From: 2nd Tech Support Sec. Service Support Dept.
Classification:
Troubleshooting
Part information
Action required
Mechanical
Electrical
Service manual revision
Transmit/receive
Retrofit information
Paper path
Other (
)
This RTB is the release note for Patch File 1-HG4WZ for EB-105EX printer controller
System V1.2.
Patch File
1-HG4WZ
Issue(s)
This patch uses the linearization curve (gamma curve) from System
V1.01.
Important Note
Use this patch only when:
1) The machine was upgraded directly from System V1.01 to V1.2,
AND
2) The customer says they like the image quality of V1.01 better than
that of V1.2.
Note: This patch is only for EB-105EX System Version 1.2.
Patch Update Procedure
1. Use the Fiery Downloader to download the patch file (1-HG4WZ.ps) to the Direct
queue.
2. Wait at least 60 seconds.
Note: This is very important.
3. Reboot the EB-105EX.
“Fiery” menu
“Shut Down”
“Reboot System”
4. Wait until “EB-105EX” is displayed on the EB-105EX LCD panel.
5. Reboot the EB-105EX again.
Note: This step is necessary to apply the new patch.
6. Wait until “EB-105EX” is displayed on the EB-105EX LCD panel.
7. Print out the Configuration Sheet.
8. Make sure that patch number 1-HG4WZ is listed in the “Update Information” section of
the Configuration Sheet.
Technical Bulletin
Model: Bellini-C2
PAGE: 1/3
Date: 15-Apr-05
Subject: Printer Bit Switch Information
No.: RB070059
Prepared by: M. Matsuda
From: 2nd Tech Support Sec. Service Support Dept.
Classification:
Troubleshooting
Part information
Action required
Mechanical
Electrical
Service manual revision
Paper path
Transmit/receive
Product Safety
Other (
Retrofit information
)
Service Manual Revision
The following printer bit switches were added to the Service Manual.
Note: The software already contains these switches. They were missing from the manual.
Printer SP Mode
Bit
76543210
Initial
Setting
00000000
SP
1001
Number/Bit
Bit Switch
001
Bit 0
Bit 1
Bit 2
Bit 3
Bit 4
002
Bit 5
Bit 6
Bit 7
Bit 0
Bit 1
Bit 2
Function
DFU
DFU
DFU
DFU
Enables/Disables Service Tool
Note: Currently, the only service tool is card
save.
0: Disables service tool (card save)
1: Enables service tool (card save)
DFU
DFU
DFU
DFU
DFU
Toggles between collate types Shift and
Normal. (Sets the PJL JOBOFFSET variable to
SHIFT or NORMAL)
0: SHIFT (shift collate)
1: Normal
Technical Bulletin
Model: Bellini-C2
SP
Date: 15-Apr-05
Number/Bit
Bit 3
003
004
005
Bit 4
Bit 5
Bit 6
Bit 7
Bit 0
Bit 1
Bit 2
PAGE: 2/3
No.: RB070059
Function
Enables/Disables PDL switching (mid-job).
0: ON (Allows PDL switching)
1: OFF (Forbids PDL switching)
DFU
DFU
DFU
DFU
DFU
DFU
Toggles the minimum value of the x coordinate
(left margin) between 0 and 1. This is mainly
used for compatibility with HP4000/HP8000.
0: OFF (Conventional spec. Left margin starts
at x = 0)
1: ON (Left margin starts at x = 1)
Bit 3
Changes the number of pen widths that can be
used for HPGL/2. (Only for PCL5e)
0: MFP default
1: 256 pen
Bit 4
Can be used to make the Use Tray Selection
feature the same as HP/Previous GW models.
(Only for PCL5e)
0= Current spec
1= Like HP/Previous GW models.
Bit 5
Bit 6
Bit 7
Bit 0
Bit 1
Bit 2
Bit 3
Bit 4
Bit 5
Bit 6
Bit 7
Bit 0
DFU
DFU
DFU
DFU
DFU
DFU
DFU
DFU
DFU
DFU
DFU
Bit 1
Bit 2
Bit 3
Bit 4
Bit 5
Enables/Disables the setting of the Collate,
Staple and Punch features from the MFP
operation panel.
0: Disabled
1: Enabled
DFU
DFU
DFU
DFU
DFU
Technical Bulletin
Model: Bellini-C2
SP
Number/Bit
Bit 6
Bit 7
006
Bit 0
Bit 1
Bit 2
Bit 3
Bit 4
Bit 5
Bit 6
Bit 7
007
Bit 0
Bit 1
Bit 2
Bit 3
Bit 4
Bit 5
Bit 6
Bit 7
Bit 0
008
Bit 1
Bit 2
Bit 3
Bit 4
Bit 5
Bit 6
Bit 7
Date: 15-Apr-05
Function
DFU
DFU
DFU
DFU
DFU
DFU
DFU
DFU
DFU
DFU
DFU
DFU
DFU
DFU
DFU
DFU
DFU
DFU
DFU
DFU
DFU
DFU
DFU
DFU
DFU
DFU
PAGE: 3/3
No.: RB070059
Technical Bulletin
Model: Bellini-C2
PAGE: 1/1
Date: 04-Aug-06
RTB Reissue
The items in bold italics have been added.
Subject: Firmware History (Bellini-C2 Printer)
No.: RB070020a
Prepared by: S.Ishizu
From: Technical Services sec. Service Planning Dept.
Classification:
Troubleshooting
Part information
Action required
Mechanical
Electrical
Service manual revision
Paper path
Transmit/receive
Retrofit information
Other (
)
This is to inform you of the firmware history for the Bellini-C2 Printer.
B5806415
B5806515
A
B5806516
B5806516A
Version
V1.00
V1.13
V1.20
V2.07
V2.09
C.SUM
2D42
BA55
AE88
Production
1st Mass Prod.
April Prod 03’
July Prod 03’
April Prod 04’
Jul Prod 06’
Symptom Corrected
1.
0 counter
Suffix
B5806515
2. SMTP Authentication
Note: For details, refer RTB RB070003
1.
2.
3.
Only the first duplex command is interpreted correctly when printing PCL files containing
simplex, duplex (short) and duplex (long) commands (GFPR #RC03020001).
Downloaded PCL barcode fonts are not printed correctly on the PCL font list (GFPR
#RC03010004).
Merged PCL job does not print (TechMail #TS030100).
A
The machine prints out 99 copies of a 1-page document set for 300 copies when the driver is
at standard settings (GFPR #RC03050014, RE03050021).
IMPORTANT NOTE: Refer to RTB RB070039 at the firmware installation
1.
1.
2.
3.
4.
Firmware modified for upgrade to the Bellini-C2e (enhanced version) by supporting use
with the Z-fold unit and Victoria-D (B706).
The "Clear/Stop" button can cancel print jobs like the "Job Reset"button.
Printer settings can be configured from either the operation panel or WIM.
Configuration of printer settings via WIM requires both Printer firmware Ver 2.09
(Part#B1805958C) or later and Websys firmware Ver 2.05 (Part#B0705777A) or
later.
The page counters of some jobs may be incorrect in the Job History section of
WIM. This only affects duplex jobs that have 9 or more pages processed in the
MFP at one time. The problem affects any utilities (not only WIM) that queries the
MFP for the page counter of a job via MIB or the PJL USTATUS PAGE command.
Acrobat jobs sent to the Document server via the RPCS driver with a "Job Load
Distribution" setting of "Automatic" or "Shift load to printer", might have vertical
blank stripes of data missing from the image. Only Adobe Acrobat version 5.x is
affected.
B5806516
B5806516A
Technical Bulletin
Model: Bellini-C2
PAGE: 1/4
Date: 10-Aug-06
RTB Reissue
The items in bold italics have been changed.
Subject: Firmware History (Bellini-C2 System)
No.: RB070060
Prepared by: S.Ishizu
From: 2nd Tech Support Sec. Service Support Dept.
Classification:
Troubleshooting
Part information
Action required
Mechanical
Electrical
Service manual revision
Paper path
Transmit/receive
Retrofit information
Other (
)
This is to inform you of the firmware history for the Bellini-C2 System.
System
Version
B0705734
A
B
B0705754
A
B
C
D
E
B0705774
A
B
C
D
System
Version
D
B
Program No.
V1.02.1
V1.04.2
V1.04.4
V2.12.7
V3.04.1
V4.01.4
V4.02.1
V.4.03.3
V.4.04.1
V5.04.2
V5.05
V.5.05.3
V.5.06
V5.07
Effective Date
1st Mass Prod.
February Prod 03’
March Prod 03’
April Prod 03’
May Prod 03’
June Prod 03’
July Prod 03’
Sep Prod 03’
Nov Prod 03’
March Prod 04’
December Prod 04’
April Prod 05’
August Prod 05’
August Prod 06’
Symptom Corrected
Symptom corrected:
1. Part of the image is missing on the printout after the image is scanned and
rotated.
2. If a jam occurs after continuous jobs are sent from an external controller,
the jam condition cannot be cleared by pressing the Continue button.
3. When using Copy Connection, some sheets are printed out from the sub
machine in the wrong order.
Conditions: Double copy + Sort + Page number printing
4. When using Copy Connection, some sheets from the previous job are
printed out by the sub machine.
1. SC672 (controller start-up error).
2. NetWare printing error: Machine will not accept print jobs after a certain amount
have been sent via NetWare.
Technical Bulletin
Model: Bellini-C2
Date: 10-Aug-06
Version
PAGE: 2/4
No.: RB70060
Symptom Corrected
3. Words missing (French/Spanish): Some words not displayed in French (missing
from wording lists).
4. Slow printing speed with Standard TCP/IP port.
IMPORTANT: To ensure the above symptoms do not occur, it is also necessary to
update to the following firmware versions or newer:
l BIOS: B0705742D: K02EL00O
l NIC: B0705735B: V.4.03
l LCDC: B0705371B (NA): V.2.07
B0705372B (EU): V.2.07
B0705754
l Note: For details, refer to RTB RB070001.Printer Document Server.
1. Supports 0-counter change
2. Supports SMTP Authentication
Note: For details, refer to RTB RB070003
A
1. Modified for use with Copy Connector Kit.
2. SC997/SC998 occurs with frequent use of New Job.
3. The Printer function is given priority when the Copier is set as the priority
function.
4. Modified to further minimize multifeeds for certain paper types.
5. Paper is stacked in shift tray 2 when center stapling is disabled and the job
B
resumed following a center staple End condition.
Modified for use with the MLB option (File Format Converter).
New default value for SP5-836-098 (Back Projection Removal): 1
“Please Wait” display does not clear when turning the power ON after installing a
new HDD.
4. “Please Wait” display does not clear during warm-up.
5. Key sound and subsequent screen change for Designate key is slow.
6. Incorrect PM interval: cleaning blade, cleaning brush, feed roller, fusing roller
cleaning felt (EU).
7. If the finisher tray reaches capacity at the completion of a New Job, the next New
Job in the queue will not start, even when the copies are removed from the tray.
8. New Jobs cannot be programmed up to specification maximum on either the
main or sub Copy Connection machines.
9. It was possible to clear SC861 (HDD failure) with the operation switch.
10. Copy Connection: Job may not be performed correctly if initiated while the sub
machine is in Night Mode.
11. SC818 sometimes occurs on one Copy Connection machine if the power is
turned off on the other machine while both contain New Jobs filled up to
capacity.
12. Thumbnails are not created for some files when storing/capturing 2500 Printer
files into the Document Server at once.
13. SC995 sometimes occurs with large-volume printer jobs or when the machine
receives simultaneous job requests from multiple machine functions.
1.
2.
3.
Technical Bulletin
Model: Bellini-C2
Version
Date: 10-Aug-06
PAGE: 3/4
No.: RB70060
Symptom Corrected
14. Image is not printed out correctly if Interrupt Copy is used while printing out a
Document Server file.
C
D
E
B0705774
Specification change:
Estimated job completion times added to New Job table for the Printer function.
1.
Modified for use with the EB-105EX controller (EFI).
2.
Error in storing debug log data when the function is set for engine log storage
(2224) of paper jams.
1.
Modified for simultaneous use of the EB-105EX with Desk Top Editor for
Production.
2.
The image is sometimes positioned incorrectly when printing a file from the
Document Server to custom-sized paper using Double Copies and
Centering/Cornering.
3.
32k bytes of a scanned image is sometimes lost on the trailing edge.
4.
The image is sometimes printed in the wrong orientation when Reserve Job is
set to “Previous Job” and the paper type for the selected tray is set to “Tab
Stock”.
5.
The “Please Wait” display does not clear if the HDD installed is defective.
6.
SC819 sometimes occurs with Copier Connector mode.
7.
1200dpi image data sometimes does not appear correctly after being
transferred from the MFP hard drive to Desk Top Editor for Production (or
vice-versa).IMPORTANT: To ensure the above do not occur, it is also
necessary to update to the following firmware versions or newer:
Netfile V.3.08 (B0705756D)
1.
Modified for use of the EB-105EX in combination with Desk Top Editor for
Production.
2.
SC955 may occur when printing out a Document Server file from the
operation panel in Magazine mode if the file 1) contains blank page(s), and 2)
was originally stored to the Document Server via a GW controller.
3.
SC672 may occur on units with an MLB installed when storing a file
containing blank page(s) to the Document Sever via a GW controller.
4.
When retrieving a stored copier document at the same time as sending a print
job, an SC955 error occurs.
5.
Sometimes, JPEG 2000 images cannot be retrieved by the Desk Top Editor
for Production from the MFP HDD.
6.
The EB-105EX stalls if turned Off/On more than 100 times while the BelliniC2 main power is on (memory control related).
IMPORTANT: To ensure the above do not occur, it is also necessary to
update to the following firmware versions or newer:
Netfile V.3.09 (B0705756E)
IMPORTANT NOTE: Refer to RTB RB070039 at the firmware installation
1.
2.
3.
4.
Firmware modified for upgrade to the Bellini-C2e (enhanced version) by
supporting use with the Z-fold unit and Victoria-D (B076).
The number of holes for Punching returns to its default when the Plockmatic
Booklet Maker is connected.
New SP added: SP2115-007 (details: see RTB #RB070038).
Documents stored in the HDD and other data such as Address Book entries
are sometimes deleted at main power off if a new HDD is installed and then
Technical Bulletin
Model: Bellini-C2
Version
No.: RB70060
Symptom Corrected
5.
6.
A
Date: 10-Aug-06
PAGE: 4/4
1.
2.
3.
4.
5.
used without performing SP5832-001 (HDD Initialization).
SC819 sometimes occurs when a defective HDD sector is detected.
SC818 sometimes occurs when a relatively large print job is sent via a USB
connection.
The pre-set (new) job sometimes does not start when the Reverse Job
Setting is set to “Previous Job.” (Note: This setting is in Copier/Document
Server Features in UP mode).
The Key Counter is not enabled when the operation switch is turned Off/On.
The machine cannot make the booklet on Print jobs when the Plockmatic
(SR90) is installed.
Part of the image is cut off if: 1) Palm2 captures the image from the document
server, and 2) the image was enlarged when it was saved from the EFI
controller.
SC990 occurs when the operator prints out a Document Server file that is
over 120 pages with Designated Copy/Print.
Technical Bulletin
Model: Bellini-C2
Date: 6-Sep-06
Subject: Waste Toner Clogging
PAGE: 1/2
No.: RB070061
Prepared by: M.Matsuda
From: 2nd Tech Support Sec. Service Support Dept.
Classification:
Troubleshooting
Part information
Action required
Mechanical
Electrical
Service manual revision
Paper path
Transmit/receive
Retrofit information
Other (
)
Important Notes on Preventing Waste Toner Clogging
1. The next time you remove the development unit from the machine for maintenance,
make sure the drive gears are engaged correctly.
CORRECT
Incorrect
Note: If the drive gears are engaged correctly, the end of the coil will be in the position
shown by the red circle in the photo below.
Technical Bulletin
Model: Bellini-C2
Date: 6-Sep-06
PAGE: 2/2
No.: RB070061
2. If you replace the toner transport coil (P/N A2943619), make sure to install the new coil
and upper case (P/N B0703636; #41 below) together as a set.
Note: To ensure that the gears engage correctly, a spacer was added to the right edge of
the coil from February 2004 production. There was no service P/N change, but all coils in
stock at SPC are the new ones.
NEW
OLD
Technical Bulletin
Model: Bellini-C2
PAGE: 1/3
Date: 28-Dec-06
No.: RB070062
Subject: Patch Release for EB-105EX V.1.2 (Composite01) Prepared by: Chisato Tsuji
From: 2nd Tech Support Sec. Service Support Dept.
Classification:
Troubleshooting
Part information
Action required
Mechanical
Paper path
Electrical
Transmit/receive
Service manual revision
Retrofit information
Other (
)
This RTB is the release note for Composite Patch for EB-105EX printer controller System
V1.2.
1. Explanation about composite patch
1-1. About the set of composite patches.
G3538981.exe is a set of composite patches for EB-105EX, which consists of 3 patches
l 1-HASH8.ps
l 1-LV4GA.ps
l 1-N69ZD.ps
They should be used on EB-105EX system version 1.2.0.
[ 1-HASH8.ps ]
This is a patch, which will update the FPGA chip revision to Rev.20.
The FPGA chip should be updated to Rev.20 before applying the 1-LV4GA.ps.
If the FPGA chip revision is already Rev.20, then this patch is not needed.
[ 1-LV4GA.ps ]
This is a composite patch.
[ 1-N69ZD.ps ]
This is a patch, which will fix a bug in 1-LV4GA.ps
So, this patch should be applied after 1-LV4GA.ps.
1-2. What is fixed with the composite patch.
The following patches are actually included in the composite patch (1-LV4GA.ps)
1-FY60I WebTools 4.6.60/WebScan 1.1.42:Cannot retrieve multi-page tiff scanning jobs (the
"All" option is grayed-out).
1-GRRLM Every sheet is offset when a job is printed using the tab setting.
1-GYWYK When you Rip & Hold some multiple copy data to print, the printing process is never
completed
1-I3MIN When you print a job on Laser Soft (UNIX print Server) via PCL, SC919 happens.
1-HQ1N0 Archived job locks up printer queue, SC919 code result
1-HFWNQ The printing process is stopped after jam releasing
1-IN04O Some PCL media type commands do not work.
1-IKXIN When sending a specific PCL file, SC919 may happen.
1-JF30J When printing multiple copies of a job that uses the Interposer, sometimes some
pages are missing.
1-JF306 When repeating steps to add/delete Mixed Media settings to a job on CWS,
incorrect settings appear.
1-JDQ0D When you do overlay printing via W-ELP (software), SC919 happens.
Technical Bulletin
Model: Bellini-C2
Date: 28-Dec-06
PAGE: 2/3
No.: RB070062
1-IP6WX SC955 happens during jam recovery (Jam Code 011 and 013)
1-JRSHP With a Full Bleed size job with Acrobat, the Z-folding setting will be released.
1-HQ1NJ While printing an extremely large file, when cancelling the current job and then
cancelling the waiting jobs, the controller may freeze.
1-JWQIP When send a data that has page overlay, some areas will be not printed.
1-IS6Q4 When you do Rip&Hold a job that has MixedMedia setting on CWS, and change the
setting at Job Properties, the job will be re-ripped.
1-HT9WR Patch to improve performance when sending multiple jobs with alternating tray
selections.
1-IMA7U When you print imported PDF data with duplex printing, the resolution becomes
300DPI.
1-HYSO9 When you print an accumulated B5 Full size data, black line will be printed.
--------------------------------------------------------------------------The following patches, which are currently used at a very limited number of customers, are not included in
the composite patch (1-LV4GA.ps)
If any of these patches are already installed at the customer site, the effectiveness of the patch will remain
even if the composite patch is installed. You can also apply any of these patches after applying the
composite patch.
1-FH7LW EB-105EX cannot find an AppleTalk zone in an AppleTalk network with a very large
network number range.
1-HG4WZ This patch uses the linearization curve (gamma curve) from System V1.01.
1-HH8ZU This patch was prepared for feature request to support overriding the number of
copies for a booklet marker job.
2. Installation Procedure
0. Before applying the composite patch:
0-1. Please update the Bellini-C2 engine firmware and system (GW) firmware to the latest version.
0-2. If the system software at the customer site seems to be corrupted, re-install the system software first.
0-3. Please note that the following patches can be overwritten by the composite patch (1-LV4GA.ps)
without harm.
1-FY60I,1-GRRLM,1-GYWYK,1-I3MIN,1-HQ1N0,1-HFWNQ,1-IN04O,1-IKXIN,1-JF30J,1-JF306,
1-JDQ0D,1-IP6WX,1-JRSHP,1-HQ1NJ,1-JWQIP,1-IS6Q4,1-HT9WR,1-IMA7U,1-HYSO9, 1-HH8ZU,
1-FH7LW, 1-HG4WZ
Note: If any other patch, which is not listed above, is already installed in the controller, then the
system software should be re-installed before applying the composite patch.
0-4. Double click the G3538981.exe file and get the following 3 files:
1-HASH8.ps
1-LV4GA.ps
1-N69ZD.ps
------------------------------------------------------------------------------------------------1. Make sure to apply the patches in the following order.
1. 1-HASH8.ps
2. 1-LV4GA.ps
3. 1-N69ZD.ps
Technical Bulletin
Model: Bellini-C2
Date: 28-Dec-06
PAGE: 3/3
No.: RB070062
Read carefully the installation instructions for each patch as written below:
================================================================================
1-HASH8 (A patch which will update the FPGA revision to Rev.20)
Printing out the configuration sheet of EB-105EX can check the FPGA revision number.
If the revision number is under 20 or if you are not aware of the FPGA revison number, apply the 1-HASH8
patch first as follows:
1. Import the patch file "1-HASH8.ps" with CommandWorkstation to the "Direct" queue.
2. Reboot the EB-105EX.
3. FPGA upgrade will take place and "FPGA upgrading. Please wait..."will be displayed on the server LCD.
4. After about 14 min, "It is now safe to power off" will be displayed on the server LCD.
5. Power OFF then ON the EB-105EX.
6. Print out the configuration sheet. Verify FPGA version = Rev 20 on the configuration sheet.
-----------------------------------------------------------------------------------------1-LV4GA (Composite Patch)
1. Print out the configuration sheet and make sure that the FPGA version is Rev 20.
2. Import the patch file "1-LV4GA.ps" with CommandWorkstation to the "Direct" queue.
3. Wait at least 60 seconds. (This is very important.)
4. Select "Shut Down" and then "Reboot System" on the operation panel, or execute a soft reboot from
CommandWorkstation.
5. Wait until the EB-105EX has come to idle.
6. Print out the configuration sheet. Verify the Update Information section on the configuration sheet.
It should show the patch number "1-LV4GA".
-----------------------------------------------------------------------------------------1-N69ZD (A patch which fixes the bug in the Composite Patch)
1. Import the patch file "1-N69ZD.ps" with CommandWorkstation to the "Direct" queue.
2. Wait at least 60 seconds. (This is very important.)
3. Select "Shut Down" and then "Reboot System" on the operation panel, or execute a soft reboot from
CommandWorkstation.
4. Wait until the EB-105EX has come to idle.
5. Print out the configuration sheet. Verify the Update Information section on the configuration sheet.
It should show the patch number "1-N69ZD".
------------------------------------------------------------------------------------------
Technical Bulletin
Model: Bellini-C2
PAGE: 1/2
Date: 28-Dec-06
Subject: Patch Release for EB-105EX V.1.2 (1-N522T)
No.: RB070063
Prepared by: Chisato Tsuji
From: 2nd Tech Support Sec. Service Support Dept.
Classification:
Troubleshooting
Part information
Action required
Mechanical
Paper path
Electrical
Transmit/receive
Service manual revision
Retrofit information
Other (
)
This RTB is the release note for Patch File 1-N522T for EB-105EX printer controller
System V1.2.
Patch File
1-N522T
Issue(s)
1) During a large print job, a blank page is inserted in the job if the
paper is fed from multiple trays due to an out-of-paper condition.
Note:
l
This patch is only for EB-105EX System Version 1.2.
Prerequisite(s):
l
Before this patch is applied, the following patches should already be applied on the
system in the following order.
1-HASH8.ps (If the FPGA revision is already 20, then this patch is not needed)
1-LV4GA.ps
1-N69ZD.ps
Patch Update Procedure
1. Print out the configuration page and check that the prerequisite patches are already
installed on the system software v.1.2.0.
(If not, install the prerequisite patches first.)
2. Extract G3538982.exe until you get the 1-N522T.ps file.
3. Use the Fiery Downloader to download the patch file (1-N522T.ps) to the Direct queue.
4. Wait at least 60 seconds.
Note: This is very important.
5. Reboot the EB-105EX.
l
“Fiery” menu à “Shut Down” à “Reboot System”
6. Wait until “EB-105EX” is displayed on the EB-105EX LCD panel.
7. Reboot the EB-105EX again.
Note: This step is necessary to apply the new patch.
8. Wait until “EB-105EX” is displayed on the EB-105EX LCD panel.
Technical Bulletin
Model: Bellini-C2
Date: 28-Dec-06
PAGE: 2/2
No.: RB070063
9. Print out the Configuration Sheet.
10. Make sure that patch number 1-N522T is listed in the “Update Information” section of
the Configuration Sheet.
Technical Bulletin
Model: Bellini-C2
PAGE: 1/2
Date: 28-Dec-06
Subject: Patch Release for EB-105EX V.1.2 (1-OT69U)
No.: RB070064
Prepared by: Chisato Tsuji
From: 2nd Tech Support Sec. Service Support Dept.
Classification:
Troubleshooting
Part information
Action required
Mechanical
Paper path
Electrical
Transmit/receive
Service manual revision
Retrofit information
Other (
)
This RTB is the release note for Patch File 1-OT69U for EB-105EX printer controller
System V1.2.
Patch File
1-OT69U
Issue(s)
1) This 1-OT69U.ps patch will fix a problem in the Japanese version
of EB-105EX.
However, as this patch will be a prerequisite patch for the next
patch 1-MMWR9.ps, this patch is released officially.
Note:
l
This patch is only for EB-105EX System Version 1.2.
Prerequisite(s):
l
Before this patch is applied, the following patches should already be applied on the
system in the following order.
1-HASH8.ps (If the FPGA revision is already 20, then this patch is not needed)
1-LV4GA.ps
1-N69ZD.ps
1-N522T.ps
Patch Update Procedure
1. Print out the configuration page and check that the prerequisite patches are already
installed on the system software v.1.2.0.
(If not, install the prerequisite patches first.)
2. Extract G3538987.exe until you get the 1-OT69U.ps file.
3. Use the Fiery Downloader to download the patch file (1-OT69U.ps) to the Direct queue.
4. Wait at least 60 seconds.
Note: This is very important.
5. Reboot the EB-105EX.
l
“Fiery” menu à “Shut Down” à “Reboot System”
6. Wait until “EB-105EX” is displayed on the EB-105EX LCD panel.
7. Reboot the EB-105EX again.
Note: This step is necessary to apply the new patch.
Technical Bulletin
Model: Bellini-C2
Date: 28-Dec-06
PAGE: 2/2
No.: RB070064
8. Wait until “EB-105EX” is displayed on the EB-105EX LCD panel.
9. Print out the Configuration Sheet.
10. Make sure that patch number 1-OT69U is listed in the “Update Information” section of
the Configuration Sheet.
Technical Bulletin
Model: Bellini-C2
PAGE: 1/2
Date: 28-Dec-06
Subject: Patch Release for EB-105EX V.1.2 (1-MMWR9)
No.: RB070065
Prepared by: Chisato Tsuji
From: 2nd Tech Support Sec. Service Support Dept.
Classification:
Troubleshooting
Part information
Action required
Mechanical
Paper path
Electrical
Transmit/receive
Service manual revision
Retrofit information
Other (
)
This RTB is the release note for Patch File 1-MMWR9 for EB-105EX printer controller
System V1.2.
Patch File
1-MMWR9
Issue(s)
This 1-MMWR9.ps patch will fix the following problems:
l
Printing with A4 Full bleed + A3/Z-Fold/Staple causes the job to
cancel unexpectedly.
l
While printing a mixed media job on full bleed A3 and A4-LEF with
Z-folding in Acrobat, the EB-105EX prompts for A4-SEF
incorrectly.
Note:
l
This patch is only for EB-105EX System Version 1.2.
Prerequisite(s):
l
Before this patch is applied, the following patches should already be applied on the
system in the following order.
1-HASH8.ps (If the FPGA revision is already 20, then this patch is not needed)
1-LV4GA.ps
1-N69ZD.ps
1-N522T.ps
1-OT69U.ps
Patch Update Procedure
1. Print out the configuration page and check that the prerequisite patches are already
installed on the system software v.1.2.
(If not, install the prerequisite patches first.)
2. Extract G3538989.exe until you get the 1-MMWR9.ps file.
3. Use the Fiery Downloader to download the patch file (1-MMWR9.ps) to the Direct
queue.
4. Wait at least 60 seconds.
Note: This is very important.
5. Reboot the EB-105EX.
Technical Bulletin
Model: Bellini-C2
l
Date: 28-Dec-06
PAGE: 2/2
No.: RB070065
“Fiery” menu à “Shut Down” à “Reboot System”
6. Wait until “EB-105EX” is displayed on the EB-105EX LCD panel.
7. Reboot the EB-105EX again.
Note: This step is necessary to apply the new patch.
8. Wait until “EB-105EX” is displayed on the EB-105EX LCD panel.
9. Print out the Configuration Sheet.
10. Make sure that patch number 1-MMWR9 is listed in the “Update Information” section of
the Configuration Sheet.
Technical Bulletin
Model: Bellini-C2
PAGE: 1/2
Date: 10-Apr-07
Subject: Patch Release for EB-105EX V.1.2 (1-Q3WG8)
No.: RB070067
Prepared by: Chisato Tsuji
From: 2nd Tech Support Sec. Service Support Dept.
Classification:
Troubleshooting
Part information
Action required
Mechanical
Electrical
Service manual revision
Paper path
Transmit/receive
Retrofit information
Other (
)
This RTB is the release note for Patch File 1-Q3WG8 for EB-105EX printer controller
System V1.2.
Patch File
1-Q3WG8
Issue(s)
z
Some pages are skipped while printing a multi page job when
there is a paper jam and if the copier is out of paper or if the
copier switches tray to pull paper from a different tray.
Note:
z
This patch is only for EB-105EX System Version 1.2.
Prerequisite(s):
z
Before this patch is applied, the following patches should already be applied on the
system in the following order.
1-HASH8.ps (If the FPGA revision is already 20, then this patch is not needed)
1-LV4GA.ps
1-N69ZD.ps
1-N522T.ps
1-OT69U.ps
1-MMWR9.ps
Patch Update Procedure
1. Print out the configuration page and confirm that the prerequisite patches are already
installed on the system software v.1.2.
(If not, install the prerequisite patches first.)
2. Extract the G3538990.exe until you get the 1-Q3WG8.ps file.
3. Use the Fiery Downloader to download the patch file (1-Q3WG8.ps) to the Direct
queue.
4. Wait at least 60 seconds.
Note: This is very important.
5. Reboot the EB-105EX.
z
“Fiery” menu Æ “Shut Down” Æ “Reboot System”
6. Wait until “EB-105EX” is displayed on the EB-105EX LCD panel.
Technical Bulletin
Model: Bellini-C2
Date: 10-Apr-07
PAGE: 2/2
No.: RB070067
7. Print out the Configuration Sheet.
8. Make sure that patch number 1-Q3WG8 is listed in the “Update Information” section of
the Configuration Sheet.
Technical Bulletin
Model: Bellini-C2
PAGE: 1/2
Date: 10-Apr-07
Subject: Patch Release for EB-105EX V.1.2 (1-PH0HL)
No.: RB070068
Prepared by: Chisato Tsuji
From: 2nd Tech Support Sec. Service Support Dept.
Classification:
Troubleshooting
Part information
Action required
Mechanical
Electrical
Service manual revision
Paper path
Transmit/receive
Retrofit information
Other (
)
This RTB is the release note for Patch File 1-PY0HL for EB-105EX printer controller
System V1.2.
Patch File
1-PY0HL
Issue(s)
z
Some pages are skipped when printing a multi page job and when
there is a paper jam.
Note:
z
This patch is only for EB-105EX System Version 1.2.
Prerequisite(s):
z
Before this patch is applied, the following patches should already be applied on the
system in the following order.
1-HASH8.ps (If the FPGA revision is already 20, then this patch is not needed)
1-LV4GA.ps
1-N69ZD.ps
1-N522T.ps
1-OT69U.ps
1-MMWR9.ps
1-Q3WG8.ps
Patch Update Procedure
1. Print out the configuration page and confirm that the prerequisite patches are already
installed on the system software v.1.2.
(If not, install the prerequisite patches first.)
2. Extract the G3538992.exe until you get the 1-PY9HL.ps file.
3. Use the Fiery Downloader to download the patch file (1-PY9HL.ps) to the Direct queue.
4. Wait at least 60 seconds.
Note: This is very important.
5. Reboot the EB-105EX.
z
“Fiery” menu Æ “Shut Down” Æ “Reboot System”
6. Wait until “EB-105EX” is displayed on the EB-105EX LCD panel.
7. Print out the Configuration Sheet.
Technical Bulletin
Model: Bellini-C2
Date: 10-Apr-07
PAGE: 2/2
No.: RB070068
8. Make sure that patch number 1-PY0HL is listed in the “Update Information” section of
the Configuration Sheet.
Technical Bulletin
Model: Bellini-C2
PAGE: 1/2
Date: 10-Apr-07
Subject: Patch Release for EB-105EX V.1.2 (1-QF3AI)
No.: RB070069
Prepared by: Chisato Tsuji
From: 2nd Tech Support Sec. Service Support Dept.
Classification:
Troubleshooting
Part information
Action required
Mechanical
Electrical
Service manual revision
Paper path
Transmit/receive
Retrofit information
Other (
)
This RTB is the release note for Patch File 1-QF3AI.ps for EB-105EX printer controller
System V1.2.
Patch File
1-QF3AI
Issue(s)
z
The EB-105EX controller reboots and the engine displays SC919
when attempting to print certain PDF files.
Note:
z
This patch is only for EB-105EX System Version 1.2.
Prerequisite(s):
z
Before this patch is applied, the following patches should already be applied on the
system in the following order.
1-HASH8.ps (If the FPGA revision is already 20, then this patch is not needed)
1-LV4GA.ps
1-N69ZD.ps
1-N522T.ps
1-OT69U.ps
1-MMWR9.ps
1-Q3WG8.ps
1-PY0HL.ps
Patch Update Procedure
1. Print out the configuration page and confirm that the prerequisite patches are already
installed on the system software v.1.2.
(If not, install the prerequisite patches first.)
2. Extract the G3538994.exe until you get the 1-QF3AI.ps file.
3. Use the Fiery Downloader to download the patch file (1-QF3AI.ps) to the Direct queue.
4. Wait at least 60 seconds.
Note: This is very important.
5. Reboot the EB-105EX.
z
“Fiery” menu Æ “Shut Down” Æ “Reboot System”
6. Wait until “EB-105EX” is displayed on the EB-105EX LCD panel.
7. Print out the Configuration Sheet.
Technical Bulletin
Model: Bellini-C2
Date: 10-Apr-07
PAGE: 2/2
No.: RB070069
8. Make sure that patch number 1-QF3AI is listed in the “Update Information” section of
the Configuration Sheet.