1
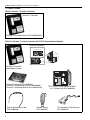
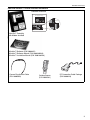
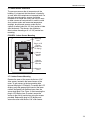
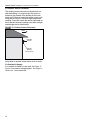
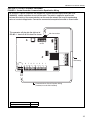
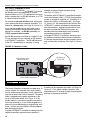
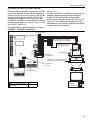
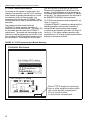
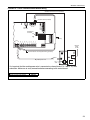
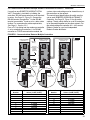
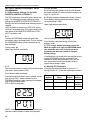
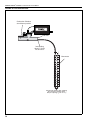
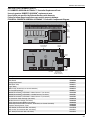
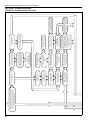
ROBERTS GORDON ® UltraVac ™ Controls for Modulating CORAYVAC Infrared Heating Systems ® Installation Manual WARNING Improper installation, adjustment, alteration, service or maintenance can result in death, injury or property damage. Read the installation and operation manuals thoroughly before installing or servicing this equipment. Installation must be done by an electrician qualified in the installation of control systems for heating equipment. Installer Please take the time to read and understand these instructions prior to any installation. Installer must give a copy of this manual to the owner. Owner Keep this manual in a safe place in order to provide your serviceman with necessary information. Roberts-Gordon 1250 William Street P.O. Box 44 Buffalo, New York 14240-0044 Telephone: 716.852.4400 Fax: 716.852.0854 Toll Free: 800.828.7450 Quality in Any Language™ © Copyright 2005 Roberts-Gordon Roberts-Gordon 76 Main Street West Unit 10 Grimsby, Ontario L3M 1R6 Canada Telephone: 905.945.5403 Fax: 905.945.0511 www.rg-inc.com P/N 10081601NA Rev C 04/05 TABLE OF CONTENTS SECTION 1: Introduction........................................................ 1 1.1 What is ROBERTS GORDON® ULTRAVAC™? ........... 1 1.2 CORAYVAC® Design Requirements ............................ 1 1.3 General Requirements................................................. 1 1.4 Check Installation Materials......................................... 1 1.5 Carton Contents .......................................................... 2 1.6 Safety........................................................................... 5 1.7 Example Site Layout .................................................... 5 SECTION 2: Specifications .................................................... 7 2.1 ROBERTS GORDON® ULTRAVAC™ Controller.......... 7 2.2 Temperature Sensors .................................................. 7 2.3 Variable Frequency Drive (VFD) .................................. 9 SECTION 3: Installation........................................................ 10 3.1 Preparation ................................................................ 10 3.2 Positioning the ROBERTS GORDON® ULTRAVAC™ Controller and Variable Frequency Drive........................................... 10 3.3 Cable Requirements: ................................................. 11 3.4 Electrical Installation Requirements .......................... 12 3.5 Pump Requirements .................................................. 12 3.6 Variable Frequency Drive Requirements ................... 12 3.7 Indoor Sensor Placement .......................................... 13 3.8 Outdoor Sensor Placement ....................................... 14 3.9 Outside Air Supply ..................................................... 14 SECTION 4: Typical External Diagrams .............................. 15 SECTION 5: Communications.............................................. 20 5.1 Dedicated Phone Line for Central Controller Modem.......................................... 20 5.2 RS-485 Converter for Central Controller ................... 21 5.3 TCP/IP Communication Module ................................ 22 5.4 Direct Connect ........................................................... 24 5.5 Communications Between Multiple ROBERTS GORDON® ULTRAVAC™ Controllers .... 25 SECTION 6: Variable Frequency Drive Programming ....... 26 6.1 VFD Parameter Settings For Use with ROBERTS GORDON® ULTRAVAC™....................... 26 6.2 Altering VFD Parameters........................................... 26 SECTION 7: Commissioning The CORAYVAC® System .... 27 7.1 Setting The CORAYVAC® End Burner Vacuum ......... 27 SECTION 8: Replacement Parts .......................................... 31 8.1 ROBERTS GORDON® ULTRAVAC™ Controller Replacement Parts.................................................... 31 8.2 Variable Frequency Drive Replacement Parts........... 32 8.3 Replacement Parts Instructions ................................ 33 SECTION 9: Troubleshooting .............................................. 34 SECTION 10: The ROBERTS GORDON® ULTRAVAC™ LIMITED Warranty......................................... 39 © 2005 All rights reserved. No part of this work covered by the copyrights herein may be reproduced or copied in any form or by any means - graphic, electronic, or mechanical, including photocopying, recording, taping or information storage and retrieval systems - without the written permission of Roberts-Gordon. Printed in U.S.A. TABLE OF FIGURES Figure 1: Example Site Layout .................................................. 6 Figure 2: ROBERTS GORDON® ULTRAVAC™ Controller Specifications ............................................ 8 Figure 3: Variable Frequency Drive Components ..................... 9 Figure 4: Controller Mounting ................................................. 10 Figure 5: Indoor Sensor Cable Detail...................................... 11 Figure 6: Outdoor Sensor, VFD (0-10 V) Signal and Pressure Switch Cable Detail ................................. 11 Figure 7: RS-485 Communications Cable Detail .................... 12 Figure 8: Variable Frequency Drive Mounting......................... 12 Figure 9: Indoor Sensor Mounting .......................................... 13 Figure 10: Outdoor Sensor Placement ................................... 14 Figure 11: Central Controller Communication Equalization Wiring ............................................... 15 Figure 12: ROBERTS GORDON® ULTRAVAC™ Central Controller External Wiring...................................... 16 Figure 13: ROBERTS GORDON® ULTRAVAC™ Central Controller External Wiring (continued)................... 17 Figure 14: ROBERTS GORDON® ULTRAVAC™ Satellite Controller External Wiring...................................... 18 Figure 15: ROBERTS GORDON® ULTRAVAC™ Satellite Controller External Wiring (continued)................... 19 Figure 16: Modem Location .................................................... 20 Figure 17: RS-485 PC Connection ......................................... 21 Figure 18: TCP/IP Communication Module Mounting............. 22 Figure 19: TCP/IP Communication Module Wiring ................. 23 Figure 20: 9 Pin Adapter for PC.............................................. 24 Figure 21: Communications Between Multiple Controllers ..... 25 Figure 22: End Vent Vacuum .................................................. 28 Figure 23: Possible Damper Couplings Locations .................. 29 Figure 24: ROBERTS GORDON® ULTRAVAC™ Controller Components Diagram............................................ 31 Figure 25: Variable Frequency Drive Components Diagram... 32 Figure 26: Troubleshooting Flow Chart ................................... 34 Figure 27: Troubleshooting Flow Chart (continued) ................ 36 SECTION 1: INTRODUCTION SECTION 1: INTRODUCTION 1.1 What is ROBERTS GORDON® ULTRAVAC™? The ROBERTS GORDON® ULTRAVAC™ is a micro processor based control package designed for modulating control of CORAYVAC® heaters based on outdoor temperatures. This controller is capable of giving control outputs to one vacuum pump and three heating zones. The controller also features inputs which are used for indoor and outdoor signal condition monitoring. 1.4 Check Installation Materials 1.4.1 Switchable Loads The controller relays are rated for switching loads no greater than 3 A. The total added current load for all 8 relays must not exceed 25 A. 1.4.2 Control Wiring Shielded cable (four twisted pairs of stranded 24 AWG minimum wire) is required for use with indoor sensors. System status and settings are viewed and altered from a PC (not supplied) running ROBERTS GORDON® ULTRAVAC™ Software. Shielded cable (one twisted pair of stranded 22 AWG minimum wire) is required for the outdoor air sensor, VFD signal wiring, pressure switch and wiring from controller #1 to the PC. 1.2 CORAYVAC® Design Requirements Shielded cable (one twisted triad of stranded 22 AWG minimum wire) is required for RS-485 communications between controllers. 1.4.3 Control Board and Sensor Power ® CORAYVAC burners shall be CRV B-6, B-8, B-9, B-10 or B-12 burners. CORAYVAC® systems designed shall have minimum radiant pipe length and 1.5 - 2.0 feet per flow unit of tailpipe length. -ORCORAYVAC® systems designed shall have recommended radiant pipe length and 1.2 - 1.5 feet per flow unit of tailpipe length. See the CORAYVAC® Design manual (P/N 127500NA) for minimum and recommended radiant pipe length. The power supply for all sensors is from the “+16 V” terminal to be found on the board of the controller. Power for the control board is 24 V provided by the relay board. 1.4.4 Programming Details Every controller is pre-programmed for one vacuum pump and up to three heating zones. Use a site layout drawing to identify the heating zones. 1.3 General Requirements The ROBERTS GORDON® ULTRAVAC™ series of controllers are supplied pre-configured for use with ROBERTS GORDON® CORAYVAC® infrared heating equipment only. Failure to comply with the installation instructions and configuration may invalidate the ROBERTS GORDON® ULTRAVAC™ limited warranty (See Page 39, Section 10.) ROBERTS GORDON® ULTRAVAC™ Software requires a PC(not supplied) running Windows® 95 or higher, with a Pentium® class processor and at least 64k of RAM. The controller, variable frequency drive, burners, pump and outside air blower must be electrically grounded in accordance with the National Electrical Code® ANSI/NFPA 70 - latest revision. Before proceeding with the installation of the controller, it will be necessary to check that the following points have been considered. 1 ROBERTS GORDON® ULTRAVAC™ CONTROLLER INSTALLATION MANUAL 1.5 Carton Contents URVSC: UltraVac™ Satellite Controller UltraVac™ Controller UltraVac™ Installation Manual (P/N 10081601NA) URVCCL: UltraVac™ Central Controller with TCP/IP Communication Module Controller Enclosure Line Voltage 120 V wiring L1 POWER OUTPUT 1 OUTPUT 2 OUTPUT 3 OUTPUT 4 OUTPUT 5 OUTPUT 6 OUTPUT 7 OUTPUT 8 L2 GRD L1 L2 GRD L1 L2 GRD L1 L2 GRD L1 L2 GRD L1 L2 GRD L1 L2 GRD L1 L2 GRD L1 L2 GRD modem chip Low Voltage 24 V wiring UltraVac™ Controller with Modem Installed UltraVac™ Software (P/N 10080421) UltraVac™ Software Manual (P/N 10081600NA) UltraVac™ Installation Manual (P/N 10081601NA) Comms Equalization Cable (P/N 10080450) 2 Outdoor Sensor (P/N 10081501) TCP/IP (LAN) Communication Module (w/ 7’ phone wire) (P/N 10080440) PC Connection Cable Package (P/N 10080410) SECTION 1: INTRODUCTION URVCCM: UltraVac™ Central Controller with Modem Controller Enclosure Line Voltage 120 V wiring L1 POWER OUTPUT 1 OUTPUT 2 OUTPUT 3 OUTPUT 4 OUTPUT 5 OUTPUT 6 OUTPUT 7 OUTPUT 8 L2 GRD L1 L2 GRD L1 L2 GRD L1 L2 GRD L1 L2 GRD L1 L2 GRD L1 L2 GRD L1 L2 GRD L1 L2 GRD modem chip Low Voltage 24 V wiring UltraVac™ Controller with Modem Installed UltraVac™ Software (P/N 10080421) UltraVac™ Software Manual (P/N 10081600NA) UltraVac™ Installation Manual (P/N 10081601NA) Comms Equalization Cable (P/N 10080450) Outdoor Sensor (P/N 10081501) PC Connection Cable Package (P/N 10080410) 3 ROBERTS GORDON® ULTRAVAC™ CONTROLLER INSTALLATION MANUAL URVCCR: UltraVac™ Central Controller with RS-485 Converter Controller Enclosure Line Voltage 120 V wiring L1 POWER OUTPUT 1 OUTPUT 2 OUTPUT 3 OUTPUT 4 OUTPUT 5 OUTPUT 6 OUTPUT 7 OUTPUT 8 L2 GRD L1 L2 GRD L1 L2 GRD L1 L2 GRD L1 L2 GRD L1 L2 GRD L1 L2 GRD L1 L2 GRD L1 L2 GRD modem chip Low Voltage 24 V wiring UltraVac™ Controller with Modem Installed UltraVac™ Software (P/N 10080421) UltraVac™ Software Manual (P/N 10081600NA) UltraVac™ Installation Manual (P/N 10081601NA) Comms Equalization Cable (P/N 10080450) Outdoor Sensor (P/N 10081501) PC Connection Cable Package (P/N 10080410) RS-485 Converter Package (P/N 10080430) RS-485 Converter 4 Power Supply SECTION 1: INTRODUCTION 1.6 Safety Your Safety is Important to Us! This symbol is used throughout the manual to notify you of possible fire, electrical or burn hazards. Please pay special attention when reading and following the warnings in these sections. Installation, service and annual inspection of controller must be done by an electrician qualified in the installation and service of control systems for heating equipment. Installation, service and annual inspection of heater must be done by a contractor qualified in the installation and service of gas-fired heating equipment. Read this manual carefully before installation, operation, or service of this equipment. For optimum heater performance and safe heating conditions, inspect and maintain heater(s) before every heating season and as necessary. Also, know and maintain heater clearances to combustibles, see heater Installation, Operation and Service manual for further details. If you require additional manuals, contact your ROBERTS GORDON® independent distributor or Roberts-Gordon at (716) 852-4400 or (800) 828-7450 in the U.S., (905) 945-5403 in Canada or at www.rg-inc.com. 1.6.1 Manpower Requirements To prevent personal injury and damage to the controls, two persons will be required for installation. 1.7 Example Site Layout Page 6, Figure 1 is an example layout for a building where ROBERTS GORDON® ULTRAVAC™ will be used to control the infrared heating systems shown. The layout consists of three zones of ROBERTS GORDON® ULTRAVAC™. 5 ROBERTS GORDON® ULTRAVAC™ CONTROLLER INSTALLATION MANUAL Zone 1 Sensor Zone 1 Zone 2 Sensor Zone 2 ROBERTS GORDON® ULTRAVAC Controller Pump Zone 3 Variable Frequency Drive Outside Sensor Zone 3 Sensor North Wall FIGURE 1: Example Site Layout NOTE: Conceptual drawing, not to scale. Venting not shown. 6 SECTION 2: SPECIFICATIONS SECTION 2: SPECIFICATIONS 2.1 ROBERTS GORDON® ULTRAVAC™ Controller 2.1.1 Enclosure Construction: 16 gauge painted steel, hinged door, removable knockouts provided. Dimensions: 14.7" w x 17.7" h x 3.5" d 2.1.2 Electrical - Control Board Power Supply: 24 V 60 Hz (from relay board) Analog Inputs: Sensor (thermistor), BMS enable (dry contact) Relay Outputs: 24 Vac Analog Outputs: 0-10 Vdc Digital Inputs: Timed, dry contact Network Ports: RS-485, RS-232 UL Standard: UL 916 / C22.2 No. 205-M1983 2.1.3 Electrical - Relay Board Power Supply: 120 V (+/- 10%) 1 Ø, 60 Hz Inputs: 24V AC Relay Outputs: Single Pole 3 A 120 Vac UL Standard: UL 916 / C22.2 No. 205-M1983 2.2 Temperature Sensors Indoor Sensor Dimensions: 2.75" w x 4.5" h x 1.15" d Power: 16 V Features: LCD temperature display, setpoint adjustment, override button Wiring: Shielded Cable, four twisted pairs, 24 AWG min. Outdoor Sensor Dimensions: 5.3" x 1.4" x 2" Enclosure: NEMA 4 gasketed aluminum LB housing, ½" threaded connection Wiring: Shielded Cable, one twisted pair, 22 AWG min. 7 ROBERTS GORDON® ULTRAVAC™ CONTROLLER INSTALLATION MANUAL FIGURE 2: ROBERTS GORDON® ULTRAVAC™ Controller Specifications 120 Vac Outputs 120 Vac Power Input 24 V Power 1 A Fuse L1 Relay Board POWER OUTPUT 1 OUTPUT 2 OUTPUT 3 OUTPUT 4 OUTPUT 5 OUTPUT 6 OUTPUT 7 OUTPUT 8 L2 GRD L1 L2 GRD L1 L2 GRD L1 L2 GRD L1 L2 GRD L1 L2 GRD L1 L2 GRD L1 L2 GRD L1 L2 GRD 24 V Power Switch Plug-In Relays 24 V Control Board Power Supply 24 V Input Connections Transformer 24 V RS 232 Board Direct Control 24 V Power Connect RS 485 Board Terminals Control Board Outputs Input Power LED Port Reset Button Meter Inputs Selector Switch Eprom Chip Modem Chip (optional - only located on Controller #1) Analog Outputs 24 V Outputs Analog Inputs 16 V Sensor Power 5 V TCP/IP Module Power Run LED Modem Phone Port Analog Output Board Controller Enclosure Note: L2 GRD L2 POWER L1 GRD Relay Board OUTPUT 1 L1 L2 GRD L2 OUTPUT 2 L1 GRD L2 OUTPUT 3 L1 GRD OUTPUT 4 L1 L2 GRD L2 OUTPUT 5 L1 GRD L2 OUTPUT 6 L1 GRD OUTPUT 7 L1 L2 GRD OUTPUT 8 L1 Line Voltage 120 V wiring To ensure robust control signaling; Do not run line voltage wiring through bottom section of enclosure that houses the control board. Do not run low voltage wiring through top section of enclosure that houses the relay board. Low Voltage 24 V wiring + - + - REF C5 + METER INPUTS RS-485 24VAC C6 + C7 + C8 + 24VAC OUTPUTS Control Board + 4 + 3 + 2 + 1 ANALOG INPUTS + 1- +2 - +3- +4- + 5- 24VAC OUTPUTS +6 - +7- + 8- +5V GND GND +16V C1 + C2 + C3 + C4 + 8 SECTION 2: SPECIFICATIONS 2.3 Variable Frequency Drive (VFD) 2.3.1 Enclosure Construction: .75 HP, 230 V Drive (used with EP-203 pump) 208/240 V 1 Ø 50-60 Hz 14-gauge painted steel, mounting Power Input: panel included, left-hinged door, Input Voltage Tolerance: +/- 10% Amps: 6.9/6.0 A vented. Dimensions: 8" w x 10" h x 8" d Protection: 2.3.2 Electrical UL 50 Type 1, NEMA Type 1 Power Output: 230 V 3 Ø 0-60 Hz Speed Reference Follower: 0-10 Vdc UL Standard: Industrial Controls Equipment 1 HP, 120 V Drive (used with EP-203 pump) Power Input: 120 V 1 Ø 50-60 Hz Input Voltage Tolerance: +/- 10% Amps: 16.6 A 2 HP, 230 V Drive (used with EP-303 pump) Power Input: 208/240 V 1 Ø 50-60 Hz Input Voltage Tolerance: +/- 10% Amps: 18.4/16.0 A Ambient Operating Temp.: 32°F - 104°F (0°C-40°C) FIGURE 3: Variable Frequency Drive Components Pre-wired L1 L2/N PE B B+ EPM Power Input Grounding Block Input Fuse Holder Mode Terminal Inputs 230 V 3 Ø outputs U V W PE 17 16 1 2 5 6 11 13A 13B 13E 25 Variable Frequency Drive Pre-wired to VFD terminal 1 PE Relay 120 V 120 V signal from relay board output #8 Pre-wired to VFD terminal 11 VFD Enclosure 9 ROBERTS GORDON® ULTRAVAC™ CONTROLLER INSTALLATION MANUAL SECTION 3: INSTALLATION WARNING Mounting Hazard Mount controls with materials with a minimum working load of 75 lbs (33 kg). Failure of the supports can result in death, injury or property damage. Note that the maximum distance from the controller to any sensor is 300' (120 m). For longer distances, larger gauge wire may be needed. (Consult your local distributor) For multiple controllers, maximum length of communication wire from the first controller to the last is 4000' (1219m). 3.2.2 Position the controller and VFD at occupant level for ease of service. To avoid electrical interferences with communications bus, do not mount VFD directly next to controller. Allow 2' (.6 m) between controller and VFD. FIGURE 4: Controller Mounting 3.1 Preparation Before installing the controller, observe the following: 3.1.1 Ensure that you have a copy of the site layout for the project that clearly identifies the separate zones. 3.1.2 Familiarize yourself with the Controller and Variable Frequency Drive component names and locations. See Page 8, Figure 2 and Page 9, Figure 3. 3.2 Positioning the ROBERTS GORDON® ULTRAVAC™ Controller and Variable Frequency Drive 3.2.1 Choose a mounting location for the controller. Generally near the pump, a dedicated phone connection (optional) and the variable frequency drive. For serviceability, it is convenient to mount the controller and variable frequency drive in the vicinity of the pump. Do not mount controller or VFD outdoors. VFD must not be installed where subjected to adverse conditions such as: combustible, oily, or hazardous vapors or dust; excessive moisture or dirt; vibration. To avoid damage from possible drips, do not mount controller or VFD directly beneath pump. VFD should be mounted in locations where the maximum ambient temperature does not exceed 104°F (40°C). Avoid installing the VFD in mezzanines, direct sunlight, or near external heat sources because these locations usually have unpredictable temperature rises. 10 16.25 Installation of the ROBERTS GORDON® ULTRAVAC™ Controller and the associated external electrical wiring must be done by an electrician qualified in the installation of control systems for heating equipment. 13 SECTION 3: INSTALLATION 3.3 Cable Requirements: 3.3.1 Line Power Supply: FIGURE 5: Indoor Sensor Cable Detail Insulation As per individual building specification for class of cable to be used. Use copper conductors only. To size the cable, use the amperages of the burners given on Page 12, Section 3.4.1, for each individual zone. 3.3.2 Control Wiring All control wiring (sensor, VFD control, pressure switch and RS-485 communication wiring) may be plenum or non-plenum rated depending on installation requirements, consult the National Electric Code® (NEC). Regardless of the code or its interpretation, the local Fire Marshall makes the final decision, contact the local Fire Marshall if you have questions. Do not run control (low voltage) wiring together with power (line voltage) wiring in the same conduit. Electrical signal interference or induced current could occur and cause communication problems. VFD (0-10 V) control wiring and all RS-485 communication wiring must be shielded. Shielded wire provides noise and interference isolation and reduces the possibility of communication problems. Sensor and pressure switch wiring is not required to be shielded. If electrical interference from machinery or other sources cannot be avoided, shielded wire must be used. All control cable specification diagrams shown will refer to shielded cable. 3.3.3 Indoor Sensor Cable: Shielded cable (four twisted pairs of stranded 24 AWG min. wire) is required for use with indoor sensors. See Page 11, Figure 5 for an illustration of the shielded cable specification to be used. See Page 11, Section 3.3.2 to see if unshielded cable may be used. Unshielded Cable: AMP #57248, #219538, #219513; Belden # 1585A, #1583A; General Cable #C6015 or equivalent. Shielded Cable: Madison Cable #08CFJ10001, #08CFJ00004; Belden #9681; General Cable #2131673, #C1676 or equivalent. Shield Wire Foil Shield 24 AWG Minimum 3.3.4 Outdoor Air Sensor VFD (0-10 V) signal, Pressure Switch Cable and PC RS-485 converter wiring: Shielded cable (one twisted pair of 22 AWG min. wire) is required for the outdoor air sensor, VFD signal wiring, pressure switch wiring and RS-485 converter wiring between controller #1 and PC (RS-485 converter wiring to PC is only used if controller is using an RS-485 Converter Communication Package). See Page 11, Figure 6 for an illustration of the cable specification to be used. Shielded Cable: Belden #8451, #1503A, #8760; General Cable #C2514 or equivalent. FIGURE 6: Outdoor Sensor, VFD (0-10 V) Signal and Pressure Switch Cable Detail Uninsulated Shield Wire Insulation Foil Shield 22 AWG Minimum conductor (White = positive) 22 AWG Minimum conductor (Black = negative) 3.3.5 RS-485 Communication Wire Between Controllers: Shielded cable (one twisted triad or two twisted pairs of 22 AWG min. wire) is required for RS-485 communications between controllers. See Figure 7 for an illustration of the shielded cable specification to be used. Shielded Cable: Belden #1902, #8770 General Cable #C1670 or equivalent. 11 ROBERTS GORDON® ULTRAVAC™ CONTROLLER INSTALLATION MANUAL FIGURE 7: RS-485 Communications Cable Detail Uninsulated Shield Wire Insulation Foil Shield 22 AWG Minimum 3.4 Electrical Installation Requirements DANGER Electrical Shock Hazard Disconnect electrical power before servicing. This appliance must be connected to a properly grounded electrical source. Failure to follow these instructions can result in death or electrical shock. 3.5 Pump Requirements The pump is powered directly from the Variable Frequency Drive (VFD). The VFD will be energized via an output from the relay board switched through a designated relay. 3.6 Variable Frequency Drive Requirements The VFD must be powered separately from the control panel. The 230 V drive power supply must be 230 V, 50-60 Hz, 1 Ø. The 120V drive power supply must be 120 V, 50-60 Hz, 1 Ø. See Page 9, Section 2.3 for additional details. The VFD on/off switching is done by an output on the relay board. The 0-10 V signal from the control panel wired into VFD input relays 5 and 2 (see Page 16, Figure 12 through Page 19, Figure 15) will dictate the speed of the vacuum pump. The VFD output supply to the pump is 230 V 3 Ø 0-60 Hz. The frequency of the output supply signal to the pump will be varied based on the 0-10 V signal from the control panel. See Page 10, Section 3.2 for additional installation requirements. FIGURE 8: Variable Frequency Drive Mounting The method for calculating the current loading is as follows: CORAYVAC® Burner 0.3 A/burner 10 ¾ 3.4.1 The panel must be supplied from a local fused isolator rated for a total amperage not exceeding 25 A. Multiply the current for the individual burners above by the number of burners supplied from the panel to give the total current required. The full load amps for the optional outside air blower (P/N 90707500) are: 1.6 A The total added current load for each individual relay must not exceed 3 A. The total added current load for all 8 relays must not exceed 25 A. 12 6 SECTION 3: INSTALLATION 3.7 Indoor Sensor Placement The sensor measures the air temperature in the building. It is important that the sensor is located in an area within the heated zone at occupant level. For the most accurate results, sensors should be mounted on an inside wall, away from any air vents or other sources of heat and cold. In order to avoid short system cycles and inaccurate temperature readings, do not mount sensors under the first section of radiant tube (first 10’ (3 m) section of tube after the burner). The sensors are suitable for direct surface mounting or 4" x 2 1/8" junction box mounting. FIGURE 9: Indoor Sensor Mounting Mounting Hole Plug-in LCD Display (grasp here to unplug) SEN SET O/R - + Setback Override Button Setpoint Adjustment Slide bar Mounting Hole 3.7.1 Indoor Sensor Mounting Remove the cover of the sensor by the two 1/16" allen screws, located in the lower corners of the cover. To gain access to the top mounting hole remove the plug-in LCD display. To remove the LCD display, grasp the green plug-in board at the lower corners and gently pull the board away from the sensor back plate. See Figure 9. After removing the plug-in LCD display from its socket, secure the sensor to the wall or junction box using the screws provided. Replace the plug-in LCD display and secure the cover with the two 1/16" allen screws. 13 ROBERTS GORDON® ULTRAVAC™ CONTROLLER INSTALLATION MANUAL 3.8 Outdoor Sensor Placement The outdoor sensor measures air temperature outside the building. It is important that the sensor is located on the outside of the building on the north facing wall. Failure to mount the sensor on the north facing wall will result in artificially high temperature readings. If possible, locate the sensor high under an eve to prevent incorrect readings from direct sunlight and damage due to the elements. FIGURE 10: Outdoor Sensor Placement North Outside Sensor Sensor Module facing down Mount the outside sensor with the sensor module facing down to prevent accumulation of dirt or water. 3.9 Outside Air Supply If an outside air blower is to be used, See Page 17, Figure 13 for external wiring diagrams. See Page 12, Section 3.4.1 for current load. 14 SECTION 4: TYPICAL EXTERNAL DIAGRAMS SECTION 4: TYPICAL EXTERNAL DIAGRAMS FIGURE 11: Central Controller Communication Equalization Wiring 120 ohm resistor + - + - REF BLACK This connector will plug into the right set of RS-485 +/- terminals on this board as shown. RED All UltraVac™ Central Controllers are shipped with a communication equalization cable (P/N 10080450), satellite controllers do not use the cable. The cable is supplied to equalize and balance the circuitry of the communications on the controller network that may be experiencing noise or transient voltage levels. Connect the communication equalization cable as shown below. RS-485 3 2 +5 7 6 5 4 3 2 1 1 Shrinkwrap Black Red +16 8 + - + - + - + - + - + - + - + - GND + + + + - 4 Communications Circuit Equalizer Wiring (included, must be field installed) Description Comms Equalization Cable Part Number 10080450 15 ROBERTS GORDON® ULTRAVAC™ CONTROLLER INSTALLATION MANUAL FIGURE 12: ROBERTS GORDON® ULTRAVAC™ Central Controller External Wiring To Satellite Controller RS-485 (see NOTE 2) SEN SET O/R - + Zone 2 Sensor Outdoor Sensor SEN SET O/R - + POWER OUTPUT 1 OUTPUT 2 OUTPUT 3 OUTPUT 4 OUTPUT 5 OUTPUT 6 OUTPUT 7 OUTPUT 8 L1 L2 GRD L1 L2 GRD L1 L2 GRD L1 L2 GRD L1 L2 GRD L1 L2 GRD L1 L2 GRD L1 L2 GRD L1 L2 GRD Zone 1 Sensor NC C NO c + c + c + c + 5 6 7 8 24VAC Outputs 24V VAC RS-485 + - + - REF Modem Chip METER INPUTS + 4 - - + - + - + - + 1 2 3 4 + 1 + 2 + 3 - BMS Enable (optional) ANALOG INPUTS + 1 - + 2 - + 3 - + 4 - + 5 - + 6 - + 7 - + 8 - +5v GND GND +16v c 1+ c 2+ c 3+ c 4+ 24VAC Outputs + - Phone Line for Modem (optional) see NOTE 1 Electrical wiring connections indicated by a dot; Separate line and low voltage circuits. Do not run line voltage wiring through bottom section of enclosure that houses the control board. Do not run low voltage wiring through top section of enclosure that houses the relay board. Do not run line and low voltage wiring in the same conduit. See NOTE 2 To RS-485 Converter at PC (optional) see NOTE 1 & 2 Continued On Next Page 120 V 1Ø 60 Hz Pressure Switch (Pump) Pressure Switch (Optional Outside Air Blower) NOTE 1: This diagram applies to the Central Controller (controller #1) only. For all Satellite Controllers see Satellite Controller External Wiring Diagram. Central Controller (controller #1) requires outdoor sensor wiring and either modem, RS-485 converter wiring, or TCP/IP module wiring. NOTE 2: Twist shield wires for both RS-485 communication cables together. On controller #1 only, connect these twisted shield wires to ground. For VFD 0-10 V signal wiring, connect shield wire to ground at the controller only. NOTE 3: 120 V 1 Ø 50-60 Hz supply for 120 V VFD model. 230V 1 Ø 50-60 Hz supply for 230 V VFD model. See VFD rating plate for required input. Repetitive cycling of a disconnect or input contactor (more than once every two minutes) may cause damage to the drive. NOTE 4: Zone 3 Sensor(not shown) wiring is as follows: SEN output to analog input 3; SET output to analog input 6; O/R output to meter input 3; +/- outputs to +16 V/GND inputs. NOTE 5: Internal pre-wiring not shown. NOTE 6: All three power output wires from terminals U, V, and W to the pump motor must be kept tightly bundled and run in a separate conduit away from all other power and control wiring. 16 SECTION 4: TYPICAL EXTERNAL DIAGRAMS FIGURE 13: ROBERTS GORDON® ULTRAVAC™ Central Controller External Wiring (continued) Outside Air Blower (optional) Zone 3 Burners Zone 2 Burners Zone 1 Burners L2 L1 L2 L1 L2 L1 L2 L1 L2 L1 L2 L1 L2 L1 L2 L1 L2 L1 Continued From Previous Page VFD Power Supply (see NOTE 3) VFD Assembly L1 L2/N PE B- B+ EPM To Terminal 5 To Terminal 2 Mode T1 U V W PE PE To Terminals 13 and 14 T2 T3 Vacuum Pump 230 V 3Ø 0-60 Hz Motor Power Supply (see NOTE 6) 17 ROBERTS GORDON® ULTRAVAC™ CONTROLLER INSTALLATION MANUAL FIGURE 14: ROBERTS GORDON® ULTRAVAC™ Satellite Controller External Wiring To Satellite Controller RS-485 (See NOTE 2) METER INPUTS + 2 + 3 + 4 - + 1 - - + - + - + - + 1 2 3 4 See NOTE 2 Separate line and low voltage circuits. Do not run line voltage wiring through bottom section of enclosure that houses the control board. Do not run low voltage wiring through top section of enclosure that houses the relay board. Do not run line and low voltage wiring in the same conduit. c + c + c + c + 5 6 7 8 24VAC Outputs RS-485 + - + - REF ANALOG INPUTS 24V VAC GND GND +16v + 1 - + 2 - + 3 - + 4 - + 5 - + 6 - + 7 - + 8 - +5v NC C NO BMS Enable (optional) Electrical wiring connections indicated by a dot; POWER OUTPUT 1 OUTPUT 2 OUTPUT 3 OUTPUT 4 OUTPUT 5 OUTPUT 6 OUTPUT 7 OUTPUT 8 L1 L2 GRD L1 L2 GRD L1 L2 GRD L1 L2 GRD L1 L2 GRD L1 L2 GRD L1 L2 GRD L1 L2 GRD L1 L2 GRD SEN SET O/R - + c 1+ c 2+ c 3+ c 4+ SEN SET O/R - + Zone 2 Sensor 24VAC Outputs Zone 1 Sensor From previous controller RS-485 (See NOTE 2) Continued On Next Page 120V 1ph 60 Hz Pressure Switch (Pump) Pressure Switch (Optional Outside Air Blower) NOTE 1: This diagram applies to the Satellite Controller only. The Satellite Controller does not require modem, RS-485 converter wiring to the PC, TCP/IP module wiring, or outdoor sensor wiring. For Central Controller see Central Controller External Wiring Diagram. NOTE 2: Twist shield wires for both RS-485 communication cables together. On controller #1 only, connect these twisted shield wires to ground. For VFD 0-10 V signal wiring, connect shield wire to ground at the controller only. NOTE 3: 120 V 1 Ø 50-60 Hz supply for 120 V VFD model. 230V 1 Ø 50-60 Hz supply for 230 V VFD model. See VFD rating plate for required input. Repetitive cycling of a disconnect or input contactor (more than once every two minutes) may cause damage to the drive. NOTE 4: Zone 3 Sensor(not shown) wiring is as follows: SEN output to analog input 3; SET output to analog input 6; O/R output to meter input 3; +/- outputs to +16 V/GND inputs. NOTE 5: Internal pre-wiring not shown. NOTE 6: All three power output wires from terminals U, V, and W to the pump motor must be kept tightly bundled and run in a separate conduit away from all other power and control wiring. 18 SECTION 4: TYPICAL EXTERNAL DIAGRAMS FIGURE 15: ROBERTS GORDON® ULTRAVAC™ Satellite Controller External Wiring (continued) Outside Air Blower (optional) Zone 3 Burners Zone 2 Burners Zone 1 Burners L2 L1 L2 L1 L2 L1 L2 L1 L2 L1 L2 L1 L2 L1 L2 L1 L2 L1 Continued From Previous Page VFD Power Supply (see NOTE 3) VFD Assembly L1 L2/N PE B- B+ EPM To Terminal 5 To Terminal 2 Mode T1 T2 T3 U V W PE PE To Terminals 13 and 14 Vacuum Pump 230 V 3Ø 0-60 Hz Motor Power Supply (See NOTE 6) 19 ROBERTS GORDON® ULTRAVAC™ CONTROLLER INSTALLATION MANUAL SECTION 5: COMMUNICATIONS One ROBERTS GORDON® ULTRAVAC™ Controller per building must have equipment for remote communications to a PC. This equipment consists of either a modem chip, an RS-485 converter, or a TCP/ IP communications module. shielded twisted pair communication wiring. See Page 21, Figure 17. To interface with ULTRAVAC™ controllers through a Local Area Network (LAN), a TCP/IP Communication module is installed at controller #1. Controller #1 is For remote on-site and off-site control and system wired to the LAN by an Ethernet cable. See Page status viewing the central controller (controller #1) is 22, Section 5.3. Any computer on the LAN that has fitted with a modem chip. See Page 20, Section 5.1. ULTRAVAC™ software installed can communicate with the controllers. Appropriate precautions must If only remote on-site control and system status be taken to protect the Ethernet wiring from any viewing, two controller communications interface possible electrical interference (noise) caused by devices are available: an RS-485 converter or a surrounding machinery or equipment. TCP/IP communication module. An RS-485 converter is installed at a single PC, this PC can interface with any controller on the network of ULTRAVAC™ controllers. The RS-485 converter at the PC is wired directly to controller #1 using If multiple ULTRAVAC™ controllers are being used, the additional controllers communicate to controller #1 through communication wiring arranged in-series from one controller to the next. See Page 25, Section 5.5. FIGURE 16: Modem Location Dip Switch #1 Set to ON 12345678 Control Board of the Central Controller Modem Chip Phone Cable Connection Description Modem Chip Part Number 10080142 5.1 Dedicated Phone Line for Central Controller Modem through RS-485 communication wiring arranged The Central Controller is fitted with a modem chip. To in-series from one controller to the next. See Page 25, Section 5.5. This allows multiple controllers to be use the modem, the controller must have a phone line for modem communications. Install a phone line controlled from a PC through a single communication near the location of the Central Controller. The phone package at the central controller. cable is plugged into the phone connection in the corner of the control board. See Figure 16. If the modem option is not used for everyday communication to the controller(s), it can still be plugged into a phone line for troubleshooting or programming assistance. Contact your local Roberts Gordon independent distributor for details. If multiple ULTRAVAC™ controllers are being used, the additional controllers communicate to controller #1 20 SECTION 5: COMMUNICATIONS 5.2 RS-485 Converter for Central Controller For remote on-site viewing of system status and settings of any controller, use the RS-485 converter to connect a single PC (9 pin serial port) to the RS-485 terminals on the Central Controller. This will allow communication between one PC and any of the ULTRAVAC™ controllers on the network. For RS-485 converter wiring details see Page 21, Figure 17 and see Page 25, Section 5.5 Section 3.3.5. If multiple ULTRAVAC™ controllers are being used, the additional controllers communicate to controller #1 through RS-485 communication wiring arranged in-series from one controller to the next. See Page 25, Section 5.5. This allows multiple controllers to be controlled from a PC through a single communication package at the central controller. For communication cable requirements see Page 11, FIGURE 17: RS-485 PC Connection RS-485 adapter power supply (supplied with RS-485 adapter) (+) (-) METER INPUTS RS-485 Adapter (Shield wire not connected) 25-pin male to 9-pin female adapter (supplied with RS-485 adapter) +V gnd shld B A RS-485 + - + - REF ANALOG INPUTS Wire with white stripe to positive terminal single LED + 1 - + 2 - + 3 - + 4 - + 5 - + 6 - + 7 - + 8 - +5v To controller #2 25-Pin Female 25-Pin Male Dip Switch #1 set to ON + 1 + 2 + 3 + 4 - 9-Pin Female Description RS-485 Converter Package with Power Supply Central Controller Part Number 10080430 Windows® Compatible PC 21 ROBERTS GORDON® ULTRAVAC™ CONTROLLER INSTALLATION MANUAL 5.3 TCP/IP Communication Module For remote on-site viewing of system status and settings of any controller, use the TCP/IP communication module to connect the controllers to a Local Area Network (LAN) via Ethernet cable. Any computer on the LAN that has ULTRAVAC™ software installed can be used to communicate with the controllers. The module must be mounted inside the ULTRAVAC™ central controller (controller #1) enclosure next to the control board. The power (5V) for the module will come from the ULTRAVAC™ control board. The module will communicate to the controller via regular phone wire from the RJ11 jack on the module to the RS-232 direct connect port on the control board. The module will relay the data from the controller to computers on the LAN via Ethernet cable plugged into the RJ45 jack on the module. A setup procedure must be performed on the module upon installation to create its IP address on the LAN. The setup instructions can be found in the ROBERTS GORDON® Software Manual. For TCP/IP communication module wiring details, see Page 23, Figure 19. If multiple ULTRAVAC™ controllers are being used, the additional controllers communicate to controller #1 through RS-485 communication wiring arranged in-series from one controller to the next. See Page 25, Section 5.5. This allows multiple controllers to be controlled from a PC through a single communication package at the central controller. FIGURE 18: TCP/IP Communication Module Mounting Controller Enclosure L2 GRD POWER L1 L2 GRD OUTPUT 1 L1 L2 GRD OUTPUT 2 L1 L2 GRD OUTPUT 3 L1 L2 GRD OUTPUT 4 L1 L2 GRD OUTPUT 5 L1 L2 GRD OUTPUT 6 L1 L2 GRD OUTPUT 7 L1 L2 GRD OUTPUT 8 L1 Line Voltage 120 V wiring Relay Board Low Voltage 24 V wiring + - + - REF C5 + METER INPUTS RS-485 24VAC C6 + C7 + C8 + 24VAC OUTPUTS Control Board + 4 + 3 + 2 + 1 ANALOG INPUTS + 1- +2 - +3- +4- + 5- 24VAC OUTPUTS +6 - +7- + 8- +5V GND GND +16V C1 + C2 + C3 + C4 + 22 Mount TCP/IP module to enclosure here or other suitable location within the control board's compartment. Do not mount module in relay board compartment. SECTION 5: COMMUNICATIONS FIGURE 19: TCP/IP Communication Module Wiring 120 ohm resistor (included) + - + - REF RED BLACK Standard 4 Wire Phone Cord (included) METER INPUTS RS-485 RS-232 Direct Port Dip Switch #1 set to ON 3 2 +5 +16 8 7 6 5 4 3 2 1 1 + - + - + - + - + - + - + - + - GND + + + + - 4 Shrinkwrap Ethernet Cable to LAN Black Red Red Black Communications Circuit Equalizer Wiring (included) module power wire Black Red + + RS-45 Jack RJ-11 Jack It is important that the module power wire is connected as shown (black=5 V- / red= 5 V+) wire orientation. Make sure to verify connection before connecting to the control board. Description TCP/IP Communication Module Part Number 10080440 23 ROBERTS GORDON® ULTRAVAC™ CONTROLLER INSTALLATION MANUAL 5.4 Direct Connect For local viewing of system status and settings of any controller, a portable PC can be connected. Using the 9 pin adapter provided, (See Page 24, Figure 20), you may wire from your computer serial port to the RS-232 direct connect port on the control board via standard 4-wire phone cable. For identification of the RS-232 direct connect port, see Page 8, Figure 2. This can be useful when a PC is in close proximity to any ROBERTS GORDON® ULTRAVAC™ Controller or while troubleshooting at the controller using a laptop PC. This type of connector should not be used if the phone wire is more than 50’ (15m) in length. Plug one end of the phone cable into the RS-232 direct port, plug the other end into the adapter shown in Figure 20. Plug the adapter into a 9-pin serial port on your computer. If a PC does not have a serial port, but does have a USB port, purchase of a USB Serial Converter is required. A USB to 9-pin Serial Cable will allow connection between the RS-232 device (ULTRAVAC™ Control Board) and the USB port on the PC. The USB to serial RS232 DB9 Cable Adapter will be used in conjunction with the PC Connection Cable Package (P/N 10080410). USB to Serial RS232 DB9 Cable Adapters can be purchased at a local computer store or on the internet for $20.00 or less. The converter should come with drivers and should draw power directly from USB, requiring no additional power adapter. FIGURE 20: 9 Pin Adapter for PC Phone Jack Connect to RS-232 direct port on control board 9 Pin Adapter Description PC Connection Cable Package 24 Part Number 10080410 SECTION 5: COMMUNICATIONS 5.5 Communications Between Multiple ROBERTS GORDON® ULTRAVAC™ Controllers system status and settings can be viewed for any of the controllers on the network. If more than one ROBERTS GORDON® ULTRAVAC™ Controller is installed in a building, the controllers’ RS-485 communications must be wired in series. See Page 25, Figure 21. Connect the RS-485 terminal on controller #1 to the RS-485 terminal on controller #2 and so on in a daisy chain fashion. For communication cable requirements, See Page 11, Section 3.3.5 The control board identification dip switch must be set on each ROBERTS GORDON® ULTRAVAC™ Controller. See Page 25, Figure 21 for dip switch settings. The dip switch allows for up to 32 controllers to be connected together on the same network. For dip switch settings on controller #12 - #32, contact Roberts-Gordon or your local independent Roberts-Gordon distributor. From a PC, by dialing into the modem on controller 1 or by connecting to controller #1 via RS-485 converter or TCP/IP communication module, the FIGURE 21: Communications Between Multiple Controllers # Central Controller (controller #1) RS 485 Wiring Satellite Controller (controller #3) Satellite Controller (controller #2) To Additional Controllers To RJ11 connection on TCP/IP Module (optional) Dedicated Outside Phone Line (optional) Wiring to RS 485 Converter at PC (optional) ' 12345678 Modem Chip 12345678 Dip Switch #1 Set to ON 12345678 Dip Switch #2 Set to ON Dip Switch # 1 and #2 Set to ON Controller Number Dip Switch Order (1,2,3,4,5,6,7,8) Values (1=ON, 0=OFF) Controller Number Dip Switch Order (1,2,3,4,5,6,7,8) Values (1=ON, 0=OFF) 1 (Central Controller) 2 3 4 5 6 7 8 9 10 10000000 01000000 11000000 00100000 10100000 01100000 11100000 00010000 10010000 01010000 11 12 13 14 15 16 17 18 19 20 11010000 00110000 10110000 01110000 11110000 00001000 10001000 01001000 11001000 00101000 25 ROBERTS GORDON® ULTRAVAC™ CONTROLLER INSTALLATION MANUAL SECTION 6: VARIABLE FREQUENCY DRIVE PROGRAMMING 6.1 VFD Parameter Settings For Use With ROBERTS GORDON® ULTRAVAC™ The VFD parameters come with factory default settings. The following parameter settings must be changed for ROBERTS GORDON® ULTRAVAC™. Settings can only be altered when the pump motor is stopped. must be repeated. 6.1.3 Use the arrow buttons to scroll to the desired parameter number. For new parameter settings See Page 26, Section 6.2. 6.1.4 Once the desired parameter number is found: Press Mode to display present parameter setting (example setting is 20.0). Upper right decimal point blinks. Verify that there is power to the VFD (LCD display will be on) and power to the 24 V power switch on the relay board of the ROBERTS GORDON® ULTRAVAC™ controller is off. 6.1.1 To enter the PROGRAM mode and access the parameters, press the Mode button. This will activate the PASSWORD prompt (if the password has not been disabled). Display reads "00" Upper right decimal point blinks 00 6.1.2 200 Use arrow buttons to change setting Press Mode to store new setting and exit the program mode. 6.1.5 To change another parameter, press the Mode key again to re-enter the PROGRAM mode (the parameter menu will be accessed at the parameter that was last viewed or changed before exiting). If the Mode key is pressed within two minutes of exiting the PROGRAM mode, the password is not required to access the parameters. After two minutes, the password must be entered in order to access the parameters again. 6.2 Altering VFD Parameters Use the arrow buttons to scroll to the password value Using the procedure described in Section 6.1.1 through Section 6.1.5, alter the following parameters: (the factory set password is 225) Press Mode to enter password Once the correct password value is entered, the display will read "P01", which indicates that the PROGRAM mode has been accessed at the beginning of the parameter menu (P01 is the first parameter) . 225 P01 NOTE: If the display flashes "Er", the password was incorrect, and the process to enter the password 26 Parameter Number P16 P44 Parameter Name Units Ending Password Factory Default 02 225 P03 Start Method 01 New Setting 01 Any # 000-999 05 SECTION 7: COMMISSIONING THE CORAYVAC® SYSTEM SECTION 7: COMMISSIONING THE CORAYVAC® SYSTEM proper. If necessary, adjust the proper damper couNOTE: The ROBERTS GORDON® ULTRApling to achieve an end vent vacuum of 2.5" - 3.0" VAC™software must be installed on the PC, the communication connection must be made to the con- w.c. See Page 28, Figure 22. Damper couplings should be found near the end of the radiant portion of troller and all wiring of the ROBERTS GORDON® ULTRAVAC™ control boards, relay boards, burners, the pipe in each branch or where a branch connects to other branches at a cross or tee. See Page 29, pumps and VFD must be completed before starting Figure 23. the commissioning procedure. 7.1 Setting The CORAYVAC® End Burner Vacuum It is important to understand that the frequency that the VFD runs the motor at, determines the speed of the impeller in the pump. Variation of the impeller speed will increase or decrease vacuum in the system. The following procedure will help you set minimum and maximum VFD frequency settings to achieve proper vacuum in the system. Step 7.1.1 At the controller, turn on the 24 V power switch on the relay board. At the PC, "connect" to the controller (see the ROBERTS GORDON® ULTRAVAC™Software Installation and Operation Manual, P/N 10081600NA for details) and then open the manual override screen(Alt + M). On the screen, click the "ON" button for the vacuum pump. Wait 30 seconds then click the ON button for zones 1-3. Step 7.1.2 The pump should be running and the burners should light within 60 seconds. At the VFD, verify that the number displayed on the LCD screen is "60.0" If it is lower than 60.0, hit the "up" arrow button on the VFD until the number reads 60.0 Let the burners fire for approximately 20-30 minutes to warm up the system. Using a manometer, check the end vent vacuum in each zone (each branch of burners). See Page 28, Figure 22. If the lowest end vent vacuum reading is above 3.0" w.c., reduce the vacuum pump speed. Generally the lowest end vent vacuum reading is on the longest branch of the system. Use the down arrow button on the VFD to reduce the frequency of the output signal to the pump, thus reducing the pump speed and lowering the end vent vacuum reading. Continue to reduce the frequency until the end vent vacuum reading is between 2.5" - 3.0" w.c. Make note of this frequency setting below. The frequency is found on the VFD’s LCD screen. 2.5" w.c. - 3.0" w.c. VFD Frequency Setting Record Frequency Setting Here: To avoid damage to the pump motor, do not adjust the frequency above 60.0 Hz. Verify that the end vent vacuum readings in the remaining branches are 27 ROBERTS GORDON® ULTRAVAC™ CONTROLLER INSTALLATION MANUAL FIGURE 22: End Vent Vacuum Combustion Chamber at end burner position End Vent Insert tubing about 6" (15cm) into end vent. 6 5 4 3 2 1 0 1 2 3 4 Manometer 5 6 Approximate reading after adjusting VFD frequency setting and/or damper couplings. (~ ~ 2.5"-3" w.c.) 28 Damper Zone 1 Damper Coupling NOTE: Damper setting will vary Zone 1 Damper Coupling Zone 2 Zone 2 Damper Coupling Zone 1 End Vent Zone 3 Damper Coupling Pump Damper Zone 3 Zone 2 End Vent Zone 3 End Vent SECTION 7: COMMISSIONING THE CORAYVAC® SYSTEM FIGURE 23: Possible Damper Couplings Locations 29 ROBERTS GORDON® ULTRAVAC™ CONTROLLER INSTALLATION MANUAL Step 7.1.3 After setting end vent vacuums between 2.5" w.c. and 3.0" w.c., while all the burners are still operating, use the down arrow button on the VFD to reduce the frequency of the output signal to the pump. Reduce the frequency of the VFD until the manometer at each of the end vents reads 1.0" w.c. 1.2" w.c. Make note of this frequency setting below. The frequency is found on the VFD’s LCD screen. 1.0" w.c. - 1.2" w.c. VFD Frequency Setting Record Frequency Setting Here: Step 7.1.4 Return to the PC and click the vacuum pump and zones to "OFF". Step 7.1.5 Using the procedure described in Section 6.1.1 through Section 6.1.5, alter the following parameters on the VFD: Parameter Parameter Factory New Number Name Default Setting P05 Standard 01 03 Speed Source P45 Speed at 0.0Hz Frequency Minimum Setting noted in Signal Section 7.1.3 P46 Speed at 60.0Hz Frequency Maximum Setting noted in Signal Section 7.1.2 Step 7.1.6 Return to the PC and click the vacuum pump and three zones to "AUTO", then click exit. 30 SECTION 8: REPLACEMENT PARTS SECTION 8: REPLACEMENT PARTS 8.1 ROBERTS GORDON® ULTRAVAC™ Controller Replacement Parts Use only genuine ROBERTS GORDON® replacement parts. Use of parts not specified by Roberts-Gordon voids warranty. Failure to follow these instructions can result in property damage. FIGURE 24: ROBERTS GORDON® ULTRAVAC™ Controller Components Diagram 24 V Power 1 A Fuse L1 POWER OUTPUT 1 OUTPUT 2 OUTPUT 3 OUTPUT 4 OUTPUT 5 OUTPUT 6 OUTPUT 7 OUTPUT 8 L2 GRD L1 L2 GRD L1 L2 GRD L1 L2 GRD L1 L2 GRD L1 L2 GRD L1 L2 GRD L1 L2 GRD L1 L2 GRD 24 V Power Switch Relay Board Plug-In Relays Control Board Power LED Reset Button Control Board URV Eprom Chip Run LED Modem Chip (only located on Central Controller) Description Control Board Relay Board Analog Output Board URV Eprom Chip Plug-In Relay Modem Chip (located only on central controller) 1 A Fuse (Relay Board) ROBERTS GORDON® ULTRAVAC™ Indoor Sensor °F (not shown) ROBERTS GORDON® ULTRAVAC™ Outdoor Sensor (not shown) ROBERTS GORDON® ULTRAVAC™ Indoor Sensor °C (not shown) PC Connection Cable Package (not shown) RS-485 Converter Package (not shown) TCP/IP Communication Module (not shown) Comms Equalization Cable (not shown, located only on Central Controller) Telephone Sharing Device, 4 port Lamp Socket (for enclosure door, not shown) Lamp 24 Vac (for enclosure door, not shown) Lens, Red (for enclosure door, not shown) Analog Output Board Part Number 10080101 10080200 10080141 10080121 10080212 10080142 10080211 10081500 10081501 10081502 10080410 10080430 10080440 10080450 10080600 91321610 91321611 91321612 31 ROBERTS GORDON® ULTRAVAC™ CONTROLLER INSTALLATION MANUAL Part Number 91321613 Description Lens, Green (for enclosure door, not shown) 8.2 Variable Frequency Drive Replacement Parts Use only genuine ROBERTS GORDON® replacement parts. Use of parts not specified by Roberts-Gordon voids warranty. Failure to follow these instructions can result in property damage. FIGURE 25: Variable Frequency Drive Components Diagram Input Fuse Holders Fuse Holder Levers Grounding Block L1 L2/N PE B B+ EPM U V W PE 17 16 1 2 5 6 11 13A 13B 13E 25 Mode PE Relay 120 V Variable Frequency Drive Description Variable Frequency Drive, 1 HP, 120 V 1 Ø Input (for use with EP-203) Variable Frequency Drive, 3/4 HP, 230 V 1 Ø Input (for use with EP-203) Variable Frequency Drive, 2 HP, 230 V, 1 Ø Input (for use with EP-303) Relay, 120 V Fuse 10 A (for .75 HP 230 V VFD) Fuse 25 A (for 1 HP 120 V VFD and 2 HP 230 V VFD) Grounding Block Fuse Holder 32 Part Number 10081201 10081202 10081203 90429100 91321410 91321425 91321300 91321400 SECTION 8: REPLACEMENT PARTS 8.3 Replacement Parts Instructions WARNING Electrical Shock Hazard Disconnect electrical power before servicing. Replace cover before operating. Failure to follow these instructions can result in death or electrical shock. 8.3.1 Plug-In Relay To replace the plug-in relay, turn off 120 V power to the relay board. Turn off the 24 V power switch on the relay board. Locate the malfunctioning relay and pull the relay from its socket. Fit a new relay in the socket. Return 120 V power to the relay board and turn on the 24 V power switch on the relay board. Press the reset button on the control board and close the doors. 8.3.2 Control Board Power LED The LED is linked to the 24 Vac input which supplies the control board with power. If the LED is not lit, there is no power to the board. If this is the case, check the 120 V power wiring to the relay board, the 24 Vac power wiring from the relay board to the control board and the 24 V power 1 A fuse. 8.3.3 10080121 Eprom Chip The Eprom is where the controller's program (not settings) is stored. To take out the Eprom. The following steps must be taken: Turn off the power to the control board by turning off the 24 V power switch on the relay board. Locate the Eprom and with a small terminal screw driver placed underneath the device, pry the Eprom out of the socket. To fit a new Eprom, look for the notch on one end of the Eprom.There is a notch on the socket and a notch on the Eprom. The Eprom should be fit so that the notch on the socket and the Eprom are aligned. Turn on the 24 V power switch on the relay board, press the reset button on the control board and close the doors. 8.3.4 24V Power 1 A Fuse To replace the 1 A fuse, turn off power to the relay board and turn off the 24 V power switch on the relay board. Locate the 1A fuse and remove it from its socket using a flathead screwdriver. Twist the fuse a 1/4 turn counter-clockwise until the fuse pops out of the socket. Replace it with a new fuse. Slide the fuse back into the socket, press down and turn the fuse a 1/4 turn clockwise until secure. Return 120 V power to the relay board and turn on the 24 V power switch on the relay board. Press the reset button on the control board and close the doors. 8.3.5 Variable Frequency Drive (VFD) To replace the Variable Frequency Drive, turn off all power to the drive assembly at the breaker or disconnect switch. Turn off 120 V power to the relay board inside the ROBERTS GORDON® ULTRAVAC™ Controller. Turn off the 24 V power switch on the relay board. Mark all wires connected to the VFD, noting the terminals that they are secured to. Remove all wires from the VFD terminals. Remove the VFD from its mounting plate by removing the four securing screws. Verify that the input voltage noted on the rating plate of the VFD matches the input voltage of the old VFD. Secure the new VFD to the mounting plate with the four screws. Return all wires to the correct VFD terminals. If possible, it may be easier to partially rewire the new VFD before mounting it to the mounting plate. Close the door and return power to the VFD. Return 120 V power to the relay board. Turn on the 24 V power switch on the relay board. Press the reset button on the control board and close the doors. 8.3.6 Variable Frequency Drive 25 A or 10 A Fuse To replace a fuse, turn off input power to the variable frequency drive assembly at the breaker or disconnect switch. Turn off 120 V power to the relay board inside the ROBERTS GORDON® ULTRAVAC™ Controller. Turn off the 24 V power switch on the relay board. Inside the VFD assembly, open the fuse holder by pulling down the lever to expose the fuse. Remove the old fuse and insert a new fuse. Verify the correct fuse rating, 25 A for 1 HP 120 V VFD or 2 HP 230 V VFD, 10 A for the .75 HP 230 V VFD. Close the fuse holder. Return power to the VFD assembly and verify that the VFD LCD screen is on. (dashes displayed). Close the VFD assembly door. Return 120V power to the relay board. Turn on 24 V power switch on the relay board. Press the reset button on the control board and close the doors. 33 34 START Yes Yes Yes No Set the setpoint above the zone temperature. Verify scheduling times and adjust the correct setpoint (occupied or setback). Verify zone temperature sensor reading on the Board Status screen. Does the pump turn ON? Yes Yes Is the red RUN LED on the control board blinking? Yes No No Is the green power LED on the No control board lit? Yes Is the 24 Vac switch on the relay board on? No Is the power light bulb burnt out? No Is the power light on the control Yes panel lit? On the Manual Override screen (Alt+M), set the vacuum Yes pump status to "Auto". Does the pump go on? No No Are current conditions being continually updated on the No Board Status screen? Press the reset button on the control board. Is the red "RUN" No light blinking. Is there 24 Vac across the 24 V control board power supply Yes terminals on the relay board? No Is there 120 V at the relay board No power input terminals L1 and L2? Yes Replace 24 V power 1 A fuse on relay board. See Section 8. Contact your ROBERTS GORDON® Independent Distributor. Yes Are shield wires from RS-485 communication bus wiring and VFD 0-10 V signal wiring correctly twisted and/or grounded? Yes Are pump and/or burners No turning on and off erratically? No Yes Verify communication wiring between PC and controller. Verify wiring between sensor and No controller. Verify shield wires are twisted and/or grounded. Does the pump light on the controller turn on? Contact your ROBERTS GORDON® Independent Distributor. Yes Is there 24 Vac at the 24 V control board power input? Check circuit breaker and controller power supply. No No Is the bulb for the pump light on the controller burnt out? No Is the pump light on the controller lit? Yes On the Manual Override screen (Alt+M), set the vacuum pump status to ON. Does the pump light on the controller come on? No Rectify wiring between 24 V control board power supply and 24 V control board power input. Yes Yes ROBERTS GORDON® ULTRAVAC™ CONTROLLER INSTALLATION MANUAL SECTION 9: TROUBLESHOOTING FIGURE 26: Troubleshooting Flow Chart Yes Yes Check circuit breaker and VFD power supply. Rectify wiring between 120 V relay and VFD terminals 1 and 11. No Yes Is there 24 Vac across 24 V input connection #8 on the No relay board? No Yes Is there power (120 V or Yes 230 V) between fuse holder outputs? No Is there power (120 V or 230 V) between fuse holder Yes outputs? No Is there power (120 V or 230 V) between L1 and L2/N Yes inputs on the VFD? No Is the LCD display of the VFD on? Is the red LED on plug-in No relay #8 on the relay board Yes lit? Is there 120 V between VFD Yes terminals 1 and 11? Yes Replace plug-in relay. See section 8. Verify external wiring No diagrams, Does the pump turn on? Yes Replace fuse. See section 8. Rectify wiring between fuse holder outputs and VFD power inputs L1 and L2/N Replace VFD. See section 8. Is there an error showing on the LED display? Yes No Motor bearings may have failed. Repace motor. No Is the pump impeller obstructed? No Disconnect power to the motor. Does the motor shaft turn freely? No Is the pump motor hot? Yes Rectify wiring between VFD and pump. Replace VFD. See section 8. Motor may have tripped Yes overload. Wait 10-15 minutes and reset. Is there power between any No two input wires at the pump? Yes Is there 120 V between any No two output (motor) terminals (U,V or W)? Replace 120 V relay. See section 8. Rectify wiring between controller and 120 V relay. Replace plug-in relay or relay board. See section 8. Refer to the VFD manufacturer's Installation and Operation Manual to clear error. No Is there 120 V between output terminals on 120 V relay. No Is there 120 V into 120 V relay in the variable Yes frequency drive assembly. No Is there 120 V at output # 8 Yes on the relay board? Secure wiring between 24 V Output #8 on control board and 24 V input connection #8 on relay board. Yes Yes SECTION 9: TROUBLESHOOTING 35 No Yes Yes Wrong end vent plate may be installed. Make sure plate and burner match. No Is the end vent vacuum setting too high? Do all the burners ignite smoothly? Yes Adjust system for proper vacuum at the end vent. See Section 7 for details. Contact your ROBERTS GORDON® Independent Distributor. Is there continuity across Is there 24 Vac across the meter input #4 (pressure Yes control board 24 V output switch input) on the control (#1-3) for that zone? board? No No No Yes No No Verify wiring between controller and burner. Yes Replace plug-in relay. See Section 8. Yes Is there proper gas pressure and flow to the burners? Yes Microprocessor failure within module Ignition lockout Lockout of module after 3 tries Three flashes Normal Replace ignition module. Troubleshoot Ends Check for proper vacuum at end vent. See Section 7 for details. Recycle unit: check for spark and valve opening and replace:if none, replace module Replace module Wait for valve to open Ignition Module Diagnostic Codes: Problem Solution Replace burner transformer. No Is there 24 V at the burner transformer secondary (blue and yellow wires)? No Pre-purge. Wait 45 seconds. Do the burners light? Yes Check LED on module and refer to LED codes below. No Unplug burner, wait 10 seconds, then plug it in again. Does the Yes ignition module begin ignition sequence by sparking? Yes No Correct gas problem. See gas piping section of CORAYVAC® IOS manual (P/N 127102NA) Steady on LED 4 second steady flash at start of cycle Secure wiring between 24 V output on the control board and output connection on the relay board. No Is there 24 Vac across the Yes relay board's appropriate 24 V output connection (#1-3)? On the relay board, is the appropriate zone relay (#1- Yes Is there power at the burner Yes recepticle? 3) LED lit? Are shield wires from RS-485 communication wiring and VFD 0-10 V signal wiring correctly twisted and/or grounded? Yes Verify pressure switch wiring and operation. Replace pressure switch if necessary. After 45 seconds pre-purge period, do the burners light? No Yes Are pump and/or burners Yes turning on and off erratically? Yes Contact your ROBERTS GORDON® Independent Distributor. FIGURE 27: Troubleshooting Flow Chart (continued) Yes Yes TROUBLESHOOT ENDS. If problems persist, contact No your ROBERTS GORDON® Independent Distributor. Yes Does the pump shut down after a 2 minute post-purge No period? Yes Do burners shut off after the call for heat is satisfied? No No Is the flame low? No Is the system leaking water? Yes No Do the burners lockout intermittently? Yes Consult wiring instructions in EP-201/203 pump manual (P/N 127200NA) for reversal instructions. Adjust system for proper vacuum at the end vent. See section 7 for details. Contact ROBERTS GORDON® at www.rg-inc.com Make sure that all sensor set points are satisfied. Make sure that all sensor set points are satisfied. No Is the rotation of the pump motor correct? Yes No Follow burner check procedure given above. Adjust system for proper vacuum at the end vent. See section 7 for details. Is the vacuum setting too low? Yes Yes No Are there any "dead" burners in a branch? Adjust the gap or replace the electrode. Replace the electrodes. Is the vacuum setting too low? Yes Electrode gap should be 1/8". Is the gap too small? Yes Inspect the electrodes on the affected burners. Are they No burned or damaged? Yes No No Replace filters as necessary. Yes Check for blockage in the outside air supply or for leaks in the system. Replace filters as necessary. Are the filters on the burners dirty? Yes No No No Yes Are the filters on the burners dirty? Consult wiring instructions in EP-201/203 pump manual (P/N 127200NA) for reversal instructions. Is the rotation of the pump motor correct? Ignition module may have failed. Replace module. Couplings may be installed improperly. Lined couplings should be used for tailpipe. All couplings should be snug around tube. SECTION 9: TROUBLESHOOTING 37 ROBERTS GORDON® ULTRAVAC™ CONTROLLER INSTALLATION MANUAL 38 SECTION 10: THE ROBERTS GORDON® ULTRAVAC™ LIMITED WARRANTY SECTION 10: THE ROBERTS GORDON® ULTRAVAC™ LIMITED WARRANTY ROBERTS-GORDON WILL PAY FOR: Within 42 months from date of shipment from RobertsGordon, replacement parts will be provided free of charge for any part of the controller which fails due to a manufacturing or material defect. Roberts-Gordon will require the part in question to be returned to the factory. Roberts-Gordon will, at its sole discretion, repair or replace after determining the nature of the defect and disposition of part in question. ROBERTS GORDON® Replacement Parts are warranted for a period of 18 months from date of shipment from Roberts-Gordon or the remaining ROBERTS GORDON® ULTRAVAC™ warranty. ROBERTS-GORDON WILL NOT PAY FOR: Service trips, service calls and labor charges. Shipment of replacement parts. Claims where the total price of the goods have not been paid. Damage due to: • Improper installation, operation or maintenance. • Misuse, abuse, neglect, or modification of the ROBERTS GORDON® ULTRAVAC™ in any way. • Use of the ROBERTS GORDON® ULTRAVAC™ for other than its intended purpose. • Incorrect gas or electrical supply, accident, fire, floods, acts of God, war, terrorism, or other casualty. • Improper service, use of replacement parts or accessories not specified by Roberts-Gordon. • Failure to install or maintain the ROBERTS GORDON® ULTRAVAC™ as directed in the Installation, Operation and Service manual. • Relocation of the ROBERTS GORDON® ULTRAVAC™ after initial installation • The use of the ROBERTS GORDON® ULTRAVAC™ in a corrosive atmosphere containing contaminants. • The use of the ROBERTS GORDON® ULTRAVAC™ in the vicinity of a combustible or explosive material. • Any defect in the ROBERTS GORDON® ULTRAVAC™ arising from a drawing, design, or specification supplied by or on behalf of the consumer. • Damage incurred during shipment. Claim must be filed with carrier. WARRANTY IS VOID IF: The ROBERTS GORDON® ULTRAVAC™ is not installed by an electrician qualified in the installation and service of control systems for heating equipment. You cannot prove original purchase date and required annual maintenance history. READ YOUR INSTALLATION, OPERATION AND SERVICE MANUAL If you have questions about your controller, contact your installing professional. Should you need Replacement Parts or have additional questions, call or write RobertsGordon: U.S.A. 1250 William Street P.O. Box 44 Buffalo, New York 14240-0044 716.852.4400 Canada 76 Main Street West, Unit 10 Grimsby, Ontario L3M 1R6 905.945.5403 On the web at: www.rg-inc.com Roberts-Gordon's liability, and your exclusive remedy, under this warranty or any implied warranty (including the implied warranties of merchantability and fitness for a particular purpose) is limited to providing replacement parts during the term of this warranty. Some jurisdictions do not allow limitations on how long an implied warranty lasts, so this limitation may not apply to you. There are no rights, warranties or conditions, expressed or implied, statutory or otherwise, other than those contained in this warranty. Roberts-Gordon shall in no event be responsible for incidental or consequential damages or incur liability for damages in excess of the amount paid by you for the ROBERTS GORDON® ULTRAVAC™. Some jurisdictions do not allow the exclusion or limitation of incidental or consequential damages, so this limitation or exclusion may not apply to you. This warranty gives you specific legal rights, and you may also have other rights which vary from jurisdiction to jurisdiction. Roberts-Gordon shall not be responsible for failure to perform under the terms of this warranty if caused by circumstances out of its control, including but not limited to war, fire, flood, strike, government or court orders, acts of God, terrorism, unavailability of supplies, parts or power. No person is authorized to assume for Roberts-Gordon any other warranty, obligation or liability. LIMITATIONS ON AUTHORITY OF REPRESENTATIVES: No representative of Roberts-Gordon, other than an Executive Officer, has authority to change or extend these provisions. Changes or extensions shall be binding only if confirmed in writing by Roberts-Gordon's duly authorized Executive Officer. The data plate and/or serial number are removed, defaced, modified or altered in any way. The ownership of the ROBERTS GORDON® ULTRAVAC™ is moved or transferred. This warranty is nontransferable. Roberts-Gordon is not permitted to inspect the damaged controller and/or component parts. 39