1
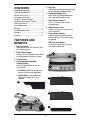
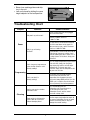
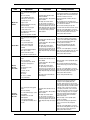
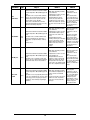
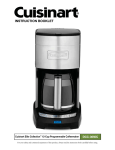
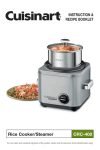
Elite Collection
TM
INSTRUCTION AND
RECIPE BOOKLET
Griddler® Deluxe
GR-150C
For your safety and continued enjoyment of this product, always read the instruction book carefully before using.
IMPORTANT
SAFEGUARDS
15. WARNING: TO REDUCE THE RISK
OF FIRE OR ELECTRIC SHOCK,
ONLY AUTHORIZED PERSONNEL
SHOULD DO REPAIRS.
16. Do not operate your appliance in an
appliance garage or under a wall
cabinet. When storing in an
appliance garage always unplug
the unit from the electrical outlet.
Not doing so could create a risk of
fire, especially if the appliance
touches the walls of the garage or
the door touches the unit as it
closes.
When using electrical appliances, basic
safety precautions should always be
followed, including the following:
1. READ ALL INSTRUCTIONS.
2. Unplug from outlet when not in
use and before cleaning. Allow to
cool before putting on or taking
off parts, and before cleaning
appliance.
3. Do not touch hot surfaces; use
handles, knobs or buttons.
4. To protect against fire, electric
shock, and injury to persons, DO
NOT IMMERSE CORD OR PLUG
in water or other liquids.
5. Close supervision is necessary when
any appliance is used by or near
children.
6. Do not operate any appliance with a
damaged cord or plug, or after the
appliance has malfunctioned or has
been damaged in any manner.
Return the appliance to the nearest
Cuisinart Repair Center for
examination, repair or adjustment.
7. The use of accessory attachments
not recommended by Cuisinart may
result in fire, electrical shock, or risk
of injury to persons.
8. Do not use outdoors.
9. Do not let power cord hang over
edge of table or counter, or touch
hot surfaces.
10. Do not place on or near hot gas or
electric burners, or in a heated oven.
11. Unplug the unit when finished using.
12. Do not use appliance for other than
intended use.
13. Extreme caution must be exercised
when moving an appliance
containing hot oil or other hot liquids.
14. Always attach plug to appliance first,
then plug cord in the wall outlet. To
disconnect, turn both Temperature
Knobs of UPPER PLATE and
LOWER PLATE to OFF setting, then
remove plug from wall outlet.
SAVE THESE
INSTRUCTIONS
FOR HOUSEHOLD
USE ONLY
SPECIAL CORD SET
INSTRUCTIONS
A short power-supply cord is provided to
reduce the risks resulting from becoming
entangled in or tripping over a longer
cord. Extension cords may be used if
care is exercised in their use.
If an extension cord is used, the marked
electrical rating of the extension cord
should be at least as great as the
electrical rating of the appliance, and the
longer cord should be arranged so that it
will not drape over the countertop or
tabletop where it can be pulled on by
children or animals, or tripped over.
NOTICE
This appliance has a polarized plug (one
blade is wider than the other) to reduce
the risk of electric shock. This plug will fit
in a polarized outlet only one way. If the
plug does not fit fully in the outlet, reverse
the plug. If it still does not fit, contact a
qualified electrician. Do not modify the
plug in any way.
2
CONTENTS
5. Drip Tray
Collects grease and removes from base
for easy cleanup (dishwasher safe).
Important Safeguards ............................ 2
Features and Benefits ............................ 3
Before the First Use ............................... 4
Assembly Instructions ........................... 4
Griddler® Deluxe Positions .................... 4
Operating the Griddler® Deluxe ............. 5
Cleaning and Care ................................. 6
User Maintenance .................................. 6
Storage ................................................... 6
Troubleshooting Chart ........................... 7
Receipe ................................................... 8
6. Cleaning/Scraping Tool
Helps clean grill and griddle plates
after cooking (dishwasher safe).
7. Plate Release Buttons
Push in to release and remove
cooking plates.
8. Hinge Release Lever
Allows the cover to extend back to
the Flat position.
9. Cover Height Adjuster
Features 6 preset height positions
for top melting. Locks cover closed
for storage.
Warranty ............................................... 27
FEATURES AND
BENEFITS
BPA Free (not shown)
All materials that come in contact
with food are BPA free.
1. Base and Cover
Solid construction with stainless steel
self-adjusting cover.
2. Panini-Style Handle
Sturdy cast-metal handle adjusts cover
to accommodate thickness of food.
1
2
3. Control Panel
4. Removable and Reversible
Cooking Plates
Nonstick and dishwasher safe for
easy cleanup.
3
a. Grill Side: Perfect for grilling steak,
burgers, chicken and vegetables.
b. Griddle Side: Prepare pancakes,
eggs, heat tortillas, even sear
scallops.
4a
6
4b
8
7
7
5
9
3
BEFORE THE
FIRST USE
Remove all packaging materials and any
labels or stickers from your grill. Be sure
all parts (see Features and Benefits) have
been included before discarding any
packaging materials. You may want to
keep the box and packing materials in the
event that the unit has to be shipped in
the future.
3. Slide the drip tray into the base at the
rear of the unit from the right side.
Before using your Cuisinart® Griddler®
Deluxe for the first time, wipe the base,
cover and controls with a damp cloth.
Thoroughly clean cooking plates, drip tray
and scraping tool; all are dishwasher safe.
Refer to Assembly Instructions below for
plate removal.
4. Plug the cord into a standard
electrical outlet.
ASSEMBLY
INSTRUCTIONS
5. Just follow the instructions below
to position the unit, and you’re ready
to cook!
Place base on a clean, flat surface where
you intend to cook, with the controls
directly in front of you.
To insert the cooking plates:
GRIDDLER® DELUXE
POSITIONS
1. Choose the side(s) you intend to cook
on. The two cooking plates each have
two sides:
STORAGE Position – Upper plate/cover
rests flat on the lower plate/base and
cover height adjuster is in Lock position.
PREHEAT Position – Upper plate/
cover rests flat on the lower plate/
base and cover height adjuster is in
Unlock position.
a. Grill side: ribbed surface intended for
grilling steaks, hamburgers, chicken,
seafood and vegetables. Also can be
used for panini and other toasted
sandwiches.
OPEN COOKING Position –
To cook on lower plate only: Lift the
handle so upper plate/cover is vertical.
Plate does not “float” in this position.
b. Griddle side: smooth surface
intended for cooking bacon and eggs,
pancakes and French toast. Also can
be used for panini and other toasted
sandwiches.
a.
CLOSED COOKING Position –
To Contact Grill or Panini Press: Start
with unit in Open Cooking position.
Lower top carefully until plate contacts
food. Hinge will automatically release the
plate, allowing it to “float” and rest evenly
on food. If necessary, press down slightly
on front of upper plate/cover wearing
oven mitt to release hinge.
b.
2. Locate the metal brackets at the back
of the housing. Tilt the back end of the
plate and line up the cutouts at the
back of the plate with the metal
brackets. Slide the plate underneath
the brackets and push down the front
end of the plate. It will snap into place.
Insert the second plate into the upper
housing as you did with the first plate.
To Top Melt: Start with unit in Open
Cooking position. Wearing an oven mitt,
press down slightly on front of upper
plate/cover to release hinge, allowing
plate to “float.” Lower it to close to the
4
desired height, then slide the cover height
adjuster into a notch to set the position.
2. Turn the UPPER PLATE and/or LOWER
PLATE temperature to the desired
setting – from Warm to 450°F.
See below for recommendations:
Cooking Option
FLAT COOKING Position –
To cook on Full Grill, Full Griddle or
Half Grill/Half Griddle: Upper plate/
cover opens to lie flat, level with the
lower plate/base.
Plate Selection
Contact Grill
Both
Panini Press
Both
Full Grill
Both
Full Griddle
Both
Half Grill and Half Griddle
Both
Half Grill or Half Griddle
Lower or Upper
Top Melt
Both
3. A red indicator light on the selected
control will illuminate to indicate that
the power is on. It may take up to 12
minutes to reach operating temperature,
depending on the temperature level
that was set.
To adjust to this position from the Preheat
position, put on oven mitts, open unit and
slide the hinge release lever up while
pushing the handle back. The upper plate/
cover will sit flat, resting on the handle.
To adjust to this position from Closed
Cooking position, first close the unit,
resting upper plate/cover flat on lower
plate/base. You will hear the upper plate
click into place. Open unit and slide the
hinge release lever up while pushing the
handle back. The upper plate/ cover will
sit flat, resting on the handle.
NOTE: The first time you use the
Griddler® Deluxe, it may have a slight
odor and may smoke a bit. This is
normal and common to appliances with
nonstick surfaces.
4. When the thermostat has reached
operating temperature, a green
indicator light inside the chosen control
will indicate that the Griddler ® Deluxe is
ready for cooking.
To adjust to this position from Open
Cooking position, grasp handle and pull
slightly forward, then slide the hinge
release lever up while pushing the handle
back. The upper plate/cover will sit flat,
resting on the handle.
5. You may vary the setting of the control
knob at any time during cooking.
6. To turn the plate(s) off, simply turn the
temperature dial(s) to the OFF position.
NOTE: If the unit is on and heated for
more than 2 hours, it will automatically
shut off. This is a safety feature of the
Griddler® Deluxe. To reactivate, simply
turn either dial.
SEAR Function
You can sear foods at 500°F for up to
2 minutes. NOTE: We do not recommend
putting food on the grill during preheat.
OPERATING THE
GRIDDLER® DELUXE
1. Follow Standard Cooking, Step 1.
Standard Cooking
2. Press UPPER SEAR and/or LOWER
SEAR button to initiate SEAR function.
The LED light in the UPPER PLATE
and/or LOWER PLATE temperature dial
will go off.
1. Make sure the Griddler ® Deluxe is in
the PREHEAT position. We recommend
you preheat with grill in the closed
position.
5
5. Wipe down the plates to remove any
leftover food. The cooking plates, drip
tray and cleaning/scraping tool can be
cleaned by hand or on the top shelf of
the dishwasher. The housing base,
cover and control panel can be wiped
clean with a soft, dry cloth. For tough
stains, dampen cloth. Never use an
abrasive cleaner or harsh pad.
3. The LED light around the UPPER SEAR
and/or LOWER SEAR button(s) will
illuminate red indicating the unit is
heating to 500˚F.
4. When the plate(s) reach the SEAR
temperature, the LED light around the
UPPER SEAR and/or LOWER SEAR
button(s) will turn green and will flash
ten times to allow enough time to put
the food on the plate(s).
USER MAINTENANCE
5. After 10 seconds, the green light will
stop flashing and the upper and/or
lower plates will sear for 2 minutes.
• Always exercise caution when handling
the Griddler ® Deluxe during cooking.
Open and close the unit using the
handle only. Do not touch the arms or
top cover during or immediately after
cooking, as they become hot during
use. We recommend you wear oven
mitts when handling the Griddler®
Deluxe to prevent burns.
6. When the sear cycle has finished, the
LED light around the UPPER SEAR
and/or LOWER SEAR button(s) will go
off and the unit will adjust to the
temperature(s) selected on the
corresponding temperature knobs.
7. To cancel SEAR, press the SEAR
button(s) again. The LED light(s) will
turn off and the unit will adjust to the
temperature(s) selected on the
corresponding temperature knobs.
• Never use metal utensils, which will
scratch the nonstick plates. Instead,
use wooden or heat-proof plastic
utensils.
• Never leave plastic utensils in contact
with the hot grill plates. This includes
the cleaning tool that is included.
CLEANING AND CARE
1. Once you have finished cooking, turn
Plate Selector dial(s) to the OFF
position and unplug the power cord
from the wall outlet. Allow the unit to
cool down for at least 30 minutes.
• In between recipes, use cleaning/
scraping tool to scrape excess food
buildup through grease channels and
into the drip tray. Wipe off any residue
with a paper towel before proceeding
with next recipe.
2. Use the cleaning/scraping tool to
remove any leftover food from the
cooking plate(s).
• Allow the Griddler® Deluxe to cool
down completely (at least 30 minutes)
before cleaning.
3. Dispose of grease from the drip tray,
once cooled.
• Any other servicing should be
performed by an authorized service
representative.
4. Press the plate release buttons to
remove cooking plates from the
housing. Be sure that the plates have
cooled completely before handling
(at least 30 minutes).
STORAGE
• Wrap the power cord around the
cord storage clips at the back of
the base.
6
• Store clean cooking plates and drip
tray in the unit.
• Lock unit closed by sliding the cover
height adjuster to the Lock position.
Troubleshooting Chart
Subject
Question
Answer/Solution
Check to make sure your unit is plugged
into a functional outlet.
Why won’t my unit turn on?
Contact Customer Service at
1-800-472-7606.
It is possible the unit overheated. Wait for
the unit to cool down and try again. If it
does not turn back on, contact Customer
Service at 1-800-472-7606.
Power
Why is my unit turning
itself off?
If your Griddler® Deluxe is not turned off or
if you do not change any settings, it will
shut off automatically after 2 hours. This is
a safety feature. To reactivate, simply turn
either dial.
Can I change my temperature or
plate selection when the unit is
already cooking?
Yes. To change temperature of your current
plate selection, simply turn the plate’s
temperature dial and the unit will adjust
automatically. To change your plate
selection, simply turn the temperature dial
for your new selection.
Can I sear when I’m
already cooking?
Yes. Simply press the SEAR button(s)
and the plates will preheat to sear
temperature. We recommend you take
the food off during SEAR preheat. Once the
SEAR cycle is complete, the unit will revert
back to previously selected temperatures.
Are the parts and accessories
dishwasher safe?
Yes, all removable parts are
dishwasher safe. Do not immerse or
put the base of the unit in the
dishwasher. Clean it and the control
panel with a damp cloth.
Food residue is sticking to the
plates. How do I clean them
without damaging them?
Use the scraper tool provided to scrape off
any excess food buildup. Do not use metal
utensils to clean the plates as they can
damage the nonstick coating.
Programming
Cleaning
7
®
The GRIDDLER DELUXE
a guide to perfect meals
Table of Contents
COOKING GUIDE AND FOOD TEMPERATURE CHART ............................................................................ 10
PIZZA CHART ......................................................................................................................................... 11
SANDWICH CHART ................................................................................................................................ 13
STEAK CHART....................................................................................................................................... 15
RECIPES ................................................................................................................................................ 16
Perfect Pancakes ................................................................................................................................... 16
Crab Cakes ............................................................................................................................................ 16
Classic Tomato Bruschetta ..................................................................................................................... 17
The All-American Burger......................................................................................................................... 18
Open-Faced Turkey Sandwich ................................................................................................................. 19
Fish Tacos .............................................................................................................................................. 19
Grilled Vegetables .................................................................................................................................. 20
The Perfect Combination: Grilled Potato “Chips” and Onion Rings .......................................................... 21
Garlic and Herb Marinated Lamb Chops ................................................................................................. 21
Teriyaki Glazed Salmon ........................................................................................................................... 22
Rib-Eye Steaks ...................................................................................................................................... 23
Compound Herb Butter .......................................................................................................................... 24
9
Cooking Guide
and Food Temperature Chart
Food
Bacon
Preparation
Place in a single layer.
Plate and
Position
Suggested Grilling
Temperatures and Times
Grill or Griddle; Flat or
Open
Place bacon on cold plates. Turn to 450°F (220°C). Cook
until desired doneness. Should take about 20 to 25
minutes for 1 pound of bacon (if using the Flat position).
Beef, boneless
steak (refer to the
Steak Chart for
specific times and
temperatures)
Up to 2 (5 cm) inches thick.
Season to taste. Drain off
marinade completely if marinated
before grilling.
Allow to come to room temperature
for best results.
Grill; Closed, Open or
Flat
When cooking in the Closed position, preheat to SEAR
(with 450°F [220°C] as the default). Put the steak(s) on
the preheated lower grill plate. Using the cover height
adjuster, set the upper plate so it is just sitting on top of
the steak, but not pressing it. Sear for 2 minutes, then
the grill will revert to 450°F (220°C). Cook for 2 to 5
minutes, depending on thickness and desired doneness.
Rest for 5 minutes before serving.
When cooking in the Open or Flat positions, preheat to
450°F (220°C). Put the steaks on the preheated grill
plates. Cook for about 4 to 6 minutes per side, depending
on the thickness of the steaks and desired doneness.
Rest for 5 minutes before serving.
Chicken Breasts
(boneless)
Pound to an even thickness of no
more than 1 inch (2.5 cm).
Grill; Closed
Preheat to 400°F (200°C). Cook for 7 to 9 minutes.
(Internal temperature should be 165˚F [74°C]- juices will
run clear with no signs of pink.)
Chicken Thighs
(boneless)
Spread to even thickness.
Grill; Closed
Preheat to 400°F (200°C). Cook for 8 to 10 minutes.
(Internal temperature should be 170˚F [75°C]- juices will
run clear with no signs of pink.)
Fish Steaks (sword,
tuna, salmon/boned)
No more than 1 to 2 inches
(2.5 to 5 cm) thick.
Grill; Closed, Open or
Flat
Preheat to 400˚F (200°C). Cook for 6½ to 7 minutes
when grilling in the Closed position. 7 to 12 minutes in
the Flat position, flipping halfway through. Timing
depends on the firmness of the fish.
Grill; Closed (with cover
height adjuster)
Preheat to 450°F (220°C). Put the burgers on the
preheated lower grill plate. Using the cover height
adjuster, set the upper plate so it is just sitting on top of
the burgers, but not pressing them. Grill burgers for
about 4 to 8 minutes, depending on thickness and
desired doneness.
Grill; Closed (with cover
height adjuster)
Same as above, but once burger is nearly cooked, with
about 1½ minutes remaining (it is helpful to use the timer
with this recipe), carefully open upper plate, place piece
of cheese on top of burgers, and then using the cover
height adjuster, close upper plate so that it is sitting right
above the top of the cheeseburger, not touching it. Cook
until cheese is just melted.
Grill or Griddle; Closed
Preheat to 450°F (220°C). Put the links on the preheated
grill/griddle plates - the grill ribs are perfect for holding
the links in place, and allow for easy turning for even
cooking. Close the top. Grill for about 12 minutes (turning
halfway through) depending on the thickness of the
sausages.
Grill or Griddle; Closed
Preheat both plates to 400°F (200°C). Put the prepared
sandwiches on the preheated lower grill/griddle plate.
Close the top. Allow sandwiches to cook for about 4 to 6
minutes, depending on thickness of sandwiches.
Grill or Griddle; Closed
(with cover height
adjuster)
Preheat lower plate to 350°F (180°C); upper plate to
450°F (220°C). Put the prepared sandwiches on the
preheated lower grill/griddle plate. Using the cover height
adjuster, close upper plate until it is sitting right above
the top of the sandwich, not touching it. Cook sandwich
until cheese on top is fully melted and lightly browned,
about 5 to 7 minutes, depending on the type of
sandwich.
Beef, hamburgers
Beef,
cheeseburgers
Shape meat into burgers of even
weight and thickness.
Shape meat into burgers of even
weight and thickness.
Sausages, fresh
Prick links with tines of fork
or tip of paring knife.
Panini
(see Sandwich Chart
for delicious fillings)
Brush tops and bottoms of bread
with oil before grilling.
Open-Faced
Sandwiches
(see Sandwich Chart
for some great
recipes)
Prepare desired sandwiches
to a height of 1½ inches (7.5 cm).
10
Preparation
Plate and
Position
Suggested Grilling
Temperatures and Times
Quesadillas
Prepare quesadillas according to
your favorite recipe.
Grill or Griddle; Closed
(with cover height
adjuster)
Preheat both plates to 400°F (200°C). Put the prepared
quesadilla on the preheated lower plate. Close the top
and using the cover height adjuster, set the upper plate
so it is just sitting on top of the quesadillas. Grill for
about 2 to 3 minutes, depending on thickness and filling
of the quesadillas.
Eggs
Fried or over-easy. Up to 4 eggs
per plate.
Griddle; Open or Flat
Preheat to 350°F (180°C). Break the eggs onto the hot
griddle plates. Flip once whites are set, about 3 to 3½
minutes, and then remove when cooked to desired
doneness.
French Toast
Prepare French toast as desired.
Griddle; Open
Preheat to 350°F (180°C). Flip after 3 to 5 minutes,
depending on thickness. Cook for an additional 2 to 3
minutes.
Up to 2 inches (2.5 cm) thick.
Season to taste. Drain off
marinade well if marinated before
grilling.
Grill and Griddle; Open
Preheat lower plate to 350°F (180°C); upper plate to
450°F (220°C). Put the seasoned steak(s) on the
preheated upper grill plate. Grill for about 4 to 10 minutes
per side, depending on thickness and desired doneness.
After flipping steak(s) to cook the second side, add the
eggs to the preheated griddle plate and cook for 3 to 3½
minutes per side. At that time, the steaks should be done
as well (or shortly thereafter, depending on the
thickness).
Vegetables
Have vegetables evenly cut.
Season or marinate if desired.
Grill; Open, Flat or
Closed
(if closed, be sure that
the vegetables are all
the exact same
thickness, or results
will be uneven)
Preheat to 400°F (200°C). Grill until tender. This will vary
depending on the types of vegetables used, but should
take between 10 and 30 minutes. Refer to our recipe on
page 20 for more specifics.
Pizza (see Pizza
Chart for great
recipe ideas)
Prepare pizza dough or use
purchased; prepare desired
toppings.
Grill; Closed and Open
(with cover height
adjuster)
Grill dough on 450°F (220°C) with the unit closed. Open
to add toppings and using the cover height adjuster,
close upper plate until it is sitting right above the top of
the pizza, not touching it. Cook until cheese/toppings are
melted and browned, about 10 to 15 minutes.
Food
Steak & Eggs
Pizza Chart
The Cuisinart kitchen could go on for pages with delicious recipes for tasty pizzas - and you
have your favorites too - but here is a small selection of some combinations and tips that will
hopefully bring some new flavors to your table. The cover height adjuster and top-melting
feature of the Cuisinart® Griddler® Deluxe makes it the perfect tool for grilled pizzas. You can
always start out with our classic Grilled Pizza on page 11 and build from there, or you can take
some components from the options below as a fun treat for your family.
Food
Ingredients
Preparation
Cooking Procedure
EggplantPesto-Tomato
¾ to 1 pound (335 to 450 g) pizza
dough
olive oil for brushing
¼ cup (60 ml) prepared pesto
½ small eggplant, ½-inch
(1.25 cm)-thick round slices - grilled
for 4 minutes per side
1 cup (250 ml) halved cherry
tomatoes
salt and pepper, to taste
2 ounces (58 ml) fresh mozzarella,
sliced into 1- to 2-inch (2.5 to 5 cm)
pieces
Cooking Position and Plates: Closed;
Grill or Griddle
Preheat Temperature: 450°F (220°C )
upper and lower
Roll dough out to about 10-inch (25
cm) rectangle, to fit shape of plate as
best you can.
Brush top and bottom of dough with
olive oil.
Grill oiled pizza dough for about 5 minutes in
the Closed position.
Open grill and carefully top with pesto,
eggplant, tomatoes, salt, pepper and
mozzarella.
Using the cover height adjuster, close upper
plate until it is sitting right above the top of the
pizza, not touching it. Cook until cheese/
toppings are melted, about 10 to 15 minutes.
11
Food
Ingredients
Preparation
Cooking Procedure
MushroomFontina
¾ to 1 pound (335 to 450 g) pizza
dough
olive oil for brushing
6 cups (1500 ml) mushrooms
3 tablespoons (45 ml) olive oil
¼ (1 ml) teaspoon salt
pepper, to taste
4 sprigs fresh thyme, leaves only
(stems discarded)
1 garlic clove, finely chopped
½ small shallot, sliced
2 to 3 tablespoons (30 to 45 ml)
grated Parmesan
3 ounces (85 g) Fontina, shredded
Cooking Position and Plates: Open
and Closed; Griddle
Preheat Temperature: 350°F (180°C)
upper and lower
Roll dough out to about 10-inch
(25 cm) rectangle, to fit shape of
plate as best you can. Brush top and
bottom of dough with olive oil. Cover
lightly with plastic wrap until ready to
use. Toss mushrooms, 3 tablespoons
oil, salt, pepper, thyme, garlic and
shallot together.
Sauté mushroom mixture on hot griddle plates
in the Open position until softened, about 6 to
10 minutes. Remove and reserve.
Increase temperature to 450°F (220°C) on
both plates.
Once preheated, place oiled dough on the
lower griddle plate; close upper plate and allow
to cook for about 5 minutes.
Open unit and carefully top dough with
reserved mushroom mixture and both cheeses.
Using the cover height adjuster, close upper
plate until it is sitting right above the top of the
pizza, not touching it. Cook until cheese is
melted, about 10 to 15 minutes.
Bacon-Olive
¾ to 1 pound (335 to 450 g) pizza
dough
olive oil for brushing
½ cup (125 ml) pizza sauce
2 garlic cloves, thinly sliced
6 slices bacon, cooked and
crumbled
½ cup (125 ml) halved and pitted
olives, green or black
2 pinches dried fines herbes
¼ cup (60 ml) shredded Parmesan
Cooking Position and Plates: Closed;
Grill or Griddle
Preheat Temperature: 450°F (220°C)
upper and lower
Roll dough out to about 10-inch
(25 cm) rectangle, to fit shape of
plate as best you can. Brush top and
bottom of dough with olive oil. Cover
lightly with plastic wrap until ready to
use.
If bacon was not already cooked, it may be
cooked on the 450°F (220°C) griddle plates.
Then remove and grill pizza dough in the
closed position for 5 minutes.
Open unit and carefully top dough with
remaining ingredients, finishing with the
cheese.
Using the cover height adjuster, close upper
plate until it is sitting right above the top of the
pizza, not touching it. Cook until cheese is
melted, about 10 to 15 minutes.
Ricotta,
Fig and
Prosciutto
¾ to 1 pound (335 to 450 g) pizza
dough
olive oil for brushing
½ cup (125 ml) ricotta, strained
1 tablespoon (15 ml) grated
Parmesan
salt and pepper, to taste
figs, sliced
prosciutto, torn into
small pieces
Brie, sliced
blue cheese, crumbled
honey, for finishing
Cooking Position and Plates: Closed;
Grill or Griddle
Preheat Temperature: 450°F (220°C)
upper and lower
Roll dough out to about 10-inch
(25 cm) rectangle, to fit shape of
plate as best you can. Brush top and
bottom of dough with olive oil. Cover
lightly with plastic wrap until ready to
use.
Stir together the ricotta, Parmesan,
salt and pepper.
Grill oiled dough on the hot grill/griddle plates
for 5 minutes.
Open unit and carefully top dough with the
ricotta mixture, figs, prosciutto, Brie and blue
cheese.
Using the cover height adjuster, close upper
plate until it is sitting right above the top of the
pizza, not touching it. Cook until cheese is
melted, about 10 to 15 minutes.
Before serving, drizzle with honey.
Cooking Position and Plates: Closed;
Griddle
Preheat Temperature: 450°F (220°C)
upper and lower
Roll dough out to about 10-inch
(25 cm) rectangle, to fit shape of
plate as best you can. Brush top and
bottom of dough with olive oil. Cover
lightly with plastic wrap until ready to
use.
If sausage has not yet been cooked, grill
sausage on the hot griddle plates until
browned, about 8 minutes. (For best results,
halve sausage lengthwise if using precooked. If
using raw, prick links all over and then grill for
a minute or two on each side.) Let sausage
cool slightly and crumble or slice as desired.
If onion has not yet been cooked, toss in some
oil with salt and pepper. Place on hot griddle
plates after removing sausage and allow to
cook until softened, about 5 to 6 minutes.
Remove and reserve.
Grill oiled dough on the hot griddle plates,
closed, for 5 minutes.
Open unit and carefully top dough with the
sauce, reserved onion and sausage and
cheese.
Using the cover height adjuster, close upper
plate until it is sitting right above the top of the
pizza, not touching it. Cook until cheese is
melted, about 10 to 15 minutes.
Sausage,
Onion and
Pecorino
¾ to 1 pound (335 to 450 g) pizza
dough
olive oil for brushing
1 to 2 links Italian sausage, cooked
and crumbled
1 medium onion, sliced and
griddled/grilled
½ cup (125 ml) pizza sauce
¼ cup (60 ml) shaved/thinly sliced
pecorino
12
Sandwich Chart
A sandwich is a beautiful thing - simple and comforting. Add some heat to cheese and bread
and create the perfect lunch. Like any good meal, the perfect sandwich starts with the best
ingredients that you can find. Use a nice hearty bread, good oil or butter, and fresh, in-season
ingredients. Don't stop there, for your pantry probably has some great additions - roasted red
peppers can add a lot of flavor to simple grilled chicken. Mayonnaise and mustards can do
wonders. Have leftover barbequed chicken from the grill last night? Shred it and put it on bread.
The options are endless. Place on the hot grill, press or top melt, and your sandwich will be
ready before you can finish setting the table. The extra-large cooking surface allows you to
make up to four sandwiches at a time.
Sandwich
The Perfect
Grilled
Cheese
(with
variations)
The Classic
Italian
The Melt
The Meat
Lovers
Type
Prep It
Build It
Cook It
Panini
Grill Position and Plates: Closed; Grill or Griddle
Preheat Temperature: 400°F (200°C) upper and
lower
Ingredients: Your favorite sliced bread •
softened butter • a good melting cheese: classic
American, Swiss varieties, Cheddar, etc.
If you're feeling adventurous, or just want a
change from the ordinary, get some other
ingredients ready: sliced deli pickles, sliced
tomato, some bacon from yesterday's breakfast.
While grill is preheating, assemble
your sandwiches:
Lightly brush one side of each slice
of bread with the softened butter.
Layer the cheese on top of half of
the un-buttered slices (if using
optional fillings, layer them in
between the cheese). Top with the
other pieces of the bread, with the
buttered side facing up.
Open grill carefully and
place prepared
sandwiches on the hot
plate.
Close grill and set the
cover height adjuster so
the upper plate is just
sitting on top of the
bread.
Allow to cook for about
5 minutes, or until bread
is crispy and cheese is
fully melted.
Panini
Grill Position and Plates: Closed; Griddle or Grill
Preheat Temperature: 400°F (200°C) upper and
lower
Ingredients: Ciabatta or a rustic Italian bread (for
ciabatta, cut into enough for 4 sandwiches; for
Italian, cut 8 slices) • olive oil for brushing on
bread • 8 (225 g) ounces of a variety of Italian
meats (prosciutto, mortadella, salami,
sopressata, etc.) • 2 roasted red peppers,
drained and sliced • 4 ounces (115 g) of
provolone • salt and pepper
While grill is preheating, assemble
your sandwiches:
Lightly brush one side of each slice
of bread with the oil.
Layer the meats on the bottom half
of each bread slice, oiled side
down. Top with the roasted pepper,
then provolone. Sprinkle with salt
and pepper if desired. Top with the
other pieces of bread, oiled side
facing up.
Open grill carefully and
place prepared
sandwiches on the hot
plate.
Close grill to press the
sandwich. Allow to cook
for about 5 minutes, or
until bread is crispy and
cheese is fully melted.
While grill is preheating, assemble
your sandwiches:
Lay the four slices of bread on a
plate or tray. Top with the salad,
and then with the cheese.
Open grill carefully and
place prepared
sandwiches on the hot
plate.
Using the cover height
adjuster, close upper
plate until it is sitting
right above the top of the
sandwich, not touching
it. Cook until cheese is
melted, about 5 to 7
minutes.
While grill is preheating, assemble
your sandwiches:
Lightly brush one side of each slice
of bread with the softened butter.
Brush the inside of 4 of the slices
with the mustard.
Evenly distribute the meat on
top of half of the bread, buttered
side down.
Top with the Swiss, and then place
the other slice of bread, mustardside down, on top.
Open grill carefully and
place prepared
sandwiches on the hot
plate.
Close grill to press the
sandwich. Allow to cook
for about 5 minutes, or
until bread is crispy and
cheese is fully melted.
OpenFaced
Panini
Grill Position and Plates: Open; Grill or Griddle
Preheat Temperature: 450°F (220°C) upper;
400°F (200°C) lower
Ingredients: 4 slices of your favorite sandwich
bread • 1 cup (250 ml) of either chicken, tuna,
turkey or egg salad • 4 slices (about 4 ounces
[110 g]) Swiss, Cheddar or American cheese
Grill Position and Plates: Closed; Grill or Griddle
Preheat Temperature: 400°F (200°C) upper and
lower
Ingredients: 8 slices of your favorite sandwich
bread • softened butter, for brushing bread
• brown deli mustard • 16 ounces (450 g) of
your favorite deli meats (roast beef, turkey, ham,
pastrami, etc.) • 6 to 8 ounces (175 to 225 g)
Swiss cheese
13
Sandwich
The
Californian
The Gobbler
The Niçoise
Chocolate
Panini
Type
Prep It
Build It
Cook It
Panini
Grill Position and Plates: Closed; Grill or Griddle
Preheat Temperature: 400°F (200°C) upper and
lower
Ingredients: 8 slices of your favorite sandwich
bread • olive oil for brushing bread • grilled
chicken breast*, sliced • sprouts • avocado,
sliced • tomato, sliced • Cheddar
*This can be coated with olive oil, salt and
pepper and then grilled beforehand, or use any
leftover chicken that you may have.
While grill is preheating, assemble
your sandwiches:
Lightly brush one side of each slice
of bread with the olive oil.
Evenly distribute the chicken,
sprouts, avocado, tomato and
cheddar on 4 slices of the bread,
with the oiled side down. Top with
the other slices of bread, oiled side
up.
Open grill carefully and
place prepared
sandwiches on the hot
plate.
Close grill and set the
cover height adjuster so
upper plate is just sitting
on top of the bread. Allow
to cook for about 5
minutes, or until bread
is crispy and cheese is
fully melted.
Grill Position and Plates: Closed; Grill or Griddle
Preheat Temperature: 400°F (200°C) upper and
lower
Ingredients: 4 slices of white sandwich bread
• butter for brushing bread • mayonnaise •
sliced turkey • prepared stuffing • cranberry
sauce
• Swiss cheese
While grill is preheating, assemble
your sandwiches:
Lightly brush one side of each slice
of bread with the butter. Spread
mayonnaise on the inside of the
slices.
Evenly distribute the turkey,
stuffing, cranberry sauce and Swiss
cheese on the 4 slices of bread,
with the buttered side down. Top
with the other slices of bread,
buttered
side up.
Open grill carefully and
place prepared
sandwiches on the hot
plate.
Using the cover height
adjuster, close upper
plate until it is sitting
right above the top of the
sandwich, not touching
it. Allow to cook for about
5 minutes, or until bread
is crispy and cheese is
fully melted.
Panini
Grill Position and Plates: Closed; Grill or Griddle
Preheat Temperature: 400°F (200°C) upper and
lower
Ingredients: 8 slices of thickly cut rustic-style
bread • olive oil, for brushing bread • tapenade
• grilled tuna steak, sliced • sliced tomatoes
While grill is preheating, assemble
your sandwiches:
Lightly brush one side of each slice
of bread with the oil.
Evenly distribute the tuna and
tomatoes on 4 slices of the bread,
with the oiled side down. Spread
the tapenade on the inside of the
other 4 slices. Top sandwiches with
these slices, tapenade facing down.
Open grill carefully and
place prepared
sandwiches on the hot
plate.
Close grill and set the
cover height adjuster so
upper plate is just sitting
on top of the bread. Allow
to cook for about 5
minutes, or until bread is
crispy.
Panini
Grill Position and Plates: Closed; Grill or Griddle
Preheat Temperature: 400°F (200°C) upper and
lower
Ingredients: 8 slices of good quality rustic bread
• olive oil, for brushing bread • 4 ounces (125 g)
semi-sweet chocolate, chopped (you may also
use Nutella®, about 2 tablespoons [30 ml] per
sandwich)
While grill is preheating, assemble
your sandwiches: Lightly brush one
side of each slice of bread with
the oil.
Top the un-oiled side of four pieces
with the chocolate. Top with the
other slices of bread, oiled sides
facing up.
Open grill carefully and
place prepared
sandwiches on the hot
plate. Close grill and set
the cover height adjuster
so upper plate is just
sitting on top of the
bread. Allow to cook for
about 5 minutes, or until
bread is crispy and
chocolate is melted.
OpenFaced
14
Steak Chart
The SEAR function grills steaks to perfection. Here is a simple guide to cooking to your personal
preference. We give instructions for grilling the steaks in the Closed position, but they can easily
be done in the Open position as well - just flip the steaks halfway through. Remember to always
monitor the temperature of your steaks to achieve desired doneness.
Preparation:
Season to taste. Drain off marinade completely if marinated before
grilling. Bring to room temperature for best results.
Plate and Position
Grill; Closed
Cooking Instructions Two-minute SEAR (with 450˚F [220˚C] as the default). Put the steak(s) on
the preheated lower grill plate. Using the cover height adjuster, set the
upper plate so it is just sitting on top of the steak, but not pressing it.
Steak Doneness
1" (2.5cm) thick steak
1.5" (4cm) thick steak
2” thick steak (5cm)
Rare (120-125°F/49-52°C)
SEAR + 1 - 2 minutes
SEAR + 2 - 3 minutes
SEAR + 5 - 8 minutes
Medium-Rare
(130-135°F/54-57°C)
SEAR + 2 - 4 minutes
SEAR + 3 - 5 minutes
SEAR + 8 - 12 minutes
Medium
(140-145°F/60-63°C)
SEAR + 4 - 5 minutes
SEAR + 5 -6 minutes
SEAR + 12 - 18 minutes
Medium-Well
(150-155°F/66-68°C)
SEAR + 5 - 6 minutes
SEAR + 6 - 7 minutes
SEAR + 18 - 25 minutes
Well (160°F+/71°C)
SEAR + 6 minutes and up
SEAR + 7 minutes and up
SEAR + 25 minutes and up
Steak Tips
• Allow steaks to sit at room temperature at least 15 minutes before grilling.
• Allow steaks to rest at 5 minutes after grilling so juices are able to redistribute before cutting.
Otherwise all of that delicious juice will be on your plate and not in your steak.
• For the larger 2-inch (5 cm) steaks grill all 4 surfaces for even cooking.
15
RECIPES
Perfect Pancakes
This is a great all-purpose pancake recipe to have up your sleeve for breakfast
next weekend. It can be dressed up by mixing in fresh or frozen fruit, or nuts
and chocolate chips.
Griddler ® Deluxe Cooking Position: Flat
Plate Side: Griddle
Makes about twelve 4-inch pancakes
2
large eggs
¾
cup (180 ml) reduced-fat milk
½
teaspoon (12.5 ml) pure vanilla extract
1
cup (250 ml) plus 2 tablespoons (30 ml) unbleached, all-purpose flour
1
tablespoon (15 ml) baking powder
1
tablespoon (15 ml) granulated sugar
½
teaspoon (2.5 ml) table salt
2
tablespoons (30 ml) unsalted butter, melted and cooled (plus more for griddle
plates if desired)
1. Fit the Griddler ® Deluxe with the griddle plates and preheat both plates to 350°F (180
°C).
2. Put the eggs, milk and vanilla in a small bowl and whisk to blend until smooth;
reserve. Combine flour, baking powder, sugar and salt in a medium bowl. Stir with a
whisk to blend. Add the egg/milk mixture and stir until just blended. Stir in the
melted, cooled butter. Do not over-mix, or pancakes will be thin and tough – batter
should be a bit lumpy.
3. Using a ¼-cup (60ml) measure, drop batter onto preheated griddle (if you like extrabuttery pancakes, put about ½ tablespoon [7ml] of butter on each plate and melt
before dropping batter on plates). Cook pancakes until bubbles form, about 2 to 3
minutes; flip and cook until done, about 2 minutes longer.
4. Transfer to warm plates to serve. As you finish each batch of pancakes, you can
keep them warm on a wire rack placed on a baking sheet in a low oven (200°F
[100°C]). Repeat until all the batter is used.
Nutritional information per serving (2 pancakes):
Calories 150 (35% from fat) • carb. 20g • pro. 4g • fat 6g • sat. fat 3g
• chol. 74mg • sod. 453mg • calc. 83mg • fiber 0g
Crab Cakes
Fresh crab is ideal, but high-quality canned or frozen crab works well too.
Griddler ® Deluxe Cooking Position: Flat
Plate Side: Griddle
Makes
1
1
1
4
1
16 crab cakes
pound (45 0g) lump crabmeat
large red bell pepper, finely chopped
jalapeño, seeded and finely chopped
green onions (including some of the flavorful green part), chopped
garlic clove, peeled and finely chopped
16
¼
1
1½
½
1
1
1½
teaspoon (1 ml) kosher salt
large egg, lightly beaten
cups (375 ml) panko (Japanese-style breadcrumbs), plus ½ cup (125 ml) for dredging
cup (125 ml) mayonnaise
teaspoon (5ml) Worcestershire sauce
teaspoon (5 ml) Dijon mustard
teaspoons (7 ml) Old Bay® seasoning
hot sauce, to taste (optional)
vegetable oil, for brushing the griddle
lemon wedges, for serving
1. Pick through crabmeat to make sure there are no shells or cartilage, being careful
not to tear the meat into small pieces. Reserve in refrigerator.
2. In a medium to large bowl, mix the peppers, green onions, garlic, salt, egg, 1½ cups
(375ml) of the panko, mayonnaise, Worcestershire, Dijon, Old Bay and hot sauce (if
using). Add the crabmeat and very gently mix all of the ingredients together (it is best
to do this with clean hands to avoid over-mixing, but you can do it with a spoon if
you are careful to keep the crabmeat intact).
3. Using your hands, shape the mixture into ¼-cup (60ml) round cakes (no higher than
½-inch [1.25cm]) and put them on a clean plate, separating the layers with wax
paper. Cover with plastic and refrigerate for 1 hour before cooking (this helps keep
the crab cakes together when cooking and melds the flavors).
4. Fit the Griddler ® Deluxe with the griddle plates and preheat both plates to 400°F
(200°C). Brush the plates with a little vegetable oil (this will help to crisp and lightly
brown the crab cakes).
5. While the unit is preheating, lightly dredge the crab cakes in the remaining panko.
6. When the griddle is hot, cook the crab cakes in batches, approximately 8 minutes
per side. Crab cakes should be a deep golden brown on both sides.
7. Serve immediately with lemon wedges.
Nutritional information per crab cake:
Calories 119 (5% from fat) • carb. 5g • pro. 4g • fat. 9g • sat. fat 1g
• chol. 41mg • sod. 278mg • calc. 29mg • fiber 0g
Classic Tomato Bruschetta
The Griddler ® Deluxe’s independently heated plates make the perfect bruschetta easy,
keeping bread warm on the bottom while melting cheese on top.
Griddler ® Deluxe Cooking Position: Flat and Closed
Plate Side: Grill
Makes
16
4
1
½
¼
6
3
½
16 bruschetta
slices (½-inch [1.25 cm] thick) French bread (baguette)
tablespoons (60 ml) extra virgin olive oil, divided, plus 1 teaspoon (5 ml)
pint grape tomatoes, quartered (about 1½ cups [375 ml])
teaspoon (2.5 ml) kosher salt
teaspoon (1 ml) freshly ground black pepper
small garlic cloves, chopped
medium fresh basil leaves, thinly sliced (chiffonade)
ounce (14 g) Parmesan, grated or finely shredded
17
1. Fit the Griddler ® Deluxe with the grill plates and preheat both plates to 450˚F (230˚C).
2. Using 2 tablespoons (30 ml) of the oil, brush all the bread on both sides. Once the
unit has preheated, put all pieces of oiled bread onto the hot plates and grill about 3
to 5 minutes per side, until lightly browned.
3. While bread is grilling, prepare topping. In a small bowl, stir together the tomatoes,
salt, pepper, garlic and basil with the remaining oil.
4. Keeping the upper plate at 450˚F (230˚C), reduce the lower plate to Warm. Move all
toasted bread to the lower plate and distribute the tomato mixture evenly on each
piece, then top with the Parmesan. Setting the cover height adjuster at the highest
notch, close the upper plate until it is sitting just above the Parmesan, but not
touching it. Let the bruschetta cook until the cheese is just melted, about 5 minutes.
5. Serve immediately.
Nutritional information per bruschetta:
Calories 67 (34% from fat) • carb. 9g • pro. 2g • fat 3g • sat. fat 1g
• chol. 1mg • sod. 138mg • calc. 21mg • fiber 1g
The All-American Burger
Start with the best beef you can find, then simply season, grill, top with blue cheese,
and finish cooking. The Cuisinart® Griddler ® Deluxe does it all!
Griddler ® Deluxe Position: Closed
Plate Side: Grill
Makes
2
1½
¾
½
3
6
6 servings
pounds (900 g) ground beef round or chuck (freshly ground if possible)
teaspoons (7 ml) kosher salt
teaspoon (4 ml) freshly ground black pepper
teaspoon (2.5 ml) garlic powder
tablespoons (45 ml) crumbled blue cheese, divided
hamburger buns, for serving
1. Fit the Griddler ® Deluxe with the grill plates and preheat both plates to 450˚F (230˚C).
2. Working the ground chuck as little as possible, mix in a large bowl with the salt,
pepper and garlic powder. Shape into 6 patties, about 4 inches (10 cm) in diameter.
The best way to do this is to use a 4-inch [10cm] round cookie cutter: Divide meat
equally into six portions, put each into into the cookie cutter and gently press to
evenly fill. All burgers should be the same thickness for optimal results. Use your
thumb to press a dimple into the center of each patty.
3. When the unit has preheated, place the burgers on the lower grill plate, evenly
spaced. Using the cover height adjuster, close the upper plate so the hinge is set to
the position where the upper grill plate is just sitting on the burgers without pressing
them.
4. Contact grill for 5 minutes for rare burgers (this will result in a medium-rare burger by
the end of cooking). Then open the unit and top with the blue cheese, ½ tablespoon
(7 ml) per burger. Setting the cover height adjuster, close the upper grill plate so it is
sitting over the blue cheese but not touching it. Grill for an additional 2 minutes, or
until the cheese is just melted.
5. Remove burgers and serve immediately.
18
NOTE: For toasted buns, halve the buns and grill in the Closed position, using the cover
height adjuster so that the upper plate is just touching the tops of the buns. Grill for
about 30 seconds right after finishing burgers.
Nutritional information per burger:
Calories 283 (54% from fat) • carb. 0g • pro. 31g • fat 16g • sat. fat 7g
• chol. 101mg • sod. 549mg • calc. 42mg • fiber 0g
Open-Faced Turkey Sandwich
A simple and delicious sandwich to celebrate autumn – but can easily be enjoyed year round.
Griddler ® Deluxe Cooking Position: Closed
Plate Side: Grill
Makes
4
2
2
12
1
6
4 servings
slices whole grain or multigrain bread
tablespoons (30 ml) whole grain Dijon mustard
tablespoons (30 ml) fig jam
ounces (340 g) sliced turkey
large Granny Smith apple, cored and thinly sliced
ounces (170 g) sliced sharp Cheddar
1. Fit the Griddler ® Deluxe with the grill plates and preheat the top plate to 450°F
(230°C) and the bottom plate to 350°F (170°C).
2. While the grill is preheating, spread 1/2 tablespoon (7 ml) each of the mustard and
fig jam on top of each slice of bread. Evenly divide the turkey, sliced apple and then
the Cheddar on top of each piece of bread.
3. When the unit is ready, place the sandwiches on the lower grill plate. Using the cover
height adjuster, close the upper plate so the hinge is set to the position where the
upper grill plate sitting just above the cheese but not touching it.
4. Cook sandwiches for 5 to 7 minutes, or until cheese is melted.
Nutritional information per sandwich:
Calories 413 (40% from fat) • carb. 34g • pro. 29g • fat 14g • sat. fat 9g
• chol. 82mg • sod. 1499mg • calc. 355mg • fiber 5g
Fish Tacos
Need a fun dinner party idea? Set up a make-your-own taco bar with all of the fixings!
It’s little work for the host, so you can enjoy these light and simple tacos with your guests.
Griddler ® Deluxe Cooking Position: Flat
Plate Side: Grill
Makes
Fish:
1¼
¼
3
¼
½
½
2
8 tacos
pounds (670 g) fish fillet (snapper or similar type fish), about 1-inch (2.5 cm) thick
cup (60 ml) olive oil
tablespoons (45 ml) fresh lime juice
teaspoon (1 ml) chili powder
teaspoon (2.5 ml) kosher salt
jalapeño, halved, seeded and thinly sliced
tablespoons (30 ml) chopped cilantro
19
Tacos:
2
cups (500 ml) shredded cabbage, about ¼ small to medium head
2
teaspoons (10 ml) vegetable oil
1¼
teaspoons (6 ml) kosher salt
pinch freshly ground black pepper
juice of one lime
1
tablespoon (15 ml) chopped fresh cilantro, plus more for serving
8
6-inch (15 cm) corn tortillas
½
avocado, sliced
hot sauce, to taste
lime wedges, for serving
1. Put all of the fish ingredients in a shallow glass baking dish, turning fish once or
twice to fully coat. Cover and marinate for about 30 minutes.
2. While fish is marinating, put the shredded cabbage, oil, salt, pepper, lime juice and
chopped cilantro in a mixing bowl. Toss to combine; reserve.
3. When fish is just about done marinating, fit the Griddler ® Deluxe with the grill plates
and preheat both plates to 400˚F (200˚C).
4. Remove fish from marinade, place on preheated grill plates and grill for 2 to 4
minutes on each side, depending on the thickness of the fish. Remove and reserve.
Lower the temperature of both the upper and lower plates to Warm.
Assemble Tacos: Place tortillas on the grill plates to warm. Remove when warmed
through and evenly divide the grilled fish among the tacos, topping them with the
cabbage slaw, and then the avocado. Add a little hot sauce and a squeeze of lime.
Nutritional information per serving:
Calories 193 (32% from fat) • carb. 17g • pro. 16g • fat 7g • sat. fat 1g
• chol. 26mg • sod. 185mg • calc. 34mg • fiber 2g
Grilled Vegetables
As a side dish or served over a mixed green salad, grilled vegetables never disappoint!
Griddler ® Deluxe Cooking Position: Flat
Plate Side: Grill
Makes
½
1
1
8
2
3
½
2
4 to 6 servings
medium to large eggplant, cut into ¼-inch (7 mm)-thick slices
medium red or yellow pepper, quartered and cut into ¼-inch (7 mm) slices
small to medium summer squash or zucchini, cut into ¼-inch (7 mm) rounds
asparagus spears, trimmed and halved lengthwise
garlic cloves, peeled and smashed
tablespoons (45 ml) olive oil
teaspoon (2.5 ml) kosher salt
pinch freshly ground black pepper
sprigs fresh thyme
1. Fit the Griddler ® Deluxe with the grill plates and preheat both plates to 400˚F (200˚C).
2. While the unit is preheating, toss all of the ingredients together. Once hot, put the
vegetables on the grill. Tossing occasionally, cook until grill marks are visible and
vegetables are tender, about 25 to 30 minutes.
20
3. Remove and serve immediately.
Nutritional information per serving (based on 6 servings):
Calories 86 (70% from fat) • carb. 5g • pro. 1g • fat 7g • sat. fat 1g
• chol. 0mg • sod. 134mg • calc. 17mg • fiber 3g
The Perfect Combination: Grilled Potato
“Chips” and Onion Rings
Whether served with a perfectly seared steak (page 15) or our All-American Burger
(page 20), onion rings and “chips” make the meal.
Griddler ® Deluxe Cooking Position: Flat
Plate Side: Griddle/Grill
Makes 6 servings
Grilled Potato “Chips”:
¾
pound (340 g) red potatoes, scrubbed and very thinly sliced
1
tablespoon (15 ml) extra virgin olive oil
½
teaspoon (2.5 ml) sea or kosher salt
pinch freshly ground black pepper
Onion
1
1
¼
1
⁄8
1
⁄8
Rings:
large onion, cut into 1⁄3 to ½-inch (80 mm to 125 mm) slices
tablespoon (15 ml) extra virgin olive oil
teaspoon (1 ml) sea or kosher salt
teaspoon (0.5 ml) freshly ground black pepper
teaspoon (0.5 ml) paprika
1. Fit the Griddler ® Deluxe with one grill and one griddle plate and preheat both to
450˚F (220˚C).
2. While the unit is preheating, put all of the “chips” ingredients into one mixing bowl
and toss, and all of the onion rings ingredients into a separate bowl and toss.
3. Once the unit has preheated, place the potatoes on the hot griddle side and the
onions on the hot grill side.
4. The potatoes will take about 8 to 10 minutes per side – you want them to be very
crispy so you may have to grill in batches in single layers. The onions will take about
5 minutes per side, or until grill marks are well defined.
5. Remove and serve immediately, sprinkling with more salt if desired.
Nutritional information per serving:
Calories 50 (80% from fat) • carb. 2g • pro. 0g • fat 5g • sat. fat 1g
• chol. 0mg • sod. 196mg • calc. 6mg • fiber 0g
Garlic and Herb Marinated Lamb Chops
Pull out all the stops with this gourmet dish. These lamb chops make a great specialoccasion dinner paired with grilled vegetables and potatoes.
Griddler ® Deluxe Cooking Position: Flat
Plate Side: Grill
Makes 4 to 6 servings
21
1 to 2 garlic cloves, peeled and finely chopped
1
tablespoon (15 ml) fresh rosemary, chopped
¼
teaspoon (1 ml) freshly ground black pepper
¼
cup (60 ml) olive oil
1¾ to 2 pounds (800 to 900 g) loin lamb chops, approximately 6 chops
½
teaspoon (2.5 ml) kosher salt
1. Combine the garlic, rosemary, black pepper and olive oil in a medium stainless bowl.
Place chops in marinade to coat all sides. Scrape out the remaining marinade with a
rubber spatula and drizzle over the chops and refrigerate for up to 24 hours.
2. One hour before grilling, remove chops from refrigerator so they can come to room
temperature.
3. Fit the Griddler ® Deluxe with the grill plates and preheat both plates to 425°F. Then,
set both plates to SEAR. Sprinkle salt on both sides of lamb chops.
4. When the unit has preheated, place the lamb chops evenly spaced across the lower
plate. Using the cover height adjuster, carefully close the upper grill plate so the
plate is just touching the top of the chops (this is so the juices are not pressed out of
the lamb). Grill for two minutes on SEAR and then about 4 to 6 minutes on 425°F for
medium rare.
Nutritional information per serving (based on 6 servings):
Calories 358 (72% from fat) • carb. 1g • pro. 24g • fat 28g • sat. fat 10g
• chol. 87mg • sod. 208mg • calc. 18mg • fiber 0g
Teriyaki Glazed Salmon
Grilled salmon makes a beautiful presentation, whether on top of a salad
or alongside some grilled vegetables.
Griddler ® Deluxe Cooking Position: Closed
Plate Side: Grill
Makes
1
¼
3
3
1
1
2
1
2
¼
½
¼
4 servings
cup (250 ml) soy sauce, reduced sodium
cup (60 ml) mirin (Japanese rice wine)
tablespoons (45 ml) packed light brown sugar
small garlic cloves, grated (will come to about 1 teaspoon [5 ml] after grating)
½-inch (1.25 cm) piece fresh ginger, peeled and grated
medium orange, zested and then half juiced (about 1 teaspoon [5 ml] zest,
¼ cup [60 ml] juice)
tablespoons (30 ml) sesame oil
scallion, trimmed and cut into 2-inch (5 cm) pieces
pounds (900 g) salmon fillet (or four 8-oz [225 g] fillets)
teaspoon (1 ml) kosher salt
tablespoon (7 ml) olive oil
teaspoon (1 ml) sesame seeds, for serving
1. In a small saucepan, combine the soy sauce, mirin, brown sugar, garlic, ginger, zest,
juice, sesame oil and scallion. Set over medium heat and bring to a boil. Allow to
cook until mixture is reduced by about half and the liquid has become thick and
syrupy – this should take around 20 minutes, depending on the stove being used.
Set aside to cool slightly.
22
2. Fit the Griddler ® Deluxe with the grill plates and preheat both plates to 400°F
(200°C). While grill is preheating, season the salmon with the salt and brush with oil
on both sides of the fish.
3. Place the salmon on the lower grill plate, flesh side down. Cook for 4 to 5 minutes,
until the edges are cooked (interior of fish will only be cooked about halfway through
at this point). Flip the fish and then brush with some of the reserved glaze. Using the
cover height adjuster, carefully close the upper grill plate so the plate is just above
the top of the fish, but not touching it. Grill until cooked through, an additional 4 to 5
minutes (flesh will flake away with a fork, but still be bright pink inside).
4. With about 1 minute remaining, open the grill and brush the top of the fish with more
of the glaze and then flip to cook an additional minute. Remove and serve
immediately, brushing with more glaze and sprinkling with the sesame seeds.
Nutritional information per serving:
Calories 508 (39% from fat) • carb. 27g • pro. 53g • fat 23g • sat. fat 3g
• chol. 125mg • sod. 2329mg • calc. 37mg • fiber 0g
Rib-Eye Steaks
®
®
The Cuisinart Griddler Deluxe sears steaks to perfection. Use our grilling guide on
page 8 to cook steaks just the way you and your family like them,
from rare to well done.
Griddler ® Deluxe Cooking Position: Closed
Plate Side: Grill
Makes
2
2
½
¼
2 steaks
rib-eye steaks, 1 to 2 inches (2.5 to 5 cm) thick
teaspoons (10 ml) olive oil
teaspoon (2.5 ml) kosher salt
teaspoon (1 ml) freshly ground black pepper
1. Marinate the steaks in the olive oil, salt and pepper for at least 1 hour.
2. Fit the Griddler ® Deluxe with the grill plates and preheat both plates to 450°F
(220°C), then set both plates to SEAR.
3. Place the marinated steaks on the lower grill plate. Close the unit and using the
cover height adjuster, adjusting the upper plate so it is just resting on the top of the
steaks. Allow to grill for 2 minutes on SEAR with an additional 1 to 2 minutes at
450°F (220°C), if using 1-inch (2.5 cm) steaks for rare, or an additional 3 to 4 minutes
for medium rare. (Refer to the Steak Chart on page 8 for more specific grilling times.)
4. Allow steaks to rest for at least 5 minutes, and then serve with any of the following
options.
Nutritional information per serving:
Calories 331 (35% from fat) • carb. 0g • pro. 52g • fat 12g • sat. fat 3g
• chol. 136mg • sod. 699mg • calc. 46mg • fiber 0g
23
Compound Herb Butter
A bit of this butter on top of a hot steak takes it to the next level.
Also put a pat of the butter inside a burger before grilling for extra richness and flavor.
Makes
1
½
1
2
½
1
½ cup (125 ml)
small garlic clove, peeled
tablespoon (7 ml) fresh oregano
sprig of thyme, leaves only (stems discarded)
chives, cut into 1-inch (2.5 cm) pieces
teaspoon (2.5 ml) kosher salt
stick good quality butter, room temperature
1. In a small food processor or chopper, chop the garlic, oregano, thyme and chives.
Scrape down the sides of the work bowl and add the salt and butter. Process until
completely smooth.
2. Place butter onto a piece of plastic wrap and roll into the shape of a log, twisting the
ends of the plastic to seal. Chill well.
3. Slice and put on top of grilled steaks prior to serving.
Nutritional information per serving:
Calories 51 (99% from fat) • carb. 0g • pro. 0g • fat 6g • sat. fat 4g
• chol. 15mg • sod. 49mg • calc. 2mg • fiber 0g
24
NOTES
25
NOTES
26
WARRANTY
Address:
Cuisinart Canada
100 Conair Parkway
Woodbridge, Ont. L4H 0L2
LIMITED THREE-YEAR
WARRANTY
Email:
[email protected]
We warrant that this Cuisinart product
will be free of defects in materials or
workmanship under normal home use
for 3 years from the date of original
purchase. This warranty covers
manufacturer’s defects including
mechanical and electrical defects. It
does not cover damage from consumer
abuse, unauthorized repairs or
modifications, theft, misuse, or damage
due to transportation or environmental
conditions.
Model:
GR-150C
To facilitate the speed and accuracy of your
return, please enclose:
Products with removed or altered identification
numbers will not be covered. This warranty is
not available to retailers or other commercial
purchasers or owners. If your Cuisinart product
should prove to be defective within the warranty
period, we will repair it or replace it if necessary.
For warranty purposes, please register your
product online at www.cuisinart.ca to facilitate
verification of the date of original purchase and
keep your original receipt for the duration of the
limited warranty. This warranty excludes damage
caused by accident, misuse or abuse, including
damage caused by overheating, and it does
not apply to scratches, stains, discolouration or
other damage to external or internal surfaces
that does not impair the functional utility of the
product. This warranty also expressly excludes
all incidental or consequential damages.
•
$10.00 for shipping and handling of the
product (cheque or money order)
•
Return address and phone number
•
Description of the product defect
•
Product date code*/copy of original proof of
purchase
•
Any other information pertinent to the
product’s return
* Product date code can be found on the
underside of the base of the product. The
product date code is a 4 or 5 digit number.
Example, 90630 would designate year, month &
day (2009, June 30th).
Note: We recommend you use a traceable,
insured delivery service for added protection.
Cuisinart will not be held responsible for
in-transit damage or for packages that are not
delivered to us.
To order replacement parts or accessories, call
our Customer Service Centre at 1-800-472-7606.
For more information, please visit our website at
www.cuisinart.ca
Your Cuisinart product has been
manufactured to the strictest
specifications and has been designed for
use only in 120 volt outlets and only with
authorized accessories and replacement
parts.
This warranty expressly excludes
any defects or damages caused
by attempted use of this unit with
a converter, as well as use with
accessories, replacement parts or repair
service other than those authorized by
Cuisinart.
If the appliance should become defective
within the warranty period, do not return
the appliance to the store. Please contact
our Customer Service Centre:
Toll-free phone number:
1-800-472-7606
27
®
MD
Coffeemakers
Blenders
Juicers
Cookware
Cafetières
Mélangeurs
Presse-agrumes
Ustensiles
de cuisson
Tools and
Gadgets
Outils et
accessoires
Cuisinart offers an extensive assortment of top quality products
to make life in the kitchen easier than ever. Try some of our other
countertop appliances and cookware.
CuisinartMD offre une vaste gamme de produits de grande qualité qui
facilitent la vie dans la cuisine comme jamais auparavant. Essayez nos
autres appareils de comptoir, nos ustensiles de cuisson et nos outils
et accessoires de cuisine.
www.cuisinart.ca
Trademarks or service marks of third parties
referred to herein are the trademarks or
service marks of their respective owners.
Toutes les autres marques de commerce ou
de service utilisées dans le présent
document sont les marques de leurs
propriétaires respectifs.
©2013 Cuisinart Canada
100 Conair Parkway,
Woodbridge, OntarioL4H 0L2
Printed in China/
Imprimé en Chine
13CC142103
IB-11144-CAN