1
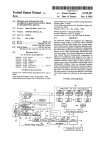
Power User’s Guide Apple CD Player K Apple Computer, Inc. This manual and the software described in it are copyrighted, with all rights reserved. Under the copyright laws, this manual or the software may not be copied, in whole or part, without written consent of Apple, except in the normal use of the software or to make a backup copy of the software. The same proprietary and copyright notices must be affixed to any permitted copies as were affixed to the original. This exception does not allow copies to be made for others, whether or not sold, but all of the material purchased (with all backup copies) may be sold, given, or loaned to another person. Under the law, copying includes translating into another language or format. You may use the software on any computer owned by you, but extra copies cannot be made for this purpose. The Apple logo is a trademark of Apple Computer, Inc., registered in the U.S. and other countries. Use of the “keyboard” Apple logo (Option-Shift-K) for commercial purposes without the prior written consent of Apple may constitute trademark infringement and unfair competition in violation of federal and state laws. Every effort has been made to ensure that the information in this manual is accurate. Apple is not responsible for printing or clerical errors. © Apple Computer, Inc., 1993 20525 Mariani Avenue Cupertino, CA 95014-6299 (408) 996-1010 Apple, the Apple logo, Macintosh, and QuickTime are trademarks of Apple Computer, Inc., registered in the U.S. and other countries. PowerCD is a trademark of ZCI, Inc., Dallas, Texas. Kodak and Photo CD are trademarks of Eastman Kodak Company. Simultaneously published in the United States and Canada. Mention of third-party products is for informational purposes only and constitutes neither an endorsement nor a recommendation. Apple assumes no responsibility with regard to the performance or use of these products. Contents Radio and television interference Laser information vii 1 PowerCD at a glance Front view Rear view vi 1 2 3 The remote control 4 The message display 2 Setting up 6 7 Attaching the base 8 Attaching the power adapter Connecting to a television 9 9 Connecting to stereo speakers or headphones Connecting to a Macintosh computer Turning power on or off 16 Viewing the Introducing PowerCD disc Care and handling 12 16 Loading and unloading discs Using batteries 11 17 18 19 iii 3 Types of compact discs you can use CD-ROM discs Photo CDs 23 Audio CDs 23 21 22 4 Using Photo CDs with a Macintosh computer Using Photo CD images on your Macintosh Viewing the contents of a Photo CD 26 Viewing several images in sequence 30 25 25 Setting preferences for how Photo CD images are displayed Copying images from a Slide Show 33 5 Using Photo CDs with a television 35 Using your PowerCD with both a television and a computer Photo CD basics 36 Showing pictures automatically Composing pictures on the screen 37 38 Programming sequences of your favorite pictures 40 Viewing the original unedited versions of pictures 6 Playing audio CDs Audio CD basics 44 45 Playing audio for a specified period of time Playing audio CDs with a Macintosh computer C O N T E N T S 41 43 Programming a sequence of audio tracks iv 31 47 48 35 7 Managing the PowerCD player’s memory Deleting the program for a disc 49 50 Deleting the entire contents of your PowerCD’s memory 8 Troubleshooting 51 General problems 52 Problems viewing Photo CDs on TV Audio problems 52 53 Problems using your PowerCD with a Macintosh 9 Technical specifications Index 50 53 57 63 C O N T E N T S v Important This equipment has been tested and found to comply with the limits for a Class B digital device in accordance with the specifications in Part 15 of FCC rules. See instructions if interference to radio or television reception is suspected. Radio and television interference The equipment described in this manual generates, uses, and can radiate radio-frequency energy. If it is not installed and used properly—that is, in strict accordance with Apple’s instructions—it may cause interference with radio and television reception. This equipment has been tested and found to comply with the limits for a Class B digital device in accordance with the specifications in Part 15 of FCC rules. These specifications are designed to provide reasonable protection against such interference in a residential installation. However, there is no guarantee that interference will not occur in a particular installation. You can determine whether your computer system is causing interference by turning it off. If the interference stops, it was probably caused by the computer or one of the peripheral devices. If your computer system does cause interference to radio or television reception, try to correct the interference by using one or more of the following measures: m Turn the television or radio antenna until the interference stops. m Move the computer to one side or the other of the television or radio. m Move the computer farther away from the television or radio. m Plug the computer into an outlet that is on a different circuit from the television or radio. (That is, make certain the computer and the television or radio are on circuits controlled by different circuit breakers or fuses.) If necessary, consult your authorized Apple dealer or an experienced radio/television technician for additional suggestions. You may find helpful the following booklet, prepared by the Federal Communications Commission: Interference Handbook (stock number 004-000-00345-4). This booklet is available from the U.S. Government Printing Office, Washington, DC 20402. Important Changes or modifications to this product not authorized by Apple Computer, Inc., could void the FCC Certification and negate your authority to operate the product. This product was tested for FCC compliance under conditions that included the use of shielded cables and connectors between system components. It is important that you use shielded cables and connectors to reduce the possibility of causing interference to radios, television sets, and other electronic devices. For Apple peripheral devices, you can obtain the proper shielded cables from your authorized Apple dealer. For non-Apple peripheral devices, contact the manufacturer or dealer for assistance. DOC Class B Compliance This digital apparatus does not exceed the Class B limits for radio noise emissions from digital apparatus set out in the radio interference regulations of the Canadian Department of Communications. Observation des normes—Classe B Le présent appareil numérique n’émet pas de bruits radioélectriques dépassant les limites applicables aux appareils numériques de la Classe B prescrites dans les règlements sur le brouillage radioélectrique édictés par le Ministère des Communications du Canada. vi WARNING Making adjustments or performing procedures other than those specified in your equipment’s manual may result in hazardous exposure. WARNING Do not attempt to disassemble the cabinet containing the laser. The laser beam used in this product is harmful to the eyes. The use of optical instruments, such as magnifying lenses, with this product increases the potential hazard to your eyes. For your safety, have this equipment serviced only by an authorized Apple service provider. Your CD player is a Class 1 laser product. The Class 1 label, located on the back of the product, indicates that the player meets minimum safety requirements. A service warning label is inside the player. Class 1 label Service warning label vii 1 PowerCD at a glance In this chapter m Front view m Rear view m The remote control m The message display 1 Front view Message display (See “The Message Display” section later in this chapter.) : STOP button* PAUSE button* PLAY button* NEXT button* PREV. (Previous) button* Remote control sensor Point at this when you use the remote control. MODE button With Photo CDs, you can select the following modes of play: m Normal m Autoplay m Repeat m Reverse m Repeat and Reverse With audio CDs, you can select the following modes of play: m Normal m Repeat m Shuffle m Repeat and Shuffle *For an explanation of these buttons, see “The Remote Control” section later in this chapter. 2 C H A P T E R O N E Rear view OPEN button For unlatching the disc compartment door POWER ON/OFF switch Video/audio port For connecting a television Battery compartment door Headphone port Headphone volume control Sound output port For connecting a stereo amplifier or powered speakers Power adapter port SCSI port For connecting a Macintosh computer SCSI ID switch For selecting a SCSI ID number Power adapter For plugging into an electrical outlet Base lock/unlock switch For attaching or removing the base P O W E R C D A T A G L A N C E 3 The remote control PROG. STORE INSERT SKIP FTS/FPS EDIT 1 2 3 4 5 6 7 8 SHUFFLE 9 REPEAT 0 REV. PLAY AMS AUTO PLAY PAUSE PREV. PLAY NEXT STOP 4 C H A P T E R O N E FULL NORMAL ROTATE ROTATE FRAME ZOOM For more information about using the remote control, see Chapters 5-7. Buttons on the remote control Arrows (o, k l) Move a picture or the frame up, down, left, or right. AMS (Automatic Music Scan) Plays the first ten seconds of each track on an audio CD. AUTOPLAY Displays pictures in an automatically advancing slide show. You can also select the duration of each picture. INSERT Inserts a picture in front of the current picture in a programmed sequence. EDIT Selects the length of time that an audio CD will be played. FRAME Shows the area of the picture that will be enlarged when you press ZOOM. FTS/FPS With Photo CDs, turns FPS (Favorite Picture Selection) on and off. (FPS is on until you turn it off.) With audio CDs, turns FTS (Favorite Track Selection) on and off. (FTS is off until you turn it on.) FULL Shows an entire picture on a small scale surrounded by a black background. NEXT Selects the next picture or audio track. With Photo CDs, holding down NEXT scans quickly forward through a sequence of pictures. NORMAL Shows a normal-sized picture. (The picture takes up the entire screen, and some portions of the picture are hidden.) Numbers (0-9) Select a specific picture or audio track. With portfolio Photo CDs, use numbers to choose options from on-screen menus. PAUSE Pauses a sequence of pictures or an audio track. Pressing PAUSE a second time resumes play. PLAY Displays a picture or begins playing an audio CD. PREV. (Previous) Selects the previous picture or audio track. With Photo CDs, holding down PREV scans quickly backward through a sequence of pictures. PROG. (Program) Places an audio track in a programmed sequence of tracks. (Or, if the track is already in the program, PROG. removes the track from the program.) REPEAT Plays the picture sequence continuously. REV. PLAY (Reverse Play) Plays a picture sequence or audio tracks in reverse order. ROTATE Turns a picture clockwise or counterclockwise. Scan (>> ..) Holding down a Scan button searches quickly (either forward or backward) through a sequence of pictures or audio tracks. SHUFFLE Plays audio tracks in random order. SKIP Deletes a picture from a programmed sequence. With audio CDs, deletes a program from the player’s memory. STOP Stops playing a sequence of pictures or an audio track. With portfolio Photo CDs, displays the main menu. STORE Saves any changes you make to a picture or program. With audio CDs, saves a programmed sequence of audio tracks in the player’s memory. ZOOM Enlarges a portion of a picture. The message display Messages for Photo CDs Picture The number of the currently selected picture. REPEAT FPS (Favorite Picture Selection) When “FPS” is flashing, a program of pictures can be modified. When “FPS” is displayed continuously, a program is in use. PICTURE FPS NEXT PICTURE REVERSE Repeat and Reverse m When REPEAT is displayed, pictures repeat continuously. Battery level Three bars indicates the batteries are fully charged. Next picture The number of the next picture in the playing sequence. m When REVERSE is displayed, pictures are shown in reverse order. Messages for audio CDs FPS When “FPS” is flashing, a program of audio tracks can be modified. When “FPS” is displayed continuously, a program is in use. Track The number of the currently selected audio track. REPEAT PROGRAM Battery level Three bars indicates the batteries are fully charged. FPS : SHUFFLE TRACK MIN Repeat, Program, and Shuffle m When REPEAT is displayed, a sequence of audio tracks repeats continuously. m When PROGRAM is displayed, you can add an audio track to a program or remove a track from a program. m When SHUFFLE is displayed, audio tracks play in random order. 6 C H A P T E R O N E SEC Minutes and seconds The total playing time of an audio CD or the elapsed playing time of an audio track. 2 Setting up In this chapter m Attaching the base m Attaching the power adapter m Connecting to a television m Connecting to stereo speakers or headphones m Connecting to a Macintosh computer m Loading and unloading discs m Viewing the Introducing PowerCD disc m Using batteries m Care and handling 7 Attaching the base 1 Attach the base to the back of the player. Make sure the switch is set to the unlocked position. 2 Slide the switch on the base to the locked position. After connecting the base, set the switch to the locked position. 3 Place the PowerCD on a level surface. Avoid blocking the vents on the PowerCD or on any other piece of equipment, such as a television or computer monitor. 8 C H A P T E R T W O Attaching the power adapter m To plug your PowerCD into an electrical outlet, connect the power adapter to the socket on the side of the base. Connecting to a television Do you have what you need? You connect your player to a television using the video/audio cable (included with the player). The cable has three RCA phono plugs. (The yellow plug is for video, the white plug is for the left audio channel, and the red plug is for the right audio channel.) If your equipment requires a different type of connector—such as an S-Video connector, a BNC connector, an RF connector, or an audio connector—you can purchase an appropriate adapter at an electronics store. RCA phono plug S-Video connector BNC connector RF connector Audio connector IMPORTANT Before connecting equipment to your PowerCD, be sure all equipment is turned off. S E T T I N G U P 9 Connecting directly to a television Television PowerCD VIDEO IN (YELLOW) LEFT AUDIO IN (WHITE) RIGHT AUDIO IN (RED) Connecting to a VCR and television Television PowerCD VCR VIDEO IN VIDEO OUT LEFT AUDIO OUT LEFT AUDIO IN RIGHT AUDIO IN RIGHT AUDIO OUT VIDEO IN (YELLOW) LEFT AUDIO IN (WHITE) RIGHT AUDIO IN (RED) Connecting to a television and stereo amplifier Television PowerCD Amplifier VIDEO IN LEFT AUDIO IN (WHITE) RIGHT AUDIO IN (RED) EXTENSION CABLE (NOT INCLUDED) 10 C H A P T E R T W O Connecting to a television using an RF remodulator Television PowerCD REMODULATOR (NOT INCLUDED) RF CONNECTOR RF CABLE (NOT INCLUDED) Turning on your television After you have connected your PowerCD: 1 Turn on your PowerCD by pressing the On/Off switch on the top of the player. 2 If your PowerCD is also connected to a personal computer, make sure the computer is turned off. 3 Turn on your television and tune it to the appropriate channel for video input. You should see a blue screen. Connecting to stereo speakers or headphones Headphones Amplifier (or powered speakers) LEFT AUDIO IN (WHITE) RIGHT AUDIO IN (RED) AUDIO CABLE (NOT INCLUDED) Do not connect an amplifier or powered speakers to the headphone port. S E T T I N G U P 11 Connecting to a Macintosh computer By connecting your PowerCD to a Macintosh computer, you can use CD-ROM discs, Photo CDs, and audio CDs on your Macintosh. Do you have what you need? To use your PowerCD with a Macintosh computer, you need a Macintosh with system software version 6.0.7 or later. You connect your PowerCD to a Macintosh using a SCSI (Small Computer Systems Interface) cable. See the diagrams in this section to determine the type of cable you need. If you do not have a SCSI cable, you can purchase one at a computer supply store. If you want to connect your PowerCD to a chain of SCSI devices, you will also need a SCSI terminator. IMPORTANT Before connecting your PowerCD, be sure to turn off the power on both your PowerCD and your computer. Connecting directly to the computer Desktop or PowerBook computer PowerCD g SCSI system cable or Apple HDI-30 SCSI system cable (for PowerBook computers) 12 C H A P T E R T W O SCSI connector Connecting to a chain of SCSI devices If you connect your PowerCD to a chain of SCSI devices, your PowerCD must be the last device on the chain. Connecting to a chain of devices attached to a desktop computer Desktop computer PowerCD Disk drive SCSI terminator SCSI peripheral cable g SCSI system cable SCSI connector Connecting to a chain of devices attached to a PowerBook computer PowerBook computer PowerCD Disk drive g SCSI terminator SCSI terminator SCSI peripheral cable SCSI connector Apple HDI-30 SCSI system cable S E T T I N G U P 13 Setting the SCSI ID number Each device in a chain of SCSI devices must have a unique ID number that distinguishes it from other devices on the chain. The SCSI ID number of your PowerCD is preset to 3. If another external device on the chain has the ID 3, you can change the SCSI ID number by pressing either of the small buttons above or below the number. Don’t use the number 0 if your computer has a built-in hard disk. 3 SCSI ID number If you need to change the SCSI ID number, press one of these buttons. 14 C H A P T E R T W O 3 Turning on the computer You should turn on your PowerCD (and any other peripheral devices) before turning on your computer. Installing the PowerCD software on a Macintosh computer To use your PowerCD with a Macintosh computer, you’ll need to install software onto your computer’s hard disk. 1 Turn on your Macintosh. 2 Insert the floppy disk labeled PowerCD Setup into your computer’s floppy disk drive. 3 Double-click the disk icon to open it. 4 Double-click the Installer icon to open it. A screen appears welcoming you to the Installer. 5 Click OK. The Easy Install screen appears. Name of the disk on which software will be installed S E T T I N G U P 15 6 Make sure the hard disk named in the box is the one on which you want to install the PowerCD software. If it’s not, click the Switch Disk button until the name of the correct disk appears. 7 Click Install. Messages appear on the screen describing the progress of the installation. 8 When you see a message asking you to insert the QuickTime disk, insert the disk. 9 When you see a message asking you to insert the PowerCD Setup disk, insert the disk. 10 When you see a message saying that installation was successful, click Restart. Your Macintosh restarts. The computer can now use discs in your PowerCD. Turning power on or off m To turn power on or off, press the on/off switch on the top of your PowerCD. When you turn power on, the message display lights up. (If you are running your PowerCD on batteries, the message display dims after ten seconds. The message display will light up again when you press any key on either the player or the remote control.) IMPORTANT Power is available in the CD player even when the player is switched off. If you need to remove all power to the player, be sure to unplug the power cord and remove the batteries. Loading and unloading discs Loading a disc 16 C H A P T E R 1 Press the Open button on the top of your PowerCD. 2 Pull open the disc compartment door. 3 If you’re opening the door for the first time, remove the foam packing insert. T W O 4 Slide the disc into the door with the label side of the disc facing out. Open button On/off switch 5 Close the door. Unloading a disc If you’re using a CD-ROM disc on a Macintosh computer, drag the disc icon to the Trash before removing the disc from the player. Viewing the Introducing PowerCD disc A good way to become familiar with your PowerCD is to view the Introducing PowerCD disc. The disc demonstrates ways to use your PowerCD and includes some sample Photo CD images. m To view the disc on a television connected to your PowerCD, simply load the disc into the player. The program begins automatically. If your PowerCD is connected only to a computer, you can’t view the program, but you can use the Photo CD images on the disc. For instructions on how to view Photo CDs on a Macintosh, see Chapter 4. S E T T I N G U P 17 Using batteries Inserting batteries in the player m To use your PowerCD on batteries, insert eight AA-size batteries (not included). You can run your PowerCD on batteries for about one hour. To open the battery compartment, press this tab. WARNING Follow these safety instructions to avoid battery leakage, damage to your player, and potential fire hazard: m Follow the safety instructions that came with your batteries. m Make sure not to insert any batteries backwards. m Your PowerCD was designed for use with AA-cell alkaline and NiCad (nickel-cadmium) batteries only. For information about other types of batteries, consult your dealer. m Do not mix different types of batteries. Use eight alkaline batteries or eight NiCad batteries, but do not combine alkaline and NiCad batteries. m Do not mix old and new batteries. 18 C H A P T E R T W O Inserting batteries in the remote control 1 Open the battery compartment by placing your thumbnail in the curved slot and squeezing. 2 Insert two AAA batteries. Care and handling m Do not leave the disc compartment door open, because dust could get on the lens inside the player. If you need to clean the lens, see your dealer for a lens cleaner. Do not wipe the lens with a paper towel or other abrasive surface. m When transporting your player, replace the foam packing insert in the disc compartment. Never transport your player with a disc inside of it. m Hold a disc by the edges, or by one edge and the center hole. Do not touch the disc surface. S E T T I N G U P 19 m To avoid damage to your CDs, keep these points in mind: Do not expose discs to direct sunlight. Do not write on discs. Do not spill liquids on discs. Do not put tape on discs. Do not scratch discs. Do not get dust on discs. m To clean discs, wipe the shiny surface with a soft cloth, working in straight lines from center to edge. Do not use any form of cleaning agent. WARNING Electrical equipment may be hazardous if misused. Operation of this product or similar products must always be supervised by an adult. Do not allow children access to the interior of any electrical product and do not permit them to handle cables. 20 C H A P T E R T W O 3 Types of compact discs you can use In this chapter m CD-ROM discs m Photo CDs m Audio CDs 21 CD-ROM discs If you connect your PowerCD to a Macintosh computer, you can use CD-ROM discs. What is CD-ROM? A CD-ROM disc is like a huge, locked floppy disk. A CD-ROM disc gives you access to large amounts of information, however, you cannot save information onto CD-ROM discs. ROM stands for “read-only memory,” which means that you cannot “write” information onto CD-ROM discs. A wide selection of CD-ROM discs is available for education, entertainment, and business. One disc can hold over 650 megabytes of information—the equivalent of 270,000 pages of text, up to eight hours of speech or music (depending on the sound quality), hundreds of high-resolution color images, or a combination of text, sound, and graphics. File formats Not all CD-ROM discs store information in the same way. Your computer must be able to understand the file format in order to use the disc. Macintosh computers can use CD-ROM discs with these standard file formats: m HFS (Hierarchical File System)—the standard file format used by the Macintosh. m ISO 9660—the International Standards Organization’s file format for CD-ROM discs. This format has been adopted by many CD manufacturers to make their discs compatible with a variety of computers. It is also the format used by Photo CD discs. m The High Sierra format, which is part of the ISO 9660 format. Your PowerCD can also work with the CD-ROM XA file format if you install the necessary software on your Macintosh. To find out the availability of software for additional file formats, contact the publisher of the disc you want to use. 22 C H A P T E R T H R E E Photo CDs Photo CDs contain digitized photographs. To obtain a photo CD of your own photographs, you give standard film to a photoprocessor who has a Kodak Photo CD system. The photofinisher develops your film, digitizes the photographs, and returns a Photo CD to you containing your Photo CD images. A single Photo CD can hold approximately 100 images. You can take a Photo CD back to your photofinisher and have more photos added until the disc is full. (However, some other CD-ROM drives cannot read these “multisession” discs.) Portfolio CDs Portfolio CDs are commercially available Photo CD titles that you can purchase. They often include audio as well. For instance, you might purchase a Photo CD version of a book. Images on a portfolio Photo CD are meant to be viewed in a pre-programmed order. Audio CDs Your PowerCD can play audio CDs through headphones or speakers. For more information, see Chapter 6. T Y P E S O F C O M P A C T D I S C S Y O U C A N U S E 23 4 Using Photo CDs with a Macintosh computer In this chapter m Using Photo CD images on your Macintosh m Viewing the contents of a Photo CD m Viewing several images in sequence m Setting preferences for how Photo CD images are displayed m Copying images from a Slide Show Using Photo CD images on your Macintosh You can use your computer to open and view Photo CD images. You can copy and save them, print them, paste them into word-processing documents or other documents that accept graphics, and edit them using graphics applications. You can also view your Photo CD images as a slide show. Photo CD images are an excellent source of graphics for desktop publishing, multimedia presentations, business documents, and professional-quality graphic design. 25 Do you have what you need? To use your PowerCD with a Macintosh, you should have the following software in the System Folder on your computer’s hard disk: m PowerCD extension m Foreign File Access extension m Apple Photo Access extension m High Sierra File Access extension m ISO 9660 File Access extension m QuickTime extension This software is automatically installed when you install the PowerCD Setup software. If you haven’t already installed this software, follow the instructions in “Installing the PowerCD Setup Software on a Macintosh Computer” in Chapter 2. Viewing the contents of a Photo CD To view images on a Photo CD, follow these steps: 1 Open the disc compartment door and load the CD. The first time you insert a Photo CD disc, a message appears telling you the system is creating custom Photo CD icons. You can click Stop if you want to save time by using standard document icons instead. After several seconds, an icon for the Photo CD disc appears on the desktop. The disc name appears with the letters “PCD” and an identifying number supplied by the photoprocessor. You cannot change the name of the disc. 26 C H A P T E R F O U R 2 Double-click the disc icon to open it. A window appears with a QuickTime movie named Slide Show, the Slide Show Viewer, and a Photos folder. 3 Double-click the Photos folder to open it. The Photos folder contains Photo CD images recorded at five different resolutions. The higher the image resolution, the more detail it has, and the more storage space it takes. High-resolution images can contain as much as 18 MB (megabytes) of data for one photograph. However, depending on your computer’s screen resolution or printer’s printing resolution, you may not be able to view or print the graphic at such high resolution. U S I N G P H O T O C D S W I T H A M A C I N T O S H C O M P U T E R 27 Because each Photo CD image is recorded at five levels of resolution, you can work with an image at a resolution appropriate for your display or printing device. For example, you might use a Photo CD image at low resolution for displaying on a TV or computer screen in a multimedia presentation. On the other hand, to produce high-quality color separations from a Photo CD image, you might select a high-resolution image appropriate for the highresolution printing capabilities of an imagesetter. 4 Double-click one of the five folders to open it. Within each folder, an icon appears for each Photo CD image. Each icon is a tiny representation of the Photo CD image. The name of each icon corresponds to the index number of the image. (The index comes with your Photo CD.) You can’t rename the images on a Photo CD disc, but you can copy them to another disc and rename the copies. 28 C H A P T E R F O U R 5 Double-click the icon of the image you want to see. The image appears in a window. Unless you have already specified a graphics program you want to have open Photo CD images, the image will be opened by TeachText. If you prefer, you can have Photo CD images opened by your favorite graphics program. See “Setting Preferences for How Photo CD Images are Displayed” later in this chapter. U S I N G P H O T O C D S W I T H A M A C I N T O S H C O M P U T E R 29 Viewing several images in sequence You can conveniently browse through all your Photo CD images by using the Slide Show movie and Slide Show Viewer in the Photo CD window. The Slide Show file is a QuickTime movie of all your Photo CD images. To play the Slide Show movie: 1 Double-click the Slide Show movie icon. The Slide Show Viewer automatically begins displaying Photo CD images. 2 Use the Slide Show Viewer controls to stop or start the movie, scroll to a particular image, or flip forward or backward through the images. Image number Click to start or stop the movie. Drag to scroll to a different image. Click to move forward or backward through the images. You can also display an image by typing its number. 30 C H A P T E R F O U R Opening a Slide Show image in a graphics program When you are looking at an image with the Slide Show Viewer, you can copy the image into another program. m While the image you want is displayed, choose View or View As from the Photos menu. If you choose View, the image opens in the program and at the resolution specified in the Preferences dialog box (described in the next section, “Setting Preferences for How Photo CD Images are Displayed”). If you choose View As, you can specify a program and resolution. Setting preferences for how Photo CD images are displayed You can choose: m which graphics program will automatically open Photo CD images m which resolution is used m how large the images appear on the screen when you view them as a slide show You set these options by using the Preferences command in the Slide Show Viewer. 1 Open the Slide Show Viewer by double-clicking its icon. U S I N G P H O T O C D S W I T H A M A C I N T O S H C O M P U T E R 31 2 Choose Preferences from the File menu. The Preferences dialog box appears. Click one of these buttons to set the size of the slide show window. Choose a resolution from this pop-up menu. Choose a graphics program for opening Photo CD images from this pop-up menu. Click these buttons to add or remove programs in the pop-up menu labeled “Using.” 3 After you have chosen the options you want, click OK. Your changes take effect when you restart your Macintosh. After restart, when you double-click a Photo CD image or choose View in the Slide Show Viewer, the image opens in the program and at the resolution you specified. 32 C H A P T E R F O U R Copying images from a Slide Show You can also copy a Slide Show image using the Clipboard and paste it into any document that accepts images. The image is copied at the resolution chosen in the Preferences dialog box. 1 While the image you want is displayed in the viewer, choose Copy from the Edit menu. 2 Open the document you want to paste the image into. 3 Choose Paste from the Edit menu. The image appears in your document. Copying a Slide Show image using a different resolution You can copy an image displayed in the viewer at a resolution different than the one specified in the Preferences dialog box. To copy the image at a different resolution: 1 While the image you want is displayed, choose Copy As from the Edit menu. 2 In the dialog box that appears, choose the resolution you want from the Size pop-up menu. 3 When you’ve chosen the resolution you want, click OK. 4 Paste the image into your document. U S I N G P H O T O C D S W I T H A M A C I N T O S H C O M P U T E R 33 Copying a Slide Show movie onto another disk You can’t copy a Slide Show movie by dragging its icon to a different disk, because the links between the movie and the Photo CD are lost. Instead, you need to follow these steps: 1 Open the Slide Show Viewer. 2 Choose Save a Copy from the File menu. 3 Choose a location and type a name for the copy. Click Save. A file compression dialog box appears. 34 C H A P T E R 4 If you wish, choose a compression method. 5 Click Save. F O U R 5 Using Photo CDs with a television In this chapter m Using your PowerCD with both a television and a computer m Photo CD basics m Showing pictures automatically m Composing pictures on the screen m Programming sequences of your favorite pictures m Viewing the original unedited versions of pictures Using your PowerCD with both a television and a computer If your PowerCD is connected to both a television and a computer, it will function as a CD-ROM drive for the computer. In order to view Photo CDs on your television, you must first turn off the computer. 35 Photo CD basics To see the previous picture in a sequence, press PREV. To scan backward through a sequence of pictures, hold down the PREV. button. PROG. STORE INSERT SKIP FTS/FPS EDIT 1 2 3 4 5 6 7 8 SHUFFLE 9 REPEAT To see a specific picture, press the number of the picture. To see the first picture on a disc, load the disc and press PLAY. 0 REV. PLAY To scan quickly backward through a sequence of pictures, press the >> button. AMS AUTO PLAY PAUSE PREV. PLAY NEXT STOP To see the main menu on a portfolio CD, press STOP. 36 C H A P T E R F I V E FULL NORMAL ROTATE ROTATE FRAME ZOOM To see the next picture in a sequence, press NEXT. To scan forward through a sequence of pictures, hold down the NEXT button. To scan quickly forward through a sequence of pictures, press the .. button. Showing pictures automatically Autoplay shows you all the photos on a disc in sequence, one after the other, automatically. m To turn on autoplay, press AUTOPLAY. Pictures are displayed one after another in sequence. m To pause an autoplay sequence, press PAUSE. To resume play, press PAUSE again. m To turn off autoplay, press AUTOPLAY again. Setting the speed of autoplay When you turn on autoplay, each picture is shown for 2 seconds. You can choose to display each photo for 2, 4, or 8 seconds. m To display each photo for 4 seconds, press AUTOPLAY twice quickly when turning autoplay on. m To display each photo for 8 seconds, press AUTOPLAY three times quickly when turning autoplay on. Repeating the disc continuously m To show all the photos on a disc in a repeating loop, press REPEAT on the remote control. To turn off repeating, press REPEAT again. U S I N G P H O T O C D S W I T H A T E L E V I S I O N 37 Composing pictures on the screen m To see an entire photo, press FULL. m To have a photo take up the entire screen (with some parts of the photo hidden), press NORMAL. Full view Normal view m To rotate a picture, press either of the two ROTATE buttons. Before 38 C H A P T E R F I V E After Enlarging part of picture 1 Press FRAME. A rectangular box appears on the screen, indicating the part of the picture to be enlarged. Frame 2 Press the arrow keys to move the frame to the part of the picture you want to enlarge. 3 Press ZOOM. Storing your favorite view of a picture 1 Make sure that “FPS” is lit on the message display. If FPS (Favorite Picture Selection) is not displayed, you can turn it on by pressing FTS/FPS. 2 Set up the picture the way you like it. 3 Press STORE. Your favorite view of the picture is stored in the player’s memory. The next time you see the picture, it will appear the way you like it. U S I N G P H O T O C D S W I T H A T E L E V I S I O N 39 Programming sequences of your favorite pictures On your first showing, photos appear in the order depicted on the index that comes with a Photo CD disc. You can set up your disc so you see only the photos you like in the order you like. Changes are stored in the PowerCD player’s memory. They do not affect the original pictures in any way, which are still on your disc so that you can call them back at any time. Inserting a photo in the playing sequence You can rearrange photos in the playing sequence by inserting one photo in front of another. For example, you can insert photo number 3 in front of photo number 2. To insert a photo in the playing sequence: 1 Make sure that “FPS” is lit on the message display. If FPS (Favorite Picture Selection) is not displayed, you can turn it on by pressing FTS/FPS. 2 Display a picture. The picture you insert will go in front of this one. 3 Press INSERT on the remote control. On the display, the Next Picture number flashes. 40 C H A P T E R 4 Enter the number of the photo you want to insert, using the number keys or the NEXT/PREV. buttons. 5 Press STORE. F I V E Removing a photo from the playing sequence You can skip the photos you don’t like. To remove a photo from the playing sequence: 1 Make sure that “FPS” is lit on the message display. If FPS (Favorite Picture Selection) is not displayed, you can turn it on by pressing FTS/FPS. 2 Display the picture by pressing its number on the remote control. 3 Press SKIP. Restoring a skipped photo Skipped photos are still on the disc. To restore a skipped photo to the playing sequence: 1 Make sure that “FPS” is lit on the message display. If FPS (Favorite Picture Selection) is not displayed, you can turn it on by pressing FTS/FPS. 2 Display the picture by pressing its number on the remote control. 3 Press STORE. Viewing the original unedited versions of pictures m To see your pictures as they appeared on your original disc—before you made any changes—you just turn off FPS (Favorite Picture Selection). When FPS is on, the letters “FPS” appear on the message display. You can turn FPS off by pressing FTS/FPS. To see the pictures as you edited them, press FTS/FPS to turn FPS back on. U S I N G P H O T O C D S W I T H A T E L E V I S I O N 41 6 Playing audio CDs In this chapter m Audio CD basics m Programming a sequence of audio tracks m Playing audio for a specified period of time m Playing audio CDs with a Macintosh computer 43 Audio CD basics To play tracks in random order, press SHUFFLE. To resume normal play, press SHUFFLE again. To pause an audio track, press PAUSE. To resume play, press PAUSE again. PROG. STORE INSERT SKIP FTS/FPS EDIT 1 2 3 4 5 6 7 8 9 SHUFFLE REPEAT To select a specific track, press the number of the track. To hear the first ten seconds of each track, press AMS (Automatic Music Scan). To resume normal play, press AMS again. 0 REV. PLAY To select the previous audio track in a sequence, press PREV. AMS AUTO PLAY To play an audio CD, load the disc and press PLAY. PAUSE PREV. PLAY NEXT STOP To scan backward through a sequence of tracks, press the >> button. To stop play, press STOP. 44 C H A P T E R S I X FULL NORMAL ROTATE ROTATE FRAME ZOOM To select the next audio track in a sequence, press NEXT. To scan forward through a sequence of tracks, press the .. button. Programming a sequence of audio tracks With a disc loaded, you can set tracks to play in any order you want. You can also store the program permanently in the PowerCD’s memory. Creating a program 1 If music is playing, press STOP. 2 Select a track using the number keys or NEXT/PREV. 3 Press PROG. PROGRAM appears on the display. 4 Repeat steps 2 and 3 to add more tracks to your program. A program can contain up to 30 tracks. Reviewing a program m To review a program you have created, press PROG. Each track number appears on the display in the order you set. Playing a program m To play a program you have created, press PLAY. Play begins with the first track in the program. During program play, you can use all the player’s audio functions except program compiling and Time Edit. You can scan only within the track being played. Removing a track from a program A track can appear only once in a program. Programming a track a second time removes it from the program. 1 Stop the player. 2 Select a track that has already been programmed. 3 Press PROG. P L A Y I N G A U D I O C D S 45 Clearing a program m To clear a program you have created, press STOP while the player is already stopped. On the display, PROGRAM disappears. The program is also cleared when you open the disc compartment door or switch the player off. Storing a program in the player’s memory Unless you store a program in the PowerCD’s memory, the program won’t be available the next time you load the audio CD. To permanently store a program in memory, follow these steps: 1 Create a program (as described in “Creating a Program” earlier in this section). 2 Press FTS/FPS. Then, while “FPS” is flashing on the display, press STORE. Your program is stored in memory and FPS stops flashing. The program replaces any previous program you made for that disc. Playing a program you have stored 1 Press FTS/FPS. Then, while “FPS” is flashing on the display, press PLAY. If a program exists for this disc, play starts with the first track in the program. If not, “Er” appears on the display. During program play, you use all of the player’s audio functions except program compiling and Time Edit. You can scan only within the track being played. 2 To turn off program play, press STOP to stop the player, then press STOP again. FPS disappears from the display. 46 C H A P T E R S I X Playing audio for a specified period of time The Time Edit feature of your PowerCD lets you play music for any time up to 99 minutes. This is handy for recording onto cassettes, as a signal that a certain amount of time has passed, or when you are listening to music while falling asleep. To set the amount of time that audio will play: 1 With the player stopped, press EDIT. 2 Enter the required time in minutes using the number keys. The Time Edit feature plays complete tracks only, so make sure the time you enter is at least as long as the first audio track. 3 Press PLAY. Play starts, and the time begins to count down on the display. P L A Y I N G A U D I O C D S 47 Playing audio CDs with a Macintosh computer If your PowerCD is connected to a Macintosh computer, you can play audio CDs using the PowerCD Audio desk accessory. m To open the desk accessory, pull down the Apple () menu and choose PowerCD Audio. The PowerCD Audio desk accessory appears. If PowerCD Audio is not in the Apple menu, install the PowerCD Setup software as described in Chapter 2. Drag this slider to jump quickly to specific locations on the disc. Click this button to play or pause a disc. Click this button to stop or eject a disc. Press these buttons to scan quickly forward or backward. Click these buttons to select the next or previous track. Click these buttons to turn the left and right speakers on or off. 48 C H A P T E R S I X 7 Managing the PowerCD player’s memory In this chapter m Deleting the program for a disc m Deleting the entire contents of your PowerCD’s memory 49 Deleting the program for a disc As you store more photo sequences and audio programs, your PowerCD player’s memory gradually fills up. If you see the word “FULL” on the message display, it means you need to clear some programs in order to store additional changes. To make room available in the player’s memory, you can delete the programs for discs that you seldom use. 1 Load the disc. 2 Press FTS/FPS on the remote control. 3 While FPS is flashing on the display, press SKIP twice. FPS flashes until the program for that disc is deleted from memory. Deleting the entire contents of your PowerCD’s memory WARNING Deleting the entire contents of the player’s memory will remove all the programs you have made for all your CDs. 1 Open the disc compartment door. 2 Press FTS/FPS on the remote control. Then immediately press REPEAT. “A” appears on the display. (At this point you can still change your mind by pressing any key on the remote control other than SKIP.) 3 Press SKIP twice. “Clr” is displayed until the entire contents of the player’s memory is cleared. 50 C H A P T E R S E V E N 8 Troubleshooting In this chapter m General problems m Problems viewing Photo CDs on TV m Audio problems m Problems using your PowerCD with a Macintosh This chapter describes solutions to common problems you may encounter while using your PowerCD. If you have a problem with your PowerCD and nothing in this chapter solves it, take the unit to your authorized Apple dealer or service provider. WARNING If you attempt to repair the PowerCD yourself, you may void the Limited Warranty. Contact your Apple authorized dealer or service provider for additional information about this or any other warranty questions. 51 General problems There is no power. m Make sure that the ON/OFF switch is set to on. m If you are using batteries, replace the batteries. m If your PowerCD is plugged into an electrical outlet, make sure that both ends of the power adapter are properly connected. Also make sure that there is power in the electrical outlet. Plug in another device to check. The remote control doesn’t work. m Aim the remote control at the player. m Remove any obstacles that may lie in the signal path. m Replace the batteries in the remote control. You can’t make changes to a program, and the word “FULL” appears on the message display. m The player’s memory is full. See Chapter 7, “Managing the PowerCD Player’s Memory.” Problems viewing Photo CDs on TV There is no picture on the TV. m Make sure that the disc is a Photo CD. m Make sure that the disc label is facing towards the door. m Make sure that the TV is turned on. m Make sure you have selected the correct channel or external source on the TV. m If the PowerCD is connected to both the TV and your computer, make sure the computer is turned off. m Check the video connection. The picture is distorted. m Check the disc for marks, and clean it with a soft cloth, wiping from center to edge. m Check if the disc is defective by trying another disc. 52 C H A P T E R E I G H T Audio problems There is no sound. m Make sure the volume is turned up. m Make sure the disc is an audio CD or a portfolio Photo CD with sound. m Make sure the disc label is towards the door. m Check all audio connections. m If you are using headphones, connect the headphones into another sound source to make sure they work. m If you are using a high-fidelity amplifier, check whether it is working by trying another sound source. The sound is distorted. m Check the disc for marks, and clean it with a soft cloth, wiping from center to edge. m Check if the disc is defective by trying another disc. Sound from a high-fidelity amplifier is distorted. m Check that the audio connections are not made to the amplifier Phono input. Problems using your PowerCD with a Macintosh The computer doesn’t seem to know that there is a PowerCD. m Make sure the PowerCD is turned on and that a disc is inserted. m Make sure the PowerCD software is installed. (See “Installing the PowerCD Software on a Macintosh Computer” in Chapter 2.) m Restart your computer. m Check that each SCSI device attached to your computer has a unique SCSI ID number. (See “Setting the SCSI ID Number” in Chapter 2.) T R O U B L E S H O O T I N G 53 Your computer won’t restart after you’ve copied software for your PowerCD to the System Folder. m If you attempt to install the software for your PowerCD without using the Installer as described in Chapter 2, you may not be able to restart your computer. Restart using another startup disk and install the software according to the instructions in Chapter 2. You insert a CD-ROM disc but its icon does not appear on the Macintosh desktop. m Make sure the disc label is facing towards the door. m Make sure the SCSI cable is connected properly. m Make sure the PowerCD software is installed (as described in Chapter 2). m Restart the computer. You can’t open documents on a particular CD-ROM. m Try opening an application program first, then opening the document. m Read the manual that came with your CD-ROM disc. Some discs come with a separate floppy disk containing the program that reads the information on the disc. You can’t save changes you make to information on a CD-ROM disc. m CD-ROM is a read-only medium. That means that information can be read (retrieved) from it, but not written (stored) on it. You can save the changed information on a hard disk or floppy disk. When you insert a disc in your PowerCD, your computer displays the message “This is not a Macintosh disk: Do you want to initialize it?” m Make sure the PowerCD software is installed (as described in Chapter 2). m The disc may use a format that the Macintosh cannot recognize. Exchange it for a disc that works with your Macintosh. 54 C H A P T E R E I G H T You don’t hear any sound when you try to use an audio CD. m If you have headphones or speakers connected to the computer, adjust the connector to make sure you have a good connection. m Turn up the volume control on the PowerCD player. m Use the PowerCD Audio desk accessory to start the audio playback. m Click the Play button. m Click the Pause button once or twice. m Are you using a CD-ROM disc over a network? You can’t hear the audio portion of discs you access over a network. You can’t open a track icon on an audio CD. m You can’t play tracks on audio CDs by opening track icons. Use the PowerCD Audio desk accessory to play audio tracks. When you double-click the icon of a CD that combines audio tracks and data (while that CD is playing), you cannot open it. m You can’t open a CD-ROM disc while it’s playing an audio track. Click Stop in the PowerCD Audio desk accessory before opening the disc. You are unable to record sound from an audio CD disc. m Check your computer’s sound input port to see if a microphone or other device is connected. Connecting a microphone or other device to the port turns off the computer’s ability to record from your CD-ROM drive. Your PowerCD will not open Photo CD discs. m To open Photo CD images, your computer must have both QuickTime and the Photo CD extension installed on your system. Be sure to install the PowerCD software (as described in Chapter 2). T R O U B L E S H O O T I N G 55 9 Technical specifications General specifications Weight m 1.4 Kg Dimensions (assembled) m 165 mm high by 220 mm wide by 125 mm deep Operating temperature m + 5° C to 40° C (+ 41° F to 104° F) Operating humidity m 5% to 90% (no condensation) Interfaces m One video/audio port m One 50-pin SCSI interface port m One stereo output port m One headphones port 57 Power Power adapter m One of the following: 120 V AC, 60 Hz 230 V AC, 50 Hz 100 V AC, 50/60 Hz 240 V AC, 50 Hz 100 to 240 V AC, 50/60 Hz DC input m 7 to 11 V, 1.2 A Power consumption m 15 W Video Video out (CVBS) m 1 Vpp (75-ohm load) Signal-to-noise ratio m > 48 dB (PAL) > 50 dB (NTSC) Bandwidth m > 4.5 MHz (PAL) > 4.2 MHz (NTSC) 58 C H A P T E R N I N E Audio Analog output m 2 Vrms +/- 2 dB Headphones output power m ≥ 30 mW (47-ohm load) Signal-to-noise ratio m ≥ 95 dB (speakers) ≥ 82 dB (headphones) Dynamic range m ≥ 80 dB (speakers) ≥ 84 dB (headphones) Channel separation m ≥ 90 dB (speakers) ≥ 75 dB (headphones) Total harmonic distortion m ≤ 70 dB (speakers) ≤ 75 dB (headphones) T E C H N I C A L S P E C I F I C A T I O N S 59 Data Data capacity m 656 MB, Mode 1 748 MB, Mode 2 Number of blocks per disc m 270,000 (typical) Data per block m 2,048 bytes, Mode 1 2,336 bytes, Mode 2 Address description m Minutes, seconds, frames Data streaming Blocks per second m 75 User bytes per second m 153.6K, Mode 1 175.2K, Mode 2 SCSI transfer rate m 2.1 MB per second Buffer size m 256K 60 C H A P T E R N I N E Laser Type m Semiconductor laser GaAIAs Wavelength m 780 nm Output power m 0.6 mW Beam divergence m 54.8° T E C H N I C A L S P E C I F I C A T I O N S 61 Index A adapters 9 address description 60 amplifier connecting to 11 troubleshooting 53 AMS (Automatic Music Scan) button 5, 44 analog output 59 arrow buttons 5 audio CDs. See also discs basics of 44 clearing a program 46 ejecting with PowerCD Audio 48 messages for 6 modes of play for 2 networks and 55 pausing an audio track 44 playing a program 45 playing a stored program 46 playing for a specified period 47 playing tracks in random order 44 playing with a Macintosh 48 playing with PowerCD Audio 48 programming a sequence of audio tracks 45–46 removing a track from a program 45 reviewing a program 45 scanning 44 scanning with PowerCD Audio 48 selecting a track 44 selecting next or previous track with PowerCD Audio 48 speakers and 48 stopping play 44 storing a program in player’s memory 46 troubleshooting 53, 55 audio specifications 59 troubleshooting 53, 55 Automatic Music Scan (AMS) button 5, 44 AUTOPLAY button 37 63 B bandwidth 58 base attaching to player 8 lock/unlock switch 3, 8 batteries 18–19 inserting in player 18 inserting in remote control 19 safety instructions 18 battery level display 6 blocks per disc 60 blocks per second 60 buffer size 60 C cables 9, 12–13 care and handling of player 19–20 CD-ROM discs. See also discs capacity of 22 description of 22 file formats for 22 unloading 17 CDs. See audio CDs; CD-ROM discs; discs; Photo CDs; Portfolio CDs chaining SCSI devices 13 channel separation 59 cleaning discs 20, 52 lens inside player 19 compact discs. See audio CDs; CD-ROM discs; discs; Photo CDs; Portfolio CDs composing images on screen 38 connecting 9–16 base to player 8 player to chain of SCSI devices 12–13 player to Macintosh 12–16 64 I N D E X player to stereo speakers or headphones 11 player to television 9–11 power adapter to socket 9 copying images from a Slide Show 33 Slide Show movies onto another disk 34 D data specifications 60 DC input 58 deleting memory contents 50 dimensions (assembled) 57 disc icons, opening 27 discs. See also audio CDs; CD-ROM discs; Photo CDs; Portfolio CDs blocks per disc 60 cleaning 20, 52 damaging 20 deleting programs from 50 handling 19 loading and unloading 16–17 types of 21–23 dynamic range 59 E EDIT button 5, 47 electrical hazard 20 enlarging Photo CD images 38–39 erasing audio CD programs 46 audio track from programs 5, 45 memory 50 Photo CD images from playing sequence 41 F Favorite Picture Selection (FPS) 6, 39–41 Favorite Track Selection (FTS) 5 file compression 34 file formats 22 FPS (Favorite Picture Selection) 6, 39–41 FRAME button 5, 39 FTS (Favorite Track Selection) 5 FTS/FPS button 5, 39–41 FULL button 5, 38 FULL message 50, 52 inserting batteries 18 discs 16–17 Photo CD image in playing sequence 40 installing PowerCD software 15–16 troubleshooting 54 interfaces 57 Introducing PowerCD disc 17 ISO 9660 format 22 L G laser specifications 61 lens inside player, cleaning 19 loading and unloading discs 16–17 graphics programs, opening Slide Show images in 31–32 M H handling player and discs 19 harmonic distortion 59 headphone port 3, 11 headphones connecting to 11 output power 59 specifications 59 troubleshooting 53 volume control 3 HFS (Hierarchical File System) format 22 High Sierra format 22 I, J, K images. See Photo CDs; Slide Show movies index number of Photo CD images 28 INSERT button 5, 40 Macintosh connecting to 12–16 installing PowerCD software on 15–16 playing audio CDs with 48 playing Photo CDs with 25–34. See also Photo CDs problems using PowerCD with 53–55 System Folder, software in 26 system software 12 turning on 15 memory 49–50 deleting entire contents of 50 deleting program from 50 full 50, 52 storing audio CD programs in 46 storing Photo CD images in 39–41 message display 6, 16 minutes and seconds display 6 MODE button 2 movies. See Slide Show movies I N D E X 65 N networks, audio CDs and 55 NEXT button 5, 36, 44 NEXT PICTURE display message 6 NORMAL button 5 O On/off switch 3, 11 OPEN button 3, 16–17 opening icons 27 Photo CD images 29 Slide Show images in graphics program 31–32 operating temperature and humidity 57 P Paste command 33 PAUSE button 5, 37, 44 phono plugs 9 Photo CD icons 26 Photo CDs. See also discs; Slide Show movies description of 23 loading 26 messages for 6 modes of play for 2 Photo CDs, using with both television and Macintosh 35, 52 Photo CDs, using with a Macintosh 25–34 copying images from a Slide Show 33 copying images into another program 31 copying Slide Show movies onto another disk 34 installing PowerCD software 15–16 opening images 29 opening Slide Show images in graphics program 31–32 66 I N D E X playing Slide Show movies 30 renaming copies of images 28 resolution of images 27–28, 32–33 setting preferences for image display 31–32 Slide Show movies 30–34 software, installing 15–16 software in System Folder 26 viewing Photo CD contents 26–31 Photo CDs, using with television 35–41 AUTOPLAY, speed of 37 basics of 36 composing pictures on screen 38 enlarging all or part of picture 38–39 inserting photos in playing sequence 40 programming sequences of favorite pictures 40 removing photos from playing sequence 41 repeating disc continuously 37 restoring skipped photos 41 rotating pictures 38 scanning pictures 36 showing pictures automatically 37 storing favorite view of picture 39 viewing a specific picture 36 viewing entire photo 38 viewing original unedited picture 41 photofinisher 23 photographs, obtaining Photo CD of 23 photos. See Photo CDs PICTURE display message 6 pictures. See Photo CDs PLAY button 5, 36, 44–45 playing audio CDs 43–48 Photo CDs on a Macintosh 25–34 Photo CDs on a television 35–41 Slide Show movies 30 Portfolio CDs 23 viewing main menu on 36 ports 3, 11 power adapter attaching 3, 9 specifications for 58 power specifications for 58 turning on or off 16 troubleshooting 52 PowerCD, turning on or off 16 PowerCD Audio desk accessory 48 PowerCD Setup floppy disk 15 PowerCD software, installing 15–16 Preferences command (Slide Show Viewer) 31–32 PREV. button 5, 36, 44 PROG. button 5, 45 PROGRAM display message 6 programming a sequence of audio tracks 45–46 a sequence of images 40 Q QuickTime installing 15–16 using to view Photo CDs 26–34 R RCA phono plugs 9 remote control buttons on 5, 36. See also specific button inserting batteries in 19 sensor for 2 troubleshooting 52 removing audio CD programs 46 audio track from programs 5, 45 discs from player 17 images from playing sequence 41 memory contents 50 renaming copied Photo CD images 28 REPEAT button 5, 37, 50 REPEAT display message 6 repeating Photo CD discs continuously 37 resolution choosing 32 copying a Slide Show using different resolution 33 levels of 27–28 restoring skipped photos 41 REVERSE display message 6 REV. PLAY button 5 ROTATE button 5, 38 S safety instructions 18, 20 Save a Copy command (Slide Show Viewer) 34 saving audio programs 46 Photo CD images (Mac) 33–34 Photo CD images (TV) 39–41 Slide Show images 33–34 scan buttons 5, 36 scanning audio CDs 44 pictures or audio tracks 5, 36 SCSI connector 13 SCSI devices, connecting to chain of 12–13 SCSI ID number 14, 53 SCSI ID switch 3, 14 SCSI peripheral cable 12–13 SCSI port 3 SCSI system cable 12–13 SCSI terminator 12–13 SCSI transfer rate 60 setting up 7–20 SHUFFLE button 5, 44 SHUFFLE display message 6 signal-to-noise ratio audio 59 video 58 I N D E X 67 SKIP button 5, 41, 50 Slide Show movies 30–34. See also Photo CDs controlling 30–32 copying images from 33 copying onto another disk 34 opening images in a graphics program 31–32 playing 30 setting preferences for 31–32 setting window size 32 Slide Show Viewer 30–34 software PowerCD, installing 15–16 System Folder, software in 26 system software, version of 12 sound, troubleshooting 53, 55. See also audio CDs sound output port 3 speakers connecting to 11 specifications for 59 turning on and off 48 STOP button 5, 44, 46 STORE button 5, 39–41 storing audio programs 46 Photo CD images 39–41 System Folder, software in 26 system software, version of 12 68 I N D E X T technical specifications 57–61 television 35–41 connecting 9–11 to TV and stereo amplifier 10 to TV and VCR 10 to TV directly 10 to TV using an RF remodulator 11 troubleshooting 52 turning on 11 using Photo CDs with 35–41. See also Photo CDs Time Edit feature 47 TRACK display message 6 tracks. See audio CDs transporting player 19 troubleshooting 51–55 audio 53, 55 CD-ROM discs 54 memory 52 Photo CD images 52, 55 power 52 remote control 52 using player with a Macintosh 53–55 turning on Macintosh 15 turning on television 11 turning PowerCD on or off 16 turning speakers on or off 48 U unloading discs 17 user bytes per second 60 V video/audio cable 9 video/audio port 3 video specifications 58 View As command (Slide Show Viewer) 31 View command (Slide Show Viewer) 31–32 viewing Photo CDs on Macintosh 26–31 Photo CDs on television 35–41 Slide Show movies on Macintosh 30–34 W, X, Y warranty, voiding 51 weight specifications 57 Z ZOOM button 5, 39 I N D E X 69 The Apple Publishing System This Apple manual was written and edited on a desktop publishing system using Apple Macintosh computers and QuarkXPress. Technical illustrations were drawn in Adobe Illustrator and Photoshop. Screen shots were created and modified with system software, Exposure Pro, Photoshop, and Aldus SuperPaint. Proof pages were created on Apple LaserWriter printers and on the QMS and Tektronics color printers. Final pages were output directly to separated film on a PostScript™-driven imagesetter. Text type is Times, display type is Helvetica Narrow, and cover type is Apple Garamond, Apple’s corporate font. Ornaments are a custom font designed for Apple Computer. PostScript, the LaserWriter page-description language, was developed by Adobe Systems Incorporated. K Apple Computer, Inc.