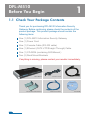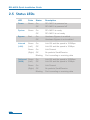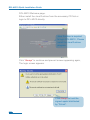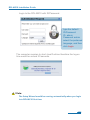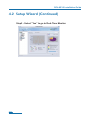
1
Building Networks for People
Information
Security gateway(ISG)
This Quick Guide will guide you through the installation process. You are
only moments away from using your new D-Link Network Security Product
DFL-M510
DFL-M510 Quick Installation Guide
1.Before You Begin
1.1 Check Your Package Contents................................................................1
1.2 DFL-M510 Introduction...........................................................................2
1.3 DFL-M510 Architecture...........................................................................3
2.Identifying Components
2.1 Front View..............................................................................................4
2.2 Rear View...............................................................................................5
2.3 LCD Navigation Button Description........................................................5
2.4 LCD Panel .............................................................................................6
2.5 Status LEDs ............................................................................................7
3.Connecting the DFL-M510
3.1 Setting up without firewall.....................................................................8
3.2 Setting up with firewall..........................................................................9
4.Configure DFL-M510
4.1 Connect to DFL-M510............................................................................10
4.2 Setup Wizard.........................................................................................13
5.WARRANTY
Warranty...............................................................................................16
1
DFL-M510
Before You Begin
1.1 Check Your Package Contents
Thank you for purchasing DFL-M510 Information Security
Gateway. Before continuing, please check the contents of the
product package. This product package should contain the
following items:
One (1) DFL-M510 Information Security Gateway
One (1) Power Cord
One (1) Console Cable (RS-232 cable)
One (1) Ethernet (CAT5 UTP/Straight Through) Cable
One (1) CD-ROM (containing QIG/Manual )
Two (2) Rack Mount Brackets
If anything is missing, please contact your reseller immediately.
01
DFL-M510
Power Cord
Console Cable
Rack Mount Brackets
Ethernet Cable
CD-ROM
DFL-M510 Quick Installation Guide
1.2 DFL-M510 Introduction
DFL-M510 is a transparent network device which is installed in
In-Line mode with “Hardware Bypass” function, without any
change of current network architecture to control/manage
information traffic flow (IM, P2P and Streaming Media … etc.)
from intranet and detect/drop the traffic with health concerns
(Trojan, Illegal agent and Network worm … etc.) Based on the
policy rules applied to specific Group/Hosts/subnet.
DFL-M510 provides very friendly user-interface to configure.
D-Link develops this product based on easy-to-use principle
without compromising any security protection issue.
02
DFL-M510 Quick Installation Guide
1.3 DFL-M510 Architecture
Without Firewall
When there is no firewall involved, we suggest to place DFLM510 behind the router or ADSL modem. Below illustrates the
recommended structure.
ADSL Router
DFL-M510
WAN Port
Switch
LAN Port
With Firewall
When there is a firewall, placing the DFL-M510 between the
firewall and the LAN is recommended. The recommended
structure is illustrated as following.
ADSL Router
Firewall
WAN Port
03
DFL-M510
LAN Port
2
Identifying Components
The following illustrations show the front view, rear view,
LCD Panel and status LEDs of the DFL-M510.
2.1 Front View
1
2
3
1.
See “LCD Panel” below
2.
See”Status LEDs” below
3.
LCD Navigation Buttons
* 4.
WAN Port with hardwave bypass
* 5.
LAN Port with hardwave bypass
6.
4 5
6
Console Port
Note:
* Hardware Bypass – A built-in failure-proof function of the
DFL-M510. In an unlikely event of a hardware failure or an
accidental power-off, your network traffic will automatically skip
(bypass) the DFL-M510 and flow normally as if a DFL-M510 was
not deployed on your network at all in the first place.
04
DFL-M510 Quick Installation Guide
2.2 Rear View
1
1.
Power socket
2.
Power switch
2
2.3 LCD Navigation Button Description
Button
05
Name
Description
UP
Scroll Up
Down
Scroll Down
ESC
Go back to the previous screen
Enter
Next screen
DFL-M510 Quick Installation Guide
2.4 LCD Panel
Main Menu
Sub-Menu
Description
Device Status
System Info.
Firmware Ver.:
Policy Ver.:
Policy Number:
Current Date:
Current Time:
Dev. Up Time:
CPU Load:
Memory Usage:
Current Session:
Traffic Info.
WAN RX:
WAN Drop:
LAN RX:
LAN Drop:
Traffic Level:
Alert Monitor
Traffic Alert:
IP Info.
Device Name:
IP Address:
IP Mask:
Gateway IP:
DNS IP:
Operation Mode:
Interface Info.
LAN Link Mode:
LAN Stealth:
WAN Link Mode:
WAN Stealth:
Device Config
Reset
Reset Confirm
Reboot
Reboot Confirm
06
DFL-M510 Quick Installation Guide
2.5 Status LEDs
LED
Color
Status
Description
Power
Green
On
Off
DFL-M510 is powered on
DFL-M510 is powered off
System
Green
On
Off
DFL-M510 is ready
DFL-M510 is not ready
Bypass
Red
On
Off
Hardware Bypass is enabled
Hardware Bypass is not enabled
Inbound
(LAN)
Green
(Left)
On
Off
Link OK and the speed is 100Mbps
Link OK and the speed is 10Mbps
Green On
(Right) Off
Blinking
Outbound Green
(WAN)
(Left)
On
Off
Green On
(Right) Off
Blinking
07
Link Present
No packets Send/Receive
Port is sending or receiving data
Link OK and the speed is 100Mbps
Link OK and the speed is 10Mbps
Link Present
No packets Send/Receive
Port is sending or receiving data
Connecting the DFL-M510
3
The client’s network structure can be set up with/without a firewall.
3.1 Setting up without a firewall
If your network is not behind a firewall, the DFL-M510 is
placed between the ADSL or router and switch. Refer to the
following:
Connect a UTP cable from the ADSL router to the WAN port
on the DFL-M510.
Connect a UTP cable from the LAN port on the DFL-M510 to
the switch.
ADSL Router
WAN Port
DFL-M510
Switch
LAN Port
Note:
Transparent Device – The DFL-M510 is a “transparent device” in
the sense that it can be deployed directly behind a firewall without
affecting your existing network configuration and architecture. It
can be added to or removed from your network anytime without
requiring you to re-configure or reset your network.
08
DFL-M510 Quick Installation Guide
3.2 Setting up with a firewall
If your network is behind a firewall, the DFL-M510 is
placed between firewall and LAN. Refer to the following:
Connect a UTP cable from the firewall to the WAN port on
the DFL-M510.
Connect a UTP cable from the LAN port on the DFL-M510 to
the LAN.
ADSL Router
Firewall
WAN Port
DFL-M510
LAN Port
Note:
If you are deploying DFL-M510 over the VLAN (802.1q) network,
you have to configure the VLAN setting before putting in the
network. Please refer to the manual for detail configuration in
VLAN environment.
09
Configure DFL-M510
4
The DFL-M510 GUI is a Web-based application that allows you
to manage the DFL-M510. The GUI is a java applet application.
Before accessing the GUI from any PC, note the following:
You must install Java Runtime (1.4.2 or above) as
described below
Pentium 4, 2.0 GHz
512 MB RAM
Refer to the following to log on to the DFL-M510.
4.1 Connect to DFL-M510
After placing the DFL-M510 within your network transparently,
you could use web browser to connect the DFL-M510 with
Java Runtime installed.
Activate your browser.
Then type the default
IP (http://192.168.1.1)
and press enter.
Note:
1. The IP address shown in the example above is the default
setting. If you have changed the IP address of the DFL-M510
to conform to a network, then input that IP address in the web
brower, instead of the default IP address shown.
2. For the best view of this GUI, please adjust your screen
resolution to 1024X768.
10
DFL-M510 Quick Installation Guide
DFL-M510 Welcome page.
Either install the Java Runtime from the accessary CD first or
login to DFL-M510 directly.
Java Runtime is required
to login DFL-M510 , Please
install the Java Runtime
program.
Click “Always” to continue and prevent screen appearing again,
The login screen appears.
Click Always to trust the
signed applet distributed
by “D-Link”.
11
DFL-M510 Installation Guide
Login to the DFL-M510 with ID/Password.
type the default
ID/Password
ID: admin
Password: admin
select the preferred
language, and then
click Login
The computer requires to start Java Runtime therefore the log-on
time would be around 20 seconds.
Note:
The Setup Wizard would be running automatically when you login
into DFL-M510 first time.
12
DFL-M510 Installation Guide
4.2 Setup Wizard
Running the Setup Wizard
Welcome to the DFL-M510 Setup Wizard.
This wizard will guide you through the setup of your DFL-M510
Step1 - Setup Wizard welcome page
3 Steps to guide you
to finish the quick
configuration.
Click Next
Step2 - Set up the IP/Subnet mask and default gateway
After set up the IP
information for
DFL-M510.
Click Next
13
DFL-M510 Installation Guide
4.2 Setup Wizard (Continued)
Step3 - Choose the Applications you want to block
Choose the
applications that you
want to block in your
network.
Click Next
Step4 - Go to Real-Time Monitor or back to configuration page
Select Yes to go to
Real-Time Monitor
directly or No to back
to configuration page
Click Finish
14
DFL-M510 Installation Guide
4.2 Setup Wizard (Continued)
Step5 - Select ”Yes” to go to Real-Time Monitor.
15
WARRANTY
5
Warranty
FCC Warning
This equipment has been tested and found to comply with the
limits for a Class A digital device, pursuant to Part 15 of the FCC
Rules. These limits are designed to provide reasonable protection
against harmful interference when the equipment is operated in
a commercial environment. This equipment generates, uses, and
can radiate radio frequency energy and, if not installed and used
in accordance with this manual, may cause harmful interference to
radio communications. Operation of this equipment in a residential
area is likely to cause harmful interference in which case the user
will be required to correct the interference at his own expense.
CE Mark Warning
This is a Class A product. In a domestic environment, this product
may cause radio interference in which case the user may be required
to take adequate measures.
Warnung!
Dies ist ein Produkt der Klasse A. Im Wohnbereich kann dieses
Produkt Funkstoerungen verursachen. In diesem Fall kann
vom Benutzer verlangt werden, angemessene Massnahmen zu
ergreifen.
Precaución!
Este es un producto de Clase A. En un entorno doméstico, puede
causar interferencias de radio, en cuyo case, puede requerirse al
usuario para que adopte las medidas adecuadas.
Attention!
Ceci est un produit de classe A. Dans un environnement domestique,
ce produit pourrait causer des interférences radio, auquel cas
l`utilisateur devrait prendre les mesures adéquates.
16
DFL-M510 Installation Guide
Attenzione!
Il presente prodotto appartiene alla classe A. Se utilizzato in ambiente
domestico il prodotto può causare interferenze radio, nel cui caso è
possibile che l`utente debba assumere provvedimenti adeguati.
VCCI Warning
VCCI
Warning
BSMI Warning
警告使用表
這是乙類的資訊產品,在居住的環境中使用時,可能會造成射頻干擾,在這
種情況下使用者會被要求採取某些適當的對策。
17