1
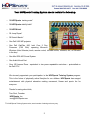
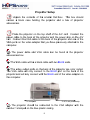
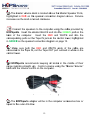
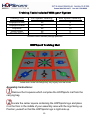
Table of Contents
Welcome Letter……………………………………………………....... 2
HOPSports Training System Contents……………………………… 3
System Setup…………………………………………………………... 4
A/V Cart……………………………………………………….. 4
Computer……………………………………………………… 5
Projector………………………………………………………. 9
Sound System………………………………………………… 10
Activating the HOPSports Training System………………………… 15
Accessing the HOPSports Video Library…………………………… 17
Using the Microsoft Remote Control…………………………………. 18
Shutting off the HOPSports Training System………………………. 19
The Training Tools ……………………………………………………. 20
Assembly and care of the HOPSports Mat ……………….. 20
Setup and care of the Stability Balls ………………………. 25
Setup and care of the Jump Ropes ……………………….. 27
HOPStick and Stretch Bands ………………………………
30
Trouble Shooting Tips…………………………………………………. 31
The Projector…………………………………………………………… 32
The Computer………………………………………………………….. 33
Receiving New Content……………………………………………….. 34
iTunes…………………………………………………………………… 35
1
WELCOME TO HOPSports®
We are so excited that your school has become a member of the HOPSports Training
System community! We look forward to a long and successful partnership in bringing
active and healthy lifestyles to our youth.
HOPSports is a multi-media, technology driven, standards-compliant
physical education system. For HOPSports, the nation-wide success of its educational
model combines the need for effective and comprehensive programs from the
administrative perspective, with a system that teachers and students alike respond to
positively. Consequently, the entire structure of the educational pyramid is able to achieve
success - empowering all participants in the spectrum!
The HOPSports commitment is first and foremost to provide students with
the foundation for a healthy and active lifestyle. Movement and energy education are the
key components for the lessons. HOPSports provides a turn-key media cart containing
Vista Media Center preloaded with lessons taught by athletes and performers including
The Harlem Globetrotters, Chris Draft, Guillermo Gomez, Tezoro Productions, Ringling
Brothers Barnum and Bailey, Jenny Blake, Byron Davis, Cheryl Broughton, and
Olympians Buddy Lee, Annett Davis and Nicole Giordano.
For any technology-related questions (CPU & Projector), please
contact DELL™ GOLD TECHNICAL SUPPORT 24/7 at (866) 461-3355.
For any HOPSports-related questions, please contact HOPSupport at
(866) 762-4677 between 9 a.m. & 5 p.m. (PT), Monday through Friday.
Or, e-mail your questions to [email protected].
2
Your HOPSports Training System should contain the following:
o 30 HOPSports training mats*
o
30 HOPSports stability balls*
o 30 HOPSticks*
o 30 Jump Ropes*
o 30 Stretch Bands*
o One Dell 2400 MP projector
o One Dell OptiPlex 960, Intel Core 2 Duo
Processor (2.66 GHz) operating Microsoft
Windows Vista Ultimate (cords, remote control, infrared sensor, manuals, etc., all included
in the box)
o One Alto OEX-400 Sound System
o One Audio/Visual Cart
o Over 100 Lesson Plans - equivalent to two years repeatable curriculum – preinstalled on
the Dell CPU
We sincerely appreciate your participation in the HOPSports Training System program.
This is the future of physically active lifestyles for our children. HOPSports has merged
entertainment with physical education making movement, fitness and sports fun for
everyone.
Thanks for caring about kids,
Tom Root, Founder
HOPSports, Inc.
[email protected]
*Full HOPSports Training System order, actual number of training tools may vary.
3
G
GETTIN
G STAR
RTED
A/V Cart
C
Setup
Rem
move the Box containing the A/V
V cart fro
om the pallet.
p
Op
pen the
ox and re
emove th
he conte
ents.
bo
The box
b shou
uld conta
ain 3 pla
astic shelves, 8 le
egs, 4 casters, and
a a3
g (ULV approved
a
d) electriccal asse
embly witth a 15 ftt. cord.
prrong plug
The shelves can
c be diistinguish
hed in th
he following way::
h a mo
olded pla
astic handle
1) The top shelf has
2 The middle she
2)
elf has le
eg conne
ection po
osts on both
b
side
es
3 The bo
3)
ottom sh
helf has leg con
nnection posts on
o the finished
f
side an
nd holes for the casters
c
o the un
on
nfinished
d side.
HOPS
Sports re
ecomme
ends usin
ng a 2 pound
p
ru
ubber ma
allet duriing cart
asssembly as the le
eg conne
ections are
a tight.
sters into
o the unffinished side of the bottom shelf.
Inserrt the cas
Placce one lo
ong leg over
o
each
h leg posst on the bottom shelf.
Place
e the mid
ddle she
elf on legs from th
he bottom
m shelf.
Repe
eat steps
s 3 and 4 for the top shellf, using the shorrter legs.
The electrica
al assem
mbly com
mes in tw
wo piece
es with screws. There
arre 4 scre
ew holes along th
he long side
s
of th
he top sh
helf.
4
Compu
uter Se
etup
No
ow that the
t cart is togeth
her we can assemble you
ur HOPS
SportsTrraining
Sy
ystem (HTS). We will set up the
t
computer firsst since it is the
e center
piece of th
he system
m.
Unpack the contentss of the larger Dell
D box from yo
our pallett. This
ox should contaiin your compute
c
er, a boxx of computer acccessorie
es (e.g.
bo
ca
ables an
nd mouse), diskss for the
e factoryy installe
ed softwa
are, and
d a box
co
ontaining
g the com
mputer keyboard.
Your remote control and I/R Receive
er can be
e found in
i the co
omputer
es box.
acccessorie
The HOPSpo
H
orts Lessson Plans are prreloaded
d on your compu
uter and
e through
h the Me
edia Center interfface.
acccessible
5
The disks
d
inc
cluded with
w the compute
er are fo
or re-insttallation of Dell
installed software
s
ONLY. These
T
diisks shou
uld be ke
ept in a secure
s
lo
ocation.
ontent iss preload
ded, you
u will nott receive
e a set of
o disks
Siince the HTS co
co
ontaining
g the HO
OPSports
s program
m lesson
ns.
Place
e the computer on
o the bo
ottom shelf of the
e A/V cart. Conn
nect the
po
ower ca
able to the
t
com
mputer and
a
the power strip on the A//V cart.
Co
onnect I/R sensor, mouse and keyboard
d to USB ports on the back
b
of
th
he compu
uter.
Position the computer
c
r so that it faces the narrrow side of the A/V
A cart.
e, the com
mputer will
w hit the
e 3 outle
et electriccal assembly.
Otherwise
Connect the I/R senso
or, mousse, and keyboard
k
d to open
n USB ports
p
on
he back of
o the computer.
th
The power
p
ca
able and
d video adapter can be found in
n the co
omputer
acccessorie
es box.
Attach
h the po
ower cab
ble to com
mputer (#4
( in im
mage on next pag
ge) and
c powe
er strip.
plug into the A/V cart
6
Computer Connections Diagram
1. Cover-Release Latch
2. Padlock Ring - will lock the cover release
latch
3. Voltage Selection Switch
4. Power Connector
5. Back Panel Connectors
a. GREEN Port is connected to Alto
Audio System.
b. BLACK USB ports for mouse.
optional keyboard, and IR sensor
c. BLUE VGA port will be covered up.
6. Card Slots
a. White video output port will be
located in one of these expansion
slots
7
Conn
nect the dual VGA video adapter to the ba
ack of th
he compu
uter.
Dual VGA
V
Adaptter
A pla
astic bag
g contain
ning 2 video ada
apters ca
an be fo
ound in the
t
box
omputer’s keybo
oard and mouse.
with the co
The dual
d
VGA
A adapte
er picture
ed above
e will havve a BLA
ACK con
nnector
and tw
wo BLUE conne
ectors
. The other
o
ad
dapter, w
with two WHITE
onnectorrs (dual DVI), is not u
used in the setu
up of th
he HOP
PSports
co
Trraining System.
S
The BLACK
B
end
e of th
he adapte
er will co
onnect to
o the WH
HITE portt on the
ack of th
he computer as shown
s
b the re
by
ed arrow. One off the two
o BLUE
ba
co
onnectorrs on the other end will connecct to the
e VGA cable fro
om the
prrojector.
8
Projec
ctor Se
etup
Unp
pack the contentts of the
e smalle
er Dell box.
b
Th
his box should
co
ontain a black case ho
olding the proje
ector an
nd a bo
ox of prrojector
acccessorie
es.
Placce the prrojector on the top
t
shelff of the A/V cartt. Conn
nect the
po
ower cab
ble to the back of
o the prrojector and
a the power strip
s
on the
t A/V
ca
art. Con
nnect the
e VGA ca
able to the back of the projector
p
and one
e of the
VG
GA portss on the video ad
dapter th
hat you have
h
pre
eviously attached
d to the
co
omputer..
The power cable
c
an
nd VGA cable can
c
be found in
n the prrojector
es box.
acccessorie
The VGA
V
cable will be
e a blackk cable with
w two BLUE
B
en
nds.
The video
v
outtput portts on the
e back of
o the pro
ojector are
a color coded.
he VGA cable will
w only connectt to the BLUE port
p
on the
t
backk of the
Th
prrojector and
a will only
o
connect with
h the BL
LUE end of the viideo ada
apter on
th
he compu
uter.
To compu
uter
To A/V cart powerr strip
The projector should
d be con
nnected to the VGA ad
dapter with
w
the
nu
umber 1 stamped
d on the blue pla
astic casiing.
9
Alto Setup
To complete the technology setup, we will now connect the Alto OEX-400
Sound System.
Unpack the contents of the Alto box. This box should contain the
Alto OEX-400 audio system and the corresponding instruction manual.
Detach the satellite speakers from the main control tower by lifting
the latch on the side of the unit.
Control Tower – Front
Control Tower - Back
Place the central control tower on the bottom shelf of the A/V cart,
the two satellite speakers will fit on the middle shelf. Connect the Power
cable from the central control tower to the power strip on the A/V cart.
10
The Power
P
co
onnectio
on and ON/OFF
O
switch are
a located on th
he back
off the central towe
er above the storrage com
mpartmen
nt.
All cab
bles for the
t audio system
m are located in a comp
partment on the
ack side of the central
c
to
ower. Simply pull the cables thro
ough the
e elastic
ba
ne
etting. In this comparttment th
here sho
ould be 5 cable
es/cords and 2
m
microphon
nes as sh
hown be
elow.
Speaker Cable (qty:
(
2)
Microphone & Cable (qty.. 2)
Power Cord (qty:1)
11
Conn
nect the satellite
e speakers to the
e central control tower
t
ussing the
included speaker
s
cable. One
O end
d should be firmly inserte
ed into the
t port
n the fron
nt of eac
ch speakker.
on
Th
he other end sho
ould be fiirmly inserted intto one off the two Master Spk.
po
orts at th
he bottom
m of the control
c
to
ower hig
ghlighted in YELL
LOW bellow.
Pllease no
ote: RED, GREEN
N, and YELLOW
Y
W highligh
hts have been digitally
ad
dded to the
t diagrram for clarity,
c
th
hey will NOT
N
appear on th
he contro
ol
to
ower.
S
Speaker
Connecction Diagram
s
cables will
w be in the com
mpartmen
nt with th
he other cables.
The speaker
It doe
es not matter wh
hich spea
aker (leftt or rightt) is plug
gged into
o which
m
master
sp
peaker po
ort (1 or 2).
12
The master
m
vo
olume kn
nob is lo
ocated ab
bove the
e Master Speaker Ports,
highlighted
d in RED
D on the
e speake
er conne
ection diagram above.
a
V
Volume
k
is tu
urned clo
ockwise.
increases as the knob
nect the speakers to the
e computter using
g the cab
ble provided by
Conn
ert the sm
maller BLACK
B
end into the
t GRE
EEN portt on the
HOPSporrts. Inse
ack of the com
mputer. Insert the RE
ED and WHITE
E end in
nto the
ba
co
orrespon
nding porrts on the
e Tape IN
I jack on
o the co
ontrol tow
wer, high
hlighted
in GREEN
N on the speakerr connecttion diag
gram on page 12.
Make
e sure both the
e RED and WHITE
W
e
ends
of the cab
ble are
co
onnected
d to the Tape
T
IN,, not the Tape OUT port outlined in white
e on the
co
ontrol tow
wer.
HOPS
Sports recommends ke
eeping all
a knobss in the middle of their
ange (po
ointing sttraight up
p). Con
ntrol volu
ume usin
ng the “M
Master Volume”
V
ra
kn
nob and the volume control on the compu
uter.
2 RCA
A Male to 3.55 Stereo Male audio adappter
The HOPSpo
H
orts adap
pter will be in the compu
uter acce
essories box or
aped to th
he outer Alto Boxx.
ta
13
The
e Alto OEX-40
00 Aud
dio Systtem comes with two wired
m
microphon
nes. The
ese can be conn
nected to
o the cen
ntral conttrol towe
er using
an
ny of the
e 4 line in
nputs.
You can
c
use the inclluded wiired microphone
es or con
nnect yo
our own
s
wireless sets.
14
Activating the HOPSports Training System
With all components plugged in, it is time to turn on your HOPSports
Training System!
Turn on the projector with the projector remote or by firmly pushing
the power button located on top of the projector. The BLUE power button
on the projector’s remote is located in the top right corner. Push firmly for
a few seconds and the projector will begin warming up. A light should
come on showing that the projector is waiting for a signal.
Let’s turn on the Dell with Vista Media Center! The power button is
located at the top right corner as you are looking at the front of the
computer. Press the power button firmly and the power button will light
up. Windows will load and you will see a desktop screen.
15
Note: It is recommend
ded to tu
urn on th
he projector befo
ore startting the
co
omputer..
Turn
n on your Alto OEX-400 sound system byy pressin
ng the ON/OFF
O
sw
witch loccated on
n the back
b
of the con
ntrol tow
wer abovve the sstorage
co
ompartm
ment.
When
n the sou
und system is on
n, a gree
en light will
w be on
n directlyy to the
e control knob on the fro
ont pane
el of the central
left of the monitorr volume
ower.
to
16
Acc
cessing HOPSp
ports Content
C
Librarry
Once
e at the main
m
scrreen (de
esktop) there sho
ould be only two
o icons.
he GREE
EN Wind
dows Me
edia Centter icon and the iTunes icon are located
Th
in the mid
ddle of your
y
scrreen. Yo
ou can use
u
the mouse
m
t selectt Media
to
p
the
e GREEN
N Windo
ows MC button on
o the middle of
Center or simply push
our remo
ote. Push
hing thiss button will auto
omatically take you
y to th
he Vista
yo
Media Center.
You will
w need
d to scrroll up with
w
the mouse or use the Dire
ectional
ad’s up button
b
to
o go up tw
wo click
ks to the
e Picture
e/Video Library.
L
Pa
From this poin
nt you ne
eed to sccroll to th
he Rightt two clicks to highlight
h
an
nd selectt the Vid
deo Libra
ary. Thiss is wherre all of the
t HOP
PSports content
is located..
Selecct a Lesson Plan by scrolling and selecting. The OK
O button in the
m
middle
of the Directional Pad
P is ho
ow you select.
s
Once you select a lesson
plan, allow
w a few moments
m
s for the file to load.
If at any
a poin
nt during the lessson you wish
w
to change
c
w
workouts
s, either
ush “Pau
use,” “Sttop” or simply
s
p
push
the “Back” button to
t go ba
ack one
pu
sccreen at a time.
NOTE:
Th
he “Free Music
M
Choice” Lesso
on Plans allow you to
t play son
ngs of you
ur choice
wh
hile following the les
sson. You can uploa
ad songs in
nto the pre
e-installed iTunes fille or play
CD
Ds in Wind
dows Media
a PLAYER to create a more cus
stomized lesson for your class
s.
17
Using the Media Center Remote
Range of Vista Remote Control: Approx. 300 feet.
Unit Sensitivity to Remote Signals: Very High – Nearly 180-Degree arc of sensitivity.
Note: Make sure to point remote at the IR sensor – NOT at the screen.
18
To
o shut off
o the compute
c
er from
m inside
e Media Centerr
(
(using
t rem
the
mote):
Press the
t
back button on
n the rem
mote until you are at
a the ma
ain menu (Picture
Lib
brary should be hig
ghlighted).
Press the UP arrrow once and selecct “TASKS
S.”
Selectin
ng the firs
st option, "Close," will
w close the Media Center and returrn you to
p. From this poin
nt follow the
t
shut d
down insttructions on the bo
ottom of
the desktop
pa
age 6.
Selectin
ng the third option
n, "Shut Down,"
D
will close all
a program
ms and power off
oks like a circle with
h a line do
own the middle.
m
the computer. This symbol loo
In the event
e
the computerr freezes, press and hold the
e power button
b
on the front
off the CPU
U for three
e to five seconds. This
T
will power
p
dow
wn the co
omputer and allow
yo
ou to resta
art.
Pllease notte: Powering off th
he computer will take a minu
ute or two
o. Do nott unplug
th
he Compu
uter or Projector before it is done powering down. This will result in
errror messa
ages the next
n
time the comp
puter is po
owered up
p and a much
m
longe
er power
up
p sequencce.
19
Training Tools Included With your System
Training Tool
Hopsports Mat
Hopsports Ball
Hopstick
Jump Rope
Stretch Band
Full System Quantity*
30
30
30
30
30
Mini System Quantity*
5
0
10
0
0
*Numbers reflect standard package quantities.
HOPSport Training Mat
* Please Note: actual mat design may vary slightly from that shown
Assembly Instructions:
Remove the 9 squares which comprise the HOPSports mat from the
carrying bag.
Locate the center square containing the HOPSports logo and place
it on the floor in the middle of your assembly area with the logo facing up.
Position yourself so that the HOPSports logo is right-side up.
20
Place
e the rem
maining 8 square
es around the center starrting with
h the
quare witth the nu
umber 9 directly above
a
th
he centerr square and
sq
prrogressin
ng clockw
wise as the
t numbers incrrease.
The arrows
a
on
n each square sh
hould point to the
e outer edge
e
of th
he
asssembled
d mat.
When
n comple
eted the mat
m shou
uld resem
mble the
e image on
o page 20
hough it may
m not match exactly ass the gra
aphic dessign of th
he mat has
th
be
een revissed seve
eral timess.
Make sure all connecttion tabss are pusshed dow
wn fully.
c
ed mat so
s that th
he arrow on the piece
p
witth the
Posittion the complete
umber niine is po
ointing tow
ward the
e wall on which th
he progrrams will be
nu
prrojected.
cessary for all prrograms;; howeve
er certain
n warm-u
ups do
This iss not nec
bers to co
orrectly position
p
s
students
s.
usse the mat numb
Hurdles and
a Ladd
ders:
The Mat
M can be
b disasssembled
d to form hurdles and ladd
ders. Th
he
enter of each
e
ma
at section
n, exceptt the one
e contain
ning the HOPSpo
H
orts
ce
logo, can be remo
oved.
21
Folding the center secttion alon
ng the ce
entral cutt will resu
ult in a lo
ow
hu
urdle.
g the cen
nter secttion and attaching the short sidess will
Disasssembling
m
make
a high hurdle.
Attach
hing the frames remainin
r
ng after th
he cente
er section
ns are re
emoved
orms a la
adder.
fo
22
Care:
m can be
b cleaned with a cloth and
a warm
m soapy water.
w
A small
The mat
mount off antibac
cterial cle
eanser ca
an be ad
dded to disinfect
d
the surfa
ace
am
Do no
ot use ble
each to disinfect
d
the mats as thiss will dam
mage the
e
de
esign printed on them.
Avoid abrasive or chemical cle
eaners and
a prolo
onged co
ontact witth
water.
Sttorage:
Sports re
ecommen
nds storiing the mats
m
fullyy assemb
bled on a flat
HOPS
urface.
su
If the mats mu
ust be brroken do
own into their
t
9 co
omponent squares for
H
rts recom
mmends placing the squa
ares bacck in the
sttorage, HOPSpor
ca
arrying bag
b or us
sing a Ve
elcro stra
ap to bun
ndle the squares.
s
. This will
w
m
make
distribution of
o the mats easie
er the ne
ext time they
t
are used.
23
WARN
NING: Storing mats on edge mayy cause warping
w
and cou
uld
da
amage th
he tabs that
t
the mat
m is re
esting on. As a re
esult HO
OPSportss
re
ecommen
nds this method only as a last ressort.
elpful Tips:
He
Some
e tabs ma
ay be da
amaged during
d
no
ormal usse. If the
e torn pie
ece can
e located
d use Su
uper Glue
e or a sim
milar pro
oduct, to reattach
h the piecce. If
be
th
he torn piiece cannot be lo
ocated th
he mat may
m continue to be
b used safely
s
with tabs missing.
m
When
n gluing mat
m pieces back togetherr, make sure
s
to use
u apprropriate
sts foam repair on
o the lab
bel.
glue; one which lis
Occa
asionally,, while being use
ed as a la
adder, th
he mat sq
quares will
w
ear. Thiss occurs most oftten when
n a stude
ent catch
hes their foot on the
t
te
ladder and
d stumbles. Thiss tearing will usually allow
w the stu
udent to regain
heir balan
nce and continue
e on with
h the drill without falling. If tearing
g
th
ha
appens the
t mats may be glued back toge
ether along the te
ear.
24
Hopsports Ball
B
In
nflation and
a Care:
All HO
OPSports
s balls are 55 cm
m. diameter balls and are
e latex fre
ee.
essor to inflate th
he balls.
Usse an airr compre
The ball
b can be
b cleane
ed with a cloth and warm
m soapy water.
w
A small
mount off antibac
cterial cle
eanser ca
an be ad
dded to disinfect
d
the surfa
ace
am
Do no
ot use ble
each to disinfect
d
the ball..
Avoid abrasive or chemical cle
eaners.
elpful Tips
He
All infflatable items
i
will lose air over tim
me. Sim
mply remo
ove the plug
p
oin and add
a more
e air as needed.
n
ussing a co
25
The ball
b material will stretch
s
affter it is inflated.
i
This willl make the
t ball
ap
ppear to lose air quicker than would be ottherwise
e expecte
ed. How
wever,
on
nce the ball
b has stretched
s
d to the rated sizze (55 cm
m in diam
meter) this
sttretching will diminish.
o the ela
asticity off the balll materia
al it is rarre for the
e final dia
ameter
Due to
(5
55 cm.) to
o be reached on the initia
al inflatio
on. Simp
ply inflate
e the balll until it
is firm and
d can hold a partticipant’ss weight without
w
b
becomin
g overly
n.
m
misshape
b
are burst ressistant however no inflata
able item
m is
HOPSports balls
urst proo
of.
bu
If the balls see
em to be
e losing air
a and th
here is no obviou
us sign of
o
earing or puncture
e, make sure the
e plug is fully inse
erted.
te
The plug
p
will slide
s
into
o the balll easier if it is we
et. If you
u are havving
g
th
he plug fu
ully inserrted, wett the plug
g then insert.
difficulty getting
Normal use will
w cause
e the ball to flex, which
w
co
ould loossen the plug
p
ovver time.
26
Jum
mp Rope
es
s
off the jum
mp ropes
s
Correct sizing
Stand in the center of
o the rop
pe and ho
old both handless in one hand.
h
Make
e sure the participant is in
n the cen
nter of th
he rope. The han
ndles
hould be at the same leve
el and th
here should not be
b any sllack in th
he
sh
ro
ope.
e the parrticipant place the
e tips of the hand
dles eve
en with th
he top
Have
off their shoulder
nced jum
mpers can shorte
en the rop
pe furthe
er by placcing the
Advan
andles even with
h their arm
mpit.
ha
27
Tie one
o or tw
wo knots in the ro
ope direcctly below
w the handles.
You can
c also use a pa
air of plie
ers to mo
ove the brass
b
eye
elets
co
onnecting
g the handle and
d rope. You mayy then cu
ut off the
e extra le
ength of
ro
ope
o the varrying heiights of participa
p
nts in diffferent se
essions
Due to
hroughou
ut the day
y, HOPS
Sports do
oes not recomme
r
end makking this more
m
th
pe
ermanen
nt change
e in leng
gth.
While
e jumping
g, the ro
ope should barelyy skim th
he floor. If the rope is
on, the ro
ope need
ds to be
slamming into the floor witth every revolutio
hortened
d further.
sh
Your jump
j
rop
pes may be red or
o blue; both
b
rope
es are ad
djusted the
t
ame wayy.
sa
28
Care of th
he Jump
p Ropes
The jump rop
pes should be hung after use. Th
his will prrolong th
he life
e and prevent tangling.
off the rope
The ro
ope does
s not nee
ed to be hung be
etween ju
umping sessions
s
s.
Siimply ha
ang the ro
opes at the
t end of
o the da
ay.
Prolon
nged use
e of an im
mproperrly sized rope cou
uld cause
e damag
ge to
he rope frrom cons
stant sla
amming into the floor.
f
th
Ropess may be
ecome stiff
s and brittle
b
if stored
s
be
elow 60 degrees
d
ahrenheit. Allow
w ropes th
hat have
e been sttored bellow this tempera
t
ature to
Fa
warm befo
ore use.
Do no
ot wind th
he jump rope aro
ound its handles
h
for stora
age. Thiss will
horten th
he life of the jump
p rope.
sh
29
HO
OPStick
k
The HOPStick
H
k is desig
gned as a substittute for racquets
r
s, bats, golf
d is utilize
ed in ourr stunt se
equence
e program
ms.
clubs, and
As witth any fo
oam mate
erial, exccessive bending,
b
, twisting
g, or pulliing can
ause tears which
h will eve
entually break
b
the
e stick.
ca
Strettch Ban
nds
Sports sttretch ba
ands are latex-fre
ee
HOPS
Bandss come precut
p
in 6 foot le
engths
Throu
ughout th
he full ran
nge of motion
m
du
uring exe
ercise, th
he bandss
hould rem
main at least slig
ghtly stretched. If at any point the
e bands sag,
s
sh
ha
ave the participa
p
nt slide their
t
han
nds close
er togeth
her on the
e band or
o have
th
he participant wra
ap the ba
and arou
und their wrist.
30
Trroubles
shootin
ng Tips
Make sure tha
at all com
mponentss of the system
s
a indee
are
ed plugg
ged in.
All components are co
olor-code
ed. For example
e
, the BLU
UE VGA
A cables
co
onnect to
o the blue ports on
o the CPU and projector.
The Infrared (IR) Se
ensor is what alllows the
e remote
e to control the
CPU. Enssure thatt the IR Sensor is
i plugge
ed into any
a one of the six
s USB
po
orts located on th
he back side of the comp
puter. Th
hese USB
B ports are
a also
where the
e Mouse and Keyyboard co
onnect.
Also ensure
e
th
hat the In
nfrared Sensor
S
iss either elevated
e
d or pointted in a
direction that it can
n pick up
p the Remote’s signal.
s
W
WARNIN
NG: Wheen turninng off yoour HOP
PSports Training
g Syste
em, it is
im
mperative
e that yo
ou follow
w the pro
oper proccedure to mainta
ain the integrity
off the sysstem. Shut down the Dell by clickking on the
t Wind
dows symbol in
th
he bottom
m left ha
and side
e of yourr screen. Scroll over to the rightt-facing
arrrow and
d select “Shut Do
own.”
→
Turning off the projector is simple
e but requires two (2) full minutes
m
off cooling
do
own beforre being unplugged
u
d. Doing this
t
will extend
e
the
e life of your projector and
ke
eep you frrom needing expensive repla
acement bulbs.
b
31
The Project
P
tor
In order
o
to transfer ownersh
o
ur projecttor from HOPS, you
y will
ip of you
n
need
to call
c Dell Custom
mer Care
e at 1-80
00-624-9
9897, and
d be rea
ady with
t Service Tag number and Exp
the
press Service Co
ode.
ate the “S
Service Tag num
mber” as well ass the “Ex
xpress Service
S
Loca
C
Code.”
B
Both
num
mbers arre found on the bottom of the projector as well
a on its Dell box
as
x.
An example
e
ervice Tag
T number is “C
CCSNT91
1.”
of the Se
An example
e
of the Ex
xpress Service
S
Code iss “418307
74901.”
FYI - If you
ur projector’s tem
mperaturre light comes
c
o follow
on,
w these
s
steps
to reset your projecctor:
t proje
ector.
1. Unplug the power cord from the
’s powe
n push and hold the projector
p
er button
n for TW
WO (2)
2. Then
minu
utes. Thiis will resset your projecto
or and sh
hould be done BE
EFORE
callin
ng Dell’s Customer Care.
3. Plug the pow
wer cord
d back in
nto the projector and prress the
e power
butto
on “on.” This
T
proccess sho
ould rese
et the pro
ojector. At
A this po
oint, no
temp
perature light sho
ould be “on.”
“
If th
he tempe
erature light does come
on affter you have co
ompleted this pro
ocess, then call Dell’s
D
Te
echnical
Service numb
ber at 87
77-671-3
3355 and
d press Option
O
2 for help
p.
32
The Comput
C
ter
In orrder to trransfer ownership
o
p of yourr computter from HOPS, you
y will
n
need
to call
c Dell Custom
mer Care
e at 1-80
00-624-9
9897, and
d be rea
ady with
t Service Tag number and Exp
the
press Service Co
ode.
ate the “S
Service Tag num
mber” as well ass the “Ex
xpress Service
S
Loca
C
Code.”
B
Both
num
mbers arre found on the bottom of the projector as well
a on its Dell box
as
x.
An example
e
ervice Tag
T number is “70N92G1
1.”
of the Se
An example
e
of the Ex
xpress Service
S
50593.”
Code iss “152765
The compute
er come
es with only a 30
0 day tria
al of anti-virus so
oftware.
A such, it is not recomm
As
mended to
t conne
ect your HOPSpo
H
orts comp
puter to
t scho
the
ool netwo
ork or the
e interne
et unlesss your sitte IT representattive has
installed full vers
sions of the softw
ware used
d in yourr facility.
33
Re
eceiving
g New Content
C
t
HOP
PSports may perriodicallyy mail yo
ou Conte
ent Disk(ss) with which
w
to
u
update
y
your
Content Librrary.
--Open
n your DVD/CD
D
g the button belo
ow it and
d to the
drive byy pushing
right (nea
ar the top
p of the compute
c
er).
--A screen will prompt you to “R
Run App
plication””
A
ion”
--Select “Run Applicati
it will assk you to
m
o “Allow”
--Afterr a few moments
--Select “Allow
w”
--Then
n Click “N
Next” wh
hen prom
mpted
These simple ste
T
eps will begin
b
your content upload and will
w autom
matically
o
organize
e and upd
date you
ur Conten
nt Libraryy.
Click “Fiinish” wh
C
hen the Disk(s) are done uploading and the “Finish”
“
b
button
appears. You may then remove the
t DVD
D and retturn it to
o HOPS
ressed, postagew the self-add
with
s
p
-paid envvelope.
HOP
PSports Mini
M users will be
e charge
ed for con
ntent upd
dates.
34
iTunes
iTunes comes pre-loaded on your computer so you can play the music of
your choice during our “Free Music Choice” Lesson Plans.
Load a CD of your choosing into the Disk Drive and the Computer will
prompt you to either “Play the Audio CD” with various media players, “Show Songs
using iTunes,” or “IMPORT songs using iTunes.” Select “Import.”
35
iTunes will then import the songs from your CD into your Music Library.
To play your songs, click on Music at the top left side and your songs will
appear to the right.
36
Highlight the song of choice and push play at the top left side.
37
Once you’ve pressed play, you may play songs simultaneously with our
Lesson Plans by minimizing iTunes (click the highlighted line at the top left corner
of iTunes) and then clicking on, and maximizing the Media Center.
Now you should be able to hear your music while working out to HOPS
lesson plans. If your remote changes the song instead of operating Media Center,
simply use the mouse to maximize Media Center as the primary program.
38