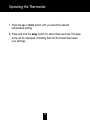
1
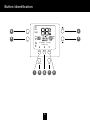
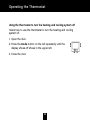
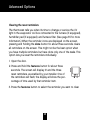
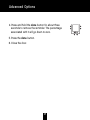
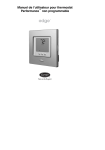
Performance™ Non-Programmable Owner’s Manual
You will love this thermostat.
You have the Edge™ thermostat. This unique device’s
state-of-the-art technology makes it easier than ever
for you to keep your home comfortable. And with an
ultra-thin profile and a selection of attractive faceplates,
it is easily the most decorator-friendly thermostat
available. Designed to be as smart – and smart-looking
– as any of the other electronics in your home, your new
Edge thermostat offers three different “Touch ‘N’ Go”
comfort settings to fit your lifestyle – not anybody else’s.
Let this manual show you how easy it is to enjoy the
newest experience in home comfort.
1
Table of Contents
Button Identification . . . . . . . . . . . . . . . . . . . . . . . . . . . . . . . . . . . . . . . . . . . . . .6
On-screen Indicators . . . . . . . . . . . . . . . . . . . . . . . . . . . . . . . . . . . . . . . . . . . . .8
Quick Start
Setting or changing the temperatures for heating and cooling . . .10
Understanding Touch ‘N’ Go . . . . . . . . . . . . . . . . . . . . . . . . . . . . . . . . . . . . . . .11
Operating the Thermostat
Using the Touch ‘N’ Go feature . . . . . . . . . . . . . . . . . . . . . . . . . . . . . . . . . . . . .12
Setting the home temperature . . . . . . . . . . . . . . . . . . . . . . . . . . . . . . . .14
Setting the away temperature . . . . . . . . . . . . . . . . . . . . . . . . . . . . . . . . .16
Setting the sleep temperature . . . . . . . . . . . . . . . . . . . . . . . . . . . . . . . .18
Using the fan . . . . . . . . . . . . . . . . . . . . . . . . . . . . . . . . . . . . . . . . . . . . . . .20
Changing the humidity level . . . . . . . . . . . . . . . . . . . . . . . . . . . . . . . . . .21
2
Table of Contents
Using normal humidify . . . . . . . . . . . . . . . . . . . . . . . . . . . . . . . . . . .21
Using auto humidify . . . . . . . . . . . . . . . . . . . . . . . . . . . . . . . . . . . . .22
How to turn off the humidify or dehumidify feature . . . . . . . .24
Using emergency heat (heat pump systems only) . . . . . . . . . . . . .25
Using the thermostat to turn the heating and cooling system off . .26
Advanced Options
Advanced options display codes chart . . . . . . . . . . . . . . . . . . . . . . .27
Clearing the reset reminders . . . . . . . . . . . . . . . . . . . . . . . . . . . . . . . . .28
Changing from Fahrenheit to Celsius . . . . . . . . . . . . . . . . . . . . . . . . .30
Adjusting or turning off the continuous backlighting . . . . . . . . . . .31
Keypad lockout . . . . . . . . . . . . . . . . . . . . . . . . . . . . . . . . . . . . . . . . . . . . .33
Unlocking the keypad . . . . . . . . . . . . . . . . . . . . . . . . . . . . . . . . . . .34
3
Table of Contents
Special Features
Hybrid Heat (heat pump systems only) . . . . . . . . . . . . . . . . . . . . . . .35
Service reminders . . . . . . . . . . . . . . . . . . . . . . . . . . . . . . . . . . . . . . . . . . .35
Outdoor temperature display . . . . . . . . . . . . . . . . . . . . . . . . . . . . . . . .36
Auto changeover . . . . . . . . . . . . . . . . . . . . . . . . . . . . . . . . . . . . . . . . . . . .36
What If . . .
“Aux heat on” is displayed (heat pump systems only) . . . . . . . . . .37
“Em heat” is displayed (heat pump systems only) . . . . . . . . . . . . .37
There is a power outage . . . . . . . . . . . . . . . . . . . . . . . . . . . . . . . . . . . . .37
You get a service reminder message . . . . . . . . . . . . . . . . . . . . . . . . .38
You get a system error message . . . . . . . . . . . . . . . . . . . . . . . . . . . . .38
4
Table of Contents
Common Terms and Where to Find Them
Auto changeover . . . . . . . . . . . . . . . . . . . . . . . . . . . . . . . . . . . . . . . . . . . .39
Auxiliary heat (heat pump systems only) . . . . . . . . . . . . . . . . . . . . . .39
Backlighting . . . . . . . . . . . . . . . . . . . . . . . . . . . . . . . . . . . . . . . . . . . . . . . .39
Dehumidify . . . . . . . . . . . . . . . . . . . . . . . . . . . . . . . . . . . . . . . . . . . . . . . . .39
Emergency heat (heat pump systems only) . . . . . . . . . . . . . . . . . . .40
Hold . . . . . . . . . . . . . . . . . . . . . . . . . . . . . . . . . . . . . . . . . . . . . . . . . . . . . . .40
Hybrid Heat . . . . . . . . . . . . . . . . . . . . . . . . . . . . . . . . . . . . . . . . . . . . . . . .40
Humidify . . . . . . . . . . . . . . . . . . . . . . . . . . . . . . . . . . . . . . . . . . . . . . . . . . .40
Mode . . . . . . . . . . . . . . . . . . . . . . . . . . . . . . . . . . . . . . . . . . . . . . . . . . . . . . .41
Service reminders . . . . . . . . . . . . . . . . . . . . . . . . . . . . . . . . . . . . . . . . . . .41
Warranty . . . . . . . . . . . . . . . . . . . . . . . . . . . . . . . . . . . . . . . . . . . . . . . . . . . . . . . .42
5
Button Identification
off
Em
heat
b
c
mode
aux
heat
on 2
fan
auto
fan
on
a
fan
cool
on 2
set at
check UV light
check filter
check hum pad
home
away
done
features
i
h
sleep
g
6
f
e
d
Button Identification
a
FAN
Selects whether the fan operates continuously (on) or only when needed for
heating or cooling (auto)
b
MODE
Selects whether thermostat is set for heating, cooling, emergency heat, or
auto (heat and cool as needed), or off
c
UP
Increases the temperature or adjusts the screen selection up when setting
advanced features
d
DOWN
Decreases the temperature or adjusts the screen selection down when
setting advanced features
e
SLEEP
Activates heating and cooling settings for the sleep program period
f
DONE
Saves settings
g
AWAY
Activates heating and cooling settings for the away program period
h
FEATURES
Provides access to advanced options
i
HOME
Activates heating and cooling settings for the home program period
7
On-Screen Indicators
9
8
10
7
off
Em
heat
6
11
mode
5
4
3
fan
aux
heat
on 2
fan
auto
fan
on
cool
on 2
set at
check UV light
check filter
check hum pad
12
2
home
away
sleep
1
13
done
features
8
On-Screen Indicators
1. Programming option; indicates which settings are being adjusted
2. Fan mode – on or auto
3. Filter, UV lamp, humidifier pad reminders
4. Indicates whether setting humidify or dehumidify preferences
5. System is in auxiliary (supplemental) mode
6. Heating set point
7. Current system mode – heating, cooling, emergency heat, heat/cool (auto), off
8. Current temperature
9. Indicates humidify or dehumidify settings
10. Fahrenheit or Celsius
11. Keypad is locked (no padlock means unlocked)
12. Selected cooling set point; cooling on
13. Outdoor temperature; also displays other information during programming
9
Quick Start
Setting or changing the temperatures for heating and cooling
Your thermostat is installed with pre-set heating and cooling temperature
settings. You can use these or change them so your home is as warm
or as cool as you would like it to be. These steps will hold the temperature
where you set it until you make another change.
1. Open the door. You will see the word heat or cool on the screen
next to the pre-set temperature, depending on the mode your
system is in. (If the thermostat is in “auto” mode, you will see both
the heating and cooling set points. If it’s the first time you’ve used
the thermostat, the mode will say heat.)
2. To change the displayed temperature, press the up or
down button located on the right side until you reach
the desired setting.
3. To change the other temperature setting, press the
mode button on the left. The screen will display the
word cool or heat and the pre-set temperature.
4. Press the up or down button to change the displayed
setting. Stop on the desired setting.
5. Close the door.
10
Quick Start
Understanding Touch ‘N’ Go
The unique Touch ‘N’ Go feature on your thermostat is a revolutionary
tool that lets you use a simpler programming option – literally, touch
and go – to help you get the maximum comfort control from the entire
comfort system.
With the touch of one Touch ‘N’ Go button – home, away
or sleep – you can tell your thermostat where you’ll be.
It’s the ideal solution for somebody who prefers different
comfort settings for different times of the day.
The three Touch ‘N’ Go buttons are preset at the factory for typical
heating and cooling temperature settings. You can change these
temperature settings easily.
11
Operating the Thermostat
Using the Touch ‘N’ Go feature
The Touch ‘N’ Go feature on your thermostat involves the home, away
and sleep buttons immediately under the display. You can either accept
the preset temperature settings for when you are home, away or
asleep, or set your own Touch ‘N’ Go heating and cooling temperature
settings. And, because these buttons and their comfort settings aren’t
linked to specific times of the day, you are free to use any button and
its settings whenever it suits your lifestyle needs. Just touch the
button you want to use when you are away from home, return, or go
to sleep. It’s easier than manually re-setting the temperature several
times a day.
Here are the temperature settings that are pre-set for your home,
away and sleep buttons.
Touch ‘N’ Go Option
Heat
Cool
Home
68
74
Away
60
85
Sleep
66
78
12
Operating the Thermostat
Use this blank grid to determine how warm or cool you want your
home to be when you’re home, away or asleep.
Touch ‘N’ Go Option
Heat
Home
Away
Sleep
13
Cool
Operating the Thermostat
Setting the home temperature
1. Open the door.
2. Press the home button located under the display on
the left. You will see a triangle icon ( ) above the home
button. This icon will always tell you whether you’re in
the home, away or sleep setting.
3. You will see the heating and cooling temperatures that
were set at the factory. To use these, just close the door.
4. To change the heating setting, press the mode button
on the left until you see the word heat on the screen
on the left.
5. Press the up or down button until you reach the desired
temperature setting. The arrow pointing to the home
button will disappear.
6. Press and hold the home button for about three seconds. The home
arrow will be displayed, indicating that the thermostat has saved
your settings.
7. To change the cooling temperature setting, press the mode button
repeatedly until you see the word cool on the screen on the right.
14
Operating the Thermostat
8. Press the up or down button until you reach the desired
temperature setting.
9. Press and hold the home button for about three seconds. The
home arrow will be displayed, indicating that the thermostat has
saved your settings.
15
Operating the Thermostat
Setting the away temperature
1. Press the away button located under the display in
the center. You will see a triangle icon ( ) above the
away button.
2. You will see the heating and cooling temperatures that
were set at the factory. To use these, just close the
door.
3. To change the heating settings, press the mode button
until you see the word heat on the screen on the left.
4. Press the up or down button on the right until you
reach the desired temperature setting. The arrow
pointing to the away button will disappear.
5. Press and hold the away button for about three seconds.
The away arrow will be displayed, indicating that the thermostat has
saved your settings.
6. To change the cooling temperature setting, press the mode button
repeatedly until you see the word cool on the screen on the right.
16
Operating the Thermostat
7. Press the up or down button until you reach the desired
temperature setting.
8. Press and hold the away button for about three seconds. The away
arrow will be displayed, indicating that the thermostat has saved
your settings.
17
Operating the Thermostat
Setting the sleep temperature
1. Press the sleep button located under the display in
the center. You will see a triangle icon ( ) above the
sleep button.
2. You will see the heating and cooling temperatures that
were set at the factory. To use these, just close the
door.
3. To change the heating setting, press the mode button
until you see the word heat on the screen on the left.
4. Press the up or down button on the right side of the
display until you reach the desired temperature setting.
The arrow pointing to the sleep button will disappear.
5. Press and hold the sleep button for about three
seconds. The sleep arrow will be displayed, indicating
that the thermostat has saved your settings.
6. To change the cooling temperature setting, press the mode button
repeatedly until you see the word cool on the screen on the right.
18
Operating the Thermostat
7. Press the up or down button until you reach the desired
temperature setting.
8. Press and hold the sleep button for about three seconds. The sleep
arrow will be displayed, indicating that the thermostat has saved
your settings.
9. Close the door.
19
Operating the Thermostat
Using the fan
When the fan is on, it helps distribute air throughout your home for a more
even temperature in all spaces. You can set the thermostat so that the fan
runs only during your heating and cooling cycles (auto mode) or to run
continuously.
The thermostat is set at the factory to run the fan automatically as needed
(“auto fan”). Here’s how to change the setting so it runs continuously.
1. Open the door.
2. Press the fan button on the left. The display message will
change from auto fan to fan on.
3. To return the fan to auto mode, press the fan button again.
You will see fan auto on the display.
4. Close the door.
20
Operating the Thermostat
Changing the humidity* level
Your thermostat offers three humidity options: normal, auto and off. It is
set at the factory for “normal humidify,” which is a fixed setting based on
how much humidity you want in the home. This humidity level remains
constant, regardless of the outdoor temperature. You can manually adjust
the humidity level according to your own preferences.
The second option, “auto humidify,” uses an outdoor temperature sensor
(when installed) to automatically adjust the inside humidity level according
to the outside temperature when the thermostat is set for auto humidify.
You can also turn off the humidify/dehumidify feature.
Using normal humidify
Here’s how to change the fixed (constant) humidity setting.
1. Open the door.
2. Press the features button twice. The first press will display
the outdoor air temperature and the second press will display the humidify settings. The display will include the
humidity level and the humidity setting. It is factory-set at
* Only homeowners with the TP-PRH model of thermostat will see a "humidify" icon.
21
Operating the Thermostat
26% for humidify and 60% for dehumidify. If there’s too much condensation
on the windows, try a lower number. If the air is too dry (perhaps there is
too much static electricity), try a higher number. If your home is newer and
has quality windows that create a “tight” home, try a higher setting. If your
home is older, you might need a lower setting.
3. Press the up or down button to change the setting.
You can set the humidity between 10% and 46%; the
dehumidify range is from 46% to 66%.
4. Close the door.
Using auto humidify
The auto humidify feature automatically adjusts the amount of humidity
according to the outside temperature when an outdoor temperature
sensor is installed. It can be manually adjusted when there is too much
condensation accumulating on windows or the air seems too dry. Here’s
how to switch to auto humidify and make adjustments.
22
Operating the Thermostat
1. Open the door.
2. Press the features button twice. The first press will display
the outdoor air temperature and the second press will display the humidify settings. The display will include
the humidity level and the humidity setting.
3. Press the mode button until the screen displays auto
and a set at number. (Auto indicates you have put the
thermostat in auto humidify mode.)
4. Press the up or down button to change this auto humidify
set at number. If there is too much condensation on the
windows, select a number lower than 5. If there seems to
be a lot of static electricity, which often means the air is
too dry, select a number higher than 5. If your home is
newer and has quality windows that create a “tight” home,
try a higher setting. If your home is older, you might need
a lower setting.
5. Close the door.
23
Operating the Thermostat
How to turn off the humidify or dehumidify feature
Here’s how to turn off the humidify and/or dehumidify features.
1. Open the door.
2. Press the features button twice. The first press will display
the outdoor air temperature and the second press will display the humidify settings. The display will include
the humidity level and the humidity setting.
3. Press the mode button until the screen says OF.
4. Close the door.
24
Operating the Thermostat
Using emergency heat (heat pump systems only)
Emergency heat is useful when the automatic auxiliary heat system can’t
keep up with demand. (Systems with heat pumps use “auxiliary heat”
when it’s too cold outside for the heat pump to heat the house without
help. The display indicator for this is auxiliary heat on.)
If the heat pump compressor that works with auxiliary heat fails, or if the
heat pump isn’t working at all, you can turn on the emergency heat for
that extra help. (You’ll know there’s a problem if the house can’t seem to
get warm when it’s very cold outside.) You want to avoid using emergency
heat, though, because it’s the most expensive option. And, of course,
if you suspect a problem with your heat pump, call your heating and
cooling dealer immediately.
Here’s how to set your thermostat to use emergency heat.
1. Open the door.
2. Press the mode button repeatedly until Em heat
is displayed on the screen.
3. Close the door.
25
Operating the Thermostat
Using the thermostat to turn the heating and cooling system off
Here’s how to use the thermostat to turn the heating and cooling
system off.
1. Open the door.
2. Press the mode button on the left repeatedly until the
display shows off shows in the upper left.
3. Close the door.
26
Advanced Options
Advanced options display codes chart
You can customize a few thermostat features. This chart shows which
features you can change and the codes associated with them. The
codes will appear on the display after following the instructions below.
Feature
Configuration
Code
Change Indication
reset reminders
01
0 to 100%
Fahrenheit to Celsius
02
F or C
backlighting
03
Off, 1, 2, 3, 4, 5,
keypad lockout
04
Off, 1, 2,
padlock
27
Advanced Options
Clearing the reset reminders
The thermostat tells you when it’s time to change or service the UV
light in the evaporator coil box connected to the furnace (if equipped),
humidifier pad (if equipped), and furnace filter. (See page 35 for more
information.) When the reminder icons are displayed on the screen,
pressing and holding the done button for about three seconds clears
all reminders on the screen. This might not be the best option when
you have multiple reminders but have done only one of the tasks. This
option lets you reset the reminders individually.
1. Open the door.
2. Press and hold the features button for about three
seconds. The screen will display 01 and the three
reset reminders, as enabled by your installer. One of
the reminders will flash; the display will show the percentage of time used by that reminder item.
3. Press the features button to select the reminder you want to clear.
28
Advanced Options
4. Press and hold the done button for about three
seconds to remove the reminder. The percentage
associated with it will go down to zero.
5. Press the done button.
6. Close the door.
29
Advanced Options
Changing from Fahrenheit to Celsius
Your thermostat is preset to display the temperature in degrees
Fahrenheit. You can change this to Celsius.
1. Open the door.
2. Press and hold the features button for about three
seconds. The screen will display 01 and the three reset
reminders, as enabled by your installer.
3. Press the up button under the configuration number,
01. The number will change to 02 with F (Fahrenheit)
next to it.
4. Press the sleep button under the F so it flashes.
5. Press the up or down button on the side to change
it to C (Celsius).
6. Press the done button.
7. Close the door.
30
Advanced Options
Adjusting or turning off the continuous backlighting
Your thermostat features a continuous low level backlighting until you
press any button, which increases the lighting temporarily. You can
adjust the intensity of the backlighting or turn if off completely. Here’s
how.
1. Open the door.
2. Press and hold the features button for about three
seconds. The screen will display 01 and the three
reset reminders.
3. Press the up button twice to advance from 01 to 03.
4. Press the sleep button under the intensity number (3)
so it flashes.
5. To increase the amount of backlighting, press the
up button. To decrease the amount, press the down
button. The range is Of to 5 with off being no backlighting and 5 being the brightest backlighting..
31
Advanced Options
6. Press the done button.
7. Close the door.
32
Advanced Options
Keypad lockout
The keypad lockout feature lets you partially “lock” the thermostat so
that you can change only the temperature or lock it completely, allowing no changes. Here’s how to lock the keypad on either level.
1. Open the door.
2. Press and hold the features button for about three
seconds. The screen will display 01 and the three
reset reminders.
3. Press the home button under the configuration
number, 01, repeatedly until it changes to 04.
4. Press the sleep button under the security setting
(Off) so it flashes.
5. Press the up or down button to select 1 – limited
access or 2 – total lockout.
6. Press the done button.
33
Advanced Options
7. Close the door.
Unlocking the Keypad
Here’s how to temporarily unlock the keypad after you have locked it.
1. Open the door.
2. Press and hold the up and down buttons on the right
simultaneously for about five seconds.
3. The padlock icon will disappear. This means the keypad is unlocked
and can be used. The keypad will revert back to the locked state
after you’ve stopped pushing buttons for two minutes.
4. Close the door.
34
Special Features
Hybrid Heat (heat pump with a furnace system only)
This thermostat works with the Carrier Hybrid Heat systems offering
maximum comfort and economy by automatically controlling whether
your system delivers heating with the heat pump, with the furnace, or
with both options working together.
Service reminders
The thermostat tells you when it’s time to change or service the
UV light in the evaporator coil box connected to the furnace (if
equipped), humidifier pad (if equipped), and furnace filter. Each
reminder – check UV light, check hum pad, check filter – will be
displayed near the center of the screen. (For important safety
reasons, ask your dealer to replace your UV light.)
To remove the reminder after you or your dealer have
replaced the indicated product, press and hold the done
button for about three seconds. (Refer to page 28 for
additional details.)
35
Special Features
Outdoor temperature display
The thermostat automatically displays the outdoor temperature when you
press the features button.
Auto changeover
The thermostat displays one of five modes: heat, cool, Em heat (heat
pump version only), heat cool (auto mode) and off. When the mode
selection is for both heating and cooling – auto mode – the thermostat
is in auto changeover mode. This allows the system to switch from
heating to cooling – or from cooling to heating – to maintain the
temperatures you've programmed. It does this automatically.
36
What If . . .
“Aux heat on” is displayed (heat pump and Hybrid Heat
systems only)
Aux heat on is auxiliary heat. It applies only to the heat pump
version. If it is on, you will see aux heat on. When it is displayed,
it means the system has determined that it’s too cold outside for your
heat pump to heat the house without help, so it’s getting help from the
electric heaters. This happens automatically.
“Em heat” is displayed (heat pump and Hybrid Heat systems only)
Em heat is the display term for emergency heat and applies only to
the heat pump version. When emergency heat has been turned on,
Em heat is displayed. You have to turn on emergency heat manually –
it doesn’t happen automatically – so if you see Em heat on the display,
it means somebody has turned it on.
There is a power outage
If you lose electricity, you won’t have to reprogram the thermostat
because your settings are retained in its memory.
37
What If . . .
You get a service reminder message
Service reminder messages – check UV light, check hum pad, check
filter – tell you that it’s time to change the UVC lamp in the evaporator
coil box connected to the furnace (when installed), humidifier pad
(when installed), and furnace filter. Make the indicated changes with
the exception of the UV lamp – for important safety reasons, ask your
dealer to replace that.
You get a system error message
Here are the possible system error messages and what they mean:
E1 The system isn’t communicating properly. Call your heating and
cooling dealer for service.
-- The room air temperature sensor has failed. Call your heating
and cooling dealer for service.
or
The outdoor temperature sensor isn’t working. Call your heating
and cooling dealer for service.
E4 There’s an internal memory failure. Call your heating and cooling
dealer for service.
E5 The humidity sensor isn’t working. Call your heating and cooling
dealer for service.
38
Common Terms and Where to Find Them
Auto changeover . . . . . . . . . . . . . . . . . . . . . . . . . . . . . . . . . . . .page 36
This feature automatically switches your system from heating to
cooling – or from cooling to heating – whenever necessary when
in auto mode only (heat/cool).
Auxiliary heat (heat pump and Hybrid Heat systems only) . . .page 25
Most heat pump systems can’t heat a home sufficiently when it gets
very cold outside so they use a supplemental heating source called
auxiliary heat. The system knows when to use this help and does so
automatically. If it’s using auxiliary heat, the display will show aux heat
on when you press the mode button. You have no control over the
auxiliary heat function.
Backlighting . . . . . . . . . . . . . . . . . . . . . . . . . . . . . . . . . . . . . . . .page 31
Backlighting illuminates your display. The backlight is on constantly at
a dim level that brightens when you push a button.
Dehumidify . . . . . . . . . . . . . . . . . . . . . . . . . . . . . . . . . . . . . . . . .page 21
When your heating and cooling system is used to dehumidify the
air and the thermostat is set up to dehumidify, the thermostat will
instruct it to remove moisture from the air as necessary when the
air conditioning is on.
39
Common Terms and Where to Find Them
Emergency heat (heat pump and Hybrid Heat systems only) . .page 25
You can manually set the thermostat to use emergency heat but it is
the most expensive option. If it’s using emergency heat, the display
will show Em heat when you press the mode button.
Hybrid Heat (heat pump with a furnace system only) . . . . .page 35
This Carrier heating and cooling system concept offers maximum
comfort and economy. When a Hybrid Heat system is installed, the
thermostat automatically controls whether your system delivers
heating with the heat pump, with the furnace, or with both options
working together.
Humidify . . . . . . . . . . . . . . . . . . . . . . . . . . . . . . . . . . . . . . . . . . .page 21
When your heating and cooling system includes a humidifier, the
thermostat will instruct it to add moisture to the air as necessary
when the heat is on.
40
Common Terms and Where to Find Them
Mode . . . . . . . . . . . . . . . . . . . . . . . . . . . . . . . . . . . . . . . . . . . . . .page 36
This term refers to the type of operation your system is performing.
The options are heat, cool, emergency heat, auto (heat/cool) and off.
Service reminders . . . . . . . . . . . . . . . . . . . . . . . . . . . . . . . . . . .page 35
The thermostat tells you when it’s time to change the UVC lamp (if
equipped), humidifier pad (if equipped) and furnace filter. (For safety
reasons, ask your dealer to replace your UV lamp.)
41
Thermostat Limited Warranty
FOR SERVICE OR REPAIR, FOLLOW THESE STEPS IN ORDER:
FIRST: Contact the installer. You may find their name on the furnace or in your Homeowner’s Packet. If the
installer’s name is not known, call your builder or home retailer if yours is a new residence.
SECOND: Contact the nearest distributor. (See yellow pages.)
THIRD: Contact:
Carrier Corporation
Consumer Relations
P.O. Box 4808
Syracuse, New York 13221
Phone: 1-800-428-4326
Model No.
Unit Serial No.
Date of Installation
Installed by
Name of Owner
Address of Installation
THERMOSTAT LIMITED WARRANTY
FIVE-YEAR LIMITED WARRANTY – Carrier Corporation (hereinafter referred to as “Company”) warrants
this product to be free from defects in material and workmanship. If a defect is found within five years
from date of original installation of product (whether or not actual use begins on that date) Company will
provide a new or remanufactured part, at Company’s sole option, to replace any defective part, without
charge for the part itself.
This warranty does not include labor or other costs incurred for diagnosing, repairing, removing, installing,
shipping, servicing or handling of either defective parts or replacement parts.
WARRANTY CONDITIONS:
1. Warranties apply only to products in their original installation location.
2. Installation, use, care, and maintenance must be normal and in accordance with instructions contained
42
Thermostat Limited Warranty
in the Owner’s Manual and Company’s service information.
3. Defective parts must be returned to the distributor through a registered servicing dealer for credit.
4. All work shall be performed during normal working hours.
LIMITATIONS OF WARRANTIES – ALL IMPLIED WARRANTIES (INCLUDING IMPLIED WARRANTIES OF MERCHANTABILITY AND FITNESS FOR A PARTICULAR PURPOSE) ARE HEREBY LIMITED IN DURATION TO THE
PERIOD FOR WHICH THE LIMITED WARRANTY IS GIVEN AND APPLIES. SOME STATES DO NOT ALLOW
LIMITATIONS ON HOW LONG AN IMPLIED WARRANTY LASTS, SO THE ABOVE MAY NOT APPLY TO YOU.
THE EXPRESSED WARRANTIES MADE IN THIS WARRANTY ARE EXCLUSIVE AND MAY NOT BE ALTERED,
ENLARGED, OR CHANGED BY ANY DISTRIBUTOR, DEALER, OR OTHER PERSON, WHATSOEVER.
COMPANY WILL NOT BE RESPONSIBLE FOR:
1. Normal maintenance as outlined in the installation and servicing instructions or Owner’s Manual,
including filter cleaning and/or replacement and lubrication.
2. Damage or repairs required as a consequence of faulty installation, misapplication, abuse, improper
servicing, unauthorized alteration or improper operation.
3. Failure to start due to voltage conditions, blown fuses, open circuit breakers, or damages due to the
inadequacy or interruption of electrical service.
4. Damage as a result of floods, winds, fires, lightning, accidents, corrosive environments or other
conditions beyond the control of Company.
5. Parts not supplied or designated by Company, or damages resulting from their use.
6. Company products installed outside the continental U.S.A., Alaska, Hawaii, and Canada.
7. Electricity or fuel costs, or increases in electricity or fuel costs from any reason whatsoever, including
additional or unusual use of supplemental electric heat.
8. ANY SPECIAL INDIRECT OR CONSEQUENTIAL PROPERTY OR COMMERCIAL DAMAGE OF ANY
NATURE WHATSOEVER. Some states do not allow the exclusion of incidental or consequential
damages, so the above limitation may not apply to you.
This Warranty gives you specific legal rights, and you may also have other rights which vary from state to state.
43
Infinity™ Air Purifier Offers
Healthier Air for the Entire Home
The Infinity™ Air Purifier is Carrier’s premier air purification
solution. It’s ideal for homeowners with allergy concerns,
those susceptible to airborne germs – such as infants and
the elderly – and those sensitive to the effects of molds,
pollen, pets and more. And, it is an integral component to
Carrier Healthy Home Solutions.
• The Infinity Air Purifier’s patented technology is
so effective it even captures and kills airborne
pathogens such as bacteria, viruses and mold.
• Its exclusive technology is also trusted to
protect secure government facilities and
hospital room patients.
• The Infinity Air Purifier cleans over 100 times
more air than some of the popular portable
units – and can clean your entire home.
• It’s convenient -- no cleaning is required.
Simply remove and replace the media cartridge
periodically to maintain peak performance.
OM-TPNRH-1CA
Manufacturer reserves the right to discontinue, or change at any time,
specifications or designs without notice or without incurring obligations.
© Carrier Corporation 2007