1
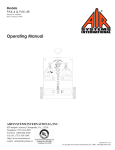
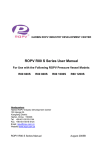
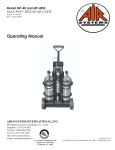
King Cobra® 1200 Pro
INFORMATION AND OPERATING
INSTRUCTIONS
TABLE OF CONTENTS
Introduction
Important Safety Instructions
Know Your Machine
Control Panel
Set-Up and Operation
1200PSI High Pressure Washer
500PSI and Heat
Auto-Fill
Auto-Dump
After Use
After Using the Machine
IMPORTANT SAFETY INSTRUCTIONS:
To reduce the risk of fire, electric shock, or injury:
•
•
•
•
•
•
•
•
•
•
•
•
•
•
•
•
•
•
•
•
Before each use, remove the spray tool from the hose, and check to make sure the spray nozzles are securely tightened
to the spray tool. A loose nozzle could fly off during use.
Never use solvents.
Do not leave the machine unattended when it is plugged in. Unplug the unit from the outlet when not in use, and before
servicing.
To avoid electric shock, do not expose to rain or snow. Store, and use, indoors.
Do not allow the machine to be used as a toy. Close attention is necessary when used near children.
Use only as described in this manual. Use only the manufacturer’s recommended attachments.
Never add water over 130 °F/54 °C to the Holding Tank.
If the machine is not working as it should, has been dropped, damaged, left outdoors, or dropped into water, return it to a service
center.
Do not pull by the cord, use the cord as a handle, close a door on the cord, or pull the cord around sharp edges or corners. Do
not run the machine over the cord. Keep the cord away from heated surfaces. To unplug, grasp the plug, not the cord.
Do not handle the plug, the cord, or the machine with wet hands.
Extension cords must be 12/3 and no longer than 50 feet.
Do not use with a damaged cord or cord end. If the cord or plug becomes damaged have it repaired immediately by an
authorized service center.
Do not put any object into openings. Do not use with any opening blocked; keep free of dust, lint, hair, and anything that may
reduce air flow.
Keep loose clothing, hair, fingers, and all parts of body away from openings and moving parts.
Do not pick up anything that is burning or smoking, such as cigarettes, matches, or hot ashes, or any health endangering dusts.
Do not use the machine to pick up flammable or combustible liquids such as gasoline or use it in areas where they may be
present.
Turn off all controls before unplugging.
Use extra care when cleaning on stairs.
Connect to a properly grounded outlet only.
Liquid ejected at the spray nozzle could be dangerous as a result of its temperature, pressure, or chemical content. Use caution.
Always read chemical MSDS sheets before use.
120VAC GROUNDING INSTRUCTIONS
This appliance must be grounded. If it should electrically malfunction, grounding provides a path of least resistance for electric current to reduce the risk of electric
shock. This appliance is equipped with a cord having an equipment-grounding conductor and grounding plug. The plug must be plugged into an appropriate outlet
that is properly installed and grounded in accordance with all local codes and ordinances.
DANGER!
Improper connection of the equipment-grounding conductor can result in a risk of electric shock. Check with a qualified
electrician or service person if you are in doubt as to whether the outlet is properly grounded. Do not modify the plug
provided with the appliance. If it will not fit the outlet, have a proper outlet installed by a qualified electrician.
This appliance is for use on a nominal 120-volt circuit, and has a grounding plug that looks like the plug illustrated in Figure 1 below. A temporary adapter
illustrated in Figures 2 and 3 may be used to connect this plug to a 2-pole receptacle as shown in Figure 2 if a properly grounded outlet is not available. The
temporary adapter should be used only until a properly grounded outlet (Figure 1) can be installed by a qualified electrician. The green-colored rigid ear, tab, or
the like extending from the adapter must be connected to a permanent ground such as a properly grounded outlet box cover. Whenever the adapter is used, it
must be held in place by a metal screw. Grounding adapters are not approved for use in Canada.
Replace the plug if the grounding pin is damaged or broken.
The Green (or Green/Yellow) wire in the cord is the grounding wire. When replacing a plug, this wire must be attached to the grounding pin only.
Extension cords connected to this machine should be 12 gauge, three-wire cords with three-prong plugs and outlets. DO NOT use extension cords more than 50
feet (15 m) long.
WARNING!
• If an extension cord is used, the plug and socket must be of watertight construction.
• Inadequate extension cords can be dangerous.
INSTRUCTIONS FOR USE
KNOW YOUR MACHINE
1
2
3
4
5
6
7
8
9
10
11
12
13
14
15
16
17
18
19
20
21
22
23
24
25
26
27
28
29
Vacuum Hose Connection
Recovery Tank Lid
Wand Holder
Control Panel
Recovery Tank
1200PSI Quick Connect
Auto-Fill Hose Connector
Rear Wheel
Base Compartment
500PSI Quick Connect
1200PSI Gauge
500PSI Gauge
500PSI Pressure Adjust Knob
Holding Tank
Tank Latch
Vacuum Hose Reel
Recovery Tank Drain Hose
Dump Hose Connection
Power Cord Receptacle
Power Prime Pedal
Front Castor with Brake
Power Cords
Pressure Relief Valve
Solution Hose
Dump Pump Inlet Filter
Pump Inlet Filter
Pre-Filter Bag
Vacuum Hose
Cord Hooks
16
17
27
26
22
25
19
18
21
20
1
19
2
3
4
5
28
6
14
15
29
24
7
8
12
23
10
13
11
9
CONTROL PANEL
A
Separate Circuit Locator Light: This green light will turn on when the two power cords are plugged into separate circuits. Try different outlets with
one cord until you can get a green light, otherwise a circuit breaker in the wall may trip.
B High Pressure/Heat Switch: This selector switch determines whether you will use the 1200 psi pump or the heater. You can select either, but not
both at the same time. The heater will only work with the 500 psi pump. The center position is OFF, and neither the 1200 psi pump nor the heater is
turned on. CAUTION: do not operate the 1200 psi pump and the 500 psi pump at the same time.
C
1200PSI Indicator Light: This light will turn on when the switch is set to the 1200 PSI pump.
D
Vacuum Switch: This switch turns on the vacuum.
E
500PSI Pump Switch: This switch turns on the 500PSI solution pump. CAUTION: do not run both solution pumps at the same time.
F
Dump Pump Switch: This last switch turns on the automatic pump-out pump. Use this when you want the machine to automatically pump out the
recovered solution. CAUTION: do not turn on this pump until you have connected the pump-out hose.
G Heat Indicator Light: This light will turn on when you have selected heat instead of the 1200 psi pump.
D
C
E
B
F
A
G
SET-UP AND OPERATION
1200PSI HIGH PRESSURE WASHER
CAUTION!
Use care when handling hazardous chemicals.
Never leave the machine running when you are not actively using it.
Always use a defoamer when foaming occurs to prevent vacuum motor damage.
DANGER!
Do NOT use solvents, or any chemicals that may be flammable, explosive or combustible.
CLEANING SOLUTIONS:
Select a proper pre-spray for the surface to be cleaned, and apply the pre-spray. Use a neutral pH rinse or detergent (6 to 10 pH) in the King Cobra to prevent
premature wear of the pumps, seals, and other components. Damage caused by the use of improper or strong chemicals is not covered by warranty. Powdered
chemicals are not recommended.
1
Before each use, inspect the machine, hoses, and cleaning tools for cleanliness and completeness. Make sure the hoses are in good condition and the
spray nozzle(s) is tight. Be sure the Pre-Filter Bag (27) and the Dump Pump Inlet Filter (25) are installed and are clean.
2
When not using the auto-dump feature, make sure the brass cap is screwed tightly on the Dump Hose Connection (18) on the dump pump on the rear of the
machine. If you choose to use the auto-dump, connect the dump hose to the Dump Hose Connection (18) on the back of the dump pump, and place the open
end of the hose in a drain. Make sure the Recovery Tank Drain Hose (17) is closed, and the Recovery Tank Lid (2) is closed tight.
REFER TO THE AUTO-FILL AND AUTO-DUMP INSTRUCTIONS ON THE FOLLOWING PAGES.
3
If you choose to use the auto-fill feature, connect the fill hose to the Auto-Fill Hose Connector (7). Turn on the water source, and allow the tank to fill with
water. When using the auto-fill system, the auto-fill float will automatically turn on and turn off as the tank empties and then fills. NOTE: If you are not going to use
the auto-fill system, just fill the tank with water and cleaning chemical. Follow chemical directions regarding dilution and mixing. Do not use harsh chemicals; they
may damage seals in pumps and valves, and cause the pump to wear prematurely.
NOTE: using warm water in the tank may improve the efficiency of the heat exchanger when cleaning with heat, but never use water with a temperature
exceeding 130 °F / 54 °C.
REFER TO THE AUTO-FILL AND AUTO-DUMP INSTRUCTIONS ON THE FOLLOWING PAGES.
4
Pre-spray the area to be cleaned, with a pump-up sprayer, while the tank is filling. Follow chemical directions.
5
Plug in the two power cords (22). Do not connect both cords to the same outlet. The green, ‘separate circuit’ locator light (A) on the switch plate should light
up. If the locator light does not come on, check the circuit breaker box in the wall, and/or try different outlets until it does turn on. Although all systems in
the machine may work correctly if you are not on two circuits, a circuit breaker in a wall panel may trip. If you make sure the green light is turned on, you will
prevent tripped circuit breakers. Turn on the 1200 PSI pump by placing the HIGH PRESSURE/HEAT Switch (B) in the UP position, to select the 1200 PSI
Pump.
NOTE: This switch is off when it is set to the middle position and neither the 1200PSI pump nor the heater are selected. The heater and the 1200PSI pump cannot
operate at the same time.
6
Prime the 1200 psi pump using the ‘power prime’ system. Turn on both the pump (B) and the vacuum (D), cover the Vacuum Hose Connection (1) on the
top of the machine with your hand, then depress the Power Prime Pedal (20). This will pull trapped air through the pump and into the recovery tank, priming
the pump. You should notice a change in the ‘tone’ of the pump (smoother, with less rattle), and the water being pulled into the recovery tank will change
from a white, sputtering flow to a clear, solid stream. NOTE: Priming requires a full Holding Tank (14), and it may take between 20 to 90 seconds. Once the
pump has primed, release the Power Prime Pedal (20), and turn both the pump (B) and the vacuum (D) off. Momentarily depress the Power Prime Pedal
(20) again after the pump has stopped running to release any built-up back pressure.
7
Your machine has two solution outputs. The solution output for the 1200 psi pump is a quick disconnect (6) located just above the fill hole on the Holding
Tank, on the front face of the machine (the 500 psi outlet is a quick disconnect (10) on the end of a short length of hose, on the front of the base section of the
machine). Attach the Solution Hose (24) from the reel to the 1200PSI Quick Connect (6). Attach the Vacuum Hose (28) on the reel to the Vacuum Hose
Connection (1). Pull the hoses out from the reel. Attach the other ends of the hoses to the cleaning tool.
8
Turn on the vacuum (D) and turn on the dump pump (F). Begin cleaning.
NOTE: The dump pump will automatically turn on and turn off as the tank fills and then empties (refer to drawings on following pages).
9
When finished with the job, turn off the water source (if using Autofill).
ELECTRIC CIRCUIT LOCATOR: This system will inform the operator when the two cords are plugged into separate circuits by turning on the green, circuit
locator light (A). This helps to prevent tripping circuit breakers.
NOTE: If the green circuit locator light (A) does not illuminate when the cords are plugged in, then both cords are on the same circuit. Try other outlets with one of
the cords until you get the locator light to come on.
SET-UP AND OPERATION
500PSI AND HEAT
CAUTION!
Use care when handling hazardous chemicals.
Never leave the machine running when you are not actively using it.
Always use a defoamer when foaming occurs to prevent vacuum motor damage.
DANGER!
Do NOT use solvents, or any chemicals that may be flammable, explosive or combustible.
CLEANING SOLUTIONS:
Select a proper pre-spray for the surface to be cleaned, and apply the pre-spray. Use a neutral pH rinse or detergent (6 to 10 pH) in the King Cobra to prevent
premature wear of the pumps, seals, and other components. Damage caused by the use of improper or strong chemicals is not covered by warranty. Powdered
chemicals are not recommended.
1
2
3
4
5
6
7
8
9
10
11
12
13
Before each use, inspect the machine, hoses, and cleaning tools for cleanliness and completeness. Make sure the hoses are in good condition and
the spray nozzle(s) is tight. Be sure the Pre-Filter Bag (27) and the Dump Pump Inlet Filter (25) are installed and are clean.
When not using the auto-dump feature, just make sure the brass cap is screwed tightly on the Dump Hose Connection (18) on the dump pump on
the rear of the machine. If you choose to use the auto-dump, connect the dump hose to the Dump Hose Connection (18) on the back of the dump
pump, and place the open end of the hose in a drain. Make sure the Recovery Tank Drain Hose (17) is closed, and the Recovery Tank Lid (2) is
closed tight.
REFER TO THE AUTO-FILL AND AUTO-DUMP INSTRUCTIONS ON THE FOLLOWING PAGES.
If you choose to use the auto-fill feature, connect the fill hose to the Auto-Fill Hose Connector (7). Turn on the water source, and allow the tank to fill
with water. When using the auto-fill system, the auto-fill float will automatically turn on and turn off as the tank empties and then fills. NOTE: If you
are not going to use the auto-fill system, just fill the tank with water and cleaning chemical. Follow chemical directions regarding dilution and mixing.
Do not use harsh chemicals; they may damage seals in pumps and valves, and cause the pump to wear prematurely.
NOTE: Using warm water in the tank may improve the efficiency of the heat exchanger when cleaning with heat, but never use water with a
temperature exceeding 130 °F / 54 °C.
Pre-spray the area to be cleaned, with a pump-up sprayer, while the tank is filling. Follow chemical directions.
Plug in the two power cords (22). Do not connect both cords to the same outlet. The green, ‘separate circuit’ locator light (A) on the switch plate
should light up. If the locator light does not come on, check the circuit breaker box in the wall, and/or try different outlets until it does turn on.
Although all systems in the machine may work correctly if you are not on two circuits, a circuit breaker in a wall panel may trip. If you make sure the
green light is turned on, you will prevent tripped circuit breakers. Select ‘HEAT” by placing the HIGH PRESSURE/HEAT Switch (B) in the DOWN
position.
NOTE: This switch is off when it is set to the middle position and neither the 1200 PSI pump nor the heater are selected. When set to the bottom
position, the heat is selected; the red light will come on and stay on. The heater and the 1200PSI pump cannot operate at the same time.
Press the lever on the Pressure Relief Valve (23) to make sure there is no back pressure in the system.
Connect the priming/siphon hose to the 500PSI Quick Connect (10) and turn on the pump (E) and place the open end over the Holding Tank (14).
The air should prime out of the pump within 20 - 60 seconds. Watch the water flow into the tank. When the water is clear (no air in it) and is flowing
strongly, turn the pump off and remove the priming hose. NEVER remove the priming hose while the pump is still running.
Connect the Solution Hose (24) from the reel to the 500PSI Quick Connect (10) and connect the Vacuum Hose (28) from the reel to the Vacuum
Hose Connection (1). Connect both hoses to the cleaning tool.
Turn ON the 500PSI pump (E). Set the pump to the desired pressure by adjusting the 500PSI Pressure Adjust Knob (13) while you are spraying and
watching the 500PSI Gauge (12). NOTE: The gauge will only read pressure while you are spraying.
Spray for a few seconds to fill the lines with solution. Wait two minutes to allow the heater to reach temperature.
Turn on the vacuum (D) and turn on the dump pump (F). Begin cleaning. NOTE: The dump pump will automatically turn on and turn off as the tank
fills and then empties (refer to drawings on following pages). It may take several cycles to heat the lines and the cleaning tool.
If you are not using the auto-fill and auto-dump features, turn off both the pump (E) and vacuum (D) when the Holding Tank gets low, fill the Holding
Tank, and empty and clean the recovery tank.
When finished with the job, turn off the water source (if using Autofill).
ELECTRIC CIRCUIT LOCATOR: This system will inform the operator when the two cords are plugged into separate circuits by turning on the green,
circuit locator light (A). This helps to prevent tripping circuit breakers.
NOTE: If the green circuit locator light (A) does not illuminate when the cords are plugged in, then both cords are on the same circuit. Try other outlets
with one of the cords until you get the locator light to come on.
INSTRUCTIONS FOR USE
ENGLISH - A
SET-UP AND OPERATION
500PSI AND HEAT
A
B
D
F
28
1
2
17
22
6
7
12
24
13
23
10
AUTO-FILL
OPERATION:
•
•
•
•
Attach a 3/4” garden hose to the Auto-Fill Hose Connector (7), and connect the other end of the hose to your water source.
Make sure the float that hangs from the auto fill valve into the tank is free of obstruction and can move freely.
Turn on the water supply. NOTE: Do not turn the water pressure on high; just turn the water on.
The auto-fill float will automatically shut-off the flow of incoming water when the tank is nearly full, and it will allow the valve to open again once the
water level has dropped to a predetermined level.
AUTO-DUMP
OPERATION:
Before each use: Always use a clean pre-filter bag when operating the machine. If necessary, unscrew the stainless steel filter at the bottom of the
recovery tank and clean it. Also make sure the ball float in the recovery tank is clean.
•
Attach a 3/4” garden hose to the Dump Hose Connection (18) on the dump pump on the back of the base of the machine.
•
Run the other end of the hose into a drain.
•
Turn ON the dump pump switch (F).
•
NOTE: The dump pump is ‘self-priming.’ You should see water start to flow within 30 seconds of the pump turning on. If water does not begin to
flow, check the filter to see if it is plugged with debris.
After each job: Run clear water though the dump pump to wash out any chemical residue. Remove and clean both the Pre-Filter Bag (27) and the
Pump Inlet Filter (26). Reinstall the filter once it is clean. Clean and empty the recovery tank.
DANGER!
Do NOT use solvents, or any chemicals that may be flammable, explosive or combustible.
CAUTION!
Always use a defoamer in the recovery tank to prevent water or foam from entering the vacuum motor.
DANGER!
Always unplug the King Cobra from the electrical outlet(s) before cleaning or maintaining. Certain internal components are
electrically live, even with switches in their OFF position.
AFTER USING THE MACHINE
1
2
3
4
5
6
To empty the Holding Tank, vacuum out all unused solution into the recovery tank using the vacuum hose. Rinse the tank with clean water.
Turn all the Power Switches (B, D, E & F) to OFF (O). Unplug the Power Cords (22). Coil the cords around the Cord Hooks (29) on the rear of the
machine.
To empty the recovery tank, loosen the Velcro strap retaining the Recovery Tank Drain Hose (17). Direct the hose to a designated waste water
“DISPOSAL SITE” and remove the plug (hold the end of the hose above the water level in the tank to avoid sudden, uncontrolled flow of waste
water). Rinse the tank with clean water. Inspect the drain hose; replace if kinked or damaged.
Disconnect the solution and vacuum hoses from the machine, at the Solution Hose Quick Connect (6 or 10) and Vacuum Hose Connection (1)
respectively. Flush the vacuum hose with warm water to wash any debris out of the vacuum hose and cleaning tool. Inspect them for damage. Set
the wand on the Wand Retainer Bracket (3).
Wipe the machine with a damp cloth. Do not use abrasive chemicals or solvents.
Perform any required maintenance before storage.
MAINTENANCE SCHEDULE
MAINTENANCE ITEM
Check / Clean Tanks & Hoses
Check / Clean Recovery Tank Shut-Off Float
Clean Extraction Wand/Tool
Inspect & Clean Solution Filters
Check Carbon Brushes
Daily
•
•
•
Weekly
Yearly
•
•
IMPORTANT!
Motor damage resulting from failure to service the carbon brushes is not covered under warranty. See the Limited
Warranty Statement.
7
Store the machine indoors in a clean, dry place with the recovery tank lid open. Keep from freezing.
POWER CORD MAINTENANCE
Once a week (or more often if necessary), check the power cords for cracked or damaged insulation, exposed wires in the cord or plug, and damaged or
missing ground pin. Repair or replace damaged cord or plug immediately.
MAINTENANCE:
For optimum performance, flush the machine with clear water at the end of each working day. Once a month, minimum, run a flushing compound through
the machine to break up any mineral or chemical build-up that may have formed. The vacuum motor, pump motors, and the pumps do not require any
scheduled maintenance; however, the motors may require replacement brushes after 1000 - 1500 hours, and the high pressure pumps and unloader valves
may require rebuild kits after 500 -1000 hours (refer to machine part list for numbers). Clean the body with an all purpose detergent, and protect it with an
automobile interior polish. Lubricate the wheels, castors, and quick disconnects with an all purpose silicone spray.
TROUBLESHOOTING:
IF THIS OCCURS
NO SPRAY
LOW PUMP PRESSURE
PUMP DOES NOT RUN
LOW SUCTION
NO SUCTION
LOW HEAT
NO HEAT
CHECK THIS
Holding Tank is empty, or filter is plugged.
Clogged spray tip(s).
Pump not running or not primed.
Valve on wand not operating.
Solution hose not completely connected to hose or to machine.
Check to see that the pressure relief valve is fully closed.
This pump motor runs on AC voltage, so it should start running as soon as you turn on the switch. If the pump
motor does not start running, check the wiring to the switch and to the motor. Check the switch to see if it is “open”.
Debris is plugging cleaning tool or vacuum hose.
Drain hose cap is not completely closed.
Recovery tank lid is not seated or gasket is damaged.
Ball in the float is blocking air flow. Turn off the vacuum so the ball will drop down, or the recovery tank is full and
needs to be emptied.
No power to motor(s).
Test the switches.
Test the vacuum motors.
Spraying too long. Try spraying for 12-15 seconds, or about three strokes.
Heat exchanger needs to be flushed.
Wrong tool being used. Too much water passing through. Longer hose or larger diameter hose, than standard.
Heat is not turned on. The green circuit indicator light must be on.
No power in the wall outlet - check to see if the breaker has tripped.
Call your distributor for additional help.