1
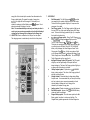
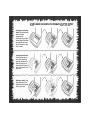
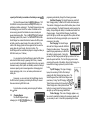
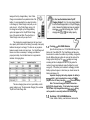
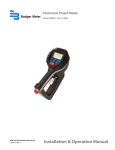
QUICK START
To try out your SmartCharger right away without reading the entire manual first, follow
these simple steps to recharge a single battery. For more detailed information and
instructions on how to charge up to four batteries at one time, see Section One.
Warning: Read IMPORTANT SAFETY INFORMATION overleaf before you start!
1
Make sure there are no batteries installed in the
compartment.
2
Plug the jack of the AC-DC adapter into the socket of
the SmartCharger. Then plug the AC-DC adapter into a
wall socket (see KEYS AND FEATURES).
3
Open the lid by pressing the button that is in front of the
lid.
4
Pull back one of the metal contact plates and insert your
1.2V Ni-Cd or Ni-MH (AAA, AA, C or D size) battery into
a slot, making sure that the battery is placed so that the
"+" symbol on the battery is in the same position as the
"+" symbol inside the compartment. If you wish to
recharge a 1.2V prismatic battery instead, first insert the
prismatic adapter into the slot (see section 1.2). Then
insert the 1.2V prismatic battery. Again, make sure that
the position of the"+" symbol on the battery matches
with that of the"+" symbol inside the compartment.
The SmartCharger
INSTRUCTION MANUAL
KEYS AND FEATURES
INTRODUCTION
Close the lid and watch the LCD as the SmartCharger
evaluates your battery to test its recharging needs.
Charging will then begin automatically. If the battery is
not suitable for recharging, the Bad Battery symbol $
will appear on the LCD. Open the lid, remove the bad
battery and then try another battery!
If you are in a hurry to use the battery you are charging,
you may remove and use it as soon as you see the TopOff/Trickle Charge icons on the LCD even though,
during Top-Off Charge mode, the battery may only be
80%-90% recharged. Otherwise, you can wait until the
battery is fully recharged by looking out for the Charged
Battery symbol ^. Either way, your battery will be ready
to use, with a new lease on life!
To learn how to charge up to four batteries at one
time, see Section One!
SECTION ONE: BASIC OPERATING INSTRUCTIONS
1.1 Batteries Out, Power On
1.2 Inserting the Batteries
1.3 Charging Begins
1.4 Checking 1.2V Ni-Cd/Ni-MH Batteries
1.5 Revitalising 1.2V Ni-Cd/Ni-MH Batteries
1.6 9V Battery Charging
1.7 Bad Battery Symbol Appears? Here's Why!
1.8 Recharging is Complete!
1.9 Batteries Out, Power Down
SECTION TWO: SPECIAL FEATURES ON RECHARGING 1.2V Ni-Cd/Ni-MH
BATTERIES
2.1 Built-in Microprocessor
2.2 1.2V Ni-Cd/Ni-MH Battery Checking
2.3 High-tech, Super-fast Charging Capabilities on 1.2V Ni-Cd
or Ni-MH Batteries
Negative Pulse
Soft-Start
Intelligent Discharge System (IDS)
Negative Delta V and Delta V Square over Delta t Square
Technologies
2.4 Advanced Features on Charging 1.2V Ni-Cd/Ni-MH Batteries
Super-fast Charging Capabilities
User-friendly Operation
Negative Delta V and Delta V Square over Delta t Square
Memory Effect Suppressor
Triple Overcharge Guard
SECTION THREE: TECHNICAL DETAILS
3.1 Care and Maintenance
3.2 Technical Specifications
TROUBLESHOOTING GUIDE
IMPORTANT SAFETY INFORMATION
READ BEFORE USE
The following precautions must be observed when operating the
SmartCharger. To reduce the risk of electric shock, fire or injury, pleas*
read the points below before using the unit, and follow the rules during
use. Failure to observe these safety rules will render the warranty void
USING THE SMARTCHARGER
• Place the SmartCharger on a dry, stable surface when in use. Do not position th<
unit above a heater or a heating vent. Do not place the unit where it can fall into
or come into contact with water. Do not place the unit on a vibrating surface such
as a washing machine.
• If the unit comes into contact with water or any other liquids, immediately unplug
your SmartCharger. Do not remove the unit from the liquid until you have done
so.
• Do not place anything over the SmartCharger during use. Never drop anything
onto the unit.
• Do not use any adapter other than the one supplied by the manufacturer.
The use of any other adapter renders the warranty void.
• Do not use extension cords or plug adapters with this unit.
• The use of any attachments not intended for this battery charger may
involve the risk of fire, electric shock or other personal injury.
• Do not disassemble the charger. It should be serviced or repaired by
qualified service personnel only. Incorrect assembly may result in an
electric shock or fire.
• Do not alter the provided AC-DC adapter in any way. If it does not fit
into an AC outlet, have a qualified technician install the proper outlet.
An improper connection may result in an electric shock.
• Never use the charger as a DC power source for any electrical equipment.
• The SmartCharger is for indoor use only. Do not expose it to rain or
excessive moisture.
• Do not use chemical agents to clean the SmartCharger or adapter. Before
cleaning the charger, disconnect the charger from the AC-DC outlet. Clean the
metal contact with a soft cloth only.
• Check the SmartCharger and the AC-DC adapter regularly. Do not use the
unit if there is any sign of damage.
• The SmartCharger will not recharge dead or almost-dead batteries.
BATTERY SAFETY RULES
• Only recharge AAA, AA, C, D, Prismatic size 1.2V and 9V (6F22/1604)
Ni-Cd/Ni-MH batteries. Do not attempt to recharge Lithium batteries or any
other type of battery.
• Do not try to recharge batteries that are rusty, corroded, damaged or leaking.
• Remove rechargeable batteries from electrical equipment before charging
them.
• Make sure the polarity marked on the rechargeable battery matches the
polarity marked in the SmartCharger compartment.
STORING THE SMARTCHARGER
• Remove all the batteries before disconnecting the adapter from the unit.
• Check the AC-DC adapter regularly. Replace the adapter if damaged.
• Always unplug the SmartCharger after use and store the unit in a dry place.
• Disconnect the charger by pulling the plug rather than the cord to reduce
the risk of damage to the AC-DC adapter.
SAVE THIS INFORMATION FOR FUTURE
REFERENCE
NOTE: PLEASE CHECK ALL PACKAGING BEFORE
THROWING AWAY
ENCLOSED YOU SHOULD FIND:
1 main unit
2 prismatic battery adapters
1 AC-DC adapter
1 instruction manual
KEYS AND FEATURES
1. AC-DC ADAPTER SOCKET
2. 1.2V Ni-Cd/Ni-MH BATTERY RECHARGING SLOTS (4) Insert from
one to four AAA, AA, C, D batteries or up to two prismatic batteries.
3. 9V BATTERY RECHARGING SLOT Insert a 9V Ni-Cd/Ni-MH battery
(6F22/1604). Note that C and D size batteries may not be placed into
slots 2 and 3 while you are recharging a 9V battery.
4. DISCHARGE KEY Skip the Intelligent Discharge System (IDS) by
pressing this key. Conversely, to force the SmartCharger to switch to
IDS mode while in Soft-Start mode, press and hold the DISCHARGE key
for around three seconds
5. ANALYZE KEY Press to activate the Battery Checking function on a
1.2V rechargeable battery. Insert a single battery into a 1.2V slot,
leaving the lid open as you do so. Press the ANALYZE key. The
SmartCharger will take approximately ten seconds to evaluate the
condition of the battery.
The estimated level of energy left along with the battery voltage
(Voltage indicator) will appear on the LCD. The estimated level of
energy left will be indicated by the number of bars illuminated on the
Energy symbol display. The greater the number of energy bars
displayed, the higher the level of energy left. If the battery is not
suitable for recharging, the Bad Battery symbol (Jg> will appear. Do not
attempt to recharge the battery in this case.
Note: It is recommended that you test only one battery at a time in
order to gain an accurate representation of each individual battery's
voltage and level of energy left as displayed by the Energy bars.
6. LID BUTTON Press to release the lid so that you can then open it.
The charging process is conducted only when the lid is firmly closed.
7. LCD DISPLAY
a.
Soft-Start symbol: The Soft-Start symbol will light up and the
inner segment of the symbol will flash during Soft-Start mode.
The bars of the Energy symbol will light up in a sequence that
converges in the middle.
b.
Fast Charge symbol: The Fast Charge symbol will light up and
the inner FAST icon of the symbol will flash during Fast Charge
mode. The bars of the Energy symbol will light up in a sequence
that cycles from bottom to top.
c.
Top-Off/Trickle Charge symbol: During Top-Off Charge mode,
the Top-Off/Trickle Charge symbol Q will light up and the
Top-Off / Trickle Charge icons v. ^4 °f the symbol will flash.
The bottom four energy bars of the Energy symbol will also light
up, while the top bar will flash. When the 1.2V Ni-Cd/Ni-MH
battery is fully recharged, the SmartCharger will enter Trickle
Charge mode. During this time, all of the energy bars will light
up, the Charged Battery symbol ^ will appear and the Top-Off/
Trickle Charge icons of the symbol will flash. The unit will stay in
Trickle Charge mode until you open the lid.
d.
Intelligent Discharge System (IDS) symbol: The IDS symbol
will light up and the upper triangle of the symbol will flash
during discharging. The bars of the Energy symbol will light up in
a sequence that cycles from top to bottom.
e.
Battery Analyzer symbol: Cycles when a 1.2V Ni-Cd/Ni-MH
battery is being analyzed. The outline of the Energy symbol will
also light up during this time.
f.
Voltage indicator: Shows the battery's voltage during Battery
Analyzer mode. It is recommended that you test only one battery
at a time in order to gain an accurate representation of each
individual battery's voltage and level of energy left as
indicated by the number of energy bars.
g.
Loading symbol: Flashes to remind you to insert the batteries.
h.
Bad Battery symbol: Appears if the 1.2V Ni-Cd/Ni-MH battery
is bad and cannot be recharged.
i.
Charged Battery symbol: This is the same symbol as the Bad
Battery symbol, but without a circle around the flash. The
Charged Battery symbol appears when the SmartCharger has
finished charging a 1.2V Ni-Cd/Ni-MH battery.
Energy symbol: The Energy symbol has five bars which light
up according to the particular charging process underway. Also,
when you press ANALYZE, the bars will light up according to the
percentage of battery energy left.
k.
9V Charging LED: Flashes while a 9V battery is being
recharged and remains continuously lit once the battery is
recharged.
8. PROTECTIVE LID: Close the lid after you have inserted a battery to
start the charging process. Keep the lid closed and firmly clipped
during recharging.
j.
INTRODUCTION
Congratulations on your purchase of this super-fast battery
recharger! With Saitek's SmartCharger, you not only save money
by recharging Ni-Cd/Ni-MH batteries over and over again, but will
also be helping to conserve the environment and your valuable
time! Saitek's super-fast charger has a built-in, precision microprocessor that accurately monitors the charging process, plus a
host of other advanced technologies to ensure optimum, super-fast
charging in the shortest possible time! There's the Intelligent
Discharge System (IDS) which automatically discharges and
conditions batteries to a suitable level before recharging, and the
unique Soft-Start Charging function which prevents the generation
of damaging heat, helping to extend your battery's life by up to six
times. The SmartCharger is also equipped with a number of stateof-the-art technologies for safe and speedy charging of Ni-Cd/NiMH batteries. What's more, it's so simple to use. Just insert the
batteries and close the lid. The SmartCharger will do the rest!
SECTION ONE: BASIC OPERATING
INSTRUCTIONS
1.1 Batteries Out, Power On
Make sure there are no batteries in the
SmartCharger before you begin. Then plug the
adapter jack into the adapter socket of the
SmartCharger and plug the AC-DC adapter into
a wall outlet. The SmartCharger will perform a
short self test. The Loading symbol will flash to indicate that the
SmartCharger is ready to use.
Important: Inspect your batteries carefully before
attempting to recharge them. Do not insert batteries that are
rusty, corroded, leaking or damaged. Remember to insert A//Cd/Ni-MH type batteries only.
1.2
Inserting the Batteries
Insert up to two prismatic batteries or up
to four AAA, AA, C, or D batteries into the slots,
matching the "+" sign on the battery with the
"+"symbol inside the compartment. The
batteries inserted must be of the same type and
capacity. Then close the lid (the SmartCharger
will not begin charging until the lid is closed).
The Loading symbol will disappear and the SmartCharger will
begin analyzing the batteries. The Battery Analyzer symbol will
cycle during this time and the outline of the Energy symbol will light
up. If the battery is found to be unsuitable for recharging, the Bad
Battery symbol will appear, and you should remove the battery.
Warning: Inserting batteries of a different size, brand,
capacity or type may lead to overcharging or a reduction in
the battery's maximum capacity. Make sure that the batteries
inserted are of the same size, brand, type, and capacity. The
HOW TO INSERT AND REMOVE THE PRISMATIC ADAPTER/BAT ERY
Inserting the prismatic battery
adapter: Tilt the prismatic battery
adapter into a battery
compartment of the
SmartCharger. Using two fingers,
as shown, gently pull the adapter
back against the metal contact
plate until the adapter is lodged
firmly into position.
Inserting the prismatic battery:
Place the prismatic battery as
shown. Pull the adapter back
against the metal plate and the
battery will fall easily into the
battery adapter slot. Release the
adapter so that the battery is held
firmly in place.
Removing the battery: Pull the
battery adapter back. Lift the
prismatic battery out of the adapter
slot with your free hand.
capacity of the battery is marked on the battery as xxx mAh.
The SmartCharger will detect the battery's voltage of 1.2V
Ni-Cd/Ni-MH and may automatically discharge the battery to a
suitable level before recharging it. The SmartCharger will also vary
the discharging current to suit the number of batteries and the
various energy levels of the batteries to ensure a steady and
speedy discharging effect. This is the SmartCharger^ Intelligent
Discharge System (IDS) at work! You will be able to tell that the
SmartCharger has entered this function because the IDS symbol
will light up and the upper triangle of the symbol will flash. The
outline of the Energy symbol will also appear at this time and the
energy bars will cycle through, from top to bottom. The
SmartCharger will then automatically begin to charge the battery in
Soft-Start mode (see 1.3 below).
You can also force the SmartCharger to skip the IDS phase
and enter Soft-Start directly by pressing the IDS key. However,
you should note that repeatedly overriding this function may lead to
increased memory effect (which will ultimately reduce the battery's
maximum capacity) and increased generation of damaging heat
during recharging, which, in turn, will reduce performance and
battery life.
Conversely, you can also force the SmartCharger to enter
the IDS function by pressing and holding the IDS key for around
three seconds during Soft-Start mode.
For instructions on inserting and recharging 9V batteries,
see 1.6 below.
1.3
Charging Begins
The SmartCharger will begin
recharging the 1.2V Ni-Cd/Ni-MH battery by
progressing automatically through the following processes:
Soft-Start Charging: The SmartCharger may enter SoftStart Charging directly, or after the IDS function has taken place.
This method of charging will ensure that the battery does not heat
up during recharging. The SmartCharger will carefully analyze the
battery, and pre-charge the battery to a suitable level before Fast
Charging begins. During Soft-Start Charging, the Soft-Start
symbol will light up and the inner segment of the symbol will flash,
while the bars of the Energy symbol light up in a sequence that
converges in the middle.
Fast Charging: The SmartCharger
will enter Fast Charge mode after Soft-Start
Charging has taken place. This super highspeed charging replenishes up to 80-90% of
the battery's original capacity. During this
process, the Fast Charge symbol will light up and the FAST icon
inside the symbol will flash. The Fast Charging current varies
according to the quality of the battery. During Fast Charging, the
bars within the Energy symbol will cycle from bottom
to top.
Top-Off Charging: This type of charging
tops up the remaining 10-20% of the battery's
capacity after Fast Charging has taken place. The
SmartCharger will then enter Trickle Charge mode
(see below). During Top-Off Charging, the Top-Off/
Trickle Charge symbol will light up while the Top-Off/
Trickle Charge icons of the symbol will flash. The
bottom four energy bars of the Energy symbol will
also light up, and the top energy bar will flash.
Trickle Charging: This mode of charging applies a very
low current to maintain the battery at its maximum capacity until
you are ready to use it. It does this by replenishing the internal
leakage of the fully charged battery. Since Trickle
Charge mode maintains the replenished state of the
battery, it is recommended that you keep the battery
in the charger (in Trickle Charge mode) until you are
ready to use it. In the Trickle Charge mode, all of
the energy bars will light up, the Charged Battery
symbol will appear and the Top-Off/Trickle Charge
icons of the symbol will flash. The unit will stay in
Trickle Charge mode until you open the lid.
The charging time required depends on the type, brand,
size, capacity and condition of the battery (for example, bad quality
batteries take longer to recharge). The time can vary anywhere
between several minutes and many hours. Your SmartCharger will
take as much time as necessary to recharge your batteries
properly and safely. See the table below for an approximate
indication of charging times:
The above charging times are for a typical battery and for
general reference only. The Approximate Charging Time excludes
Top-Off and Trickle Charge time.
Q... Can I use the batteries before Top-Off
Charging finishes? Yes. You may remove batteries
from the SmartCharger while it is in Top-Off Charging
mode. However, the battery may have only reached
around 85%-90% of its total energy level. Top-Off
charging adds 10%-15% to the battery capacity.
1.4
Checking 1.2V Ni-Cd/Ni-MH Batteries
Open the lid and place one 1.2V Ni-Cd/Ni-MH battery into a
battery slot. Press ANALYZE. The SmartCharger will take just a
few seconds to evaluate the condition of your battery, during which
time the Battery Analyzer symbol will cycle and the outline of the
Energy symbol will light up. The battery's voltage and energy
remaining will then be displayed on the LCD (the greater the
number of energy bars displayed means the higher the level of
energy left). If the battery is not suitable for recharging, the Bad
Battery symbol will appear, in which case you should remove the
battery and dispose of it.
Important: Analyzing the battery depletes the battery's
energy, which is why increasingly less energy will be displayed on the LCD every time you re-analyze the same battery.
Note: The level of energy left shown is based on a
normal, fully charged battery. If the battery being analyzed
has not been fully charged before being discharged, it may
not be possible to accurately indicate the current energy.
1.5
Revitalising 1.2V Ni-Cd/Ni-MH Batteries
Certain brands of battery, new batteries or batteries that
have been stored for a long time may not be immediately suitable
for Fast Charging and you may encounter the "Premature" (i.e.
battery is not charged to more than 60% of its rated capacity even
though the charger signals its fully charged). In this case, you
should allow the battery to undergo a number of "Premature"
charging and recharging cycles to help revitalise the batteries. The
guidelines below may help to revitalise your batteries so that you
may eventually be able to Fast Charge them:
a. Start by charging three to four of these type of batteries with the same capacity, size, type and brand - together,
allowing the batteries to undergo several charging
and discharging cycles before trying to Fast Charge
each battery separately.
OR
b. Charge one of these type of batteries on its own and
allow the SmartCharger to try to revitalise the battery by
running through several charging and discharging
cycles.
Important: If the Premature Full condition still exists
after several charging and discharging cycles, the batteries
are not suitable for Fast Charging one at a time and should
always be recharged together in packs of three or four.
9V Battery Charging
Insert the 9V (6F22/1604) battery into the slot as shown in
the diagram in the KEYS AND FEATURES Section. Make sure
that the "+" sign of the battery matches the"+" of the slot and the
battery is clipped firmly in the slot.
The "9V Charging" LED will flash on and off. Close the lid.
When the eight-hour maximum charging time has been reached,
the LED will stop flashing but will remain lit.
You can also recharge 1.2V batteries at the same time as
your 9V battery, and may open the lid to retrieve your recharged
9V battery while a 1.2V battery is in Top-Off Charge mode.
1.7
Bad Battery Symbol Appears? Here's Why!
If a 1.2V Ni-Cd/Ni-MH battery is not suitable for recharging,
the SmartCharger will automatically sense this, either immediately
or during recharging. The Bad Battery symbol will then appear on
the LCD, in which case, you should remove the defective battery
and dispose of it.
1.8
Recharging is Complete!
When a 1.2V Ni-Cd/Ni-MH battery is fully recharged, all of
the energy bars within the Energy symbol will light up, the Charged
Battery symbol will appear and the icons of the Top-Off/Trickle
Charge symbol will flash. The unit will remain in Trickle Charge
mode until you open the lid. Simply remove the battery from the
unit and it is ready to use! If you are not yet ready to use the
battery, it is recommended that you leave it in the unit without
opening the lid and without disconnecting the AC-DC adapter. The
SmartCharger will continue to apply Trickle Charge to maintain the
replenished state of the battery until you are ready to use it.
1.6
1.9
Batteries Out, Power Down
To turn off the power, remove all batteries from the unit.
Unplug the adapter from the wall socket first and then from
SmartCharger.
performance possible!
SECTION TWO: SPECIAL FEATURES ON
RECHARGING 1.2V Ni-Cd/Ni-MH BATTERIES
The SmartCharger is equipped with a whole host of state-ofthe-art technologies to allow the fastest, most efficient and userfriendly battery charging ever!
2.1
Built-in Microprocessor
The SmartCharger is equipped with a built-in microprocessor that automatically detects the battery condition and
monitors the charging process to give optimum charging capacities
each time.
1.2V Ni-Cd/Ni-MH Battery Checking
Simply insert a 1.2V Ni-Cd/Ni-MH battery leaving the lid
open, press ANALYZE and, within about ten seconds, the
SmartCharger will have evaluated the condition of your battery.
The amount of energy left in the battery and its voltage will be
displayed on the LCD. The level of energy remaining in the battery
will be indicated by the number of bars illuminated on the Energy
symbol (see 1.4). If the SmartCharger detects that the battery is
unsuitable for recharging, the Bad Battery symbol will appear, in
which case you should remove the battery and dispose of it.
«
*
*
2.2
2.3 High-tech, Super-fast Charging Capabilities on 1.2V NiCd or Ni-MH Batteries
The SmartCharger is so technologically advanced that it is
able to provide super-fast and efficient charging in the shortest
possible time. The SmartCharger customises recharging cycles
according to the battery's individual needs and is equipped with the
very latest technologies, such as Negative Pulse, Fuzzy Logic and
Soft-Start, Intelligent Discharge, and Negative Delta V and Delta V
Square over Delta t Square, to achieve the highest charging
*
Negative Pulse: Improves charging performance by applying a
loading or discharge pulse to the batteries during charging. This
prevents crystallisation and reduces the build-up of gas bubbles
around the electrode during recharging, thereby maximising the
conductive surface area around the electrode and, in turn,
increasing charging efficiency.
Soft-Start: Prevents the generation of damaging heat during
charging to extend battery life! The charging cycles are Fuzzy
Logic controlled to allow a careful analysis of the battery and
gradual increase in the battery's charging level before Fast
Charging. This protects the battery and extends its useful life.
Intelligent Discharge System (IDS): Automatically discharges
and conditions batteries to a suitable level before recharging to
allow maximum charging capacity.
Negative Delta V and Delta V Square over Delta t Square
Technologies: Negative Delta V and Delta V Square over Delta
t Square are advanced charging termination criteria. This
prevents overcharging and damaging heat generation, both of
which would permanently impair the battery.
2.4 Advanced Features on Charging 1.2V Ni-Cd/Ni-MH
Batteries
The SmartCharger has a number of unique features specific
to the charging of 1.2V Ni-Cd (Nickel-Cadmium) and Ni-MH
(Nickel-Metal Hydride) batteries.
*
V
Super-fast Charging Capabilities: The SmartCharger is
specially designed to charge Ni-Cd/Ni-MH batteries in the
fastest possible time. The table in 1.3 speaks for itself!
User-friendly Operation: There is no need to waste time in
selecting the appropriate battery size. Simply insert the battery,
close the lid and the SmartCharger will do the rest!
Negative Delta V and Delta V Square over Delta t Square: The
SmartCharger employs the most advanced charging methods
that adapt to your batteries. It then relies on direct feedback
from the battery itself to stop charging at exactly the right
moment.
Memory Effect Suppressor: Memory Effect is a phenomenon
peculiar to Ni-Cd batteries and refers to a reduction in the
capacity of Ni-Cd batteries if they are frequently recharged
without being fully discharged first. The SmartCharger
counteracts this effect by discharging each battery using its
Intelligent Discharge System before recharging it to full
strength. Meanwhile, the Negative Pulse function improves
charging performance by applying a loading or discharge pulse
to the batteries during charging. This prevents crystallisation
and reduces gas bubbles around the electrode during charging,
thereby increasing the efficiency of the charging process. The
SmartCharger may even revitalise batteries already damaged
by Memory Effect.
Triple Overcharge Guard:
1. Negative Delta V
2. Delta V Square over Delta t Square
3. Current adjustment close to the end of the Fast Charging
process
The SmartCharger is equipped with an advanced Triple
Overcharge Guard to protect Ni-Cd/Ni-MH batteries from damaging
heat generation and from becoming permanently impaired by
overcharging. Negative Delta V and Delta V Square over Delta t
Square (1 and 2 above) are advanced charging termination criteria
that prevent overcharging. In addition, close to the end of the Fast
Charging process, the Fast Charging current (3 above) is automatically reduced to minimise heat generation before the termination
criteria come into effect.
SECTION THREE: TECHNICAL DETAILS
3.1
Care and Maintenance
The SmartCharger is a precision electronic device and
should not be subjected to rough handling or exposed to extreme
temperatures or moisture. Do not use chemical agents to clean the
SmartCharger or the adapter, as these may damage the unit.
Disconnect the charger from AC-DC adapter outlet before cleaning
the metal contact with a soft cloth. Do not disassemble the charger
or AC-DC adapter.
To ensure the safe operation of the unit, the transformer
should be regularly examined for damage to the cord, plug,
enclosure or other parts. In the event of any damage, the
transformer must not be used with the unit until the fault has been
repaired by qualified service personnel. When cleaning the unit
with a soft cloth, the unit must be disconnected from the transformer first. Please note that only the recommended transformer
should be used with the unit.
3.2 Technical Specifications
Keys:
2
LED:
1
LCD Viewing Area:
31 mm x 19 mm
1.2V Battery Charging Current: Up to 2A
9V Battery Charging Current: 22.5 mA
Adapter:
DC 12V 500mA, centre positive
with barrel jack. Use supplied
adapter only.
Dimensions:
130 x 215 x 67 mm
Saitek reserves the right to make technical changes without
notice in the interest of progress.
Warning: Use supplied adapter only. If the adapter fails,
replace it with a Saitek adapter of the same model only (please
contact your nearest supplier). Improper use or failure to use the
correct Saitek adapter will render the warranty null and void.
TROUBLESHOOTING GUIDE
SYMPTOMS
POSSIBLE CAUSES
The unit doesn't work. Wrong AC-DC adapter.
Defective AC-DC adapter.
A battery is inserted
Loose or bad contact.
and the ANALYZE key
is pressed, but the
charger does not
analyze.
Lid closed.
Battery open circuited.
TROUBLESHOOTING GUIDE
ACTION TO TAKE
Use with supplied
adapter only.
Replace it with a new
Saitek adapter that is
specifically for this
charger.
Reinsert the battery
and secure it firmly.
Press the ANALYZE
key again.
SYMPTOMS
POSSIBLE CAUSES
The charger does not
leave the "analyze"
mode after 10
seconds, (i.e. the
animation is still
running).
ANALYZE key held.
Release the ANALYZE
key.
Defective unit.
Contact your local
distribution centre.
The charger does not
start to charge even
though the battery is
inserted and the lid is
closed.
Loose clamping of
battery.
Secure the battery
firmly with the sliding
contact.
Lid not closed firmly.
Make sure that the lid
is closed and locked in
place by pressing just
above the lid button.
Battery inserted with
wrong polarity.
Correct the polarity.
Dirty 1.2V contacts
Clean the contact with
a soft cloth.
Open the lid and press
the ANALYZE key
again.
Remove the bad
battery and insert
another battery.
Press the ANALYZE
key again.
9V battery inserted only.
Only the 1.2V channel
has the analyzing
function.
Defective unit.
Contact your local
distribution centre.
ACTION TO TAKE
TROUBLESHOOTING GUIDE
SYMPTOMS
POSSIBLE CAUSES
The 9V LED does not Dirty 9V contacts.
flash after a 9V battery
is inserted.
TROUBLESHOOTING GUIDE
ACTION TO TAKE
Clean the contact with
a soft cloth.
Battery inserted with
wrong polarity.
Correct the polarity.
Battery not inserted
firmly,
Secure the battery into
the contacts firmly.
Bad battery.
Insert another 9V
battery.
9V channel defects,
Contact your local
distribution centre.
There is an absurd LCD Static hang up.
display when the
power is first turned
on.
Remove all batteries.
Unplug the jack and
wait 5 seconds before
plugging the unit in
again.
Battery charging starts Defective unit.
before the lid is closed.
Contact your local
distribution centre.
SYMPTOMS
The DISCHARGE
button does not
respond when in IDS
mode.
POSSIBLE CAUSES
Defective unit.
ACTION TO TAKE
Contact your local
distribution centre.
Pressing and holding It is not in Soft-Start
the DISCHARGE button Charging mode.
for 3 seconds does not
switch to IDS mode.
Press and hold
DISCHARGE for 3
seconds to switch to
IDS mode only in SoftStart mode.
Some of the recharged
1.2V batteries have a
low battery life or no
output at all.
More that one battery
being recharged at the
same time. Some are
loose or have bad
contact.
Put those batteries
back into the 1.2V
channels and close the
lid to recharge again.
Bad batteries.
Dispose of the faulty
batteries properly, as
directed by local
authorities.
Some batteries may not
be capable of high
current recharging so
they will not be fully
charged.
Try to recharge the
batteries in packs of 3
or 4.