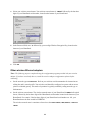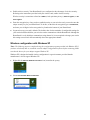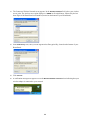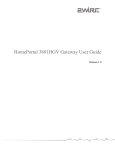
1
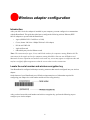
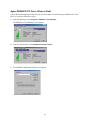
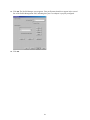
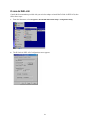
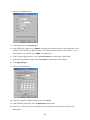
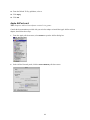
Wireless Client
Configuration Guide
for third-party wireless Ethernet adapters
Notice to Users
©2002 2Wire, Inc. All rights reserved. This manual in whole or in part, may not be reproduced, translated, or reduced to any machine-readable form without
prior written approval.
2WIRE PROVIDES NO WARRANTY WITH REGARD TO THIS MANUAL, THE SOFTWARE, OR OTHER INFORMATION CONTAINED HEREIN
AND HEREBY EXPRESSLY DISCLAIMS ANY IMPLIED WARRANTIES OF MERCHANTABILITY OR FITNESS FOR ANY PARTICULAR
PURPOSE WITH REGARD TO THIS MANUAL, THE SOFTWARE, OR SUCH OTHER INFORMATION, IN NO EVENT SHALL 2WIRE, INC. BE
LIABLE FOR ANY INCIDENTAL, CONSEQUENTIAL, OR SPECIAL DAMAGES, WHETHER BASED ON TORT, CONTRACT, OR OTHERWISE,
ARISING OUT OF OR IN CONNECTION WITH THIS MANUAL, THE SOFTWARE, OR OTHER INFORMATION CONTAINED HEREIN OR THE
USE THEREOF.
2Wire, Inc. reserves the right to make any modification to this manual or the information contained herein at any time without notice. The software described
herein is governed by the terms of a separate user license agreement.
Updates and additions to software may require an additional charge. Subscriptions to online service providers may require a fee and credit card information.
Financial services may require prior arrangements with participating financial institutions.
2Wire, the 2Wire logo, and HomePortal are trademarks of 2Wire, Inc. All other trademarks are trademarks of their respective owners.
___________________________________________________________________________________________________________________________
Contents
Wireless Client Configuration Guide
Introduction ........................................................................................................................................... 1
Locate the serial number and wireless encryption key ......................................................................... 1
Agere ORiNOCO PC Card - Silver or Gold .......................................................................................... 2
Cisco Aironet ........................................................................................................................................ 6
D-Link Air DWL-650 .............................................................................................................................. 9
Apple AirPort card ...............................................................................................................................11
Other wireless Ethernet adapters ....................................................................................................... 12
Wireless configuration with Windows XP ........................................................................................... 13
Contents
Wireless adapter configuration
Introduction
After your 802.11b wireless adapter is installed in your computer, you must configure it to communicate
with the HomePortal. This guide describes how to configure the following wireless Ethernet (IEEE
802.11b) adapters to operate with the HomePortal:
•
Agere (ORiNOCO PC Card Silver or Gold)
•
Cisco (Aironet 340 Series 11Mbps Wireless LAN Adapter)
•
D-Link Air DWL-650
•
Apple AirPort card
•
Other third-party wireless Ethernet cards
Note: The instructions for Agere, Cisco, and D-Link cards are for computers running Windows 98. The
instructions for the Apple card are for computers running MacOS 9.0. Because not all Windows and
Macintosh versions respond to new hardware in the same way, screens may appear in a different order and
may have a slightly different appearance than the screens shown in these instructions.
Locate the serial number and wireless encryption key
Your HomePortal is configured with unique security parameters that must be configured into your wireless
adapter.
On the bottom of your HomePortal you will find two important pieces of information required for
configuring your adapter: the serial number and the wireless encryption key.
After you have located the serial number and wireless encryption key, perform the following steps to
configure your wireless adapter.
1
Agere ORiNOCO PC Card - Silver or Gold
Consult the documentation provided with your wireless adapter to install the Agere ORiNOCO PC Card Silver or Gold, then follow these steps:
1.
From the Start menu, select Programs > ORiNOCO > Client Manager.
The ORiNOCO Client Manager screen appears.
2.
From the Actions menu, select Add/Edit Configuration Profile.
3.
The Add/Edit Configuration Profile screen appears.
2
4.
To create your profile, click Add. The Edit Configuration screen appears. Enter a profile name in the
Profile Name field. The profile name identifies your wireless profile, and should be no more than 29
characters in length.
5.
From the Network Type pulldown menu, select Access Point.
6.
To identify your network, click Next. The Edit Configuration screen appears.
7.
In the Network Name field, enter the word “2WIRE” followed by the last three digits of your
HomePortal serial number, located on the bottom of your HomePortal. This is the Wireless Network
Name. The Wireless Network Name is case-sensitive, so it is important that you enter the word
“2WIRE” in capital letters.
3
8.
Click Next. In the Set Security field, check the Enable Data Security checkbox. Verify that the Use
Hexadecimal (0-9, a-f, A-F) radio button is selected.
9.
In the Key field, enter your ten-digit Wireless Encryption Key, located on the bottom of your
HomePortal.
10.
Verify that Key 1 is selected in the Encrypt data with pulldown menu (this is the default).
11.
To select a power management option, click Next. The following screen appears.
12.
Select the power management option that you wish to use (the default is Off), and click Next.
4
13.
In the TCP/IP Behavior field, check the Renew IP Address when selecting this profile checkbox.
14.
Click Finish. The following screen appears.
15.
Click OK.
5
Cisco Aironet
Consult the documentation provided with your wireless card to install the Cisco Aironet adapter, then
follow these steps:
1.
Double-click the Aironet Client Utility icon on your desktop. The Aironet Client Utility screen
appears.
2.
Click the Profile Manager button. The Profile Manager screen appears.
3.
Click Add.
4.
In the Profile Management field, enter your profile name. The profile name identifies your wireless
profile, and should be no more than 29 characters in length.
5.
Click Apply. The 340 Series Properties screen appears.
6
6.
Select the System Parameters tab. In the Client Name field, enter a client name. The client name
identifies your PC.
7.
In the SSID1 field, enter the word “2WIRE” followed by the last three digits of your HomePortal serial
number. This is the Wireless Network Name. The Wireless Network Name is case-sensitive, so it is
important that you enter the word “2WIRE” in capital letters.
8.
In the Power Save Mode field, verify that the CAM (Constantly Awake Mode) radio button is selected
(this is the default).
9.
In the Network Type field, verify that the Infrastructure radio button is selected (this is the default).
10.
Select the Network Security tab. In the WEP field, select the Use Static WEP Keys radio button.
11.
In the WEP Key Entry Method field, verify that the Hexadecimal (0-9, A-F) radio button is selected.
12.
In the WEP Key 1 field, select the Transmit Key radio button and enter your ten-digit Wireless
Encryption Key, located on the bottom of your HomePortal.
7
13.
Click OK. The Profile Manager screen appears. Your profile name should now appear in the second
line of the Profile Management field, indicating that your Cisco adapter is properly configured.
14.
Click OK.
8
D-Link Air DWL-650
Consult the documentation provided with your wireless adapter to install the D-Link Air DWL-650, then
follow these steps:
1.
From the Start menu, select Programs > D-Link DWL-650 Control Utility > Configuration Utility.
2.
The D-Link Air DWL-650 Configuration screen appears.
9
3.
Select the Configuration tab.
4.
In the Mode field, enter Infrastructure.
5.
In the SSID field, enter the word “2WIRE” followed by the last three digits of your HomePortal serial
number. This is the Wireless Network Name. The Wireless Network Name is case-sensitive, so it is
important that you enter the word “2WIRE” in capital letters.
6.
In the Tx Rate pulldown menu, verify that Fully Automatic is selected (this is the default).
7.
In the PS Mode pulldown menu, verify that Disabled is selected (this is the default).
8.
Click Apply Changes.
9.
Select the Encryption tab.
10.
From the Encryption (WEP) pulldown menu, select 64 Bit.
11.
In the WEP Key Entry field, select the Manual Entry radio button.
12.
In the Key 1 field, enter your ten-digit Wireless Encryption Key, located on the bottom of your
HomePortal.
10
13.
From the Default Tx Key pulldown, select 1.
14.
Click Apply.
15.
Click OK.
Apple AirPort card
Note: Requires AirPort client software revision 2.0 or greater.
Consult the documentation provided with your wireless adapter to install the Apple AirPort wireless
adapter, then follow these steps:
1.
From the Apple pull-down menu, select AirPort to open the AirPort dialog box.
2.
In the AirPort Network panel, click the Choose Network pull-down menu.
11
3.
Select your wireless network name. Your wireless network name is “2WIRE” followed by the last three
digits of your HomePortal serial number, located on the bottom of your HomePortal.
4.
In the Password field, enter “$” followed by your ten-digit Wireless Encryption Key, located on the
bottom of your HomePortal.
5.
Click OK.
Other wireless Ethernet adapters
Note: The following steps are completed using the configuration program provided with your wireless
adapter. If you have not already done so, install the wireless adapter configuration software before
continuing.
1.
Set the network type to Infrastructure. Refer to your wireless card documentation for instructions on
editing the card’s network profile. Your wireless card should be configured to operate with an access
point or residential gateway. This mode of operation is typically enabled by setting network type to
Infrastructure.
2.
Set the wireless network name. The wireless network name of your HomePortal is 2WIRE in all capital
letters, followed by the last three digit of the HomePortal serial number located on the bottom of your
HomePortal. For example, if the last three digits of your HomePortal serial number are 102, your
HomePortal network name would be 2WIRE102.
The wireless network name is sometimes referred to as the Network Name, SSID, ESS ID, or Wireless
LAN ID.
12
3.
Enable wireless security. Your HomePortal is pre-configured to take advantage of wireless security.
Referring to the instructions provided with your wireless card, enable wireless security.
Wireless security is sometimes referred to as WEP (wired equivalent privacy), 64-bit encryption, or 40bit encryption.
4.
Enter the encryption key. Once you have enabled security on your wireless card, you need to enter the
unique security key for your HomePortal. To do this, set the network encryption type to hexadecimal,
and enter your 10-digit wireless encryption key found on the bottom of your HomePortal.
5.
In general, accept your card’s defaults. The default value for the remainder of configurable settings for
your network card should allow your wireless card to communicate with the HomePortal. Although the
HomePortal is set by default to communicate using channel 6, it is not required to change your card to
this setting as most cards will automatically detect the appropriate channel.
Wireless configuration with Windows XP
Note: The following steps are completed using the configuration program provided with Windows XP. If
you have not already done so, install the wireless adapter configuration software before continuing. Make
sure that the drivers for your adapter support Windows XP.
Windows XP is designed to handle wireless configuration in a generic manner, provided that the
manufacturer’s drivers support Windows XP.
1.
Right-click the Wireless Network Connection icon, located in the systray.
2.
Select View Available Wireless Networks.
13
3.
The Connect to Wireless Network screen appears. In the Available networks field, select your wireless
access point. The wireless access point displays as “2WIRE” in all capital letters, followed by the last
three digits of the HomePortal serial number (located on the bottom of your HomePortal).
4.
In the Network key field, enter your ten-digit Wireless Encryption Key, located on the bottom of your
HomePortal.
5.
Click Connect.
6.
A notification message now appears next to the Wireless Network Connection icon indicating that your
wireless adapter is connected to your network.
14
5100-000059-000 Rev B