1
Operating Instructions and Parts Manual
PUMP INSTALLATION
(CONTINUED)
Ridgid
PVC Pipe
Floor Joist
Be careful not to strip or cross thread
plastic fittings or check valves. Flex hose is
not recommended. Rigid PVC or metal pipe
is required for a permanent installation.
6. Place the pump with the 4’ section of
PVC pipe on the sump floor or on an
elevated surface if required.
7. Attach a rubber check valve (sold
separately) to the top of the discharge
pipe. This will allow the pump or check
valve to be removed easily for servicing.
Slope Pipe
Down
Check Valve
(See Step 6)
PS/BC
1 1/4 inch or
1 1/2 inch
PVC Pipe
Batteries
8. Duplicate the discharge piping
arrangement for the primary AC
pump if the existing discharge line
has to be adjusted to accommodate
a second pump.
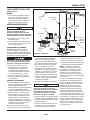
9. Glue a 45º elbow to the short pipe on
the ESP45 pump. Glue a “Y” adapter to
the short pipe on the existing pump, as
shown in illustration for Method 2.
10. Glue a short piece of PVC pipe between
the 45º elbow and the “Y”.
NOTE: Check valves can be placed
directly in the pump discharge if desired.
However, for ease of disassembly, it is
recommended that check valves be placed
above the sump as shown in Figure 3.
The remainder of the discharge pipe
installation will vary depending on
individual circumstances. Using sound
plumbing practices, route the discharge pipe
to an exterior wall by the shortest distance.
METHODS 1 AND 2
Install float switch at least 10”-12” above
bottom of sump pit so that backup unit
turns on only when the water level is higher
than the normal “on” level for main pump.
Use the hose clamps provided to secure the
switch to the discharge pipe. Make sure
power wires and hose clamp ends do not
interfere with float switch, pump inlet, or
main pump operation. Backup pump must
not be allowed to run dry.
Use Power Supply/ Battery Charger (PS/BC)
indoors, in a well-ventilated area. Do not
expose PS/BC to rain or snow. Do not use
an extension cord. Do not disassemble
PS/BC. Be sure PS/BC ventilation holes
are unobstructed. If PS/BC is dropped
or damaged, do not operate; return to
manufacturer for service.
ESP45
Pump
Battery
Box
Existing
Pump
Figure 3 – Method 2
Risk of electrical shock! Use a GFCI
(Ground Fault Circuit Interrupter)
receptacle to reduce the risk of fatal
electrical shock. Grounded receptacle
must be rated for at least 5 amps.
Always disconnect AC power and
remove pump fuse before connecting or
disconnecting battery.
1. Select a suitable position on the floor
near the sump pit to place the battery
case. Be certain that the PS/BC power
cord will reach AC power, and that
the sump pump power cord will reach
the PS/BC. Make sure the battery case
vent holes are unobstructed.
ELEVATE PS/BC BY MOUNTING ON
WALL OR SETTING ON A SHELF. SLOTS
IN THE BACK SIDE OF PS/BC ARE
AVAILABLE FOR WALL MOUNTING.
CONTROL BOX INSTALLATION
If cables are reversed, damage to the PS/
BC or battery could result, and warranty
will be void.
Dangerous hydrogen gas can be released
from batteries while charging. Sparks
can ignite the gas in an enclosed space.
www.waynepumps.com
4
Wear safety goggles when connecting
batteries. Battery connections should be
made in a well-ventilated area.
1. Place battery box within six feet of the
sump and a 115 VAC separately fused
outlet. The outlet must be protected
by a ground fault circuit interrupter
(GFCI). The area must also be clean,
dry and well-ventilated.
2. Wave cardboard over batteries to blow
away any gas that may be present.
3. Connect jumper wire between
batteries as shown on Figure 1.
4. Connect power wires from PS/BC to
battery terminals as shown in Figure 1.
Connect the red wire to the unconnected
positive terminal of battery A and
then connect the black wire to the
unconnected negative terminal of battery
B. The yellow light should now be on.
5. Plug the pump and then the float into
the PS/BC. The connections are marked.
6. Test pump operation by filling the
sump with water while the main
pump is unplugged. If the pump
operates properly, plug the PS/BC into
the GFCI protected outlet to begin
charging the battery.
NOTE: Protect electrical cord from sharp
objects, hot surfaces, oil and chemicals.
Avoid kinking the cord and replace
damaged components immediately.