1
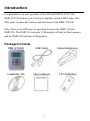
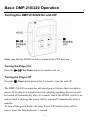
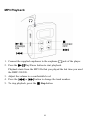
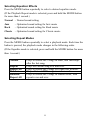
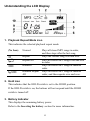
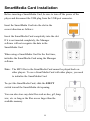
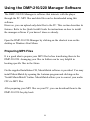
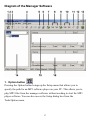
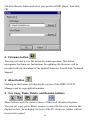
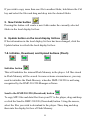
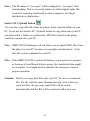
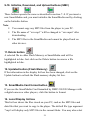
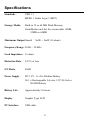
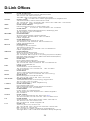
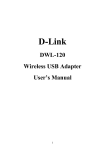
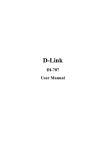
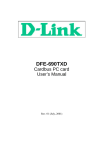
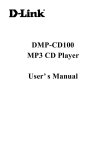
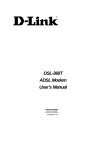
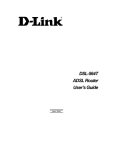
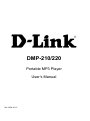
DMP-210/220 Portable MP3 Player User’s Manual Rev. 2004-10-13 Contents Introduction ....................................................................................................1 Package Cont ents ...................................................................................... 1 Introduction to MP3......................................................................................2 Precautions ....................................................................................................3 Maintaining Good Performance ............................................................... 3 Using Headphones .................................................................................... 3 Cleaning the Player ................................................................................... 3 Overview of the DMP-210/220 MP3 Player .............................................4 Button and Feature Layout ....................................................................... 4 Inserting the Battery ................................................................................. 7 Understanding The Battery Indicator ............................................... 8 Battery Replacement......................................................................... 8 Note on Dry Cell Battery.................................................................. 8 Basic DMP-210/220 Operation ...................................................................9 Turning the DMP-210/220 On and Off .................................................... 9 MP3 Playback ......................................................................................... 10 Understanding the LCD Display ............................................................ 12 SmartMedia Card Installation ................................................................. 14 Connecting The DMP-210/220 To Your PC.......................................... 15 Using the DMP-210/220 Manager Software......................................... 16 Preparing MP3 Files ............................................................................... 16 Diagram of the Manager Software ......................................................... 17 Uninstalling the Manager Software ........................................................ 23 Troubleshooting......................................................................................... 24 Specifications ............................................................................................. 27 D-Link Offices ............................................................................................. 28 Limited Warranty ........................................................................................ 29 Registration ............................................................................................... 34 Introduction Congratulations on your purchase of the D-Link DMP-210/220. The DMP-210/220 enables you to listen to digitally encoded MP3 audio files. This guide explains the features and functions of the DMP-210/220. Note: There is no difference in operation between the DMP-210 and DMP-220. The DMP-210 includes 32 Megabytes of built in flash memory and the DMP-220 includes 64 Megabytes. Package Contents DMP-210/220 USB Cable Stereo Earphones Installation CD User’s Manual 1.5V AA Battery 1 Introduction to MP3 The term “MP3” stands for Moving Picture Experts Group Audio Layer-3. A German company, Fraunhofer Gesellschaft, originally deve loped the algorithm used in MP3 in 1987. They patented the technology in Germany in 1989, and in the United States in 1996. The MP3 format became popular very quickly because of the size of MP3 files compared to other formats. The previous format used by most computer users was .WAV, which was developed by Microsoft and introduced in Windows 3.1. Microsoft WAV files in an uncompressed state tend to be very large. In 1998, several companies released MP3 players that could be used as portable audio players for MP3 files. These players became popular because of the smaller, more convenient size and because the players had no moving parts which resulted in the elimination of skipping, a problem with some CD players and other devices. At this time, companies and computer users began to put MP3 files on the Internet that could be downloaded by anyone. And because the sizes of these files are relatively small, the time it takes to download MP3 music is fast. With the advent of Broadband Internet connection like Cable and DSL, downloading MP3 files takes only a few minutes. There are several ways to get MP3 music. The most popular method is to download MP3 files from the Internet. There are many unknown artists producing their own MP3 tracks and are making them ava ilable on the Internet. Another popular method is to convert your own CD collection into MP3 format. This is knows as ripping. There are many software titles available that can rip, play, and even stream MP3 content from the Internet. 2 Precautions The following are precautions that you should keep in mind when using the DMP-210/220. Any violation of one or more of the following precautions may cause damage and will void the warranty. Maintaining Good Performance § § § § Avoid exposure to heat, moisture and static electricity. Do not use the player in places that are extremely hot, cold, dusty, or humid. Do not keep the player in a high humidity area such as a bathroom, near a heater or in an area exposed to direct sunlight (e.g., inside a parked car). When you carry the battery in your pocket, do not have other metal objects such as coins or keys in the same pocket. Friction caused from the metal and the battery rubbing together may cause a fire. Using Headphones § § § Listen at a moderate volume to avoid hearing damage. Listening to loud music for extended periods of time may damage your ears and may result in hearing loss. Do not wear the headphones while driving or cycling. Cleaning the Player Never use chemicals to clean the case of the player. This may change the color of the player or damage the surface. Use a soft towel to clean the surface of the player. 3 Overview of the DMP-210/220 MP3 Player Button and Feature Layout 4 1. SmartMedia card slot Insert your SmartMedia card (16MB, 32MB, or 64MB) into this slot. 2. Earphone jack ( ) Connect the supplied earphone. 3. HOLD switch Release before activating other buttons. When not in use, set it to the HOLD position to prevent unintentional operation. 4. USB port connector Connect the Series B connector of the supplied USB cable to connect the DMP-210/220 to your PC. 5. Display window This shows information about functions and track status. 6. POWER ON button ( ) Keep pressed for 1 second to turn on the power. Press to start playback of an MP3. Press during playback to pause, and press again to resume. 7. PREVIOUS button ( ) Press to go back to the beginning of the current track or previous track. Keep pressed during playback to search for a desired point. 7. NEXT button ( ) Press to skip to the beginning of the next or succeeding track. Keep pressed during playback to search for a desired point. 5 8. POWER OFF button ( ) Press to stop playback. Keep pressed for 1 second to turn off the power. 9. REPEAT/EQUALIZER MODE button Press and hold this button pressed for 1 second to toggle between Repeat and Equalizer mode. Pressing the Mode button quickly will change the current mode function only. If you want to switch from Repeat mode to Equalizer mode, press the Mode button for 1 second. 10. VOLUME button Press to adjust the volume. Press the top of the Volume button to increase volume. Press the bottom of the Volume button to decrease volume. 11. EJECT The Eject switch is used to eject a SmartMedia card. 12. Battery Compartment The battery compartment holds the battery. A battery with available power is required for the DMP-210/220 to function. Insert a 1.5V (size AA) alkaline battery or a rechargeable AA size 1.2V to 1.5 Ni-Ca or Ni-MH battery 6 Inserting the Battery An alkaline battery is recommended for use with this player. 1. Open the cover of the battery compartment. 2. Insert a 1.5V (size AA) alkaline battery. Pay close attention to the proper polarities (+ and -). Inserting the battery the wrong way may result in damage to electronic components and the player will not work. Note: You may use any 1.5V AA size battery, but alkaline batteries tend to last longer. You can also use a rechargeable AA size 1.2V Ni-Ca or Ni-MH battery. 7 Understanding The Battery Indicator The battery indicator on the display changes depending on the remaining power of the battery. Battery Replacement Replace the battery when the battery indicator is empty. Note on Dry Cell Battery § Make sure that the and marks are correctly aligned. § To prevent the risk of electrolyte leakage or explosions, never recharge the battery, apply heat to it, or take it apart. § When not using the battery, remove it to prevent battery discharge. § If liquid leaks out from the battery, wipe thoroughly to remove and dispose of it quickly. 8 Basic DMP-210/220 Operation Turning the DMP-210/220 On and Off Make sure that the HOLD switch is turned to the OFF position. Turning the Player On Press the Play/Pause button to turn the unit on. Turning the Player Off Press the Stop button pressed for 1 second to turn the unit off. The DMP-210/220 incorporates advanced power features that save battery power. If the player is turned on but isn’t playing anything, the power will be turned off automatically after 30 seconds. And if the HOLD switch is on and no track is playing, the power will be turned off automatically after 4 minutes. To turn off the power before the Auto Power Off function turns off the power, press the Stop button for 1 second. 9 MP3 Playback 1. Connect the supplied earphones to the earphone jack of the player. 2. Press the Play/Pause button to start playback. Playback starts from the MP3 file that you played the last time you used the DMP-210/220. 3. Adjust the volume to a comfortable level. 4. Press the or button to change the track number. 5. To stop playback, press the Stop button. 10 Selecting Equalizer Effects Press the MODE button repeatedly to select a desired equalizer mode. (If the Playback Repeat mode is selected, press and hold the MODE button for more than 1 second.) Normal – Normal sound setting Jazz – Optimized sound setting for Jazz music Rock – Optimized sound setting for Rock music Classic – Optimized sound setting for Classic music Selecting Repeat Modes Press the MODE button repeatedly to select a playback mode. Each time the button is pressed, the playback mode changes in the following order. (If the Equalize mode is selected, press and hold the MODE button for more than 1 second.) Normal Repeat Repeat All Random Random Repeat All Plays all stored MP3 songs in order, and then stops after the last song. Plays the current song over and over. Plays all stored MP3 songs over and over in order. Plays all stored MP3 songs in random order. Plays all stored MP3 songs in random order, then repeats over and over. 11 Understanding the LCD Display 1. Playback Repeat Mode icon This indicates the selected playback repeat mode. (No Icon) Normal Repeat Repeat All Random Random Repeat All Plays all stored MP3 songs in order, and then stops after the last song. Plays the current song over and over. Plays all stored MP3 songs over and over in order. Plays all stored MP3 songs in random order. Plays all stored MP3 songs in random order, and then repeats over and over. 2. Hold Icon This indicates that the HOLD switch is set to the HOLD position. If the HOLD switch is on, the buttons will not respond until the HOLD switch is turned off. 3. Battery Indicator This displays the remaining battery power. Refer to the Inserting the battery section for more information. 12 4. Status This icon shows information on the current status of play and pause. The Play icon will show if the player is playing a song. The Pause icon will show if the current song is paused. 5. Volume This indicates the volume level. The volume is louder the further the indicator gets to the right. The volume is software the further the indicator gets to the left. 6. Bit-rate This displays the bit-rate that the current MP3 file was encoded at. A higher bit-rate means better quality and bigger file size. 7. Elapsed Playback Time This indicates the elapsed time in minutes and seconds separated by a colon of the track currently being played. 8. Total Number Of Tracks This indicates the total number of MP3 files. 9. Current Track Number This indicates the file number of the current MP3 file. 10. Equalizer Shows the current equalization setting. Normal – Normal sound setting Jazz – Optimized sound setting for Jazz music Rock – Optimized sound setting for Rock music Classic – Optimized sound setting for Classic music 13 SmartMedia Card Installation Before inserting a SmartMedia Card, be sure to turn off the power of the player and disconnect the USB plug from the USB port connector. Insert the Sma rtMedia Card into the slot in the correct direction as follows: Insert the SmartMedia Card completely into the slot. If it is not inserted completely, the Manager software will not recognize the data in the SmartMedia Card. When using a SmartMedia Card for the first time, initialize the SmartMedia Card using the Manager software. Note: The MP3 files in the SmartMedia Card cannot be played back on other players. To use a SmartMedia Card with other player, you need to initialize the SmartMedia Card. To eject the SmartMedia Card, slide the EJECT switch toward the SmartMedia slot opening. You can also store any data files such as doc, gif, bmp, wav, etc. as long as the files are no larger than the available memory. 14 Connecting The DMP-210/220 To Your PC Use the supplied USB cable to connect the DMP-210/220 to your PC. Connect the series B connector to the USB port connector of the player and the other plug to the USB port connector of your PC. If a USB cable is already connected to the USB port connector of your PC, disconnect it before connecting this player. Do not disconnect the USB plug during downloading or uploading the files. Doing so will result in data loss and possible lock-up of your PC. 15 Using the DMP-210/220 Manager Software The DMP-210/220 Manager is software that interacts with the player through the PC. MP3 files and data files can be downloaded using this software. However, you can upload only data files to the PC. This section describes its features. Refer to the Quick Install Guide for instructions on how to install the manager software if you haven’t done so already. Open the DMP-210/220 Manager by clicking on the shortcut icon on the desktop or Windows Start Menu. Preparing MP3 Files It is a good idea to prepare your MP3 files before transferring them to the DMP-210/220. Arranging your files in folders can be very helpful in locating specific files in the future. On the supplied Installation CD, MusicMatch software is provided. You may install MusicMatch by opening the Autorun program and clicking on the “Install MusicMatch” button. MusicMatch allows you to convert your audio CD’s to MP3 files. After preparing your MP3 files on your PC, you can download them to the DMP-210/220 for play back. 16 Diagram of the Manager Software 1. Option button Pressing the Option button brings up the Setup menu that allows you to specify the path for an MP3 software player on your PC. This allows you to play MP3 files from the manager software without needing to start the MP3 player software. You can also access the Setup dialog box from the Tools/Option menu. 17 Click the Browse button and select your preferred MP3 player, then click OK. 2. Firmware button You may not need to use this button for usual operation. This button reprograms the firmware. Instructions for updating the firmware will be provided with the download of the updated firmware from D-Link Technical Support 3. About button Clicking on this button will display the version of the DMP-210/220 Manager and its copyright information. 4. Cut, Copy, Paste, Delete, and Rename buttons These buttons work the same as those of Microsoft Windows Explorer. You can cut, copy, paste, delete, rename or move the files you select in the display list box (local display list box) of the PC. However, folders will not be moved or copied. 18 If you wish to copy more than one file to another folder, hold down the Ctrl key and select the files and drag and drop into the desired folder. 5. New Folder button Pressing this button will create a new folder under the currently selected folder in the local display list box. 6. Update button on the local display list box If the information in the local display list box has been changed, click the Update button to refresh the local display list box. 7-8. Initialize, Download, and Upload buttons (Flash) Initialize button This will initialize the internal Flash Memory in the player. All files stored in Flash Memory will be erased. In some extreme circumstances, you may need to initialize the Flash Memory when the DMP-210/220 is not being recognized by the DMP-210/220 Manager software. Send to the DMP-210/220 (Download) button To copy MP3 files and data files from your PC to the player, drag and drop or click the Send to DMP-210/220 (Download) button. Using the mouse, select the files you wish to download to the player. Then, drag and drop them into the display list box of Flash Memory. 19 Note: The file name of “xxx.mp3” will be changed to “xxx.mpm” after downloading. This is a security feature in which digital audio files cannot be copied or transferred to other computers for illegal distribution or duplication. Send to PC (Upload) button You can also copy data files from the player to the selected folder on your PC. If you use the Send to PC (Upload) button to copy them onto your PC, you must select a folder as a destination. MP3 files stored in the player cannot be copied onto your PC. Note: DMP-210/220 Manager will not allow you to upload MP3 files from the player to your PC because of copyright considerations. Only data files can be uploaded to your PC. Note: If the DMP-210/220 is turned off during a copy process on purpose or because of insufficient battery power, the transferred data might be corrupted. You might need to initialize the memory to restore proper operation. Caution: Before you copy data files onto your PC, be sure to rename the file. If a file with the same filename already exists when you copy the files, the previous copied file will be erased automatically and the file will be replaced with a new one. 20 9-10. Initialize, Download, and Upload buttons (SMC) These buttons operate the same as described in section 7~8. If you insert a new SmartMedia card, you must initialize the SmartMedia card by clicking on the Initialize button. Note: § You cannot copy any MP3 files from the player to your PC. § The file name of “xxx.mp3” will be changed to “xxx.mpm” after downloading. § The MP3 files in the SmartMedia card cannot be played back on other devices. 11. Delete button A selected file in either Flash Memory or SmartMedia card will be highlighted in blue. Just click on the Delete button to remove a file highlighted in blue. 12. Updated button (Flash Memory) If the information in the display list box has been changed, click on the Update button to refresh the Flash memory display list box. 13. SmartMedia Card format button If you use the SmartMedia Card formatted by DMP-210/220 Manager with a digital camera or other players, click this button to format. 14. Local Display list box This list box shows the files stored on your PC, such as the MP3 files and data files that you want to copy to the player. The default file type argument *.mp3 will display only MP3 files in the current folder. You may also select 21 the file type argument *.* to display all files or specify a specific type of file to be displayed. To select multiple files, hold down the Ctrl key on the keyboard and click on the desired files. If you click on a highlighted file, the file will then be unselected. If you click on a file while holding down the Shift key, the files between the first click and the release of the mouse button will be highlighted. The total size of the selected files in the local display list box will be displayed below the list box. Refer to this when selecting multiple files before downloading them to the DMP-210/220. 15. Flash Memory Display list box The upper right list box of DMP-210/220 Manager is the Flash Memory display list box. All files in Flash Memory (built- in memory) of the player will be displayed in this list box. The size of total and available memory in the player is displayed in kilobytes below the list box. This information is helpful when organizing music on the DMP-210/220. 16. SmartMedia Card Display list box The lower right list box of DMP-210/220 Manager is the SmartMedia Card display list box. All files in the SmartMedia Card will be displayed in this list box. MP3 file Information You may modify file descriptions (ID3 tags) for any MP3 files selected in the local display list box. 22 ID3 tag song information can be changed by selecting MP3 Info from the file menu. Clicking on the Modify button will replace the ID3 tag information of the selected MP3 file with ID3 tag information you have changed. Click the Modify button to update the ID3 tag information after making a change. Otherwise, the information does not change even if you have input new data. Uninstalling the Manager Software To uninstall the DMP-210/220 Manager software, click on Start > Programs > D-Link MP3 > Uninstall from the Windows menu bar. This will remove all DMP-210/220 files folders. 23 Troubleshooting If the player fails to perform as described in these operating instructions, use the following troubleshooting guide to fix the problem: The buttons are not functioning § Check to see if the battery is installed properly. Check the + and – marks of the battery. § Check to see if the battery is dead. You may need to replace the battery. § Check to see if the HOLD switch is set to the HOLD position. § Check to see if the memory is initialized. Initialize the player using DMP-210/220 Manager. § Try reinstalling the battery. Sometimes you will need to reinstall the battery to reinitialize the player. Unable to download data § Make sure the USB cable is properly connected to your PC and the DMP-210/220. § Check that the USB driver is installed. If it is not installed, install the USB driver. § Make sure there is sufficient available memory. Click on the Update button to check the remaining memory capacity and check the size of the files stored in the player. Lost or Corrupt Data Occasionally, some parts of a data stream may be damaged because of instability of power while downloading files, or the USB cable was disconnected while downloading files. In such a case, initialize the memory in the player using the DMP-210/220 Manager. 24 Exiting the DMP-210/220 Manager Close the MP3 Manager before unplugging the USB cable from the player. Cassette Adapters You may use a cassette adapter in a car stereo system to listen to MP3 music on your car stereo. Connect the plug of the cassette adapter to the earphone jack of the player and insert the cassette adapter in the car stereo player. How do I expand the memory? 32 or 64 MB of Flash Memory is already built into the player. However, you may expand the memory by inserting a SmartMedia card, which is commercially available. Is there a standard volume level for the MP3 files? The volume level of MP3 files (encoded data of audio CD) depends on the software used for encoding the files into MP3 format. How is the available memory size on the manager software displayed? A memory chip on the player is composed of blocks, each of which can be 8KB or 16KB depending on the Flash Memory type. A whole block will be used even if you try to store a one-byte file. Thus, even though some selected files in the local list box show less than the available memory size of this model, you may not be able to download such files to the player. How many minutes of music files can this player hold? It depends on the memory size of the player and the quality of the MP3 file. A player with 32MB of memory can hold approximately 30 minutes of near CD quality MP3 file encoded at 128Kbps. If you encode your MP3 files at 64Kbps, you can get twice the play time, but audio quality will be 25 sacrificed. An MP3 file is not displayed on the Flash Memory display or in the SmartMedia card display list box even if it is downloaded. If you have had no previous problems communicating with the player, the DMP-210/220 Manager software may not recognize the player. In this case, initialize the Flash Memory or SmartMedia card of the player by clicking on the Initialize button. You may also try closing the manager software, unplugging and then reconnecting the USB cable, then opening the manager software again.. The PC does not recognize the DMP-210/220. If the DMP-210/220 Manager does not recognize the player, refer to the following: § First, check if the USB cable is connected properly, or if the player is turned on. § Check that the DMP-210/220 USB driver is installed. If it is not installed, install the DMP-210/220 USB driver. § If the player is connected to the USB hub, disconnect the player and connect to an available USB port on your PC. § If you have upgraded your PC from Windows 95 to Windows 98, the USB port of your PC may have no capability to control devices other than USB keyboard and mouse. In this case, you can upgrade the BIOS of your PC. Contact the manufacturer of your PC to get the information about the BIOS. However, the player may not work with your PC due to your PC hardware limitation. Additional information and troubleshooting tips can be found at: http://support.dlink.com 26 Specifications Standards : USB 1.1 MPEG 1 Audio Layer 3 (MP3) Storage Media: Built- in 32 or 64 MB Flash Memory SmartMedia card slot for a removable 16MB, 32MB or 64MB Maximum Output Level: 5mW + 5mW (16 ohms) Frequency Range : 20 Hz – 20 kHz Load Impedance : 16 ohms Distortion Rate : 0.35% or less S/N Ratio: 85dB Power Supply: DC 1.5V, 1 x AA Alkaline Battery Or 1 x Rechargeable AA size 1.2V Ni- Cad or Ni-MH Battery Battery Life : Approximately 10 hours Display: Graphic Type LCD PC Interface : USB cable 27 D-Link Offices AUSTRALIA CANADA CHILE CHINA DENMARK EGYPT FRANCE GERMANY INDIA ITALY JAPAN RUSSIA SINGAPORE S. AFRICA SWEDEN TAIWAN U.K. U.S.A. D-LINK AUSTRALASIA Unit 16, 390 Eastern Valley Way, Roseville, NSW 2069, Australia TEL: 61-2-9417-7100 FAX: 61-2-9417-1077 TOLL FREE: 1800-177-100 (Australia), 0800-900900 (New Zealand) URL: www.dlink.com.au E-MAIL: [email protected], [email protected] D-LINK CANADA 2180 Winston Park Drive, Oakville, Ontario L6H 5W1 Canada TEL: 1-905-829-5033 FAX: 1-905-829-5095 BBS: 1-965-279-8732 FREE CALL: 1-800-354-6522 URL: www.dlink.ca E-MAIL: [email protected] D-LINK SOUTH AMERICA Isidora Goyenechea #2934 of.702, Las Condes, Santiago, Chile TEL: 56-2-232-3185 FAX: 56-2-2320923 URL: www.dlink.cl D-LINK CHINA 2F., Sigma Building, 49 Zhichun Road, Haidian District, 100080 Beijing, China TEL: 86-10-88097777 FAX: 86-10-88096789 URL: www.dlink.com.cn D-LINK DENMARK Naverland 2, DK-2600 Glostrup, Copenhagen, Denmark TEL:45-43-969040 FAX:45-43-424347 URL: www.dlink.dk E-MAIL: [email protected] D-LINK MIDDLE EAST 7 Assem Ebn Sabet Street, Heliopolis Cairo, Egypt TEL: 202-2456176 FAX: 202-2456192 URL: www.dlink-me.com E-MAIL: [email protected] D-LINK FRANCE Le Florilege #2, Allee de la Fresnerie 78330 Fontenay Le Fleury France TEL: 33-1-30238688 FAX: 33-1-3023-8689 URL: www.dlink-france.fr E-MAIL: [email protected] D-LINK GERMANY Bachstrae 22, D -65830 Kriftel Germany TEL: 49-(0)6192-97110 FAX: 49-(0)6192-9711-11 URL: www.dlink.de BBS: 49-(0)6192-971199 (Analog) 49-(0)6192-971198 (ISDN) INFO LINE: 00800-7250-0000 (toll free) HELP LINE: 00800-7250-4000 (toll free) REPAIR LINE: 00800-7250-8000 D-LINK INDIA Plot No.5, Kurla -Bandra Complex Road, Off Cst Road, Santacruz (E), Bombay- 400 098 India TEL: 91-22-652-6696 FAX: 91-22-652-8914 URL: www.dlink-india.com E-MAIL: [email protected] D-LINK ITALIA Via Nino Bonnet No. 6/b, 20154 Milano, Italy TEL: 39-02-2900-0676 FAX: 39-02-2900-1723 URL: www.dlink.it E-MAIL: info@ dlink.it D-LINK JAPAN 10F, 8-8-15 Nishi-Gotanda, Shinagawa-ku, Tokyo 141 Japan TEL: 81-3-5434-9678 FAX: 81-3-5434-9868 URL: www.d-link.co.jp D-LINK RUSSIA Michurinski Prospekt 49, 117607 Moscow, Russia TEL: 7-095-737-3389, 7-095-737-3492 FAX: 7-095-737-3390 D-LINK INTERNATIONAL 1 International Business Park, #03-12 The Synergy, Singapore 609917 TEL: 65-774-6233 FAX: 65-774-6322 URL: www.dlink-intl.com E-MAIL: [email protected] D-LINK SOUTH AFRICA Unit 2, Parkside 86 Oak Avenue Highveld Technopark Centurion, Gauteng, Republic of South Africa TEL: 27(0)126652165 FAX: 27(0)126652186 D-LINK SWEDEN P.O. Box 15036, S-167 15 Bromma Sweden TEL: 46-(0)8564-61900 FAX: 46-(0)8564-61901 E-MAIL: [email protected] URL: www.dlink.se D-LINK TAIWAN 2F, No. 119 Pao-Chung Road, Hsin-Tien, Taipei, Taiwan, R.O.C. TEL: 886-2-2910-2626 FAX: 886-2-2910-1515 URL: www.dlinktw.com.tw D-LINK EUROPE 4th Floor, Merit House, Edgware Road, Colindale, London, NW9 5AB, U.K. TEL: 44-20-8731-5555 FAX: 44-20-8731-5511 URL: www.dlink.co.uk E-MAIL: [email protected] D-LINK U.S.A. 53 Discovery Drive, Irvine, CA 92618 USA TEL: 1-949-788-0805 FAX: 1-949-753-7033 INFO LINE: 1-800-326-1688 BBS: 1-949-455-1779, 1-949-455-9616 URL: www.dlink.com E-MAIL: [email protected], [email protected] Tech Support Hours: 6 A.M. to 6 P.M. Pacific Standard Time. Monday through Friday 28 Limited Warranty D-Link Systems, Inc. (“D-Link”) provides this limited warranty for its product only to the person or entity who originally purchased the product from D-Link or its authorized reseller or distributor. Limited Hardware Warranty: D- Link warrants that the hardware portion of the D- Link products described below (“Hardware”) will be free from material defects in workmanship and materials from the date of original retail purchase of the Hardware, for the period set forth below applicable to the product type (“Warranty Period”) if the Hardware is used and serviced in accordance with applicable documentation; provided that a completed Registration Card is returned to an Authorized D-Link Service Office within ninety (90) days after the date of original retail purchase of the Hardware. If a completed Registration Card is not received by an authorized D-Link Service Office within such ninety (90) day period, then the Warranty Period shall be ninety (90) days from the date of purchase. Product Type Warranty Period Product (excluding power supplies and fans), if One (1) Year purchased and delivered in the fifty (50) United States, or the District of Columbia (“USA”) Product purchased or delivered outside the USA One (1) Year Power Supplies and Fans One (1) Year Spare parts and spare kits Ninety (90) days D-Link’s sole obligation shall be to repair or replace the defective Hardware at no charge to the original owner. Such repair or replacement will be rendered by D-Link at an Authorized D-Link Service Office. The replacement Hardware need not be new or of an identical make, model or part; D-Link may in its discretion may replace the defective Hardware (or any part thereof) with any reconditioned product that D-Link reasonably determines is substant ially equivalent (or superior) in all material respects to the defective Hardware. The Warranty Period shall extend for an additional ninety (90) days after any repaired or replaced Hardware is delivered. If a material defect is incapable of correction, or if D- Link determines in its sole discretion that it is not practical to repair or replace the defective Hardware, the price paid by the original purchaser for the defective Hardware will be 29 refunded by D- Link upon return to D-Link of the defective Hardware. All Hardware (or part thereof) that is replaced by D-Link, or for which the purchase price is refunded, shall become the property of D-Link upon replacement or refund. Limited Software Warranty: D-Link warrants that the software portion of the product (“Software”) will substantially conform to D-Link’s then current functional specifications for the Software, as set forth in the applicable documentation, from the date of original delivery of the Software for a period of ninety (90) days (“Warranty Period”), if the Software is properly installed on approved hardware and operated as contemplated in its documentation. D-Link further warrants that, during the Warranty Period, the magnetic media on which D-Link delivers the Software will be free of physical defects. D-Link’s sole obligation shall be to replace the non-conforming Software (or defective media) with software that substantially conforms to D- Link’s functional specifications for the Software. Except as otherwise agreed by D-Link in writing, the replacement Software is provided only to the original licensee, and is subject to the terms and conditions of the license granted by D-Link for the Software. The Warranty Period shall extend for an additional ninety (90) days after any replacement Software is delivered. If a material non-conformance is incapable of correction, or if D-Link determines in its sole discretion that it is not practical to replace the non-conforming Software, the price paid by the original licensee for the non-conforming Software will be refunded by D-Link; provided that the non-conforming Software (and all copies thereof) is first returned to D-Link. The license granted respecting any Software for which a refund is given automatically terminates. What You Must Do For Warranty Service: Registration Card. The Registration Card provided at the back of this manual must be completed and returned to an Authorized D-Link Service Office for each D-Link product within ninety (90) days after the product is purchased and/or licensed. The addresses/telephone/fax list of the nearest Authorized D-Link Service Office is provided in the back of this manual. FAILURE TO PROPERLY COMPLETE AND TIMELY RETURN THE REGISTRATION CARD MAY AFFECT THE WARRANTY FOR THIS PRODUCT. Submitting A Claim. Any claim under this limited warranty must be 30 submitted in writing before the end of the Warranty Period to an Authorized D-Link Service Office. The claim must include a written description of the Hardware defect or Software nonconformance in sufficient detail to allow D-Link to confirm the same. The original product owner must obtain a Return Material Authorization (RMA) number from the Authorized D-Link Service Office and, if requested, provide written proof of purchase of the product (such as a copy of the dated purcha se invoice for the product) before the warranty service is provided. After an RMA number is issued, the defective product must be packaged securely in the original or other suitable shipping package to ensure that it will not be damaged in transit, and the RMA number must be prominently marked on the outside of the package. The packaged product shall be insured and shipped to D-Link, 53 Discovery Drive, Irvine CA 92618, with all shipping costs prepaid. D-Link may reject or return any product that is not packaged and shipped in strict compliance with the foregoing requirements, or for which an RMA number is not visible from the outside of the package. The product owner agrees to pay D-Link’s reasonable handling and return shipping charges for any product that is not packaged and shipped in accordance with the foregoing requirements, or that is determined by D-Link not to be defective or non-conforming. What Is Not Covered: This limited warranty provided by D-Link does not cover: Products that have been subjected to abuse, accident, alteration, modification, tampering, negligence, misuse, faulty installation, lack of reasonable care, repair or service in any way that is not contemplated in the documentation for the product, or if the model or serial number has been altered, tampered with, defaced or removed; Initial installation, installation and removal of the product for repair, and shipping costs; Operational adjustments covered in the operating manual for the product, and normal maintenance; Damage that occurs in shipment, due to act of God, failures due to power surge, and cosmetic damage; and any hardware, software, firmware or other products or services provided by anyone other than D-Link. Disclaimer of Other Warranties: EXCEPT FOR THE LIMITED WARRANTY SPECIFIED HEREIN, THE PRODUCT IS PROVIDED “AS-IS” WITHOUT ANY WARRANTY OF ANY KIND INCLUDING, 31 WITHOUT LIMITATION, ANY WARRANTY OF MERCHANTABILITY, FITNESS FOR A PARTICULAR PURPOSE AND NON-INFRINGEMENT. IF ANY IMPLIED WARRANTY CANNOT BE DISCLAIMED IN ANY TERRITORY WHERE A PRODUCT IS SOLD, THE DURATION OF SUCH IMPLIED WARRANTY SHALL BE LIMITED TO NINETY (90) DAYS. EXCEPT AS EXPRESSLY COVERED UNDER THE LIMITED WARRANTY PROVIDED HEREIN, THE ENTIRE RISK AS TO THE QUALITY, SELECTION AND PERFORMANCE OF THE PRODUCT IS WITH THE PURCHASER OF THE PRODUCT. Limitation of Liability: TO THE MAXIMUM EXTENT PERMITTED BY LAW, D-LINK IS NOT LIABLE UNDER ANY CONTRACT, NEGLIGENCE, STRICT LIABILITY OR OTHER LEGAL OR EQUITABLE THEORY FOR ANY LOSS OF USE OF THE PRODUCT, INCONVENIENCE OR DAMAGES OF ANY CHARACTER, WHETHER DIRECT, SPECIAL, INCIDENTAL OR CONSEQUENTIAL (INCLUDING, BUT NOT LIMITED TO, DAMAGES FOR LOSS OF GOODWILL, WORK STOPPAGE, COMPUTER FAILURE OR MALFUNCTION, LOSS OF INFORMATION OR DATA CONTAINED IN, STORED ON, OR INTEGRATED WITH ANY PRODUCT RETURNED TO D- LINK FOR WARRANTY SERVICE) RESULTING FROM THE USE OF THE PRODUCT, RELATING TO WARRANTY SERVICE, OR ARISING OUT OF ANY BREACH OF THIS LIMITED WARRANTY, EVEN IF D-LINK HAS BEEN ADVISED OF THE POSSIBILITY OF SUCH DAMAGES. THE SOLE REMEDY FOR A BREACH OF THE FOREGOING LIMITED WARRANTY IS REPAIR, REPLACEMENT OR REFUND OF THE DEFECTIVE OR NON-CONFORMING PRODUCT. GOVERNING LAW: This Limited Warranty shall be governed by the laws of the state of California. Some states do not allow exclusion or limitation of incidental or consequential damages, or limitations on how long an implied warranty lasts, so the foregoing limitations and exclusions may not apply. This limited warranty provides specific legal rights and the product owner may also have other rights which vary from state to state. Trademarks Copyright 2001 D-Link Corporation. Contents subject to change without prior notice. D-Link is a registered trademark of D-Link 32 Corporation/D-Link Systems, Inc. All other trademarks belong to their respective proprietors. Copyright Statement No part of this publication may be reproduced in any form or by any means or used to make any derivative such as translation, transformation, or adaptation without permission from D-Link Corporation/D- Link Systems Inc., as stipulated by the United States Copyright Act of 1976. CE Mark Warning This is a Class B product. In a domestic environment, this product may cause radio interference, in which case the user may be required to take adequate measures Warnung! Dies ist in Produkt der Klasse B. Im Wohnbereich kann dieses Produkt Funkstoerungen verursachen. In diesem Fall kann vom Benutzer verlangt werden, angemessene Massnahmen zu ergreifen. Advertencia de Marca de la CE Este es un producto de Clase B. En un entorno doméstico, puede causar interferencias de radio, en cuyo case, puede requerirse al usuario para que adopte las medidas adecuadas. Attention! Ceci est un produit de classe B. Dans un environnement domestique, ce produit pourrait causer des interférences radio, auquel cas l`utilisateur devrait prendre les mesures adéquates. Attenzione! Il presente prodotto appartiene alla classe B. Se utilizzato in ambiente domestico il prodotto può causare interferenze radio, nel cui caso è possibile che l`utente debba assumere provvedimenti adeguati. VCCI Warning 33 Register online at http://support.dlink.com/register/ Print, type or use block letters. Your name: Mr./Ms _________________________________________________________________ ____________ Organization: ________________________________________________ Dept. ____________________________ Your title at organization: ________________________________________________________________________ Telephone: _______________________________________ Fax:________________________________________ Organization's full address: ______________________________________________________________________ ____________________________________________________________________________________________ Country: _____________________________________________________________________________________ Date of purchase (Month/Day/Year): _______________________________________________________________ Product Model Product Serial No. Product was purchased from: Reseller's name: ______________________________________________________________________________ Telephone: _______________________________________ Fax:________________________________________ Reseller's full address: _________________________________________________________________________ _________________________________________________________________________ _________________________________________________________________________ Answers to the following questions help us to support your product: 1. Where and how will the product primarily be used? oHome oOffice oTravel oCompany Business oHome Business o Personal Use 2. If used in a business, how many employees does your company currently employ? o1 employee o2-9 o10-49 o50-99 o 100-499 o 500- 999 o1000 or more 3. What category best describes your company? oAerospace oEngineering oEducation oFinance oHospital oLegal oInsurance/Real Estate oManufacturing oRetail/Chainstore/Wholesale o Government oTransportation/Utilities/Communication oVAR oSystem house/company oOther________________________________ 4. What Windows Operating System are you using? o95 o 98 o98SE oMe o2000 o XP o Others_____________________ 5. Do you have any suggestions to make this a better product? ___________________________________________________________________________________________ ___________________________________________________________________________________________ ___________________________________________________________________________________________ ___________________________________________________________________________________________ 6. Would you recommend your D-Link product to a friend? oYes oNo oDon't know yet 7. Any other comments regarding this product? __________________________________________________________________________________________ __________________________________________________________________________________________ 34