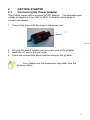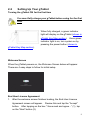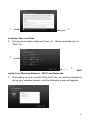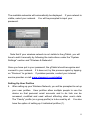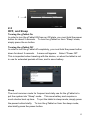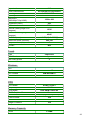
1
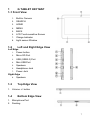
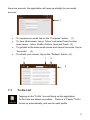
USER GUIDE Thank you for purchasing the gTablet! QUICK START 1. You must fully charge your gTablet before using for the first time. When fully charged, a green indicator light will display on the gTablet (shown below). 2. Once green indicator light is on, turn system on by pressing the power button (shown below). 3. When turning on for the very first time, your gTablet will prompt you through a quick setup process with 4 easy steps including the end user license agreement, setting the date and time, setting up your wireless network, and configuring user profiles. 4. Follow the prompts and enjoy your gTablet! For additional detailed instructions on set up, see section 2 “Getting Started” in this document. ICONS Caution: This icon warns against potential damage to the gTablet and to avoid improper operations. Important Note: This icon provides information, notes, definitions, general knowledge and references which are important to note. Other trademarks and trade names may be used in this manual to refer to either the entities claiming the marks and names, or their products. The manufacturer disclaims any proprietary interest in trademarks and trade 2 names other than its own. Information in this manual is subject to change without notice. Product images in this manual are for your reference only. Reproduction without the written consent from the manufacture is strictly prohibited. For Customer Service, please visit www.viewsonic.com/gtablet. 3 TABLE OF CONTENTS 1 G TABLET KEY MAP .............................................7 1-1 Front View ........................................................................................... 7 1-2 Left and Right Edge View..................................................................... 7 1-3 Top Edge View .................................................................................... 7 1-4 Bottom Edge View ............................................................................... 7 2 GETTING STARTED ...............................................8 2-1 Connecting the Power Adapter ............................................................ 8 2-2 Setting Up Your gTablet....................................................................... 9 2-3 ON, OFF, and Sleep .......................................................................... 12 3 4 OVER THE AIR UPDATES (OTA) ...................... 13 IMPORTANT BUTTONS.................................. 15 4-1 Task Bar – Top Left ........................................................................... 15 4-2 Task Bar – Top Right ......................................................................... 16 5 GET TO KNOW THE HOME SCREEN ..............16 5-1 6 Quick Launch Bar .............................................................................. 17 GET TO KNOW THE DASHBOARD .................. 18 6-1 Dashboard Portlets – Main Window ................................................... 19 6-2 Applications Task Bar - Along Bottom ............................................. 19 7 APPLICATIONS ..................................................... 20 7-1 News ................................................................................................. 21 7-2 Weather ............................................................................................. 23 7-3 Web ................................................................................................... 24 7-4 Clock ................................................................................................. 26 7-5 Contacts ............................................................................................ 29 7-6 Email ................................................................................................. 31 7-7 To-Do List .......................................................................................... 32 7-8 Grocery.............................................................................................. 34 7-9 Calendar ............................................................................................ 35 7-10 Music ................................................................................................. 37 7-11 Photos ............................................................................................... 38 4 7-12 Settings ............................................................................................. 41 7-13 Home ................................................................................................. 41 7-14 Dashboard ......................................................................................... 42 7-15 More .................................................................................................. 42 7-16 Calculator .......................................................................................... 42 7-17 Camera.............................................................................................. 42 7-18 ES File Explorer ................................................................................. 44 7-19 gMarket ............................................................................................. 46 7-20 Search ............................................................................................... 46 7-21 Sound Recorder................................................................................. 46 7-22 Updates ............................................................................................. 47 7-23 Videos ............................................................................................... 47 7-24 Favorites ............................................................................................ 48 7-25 Help ................................................................................................... 48 8 G TABLET MARKETPLACE ............................... 48 8-1 9 10 11 Downloading Applications .................................................................. 48 IMPORTING AND ACCESSING FILES .............49 ONSCREEN VIRTUAL KEYBOARD ................. 51 SYSTEM SETTINGS .............................................53 11-1 Status ................................................................................................ 53 11-2 Wireless & networks .......................................................................... 53 11-3 Sound ................................................................................................ 55 11-4 Display............................................................................................... 55 11-5 Family Accounts ................................................................................ 56 11-6 Location, date & time ......................................................................... 56 11-7 Storage .............................................................................................. 56 11-8 Security ............................................................................................. 57 11-9 Applications ....................................................................................... 58 11-10 Language & keyboard ........................................................................ 58 11-11 Accessibility ....................................................................................... 59 11-12 Battery Use ........................................................................................ 59 11-13 About tablet ....................................................................................... 60 5 12 CONNECTING TO YOUR G TABLET ............... 60 12-1 Connect a micro SD Card .................................................................. 60 12-2 Connect to PC ................................................................................... 61 12-3 Connect an Audio Device................................................................... 61 12-4 Connect a USB Device ...................................................................... 61 13 14 15 16 17 CARING FOR YOUR G TABLET ....................... 61 SAFETY PRECAUTIONS.....................................63 FCC COMPLIANCE ..............................................63 TROUBLESHOOTING ..........................................64 SPECIFICATIONS ................................................. 65 www.viewsonic.com/gtablet 6 1 G TABLET KEY MAP 1-1 Front View 1. Built-in Camera 2. SEARCH 3. HOME 4. MENU 5. BACK 6. LCD Touch-sensitive Screen 7. Charge Indicator 8. Light sensor Window 1-2 Left and Right Edge View Left Edge 1. Power button 2. Micro SD Port 3. USB (USB2.0) Port 4. Mini-USB Port 5. Speakers 6. Headphone Jack 7. Power Jack Right Edge 8. 1-3 Speakers Top Edge View 1. Volume +/- button 1-4 Bottom Edge View 1. Microphone Port 2. Docking 7 2 2-1 GETTING STARTED Connecting the Power Adapter The gTablet comes with a universal AC-DC adapter. The allowable input voltage of adapter is from 100V to 240V. Follow the below steps to connect the adapter: 1. Connect the piece with the plugs to the power cord. 1 2. Plug the DC end of adapter into the power jack of the gTablet. 3. Insert the AC end to the wall outlet. 4. Check the connections above before turning on the gTablet. Your gTablet and the accessories may differ from the pictures shown. 8 2-2 Setting Up Your gTablet Turning the gTablet ON for the first time You must fully charge your gTablet before using for the first time. When fully charged, a green indicator light will display on the gTablet (shown in gTablet Key Map section). Once green indicator light is on, turn system on by pressing the power button (shown in gTablet Key Map section). Welcome Screen When the gTablet powers on, the Welcome Screen below will appear. There are 4 easy steps to follow for initial setup. End User License Agreement 1. After the welcome screen finishes loading, the End-User License Agreement screen will appear. button. Review this and tap the “Accept” After tapping on the box “I have read and agree…” (1), tap on the “Next” button (2). 9 1 2 Location, Date and Time 2. Set up your Location, Date and Time (1). When complete, tap on “Next” (2). 1 2 Setti ng Up Your Wireless Network – Wi-Fi and Networks 3. After setting up your Location, Date and Time, you will be prompted to set up your wireless network, and the following screen will appear. 10 The available networks will automatically be displayed. visible, select your network. If your network is You will be prompted to input your password. Note that if your wireless network is not visible to the gTablet, you will have to add it manually by following the instructions under the “System Settings” section and “Wireless & Networks”. Once you have put in your password, the gTablet should recognize and connect to your network. If it does not, try this process again by tapping on “Previous” to go back. If problem persists, contact your internet service provider or visit www.viewsonic.com/gtablet. Setting Up User Profiles 4. After setting up your Wireless Network, you will be prompted to set up your user profiles. User profiles allow multiple people to use the device so that personal email accounts and to do lists can be accessed, modified and used without affecting other user‟s data. The “Family” profile (or a group profile) is to be used by all. You also have the option of setting up 6 individual profiles (1). 11 1 2-3 OFF, and Sleep ON, Turning the gTablet On In order to turn the gTablet ON from an Off state, you must hold the power button for about 2 seconds. To turn the gTablet on from “Sleep” mode, simply press the on button. Turning the gTablet Off In order to turn the gTablet off completely, you must hold the power button down for about 2 seconds. A menu will appear. Select “Power Off”. This is important when traveling with the device, or when the tablet is not in use for extended periods of time, and to save battery. Sleep The most common mode for frequent and daily use for the gTablet is to put the system into ”Sleep” mode. This save battery and requires a much shorter boot up time. To put the tablet in sleep mode, simply press the power button briefly. To turn the gTablet on from the sleep mode, also briefly press the power button. 12 3 OVER THE AIR UPDATES (OTA) The Updates application allows your tablet to receive the latest version of the tablet software. This application runs automatically and will always prompt you before any updates are downloaded, allowing you to decline the update. Also, no personal information is ever tracked. The only information sent is the network adapter number and application version / revision numbers. To access this application manually, find the “Updates” icon on the Home screen by tapping on the “Menu” icon in the bottom right corner of the screen. This brings up the Over the Air Updates application. If there are updates available, follow the instructions to download when you are ready. Important Note: Over the Air Updates may erase some applications which you have downloaded and you will need to reinstall them. It is important that the gTablet be fully charged before downloading updates. Furthermore, you should ensure you have a strong Wi-Fi signal to minimize the download time. Tap on “Download Update” 13 Review and accept the End User License Agreement. Wait for download to complete. the indicator bar. Once download is complete, you will have the option to “Apply Update” or “Postpone”. Applying Update will reboot the tablet. The progress will be shown on 14 You can also visit the gTablet website for additional information and online documentation. 4 http://www.viewsonic.com/gtablet IMPORTANT BUTTONS On the right side of the LCD Screen there are 4 buttons. 1. SEARCH – Pressing the search button from the 1 Home screen will bring up the Google search web site. 2. HOME – Pressing the Home button takes you back to 2 either the Home screen or the Dashboard depending 3 on which screen you were last in. 3. MENU – Pressing the menu button brings up different 3 options based on the application running at the time. 4. BACK – Pressing the back button will always take you 4 back to the previous window displayed. 4-1 1 Task Bar – Top Left 2 The “House” icon (1), will bring you back 3 to either the Home screen or the Dashboard depending on where you were last. This icon is not always visible with certain applications. For example when using the internet, it will not be visible. The “House” icon (3) on the right side of the LCD screen works the same 15 – taking you back Home or to the Dashboard depending on where you were last. The current page name is displayed next to the “House” logo (2). 4-2 Task Bar – Top Right At the top right are a row of icons displaying the system time, Alerts, current battery power remaining, and your wireless connection. By touching on any of the Wi-Fi, Battery, or Alerts icon, you can get additional information and settings for each of these functions. Time 5 Alerts Battery Wireless GET TO KNOW THE HOME SCREEN 1 The gTablet‟s Home screen is a traditional Android user interface commonly used on Android cell phones. To access the Home screen from any application, tap on the “Home” button on the right side of the LCD screen (1). Please note that this button toggles between Home and the Dashboard depending on where you were last. You may also tap on the “Home” icon in the bottom right of the Dashboard screen (see section on Dashboard). 16 5-1 Quick Launch Bar On the right of the Home screen, there are 5 icons (visible from each of the 5 Home screens). These include web, mail, menu, settings, and Dashboard (1). By tapping on these icons, you will instantly be taken to the application or feature. Web – takes you to your Internet home page. it is se up to go directly to Google. Mail – takes you to the email application. Applications Menu – opens up the Android menu screen where all of your applications and features are listed. Settings – opens up the settings menu for the GTablet. By default, Dashboard – takes you directly to the Dashboard. Customization The Home screen has 5 screens that are customizable. To access these additional screens, swipe left and right with your finger. These pages allow you to conveniently view your favorite applications by dragging and dropping them on the preferred screen. To identify which screen you are on, in the bottom left and bottom right corners of the Home screen are dots that represent the number of pages remaining to the left and number of pages remaining to the right of the screen you are on. Features 17 Long tap – the long tap is done by touching the screen and holding your finger still on an icon for about 2 seconds. This action can often bring up different options. Menu – Long tapping on an open space on the Home screen will bring up a menu option which allows you to add Shortcuts, Widgets, and Wallpapers. Moving an icon – You can move an icon from the applications menu to the Home screen or vice versa. Simply long tap the icon by holding down for 2 seconds. When the icon lifts off the page, drag and drop it to the location desired. Trash can – By long tapping an icon sitting on the Home screen, the trash can will appear on the right side of the screen. From here you can drag and drop the icon into the trash can. This will remove the icon from the Home screen but still keeps it in your Applications Menu. 6 GET TO KNOW THE DASHBOARD The gTablet‟s Dashboard screen is a user interface that 1 enables user customization. To access the Dashboard from the Home page, tap on the window pane icon. You may also tap on the “Home” button on the right side of the LCD Screen (1). This icon toggles between Home and Dashboard depending on which interface you use last. 6-1 6-2 18 6-1 Dashboard Portlets – Main Window The Dashboard screen has 3 portlets that are customizable. These windows allow you to conveniently view your favorite applications. Customizing To customize these portlets, select an application along the bottom of the Dashboard from the Applications Task Bar. Tap and hold the icon for about 2 seconds. When the icon lifts off the page, drag and drop into the portlet that you want the application displayed. Applications such as Weather, News, Clock, Photos, Music, Calendar, among others, work with this feature. Note though, that not all applications do, and when they don‟t, the display will provide the feedback that the chosen application cannot be dropped in a Portlet. With in these applications that you can display in the portlets, some require that you make additional selections. For example, with Photos. You will need to select which photo album you want running in the window by going into the Photo application and under settings, choosing a photo album using the drop down menu. See the Photos section for more information. Multiple Dashboard Screens The Dashboard has 3 different screens identifiable by the background color. The screens are blue, black and gray. To access these screens, simply touch the screen and swipe either left or right with your finger. Each of these screens will allow you to populate the three portlets. 6-2 Applications Task Bar - Along Bottom Along the bottom of the Dashboard, you will find as many as twelve icons for applications. To display all icons in an expanded view, tap the “More” icon on the very right. You can easily customize the order of these icons so that your favorite or most used are visible at all times from the Dashboard. Do this by tapping on the icon and holding (for about 2 19 seconds), then drag and drop into the position you want it displayed. you add applications or buy them, they will be displayed here in the Applications Task Bar expanded view under the “More” button. 7 As APPLICATIONS Applications Menu All applications can be accessed from both the Home screen and the Dashboard. To access your applications from the Home screen, tap on the “Applications Menu” button from the Quick Launch Bar to the right of the screen. On the Dashboard, the applications task bar is located along the bottom (2). This is where all of your applications will be easily accessed and are each represented with an icon. Note that you can drag and drop the icons to arrange them in the order you prefer. 20 Following is a quick review of the applications that came pre-loaded on your gTablet. 7-1 News Tapping on the “News” icon visible from the Home Applications Menu and the Dashboard, brings up the News application in full screen. Here you will see short snippets of the current news constantly being updated as news is created. This main page is the “Top Stories” screen. “Top Stories” screen includes the title, news agency who wrote it, and a blurb for each story in the news. You can use your finger to scroll up and down on the screen. By tapping on any one of the news snippets, it will bring up the entire article. Across the top, there are tabs including Top Stories, US, World, Entertainment, etc. (1). These tabs are customizable under the settings button in the top right corner (gear icon) (2). The refresh button (3) which updates your screen to real-time is also located on the right next to the settings button. 21 1 2 Under settings, you can choose the “Categories” that appear at the top of the news headline page. Under settings, you can also customize your Dashboard portlets (1). This application runs in the large portlet window of the Dashboard. You are able to select which news categories appear in the large window as well as the 2 smaller windows. To do this, tap on the drop down menu beside each window make your selection (2). Be sure to drag and drop the “News” icon from the applications Task Bar into the portlet window (this is from the Dashboard). Then you are able to choose which news category is displayed in that portlet. 1 2 22 By tapping on the “Advanced” tab, you are able to select how often updates for news will happen. Note that the more frequent updates are, the more it uses up battery power. You can select between 15 minutes to 1 hour intervals. 7-2 Weather Tapping on the “Weather” icon will bring up the Weather page full screen. This application is customizable allowing you to select your location, or multiple locations (1), and shows the forecast for today, hourly and for the week (2). By tapping on settings (gear icon) (3), you will be able to input your location/s, and customize your Dashboard portlets with multiple weather locations. 2 3 1 Under settings you can input multiple locations or cities. Tap on “Add a new location” (1). Then type in the ZIP code or a city and state in the US and tap search (2). Once you have added all of your cities, tap on the “Portlets” tab in the top right (3). 23 3 1 2 Under the “Portlets" window (1), you will select 3 locations using the drop down menus. Remember, from the Dashboard screen, you must drag and drop the “Weather” icon into the portlet you wish to view the weather in. 1 7-3 Web Tapping on the “Web” icon will bring up the internet. If you set up your wireless internet connection during the setup process, you will instantly go to your internet home page. The default home page for the gTablet is www.google.com. 24 If you see the below screen, then you do not have an internet connection. Please refer to the section System Settings, under “Wireless & networks”. By tapping on the “Settings” button (gear icon) (1) at the top right of the internet page, the “Web Settings” screen will appear. This screen allows you to set your default internet home page, manage your content and security settings. 1 1 25 7-4 Clock Tapping on the “Clock” icon will bring up the Clock, Alarm, and Timers function. 1 Clock To set the time, touch the clock face and “Set Clock” will appear. Select your time zone and save. The master time is set in the System Settings under “Location, date & time”. To add additional clocks (up to 4), tap on the clock “+” symbol in the bottom left hand corner of the screen (shown as 1 above). 26 Select the time zone by tapping on the clock, as previously described. Delete the clock by tapping on the clock and selecting “Delete”. Note the first clock on the left will act as your primary clock – for example, if a clock is used in the Dashboard portlets screen. Alarms Under the “Alarms” tab, you are able to manage your current alarms and set alarms (up to 4). To set an alarm, touch the face of the alarm clock. Input the time including AM or PM. (1) Make sure the “ON” button is green (not the OFF in black). Select your sound. (2) Select how often to repeat the alarm. (3) Tap on “Save” to save your alarm. (4) 1 2 3 4 27 Repeat this for as many alarms as you wish to set by touching the “Alarm +” button in the bottom left corner (shown at right). To delete an alarm, touch the face of the alarm clock you wish to cancel to bring open the “Set Alarm” window and tap on “Delete”. To simply turn off an alarm, tap on the “ON” button below the alarm clock and turn it to the “OFF” position. If it is ON, the button will be green. Timers Tapping on the “Timers” tab from the Clock page will bring up a digital timer. To set, touch the timer and the “Set Timer” window will appear. To set the timer, use your finger to scroll the hours, minutes, and seconds up and down (1). Under Label, you can name your timer (2). Then select your sound (3) and save (4). 1 2 3 4 28 You can add up to 4 timers by tapping on the “timer +” button in the bottom left corner of the screen (shown at right). 7-5 Contacts Add a Contact Tapping on the “Contacts” icon will bring up your contact list. To add contacts, you can both manually input contacts and / or import them in from your Google mail. To add a new contact, tap on the “+” icon shown at right. Simply fill out the necessary fields including Name, Numbers, Email, Addresses, and / or a Photo. When complete, tap “Save”. 1 29 Import Contacts Importing contacts only works with a Gmail (Google email) account similar to an Android based phone. To import contacts, tap on the icon shown at right. You will be prompted to input your Google email address and your password. Follow the steps on screen to select the contacts you wish to import. To search for contacts you can use the search bar (1) or tap on the letter of the alphabet along the bottom of the contacts main page (2). Once you have contacts, you can identify favorites by using the star function (3). 1 3 2 30 Note that the “Contacts” application for the gTablet operates in family mode. All contacts listed will be accessible by anyone who uses the device. 7-6 Email Tapping on the “Email” icon brings up your email. account, tap on the “Add account” button (1). 1 tap on the gear icon (2). To add an email To manage email settings, 2 You will be prompted for your email address, Password, asked to select a family member (set up during getting started under profiles), and provide a name and description. You will also select how frequently you download emails from 15 minutes to 1 hour. “Only I can see my emails” (1). For security, you can select If you have multiple email accounts set up (for example a personal account and a family account), you will always be given the option to select which account you want to open. If you only 31 have one account, the application will open up straight to your email account. 1 To compose an email, tap on the “Compose” button. To view other boxes, tap on “Inbox” and select from the drop (1) down menu – Inbox, Drafts, Outbox, Sent and Trash. (2) To go back to the main email screen and view all accounts, tap on “Accounts”. (3) To refresh your screen, tap on the “Refresh” button. (4) 3 1 2 4 7-7 To-Do List Tapping on the “To-Do” icon will bring up this application. To-Do Lists are based on profiles. There is a “Family” To-Do list set up automatically, and one for each profile. 32 To add an action (a to-do), tap on the “+” button and input the item you wish to add to the list. (1) You can email your To-Do List by tapping on the envelope. (2) To delete an item, tap on the garbage can. (3) To flag an item as important, tap on the flag. (4) Once you have completed an item, check the box and the item will be sent to the “Finished Items” List behind the “To-Do” list. (5) To Set the due date, tap on “Set Due Date”. (6) 1 2 5 6 3 4 Use your finger to scroll the month, day and year up or down to set the due date. Once you are done, tap on “Set Date”. 33 7-8 Grocery Tapping on the “Grocery” icon will bring up the application. With the Grocery List application, you can create several lists and actually set up favorites. Tapping on the list in the background that you wish to view will bring it to the foreground. On each list, there is an “envelope” icon and a “trash can”. Use the “envelope” to email the list. Use the “trash can” icon to delete the list. To add an item to the list, simply touch in between the lines on the lined paper. The onscreen keyboard will appear. To add a list, tap on the “+” icon just above the first list (shown at right). Tapping on the settings button (gear icon) brings up the “Grocery List Settings” allowing you to remove items from the “Favorites” list. At the top right of the Grocery List screen are three tabs, “Favorites”, “Find”, and “Browse”. 34 Favorites – provides you a list of your most frequently used items and is created automatically. Selecting an item will add it to the Grocery List on top. Find – allows you to start typing while it quickly suggests all of the options allowing you to select the item without having to type the entire name. Browse – lists many grocery items by “Aisle” and in alphabetical order so you can scroll through and select the items to add to your list. 7-9 Calendar Tapping on the “Calendar” icon will bring up the application. This application allows for multiple calendars including the “Family” calendar as well as calendars set up for each profile. Note that all calendars are accessible to all users on the gTablet. 4 3 2 1 6 5 To select the calendar you wish to view simply touch the profile name on the left bar. (1) 35 Along the top left, you can advance days or go back using the left and right arrows as well as tap on “Today” to instantly jump to today‟s date. (2) You can view your calendar in full screen for the Day, Week or Month. (3) To add an event, tap on the “+” button. Fill out the event title, select the time frame, set up a reminder (4) and the repeat frequency. Use the “Settings” button (gear icon) to select your event reminder tune, and to add an External Calendar. (5) To “Add external calendar”, you can also tap on the “+” button on the left bar of the main calendar screen. (6) This brings up the Calendar Settings page. 36 You will be prompted to enter the address for the external calendar. 7-10 Music Tapping on the “Music” icon will bring up the application. You are able to buy music online using the gTablet and play your music with the “Music” application. The easiest way to import your music is by using the mini USB cable connected to your PC. Please refer to section on Importing Files. 1 2 3 4 5 1. Search – Using the search function allows you to search on key words, title, names, etc. within the “Music” application. 2. Artists – Tapping on “Artists” will sort your music by artist name enabling you to find and select music. To play a song, simply tap on the artist, then tap on the album you wish to hear, and tap on the song to play. 37 3. Albums – Tapping on “Albums” will sort your music by album name enabling you to find and select music. To play a song, simply tap on the album, then select the song you wish to play. 4. Songs – Tapping on “Songs” will sort your music in alphabetical order by songs enabling you to find and select music. To play a song, simply tap on the song you wish to play. 5. Playlists – Playlists allows you to play songs you have selected all in a row. You can import playlists in the same manner you import songs. While playing a song, the control panel will pop up displaying back, forward, play / pause, replay, etc. 7-11 Photos Tapping on the “Photos” icon brings up the application. From the main page you can view “All Photos” in albums, view photos on your SD Card, and view your Picasa account. Note that Picasa is tied to your Google account and only photos set to the public security level will be displayed. 1 38 Under “All Photos”, after tapping on an album (1), your album pictures will be displayed on the page. 1 Here, you can tap on any single photo (1) and that photo will come up almost full screen. In this view, you can easily shuffle through your album. If you double tap that photo, the photo will be displayed in full screen. To view more photos, tap on the photos piled on the left or the right. You can also slide your finger left and right pushing the images to view the next image. To rotate the image, tap on “rotate” in the top right corner. (1) To email a photo, tap on the “envelope”. (2) To delete a photo, tap on the “trash can”. (3) To view in slideshow mode which automatically shows all photos in your album, tap on the “Slideshow” button. (4) 1 2 3 39 In slideshow mode, tapping the “Settings” (gear icon) button will enable you to select the transition style and the speed. To add photos to your Dashboard and to add a Picasa account, tap on the settings button in the top right corner from the main photo page (1). 1 This brings up the “Photos Settings” screen. In the top right corner, you can select “Picasa accounts” or “Home portlets”. 1 To add a Picasa account tap on the “+” sign and follow the prompts asking for your Picasa username (1). “Portlets” allows you to set which albums are displayed in each of the 3 Portlets on the Dashboard. Tap 40 on the drop down menu to select which photo album you wish to display. To enable this feature, you must also drag and drop the “Photos” icon from the Dashboard into the Portlet you wish to display the album in. 7-12 Settings Tapping on the “Settings” icon will bring up the screen below. Settings allows you to manage many aspects of your gTablet including your wireless, audio, display, profiles, date, time, security, language, etc. For detailed information on each of the categories in “Settings”, please refer to the System Settings section. 7-13 Home Tapping on the “Home” icon from the Dashboard screen will take you to the traditional Android home screen for the gTablet. 41 7-14 Dashboard Tapping on the “Dashboard” icon from the Home screen (located in the Quick Launch Bar at right) will bring up the Dashboard which is an alternative to the Home screen allowing for access to applications and customization of the portlets. 7-15 More Tapping on the “More” icon (1) from the Dashboard screen will bring up the expanded Applications Task Bar showing you all applications installed on your gTablet. 1 7-16 Calculator Tapping on the “Calculator” icon will bring up a simple calculator. 7-17 Camera Tapping on the “Camera” icon will bring up the camera application. 42 3 1 2 Camera Mode The camera runs in still shot mode and video mode (1). Tap on the “camera” button for still shot photos. Tap on the round button on the bottom right to take a picture (2). To view photos taken, tap on the button in the top right of the screen containing a snap shot (last photo taken) (3). This will bring up the “Photos” application. Note: photos taken with your gTablet are saved to your “Photos” application. 3 1 2 Video Mode Tap on the video button to switch to the video application and record motion video. (1) Tap on the button on the bottom right to start recording video (2). When recording, the button will turn red. To stop the video recording, tap on the same button. 43 To view videos taken, tap on the button in the top right of the screen containing a snap shot (last video taken) (3). This will bring up your videos. 7-18 ES File Explorer Tapping on the “ES File Explorer” icon brings up the file folder system application. Be very careful while in the ES File Explorer application as there are critical files for your gTablet to operate. Do not delete or modify anything you are not confident about. ES File Explorer Tool Bar Buttons 1 2 3 4 5 6 Home button / Slash button(1) – This button toggles between the “home” icon and the “forward slash” (/) icon. The default screen that appears is the “forward slash” (/) screen (which is the “sdcard” file folder open). important files – “DCIM” and “download”. It has 2 The home screen in the ES File Explorer application (when the home icon is displayed – icon at right) shows three important files – “sdcard”, “sdcard2” and “usbdisk”. 44 File Folder + button (2) – allows you to select multiple files at once. Search files (3) – tapping on the search icon brings up a search tool for searching files. Using keywords, search for a video / audio file or an image file such as a photo. File up (4) – moves to the previous screen or a level up in the file tree. Settings (gear icon) (5) – tapping on the settings button displays the gTablets application list. List icon (6) – tapping on the list icon shows the file explorer window in columns. Tapping on it again displays the icons from left to right. Important File Folders – “Home” Icon 1 2 3 “sdcard” File Folder (1) – Files in the “SD Card” folder (the default folder, not “sdcard 2”) are files saved on the internal memory and include the folders such as “DCIM”, and “Download”. “sdcard2” File Folder (2) – Select the “sdcard2” to view data from your micro SD card (external). “usbdisk” File Folder (3) – Select the “usbdisk” to view data loaded on your USB flash memory drive (external). Important File Folders – “Slash” Icon 45 The “Slash” (/) screen is the “sdcard” file folder opened. This screen is also the default screen to open up when you select “ES File Explorer”. DCIM – file location for all saved photos taken from your camera as well as videos taken on the gTablet. Download – lists all of your applications downloaded from the marketplace. 7-19 gMarket Tapping on the “gMarket” icon will bring up the handango Android applications marketplace online where you can download free and paid Android apps. Please see the gTablet Marketplace section of this document on how to download an app from the marketplace. 7-20 Search Tapping on the “Search” icon will bring up the Google search engine and the onscreen keyboard. 7-21 Sound Recorder Tapping on the “Sound Recorder” icon from the expanded Applications Task Bar will bring up the sound recorder application allowing you to record messages, etc. 46 Tap on the record button to start recording your message. (1) Tap on the play button to play your message back. (2) Tap on the stop button to stop recording. (3) Once you have your message, you can either “Use this recording” or “Discard”. To locate and play back these recordings, go to the “Music” application. Under songs, your recordings will be saved by the date and time of the recording. 1 2 3 7-22 Updates Tapping on the “Updates” icon brings up the Over the Air automatic update application. Here you can see what version your software is, and manually run the update software. Please refer to the Over the Air section for further details. 7-23 Videos Tapping on the “Videos” icon from will bring up all videos saved to your gTablet. This application shows videos captured with the gTablet‟s “Camera”. 47 7-24 Favorites Tapping on the “Favorites” icon from the Applications Menu takes you to the Viewsonic website. Here you will find valuable information and links that improve your experience such as important applications to download, additional marketplace resources, etc. It is recommended that you refer to this link periodically as the information will change in order to keep the gTablet relevant. 7-25 Help Tapping on the “Help” icon takes you to the Viewsonic website where you will find resources available to help you such as the users manual. 8 G TABLET MARKETPLACE Tapping on the “gMarket” icon takes you to www.handango.com which is an online application store for Android software. This store has thousands of Android applications available for free and to pay for. 8-1 Downloading Applications To download applications from handango, simply follow the below instructions: 1. Launch the “gMarket” application by tapping on the icon from the applications menu. This brings up the handango website. 48 2. Search the available applications by category, or by most popular, or by price, or Free Apps, etc. 3. After selecting the application you wish to download, tap on download. 4. From the download screen, select “download to PC”. 5. From the Home screen, tap on the “Alerts” icon in the top corner next to the clock. 6. The download status will be displayed. Once “download complete”, tap on the application 7. name 8. The “Package Installer” screen will appear. 9. Tap on “Install”. 10. To launch the application, tap on “Open”. You will also find the application in the ES File Explorer under the “download” folder. 9 IMPORTING AND ACCESSING FILES There are three methods for transferring and accessing files with the gTablet, a mini USB cable connected to your PC, a USB flash memory stick, and a micro SD card. The preferred method and simplest method for importing files is the mini USB cable. Mini USB Cable – Preferred Method for Importing Files 1. Connect the gTablet to your PC using a mini USB cable. 2. When the gTablet recognizes that the USB is connected, you will be prompted to “Turn on USB storage”. On the gTablet, tap on “Turn on USB storage” to proceed. 3. Your PC should recognize the gTablet as a “removable disk”. 4. Using Windows Explorer on your PC, you can drag and drop any music, photos, or videos that you want loaded onto your gTablet listed as a “Removable Disk” under “Computer” in Windows Explorer. 49 5. Once you are done transferring files, tap “Turn off USB storage” on the gTablet. 6. To locate your files, go to the appropriate application in the applications menu – Videos, Photos, or Music and open up the application. Micro SD Card 1. Insert your micro SD card into the card slot on the gTablet and ensure it is oriented properly. 2. Under “Alerts” in the top right next to the time, your gTablet will recognize the SD card and go through “preparing sd card” and “scanning SD card” 3. Once this short process is complete you can access the files on the SD card by simply opening up the appropriate application. 4. If you have photos loaded, simply open up the “Photos” application. If you have music loaded on the SD card, simply open up the “Music” application to access these files. 5. These files will be available to the gTablet as long as the SD card remains inserted into the device. 6. To remove the SD card, you must “unmount” the card by going into “settings”, under “Storage”, and under SD card, tap on “Unmount SD card”. Follow the instructions until it is safe to remove SD card. USB Memory Stick 1. Insert the USB memory stick with files you wish to load. 2. Tap on the “ES file explorer” icon (found on the expanded Applications Task Bar). 3. In ES File Explorer, tap on the forward slash “/” in the top left corner to bring up the “home” directory (once you have done this, the forward slash icon will change to a home icon). 4. Tap on the “usbdisk” file folder. 50 5. Select the file you wish to transfer to your gTablet. and hold for more than 2 seconds. Tap on the file A screen will pop up, tap on “Copy”. 6. Tap on the “home” button to bring you back to the “sdcard” screen. 7. At the “sdcard” screen, tap on the “menu” button on the top task bar. (icon at right) 8. This brings up the menu task bar at the bottom of the screen. Tap on “Operations”. 9. Finally tap on “Paste”. 10 ONSCREEN VIRTUAL KEYBOARD The gTablet is a touch screen LCD device. virtual and onscreen. Therefore, the keyboard is The following information will assist in understanding how to use the gTablet onscreen virtual keyboard. Some applications open the keyboard automatically while others will require you to tap inside the field where you wish to type. This will bring up the keyboard onscreen. For capital letters, touch the up arrow key on either side of the keyboard (1). Touching the up arrow key again returns the keyboard to lower case letters. To bring up the numerical keyboard, on the “12&#” key to the left and the right of the space bar (2). Symbols are also on the same virtual keyboard as numbers. Touching the “12&#” brings up symbols as well as numbers. Alphabetical Keyboard – lowercase 1 2 2 51 Alphabetical Keyboard – UPPERCASE 1 1 Touching this same button again, which now reads “abc”, will bring back the alphabetical keyboard instead of the numerical (3). While in the numerical / symbol keyboard, you can touch the up arrow button (1) and additional symbols (4) will appear. To manually remove the onscreen keyboard, touch the button at the top of all keyboards in the center (5 – icon at right). Numerical / Symbol Keyboard 1 3 3 Additional Symbols Keyboard (4) 5 52 11 SYSTEM SETTINGS To get to “System Settings”, touch the Settings icon from either application menu. 11-1 Status Provides status on the following: Wi-Fi – shows your signal strength and the name of the wireless device you are connected to. Display – allows you to change your screen brightness. Battery – shows the percent of battery remaining. Storage – shows total space and available space in memory. Selecting “more” in any of these boxes will take you directly to the category‟s specific settings page. 11-2 Wireless & networks Manage the wireless settings on your gTablet. 53 Airplane mode – Disables all wireless connections in accordance with airplane regulations. Wi-Fi – Turn your wireless connection On or Off. Wi-Fi Settings – Manage your wireless network settings, add a network, and detect a network. Bluetooth – Turns Bluetooth on or off. Bluetooth settings – Scan for devices, manage connections, and set device name. Bluetooth settings are only enabled when Bluetooth is turned on. Wi-Fi Settings Set up and manage wireless access points. Advance settings – access additional settings including MAC address information. Scan for networks Add a Wi-Fi network Bluetooth Set Up 1. Turn the gTablet and your remote device Bluetooth “ON”. (1) 2. Tap on “Discoverable” so that your Bluetooth device can see the gTablet. (2) 3. Under Bluetooth settings, “Scan for devices”. (3) 4. After Scanning, select the desired device by tapping on it and start pairing. (4) 5. Type the password as indicated on both the gTablet and the remote device and complete the connection 2 3 4 54 11-3 Sound Allows user to manage audio and sounds on the gTablet. Silent mode – makes all sounds except media & alarms silent. Audible selection – plays a sound when touching screen or making selections. Volume – control media and notification volume. Select notification tone – allows user to select the sound played when notifications such as emails or reminders are received. 11-4 Display Allows user to set display settings like brightness and screen timeout. Auto-rotate screen – select to have screen switch orientation automatically when rotating tablet. Auto brightness – selecting automatically adjusts brightness of screen. Brightness – manually control the brightness of the LCD screen. Screen timeout – select the amount of delay before screen will timeout after no activity. 55 11-5 Family Accounts Manage account settings and profiles for multiple users. Add family member – select to add a family member to the profiles by adding the member as a new contact. Select from contacts – adds a new family member by selecting from an existing contact. Selecting a specific profile name will allow: Changing colors used to identify Calendar, To-Do list, Email, etc. Edit nickname Edit contact details Remove from family – removes profile from family list 11-6 Location, date & time Select and manage your location, date and time. Select time zone Set date Select date format – either dd mm yyyy, or mm dd yyyy Set time Use 24-hour format 11-7 Storage Manage your storage options. Tablet Storage Tablet system storage – shows total and available system storage Tablet data storage – shows total and available data storage available to user Format tablet data storage – this erases your data permanently 56 SD card Note the micro SD card does not ship with the gTablet. SD card – Shows total and available space on external SD card. Unmount SD card – allows for safe removal of card. Once removed, you will not be able to save / store or access any data or files. Format SD card – formats the micro SD card (erases). This is not always required. The micro SD card in “ES File Explorer” is the “sdcard2” folder. Warning: “Format tablet data storage” and “Format SD card” erases all data from the external micro SD card. 11-8 Security Set security features and restore software to factory settings. Visible password – selecting this box shows your password for a second as you type it. It then replaces it with bullet points for privacy. Factory data reset – ERASES all data on the device (except data stored on the internal data storage) putting the gTablet back to the original factory settings. 57 WARNING: Selecting “Factory data reset” will erase all data like Contacts and Email. Data saved on the internal storage will not be lost. Please be sure that this is what you want to do before selecting “reset”. This is an unrecoverable and permanent action! 11-9 Applications Manage your applications on the gTablet. Download applications – allows you to manage and remove downloaded applications. Running services – view currently running applications and select to stop the application from running. System applications – view and control applications pre-loaded on the gTablet. Development – contains settings that are useful for developing Android applications. Most users will NOT need to use this setting. 11-10 Language & keyboard Select language – select the language you wish to use for text. 58 Tap „n Tap Western Keyboard – screen allows user to manage and select keyboard options including play sounds on key press, auto capitalize, quick fixes correcting commonly typed mistakes, show suggestions, and auto-complete. 11-11 Accessibility Accessibility is an Android service established for disabled individuals needing additional accessibility such as a “Text to Speech” application. 11-12 Battery Use Shows percent of battery life left, time since start up, time since last unplugged, as well as Advanced battery use. 59 Advanced Battery use – opens a list of applications and operating system components you have used since last connected to a power source. This setting shows the applications in order of highest to lowest amount of power used. Select an application to review additional details about power use, and make adjustments where available. 11-13 About tablet About tablet provides user with information about the tablet and the applications and software. This includes legal information, version information, and software build revision information. The version information can be useful in the case of customer support. 12 CONNECTING TO YOUR G TABLET 12-1 Connect a micro SD Card The unit is designed with a micro SD Card slot which allows you to insert a micro SD card into the unit as shown right. This enables you to both access media and files as well as save media and files to the gTablet. You can open and play files directly from the micro SD card (such as music), or you can copy or delete the files to and from the micro SD card. The gTablet currently supports up to 64GB micro SD cards. It is recommended that the gTablet be used with at least a 32GB micro SD card to ensure the best user experience. For directions on accessing media files from your micro SD card, please refer to the section on Importing and Accessing Files. 60 The USB card can only be inserted in one orientation. Forcing the card in the wrong direction may result in damage. 12-2 Connect to PC The gTablet is designed with a mini-USB port which allows you to connect the unit to a PC. This feature enables you to download files such as, music, photos, video, etc. straight from your PC to the internal storage of the gTablet. It is also the most efficient and best way to import files to the gTablet. 12-3 Connect an Audio Device The gTablet supports headphones. See the headphone jack shown here. The speaker will turn off automatically after connecting external headphones to the gTablet. Excessively loud volume could damage your hearing. Turn down the volume before connecting earphones, and then raise the volume to comfortable level. 12-4 Connect a USB Device The gTablet supports USB memory sticks up to 64 GB. This can be used to transfer / import music, photos, videos etc. into the gTablet. See Importing and Accessing Files section for additional details on how to import files using a USB memory stick. 13 CARING FOR YOUR G TABLET Caring for the LCD Screen The LCD Screen is the most delicate component of the gTablet and comprised of thin glass. Please treat with care. DO NOT apply abrupt force as LCD screen may break. 61 Place the gTablet in carrying case to protect it from dirt, water, shock and scratches before traveling. DO NOT drop or place heavy objects on the LCD Screen. DO NOT scratch the LCD Screen with fingernails or hard objects. Use a soft and lint-free cloth to wipe your gTablet. Wipe gently in order to avoid damaging the LCD Screen. DO NOT use your hand to wipe the LCD Screen directly. Turn off the gTablet if it will not be used for a long time. DO NOT clean the LCD Screen with chemical cleaners, acidic cleaner, or spray cleaners. Ensure that the LCD screen does NOT come into contact with hard objects (e.g.: buttons, watchband, pen). DO NOT spill liquid on or into the gTablet as it can damage the components of the gTablet. To properly clean your LCD screen, use a product specifically designed for LCD TVs and computers. Caring for the Battery The gTablet battery is a Lithium Ion rechargeable battery. Battery life can be increased while using the gTablet by managing your LCD screen brightness and your wireless (WiFi) connection. To maximize your battery life, review the following: Check your LCD screen brightness setting by tapping on the “Settings” icon from the applications menu. Then tap on “Display” and under “Brightness” move the slide bar towards the left to decrease brightness. This will save battery power allowing your gTablet to operate longer before needing to charge. Turn your wireless (WiFi) connection to “Off” if you are not using wireless. Do this by tapping on the “Settings” icon in the Applications Task Bar. Then tap on “Wireless & networks” and turn the wireless to “Off”. This will significantly contribute to your battery life. Remember to turn this setting back on. You may also access wireless settings by tapping on the “wireless” icon in the right hand corner of the top status bar and turn the wireless to “Off”. 62 14 SAFETY PRECAUTIONS 1. DO NOT press or touch the LCD Screen or place items on the screen which will scratch. 2. DO NOT expose the gTablet to dirty, dusty, or moist environments. 3. DO NOT expose the gTablet to strong magnetic or electrical fields. 4. DO NOT leave the gTablet in the sun as it can damage the LCD Screen, especially in the car. 5. SAFE TEMPERATURE: The gTablet should only be used in environments with ambient temperatures between 41°F (5°C) and 95°F (35°C). 6. DO NOT expose the gTablet to liquids, rain, or moisture. 7. Caution: There is a risk of explosion if battery is replaced with an incorrect battery type. 8. DISPOSING: check local regulations for the proper disposal of electronic products. Please recycle the Battery Pack, and check with your Local Authority or retailer for recycling advice. 9. The gTablet and the Adapter can create heat while operating or charging. DO NOT leave the gTablet on your lap or any part of the body in order to prevent discomfort or injury from heat exposure. 10. INPUT RATING: Refer to the rating label on the gTablet and be sure that the Power Adapter complies with the rating. Only use attachments or accessories specified by the manufacturer. 11. Check the connections between the main unit and attachments before turning on the gTablet. 12. DO NOT insert anything into the gTablet that may result in short circuit or damage the circuit. 13. Power off the gTablet, if you want insert / attach or remove any external devices that do not support hot-plug. 14. Before cleaning, disconnect the gTablet from the electrical outlet and remove any installed batteries. 15. Keep gTablet away from children. 16. DO NOT disassemble the gTablet. Only a certified service technician should perform repairs on your gTablet. Otherwise, problem may result and the manufacturer will not be responsible for any damage. 17. DO NOT place the gTablet on soft surfaces (e.g.: bed, sofa, your lap), otherwise it maybe become too hot and halt the system. 15 FCC COMPLIANCE This device complies with part 15 of the FCC Rules. Operation is subject to the following two conditions: This device may not cause harmful interference. 63 This device must accept any interference received, including interference that may cause undesired operation. This equipment has been tested and found to comply with limits for Class B digital device, pursuant to part 15 of the FCC Rules. These limits are designed to provide reasonable protection against harmful interference in a residential installation. This equipment generates, and can radiate radio frequency energy. If not installed and used in accordance with the instructions, it may cause harmful interference to radio or television reception, which can be determined by turning the equipment off and on. The user is encouraged to try to correct the interference by one or more of the following measures: Reorient or relocate the receiving antenna on the affected receiver. Increase the separation between this device and the receiver. Connect this device into an outlet on a circuit different from that to which the receiver is connected. Consult the dealer or an experienced technician for help. CAUTION: This equipment has been tested and found to comply with the limits for a Class B digital device, pursuant to Part 15 of the FCC Rules. All peripherals must be shielded and grounded. Operation with non-certified peripherals or non-shielded cables may result in interference to radio or reception. CAUTION: Any changes or modifications not expressly approved by the manufacturer of this device could void the user‟s authority to operate the device. 16 TROUBLESHOOTING Q: How do I turn off the gTablet when it freezes and cannot warm boot? A: Press the POWER button and hold 4 or 6 seconds to turn off the gTablet. Then restart. Q: Applications that I previously downloaded have disappeared after an OTA update, what happened? A: Some applications might need to be reinstalled after an OTA update has been performed. 64 Q: A: What do I do if I can not turn on the gTablet? 1. 2. 3. Q: A: If the power is low, connect to the electric outlets. Make sure the indicator light indicator of the adapter is on. Remove the micro-SD card and any other external device. What do I do if water gets into the gTablet? 1. 2. 3. 4. 5. DO NOT turn on the gTablet. Disconnect the power cable to turn off the gTablet (do not use the power button). Detach the battery pack. Disconnect all external devices. DO NOT place the gTablet into the dirty carrying case. DO NOT use a hair dryer on the gTablet. Then, take to a service center for advice. Q: How do I recover the factory status? A: Tap on “Settings”---“Security”---“Factory data reset” to recover the system to the default status in Main Menu. Note that all of your personal data will be lost (emails, contacts, etc.). Data saved on the internal storage like photos and music files will not be lost. Be sure to back up files that you wish to save. Q: A: How do I prolong increase battery life? 1. 2. 3. Adjust the brightness of the LCD Screen to proper level. Turn down the volume. Turn off wireless if not in use. Q: What do I do if the camera image is not clear? A: Check that the lens is clean. If not, clean with the soft cloth. For Customer Service, please visit www.viewsonic.com/gtablet. 17 SPECIFICATIONS Display Features Display Technology Size (inches) TFT-LCD 10.1 inch 65 Aspect ratio Panel manufacturer Panel type Driver system Resolution (480i/480p/720p/1080i) Brightness (cd/m2) Contrast Vertical viewing angle U/D (degrees) Horizontal viewing angle (degrees) Pixel Pitch(mm) Maximum colors (millions) Response time (ms) Other: 16:9 AU Optronics Corporation B101AW06 LED 1024 x 600 200 500:1 15/35 45/45 0.2175 (H)×0.2088(V) 262,144 8 N/A Touch Type Multi-Touch How many points Capacitive yes 2 Wireless WiFi Bluetooth WiFi module Bluetooth module 802.11b/g/n Bluetooth 2.1 + EDR WM-BN-BM-01 WM-BN-BM-01 CPU CPU Model Frequency Core Model 2D/3D Graphics Processor Video Decode Video Encode Audio Decode Image Processor Nvidia Tegra 2 1GHz Dual ARM Cortex-A9 Yes Yes, Up to HD (1080P) Yes Yes Yes Memory Capacity DDR2 512MB 66 Nand Flash Mass Memory SD CARD 512MB 16GB iNAND ( up to 32GB ) Option ( up to 64GB ) Mail attachment support Image Document Web Page .jpg、.tiff、.gif .txt .htm、.html Audio Frequency response Formats supported (Decode) Formats supported (Encode) Speaker Microphone 20Hz ~ 20KHz AAC-LC、AAC+、eAAC+ AMR-WB、AMR-NB WMA7、WMA8、WMA9、WMA10 MP3, PCM / WAV, SBC PCM/WAV SBC AAC-LC AMR-WB、AMR-NB PCM/WAV, SBC 1W x 2 Built in Video HD Video Decode HD Video Encode H.264 – 1080p Baseline Profile + B Frame H.264 – 1080p High Profile and Main Profile (w/CABAC,Weighted Prediction and Interlaced not Support) WMV9/VC-1 – 1080p Advanced Profile Decode MPEG-4 – 1080p Simple Profile + B Frame H.263 – D1 Profile 0 DiVX –1080p DiVX 4/5 XviD – 1080p XviD Home Theater MPEG-2 – D1 MP@ML On2 – 720p VP6-E Advanced,VP6-S Simple JPEG – up to 80 Mpixel per second H.264 1080p Baseline Profile MPEG-4 720p Simple Profile H.263 – D1 Profile 0 67 JPEG – up to 80 Mpixel per second Graphics Support OpenGL -ES 2.0 Languages Support Language Support Language Keyboard English English(U.S.)、English(UK) Operating System OS Android 2.2 Sensors Accelerometer Sensor Ambient light Sensor Yes Yes Input and Output DC Input Jack Headphone Jack USB Jack SD Card Dock 1.7mm 3.5mm stereo Mini USB USB TYPE-A Micro SD HDMI/Headphone/USB Camera Primary Video Conferencing 1.3M Mpix 640 x 480 Battery and Power Battery Capacity Type Rated voltage Dimensions Mass Operating temperature Storage temperature Battery cycle times Battery charging time Adapter 3650mAh Li-ion Polymer Battery UL 7.4V 128*131*5.3(mm) 2 0° to 35° -20° to 45° 300 3 hours 12V/2A UL 68 Power Consumption Audio Play ( <5W ) Video Play ( <6W ) Internet ( <4.5W ) Standby ( <0.5W ) Size and Weight Height (mm/inches) Width (mm/inches) Depth (mm/inches) Weight (kg/lbs) 267 / 10.5” 173 / 6.81” 14.3 / .7” .816kg / 1.8lbs Regulatory UL, FCC, CE, RoHS Design and specifications are subject to change without notice. The # symbol means that the item is optional. For Customer Service, please visit www.viewsonic.com/gtablet. 69