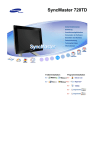
1
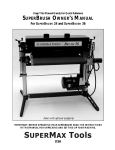
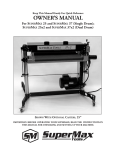
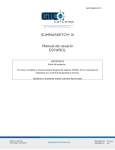
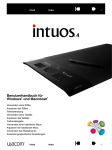
18hrd-97
NewSketch 1812HR
The Way to Precision Graphics
User’s Guide
KYE SYSTEMS CORP.
Table of Contents
Frame 1
Table of Contents
Chapter 1. Introduction 1
What is NewSketch 1812HR? 1
Package Contents 1
How Does it Operate? 2
Chapter 2. Hardware Installation 3
Looking Around the NewSketch 1812HR 3
Understanding the Four-Button Puck 3
The Stylus 4
Installing NewSketch 1812HR 4
Chapter 3. Driver Installation 6
What Are The NewSketch 1812HR Utilities Driver? 6
The Utilities Driver Diskette 6
3-1. GTABLET.COM — The DOS Tablet Driver 8
file:///C|/TABLET94/1812hr/html/18hrd-97.htm (1 of 17) [10/12/1999 11:25:03 AM]
18hrd-97
3-2. GTEST.EXE — Tablet Test Program 9
3-3. Installation of WinTAB Drivers for Windows 95/Windows 3.x 10
3-4. WCPNLKYE — The WINTAB Control Panel 14
3-5. ADI Driver — The Driver for DOS-Version AutoCAD,
AutoShade, and AutoSketch by AutoDesk, Inc. 16
APPENDIX: 19
1. Pin Assignments 19
2. Care & Cleaning 19
3. NewSketch 1812HR Features 20
Inhaltsverzeichnis
ABSCHNITT 1. Einführung 21
Beschreibung des NewSketch 1812HR 21
Lieferumfang 21
Funktionsweise 22
ABSCHNITT 2. Hardware-Installation 23
Die Fadenkreuzlupe 23
Der Stift 24
@Z_TOC LVL 2 = Installation des NewSketch 1812HR: 24
ABSCHNITT 3. Installation der Software und Treiber 26
Die Treiber des NewSketch 1812HR 26
Die Diskette “Utilities” 26
3-1. GTABLET.COM — Der DOS-Tablettreiber 28
3-2. GPTEST.EXE — Tablettestprogramm 29
3-3. Installation von WinTAB-Treibern für Windows 95/Windows 3.X 30
3-4. Die WINTAB-Systemsteuerung 34
3-5. ADI-Treiber — Der Treiber für AutoCAD, AutoShade und
AutoSketch von AutoDesk, Inc. 36
file:///C|/TABLET94/1812hr/html/18hrd-97.htm (2 of 17) [10/12/1999 11:25:03 AM]
18hrd-97
ANHANG 39
1. Steckerbelegung 39
2. Wartung und Reinigung 39
3. Leistungsmerkmale des NewSketch 1812HR 40
CHAPTER 1. Introduction
What is NewSketch 1812HR?
The NewSketch 1812HR is a graphics tablet that translates x-y dimensional data into computer readable format. Its many
uses include :
● drawings, tracing pictures and freehand drawing
●
●
guiding the cursor on a computer screen
picking locations on an application template
NewSketch 1812HR uses the latest advances in electronics and electromagnetic technology, which makes it accurate and
reliable.
Package Contents
●
●
●
●
●
●
●
●
Tablet
Two-button stylus and four-button puck (16-button puck optional)
Power adapter
9-to-25 pin serial adapter
Advanced AutoCAD compatible templates
Windows and ADI drivers
KeyCAD Complete for Windows
User’s guide
file:///C|/TABLET94/1812hr/html/18hrd-97.htm (3 of 17) [10/12/1999 11:25:03 AM]
18hrd-97
How Does it Operate?
Working Area: The area of the tablet where the grid is located is called the “Tablet working area”. This is where the
stylus or puck position can be identified. The NewSketch 1812HR working area is 18" x 12".
Proximity: Proximity is the maximum distance above the working area that the stylus/puck can be held and still be read
by the tablet. The proximity of NewSketch 1812HR is 1/2-inch. The stylus/puck can function at greater heights but may
not be as accurate. If the stylus/puck is moved outside of the “working area” or “proximity”, the coordinate position or
report cannot be given.
Resolution: Resolution is the smallest distance that the tablet can distinguish and this amount is expressed in lines per
inch (LPI). The hardware resolution of NewSketch 1812HR is up to 2540 LPI.
The NewSketch 1812HR has two main components, the tablet and the pointing device. The stylus/puck emits a
low-intensity signal. A grid within the tablet picks up the signal to read the location. Therefore, for the NewSketch
1812HR to do its job, the stylus/puck must be over the working area and close enough to sense the proximity.
file:///C|/TABLET94/1812hr/html/18hrd-97.htm (4 of 17) [10/12/1999 11:25:03 AM]
18hrd-97
CHAPTER 2. Hardware Installation
Looking Around the NewSketch 1812HR
1.
2.
Interface cable: Connects the tablet to the PC.
2.
Cursor: Plug the puck or stylus in this area.
3.
Reset: Reset the communication data of NewSketch 1812HR.
Understanding the Four-Button Puck
The puck shown below is used with the NewSketch 1812HR. It’s good to use for screen pointing, tracing and menu
applications. There are four buttons on the puck and they are used to select different functions.
Frame 7
Under DOS applications, the mouse button emulation mode is:
Button 1: Right button Button 2: Left button
Button 3: Left and right button Button 4: Middle button
Under Windows applications, the default button assignments are the same as DOS, but you can use the Tablet Control
Panel to change the button assignments.
file:///C|/TABLET94/1812hr/html/18hrd-97.htm (5 of 17) [10/12/1999 11:25:03 AM]
18hrd-97
The Stylus
There are two buttons on the stylus. One is on the tip (Button 1), and the other is on the side of stylus, in the shape of a
small barrel button (Button 2).
Under DOS Applications, Button 1 simulates the “LEFT Mouse Button” function, and Button 2 simulates the “RIGHT
Mouse Button” function.
Under Windows applications, the default button assignments are the same as DOS, but you can use the Tablet Control
Panel to change the button assignments.
Frame 9
file:///C|/TABLET94/1812hr/html/18hrd-97.htm (6 of 17) [10/12/1999 11:25:03 AM]
18hrd-97
Installing NewSketch 1812HR
Follow these steps to install your NewSketch 1812HR tablet. Make sure to turn off your computer before installing the
tablet.
1.
Plug the stylus or puck into the cursor socket.
2.
Connect the tablet to the computer. Plug the 9-pin connector of the interface cable into the host communications port. If
the computer has a 25-pin serial port, connect the 9-to-25 pin adapter between the tablet cable and the computer.
3.
Make sure you have the correct power adapter according to the electrical standards in your country. Plug the power adapter
into a standard electrical outlet.
4.
Connect the power adapter by plugging its barrel connector into the interface cable D connector.
5.
Turn on your computer and the power on the NewSketch 1812HR. The tablet is now ready to operate once you have
installed the driver.
CHAPTER 3. Driver Installation
What Are The NewSketch 1812HR Utilities Driver?
A NewSketch 1812HR driver is a program that lets your NewSketch 1812HR tablet communicate with your PC within an
application program. For your tablet to act as an input device, it must be able to communicate with your software. A driver
converts tablet data into information that can be read and used by your application.
file:///C|/TABLET94/1812hr/html/18hrd-97.htm (7 of 17) [10/12/1999 11:25:03 AM]
18hrd-97
For example, if you want to run the DOSSHELL program using the tablet mode of the NewSketch 1812HR, you need the
DOS tablet driver, and for Windows 95 or Windows 3.x, you need the Windows tablet driver.
The Utilities Driver Diskette
The NewSketch 1812HR Utilities diskette contains all the drivers you need to use NewSketch 1812HR with your
applications.
●
Note: To be safe, please duplicate the Utilities diskette and store the original in a safe place.
The Utilities Diskette contains the following files and programs:
1. README.DOC
This document contains the latest information.
2. TECHNIC.DOC
This technical reference document shows you how to write a driver for the tablet.
3. GTABLET.COM
This is the DOS tablet driver for using the tablet under DOS applications that use a mouse and support the absolute
coordinate mode.
4. GTABLET.INI
This file contains information used by GTABLET.COM.
5. GTEST.EXE
The test program that lets you check the tablet under DOS environments.
6. GNS2.PCX
This file contains information used by GTEST.EXE.
7. WINTAB Drivers
These drivers cover three parts:
(a) Windows 95 & Windows 3.x Driver;
(b) Wintab Pen Windows Driver;
(c) WinTAB compatible digitizer ADI Ver 4.2 driver.
(1) AYEMOUSE.DRV
Null mouse driver (for users without mice)
@LIST 4 =
(2) KYECLS.DLL
Class installer used in Windows 95 Setup
(3) OEMSETUP.INF
Setup file for Windows 95
file:///C|/TABLET94/1812hr/html/18hrd-97.htm (8 of 17) [10/12/1999 11:25:03 AM]
18hrd-97
(4) SETUP.DOC
Installation instructions for Windows 3.x and Windows 95
(5) SETUP.EXE
Installation program for Windows 3.x only
(6) VSERTD.386
Virtual device driver
(7) WINTAB.DLL
16-bit Wintab API & functionality
(8) WINTAB32.DLL
32-bit Wintab API & functionality
(9) WTKYEC.EXE
Wintab Control Panel DLL
(10) WTKYEC.HLP
Help file for Wintab Control Panel
(11) WTKYEF.EXE
Wintab features DLL
(12) WTMGKYE.DRV
UIOF-format tablet driver for Windows 3.x & Windows 95
(13) WTMMKYE.DRV
MM-format tablet driver for Windows 3.x & Windows 95
(14) WTPEN.DRV
Wintab pen driver for Pen Windows
(15) WTT16.DLL
16-bit interface for dual use under Win32
8. ADI Drivers
These drivers are for DOS-version AutoCAD, AutoShade, and AutoSketch of AutoDesk, Inc.
(1) DGADI.DOC
Descriptions for DGADI.COM
(2) DGADI.COM
Real-mode ADI digitizer Ver 4.2 compatible driver for NewSketch 1812HR with a 2-button stylus or 4-button puck
(3) DGPKYE.DOC
file:///C|/TABLET94/1812hr/html/18hrd-97.htm (9 of 17) [10/12/1999 11:25:03 AM]
18hrd-97
Descriptions for DGPKYE.EXP
(4) DGPKYE.EXP
Protected-mode ADI MM-format digitizer driver for NewSketch 1812HR with a 2- button stylus or 4-button puck
(5) DGKYEUIO.DOC
Descriptions for DGKYEUIO.EXP
(6) DGKYEUIO.EXP
Protected-mode ADI UIOF-format digitizer driver for NewSketch 1812HR with a 16-button puck only
You need to use the correct driver when using your particular application. For DOS applications that use a mouse
function, we suggest you to use “GTABLET.COM”. When using Windows or Pen Windows, please install the WinTAB
driver first. The information below will show you how to install a driver.
To run the Utilities driver or one of the programs, you can install from the floppy disk directly, but we suggest you copy
all the files to your hard drive. It saves you time installing the files or programs. To copy the files:
Put the Utilities diskette into drive B: (or A:). Under the C:\ prompt
C:\>MD GTABLET
C:\>CD GTABLET
C:\>GTABLET> COPY B:\*.* /v
(or COPY A:\*.* /v if the diskette is in drive A)
Then you can run the programs under the directory C:\GTABLET. For example, if you want to run the tablet driver
GTABLET.COM, just type the execution file:
C:\GTABLET>GTABLET
3-1. GTABLET.COM — The DOS Tablet Driver
This driver lets you use NewSketch 1812HR under DOS applications that use a mouse, and supports the absolute
coordinate mode. With this driver you can trace any picture and draw freehand in your drawing applications.
1.
Put the Utilities diskette into drive B: (or A). Under the C:\ prompt, type:
C:\>B: (or A:)
B:\>GTABLET <Enter>
(or A:\>GTABLET <Enter>)
Or you can install this driver from the directory you just created by typing:
C:\> CD GTABLET (the directory that contains the utility files)
C:\>GTABLET>GTABLET <Enter>
The driver will automatically detect NewSketch 1812HR, and shows a message that the DOS tablet driver has been
installed. The GTABLET.COM driver also supports the “parameters” setting. It lets you set certain conditions for
NewSketch 1812HR. The parameters are:
file:///C|/TABLET94/1812hr/html/18hrd-97.htm (10 of 17) [10/12/1999 11:25:03 AM]
18hrd-97
Command line : GTABLET N
N = /1 — Use serial port COM1
/2 — Use serial port COM2
/3 — Use serial port COM3
/4 — Use serial port COM4
/A — Use absolute coordinate
/R — Use relative coordinate
/U — Unload tablet driver and release from memory
/Np,i — Use hexadecimal I/O port BASE address (p)
and IRQ level (i).
/H or /? — Help
For example : If you want unload the driver, type GTABLET/U <Enter>
3-2. GTEST.EXE — Tablet Test Program
This program lets you test the basic functions of NewSketch 1812HR under the DOS environment. Run the
GTABLET.COM first and then follow the directions below to run the test process.
@BODY TEXT-NO. = 1.
Put the Utilities diskette into drive B: (or A). Under the C:\ prompt, type:
C:\> B: (or A:)
B:\>GTEST <Enter>
(or A:\>GTEST <Enter>)
Or you can install this driver from the directory you just created by typing:
file:///C|/TABLET94/1812hr/html/18hrd-97.htm (11 of 17) [10/12/1999 11:25:03 AM]
18hrd-97
C:\> CD GTABLET (the directory that contains the utility files)
C:\>GTABLET>GTEST <Enter>
The test screen appears as shown below.
To check the tablet and the stylus or puck, move the cursor, press the buttons, or draw a line to test the NewSketch
1812HR tablet.
3-3. Installation of WinTAB Drivers for Windows 95/Windows 3.X
This guide shows you the procedures to install the WinTAB driver when using Windows 95/Windows 3.X.
Windows 95 Installation
Before You Start
Make sure your tablet is properly connected and ready for use before you install the WinTAB driver.
Installing the WinTAB Driver
Click the Start button, move the cursor to Settings, then on Control Panel for the following first window to appear. Click
on the Add New Hardware icon and the Add New Hardware Wizard window will appear as shown below.
Click on Next to go to the next window.
Select No so you can install the correct WinTAB driver from the diskette or the directory. Then choose Next again.
From the list of Hardware types, select Other devices, then choose Next again.
Select Have Disk..., then enter the path of the WinTAB diskette or directory and press OK.
For hardware devices, please select KYE MM format when using a 2-button stylus or 4-button puck. If you’re using a
16-button puck, then you must select KYE UIOF format.
The tablet device will then be installed, so click on Finish to complete the rest of the WinTAB driver installation.
From the tablet window, select the type of cursor you are using. You can select 2-button stylus, 4-button puck, or
16-button puck. Press OK to finish the rest of the installation process.
Removing the WinTAB Driver
To remove the driver, go to the Windows Control Panel and select the System icon. In this window, select Device
Manager. Select your device from the list, then select Remove. The driver will be removed the next time you restart
Windows.
Windows 3.X Installation
Before You Start
Make sure your tablet is properly connected and ready for use before you install the WinTAB driver.
The WinTAB driver normally coexists with a conventional mouse driver. If you wish to use the WinTAB driver without
also using a mouse (for example, if you only have one COM port), you should first install AYEMOUSE.DRV, then install
the WinTAB Driver as described below.
Installing AYEMOUSE.DRV
file:///C|/TABLET94/1812hr/html/18hrd-97.htm (12 of 17) [10/12/1999 11:25:04 AM]
18hrd-97
To use a tablet as your only pointing device, you must install AYEMOUSE.DRV so Windows knows it is using another
input device besides a mouse. This driver is provided with your Utilities diskette. To use the Windows’ SETUP.EXE, open
the File menu in the Program Manager and select Run.... Type in SETUP.EXE for the menu to appear. Select Options,
then Change System Settings. When this window appears, select Mouse and choose Other at the end of the list of mouse
drivers. When asked for a disk or pathname, enter the path of your WinTAB driver diskette or the directory where it is
located.
Installing the WinTAB Driver
To install an installable driver, in the Program Manager, select File, Run and type a:\setup (or b:\setup). Then follow the
on-screen instruction to install the WinTAB driver. When asked for the tablet format, please select KYE MM format when
using a 2-button stylus or 4-button puck. If you’re using a 16-button puck, then you must select KYE UIOF format.
For more information on Windows 3.1 tablet drivers, refer to the software section in the hardware manual.
Installing a Device Driver for “AutoCAD R13 for Windows”
To run AutoCAD R13 for Windows, you must install the WinTAB Windows Driver first. After you installed the WinTAB
driver, follow the steps below to configure NewSketch 1812HR.
1.
Run AutoCAD R13 for Windows.
2.
When the screen “Available Video Displays” appears, choose: “Windows Accelerated Display Driver ADI 4.2” and press
Enter.
3.
And then from the Available Digitizers group select: “WinTAB Series Compatible Digitizer ADI 4.2” and press Enter.
4.
Follow the on-line instructions and make sure you save the configuration.
3-4. The WinTAB Control Panel
The WinTAB control panel shows the information of your tablet and lets you customize NewSketch 1812HR under
Windows. Its features include Tracking Mode, Tracking Area, Button Assignment ...etc. Please go to the Windows Control
Panel and click on the KYE Tablet icon, then the WinTAB control panel will appear as below:
In the tablet control panel, you will find the following categories:
Info: Shows the information of the WinTAB driver and NewSketch 1812HR.
Tracking: Lets you select the tracking mode, Absolute or Relative, and set up your preferred tracking area.
Pointer: Lets you change the appearance of the screen pointer. This function is provided by your Windows system.
Buttons: Lets you change the cursor type and assign a preferred action to your stylus or puck buttons.
For more details, please click on the Help button of the tablet control panel.
3-5. ADI Driver — The Driver for the DOS-Version AutoCAD, AutoShade, and AutoSketch by
AutoDesk, Inc.
●
Notes: 1. Before installing the driver, make sure you have installed the AutoCAD, AutoShade, or AutoSketch
file:///C|/TABLET94/1812hr/html/18hrd-97.htm (13 of 17) [10/12/1999 11:25:04 AM]
18hrd-97
software. 2. If you are using a 2-button stylus or 4-button puck, please go directly to the Installing DGPKYE.EXP
section. 3. If you are using a 16-button puck, please go directly to the Installing DGKYEUIO.EXP section. 4. If you
are still using real-mode AutoDesk products, e.g. AutoCAD R10, please go directly to the Installing DGADI.COM
section.
Installing DGPKYE.EXP
DGPKYE.EXP needs to be loaded by AutoCAD during a process called “configuration.” But before this can happen,
AutoCAD needs to know where to find your digitizer driver. You need to copy DGPKYE.EXP to the \ACAD\DRV
directory on your hard disk:
COPY A:\DGPKYE.EXP C:\ACAD\DRV /V
If your copy of AutoCAD is installed on a different drive or in a different directory, you will need to substitute the
appropriate drive or directory in the COPY command above.
Start AutoCAD and type “config” at the command prompt. The configuration menu lets you change a number of
AutoCAD settings. The “Configure digitizer” option (currently 4) lets you select the digitizer. Select “Genius HiSketch
MM driver v1.x, ADI 4.2" from the list.
Then you have to choose the tablet size from the following list. Please select 3.
1. EasyPainter/EasyPainter II (EasyPainter series tablet)
2. HiSketch 906
3. HiSketch 1212/1212HR
4. HiSketch 1812/D
5. NewSketch 1212
6. NewSketch 1212HR/1212HRII
7. NewSketch 1812/D
8. NewSketch 1812HR
In the next step you will be asked about your cursor/pen type. Please enter 2 or 4 based on your pointing device.
Now you will be asked to name the serial port. Do NOT enter “1" or ”2" ! Use “COM1" or ”COM2" instead.
Press 0 to return to the Main Menu, and answer Y to the “keep configuration changes” question. You are now ready to use
your tablet in AutoCAD.
Installing DGKYEUIO.EXP
DGKYEUIO.EXP needs to be loaded by AutoCAD during a process called “configuration.” But before this can happen,
AutoCAD needs to know where to find your digitizer driver. You need to copy DGKYEUIO.EXP to the \ACAD\DRV
directory on your hard disk:
COPY A:\DGKYEUIO.EXP C:\ACAD\DRV /V
If your copy of AutoCAD is installed on a different drive or in a different directory, you will need to substitute the
appropriate drive or directory in the COPY command above.
Start AutoCAD and type “config” at the command prompt. The configuration menu lets you change a number of
AutoCAD settings. The “Configure digitizer” option (currently 4) lets you select the digitizer. Select “KYE UIOF Driver
1.x ADI 4.2" from the list.
file:///C|/TABLET94/1812hr/html/18hrd-97.htm (14 of 17) [10/12/1999 11:25:04 AM]
18hrd-97
Then you will be asked about your cursor/pen type. Please enter 16.
Now you will be asked to name the serial port. Do NOT enter “1" or ”2"! Use “COM1" or ”COM2" instead.
Press 0 to return to the Main Menu, and answer Y to the “keep configuration changes” question. You are now ready to use
your tablet in AutoCAD.
Installing DGADI.COM
The GENIUS ADI driver remains in memory after your load it until you reboot your computer or turn it off. Within
AutoCAD, you have to select the real-mode ADI driver option for the digitizer driver:
C:\GTABLET>DGADI /T# /C# /H [/#] [OFF]
/T[2,5,8,9] specify tablet size
/C[p,3,4] specify cursor type
/H specify horizontal orientation
/1-4 specify serial port
OFF remove resident driver from memory
The first argument is useful with larger tablets. DGADI.COM normally detects the size of the tablet it is working with and
sets the active area to the full size. The /T# option allows you to override the full size and specify a smaller one if you
desire.
The sizes available are:
/t2 for a Genius NewSketch 1212 series tablet
/t5 for a Genius EasyPainter tablet
/t8 for a Genius NewSketch 1812/D series tablet
/t9 for a Genius HiSketch 906 tablet
●
Note: The current DGADI.COM interrogates Genius HiSketch tablets as to their size, so the /t# switch is of limited
use.
The second optional argument selects the number of buttons on the cursor or transducer. This option may also be changed
after installation:
/Cp selects a 2-button “pen” or stylus
file:///C|/TABLET94/1812hr/html/18hrd-97.htm (15 of 17) [10/12/1999 11:25:04 AM]
18hrd-97
/C3 selects a 3-button transducer
/C4 selects a 4-button transducer (DEFAULT)
The default orientation for Genius 906 tablet is portrait. However, if you prefer to use it in landscape mode, just add the
command line /H when you load DGADI.COM.
The forth optional argument selects which COM port the tablet is connected to. If this argument is omitted the driver will
be installed on the first COM port it finds.
/1 selects COM1
/2 selects COM2
/3 and /4 select COM3 and COM4 on PS/2 systems.
For more information, please refer to DGPKYE.DOC, DGKYEUIO.DOC or DGADI.DOC in the Utilities diskette.
APPENDIX
1. Pin Assignments
The pin assignments which link the NewSketch 1812HR and the computer are shown below. If you want more
programming information, please read the “TECHNIC.DOC” file on the Utilities disk. It shows you how to write a driver
for the tablet.
The male 8-pin DIN connector has the following pin assignments:
Pin Function
1 Stylus & Puck Control
2 B2
3 Coil Signal
4 B3
5 B0
6 B4
7 VCC
8 B1
2. Care & Cleaning
As with all electronic equipment, it is necessary to exercise care while handling and cleaning the NewSketch 1812HR.
● Avoid dropping or knocking the tablet, stylus, or puck.
● To clean the tablet and its accessories, turn off your computer first.
● Use a soft cloth lightly dampened with water or a non-abrasive cleaner which does not harm plastic components.
● Do not use chemicals or abrasive materials which may damage the surface.
● Never immerse any part of the tablet, stylus, or puck in any liquid as this will damage the NewSketch 1812HR
circuitry.
file:///C|/TABLET94/1812hr/html/18hrd-97.htm (16 of 17) [10/12/1999 11:25:04 AM]
18hrd-97
3. NewSketch 1812HR Features
●
●
●
●
●
●
●
●
●
●
●
Technology: Electromagnetic
Protocol: Summagraphics MM/UIOF Series compatible
Working area: 18" x 12" (457mm x 304mm)
Pointing device: 2-button stylus and four-button puck (16-button puck optional)
Power Source: Power adapter
Accuracy: +/- 0.01 inch
Jitter: ± 0 count (in 1016 LPI for puck)
Hardware Resolution: up to 2540 LPI
Proximity: 1/2-inch
Baud rate: 150-19200 BPS (UIOF format), 9600 BPS (MM format)
Cable: DB9 (or with 9-to-25 pin adapter) female to PC serial port
file:///C|/TABLET94/1812hr/html/18hrd-97.htm (17 of 17) [10/12/1999 11:25:04 AM]