1
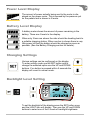
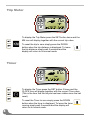
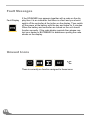
TUNGSTEN
User Manual
Thank you for purchasing a BATRIBIKE Electric Bicycle
from Fallowgate Limited.
With care and correct usage your bicycle
will give many years of service.
Please read the manual fully before use.
MODEL:-
TUNGSTEN
SERIAL NUMBER:-
PURCHASE DATE:-
/
DAY
/
MONTH
YEAR
IMPORTANT PLEASE READ THIS MANUAL FULLY
PRIOR TO ASSEMBLY AND USE
For your safety and to ensure a long and trouble free life of your bicycle,
check the operation of brakes, lights, tyre pressures, bell and gears.
Also check all fasteners, including quick release mechanisms, before
every ride.
Service & Spares
Cables may stretch a little during the first few uses. Brakes and gears may need
to be adjusted after the first few rides to ensure correct operation. If you return
the bicycle to us, (please contact us first), we will be pleased to check and adjust
accordingly within the first 6 weeks of purchase, free of charge. If it is more convenient for you a local cycle shop could carry out this operation at your expense.
Your BATRIBIKE bicycle uses standard cycle parts wherever possible. Items
such as tyres, tubes, lights, brake pads/blocks and cables may be obtained
direct from us or your local cycle shop or retailer.
Specialist parts such as the motor, battery, & electrical parts or frame components are only available from Fallowgate Limited
PACKAGE CONTENTS
1 ELECTRIC BICYCLE
1 BATTERY
1 BATTERY CHARGER
1 MANUAL
3
Usage Instructions
Important
PLEASE CHARGE THE BATTERY
BEFORE FIRST USING THE BICYCLE.
Even though the battery indicator will show charge this cannot be
relied upon until the battery has had the initial full charge.
Battery Charging.
The battery can be charged either on or off the bicycle, but must be charged
inside in dry conditions to avoid the risk of electrical shock. Only use the charger
supplied with the bicycle.
1)
2)
3)
4)
6)
Ensure the power is turned off at the battery.
Rotate the charging socket cover and insert charger lead into
socket on battery casing, taking note of the position of pins.
Insert 3 pin mains plug into mains socket and switch on at wall.
There is a indicator light on the charger
CHARGE—Glows red when charging and green when charge is
complete.
When battery is charged, firstly turn off the mains supply, unplug
and then remove the charging plug from the battery.
To ensure maximum battery life charge your battery after each ride & DO NOT
leave fully discharged.
To remove battery
push and turn the
key to the unlock
position.
The key can be removed
in
the
unlocked or locked
positions but must
remain in the lock
when the power is
switched on.
If your BATRIBIKE Tungsten is not in use for an extended period,
charge the battery once a month to prevent deterioration.
Quick release fittings for seat height adjustment.
With the locking lever in the loose position, tighten the nut until finger tight, The
final tightening is done by moving the lever to the locked position. To undo move
lever to loose position to enable height adjustment.
Loose
Locked
Front Light
To turn the light on press the red button on the handlebar.
Press again to turn off.
Rear Light
The rear light requires 2 AA size batteries. There is a switch on the light
for operation.
Braking
To stop release the throttle and pull the brake levers.
Side Stand
To put the bicycle on its stand:1)
2)
While holding the bicycle upright, push the stand
to its full extent.
Lean bicycle over onto stand.
Make sure bicycle is on solid ground.
Tyre Pressures
4
The tyres should be pumped up to within the range stated on the sidewall.
This should be regularly checked as running with the correct pressures
will ensure maximum range from the battery.
5
Riding
To turn on the power, insert the key into the
lock on the battery and turn to the on position.
Then switch on the controller on the handlebars by pressing the power button. The display will switch all segments on and display
the current settings for the wheel size. (Detailed later).
Pedal Assistance
The amount of assistance from the motor can be selected using
the UP and DOWN buttons.
There are 7 levels of power from Pedal Only
through six levels of Pedal Assistance. The
amount of assistance selected is displayed by
the Assist Meter.
Riding Without Power
When no assistance is selected the Auto indicator lights. In this
mode the motor will not provide assistance when pedalling.
Using the Twist Grip Throttle
6
When no assistance is selected the Auto indicator lights. In this
mode the throttle on the right handlebar grip is also live. You can
either pedal without power or use the throttle to propel the bicycle under power with minimal effort from the rider. The pedals
must be rotating although no pressure is needed. This is a
safety feature to ensure that the bicycle cannot be powered
without the rider on board. (Such as when getting on and off the
bike or walking with it).
Power Level Display
The amount of power actually being sent to the motor is displayed on the power meter. This is sensed by the pressure put
on the pedals and is shown in 6 levels.
Battery Level Display
A battery meter shows the amount of power remaining in the
battery. There are 4 levels to the display.
When only 2 bars are shown the rider should be heading back to
a suitable charging station. When one bar is shown there is very
little power left and the battery should be charged as soon as
possible. (See the Battery Charging section for details).
Changing Settings
Various settings can be configured on the display.
To enter setting mode use the SET button and to
change the selected option use the UP and DOWN
buttons. If no button is pressed within 5 seconds the
display will revert to normal mode.
Backlight Level Setting
To set the backlight of the display press the SET button once
and the LIGHT icon will display. Then use the UP and DOWN
buttons to select one of the 5 levels of backlight brightness.
7
Trip Meter
To display the Trip Meter press the SET button twice and the
KM icon will display together with the current trip value.
To reset the trip to zero simply press the DOWN
button when the trip distance is displayed. To leave
the trip distance simply wait 5 seconds and the
display will return to its normal mode.
Timer
To display the Timer press the SET button 3 times and the
CLOCK icon will display together with the current Time value.
(This is the time that the bicycle has been ridden since the last
reset).
To reset the Timer to zero simply press the DOWN
button when the timer is displayed. To leave the timer
running simply wait 5 seconds and the display will
return to its normal mode.
8
Speed & Distance Display
The wheel size setting is used to calibrate the electronic
controller which displays the speed and distance travelled.
Wheel Size Settings
10 Secs
To set the wheel size press and hold the SET button
for 10 secs and the WHEEL SIZE icon will display
together with the current wheel diameter and wheel
circumference values. Use the UP and DOWN buttons
to change the values.
Your BATRIBIKE Tungsten has been preset to 27 and 2174
which will give a reasonably accurate reading in Kilometres.
To reset the speedometer and distance displays to measure
miles per hour and miles you can “cheat” the display into thinking it has a 16” wheel with a circumference of 1272mm. This
gives an approximate display in Miles although the icons on the
screen will still show as KM and KMH.
9
Fault Messages
Fault Display
If the SPANNER icon appears together with a code on the display then it is an indication that there is a fault and you should
switch off the controller at the button on the display. Then switch
off the power at the battery with the key and leave for 2 minutes.
When the battery and controller are turned on the unit should
function correctly. If the code display persists then please contact your dealer or BATRIBIKE for assistance quoting the code
shown on the display.
Unused Icons
°C
There is currently no function assigned to these icons.
10
Notes
Warranty
Please retain your receipt as this is your proof of purchase and entitlement to
Warranty.
The Frame of your new BATRIBIKE Tungsten is guaranteed
for 2 years from date of purchase.
Other main cycle parts have a warranty of 1 year.
The battery is covered for 6 months as battery life is determined
by User care.
In the event of warranty repairs becoming necessary you should return your
bicycle to BATRIBIKE at the address below. Delivery & collection charges are
not redeemable under warranty.
Brake blocks/pads, tyres, lights and cables etc. are considered as consumables and replacements are available from BATRIBIKE or may be obtained
from your local cycle shop.
BATRIBIKE Electric Bicycles are exclusive to:Fallowgate Limited
Kellaway House
Marton Road
Sturton-by-Stow
Lincoln
LN1 2AH
Phone: 01427-787774
E-mail: [email protected]
————————— USER MANUAL—BATRIBIKE Tungsten — ISSUE 1 — ©2010 Fallowgate Limited —————————