1
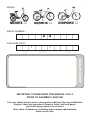
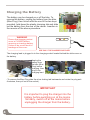
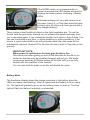
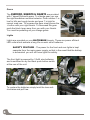
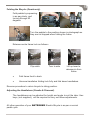
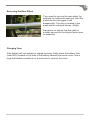
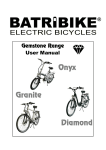
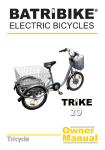
®
DIAMOND
QUARTZ
GRANITE
User
Manual
REGENERATIVE RANGE
MODEL:-
QUARTZ
GRANITE
DIAMOND
SERIAL NUMBER:-
B
B
PURCHASE DATE:-
/
DAY
/
MONTH
YEAR
DEALER STAMP
IMPORTANT PLEASE READ THIS MANUAL FULLY
PRIOR TO ASSEMBLY AND USE
For your safety and to ensure a long and trouble free life of your Batribike
bicycle, check the operation of brakes, lights, bell and gears,
and check tyre pressures are correct.
Also check all fasteners, including quick release mechanisms,
before every ride.
Thank you for purchasing a BATRIBIKE Electric Bicycle
from Fallowgate Limited.
With care and correct usage your bicycle
will give many years of service.
Important
PLEASE CHARGE THE BATTERY
BEFORE FIRST USING THE BICYCLE
Even though the battery indicator will show charge this cannot be
relied upon until the battery has had the initial full charge.
PACKAGE CONTENTS
1 ELECTRIC BICYCLE
1 BATTERY
1 BATTERY CHARGER with UK Mains Lead
1 MANUAL
Contents
Battery Charging .............................................................. PAGE 4
Usage
....................................................................... PAGE 6
Service & Spares .............................................................. PAGE 12
Warranty
....................................................................... Rear Cover
3
Charging the Battery
The battery can be charged on or off the bike. To
remove the battery, unplug the battery from the bike,
(Blue Plug), then unlock with the one of the two keys
provided, hold down the plastic clamping tab and slide
out the battery from the rear of the carrier. Insertion is
the reverse of the above procedure.
WARNING
Ensure that charging socket
cover is CLOSED before
removing or inserting battery.
Failure to do so will result in
breakage of the cover.
Powe
Charge
USE ONLY THE CHARGER SUPPLIED
The charging lead is plugged in to the charging socket located behind the slide cover on
the battery.
Unplug the
battery from
the bike (Blue
Plug) before
charging, then
plug in the
charging lead.
(To remove the Blue Plug slide the silver locking tab backwards and rotate the plug anticlockwise, then pull out of the socket).
IMPORTANT
It is important to plug the charger into the
battery before switching on at the mains.
Similarly, switch off at the mains before
unplugging the charger from the battery.
4
Plug the charger into the mains socket and switch on at the wall outlet. The lights on the
charger will illuminate after a few seconds.
Power
Charger
Power
Charger
The RED light indicates that mains power is applied. The other light
will show ORANGE whilst charging is taking place. This may take
up to six hours for a flat battery.
When the battery is charged the ORANGE light will change to
GREEN.
Once charged, switch off at the wall outlet and unplug. Unplug the charging lead from the
battery and slide the cover back over the charging socket.
NOTE: If the battery is charged and the charger left switched on for an extended
period the charger will enter a low power state, indicated by both the RED and
ORANGE/GREEN LEDs flashing slowly. Switch off and unplug as above.
Power
Charger
The battery does not have to be completely discharged before it is recharged.
The Lithium battery has no ‘memory’ and therefore can be charged at any time.
It is perfectly acceptable to recharge the battery after a short ride so that the
battery is fully charged before the next ride.
If your BATRIBIKE is not in use for an extended period it is imperative
that you charge the battery before storage and then charge the
battery once a month to prevent deterioration.
If Lithium batteries are left flat for an
extended period then they may
no longer be functional and a new
replacement will be required.
With correct User Care as outlined above your battery should have a
lifetime of around 1000 charges.
5
Usage
Your BATRIBIKE Electric Bicycle can be used as a normal pedal cycle by
simply not switching on the battery.
ON/OFF
MODE
To use under electric power plug in the battery with the blue
plug located on the end of the battery beneath the rear of the
seat. Then press and hold the ON/OFF, MODE switch on the
handlebar display. The Power Indicator on the display will
light to show the remaining power in the battery. If the unit
shows 2 LEDs or less it is recommended that you charge the
battery.
IMPORTANT NOTE:
Do not put pressure on the pedals
when turning on the power.
The system initialises the pressure as it
starts up and pressing on the pedals will
give a false reading. This means that you
will have to push harder on the pedals to
activate the pedal assist. If you have
inadvertently done this, simply switch off,
remove your feet from the pedals and
switch on again.
The Regenerative Range is equipped with Torque Sensor technology. This
means that as you put pressure on the pedals the system senses your efforts
and provides a boost. Under normal riding on flat ground the amount of power
put in by the motor is low but as you reach an incline or turn into a head wind
you naturally place more effort into the pedalling. The torque sensor adjusts the
output to match the conditions. This means that the assistance provided by the
motor increases only when needed, thereby maximising range.
There are four selectable levels of assistance
available. Press the MODE switch on the
handlebar display to show the current level.
(Flashing LEDs). To change the assistance level
press the MODE switch again within a couple of
seconds. The assistance will be changed to the
next highest level. When Level 4, (Full Power) is
reached, pressing the MODE switch again will
revert to Level 1, (Low Power).
6
MODE: Assistance level 2 shown
If the MODE switch is not pressed within a
couple of seconds the LED display will revert to
showing the battery power remaining. (Steady
LEDs).
RANGE: Battery level 3 shown
(Estimated mileage will vary with terrain but at
full power (Level 4), a 75kg rider should be able
to travel up to 40 miles over level ground with a
fully charged battery).
There is also a twist throttle provided on the right handlebar grip. To use the
throttle twist the grip slowly towards you to increase the power and away from
you to decrease again. If you release the throttle it will return to the off state. You
can use the throttle at any time, i.e whilst pedalling or without pedalling. If the
bicycle is used under throttle only without pedal assist then the range will be
substantially reduced. (Around 20 to 25 miles at Level 4 with a 75kg rider on flat
ground).
IMPORTANT NOTE:
When power is switched on the twist grip throttle is live.
Take extra care when getting on and off the bike that the throttle is not
twisted as the bike may be propelled forwards without you. We would
recommend switching off before getting off the bike until you are fully
familiar with the operation of the controls.
You can also hold the brake on as this will disable the motor.
Battery Meter
The handlebar display shows the charge remaining in the battery when the
LEDs are steady (not flashing). When 4 lights show the battery is full or nearly
full. The lights will gradually go out as the battery power is used up. The final
light will flash just before the battery is exhausted.
7
Gears
The DIAMOND, GRANITE & QUARTZ are provided
with 7 speed Shimano gears. To change gear you use
the right handlebar mounted selector. Gear number 1 is
low for hills and rough terrain and gear 7 is high for
normal road use. To increase the gear simply press the
+ button with your right thumb. To decrease the gear
push the black lever away from you with your thumb.
You must be pedalling as you change gears.
Lights
Lights are provided on your BATRIBIKE bicycle. These are power efficient
LED units which achieve a long life on each set of batteries.
SAFETY FEATURE - The power for the front and rear lights is kept
separate from the main power supply so that in the event that the battery
is exhausted you will still have lights for safety.
The front light is powered by 3 AAA size batteries
and is switched on by the black push button switch
at the rear of the unit.
To replace the batteries simply twist the lens anticlockwise and pull free.
8
9
The rear light requires 2 AA batteries. You will require a small Philips
screwdriver to take off the red lens for battery replacement. It is switched on by
the small switch on the underside of the unit.
Braking
To stop, release the throttle and pull the brake levers.
Regenerative Braking
A feature of the Regenerative Range is the addition
of REGENERATIVE BRAKING. This allows the rider to
use the motor “like a dynamo” to effect efficient braking
without using the normal brakes.
To initiate Regenerative Braking you simply pedal gently backwards. After
a couple of turns the motor will be put into braking mode and the bicycle
will slow down. At the same time, power will be regenerated and put back
into the battery, thereby helping maintain charge levels to some extent.
(This does not replace the need for mains charging).
The pedalling backwards is not using any effort, it is simply letting the
electronics know to put the motor into Regenerative Mode. If you cease to
pedal backwards the bicycle will revert to normal freewheel mode.
The slowing down effect of the Regenerative Braking is very marked and
you need to be going downhill to effectively use this mode.
Centre Stand (where fitted)
To put the bicycle on its stand:1)
2)
While holding the bicycle upright, place your foot behind the
stand.
Pull the bicycle backwards until the stand is in place.
Make sure bicycle is on solid ground.
Side Stand (where fitted)
To put the bicycle on its stand:1)
2)
While holding the bicycle upright, push the stand to its full
extent.
Lean the bicycle over onto the stand.
Make sure bicycle is on solid ground.
Tyre Pressures
The tyres should be pumped up to within the range stated on the sidewall.
This should be regularly checked as running with the correct pressures
will ensure maximum range from the battery.
Quick Release fittings for Seat Height Adjustment
With the locking lever in the loose position, tighten the nut until finger tight.
The final tightening is done by moving the lever to the locked position. To
undo move the lever to the loose position to enable height adjustment.
Loose
10
Locked
11
Folding the Bicycle (Quartz only)
Fold pedals by squeezing
in as per photo, and
turning through 90
degrees.
Turn the pedals to the position shown in photograph so
they are not trapped when folding the frame.
Release centre frame lock as follows:-
Flip catch
Turn to side
Lift up lever to
release pin from
frame
Fold frame front to back.
Unscrew handlebar folding lock fully and fold down handlebars.
Reverse procedure to return bicycle to riding position.
Adjusting the Handlebars (Granite & Diamond)
The handlebars can be adjusted for height and angle to suit the rider. Hex
keys, (not supplied), will be required to carry out these adjustments.
All other operation of your BATRIBIKE Electric Bicycle is as per a normal
pedal cycle.
Service & Spares
Remember to check all nuts and screws before and after the first ride. This will
need to be repeated after a week or so of riding and periodically to maintain safe
use of your BATRIBIKE bicycle.
Cables may also stretch a little during the first few uses. Brakes and gears may
need to be adjusted after the first few days to ensure correct operation. Refer to
your local cycle shop if you are not familiar with this operation.
Your BATRIBIKE bicycle uses standard cycle parts wherever possible. Items
such as tyres, tubes, lights, brake pads/blocks and cables may be obtained from
your local cycle shop or retailer.
Specialist parts such as the motor, battery, torque sensor or frame components
are only available from Fallowgate Limited or their authorised distributors.
Optional items such as Gel Seats, straight or extended handlebars etc are all
available to fit and most standard cycle accessories should fit the BATRIBIKE
Range. Fallowgate Limited is happy to provide accessories to meet your needs.
12
13
Removing the Rear Wheel
If you need to remove the rear wheel, for
example, to replace the rear tyre, then the
motor can be unplugged to aid
disassembly. The plug is located in the
small plastic casing as shown, (Right).
Remember to ensure that the cable is
suitably secured to the bicycle frame upon
re-assembly.
Charging Fuse
If the battery will not operate or charge correctly, firstly check the battery fuse
(rated 30A) located on the side of the battery beneath the screw cover. Use a
large flat bladed screwdriver or a small coin to remove the cover.
14
Please consider the environment before disposing of any part of your
Batribike Electric Bicycle.
The Battery Pack contains
Lithium and Special
Consideration should be given to
its safe disposal.
Your Local Authority should have
the necessary facilities in place.
Never dispose of batteries in a fire or subject them to puncture or
crushing.
Warranty
Please retain your receipt as this is your proof of purchase and entitlement
to Warranty.
The Frame of your new BATRIBIKE Granite, Diamond &
Quartz is guaranteed for 3 years from date of purchase.
The Motor and Electronics are guaranteed for 2 years from
date of purchase.
Other main cycle parts have a warranty of 1 year.
The battery is covered for 1 year.
Please take note of the Battery Care information contained
in this manual to ensure your battery life is maximised.
In the event of warranty repairs becoming necessary you should return your
bicycle to your Authorised Batribike Dealer, (where you originally purchased
your Batribike). Delivery & collection charges are not redeemable under warranty. Warranty is non transferable and applies only to the original owner.
Brake blocks/pads, tyres, lights and cables etc. are considered as
consumables and replacements are available from BATRIBIKE or may be
obtained from your local cycle shop.
BATRIBIKE Electric Bicycles are exclusive to:Fallowgate Limited
Kellaway House
Marton Road
Sturton-by-Stow
Lincoln
LN1 2AH
Phone: 01427-787774
E-mail: [email protected]
BATRIBIKE
are
Full Members of
the British Electric
Bicycle Association
—————— USER MANUAL GRANITE, DIAMOND & QUARTZ 2011 — ISSUE 2 — ©2011 Fallowgate Limited ——————