1
Acronis Backup Advanced for
Exchange
Version 11.5 Update 3
Backing Up Microsoft Exchange Server Data
Copyright Statement
Copyright © Acronis International GmbH, 2002-2014. All rights reserved.
“Acronis” and “Acronis Secure Zone” are registered trademarks of Acronis International GmbH.
"Acronis Compute with Confidence", “Acronis Startup Recovery Manager”, “Acronis Active Restore”,
“Acronis Instant Restore” and the Acronis logo are trademarks of Acronis International GmbH.
Linux is a registered trademark of Linus Torvalds.
VMware and VMware Ready are trademarks and/or registered trademarks of VMware, Inc. in the
United States and/or other jurisdictions.
Windows and MS-DOS are registered trademarks of Microsoft Corporation.
All other trademarks and copyrights referred to are the property of their respective owners.
Distribution of substantively modified versions of this document is prohibited without the explicit
permission of the copyright holder.
Distribution of this work or derivative work in any standard (paper) book form for commercial
purposes is prohibited unless prior permission is obtained from the copyright holder.
DOCUMENTATION IS PROVIDED "AS IS" AND ALL EXPRESS OR IMPLIED CONDITIONS,
REPRESENTATIONS AND WARRANTIES, INCLUDING ANY IMPLIED WARRANTY OF MERCHANTABILITY,
FITNESS FOR A PARTICULAR PURPOSE OR NON-INFRINGEMENT, ARE DISCLAIMED, EXCEPT TO THE
EXTENT THAT SUCH DISCLAIMERS ARE HELD TO BE LEGALLY INVALID.
Third party code may be provided with the Software and/or Service. The license terms for such
third-parties are detailed in the license.txt file located in the root installation directory. You can
always find the latest up-to-date list of the third party code and the associated license terms used
with the Software and/or Service at http://kb.acronis.com/content/7696
Acronis patented technologies
Technologies, used in this product, are covered and protected by one or more U.S. Patent Numbers:
7,047,380; 7,275,139; 7,281,104; 7,318,135; 7,353,355; 7,366,859; 7,475,282; 7,603,533; 7,636,824;
7,650,473; 7,721,138; 7,779,221; 7,831,789; 7,886,120; 7,895,403; 7,934,064; 7,937,612; 7,949,635;
7,953,948; 7,979,690; 8,005,797; 8,051,044; 8,069,320; 8,073,815; 8,074,035; 8,145,607; 8,180,984;
8,225,133; 8,261,035; 8,296,264; 8,312,259; 8,347,137; and patent pending applications.
2
Copyright © Acronis International GmbH, 2002-2014.
Table of contents
1
Important notices....................................................................................................................... 5
2
Overview .................................................................................................................................... 5
3
General information ................................................................................................................... 6
4
3.1
Agent for Exchange............................................................................................................... 6
3.2
Supported operating systems ............................................................................................... 6
3.3
Supported Microsoft Exchange Server versions..................................................................... 7
3.4
Supported backup locations.................................................................................................. 7
3.5
Permissions for Exchange backup and recovery .................................................................... 8
3.6
Supported operations with database and mailbox backups................................................... 9
3.7
Supported operations with legacy archives and backups..................................................... 10
Getting started with Agent for Exchange.................................................................................. 11
4.1
Simple scenario - a single Exchange server .......................................................................... 11
4.2
Advanced scenario - CDP of an Exchange cluster ................................................................. 13
4.2.1
4.2.2
4.2.3
4.2.4
4.2.5
4.2.6
5
Backup...................................................................................................................................... 17
5.1
How Exchange data is organized ......................................................................................... 17
5.2
What data items can be backed up and what backup types are used?................................. 20
5.3
Backup schemes ................................................................................................................. 22
5.3.1
5.3.2
5.3.3
5.3.4
5.4
Express full backup method ................................................................................................................................. 25
Copy-only backup .................................................................................................................................................. 29
Recovery................................................................................................................................... 30
6.1
What data items can be recovered?.................................................................................... 30
6.2
Selecting data to recover .................................................................................................... 30
6.2.1
6.2.2
6.2.3
6.2.4
6.3
Selecting the Exchange data by using the Data view or Data catalog .......................................................... 31
Selecting the Exchange data by using the Archive view.................................................................................. 32
Searching for specific items in mailboxes and public folders ......................................................................... 33
Point in time selection .......................................................................................................................................... 33
Selecting target destinations for databases or storage groups............................................. 34
6.3.1
6.3.2
6.3.3
3
Simple scheme ....................................................................................................................................................... 22
Continuous Data Protection (CDP) scheme ...................................................................................................... 23
Manual start scheme ............................................................................................................................................ 24
Custom scheme ..................................................................................................................................................... 24
Backup modes .................................................................................................................... 25
5.4.1
5.4.2
6
Prerequisites........................................................................................................................................................... 13
Installation .............................................................................................................................................................. 13
Connecting the console to the management server ....................................................................................... 14
Creating a deduplicating vault............................................................................................................................. 15
Backup ..................................................................................................................................................................... 15
Recovery ................................................................................................................................................................. 16
Recovering storage groups or databases to the original path ....................................................................... 34
Recovering storage groups or databases to a custom path ........................................................................... 34
Recovering databases or storage groups to the specified folder .................................................................. 35
Copyright © Acronis International GmbH, 2002-2014.
6.4
Selecting target destinations for mailboxes, public folders, or their contents ...................... 36
6.4.1
6.4.2
6.5
Using Acronis Active Restore for database recovery............................................................ 39
6.6
Usage examples .................................................................................................................. 39
6.6.1
6.6.2
6.6.3
7
8
9
Recovering mailboxes, public folders, and their contents to the Exchange server .................................... 36
Recovering mailboxes, public folders, and their contents to a .pst file ........................................................ 37
Example 1. Recovering mailboxes to .pst files .................................................................................................. 39
Example 2. Recovering mailboxes to a different mailbox database ............................................................. 41
Example 3. Recovering an accidentally deleted e-mail to the original mailbox .......................................... 41
Exchange servers on a management server.............................................................................. 43
7.1
Actions on Exchange servers and clusters ........................................................................... 43
7.2
Exchange server or cluster details ....................................................................................... 45
Backing up and recovering data of Exchange clusters .............................................................. 47
8.1
Supported Exchange cluster configurations......................................................................... 47
8.2
How many agents are required for cluster data backup and recovery?................................ 49
8.3
Exchange clusters on a management server ........................................................................ 49
8.4
Backing up the Exchange cluster data ................................................................................. 50
8.5
Recovering data to the Exchange cluster ............................................................................. 51
8.6
Cluster credentials .............................................................................................................. 52
Exchange-specific backup options ............................................................................................ 53
9.1
Metadata collection............................................................................................................ 53
9.2
Exclusions from mailbox backup ......................................................................................... 53
10 Glossary.................................................................................................................................... 55
4
Copyright © Acronis International GmbH, 2002-2014.
1 Important notices
This document describes backup and recovery of Microsoft Exchange Server data by using Acronis
Backup Advanced for Exchange.
For the most comprehensive information about the functionality provided by Acronis Backup, please
refer to
Acronis Backup Help
Web Help: http://www.acronis.eu/support/documentation/AcronisBackup_11.5/
Built-in context-sensitive Help available in Acronis Backup Management Console by clicking the
question-mark button
.
For the purpose of convenience, this information is also presented in other sources. Use the ones
that correspond to your preferences.
Installation information
Installation Help available in your setup program by clicking View Installation Help.
Installation Guide for Acronis Backup Advanced:
http://www.acronis.eu/download/docs/aba11.5/installguide
Information about the core functionality provided by Acronis Backup
User Guide for Acronis Backup Advanced: http://www.acronis.eu/download/docs/aba11.5/userguide
Command-line interface
Command-Line Reference: http://www.acronis.eu/download/docs/ab11.5/cmdlineref
2 Overview
Acronis Backup enables you to back up the Mailbox server role of Microsoft Exchange Server.
Mailbox servers host mailboxes and public folders. This data is most critical for any Exchange
organization.
The following is a summary of the product's key features.
Support for Microsoft Exchange Server 2013 (p. 7)
Acronis Backup can back up and recover Microsoft Exchange Server 2013 databases. The product
also supports recovery of Exchange 2013 mailboxes and their contents from database backups to
.pst files (p. 37).
Express full backup method (p. 25)
This method is based on monitoring changes of the Exchange database files. Once the initial full
backup is taken, all subsequent backups will only back up changes to this database without
needing to read the entire database file. Combining this method with the data deduplication
functionality makes it possible to back up large databases of 1TB or more during business hours
and even over WANs.
Exchange clustering support (p. 47)
5
Copyright © Acronis International GmbH, 2002-2014.
Acronis Backup supports SCC, CCR and DAG cluster configurations. You can choose to back up
database replicas rather than active databases for minimal production impact. If the Mailbox role
is moved to another server due to a switchover or a failover, the software will track all
relocations of the data and safely back it up.
Continuous Data Protection (p. 13)
By using Continuous Data Protection, you can revert Exchange data to almost any point in time. If
the most recent transaction log file survived, you can revert Exchange data to the point of failure.
Backup destinations (p. 7)
The backups can be saved to any type of storage supported by Acronis Backup, except for Acronis
Cloud Storage, Acronis Secure Zone, and removable media.
Enhanced granular recovery (p. 30)
Browse Exchange Server database or mailbox backups and recover single or multiple mailboxes
or just specific e-mails. You can also recover calendar items, notes, tasks and journal entries.
New recovery destinations
Besides being able to recover data to a live Exchange server, you can recover
Exchange databases to regular disk folders (p. 35).
E-mails and mailboxes to .pst files (p. 37).
3 General information
3.1
Agent for Exchange
Backing up Exchange data becomes available by using Acronis Backup Agent for Exchange.
The agent is included in the setup program of Acronis Backup Advanced.
The agent is installed with Agent for Windows or on a machine where Agent for Windows is already
installed.
Agent for Exchange requires one of the following licenses:
Acronis Backup Advanced for Exchange
Acronis Backup for Windows Server Essentials
Acronis Backup Advanced for VMware / Hyper-V / RHEV / Citrix XenServer / Oracle VM
Acronis Backup Advanced Universal License
Each of these licenses enables you to install Agent for Windows on the same machine. Therefore, you
can back up the entire machine in addition to Exchange databases and mailboxes.
If Agent for Windows is already installed, you can install Agent for Exchange by using the Acronis
Backup Advanced for Exchange Add-On license.
To use the product in the trial mode, you do not need licenses.
3.2
Supported operating systems
Agent for Exchange can be installed in the following operating systems:
Windows Server 2003/2003 R2 – Standard and Enterprise editions (x86, x64)
6
Copyright © Acronis International GmbH, 2002-2014.
Windows Small Business Server 2003/2003 R2
Windows Server 2008 – Standard, Enterprise, and Datacenter editions (x86, x64)
Windows Small Business Server 2008
Windows Server 2008 R2 – Standard, Enterprise, Datacenter, and Foundation editions
Windows Small Business Server 2011 – all editions
Windows Server 2012/2012 R2 – Standard and Datacenter editions
3.3
Supported Microsoft Exchange Server versions
Agent for Exchange supports the following versions of Microsoft Exchange Server:
Microsoft Exchange Server 2013 – all editions, Cumulative Update 1 (CU1) and later.
Limitation: Mailbox-level backup is not supported. Mailboxes and their contents can be
recovered from database backups to .pst files.
Microsoft Exchange Server 2007/2010 – all editions, all service packs.
The Messaging API Client and Collaboration Data Objects (version 1.2.1) package must be
installed. To download and install this package, visit
http://www.microsoft.com/en-us/download/details.aspx?id=36771.
Microsoft Exchange Server 2003 – all editions, SP2 or later.
Hotfix http://support.microsoft.com/kb/908072 must be installed.
Note: It is important to keep your Exchange servers up-to-date. This ensures the best performance, integrity and
security for all Exchange services and data.
3.4
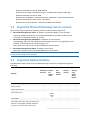
Supported backup locations
The table below shows which of Acronis Backup backup locations are supported by Agent for
Exchange.
General
Storages
Backup specific
Backup and Express
full
Recovery
backup
mode
CDP
backup
scheme
Recovery specific
Granular
recovery
Recovery
using
Acronis
Active
Restore
Acronis Cloud Storage
-
-
-
-
-
Personal vaults
+
-
+
+
+
Acronis Secure Zone
-
-
-
-
-
Centralized vaults
+
+
+
+
Local folders
+
+
Dedup.
vaults
only
-
+
+
+
Removable media (CD, DVD, BD, Floppy), and
external storages (RDX, USB HDD, USB Flash
Drives) in the "Removable media" mode.
-
-
-
-
-
7
Copyright © Acronis International GmbH, 2002-2014.
External storages (RDX, USB HDD, USB Flash
Drives) in the "Fixed drive" mode.
+
-
+
+
+
Tape devices
+
-
-
-
-
Network folders
+
-
+
+
+
FTP/SFTP
+
-
-
+
-
3.5
Permissions for Exchange backup and recovery
The table below contains the minimal permissions required to back up and recover Exchange server
data.
When creating a backup plan, make sure that the account with the required permissions is
specified in What to back up > Access credentials.
When creating a recovery task, make sure that the account with the required permissions is
specified in Where to recover > Access credentials.
To be able to back up, recover, and browse mailboxes, make sure that the account you use is
associated with the mailbox. The mailbox has to be initialized and available in a global address
list. The mailbox database containing the associated mailbox must be mounted. The user account
that is associated with the mailbox must reside in the same forest as the Exchange server.
Exchange
Server
version
2003
Backup
Database backup
Recovery
Mailbox backup and
database backup
Database recovery
Mailbox recovery
Full Exchange
administrator rights for
the domain.
Full Exchange
Full Exchange
administrator rights for administrator rights
the domain.
for the domain.
(with the Metadata
collection (p. 53)
(with the Metadata
option set to Include collection (p. 53) option
set either to Include
list of mailboxes)
mailboxes and folders
or to Include e-mails)
Membership in
Domain backup
operators group.
http://technet.micro http://technet.microsoft http://technet.microsof http://technet.micros
soft.com/en-us/librar .com/en-us/library/bb12 t.com/en-us/library/bb oft.com/en-us/library/
y/bb123926(EXCHG.6 3926(EXCHG.65).aspx
123926(EXCHG.65).asp bb123926(EXCHG.65).
5).aspx
x
aspx
2007
Membership in the
local Backup
Operators group, or
Membership in the
local Administrators
group.
Membership in
Exchange Recipient
Administrator role on
the server that holds the
target mailbox.
Membership in
Exchange Organization
Administrators group
(required for storage
group creation).
Membership in
Exchange Recipient
Administrator role on
the server that holds
the target mailbox.
http://technet.microsoft http://technet.microsof http://technet.micros
http://technet.micro .com/en-us/library/aa99 t.com/en-us/library/bb oft.com/en-us/library/
soft.com/en-us/librar 7694(EXCHG.80).aspx
310792(EXCHG.80).asp aa997694(EXCHG.80).
y/bb123693(EXCHG.8
x
aspx
0).aspx
8
Copyright © Acronis International GmbH, 2002-2014.
2010
Membership in
Organization
Management role
group.
Membership in
Organization
Management and Server
Management role
groups.
Membership in
Organization
Management role
group.
N/A
Membership in
Organization
Management role
group.
Membership in
Organization
Management and
Server Management
role groups.
http://technet.micro
http://technet.microsof
soft.com/en-us/librar http://technet.microsoft t.com/en-us/library/dd http://technet.micros
y/dd876854(v=exchg. .com/en-us/library/dd63 876854(v=exchg.141).a oft.com/en-us/library/
dd638132(v=exchg.14
141).aspx
8132(v=exchg.141).aspx spx
1).aspx
2013
Membership in
Organization
Management role
group.
http://technet.micro
soft.com/en-us/librar
y/dd876854.aspx
3.6
N/A
http://technet.microsof
t.com/en-us/library/dd
876854.aspx
Supported operations with database and mailbox
backups
This section describes how the standard Acronis Backup operations are supported for database and
mailbox backups.
Functionality
Database backup
Mailbox backup
N/A
N/A
Backup
Simplified naming of
backup files
Custom backup scheme > There is no option to consolidate an
Retention rules >
Exchange backup to be moved or
deleted that has dependencies. For
Advanced Settings
more information, see the Custom
scheme (p. 24) section.
N/A
Operations with backups in vaults
Exporting backups
Backups that have no dependencies
are exported without any
limitations.
When exporting a transaction log
backup, the data from the backup
chain (a full database backup and its
dependent transaction log backups
up to the selected one) is copied to a
single backup.
Backups that have no dependencies
are exported without any limitations.
When exporting an incremental
mailbox backup, the data from the
backup chain (a full mailbox backup
and all of its incremental backups up
to the selected one) is consolidated
into a single backup.
Transaction log files will be applied
to the database during recovery.
Converting a backup to
full
9
N/A
N/A
Copyright © Acronis International GmbH, 2002-2014.
Deleting backups
Backups that have no dependencies are deleted without any limitations.
A backup that has dependencies cannot be deleted separately from all its
dependent backups.
To delete a backup with dependencies manually, you should delete the
entire backup chain (a full backup and all its dependent transaction log
backups or incremental backups).
If you set the retention rules to delete backups older than the specified age,
icon) will be kept until all
the outdated backup (marked with the
backups that depend on it also become outdated. Then, all the chain will be
deleted at once.
3.7
Supported operations with legacy archives and
backups
Acronis Backup supports archives and backups created with Acronis Recovery for Microsoft
Exchange. The table below shows which actions are available for legacy archives and backups.
Operation
Support
Database recovery (recovery of information store, storage groups, and
databases)
Recovery point: Date and time of backup creation
Yes
Recovery point: Point of failure
No
Recovery point: Custom point in time
No
Destination: Original path
Yes
Destination: A custom path within Microsoft Exchange Server
Yes
Destination: A custom folder on a file system
Yes
Mailbox recovery (mailboxes, public folders, e-mails, calendar items, etc)
Destination: Recover to Microsoft Exchange Server
Yes
Destination: Recover to a .pst file
Yes
Other operations
Back up to an existing archive
No
Browsing the backup contents tree down to individual e-mails
Yes
Cataloging
No
In-archive search
Yes
Exporting backups from archives
Yes
Deleting individual backups from archives
No
Deleting archives
Yes
You cannot view the contents of or recover data from the backups created by Acronis Recovery for Microsoft
Exchange, if the backups are located on tapes. To recover data from an old backup, export this backup from
tapes to another vault.
10
Copyright © Acronis International GmbH, 2002-2014.
4 Getting started with Agent for Exchange
This section lets you quickly implement the most common backup and recovery scenarios for
stand-alone Exchange servers as well as for Exchange cluster environments.
4.1
Simple scenario - a single Exchange server
The following steps will guide you through the installation and basic use of Acronis Backup in simple
Exchange organizations.
Let's assume you have a single Exchange server that hosts all Exchange services and stores all
Exchange data. Considering the typical size of the server data, the frequency and the amount of the
typical data changes, a reasonable backup strategy for such a server is a nightly full backup and an
hourly transaction log backup.
Prerequisites
Ensure that:
You have a machine running one of the supported Microsoft Exchange Server versions (p. 7).
You have a license that enables installation of Agent for Exchange (p. 6).
You downloaded the setup program for Acronis Backup Advanced.
The Exchange writer for VSS is turned on. In Windows Small Business Server 2003, the writer is
turned off by default. For instructions on how to turn it on, see the following Microsoft
Knowledge Base article http://support.microsoft.com/kb/838183/.
Installation
In this step, you will install Agent for Exchange and the management console on the machine running
Exchange Server.
1. Log on to the machine as a domain administrator and start the setup program.
2. Click Install Acronis Backup. Accept the terms of the license agreement.
3. Select the Back up this machine's data check box, and on the next page ensure that the
Microsoft Exchange Server check box is selected.
4. When prompted for licenses, select I purchased a license or a subscription.
5. Click Add licenses and type in your license key or import it from a file.
6. Leave the default I will register the component(s) later setting.
7. Specify credentials for the account under which the Agent for Exchange service will run. By
default, the setup program will create a dedicated user account for the service.
8. Choose whether the machine will participate in the Acronis Customer Experience Program (CEP).
9. Proceed with the installation.
Running Acronis Backup
To start the management console, either double-click the Acronis Backup icon on the desktop, or
select from the Start menu: Acronis > Acronis Backup Management Console > Acronis Backup.
11
Copyright © Acronis International GmbH, 2002-2014.
Backup
In this step, you will set nightly full backups and hourly transaction log backups of the entire
information store.
1. Make sure that circular logging is disabled for all databases or storage groups of the Exchange
server. Otherwise, the transaction log backup will fail.
2. In the management console, click Create backup plan.
3. Under What to back up section, click Items to back up. In Data to back up, select Microsoft
Exchange Information Store. In the data tree, expand the machine and select the Microsoft
Exchange Information Store check box under the machine's name. Then, click OK.
4. Under Where to back up section, click Location, and specify the location where the backups will
be stored.
5. Under How to back up section:
a. In Backup scheme, select Custom.
b. In Full backup, click Add schedule. Select Daily and set up the schedule as follows: Every: 1
day(s), Once at: 09:00:00 PM.
c. In Transaction log, click Add schedule. Select Daily and set up the schedule as follows: Every:
1 day(s), Every: 1 Hour(s).
6. Click OK to save the backup plan.
Details. You will see the Backup plans and tasks view with the backup plan you have just
created. In this view, you can check the backup plan's status, monitor its execution state, run or
stop the plan, and more.
Recovery
In this step, you will recover a mailbox to the original mailbox database. To recover an entire
database or storage group, use the procedure described in the advanced scenario (p. 13) (see under
"Recovery", starting from step 2).
1. In the Navigation tree, expand Vaults > Personal and then select the folder where you saved the
archives. If prompted, provide access credentials for the vault.
2. On the Data view tab, select Microsoft Exchange Mailboxes in the Show list.
3. In the catalog tree, select the mailbox that you need to recover. Under Versions, select the date
and time of backup creation. The mailbox will be recovered to this point.
4. Click Recover.
5. Under Where to recover, in Data paths, select Microsoft Exchange Server.
6. Choose what to do if the software finds in the original path the mailbox items with the same IDs
as in the backup:
Overwrite existing items - this is the default setting that fits most situations.
Do not overwrite existing items - this setting will let you retain the changes made to the
items after the backup had been created.
7. Click OK to start the recovery.
Details. You will see the window with the recovery activity progress and details.
12
Copyright © Acronis International GmbH, 2002-2014.
4.2
Advanced scenario - CDP of an Exchange cluster
This section gives an example of backing up multiple Exchange servers that are integrated into a
cluster. Let's see how to leverage the advanced features: Continuous Data Protection (CDP), express
full backup, and data deduplication.
To be able to revert Exchange data to any custom point in time, we will use the CDP backup
scheme (p. 23). In this scheme, you specify when to perform full backups. In addition, the
transaction log files are backed up automatically as soon as they are closed by Exchange. In our
case, assume full backups will be performed every night.
To create full backups faster and for them to occupy much less space, we will do full backups to a
deduplicating vault by using the express full backup method (p. 25). With this method, the
software backs up only the changes that have occurred since the previous full backup. Since the
unchanged data is already stored in the deduplicating vault, the software only adds a reference
to the unchanged data.
To relieve the production server from the load associated with backup operations, we will
configure the software to back up the cluster data from any of its passive database copies. If
none of the passive copies are available at the moment, we allow the software to back up the
active database copy.
As for recovery, let's consider a case, where you need to quickly recover a lost or corrupted Exchange
database to the state that it was just before the failure. To allow users to access their e-mails while
the Exchange database is still being recovered, we will use Acronis Active Restore (p. 39).
4.2.1
Prerequisites
Make sure that:
You have machines running the supported versions of Microsoft Exchange Server (p. 7).
You have one of the supported Exchange cluster configurations (p. 47).
For each node of the cluster, you have a license that enables installation of Agent for Exchange
(p. 6).
The Exchange writer for VSS is turned on.
You downloaded the setup program of Acronis Backup Advanced.
You have a machine running Windows that will act as the management server. The management
server enables configuring of Exchange cluster backup.
You have a machine running 64-bit Windows that will act as the storage node. The storage node
serves as storage for backups of other machines and enables deduplication. Make sure this
machine meets the system requirements described in the installation documentation.
4.2.2
Installation
Installing the management server
1. On the machine that will act as the management server, log on as an administrator and start the
setup program.
2. Click Install Acronis Backup. Accept the terms of the license agreement.
3. Select the Centrally monitor and configure the backing up of physical and virtual machines
check box.
4. Type your license keys or import them from a text file.
13
Copyright © Acronis International GmbH, 2002-2014.
5. Proceed with the installation.
Details. The console will also be installed so that you can control the management server locally.
Installing Agent for Exchange
Perform the following steps on each node of the cluster.
1. Log on to a cluster node as domain administrator and start the setup program.
2. Click Install Acronis Backup. Accept the terms of the license agreement.
3. Select the Back up this machine's data check box, and on the next page ensure that the
Microsoft Exchange Server check box is selected.
4. When prompted for licenses, select I purchased a license or a subscription.
5. Click Add licenses, select the Use the following license server check box, and then specify the
name or IP address of the machine where you installed the management server.
Details. The license server is integrated with the management server.
6. Click Register now. Specify the name or IP address of the machine where you installed the
management server. Provide the user name and password of an administrator on that machine.
7. Specify whether the machine with the Exchange server will participate in the Acronis Customer
Experience Program (CEP).
8. Proceed with the installation.
Details. The console will also be installed on each machine.
Installing the storage node
1. On the machine that will act as the storage node, log on as an administrator and start the setup
program.
2. Click Install Acronis Backup. Accept the terms of the license agreement.
3. Select the Store the backups of other machines on this machine check box.
4. Click Register now. Specify the name or IP address of the machine where you installed the
management server. Provide the user name and password of a user who is a member of the
Acronis Centralized Admins group on the management server's machine.
5. Proceed with the installation.
[Optional] Installing the management console
Install the console on a machine from which you prefer to operate, if this machine is not the
management server and does not have an agent.
1. Run the setup program and click Install Acronis Backup.
2. After accepting the terms of the license agreement, select the Connect to remote machines
check box.
3. Follow the on-screen instructions.
4.2.3
Connecting the console to the management server
To connect the console to the management server:
1. Click Connect to a management server.
2. Enter the server name or IP address.
3. If prompted for credentials, specify the user name and password. The user has to be a member
of the Acronis Remote Users and the Acronis Centralized Admins groups on the server.
14
Copyright © Acronis International GmbH, 2002-2014.
4.2.4
Creating a deduplicating vault
1.
2.
3.
4.
5.
6.
7.
Connect the console to the management server.
Click Storage nodes in the Navigation pane.
Select the storage node, then click Create vault.
In Name, type the name of the vault.
In Deduplication, select On.
Click Path and then specify the path to the network share where the backups will be stored.
Click Deduplication database and then specify the path to the deduplication database.
Details. To get maximum benefit from the deduplication, we recommend that you locate the
deduplication database and the vault on separate physical devices. For more recommendations,
see the "Deduplication best practices" section in either the product Help or the User Guide for
Acronis Backup Advanced.
8. Click OK to create the deduplicating vault.
4.2.5
Backup
1. Connect the console to the management server.
2. Click Create backup plan.
3. Under What to back up:
a. Click Show access credentials, exclusions. In the Access credentials, specify the credentials
required to access the source data.
Details. To access the Exchange cluster data, a domain user account that has administrative
privileges on each of the cluster nodes is required.
When entering the name of an Active Directory user account, be sure to also specify the
domain name (DOMAIN\Username or Username@domain).
b. Click Items to back up. In data to back up, select Exchange information store. In the catalog
tree, select the Exchange cluster. In the data tree, expand the cluster and select the Exchange
information store check box under the cluster's name. The cluster databases or storage
groups are displayed as single instances regardless of the number of copies they have within
the cluster.
4. Under Where to back up, select the deduplicating vault created previously.
5. Under How to back up:
a. In Backup scheme, choose Continuous Data Protection (CDP).
b. In Schedule, select Daily and set up the schedule as follows: Every: 1 day(s), Once at:
11:59:00 PM.
c. In Cluster backup mode, choose Passive (replica) and select to Back up active if none of the
passive copies are available.
Note: To back up transaction log files, disable circular logging for all databases or storage
groups in Exchange. Otherwise, the backup task will fail.
d. Click Show backup type, validation to access the Backup type setting.
e. In Backup type, select Create full backups using the Express full backup method.
6. If required, set up the rest of the backup plan settings.
7. Click OK to create the backup plan.
15
Copyright © Acronis International GmbH, 2002-2014.
Details. You will see the Backup plans and tasks view with the backup plan you have just
created. In this view, you can check the backup plan's status, monitor its execution state, run or
stop the plan, and more.
4.2.6
Recovery
1. Connect the console to the one of the available cluster nodes.
2. In the Navigation tree, expand Vaults > Centralized and then select the vault where you saved
the backups.
3. In the Data view tab, in Show, select Microsoft Exchange Information Store.
4. In the catalog tree, select the database that you need to recover. Under Versions, select Point of
failure.
5. Click Recover.
6. Under Where to recover section:
a. In Data paths, select Original.
b. In Mount recovered databases, select Mount with Active Restore.
7. Leave the rest of the setting "as is" and click OK to start the recovery.
Details. You will see the window with the recovery activity progress and details.
16
Copyright © Acronis International GmbH, 2002-2014.
5 Backup
This section describes only the steps and settings that are specific for backing up Microsoft Exchange
Server data. The whole procedure of backup plan creation and common backup plan settings, such as
selecting backup locations, setting up backup replication, retention and validation are described in
the "Backup" section of the product Help or the User Guide for Acronis Backup Advanced.
Back up now
Use the Back up now to do a one-time backup of the Exchange server's data in a few simple steps.
The backup process will start immediately after you perform the required steps and click OK.
Create backup plan
Create a backup plan, if you need a long-term backup strategy including backup schemes, schedules,
timely deleting of backups, or moving them to different locations.
Create a backup plan on a managed machine to back up data of an individual Exchange server.
Create a backup plan on the management server to back up data of the supported Exchange clusters.
For more information, see "Backing up and recovering data of Exchange clusters" (p. 47). By backing
up individual Exchange servers with backup plans on the management server, you obtain a single
point to manage and monitor activities related to data protection.
5.1
How Exchange data is organized
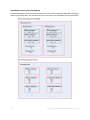
Information store
Microsoft Exchange Server stores its data in a single repository called information store (in Exchange
2003/2007), Exchange store (in Exchange 2010), or Managed store (in Exchange 2013). The primary
components of the information store are storage groups (for Exchange 2003/2007 only) and
Exchange databases.
Exchange database
There are two types of Exchange databases.
A mailbox database stores contents of mailboxes. Mailbox content is private to the mailbox user.
A public folder database stores public folders data. Public folder content is shared among
multiple users. Public folder databases exist in Exchange versions earlier than Exchange 2013.
Either type database stores the data in the following files:
17
Database file (.edb)
Contains message headers, message text, and standard attachments.
An Exchange 2003/2007 database uses two files: .edb for text data and .stm for MIME data.
Transaction log files (.log)
Contains the history of changes made to the database. Only after a change has been securely
logged, it is then written to the database file. This approach guarantees a reliable recovery of the
database in a consistent state in case of a sudden database interruption.
Each log file is 1024 KB in size. When an active log file is full, Exchange closes it and creates a new
log file.
Copyright © Acronis International GmbH, 2002-2014.
Checkpoint file (.chk)
Tracks how far Exchange has progressed in writing logged information to the database file.
Storage group
In Exchange 2003/2007, a storage group is a logical container for Exchange databases (p. 55), the
associated transaction log (p. 57), checkpoint (p. 55), and other system files. All databases in a
storage group share a single log stream. A storage group is the basic unit for backup and recovery.
Starting with Exchange 2010, the concept of a storage group is discontinued. Therefore, you can
select individual databases for backup. Each database will be backed up along with the necessary
associated files.
18
Copyright © Acronis International GmbH, 2002-2014.
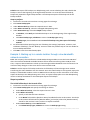
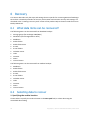
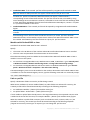
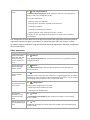
Information store structure diagram
The following diagram illustrates the information store structure for Exchange 2003/2007, Exchange
2010, and Exchange 2013. The data items that you can back up at the database level are red-framed.
19
Copyright © Acronis International GmbH, 2002-2014.
5.2
What data items can be backed up and what backup
types are used?
While creating a backup plan, you can select either the Microsoft Exchange Information Store or the
Microsoft Exchange Mailboxes data type.
Microsoft Exchange Information store
When you select this data type, the software will perform a database backup.
You can select the following items to back up:
The entire information store.
Individual databases (for Exchange 2010/2013).
Individual storage groups (for Exchange 2003/2007).
The dismounted databases are skipped during backup. The backup task gets the "Succeeded with
warning" result, if the task backed up at least one database but skipped others because they were
dismounted. The backup task gets the "Failed" result, if the task was completed but skipped all of the
databases because they were all dismounted.
During database backups, Agent for Exchange automatically performs consistency check of database
files. It verifies the page-level integrity of the databases being backed up and validates the
checksums of all database pages and log files. Databases with a checksum mismatch or file header
damage are skipped during the backup.
Database backup types
Full. A regular full database backup stores the selected storage groups or databases along with
transaction log files and Exchange-related information from Active Directory. After a full backup
is created, transaction log files are truncated (p. 57). A full backup is self-sufficient; that is, you do
not need access to any other backup to recover the data from a full backup. The database
backups are the basis for disaster recovery scenarios when it is necessary to recover lost or
corrupted databases, storage groups, or entire information store. Granular recovery from
20
Copyright © Acronis International GmbH, 2002-2014.
database backups allows for restoring mailboxes, public folders, e-mails, contacts, calendar
events, journal entries, notes and more.
Additionally, full backups can be created by using one of the following methods:
Express full backup (p. 25). This method allows creating creating full database backups in
deduplicating vaults. Although regular data deduplication can be used full database backups,
we recommend using the Express full backup method to achieve maximum deduplication
effect.
Copy-only backup (p. 29). This method allows creating full database backups without
truncating the transaction log files.
Transaction log. A transaction log backup stores the transaction log files along with checkpoint
files and other files required for recovery. After a backup is created, transaction log files are
truncated. At first, a regular full backup is created. By having full and transaction log backups,
you can recover the data to a custom point in time. From a recovery perspective, transaction log
backups are similar to incremental backups. To recover from a transaction log backup, each
transaction log backup since the last full backup and the full backup is required. A long chain of
transaction log files may significantly increase recovery time.
Note: To back up transaction log files, disable circular logging in Exchange. When circular logging is
enabled, Exchange overwrites the first log file after its data has been written to the database. This in turn,
breaks the transaction log chain preventing Acronis Backup from doing transaction log backups. If you
enable circular logging after a backup plan creation, the backups will fail.
Microsoft Exchange mailboxes
When you select this data type, the software will perform a mailbox backup.
You can select the following items to back up:
Mailboxes or mailbox folders
Public folders
By using the exclusion filters (p. 53), you can specify items to be skipped during a mailbox backup.
How to use a mailbox backup
A mailbox backup gives you the additional flexibility to back up individual mailboxes or public folders
without backing up the entire database. We recommend that you use a mailbox backup to protect
the most important mailboxes or if you need to back up less than 15 GB of data. For larger volumes
of data, a database backup is more effective. It will take less time and you can recover individual
mailboxes, e-mails, or other data items (p. 30), as well as the entire database.
Limitations of a mailbox backup
Though you can select archived mailboxes, they will not be backed up.
Unlike full database backups, mailbox backups cannot be deduplicated.
Mailbox backup types
Full backup. A full mailbox-level backup stores the contents and folder structure of the mailboxes
21
or public folders selected for backup.
Incremental backup. An incremental mailbox backup stores changes to the data against the last
backup. At first, a full mailbox backup is created. You need to access other backups from the
same archive to recover data from an incremental backup.
Copyright © Acronis International GmbH, 2002-2014.
5.3
Backup schemes
When backing up data of Microsoft Exchange server, the following backup schemes are available:
Backup
schemes
Description
Database
backup types
Mailbox backup
type
Simple (p. 22) Protects the Exchange data with full backups performed
automatically on a schedule you specify.
Regular full
- Express full
(p. 25)
Full
Manual start
(p. 24)
Regular full
Full
- Express full
Incremental
(p. 25)
- Copy-only (p.
29)
Save a backup plan now to be able to start it manually at
any time afterwards.
Transaction log
Continuous
Data
Protection
(CDP) (p. 23)
The CDP scheme allows recovering the protected data to
any point in time. In this scheme, transaction log files are
backed up automatically as soon as they are closed by
Exchange. You just need to specify when to perform full
database backups.
Regular full
- Express full
(p. 25)
N/A
Custom (p.
24)
Customize your backup strategy the way your need it
most. Specify multiple schedules for different backup
types, and set up the retention rules.
Full
Regular full
- Express full (p.
Incremental
25)
Transaction log
5.3.1
Simple scheme
With the simple backup scheme, you just schedule when to create full backups. Other steps are
optional.
For the description of the common settings for this backup scheme, such as setting up backup
schedule, backup replication, retention, and validation, see the "Backup" section in either the
product Help or the User Guide for Acronis Backup Advanced.
The specific setting for this scheme is the Backup type, which is accessible by clicking Show backup
type, validation.
The available backup types depend on the data type (p. 20) selected for backup: Microsoft Exchange
Information Store or Microsoft Exchange Mailboxes.
22
Microsoft Exchange Information Store: For this data type the archive will contain a number of
regular full database backups.
If a deduplicating vault is selected as a backup destination, full backups can be obtained by
backing up only the changes that have occurred since the last full backup. To do this, select the
Create full backups using the Express full backup method check box. For more information on
express backups, see "Express full backup method" (p. 25).
Microsoft Exchange Mailboxes: For this data type the archive will contain a number of full
mailbox backups.
Copyright © Acronis International GmbH, 2002-2014.
5.3.2
Continuous Data Protection (CDP) scheme
Continuous Data Protection (CDP) allows reverting the Exchange data to almost any custom point in
time. With the CDP scheme, transaction log files are backed up automatically as soon as they are
closed by Exchange. You only specify when to perform full database backups. The transaction log file
backup is paused until the full backup is completed.
To set up the CDP backup scheme, specify the appropriate settings as follows.
Schedule
Set up when and how often to perform full database backups. To learn more about setting up the
schedule, see the "Scheduling" section of the product Help or the User Guide for Acronis Backup
Advanced.
Retention rules
[Optional] Specify how long to store backups in the location and whether to move or delete them
afterward. The retention rules in this scheme are applied after creating a full backup. The Keep
backup indefinitely is set by default. This means that no full backups will be deleted
automatically. For more information about retention rules, see the "Setting up retention of
backups" section of the product Help or the User Guide for Acronis Backup Advanced.
2nd location
[Optional] Specify whether to replicate backups to another location. The replication in this
scheme is performed after creating a full backup. Thus, transaction log backups are replicated to
another location after the next full backup is created. For more information about backup
replication, see the "Setting up replication of backups" section of the product Help or the User
Guide for Acronis Backup Advanced.
Backup type, validation
To access these settings, click Show backup type, validation.
Backup type
[Optional] The archive will contain a number of full and transaction log backups.
If a deduplicating vault is selected as a backup destination, full backups can be obtained by
backing up only the changes that have occurred since the last full backup. To do this, select the
Create full backups using the Express full backup method check box. For more information on
express backups, see "Express full backup method" (p. 25).
Note: To back up transaction log files, circular logging must be disabled in Exchange. Otherwise,
the backup task will fail.
When to validate
[Optional] Define when to perform validation.
Disabling CDP
The CDP scheme is a combination of scheduled full backup activities and always running transaction
log backup activity. You may need to temporarily disable CDP when performing database
maintenance operations. To do this, navigate to the Backup plans and tasks view, select the backup
plan that use the CDP scheme, and click Disable. Once the maintenance operations are completed,
enable the backup plan.
23
Copyright © Acronis International GmbH, 2002-2014.
5.3.3
Manual start scheme
With the Manual start scheme, the backup will not start automatically. You can run the backup plan
from the Backup plans and tasks view manually at any time afterwards.
For the description of the common settings for this backup scheme, such as setting up backup
replication and validation see the "Backup" section of the product Help or the User Guide for Acronis
Backup Advanced.
The specific setting for this scheme is the Backup type, which is accessible by clicking Show backup
type, validation.
The available backup types depend on the data type (p. 20) selected for backup: Microsoft Exchange
Information Store or Microsoft Exchange Mailboxes.
Microsoft Exchange Information Store: For this data type choose one of the following backup
types:
Full. Selected by default. Creates regular full database backups.
Optionally, you can choose how to create full backups by using one of the following
methods:
Create full backups using the Express full backup method (available if a deduplicating
vault is selected as a backup destination) - creates full backups by backing up only the
changes that have occurred since the last full backup. For more information, see "Express
full backup method" (p. 25).
Copy-only backup - creates full database backups without truncating the transaction log
files. For more information, see "Copy-only backup" (p. 29).
Transaction log. Creates transaction log backups. Initially, a regular full database backup is
created.
Microsoft Exchange Mailboxes: For this data type choose one of the following backup types:
Full backup. Creates full mailbox backups.
5.3.4
Incremental backup. Creates incremental mailbox backups. Initially, a full mailbox backup is
created.
Custom scheme
In the Custom backup scheme, you can set up a backup strategy in the way your enterprise needs it
most: specify schedules for backups of each type and set up the retention rules.
The available backup types depend on the data type (p. 20) selected for backup: Microsoft Exchange
Information Store, or Microsoft Exchange Mailboxes.
Microsoft Exchange Information Store
If you have selected Microsoft Exchange Information Store data type, the following backup types are
available:
24
Full backup
Specify on what schedule (Add schedule...) to perform a full database backup.
If a deduplicating vault is selected as a backup destination, full backups can be obtained by
backing up only the changes that occurred since the last full backup. To do this, select the Create
full backups using the Express full backup method check box. For more information on express
backups, see "Express full backup method" (p. 25).
Copyright © Acronis International GmbH, 2002-2014.
Transaction log
Specify on what schedule (Add schedule...) to perform a transaction log backup.
If the archive contains no full backups at the time of the task run, a full backup is created instead
of the transaction log backup.
Microsoft Exchange Mailboxes
If you selected Microsoft Exchange Mailboxes data type, the following backup types are available:
Full backup
Specify on what schedule (Add schedule...) to perform a full mailbox backup.
Incremental backup
Specify on what schedule (Add schedule...) to perform an incremental mailbox backup.
If the archive contains no backups at the time of the task run, a full backup is created instead of
the incremental backup.
Clean up archive
Specify how to get rid of old backups: either to apply retention rules regularly or clean up the archive
during a backup when the destination location runs out of space.
By default, the retention rules are not specified. This means older backups will not be deleted
automatically.
Note, in the Advanced settings of the Retention rules window for Exchange backups there is no
option to consolidate a backup to be moved or deleted that has dependencies. The outdated backup
icon) will be kept until all backups that depend on it also become outdated.
(marked with the
Then, all the chain will be deleted at once during the regular cleanup. If you chose moving outdated
backups to the next location, the backup will be copied there without delay. Only its deletion from
the current location is postponed.
Replication
[Optional] Specify whether to copy backups to another location. For more information about backup
replication, see the "Setting up replication of backups" of the product Help or the User Guide for
Acronis Backup Advanced.
When to validate
[Optional] Define when and how often to perform validation and whether to validate the entire
archive or the latest backup in the archive.
5.4
5.4.1
Backup modes
Express full backup method
The express full backup method allows creating full backups of Exchange information stores, storage
groups, or databases in deduplicating vaults. With this method, Acronis Backup backs up only the
changes that have occurred since the previous full backup. The data that has not changed is replaced
with links to it in a newly created backup.
As compared to regular full database backups:
25
The express full backups are created much faster and occupy less space.
Copyright © Acronis International GmbH, 2002-2014.
The number of I/O requests to the production server is significantly reduced.
5.4.1.1
How the express full backup method works
The express full backup method is based on monitoring Exchange database files performed by
Acronis Express Backup Driver.
Beginning from the first regular full backup, the driver monitors all modifications performed on the
database file. The driver determines the offsets and regions of the database file which have been
modified by Exchange and stores information about these modifications in the list of changed file
regions.
At the next backup, the driver provides the list to the agent and the agent starts to back up only the
data corresponding to this list. The agent transfers only the changes and the data that cannot be
deduplicated (transaction log files and database page headers). Since the unchanged data is already
stored in the deduplicating vault, the agent only adds links to this data. After that, deduplication at
target is performed in the same way as for disk-level and file-level backups.
To learn more about how deduplication works, see the "How deduplication works" section in either
the product Help or the User Guide for Acronis Backup Advanced.
What happens in case of an unexpected system shutdown?
An unexpected system shutdown between the express full backups invalidates information
maintained by the Express Backup Driver. At the next backup, Acronis Backup runs the data re-sync
backup operation by comparing the current database files with the most recent backup rather than
performing a regular full database backup. Although the re-sync increases the number of I/O
requests to the production server, it still saves storage space and network traffic. The next backups
after the "re-synced" backup will proceed as regular express full backups.
What if one of the scheduled backups fails?
If one or more of the scheduled express full backups fail, the next successful backup will be a regular
express full backup based on differences since the previous successful backup.
What happens when maintenance operations involve rebooting of the Exchange
server?
If Exchange server reboot is part of maintenance operations, the next successful backup will be a
regular express full backup.
5.4.1.2
Usage examples
This section provides examples of how you can use the express full backup method.
Example 1. Backing up within a narrow backup window
Case: The company's working schedule allows a backup window of only 5 hours per night. The
network bandwidth is 60 GB per hour. This effectively limits the amount of data that can be backed
up nightly to 300 GB. The Exchange server in the company hosts 500 GB of data making it impossible
to finish a full backup within the required time frame. Daily changes, however, almost never exceed 5
GB.
26
Copyright © Acronis International GmbH, 2002-2014.
Solution: Do express full backups to a deduplicating vault. Create a backup plan and schedule the
backup to start at the beginning of the night backup window. To create the initial full backup,
temporarily expand the night backup window. The subsequent express full backups will fit the
backup window.
Steps to perform
1.
2.
3.
4.
5.
Connect the console to the machine running Agent for Exchange.
Click Create backup plan.
Under What to back up, select the required server's data.
Under Where to back up, select the managed deduplicating vault.
Under How to back up, select the Simple backup scheme.
In Schedule, select Daily and schedule backup to run at the beginning of the night backup
window.
Click Show backup type, validation to access the Backup type setting.
In Backup type, choose Full and select Create full backups using the Express full backup
method.
6. For information about specifying the rest of backup plan settings (replication, retention, and
validation of backups), see the "Backup" section in either the product Help or the User Guide for
Acronis Backup Advanced.
7. Click OK to save the created backup plan.
Example 2. Backing up to a remote location through a low-bandwidth
network connection
Case: The company's branch office has a dedicated Exchange mailbox server that hosts 500 GB of
data. The network bandwidth available between offices allows transferring about 5 GB per hour.
Thus, it requires about 100 hours to back up the Exchange mailbox databases over the network. The
amount of daily changes on this server almost never exceeds 5 GB.
Solution: Use the express full backup method to do full backups of the Exchange server without
transferring the entire database over the network. Since the initial backup is still required, export the
backup to a detachable medium such as a USB hard drive and ship it to the main office. In the office,
export the backup to the deduplicating vault. Then, set up the backup plan to use the deduplicating
vault as a backup destination for the subsequent express full backups.
Steps to perform
The initial full backup in the branch office
1. Connect the console to the machine running Agent for Exchange.
2. Click Create backup plan and specify the settings as follows:
a. Under What to back up, select the required server's data.
b. Under Where to back up:
Specify a vault that will store the data.
In the Name field, add the [Machine Name] variable before the archive name. The whole
archive name should look like [Machine Name]_Archive(N), where the [Machine Name]
stands for the machine's name, and N is a sequence number.
Under How to back up, select Manual start.
c.
27
Click Show backup type, validation to access the Backup type setting.
Copyright © Acronis International GmbH, 2002-2014.
In Backup type, choose Full.
3. Click OK to create the backup plan.
4. You will see the Backup plans and tasks view with the backup plan you have just created. Select
this backup plan and click Run.
Exporting the initial backup to a detachable medium
1.
2.
3.
4.
5.
6.
After the backup is created, navigate to the vault containing the backup.
In the vault view, click the Archive view tab and select the created backup.
Click Export.
On the Export page, under Where to export, specify the path to the USB hard drive.
Click OK to export the backup.
Once the export is completed, ship the drive to the main office.
Exporting the backup to a remote location
1.
2.
3.
4.
5.
6.
In the main office, attach the drive to the machine running the Agent for Exchange.
Connect the console to this machine.
In the Actions menu, select Export backup.
Under What to export, select the archive on the attached drive.
Under Where to export, select the deduplicating vault.
Click OK to export the backup.
Scheduling the express full backups
1.
2.
3.
4.
Connect the console to the machine running Agent for Exchange in the branch office.
Click Create a backup plan.
Under What to back up, select the same data as when creating the initial full backup.
Under Where to back up:
Select the managed vault containing the exported archive.
In Schedule, select Daily and specify the daily backup schedule.
Click Show backup type, validation to access the Backup type setting.
In the Name field, enter the following: [Application Instance Name]_Archive(N), replacing N
with the same number as in the exported backup. For example, if the exported backup name
is machine1.corp.com_Archive(1), the sequence number you should specify in the
parentheses must be the same: [Application Instance Name]_Archive(1).
5. Under How to back up, select Simple backup scheme.
In Backup type, select Create full backups using the Express full backup method.
6. For information about specifying the rest of the backup plan settings (replication, retention, and
validation of backups), see the "Backup" section in either the product help or the User Guide for
Acronis Backup Advanced.
7. Click OK to save the created backup plan.
Example 3. Minimizing storage space taken by full backups
Case: The company's backup strategy requires creating daily full backups of the Exchange server
database hosting 1 TB of data. Each backup has to be retained for 8 weeks. Thus, having 56 full
backups requires about 56 TB of storage space. The average amount of daily changes on the server is
about 30 GB.
28
Copyright © Acronis International GmbH, 2002-2014.
Solution: Do express full backups to a deduplicating vault. The storage space savings will be about 52
TB or about 92%.
Steps to perform
1.
2.
3.
4.
5.
Connect the console to the machine running Agent for Exchange.
Click Create backup plan.
Under What to back up, select the required Exchange databases or storage groups.
Under Where to back up, select the managed deduplicating vault.
Under How to back up, select the Simple backup scheme.
a. In Schedule, select Daily and schedule the required time of backup start.
b. Click Show backup type, validation to access the Backup type setting.
c. In Backup type, choose Full and select Create full backups using the Express full backup
method.
6. For information about specifying the rest of backup plan settings (replication, retention, and
validation of backups), see the "Backup" section in either the product Help or the User Guide for
Acronis Backup Advanced.
7. Click OK to save the created backup plan.
5.4.2
Copy-only backup
The copy-only backup method allows creating full database backups without truncating the
transaction log files. This way, full backups are created without interrupting other continuous backup
plans. The copy-only backups can be easily stored off-site for testing, analysis or other purposes.
The copy-only backups can be created with the Manual start (p. 24) backup scheme only.
Usage example. Obtaining a full backup of the Exchange database without
disturbing continuous backup plans
Case: The Exchange database in the organization is currently protected by the backup plan that uses
the CDP (p. 23) scheme. The administrator was asked to provide an up-to-date backup of the
database for analysis purposes.
Solution: If the administrator sets up a backup plan that only creates a regular full backup, it will
truncate the transaction log files and interrupt the backup chain of the existing CDP backup scheme.
To avoid such interferences, the administrator creates a backup plan with the following settings:
1. Under What to back up, select the required database or storage group.
2. Under Where to back up, select the backup destination.
3. Under How to back up:
a. In Backup scheme, select Manual start.
b. Click Show backup type, validation to access the Backup type setting.
c. In Backup type, select Full and then select the Copy-only backup check box.
4. Leave the rest of the backup plan settings "as is" and click OK to create the backup plan.
5. You will see the Backup plans and tasks view with the backup plan you have just created. Select
this backup plan and click Run.
29
Copyright © Acronis International GmbH, 2002-2014.
6 Recovery
This section describes only the steps and settings that are specific for recovering Microsoft Exchange
Server data. The whole procedure of recovery task creation and common recovery task settings are
described in the "Creating a recovery task" section of the product Help or the User Guide for Acronis
Backup Advanced.
6.1
What data items can be recovered?
The following items can be recovered from database backups:
Storage groups (for Exchange 2003/2007)
Databases (for Exchange 2010 or later)
Mailboxes
Public folders
Public folder items
E-mails
E-mail folders
Calendar events
Tasks
Contacts
Notes
Journal entries.
The following items can be recovered from mailbox backups:
Mailboxes
Public folders
Public folder items
E-mails
E-mail folders
Calendar events
Tasks
Contacts
Notes
Journal entries.
6.2
Selecting data to recover
1. Specifying the archive location
Choose either to specify the archive location in the Data path field, or select data using the
centralized data catalog.
30
Copyright © Acronis International GmbH, 2002-2014.
2. Selecting the data
The backed-up data can be selected using the Data view tab, or the Archive view tab. The Data view
tab displays all the backed-up data by versions (the date and time of backup creation) within the
selected archive location. The Archive view tab displays the backed-up data by the archives.
6.2.1
Selecting the Exchange data by using the Data view or Data
catalog
The Data view tab on the managed machine or the Data catalog view on the management server lets
you browse and select the backed-up data by versions (backup date and time).
Selecting the backed-up data for recovery
The steps required for browsing and selecting the Exchange data for recovery in the Catalog or Data
view are pretty much the same as for disks and files, with exception of steps 2, 4 and 5:
1. Do any of the following:
To access the Data view tab, connect the console to a machine or to the management server,
navigate to Vaults view, and click the required vault.
To access the Data catalog, connect the console to the management server and select Data
catalog in the Navigation tree.
2. In the Show field, select the type of Exchange data to display:
Exchange information store to browse and search for information stores, individual storage
groups or databases in the database-level backups.
Exchange mailboxes to browse and search for entire mailboxes, public folders, individual
folders, e-mails, calendar events, tasks, contacts, notes both in the database-level and
mailbox-level backups.
3. In the Display data backed up for field, specify the time period for which the backed-up data will
be displayed.
4. Do any of the following:
Select the data to recover in the catalog tree, or in the table to the right of the catalog tree.
In the search string, type the information that helps to identify the required data items and
then click Search. You can use the asterisks (*) and question marks (?) wildcards.
If the Exchange information store is selected in the step 2, the search is performed on
information stores, databases, or storage groups.
If the Exchange mailboxes is selected in the step 2, you can search in the mailboxes and
public folders for individual e-mails, contacts, calendar items, and other contents.
As a result, in the Search window, you will see the list of backed up data items whose names
fully or partially coincide with the entered value. If the list of matches is too long, you can
refine the search criteria by narrowing down the date range and running the search once
again. When the required data is found, select it and click OK to return to the Data
catalog/Data view.
5. In the Versions list, select the point in time to recover the data to:
31
Recover to the point of failure (available for the database backups only). The data will be
recovered to the state of the most recent transaction log file, existing in Exchange. If
transaction logs are not available (lost, deleted or corrupted), the data will be recovered to
the moment of backup creation.
Copyright © Acronis International GmbH, 2002-2014.
Select the recovery point by the date and time of backup creation. The data will be recovered
to this time.
Custom point in time (available for the database backups only). Specify the date and time to
recover the data to. During recovery the software will first recover data to the time of the
last created full backup before the specified time and then apply the transaction log files
from the transaction log backups. See the "Point in time selection" (p. 33) section for details.
6. Having selected the required data, click Recover and configure the parameters of the recovery
operation.
For information about what to do if the data does not appear in the catalog or data view, refer to the
"Data catalog" section of the product Help or the User Guide for Acronis Backup Advanced.
6.2.2
Selecting the Exchange data by using the Archive view
1. In the Show list, select the required archive type: Exchange information store or Exchange
mailboxes.
2. In the list of archives, click the required archive and select to which state to recover the data:
Recover from the selected backup (selected by default), expand the archive and select one
of the successive backups by its creation date and time. The data will be recovered to the
time of backup creation.
Recover to the point of failure (available for the database backups only) - the data will be
recovered to the state of the most recent record in the most recent transaction log file, if it
exists in the Exchange. If transaction logs are not available in the original location (lost,
deleted or corrupted), the data will be recovered to the moment of backup creation.
Recover to a custom point in time (available for the database backups only) - specify the
date and time to recover the data to. During recovery the software will first recover data to
the time of the last created full backup before the specified time and then apply the
transaction log files from the transaction log backups. See the "Point in time selection" (p.
33) section for details.
3. For the database–level archives only: in Backup contents, specify the data items to display in the
backup contents tree.
Information store - to recover entire information store, or individual databases, or storage
groups.
Mailboxes - to recover entire mailboxes, public folders, individual folders, e-mails, calendar
events, tasks, contacts, etc.
4. In the backup contents tree, select the check boxes for the items you need to recover.
Use search to find the specific items (such as e-mails, notes, contacts, tasks, etc.) within the
selected mailbox or public folder and select them for recovery. To do this, click Search and
proceed as described in the "Searching for specific items in mailboxes and public folders" (p. 33)
section.
Note: Browsing the backup contents tree down to individual e-mails and to other items is performed by
using the meta data that is collected at the backup. The level of detail for collecting metadata is set in the
Metadata collection (p. 53) option. If the most detailed level is not set, in order to browse individual
e-mails, Acronis Backup has to open the respective database and apply transaction logs directly from the
backup. The process of opening the database may take considerable time depending on the number of
transaction logs to apply. The amount of time depends on the number of transaction log files in the backup.
The opened database will be closed automatically after 10 minute idle or when you start browsing the
contents of another backup.
32
Copyright © Acronis International GmbH, 2002-2014.
5. Click OK.
6.2.3
Searching for specific items in mailboxes and public folders
The search allows you to find specific items (such as e-mails, notes, contacts, tasks, and more) within
the selected mailbox or public folder for recovery. The search is performed within the item selected
in the backup contents tree (for the Archive view (p. 32)). To make the search faster, you can narrow
the selection going deeper to the tree (such as particular mailbox or folder rather than entire
database).
1. In the Search in, select the required items to search:
2.
3.
4.
5.
E-mails
Contacts
Public folder items
Notes
Calendar items
Tasks
Journal entries
In the search strings, type the information that helps to identify the required items (for e-mails, it
can be an e-mail address in To or From fields). You can use the asterisks (*) and question marks
(?) wildcards.
Click Search.
Then, in the Search results, you will see the list of found backed up items whose names fully or
partially coincide with the entered values. If the list of matches is too long, you can refine the
search criteria by narrowing down the date range and run the search once again.
When the required data is found, select it and click OK to return to the Archive view.
6.2.4
Point in time selection
In the Point in time selection window, you specify the point in time to recover the data to. This
window is displayed, when you click Custom point in time on the Data view (p. 31) tab, or click
Recover to a custom point in time on the Archive view (p. 32) tab.
To select a point in time to recover the data to
1. In the calendar, select the date that is covered by full or transaction log backups. Such dates are
marked in bold.
2. In Transaction log coverage, select the time range that includes the time you need to recover the
data to.
Selecting the zero length time range means that the data will be recovered from the full backup.
Selecting the time range in the list means that the data will be recovered from transaction log
backup.
3. The Recover to field automatically sets the time according to the time range selected previously.
If you are satisfied with the suggested time, click OK.
Otherwise, specify the desired point in time to recover the data to. Acronis Backup automatically
finds the transaction log file (in the transaction log backups) which includes the specified point in
time, and recovers the data to the time of this transaction log file creation. If there are no log
files that include the specified time, Acronis Backup will offer the nearest point from the
transaction log file backed up before the specified time.
33
Copyright © Acronis International GmbH, 2002-2014.
6.3
Selecting target destinations for databases or
storage groups
When creating a recovery task on the management server, you can select the Exchange Server to
recover the selected data to. To do this, click Browse and select the required Exchange server with
the Agent for Exchange installed.
In the Data paths drop-down box, select one the following data paths:
Original (p. 34) - recover the databases or storage groups to their original paths (the paths are
taken from the backup).
Custom (p. 34) - recover the databases or storage groups as new, over the existing ones, or as
recovery databases or recovery storage groups.
Specified folder (p. 35) - extract the database or storage group files to a folder you specify.
6.3.1
Recovering storage groups or databases to the original path
The original path for a database or a storage group means the path taken from the backup.
If the same databases or storage groups exist in the original paths, they will be overwritten (if the
overwriting is allowed in the properties of the selected databases). The paths to the existing
databases or storage group cannot be changed.
If the database being recovered does not exist in the original path, you can change the default path
taken from the backup by clicking the database name. In Exchange 2010 or later, you can also change
the path to the transaction log files. As soon as you change any of the default settings, the Original
switches to the Custom. If you switch back to the Original, the customized mapping for databases or
storage groups will be reverted to the default one.
To mount the databases after recovery, in Mount recovered databases select either Mount or
Mount with Active Restore. In the latter case, the databases will be recovered using the Acronis
Active Restore (p. 39) technology allowing users to access their e-mails while the Exchange databases
are still being recovered.
For information about the original paths for Exchange clusters, see the "Recovering data to the
Exchange cluster" (p. 51) section.
6.3.2
Recovering storage groups or databases to a custom path
Specify where to recover the selected databases or storage groups.
Note: Since Microsoft Exchange Server has its own versioning limitations, Acronis Backup will inform you about
any possible mismatch of Exchange server versions when you recover databases or storage groups to a different
version of Exchange server. This alert will not prevent you from doing the recovery, but the recovery will fail if
the Microsoft Exchange Server cannot identify the database or storage being recovered.
To recover the selected databases (storage groups) to a new databases (storage groups)
1.
2.
3.
4.
5.
34
To the right of the Recover <database or storage group name> to, select Create new.
Click Name... and specify the unique name for the database/storage group.
In Database path, specify path to the new database.
In Log path, specify where to store the recovered transaction log files.
Repeat steps 1-4 for other databases or storage groups that you need to recover as new.
Copyright © Acronis International GmbH, 2002-2014.
To recover the selected databases (storage groups) over the existing ones
1. To the right of the Recover <database or storage group name> to, select one of the existing
databases (storage groups). The existing database (storage group) will be overwritten (if the
overwriting is allowed in the properties of the selected databases).
2. Repeat step 1 for other databases or storage groups that you need to recover over the existing
ones.
To recover the selected database (storage group) as a recovery database (recovery storage
group)
1. To the right of the Recover <database or storage group name> to, select Recovery database, or
Recovery storage group. Only one database or storage group can be recovered as a recovery
database or as a recovery storage group.
2. In Database path, specify the database location.
3. In Log path, specify where to store the recovered transaction log files. In Exchange 2003/2007
you have to specify path to the log files only if the destination recovery storage group does not
exist.
A recovery database (recovery storage group) is a special administrative database (storage group) in
Exchange server. It lets you mount a mailbox database and extract data from it. The extracted data
can be copied or merged to the existing mailboxes without disturbing user access to the current data.
Note for public folder databases: A public folder database cannot be recovered as a recovery database (in
Exchange 2010) and cannot be recovered to a recovery storage group (in Exchange 2003, 2007). When
recovering a storage group containing a public folder database, this database is skipped during recovery. If a
storage group being recovered contains a public folder database only, the recovery task will fail.
Note for Exchange 2003, 2007: The existing recovery storage group will be overwritten. Databases that
currently do not exist on the server cannot be recovered to a recovery storage group. When recovering a
storage group containing non-existent databases, such databases are skipped during recovery. If a storage
group being recovered does not contain any databases which currently exist on the server, the recovery task will
fail.
Mounting the recovered databases
To mount the databases after recovery, in Mount recovered databases select either Mount or
Mount with Active Restore. In the latter case, the databases will be recovered using the Acronis
Active Restore (p. 39) technology allowing users to access their e-mails while the Exchange databases
are still being recovered.
Mounting a recovery database in Exchange 2010 or later: When you recover the selected database as a
recovery database and choose Mount or Mount with Active Restore, the database will be mounted
automatically only if there is no other recovery database that is currently mounted on the server. We
recommend that you manually unmount the existing mounted recovery database before recovery. Otherwise,
you need to unmount the existing recovery database and mount a newly recovered database after recovery.
6.3.3
Recovering databases or storage groups to the specified
folder
Recovering databases or storage groups to the specified folder means that the database files along
with transaction log files are extracted from the backup to a folder you specify. This can be useful if
you need to extract data for audit or further processing by third party tools; or when the recovery
fails for some reason and you are looking for a workaround to mount the databases manually.
35
Copyright © Acronis International GmbH, 2002-2014.
To recover the databases or storage groups to a folder
In Path, specify the destination folder where files of the selected database or storage group will be
saved. The storage group or database files will be extracted from the backup along with transaction
log files.
The extracted databases will be in a Dirty Shutdown state. When recovering databases to their
original location, the databases can remain in a Dirty Shutdown state and be mountable by the
system. When recovering to an alternate location, databases cannot be mounted until you bring
them to a Clean Shutdown state by using the Eseutil /r <Enn> command. <Enn> specifies the log file
prefix for the database (or storage group that contains the database) into which you need to apply
the transaction log files. For instructions on how to do this, refer to:
http://technet.microsoft.com/en-us/library/dd876926.aspx
http://technet.microsoft.com/en-us/library/aa998340(EXCHG.80).aspx
6.4
Selecting target destinations for mailboxes, public
folders, or their contents
When creating a recovery task on the management server, you can select the Exchange Server where
the selected data will be recovered. To do this, click Browse and select the required Exchange server
with the Agent for Exchange installed.
In the Data paths drop-down box, select one the following data paths:
Microsoft Exchange Server (p. 36) - recover mailboxes, public folders, or their contents to the
original or different mailbox database. Mailboxes (public folders, or their contents) can be
recovered only if they have the associated user accounts in the Active Directory.
PST file (p. 37) - save mailboxes, public folders, or their contents to a .pst file.
6.4.1
Recovering mailboxes, public folders, and their contents to
the Exchange server
Requirements on user accounts
A mailbox or public folder being recovered from a backup must have an associated user account in
Active Directory.
User mailboxes, public folders, and their contents can be recovered only if their associated user
accounts are enabled. Shared, room, and equipment mailboxes can be recovered only if their
associated user accounts are disabled.
A mailbox or public folder that does not meet the above conditions is skipped during recovery. Also,
discovery and arbitration mailboxes are skipped.
If some mailboxes are skipped, the recovery task will succeed with warnings. If all mailboxes are
skipped, the recovery task will fail.
Requirements on mailbox existence
If the mailboxes being recovered already exist on the current Exchange server, the recovery will
proceed exactly to these mailboxes.
36
Copyright © Acronis International GmbH, 2002-2014.
The mailboxes that are missing on the current Exchange server, but exist on a different Exchange
server within the current Exchange organization, will be skipped during recovery. To recover such
mailboxes, you should connect the console to the Exchange server hosting these mailboxes and start
the mailbox recovery on this server.
If the mailboxes are missing within the current Exchange organization, you should specify the
mailbox database where these mailboxes will be created (see later in this section).
Mailbox recovery settings
To set up the mailbox recovery, specify the appropriate settings as follows.
Overwriting
Choose what Acronis Backup should do if it finds that the target mailbox has items (e-mails, calendar
events, contacts, tasks, etc.) with the same ID as those in the backup:
Overwrite existing items - this is the default setting that fits most situations.
Note: If you recover the same items more than once, each subsequent recovery duplicates the items
because original item IDs will change after the overwriting.
Do not overwrite existing items - this setting will let you retain the changes made to the items
after the backup had been created.
Database to re-create any missing mailboxes
If the mailboxes being recovered are missing within the current Exchange organization, specify the
mailbox database (in the current Exchange server) where the new mailboxes will be created. The
newly created mailboxes will be properly initialized and recovery will be performed to these
mailboxes. Mailboxes will also be re-created when recovering mailbox contents.
Automatic mailbox re-creation is not supported in Exchange 2003 and for linked mailboxes. The
available solutions are as follows:
[For Exchange 2003] Manually re-create the missing mailboxes and connect to these mailboxes
using Outlook. After that, perform the recovery.
[For linked mailboxes] Recover these mailboxes to their original mailbox database if they still
exist there. Otherwise, recover them to .pst files (p. 37).
6.4.2
Recovering mailboxes, public folders, and their contents to a
.pst file
Personal Storage Table (.pst) files allow storing entire mailboxes and public folders as well as their
items (individual e-mails, e-mail folders, contacts, tasks, notes, and other objects supported by
Microsoft Outlook and Exchange). The .pst files are easy to move between computers and to import
to Microsoft Outlook for further browsing and editing.
When recovering multiple mailboxes or public folders at a time, each of them is recovered to a
separate .pst file. The created .pst files retain the folder structure of the original mailboxes or public
folders.
The following section provides information that helps you select the appropriate settings.
PST file format
Select one of the following Microsoft Outlook formats:
37
Copyright © Acronis International GmbH, 2002-2014.
Outlook 97-2002 - if the created .pst files will be opened by using Microsoft Outlook 97-2002.
Note The Outlook 97-2002 format does not support Unicode and limits the file size to 2 GB.
Creation of a .pst file in Outlook 97-2002 format does not require a machine with a
corresponding version of Microsoft Outlook. The .pst files of that format are created by using
native Exchange server mechanisms. However, to be able to create such files with Exchange 2007
or later, Messaging API (MAPI) client libraries and Collaboration Data Objects, version 1.2.1 (CDO
1.2.1) must be installed on the server.
Outlook 2003-2013 - if the created .pst files will be opened by using Microsoft Outlook 2003 or
higher.
Note If the agent that performs recovery is installed on a machine with Exchange 2013, only this format is
available.
Since Exchange server does not have the libraries necessary to create .pst files in Outlook
2003-2013 format, Acronis Backup requires that a machine with Microsoft Outlook 2003 or later
be installed. Acronis Backup uses this machine as a proxy for .pst file creation.
Machine with Outlook 2003 or later
Available if the Outlook 2003-2013 format is selected.
Specify:
The name or the IP address of the machine where Microsoft Outlook 2003 or later is installed.
The user name and password of an administrator on that machine.
File and Printer Sharing must be enabled on the machine where Microsoft Outlook 2003 or later is
installed. To access this option:
On a machine running Windows Vista, Windows Server 2008, or Windows 7: go to Control panel
> Windows Firewall > Network and Sharing Center > Change advanced sharing settings.
On a machine running Windows XP with Service Pack 2 or Windows 2003 Server: go to Control
panel > Windows Firewall > Exceptions > File and Printer Sharing.
The Remote Registry service must be enabled on the machine where Microsoft Outlook 2003 or later
is installed. To start the Remote Registry service, type the following command in a command prompt:
net start RemoteRegistry
Path to .pst file
Specify a destination folder to save the .pst files being created.
When entire mailboxes (or entire mailbox folders) or public folders are selected for recovery, the
created .pst files will be named automatically according to the following templates:
For mailboxes: Mailbox – {Name of the mailbox owner}.pst.
For public folders: Public Folder – {Public folder name}.pst.
If such mailbox or public folder already exists in the target destination, the sequential numeric value
is added to the end of the file name, for example: Mailbox – {Name of the mailbox owner}(2).pst.
When the mailbox or public folder contents (such as individual e-mails, contacts, tasks, etc.) are
selected for recovery, the created .pst file will be named according to the following template:
{Original server name} recovery.pst. If required, you can change the .pst file name.
38
Copyright © Acronis International GmbH, 2002-2014.
Host machine credentials
Available if the Outlook 2003-2013 format is selected.
If you connect the console to the Exchange server (host) with Agent for Exchange remotely, the host
machine credentials are filled automatically and you do not have to enter them. If the console is
connected to the Exchange server locally, specify the user name and password. The user account has
to be a member of the Administrators group on the host. When entering the name of an Active
Directory user account, be sure to also specify the domain name (DOMAIN\Username or
Username@domain).
Access credentials
Provide credentials for the destination if the task credentials do not enable recovery of the selected
data. When entering the name of an Active Directory user account, be sure to also specify the
domain name (DOMAIN\Username or Username@domain).
6.5
Using Acronis Active Restore for database recovery
Acronis Active Restore brings up Microsoft Exchange services online in minutes allowing users to
access their e-mails while the Exchange databases or storage groups are still being recovered.
How it works
1. Once the recovery task is started, the Exchange databases are dismounted.
2. The transaction log files, checkpoint files, and other Exchange files required for recovery are
copied from the backup to the target destination.
3. The backed-up databases are mounted virtually from the archive to the target destination. The
file system and the Exchange server treat these virtual databases files as physical ones.
4. The virtual databases are mounted to the Exchange server and transaction logs are applied to the
databases. The Exchange server becomes operational and ready to provide services. Users can
send and receive e-mails, work with their mailboxes, contacts, calendar and e-mails even though
they are not yet recovered.
The Acronis Active Restore drivers intercept Exchange user queries and set the immediate
priority for recovery of the Exchange items that are necessary to serve the incoming requests.
While this on-the-fly recovery proceeds, the continuing database recovery process is transferred
to the background.
5. The background recovery of physical databases continues until all the selected databases are
recovered. After the recovery is completed, the virtual databases are dismounted and the
physical databases are mounted to the Exchange server, which takes less than a minute.
6.6
Usage examples
This section provides examples of how you can recover the Exchange data.
6.6.1
Example 1. Recovering mailboxes to .pst files
Typical usage scenarios for recovering mailboxes to a .pst files are:
39
Migrating mailboxes between different Exchange servers.
Example: the administrator needs to safely move mailboxes from the existing Exchange
organization to a newer Exchange Server version (i.e., from Exchange 2007 to Exchange 2010).
Copyright © Acronis International GmbH, 2002-2014.
The administrator recovers the required mailboxes as .pst files from the database or the mailbox
backup. The administrator then imports the mailbox data from the .pst to into the appropriate
mailboxes on another Exchange server by using the MailboxImportRequest cmdlet.
Accessing mailbox data without mandatory usage of Exchange server.
Example: the General Counsel of the company has requested the administrator to provide a copy
of the mailbox of a recently resigned employee in order to research a legal case. The General
Counsel's laptop and the laptop itself is not in the corporate network. The administrator finds the
required version of the employee's mailbox in the previously created backups. Then, the
administrator recovers the mailbox as a .pst file on a USB stick and passes this stick to General
Counsel. The General Counsel simply opens this file by using Microsoft Outlook and sees all of
the contents for the required mailbox.
Steps to perform
1.
2.
3.
4.
Connect the console to the Exchange server running Agent for Exchange.
In the Navigation tree, select the vault where the required backups are stored.
In the Data view tab, in Show, select Microsoft Exchange Mailboxes.
In the catalog tree, select the required mailbox or mailboxes. Under Versions, select a point in
time to recover the data to.
5. Click Recover.
6. Under Where to recover:
In Data paths, select .PST file.
In Format, select Outlook 2003-2013.
In Machine with Outlook 2003 or later, specify:
The name or IP address of the machine with Microsoft Outlook 2003 or later installed.
The administrative credentials for the machine.
In Path to .PST file, specify a folder where the .pst file or files will be created.
7. Leave the rest of the settings "as is" and click OK to start the recovery task.
Useful links
For instructions on how to import .pst files into Microsoft Outlook, use the following links:
Outlook 2013:
http://office.microsoft.com/en-us/outlook-help/import-outlook-items-from-an-outlook-data-filepst-HA102919679.aspx
Outlook 2010:
http://office.microsoft.com/en-us/outlook-help/import-outlook-items-from-an-outlook-data-filepst-HA102505743.aspx
Outlook 2007/2003/2002: http://support.microsoft.com/kb/287070/en-us.
For instructions on how to import mailbox data from .pst files into Exchange server mailboxes, use
the following links:
40
Exchange 2010/2013: http://technet.microsoft.com/en-us/library/ee633455.aspx
Exchange 2007: http://technet.microsoft.com/en-us/library/bb691363(v=exchg.80)
Exchange 2003: http://www.msexchange.org/tutorials/exmerge-recover-mailbox.html
Copyright © Acronis International GmbH, 2002-2014.
6.6.2
Example 2. Recovering mailboxes to a different mailbox
database
Typical usage scenarios for recovering mailboxes to a different mailbox database are:
Migrating mailboxes between different Exchange servers.
Example: the administrator needs to safely move mailboxes from the existing Exchange
organization to a newer Exchange server version (for example, from Exchange 2007 to Exchange
2010). Having created mailbox backups of the Exchange 2007, the administrator can remove the
server. Then, the administrator installs Exchange 2010 on the same hardware and recovers
mailboxes from the mailbox backups.
Re-hiring employees.
Example: the administrator needs to restore a mailbox for an employee who left the company a
while ago and was re-hired later. In order to work with his documents, the employee wants his
old mailbox. The department where the new employee is going to work uses another mailbox
database. Recovery by using the native tools of Exchange is not an option, since Exchange
retention policies have already been wiped from the mailbox and the employee's user account
has already been deleted from the Active Directory. In this case, the administrator picks up the
mailbox from one of the backups taken before the employee left and recovers it to the required
database.
Note: Before starting recovery, re-create the required user account and enable it, because mailboxes can be
recovered only if they have the associated user accounts in the Active Directory and if these user accounts are
enabled.
Steps to perform
1.
2.
3.
4.
5.
6.
7.
8.
Connect the console to the Exchange server running Agent for Exchange.
In the Navigation tree, select the vault where the required backups are stored.
In the Data view tab, in Show, select Microsoft Exchange Mailboxes.
In the catalog tree, select the required mailbox or mailboxes. Under Versions, select the most
recent date and time of backup creation. The mailbox or mailboxes will be recovered to this
point.
Click Recover.
Under Where to recover section, in Data paths, select Microsoft Exchange Server.
In Database to re-create any missing mailboxes, select the database where the mailbox will be
created.
Leave the rest of the settings "as is" and click OK to start the recovery task.
6.6.3
Example 3. Recovering an accidentally deleted e-mail to the
original mailbox
Context: The company's CEO accidentally deleted a keynote speech sent to him by e-mail and to be
used at an upcoming Board of Director’s meeting. To make matters worse, the deleted file was
purged from the CEO’s Deleted Items folder in Outlook because the Deleted Items folder was
configured to automatically delete its contents when Outlook is closed.
Solution: Since the CEO's mailbox is set to backup hourly by using Acronis Backup, the administrator
can easily find the most recent version of the e-mail in backups and recover it to the existing mailbox.
41
Copyright © Acronis International GmbH, 2002-2014.
Steps to perform
1.
2.
3.
4.
5.
6.
42
Connect the console to the Exchange server running Agent for Exchange.
In the Navigation tree, select the vault where the required backups are stored.
In the Data view tab, in Show, select Microsoft Exchange Mailboxes.
By using the search (p. 33) find the required e-mail and select it for recovery.
Under Where to recover section in Data paths, select Microsoft Exchange Server.
Leave the rest of the settings "as is" and click OK to start the recovery task.
Result: The CEO runs Outlook and finds the required e-mail in its original location.
Copyright © Acronis International GmbH, 2002-2014.
7 Exchange servers on a management server
All administrative operations with Exchange servers in Acronis Backup are performed in the
Microsoft Exchange Servers view of the management server.
Add a machine running Exchange to the management server by using the machine's name or IP
address, or add multiple machines running the Exchange server application. Once an Exchange server
is registered on the management server, it becomes available for monitoring all of the backup and
recovery activities and their results. To back up data of an Exchange cluster, add all of the cluster
nodes to the management server.
To estimate whether the data is successfully protected on the server, check its status. A server's
status is defined as the most severe status of all backup plans (both local and centralized) existing on
the server. It can be "OK", "Warning" or "Error".
To take an action on the selected server (cluster), use the toolbar buttons. See the Actions on
Exchange servers and clusters section (p. 43) for details.
To review detailed information on the selected server (cluster), use the information panel at the
bottom of the window. The content of the panel is also duplicated in the Details (p. 45) window.
7.1
Actions on Exchange servers and clusters
To access the actions
1. Connect the console to the management server.
2. In the Navigation pane, click Microsoft Exchange servers.
3. The actions are performed by clicking the corresponding buttons on the toolbar.
Registering Exchange servers and clusters on the management server
Registering on the management server allows machines running Exchange servers to be available for
monitoring the activities related to the data protection. To safely back up data of an Exchange
cluster, all cluster nodes have to be registered on the management server.
Registration provides a trusted relationship between the agent, residing on the Exchange server (or
on the Exchange cluster node), and the management server.
To
Do
Add a new Exchange
server to the
management server
Click
Add a machine to AMS.
In the Add machine window, specify:
1. The name or IP address of the machine running Exchange server.
2. The administrator's user name and password.
43
Copyright © Acronis International GmbH, 2002-2014.
Add multiple Exchange Click
Add multiple machines.
servers
In the Add multiple machines window, specify the machines running Exchange
servers to add to the management server.
You can add machines by:
Machine names or IP addresses.
Exchange server application installed on the machines.
Browsing the network.
Browsing an Active Directory domain.
Importing the list of the machines from .txt or .csv files.
For details, see the "Specifying the list of machines" section of the installation
documentation.
The management console addresses to the agent and initiates the registration procedure. Because
registration requires the agent's participation, it cannot take place when the machine is offline.
An additional agent installed on a registered machine becomes registered on the same management
server automatically.
Other operations
To
Do
Create a centralized
backup plan with the
selected Exchange
server or cluster as a
source
Click
On the Create backup plan page, specify the location for storing backups and set
the backup schedule.
Recover data to the
selected Exchange
server or cluster
Click
Connect to the
selected machine
directly
Click
Update the license for
the selected Exchange
server's agent
Back up.
Recover.
On the Recover data page, select the backed-up data and the destination to
recover the data to.
Connect directly.
Establishes a direct connection to the machine running Exchange server. Enables to
administer the server and perform direct management operations, such as creating
and managing local backup plans, tasks, and personal vaults.
Click
Change license.
The reasons for changing a license include:
Switching from trial mode to full mode.
Enabling Acronis Deduplication.
View detailed
information on the
selected Exchange
server
Click
Details.
In the Exchange server details window, examine information on the Exchange
server or cluster.
View the log entries of Click
Log.
the selected Exchange
The Log view will display a list of the log entries related to the selected Exchange
server
server or cluster.
44
Copyright © Acronis International GmbH, 2002-2014.
Delete the selected
Exchange server from
the management
server
Click
Delete machine from AMS.
As a result, the backup plans that have centralized origin are removed and
shortcuts to centralized vaults are deleted from the server. If the server is not
available at the moment, these actions will be performed as soon as the server
becomes available to the management server.
Update all information Click
Synchronize.
related to the selected
The management server will query the machine and update the management
Exchange server
server databases with the most recent information. Along with synchronizing, the
refresh operation will be performed automatically in order to update the list of the
Exchange servers.
Refresh a list of
Exchange servers
7.2
Click
Refresh.
The management console will update the list of Exchange servers from the
management server with the most recent information. Though the list of servers is
refreshed automatically based on events, the data may not be retrieved
immediately from the management server due to some latency. Manual refresh
guarantees that the most recent data is displayed.
Exchange server or cluster details
The Details window (also duplicated on the information panel in the Microsoft Exchange Servers
view) aggregates all information on the selected Exchange server or cluster.
Cluster nodes
This tab displays all nodes of the selected Exchange cluster, their states, and the agent availability.
Here, you can register Agent for Exchange on the management server (if not registered) or update
the agent for each cluster node. Click the node name or its IP address to view all of the information
about the node.
Cluster
This tab lists all of the information about the selected Exchange cluster: its name, IP address, number
of cluster nodes, cluster configuration type, etc.
Server
The tab provides information about the agent installed on the machine and the system information
about the machine itself.
Backup plans and tasks
Displays a list of the plans (both local and centralized) and tasks existing on the selected machine.
Operations
For the list of the operations available with machine's backup plans and tasks, see "Actions on
backup plans and tasks".
Filtering and sorting
Filtering and sorting of the backup plans and task is performed as described in "Sorting, filtering and
configuring table items".
45
Copyright © Acronis International GmbH, 2002-2014.
Progress
The Progress tab lists all of the selected machine's activities and tasks that are currently running. The
tab provides information about task progress, elapsed time and other parameters.
46
Copyright © Acronis International GmbH, 2002-2014.
8 Backing up and recovering data of Exchange
clusters
The main idea of Exchange clusters is to provide high database availability with fast failover and no
data loss. Usually, it is achieved by having one or more copies of databases or storage groups on the
members of the cluster (cluster nodes). If the cluster node hosting the active database copy or the
active database copy itself fails, the other node hosting the passive copy automatically takes over the
operations of the failed node and provides access to Exchange services with minimal downtime.
Thus, the clusters are already serving as a disaster recovery solution themselves.
However, there might be cases when failover cluster solutions cannot provide data protection: for
example, in case of a database logical corruption, or when a particular database in a cluster has no
copy (replica), or when the entire cluster is down. Also cluster solutions do not protect from harmful
content changes, as they usually immediately replicate to all cluster nodes. By backing up the cluster
data with Acronis Backup, you can safely protect the clustered data: storage groups, databases,
mailboxes, and public folders.
Acronis Backup provides protection for the clustered data regardless of its placement within the
cluster. This means that even if the data being backed up changes its location within the cluster (for
example, if mailbox role is moved to another server due to a switchover or a failover), the software
will track all relocations of this data and safely back it up.
Cluster-wide protection is useful in the event some of the cluster nodes go offline, unless the
backed-up data becomes completely unavailable, or backup plan configuration explicitly prohibits
the protection to run on the remaining nodes (if you select to back up only the selected node, for
example).
8.1
Supported Exchange cluster configurations
Acronis Backup supports the following Exchange cluster configurations.
47
Copyright © Acronis International GmbH, 2002-2014.
Exchange 2003 Cluster and Single Copy Cluster (SCC) for Exchange 2007
Both configurations are failover cluster solutions based on a shared storage. Each of them uses a
single copy of a storage group on storage that is shared between the cluster nodes. Only one cluster
node can access (manage) shared data at a time. The node that is currently managing shared data is
called an active node. Other nodes are called passive or standby.
Cluster Continuous Replication (CCR) for Exchange Server 2007
CCR is a failover cluster solution based on a non-shared storage. It uses two copies (active and
passive) for each storage group. Each copy is hosted on its own node. The copy that is currently in
use is called active, and the node hosting this copy is called the active node. The passive copy is
created and maintained on the passive node using continuous and asynchronous log shipping
technology.
48
Copyright © Acronis International GmbH, 2002-2014.
Database Availability Group (DAG) for Exchange Server 2010 or later
DAG is a failover cluster solution providing high availability and site resilience. DAG uses the
combination of two continuous replication technologies found in Exchange 2007: Cluster Continuous
Replication and Standby Continuous Replication. DAG is a group of up to 16 Exchange Mailbox
servers. Any node can host a copy of mailbox database from any other node. Each node can host
passive and active database copies. Up to 16 copies of each database can be created.
8.2
How many agents are required for cluster data
backup and recovery?
For successful data backup and recovery of a cluster Agent for Exchange has to be installed on each
node of the Exchange cluster.
What happens with backup if the Agent for Exchange is not installed on all nodes?
If the Agent for Exchange is not installed on all cluster nodes (for example, the agent was manually
uninstalled from one of the cluster nodes):
The backup task completes with a warning, if the data selected for backup is hosted on the node
with the Agent for Exchange installed.
The backup task fails with error, if the data selected for backup is hosted on the node without
the Agent for Exchange installed.
8.3
Exchange clusters on a management server
Exchange clusters are browsed and managed in the same way as any individual Exchange servers (in
the Microsoft Exchange servers (p. 43) view of the management server).
You manage a cluster as a whole rather than as a set of nodes. When selecting the cluster data for
backup (or browsing cluster data in the Data view), the data is displayed as a single instance even if
multiple copies of the data are available within the cluster.
49
Copyright © Acronis International GmbH, 2002-2014.
Availability of the management server
The management server's availability is mandatory for creating and editing the centralized backup
plans, since the management server deploys the backup plan to every node of the cluster. However,
its availability is not necessary to run backup and recovery tasks.
8.4
Backing up the Exchange cluster data
Normally, clustered data is backed up by creating a backup plan on the management server
(centralized backup plan). However, if you need to back up a specific data that is hosted entirely on a
single cluster node, you can connect to this node directly and create a regular (local) backup plan.
The drawback of this approach is that the backup task will fail if the data migrates to another cluster
node or if the node becomes unavailable.
To configure backup of Exchange cluster data
1. Prerequisites:
a. Install Agent for Exchange on each node of the Exchange cluster.
b. Register all of the agents on the management server, either during installation or later.
2. Connect the console to the management server.
3. Click Create backup plan.
4. Under What to back up:
a. Click Show access credentials, exclusions. In the Access credentials, specify the credentials
required to access the source data.
Details. To access the Exchange cluster data, a domain user account that has administrative
privileges on each of the cluster nodes is required.
When entering the name of an Active Directory user account, be sure to also specify the
domain name (DOMAIN\Username or Username@domain).
b. Click Items to back up.
In Data to back up, select one of the following:
Microsoft Exchange information store to back up Exchange databases or storage groups
Microsoft Exchange mailboxes to back up individual mailboxes.
In the catalog tree below Data to back up, select the Exchange cluster and specify data items
to back up. The cluster databases or storage groups are displayed as single instances
regardless of the number of copies they have within the cluster.
5. Under Where to back up, select the backup destination. The backups can be saved to any type of
storage supported by Acronis Backup, except for Acronis Cloud Storage, Acronis Secure Zone and
removable media.
Naming the archive. Acronis Backup generates a common name for the new archive and displays
it in the Name field. The name looks like [Application Instance Name]_Archive(N), where the
[Application Instance Name] variable is a substitution for the Exchange server's or cluster's name,
and N is a sequence number. If you are not satisfied with the automatically generated name, you
can construct another name. Note that the use of the [Application Instance Name] variable at the
beginning of the name is mandatory.
6. Under How to back up in the Backup scheme, select the required scheme and specify its settings
as described in the "Backup schemes" (p. 22) section.
7. In the Cluster backup mode select one of the following:
50
Active
Copyright © Acronis International GmbH, 2002-2014.
This mode is available for selection if Agent for Exchange is installed on each node of the
cluster.
In this mode, the software will back up data from the active copy of the database or the
storage group. If the active copy is not available at the moment, the backup will fail.
Backing up data from active copies may slow down the Exchange server performance, but
the backed-up data will be in the most up-to-date state.
Passive (replica)
This mode is available for selection if Agent for Exchange is installed on each node of the
cluster.
In this mode, the software will back up data from one of the available passive database or
storage group replicas (if several). Also, specify what to do if all the passive copies are
unavailable at the moment: either Back up active copy, or Fail the task.
Backing up passive copies does not affect the Exchange server performance and allows you
to extend the backup window. However, passive copies may contain information that is not
up-to-date, because such copies are often set to be updated asynchronously (lagged).
The selected node
This mode is available for selection if all items selected for backup are hosted on a single
node or if the console is directly connected to the agent.
In this mode, you specify the cluster node manually. Choose this mode only if you are
absolutely sure that the data will not be relocated to another cluster node. If the data
changes its location before or during the backup, the task will fail.
8. Under Plan parameters, click Plan's credentials and specify the user account under which the
plan will run.
When entering the name of an Active Directory user account, be sure to also specify the domain
name (DOMAIN\Username or Username@domain).
9. For information about specifying the rest of backup plan settings (replication, retention, and
validation of backups), see either the product Help or the User Guide for Acronis Backup
Advanced.
10. Click OK to create the backup plan.
8.5
Recovering data to the Exchange cluster
To configure data recovery to the Exchange cluster
1. Connect the console to the management server and click Recover.
2. Under What to recover, select the Exchange data to recover as described in the "Selecting data
to recover" (p. 30) section.
3. Under Where to recover, in Browse, specify the cluster where data will be recovered to. After
you specify the cluster and click OK, Acronis Backup automatically selects the first available
cluster node to manage the recovery. The node's name is displayed in the Browse field.
4. In Data paths, select a path to recover the data to (except Specified folder and PST file). Acronis
Backup automatically defines a cluster node where the data will be recovered to.
Notes for recovering storage groups or databases:
In the DAG configuration (Exchange 2010 or later), you can manually change the target node
if the database to recover does not exist on it.
When recovering storage groups in the CCR configuration (Exchange 2007) or databases in
theDAG configuration (Exchange 2010 or later), ensure that Mount is selected in Mount
51
Copyright © Acronis International GmbH, 2002-2014.
recovered databases. This is required for manual configuration or resumption of cluster
replication after recovery.
Notes for recovering mailboxes or public folders:
When recovering mailboxes, public folders or their contents, configure the settings as
described in the "Recovering mailboxes, public folders and their contents to the Exchange
server" (p. 36) section.
5. Under When to recover, specify when to perform the recovery.
6. Click OK to start the recovery task (if it is set to run immediately) or to save the recovery task (if it
is set to run later).
Using a similar procedure, you can configure the recovery when the console is directly connected to
a cluster node. The steps are the same except that the Browse field is not displayed. The data will be
recovered onto this node.
Important: After recovery of storage groups in the CCR configuration (Exchange 2007) or databases
in the DAG configuration (Exchange 2010 or later), you need to manually configure or resume
replication on the cluster. For detailed instructions, refer to the following articles:
Resuming replication in the CCR configuration (Exchange 2007) http://technet.microsoft.com/en-us/library/bb124706%28v=exchg.80%29.aspx
Configuring or resuming replication in the DAG configuration (Exchange 2010 or later) http://technet.microsoft.com/en-us/library/dd298080.aspx
8.6
Cluster credentials
To access the Exchange cluster data, a domain user account that has administrative privileges on
each of the cluster nodes is required. The credentials are specified when adding a cluster node to the
management server, during backup plan creation, or during recovery task creation.
Specify:
User name. When entering the name of an Active Directory user account, be sure to also specify
the domain name (DOMAIN\Username or Username@domain).
Password. The password for the account.
If the credentials are detected as missing or invalid, you will receive the respective alert. To provide
valid credentials, click Fix the issue in the alert. Also, you can provide cluster credentials at the next
backup or recovery.
52
Copyright © Acronis International GmbH, 2002-2014.
9 Exchange-specific backup options
9.1
Metadata collection
This option applies to database backups.
This option defines the amount of metadata collected during a backup. The more detailed the
metadata is, the longer the backup creation takes. However, the browsing and recovery of individual
e-mails and other items contained in the mailboxes will be faster.
If a database was backed up with the preset value then, in order to access folders or individual
e-mails, the software has to open the database directly from the backup and apply transaction logs
to the database. This process may take considerable time depending on the number of transaction
logs contained in the backup.
The preset is: Include list of mailboxes
To specify the level of detail
Select one of the following:
Include list of mailboxes
The metadata will be the least detailed and the backup will be the fastest. Only mailboxes and
public folders can be accessed without opening a database.
Include mailboxes and folders
Individual folders within mailboxes and public folders can be accessed without opening a
database.
If a folder within a mailbox or a public folder contains subfolders along with other items, the subfolders and
the items can be accessed only after opening the database.
Include e-mails
The metadata will be the most detailed and the backup will take the longest time to complete.
Individual e-mails and other items within mailboxes and public folders can be accessed without
opening a database.
9.2
Exclusions from mailbox backup
This option applies to mailbox-level backups.
The option defines which mailbox items to skip during the backup process and thus exclude from the
list of backed-up items.
To specify which files and folders to exclude:
Set up any of the following parameters:
Exclude "Deleted Items" folders
Select this check box to skip the Deleted Items folders and all their content.
Exclude "Junk E-Mail" folders
Select this check box to skip the Junk E-Mail folders and all their content.
Exclude "Sent Items" folders
53
Copyright © Acronis International GmbH, 2002-2014.
54
Select this check box to skip the Sent Items folders and all their content.
Exclude items older than: ...
Select this check box and specify the age of backed up items. The items older than the specified
age will be skipped from backup.
Exclude attachments larger than: ...
Select this check box and specify the upper size limit for the backed-up attachments. The
attachments whose size is greater than the specified value will be skipped during backup.
Exclude attachments matching the following criteria:
Select this check box to skip the e-mail attachments whose names match any of the criteria
specified by file masks. Use the Add, Edit, Remove and Remove All buttons to create the list of
file masks.
You can use one or more wildcard characters * and ? in a file mask:
The asterisk (*) substitutes for zero or more characters in a file name; for example, the file mask
Vid*.avi yields files such as Vid.avi and Video.avi. The *.avi mask yields all .avi files.
The question mark (?) substitutes for exactly one character in a file name; for example, the file
mask App?.exe yields files such as App1.exe and Apps.exe — but not the files App.exe or
App11.exe
Copyright © Acronis International GmbH, 2002-2014.
10 Glossary
C
Checkpoint file
A file that accompanies an Exchange transaction log (p. 57) stream and tracks how far Exchange has
progressed in writing logged information to the database file.
Circular logging
A Microsoft Exchange Server logging mode. In this mode, Exchange overwrites and reuses the
transaction log files (p. 57) rather than creating new log files.
Continuous Data Protection (CDP)
Continuous Data Protection (CDP) allows reverting the protected data to any point in time.
In Acronis Backup, CDP is a backup scheme applicable to Microsoft Exchange information stores (p.
56), storage groups (p. 57), and databases (p. 55). In this scheme, you specify when to perform full
backups. In addition, the transaction log files (p. 57) are backed up automatically as soon as they are
closed by Exchange. Having both full backups and transaction log backups (p. 57), you can select any
point in time to revert the Exchange data to.
Copy-only backup
Creating a full backup of a Microsoft Exchange information store (p. 56), storage group (p. 57), or
database (p. 55) without truncating (p. 57) the transaction log files (p. 57). Use this backup method to
obtain a full backup without disturbing continuous backup plans. For example, if a database is
protected with CDP (p. 55), you can do a copy-only backup of the database for transportation to an
off-site location, testing, analysis or other purposes.
Copy-only backup and express full backup (p. 56) are mutually exclusive. You can select only one of
these methods when creating a backup plan.
D
Database-level backup
A backup that contains Exchange databases (p. 55) and Exchange-related information from Active
Directory. When performing backup at a database level, Acronis Backup backs up database files,
transaction log files (p. 57) and other associated files at a file level from a snapshot taken using
Volume Shadow Copy Service (VSS). The Exchange server structure, cluster structure, user accounts
and user's settings are extracted from Active Directory.
The main purpose of this backup type is disaster recovery of Exchange. You can also recover
mailboxes, folders, e-mails, contacts, tasks, notes and other items directly from database backups.
55
Copyright © Acronis International GmbH, 2002-2014.
E
Exchange database
There are two types of Exchange databases.
A mailbox database stores contents of mailboxes. Mailbox content is private to the mailbox user.
A public folder database stores public folders data. Public folder content is shared among
multiple users.
Physically, the data stored in the files of the following types:
Database file (.edb)
Transaction log files (p. 57) (.log)
Checkpoint files (p. 55) (.chk).
Express full backup
A method of creating a full backup of Exchange information stores (p. 56), storage groups (p. 57), or
databases (p. 55). With this method, Acronis Backup backs up only the changes that have occurred
since the previous full backup. The data that has not changed is replaced with links to it.
As compared to regular full backup:
Express backups are created faster and occupy less space.
The number of I/O requests to the production server is much less.
Express full backup and copy-only backup (p. 55) are mutually exclusive. You can select only one of
these methods when creating a backup plan.
I
Information store (Exchange store, Managed store)
Microsoft Exchange Server stores its data in a single repository called information store (in Exchange
2003/2007), Exchange store (in Exchange 2010), or Managed store (in Exchange 2013). The primary
logical components of the information store are storage groups (p. 57) (for Exchange 2003/2007
only) and Exchange databases (p. 55).
M
Mailbox-level backup
A backup that stores contents of Exchange mailboxes and/or public folders. Acronis Backup accesses
the contents using Messaging Application Programming Interface (MAPI), so backing up multiple
mailboxes may take a long time. Backing up at a mailbox level makes sense when you need to
frequently back up a small number of mailboxes. Otherwise, consider a database-level backup (p.
55).
56
Copyright © Acronis International GmbH, 2002-2014.
P
Point of failure
The point in time when the most recent transaction log file (p. 57) existing in Exchange was created.
This is the most recent state Exchange data can be reverted to.
S
Storage group
In Exchange 2003/2007, a storage group is a logical container for Exchange databases (p. 55), the
associated transaction log (p. 57), checkpoint (p. 55), and other system files. All databases in a
storage group share a single log stream. A storage group is the basic unit for backup and recovery.
Starting with Exchange 2010, the concept of a storage group is discontinued. Therefore, you can
select individual databases for backup. Each database will be backed up along with the necessary
associated files.
T
Transaction log backup (Exchange)
A transaction log backup stores transaction log files (p. 57) along with checkpoint files (p. 55).
At first backup, Acronis Backup creates a regular full backup of the corresponding Exchange
information store (p. 56), storage group (p. 57) or database (p. 55). After that, only the log files and
checkpoint files are backed up. The transaction log files are truncated (p. 57) after each successful
backup. Circular logging (p. 55) must be disabled in Exchange, otherwise the backups will fail.
Having transaction log backups, you can revert Exchange data to any point in time. First, the data will
be recovered to the state saved in the full backup. Then, the transaction log will be applied.
Transaction log file (Exchange)
Transaction log files (.log) store all changes made to an Exchange database (p. 55) or storage group
(p. 57). Before committing any change to a database file, Exchange logs the change into a transaction
log file. Only after the change is securely logged, it is then written to the database. This approach
guarantees reliable recovery of the database in a consistent state in case of sudden database
interruptions.
Each log file is 1024 KB in size. When an active log file is full, Exchange closes it and creates a new log
file. A set of sequential log files is called a log stream. Each database or storage group has its own log
stream.
Transaction log file truncation (Exchange)
The process of deleting transaction log files (p. 57). Exchange truncates the transaction log files:
57
After a successful full backup of the corresponding Exchange information store (p. 56), storage
group (p. 57) or database (p. 55) (excepting the copy-only (p. 55) backup).
After a successful transaction log backup (p. 57).
Copyright © Acronis International GmbH, 2002-2014.
In either case, Exchange deletes only those files that are older than the checkpoint. This means that
transactions from these files have already been committed and written to databases.
58
Copyright © Acronis International GmbH, 2002-2014.