1
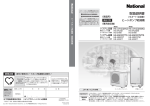
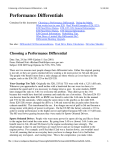
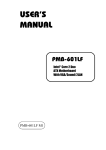
User’s Manual
Bass Multi-Effects
Pedal
Important Safeguards
For your protection, please read these safety
Instructions completely before operating the
appliance, and keep this manual for future
reference Carefully observe all warnings,
precautions and instructions on the appliance
and described in the operating instructions
supplied with the appliance.
warning
To prevent fire or hazard, do not
expose the unit to rain or moisture.
This symbol is intended to alert the user to
the presence of non-insulated “dangerous
voltage” within the products enclosure.
This symbol is intended to alert the user to
the presence of important operating and
maintenance (servicing) instructions in
the literature accompanying the unit.
•Keep away from children. In households with small children, an adult should provide
supervision until the child is capable of following all the rules essential for safe
operation of the unit. All cords and cables should be placed so they are out of
reach of children.
•Do not use this product near water, such as in or near a bathtub, sink, wet basement,
swimming pool, or in the rain. Never handle the AC adaptor with wet hands.
•Do not use this product in areas subject to temperature extremes, such as in direct
sunlight in an enclosed space, near a heat source, or on heat-generating equipment.
•This product and any AC adaptor should be located so that they do not interfere with
proper ventilation.
•Connect this product only to a power supply described in the operating instructions or
as marked on the unit. When using batteries, carefully follow the installation instructions
and make sure you observe the proper polarity. If used improperly, batteries may explode
or leak, causing damage or injury. Check to make sure that the AC receptacle holds
the power cord plug securely. If the power cord plug is loose or damaged, contact your
electrician to replace the defective and unsafe power cord.
•Place the power cord so that it is not likely to be walked on or pinched by having objects
placed on it. Prevent cords and cables from becoming entangled. Do not use the power
supply cord in an outlet with an unreasonable number of other devices. Excessive loads
can cause the insulation on the cord to heat up and eventually melt.
•Do not defeat the grounding or polarization feature of the AC power cord. If your AC
receptacle will not accept the power cord plug, contact your electrician to install a proper
AC receptacle.
•When left unused for an extended period of time, unplug the power cord from the outlet
and remove the batteries. To disconnect the power cord, pull it out by grasping the plug.
Never pull the plug out by the cord.
•Be careful that foreign objects and liquids do not enter the enclosure.
•Unplug the unit before cleaning. Do not use liquid or aerosol cleaners. Use a damp cloth
for cleaning and allow the unit to dry before plugging it in.
•Before using this unit in a foreign country, consult with your retailer or the manufacturer.
•Do not open or modify the unit or the AC adaptor. Unplug the unit and consult qualified
service personnel when:
•the power cord or the plug has been damaged
•an object or liquid has fallen into the unit
•the unit has been exposed to moisture
•the unit does not appear to be operating normally or exhibits a change in performance
•the unit has been dropped or damaged
•Do not attempt to repair or service the product beyond what is described in the operating
instructions. For all other servicing, refer to qualified service personnel.
FCC statement
This device complies with Part 15 of the FCC rules. Operation is subject to the following two conditions:
(1) This device may not cause harmful interference, and (2) this device must accept any interference
received, including interference that may cause undesired operation.
Table of Contents
Introduction. . . . . . . . . . . . . . . . . . . . . . . . . . . . . . . . . . . . . . . . . . 3
Main Features. . . . . . . . . . . . . . . . . . . . . . . . . . . . . . . . . . . . . . . . 3
Important Safety Notes. . . . . . . . . . . . . . . . . . . . . . . . . . . . . . . . . . 3
Front Panel . . . . . . . . . . . . . . . . . . . . . . . . . . . . . . . . . . . . . . . . . . 5
Rear Panel/Connections. . . . . . . . . . . . . . . . . . . . . . . . . . . . . . . . . 6
Power Supply. . . . . . . . . . . . . . . . . . . . . . . . . . . . . . . . . . . . . . . . . 7
Patches. . . . . . . . . . . . . . . . . . . . . . . . . . . . . . . . . . . . . . . . . . . . . 7
How to Select a Patch . . . . . . . . . . . . . . . . . . . . . . . . . . . . . . 7
Patch Function. . . . . . . . . . . . . . . . . . . . . . . . . . . . . . . . . . . . . 8
Factory Reset. . . . . . . . . . . . . . . . . . . . . . . . . . . . . . . . . . . . . . . . . 9
Tuner. . . . . . . . . . . . . . . . . . . . . . . . . . . . . . . . . . . . . . . . . . . . . . 10
Bypass Effects. . . . . . . . . . . . . . . . . . . . . . . . . . . . . . . . . . . . . . . 10
Drum. . . . . . . . . . . . . . . . . . . . . . . . . . . . . . . . . . . . . . . . . . . . . . 11
Tap. . . . . . . . . . . . . . . . . . . . . . . . . . . . . . . . . . . . . . . . . . . . . . . 12
Master Volume. . . . . . . . . . . . . . . . . . . . . . . . . . . . . . . . . . . . . . . 13
Expression Pedal. . . . . . . . . . . . . . . . . . . . . . . . . . . . . . . . . . . . . 13
Expression Pedal Functions. . . . . . . . . . . . . . . . . . . . . . . . . . . . . . 14
Storing Programs. . . . . . . . . . . . . . . . . . . . . . . . . . . . . . . . . . . . . 15
Selecting Effects . . . . . . . . . . . . . . . . . . . . . . . . . . . . . . . . . . . . . 16
Parameters. . . . . . . . . . . . . . . . . . . . . . . . . . . . . . . . . . . . . . . . . 17
Adjusting Parameters. . . . . . . . . . . . . . . . . . . . . . . . . . . . . . . 17
Noise Gate . . . . . . . . . . . . . . . . . . . . . . . . . . . . . . . . . . . . . . 18
Compressor. . . . . . . . . . . . . . . . . . . . . . . . . . . . . . . . . . . . . . 18
Wah . . . . . . . . . . . . . . . . . . . . . . . . . . . . . . . . . . . . . . . . . . . 19
Stomp. . . . . . . . . . . . . . . . . . . . . . . . . . . . . . . . . . . . . . . . . . 19
Amp Sim. . . . . . . . . . . . . . . . . . . . . . . . . . . . . . . . . . . . . . . . 20
EQ . . . . . . . . . . . . . . . . . . . . . . . . . . . . . . . . . . . . . . . . . . . . 21
Speaker. . . . . . . . . . . . . . . . . . . . . . . . . . . . . . . . . . . . . . . . . 21
Modulation . . . . . . . . . . . . . . . . . . . . . . . . . . . . . . . . . . . . . . 22
Delay. . . . . . . . . . . . . . . . . . . . . . . . . . . . . . . . . . . . . . . . . . . 23
Reverb. . . . . . . . . . . . . . . . . . . . . . . . . . . . . . . . . . . . . . . . . . 23
Bypass Individual Effect . . . . . . . . . . . . . . . . . . . . . . . . . . . . . . . . 24
Specifications . . . . . . . . . . . . . . . . . . . . . . . . . . . . . . . . . . . . . . . 25
Warranty . . . . . . . . . . . . . . . . . . . . . . . . . . . . . . . . . . . . . . . . . . . 26
User’s Manual
Introduction
Congratulations on your purchase of the DBFX1 Bass
Multi-Effects Processor, an advanced multi-effects pedal
with built-in drum machine.
To get the most out of your new pedal, we recommend you read
this manual carefully and keep it for future reference.
Main Features
• 54
built-in effects
use of up to 11 effects
• 48 user patches, 48 factory settings
•E
xpression pedal controls volume, wah and 8
other parameters.
• Built-in drum machine
• User-friendly interface with simple parameter adjustments
• Simultaneous
Important Safety Notes
Power Supply
To avoid damage, please make sure that all power devices
(such as amplifiers) are turned off before connecting the DBFX1.
If an AC adapter is used, it should be unplugged from the
AC outlet if the instrument will not be used for an extended
period of time.
Avoid using this unit on the same electrical circuit with other
appliances that may generate line noises.
3
Bass Multi-Effects Pedal
Bass Multi-Effects Pedal
Handling and Transportation
Grab the unit firmly while plugging in or unplugging cables.
Physical shocks caused by dropping, bumping, or placing
heavy objects on top of DBFX1 can result in scratches or
more severe damage.
Never apply excessive force to controls, connectors, or other parts.
Strong vibrations and shocks will damage the DBFX1.
Location
To minimize interference, do not place this unit close to heat
sources such as radiators and amplifiers.
Do not expose the DBFX1 to excessive sunlight or moisture.
Cleaning
Clean the DBFX1 with a soft, dry cloth. To remove more stubborn dirt, use a slightly dampened cloth with mild detergent.
Never attempt to clean the DBFX1 with thinners or alcohol.
www.deltalabeffects.com
4
User’s Manual
Front Panel
1
2
3
4
6
9
5
8
7
1 EFFECT SELECTION Knob
6
Selects the effect and various
parameters.
2 STORE Button
7 PATCH +/– Foot Switches
Selects patches, switches effect modules on and off, controls
tuner and other functions.
Saves your settings.
3 / Button
Controls rhythm playback.
8 LCD Display
Displays current information and
bank number.
4 TAP Button
Adjusts rhythm tempo.
5 BANK +/– Buttons
TYPE/PARAM/VOL Knob
Adjusts effect type, parameters,
and volume.
9 Expression Pedal
Adjusts the volume and various
parameters in real-time.
Selects bank number and
enters patch function.
5
Bass Multi-Effects Pedal
Bass Multi-Effects Pedal
Rear Panel/Connections
Bass Amplifiers
Bass
Guitar
1 INPUT Jack
4 HEADPHONE Jack
Connect your bass to this jack.
5 DC IN Jack
Connect the AC adapter
(9V, 300mA) to this jack.
2 LEFT LINE OUTPUT
Connect your bass amplifier
to this jack.
6 CORD Hook
Hook the AC adapter cord
here to prevent the adapter
from disconnecting.
3 RIGHT LINE OUTPUT
Connect a second bass
amplifier to this jack for
stereo effects.
7 POWER Switch
Turns power on and off.
NOTES:
• Before connecting to the AC IN jacks, fasten the cord of the AC adapter around the hook
as shown in the diagram. This will prevent the plug from being disconnected if the cord is
accidentally pulled.
•To prevent malfunction and/or damage to speakers or other devices, always turn down the
volume of the DBFX1 and turn all devices off before connecting cables.
•If you turn on the DBFX1 while the amplifier is already powered up, damage to the speaker
may result. Always turn amplifiers off before connecting cables.
www.deltalabeffects.com
6
User’s Manual
Power Supply
1 Connect all cables.
2 Switch on the DBFX1.
3 After the power is on,
the LCD will display “DBFX1”
followed by any previously
saved patch and effects chain.
Patches
NOTE: The unit has up to 96 patches:
48 default settings (0–1 and 7–6), and
48 user patches (A–1 and H–6).
How to Select a Patch
1 Set the EFFECT SELECTION
Set to PLAY
knob button to PLAY.
2 Use BANK– or BANK+ button
to select a bank number.
The LCD displays the current
bank number (0–7 and A–H)
with the relevant tone name
and effect chain.
NOTE: The PLAY mode will be automatically selected after you turn the unit on, even if
the knob has been set to a position other than PLAY.
7
Bass Multi-Effects Pedal
Bass Multi-Effects Pedal
3 Press the PATCH +/- to select the
PATCH. Press and hold PATCH +/again to change patches.
The screen displays the current
patch number (1–6) with the
relevant tone name and
effect chain.
Patch Function
1 Press the BANK– and BANK+
buttons simultaneously to
activate the patch function.
At the same time, the indicator
‘P.FU’ will be displayed.
Press simultaneously
2 Press PATCH+/- or BANK+/- to
change the patch display. The
patch number flashes until you
press the PATCH+ and PATCHswitches simultaneously to
select the patch.
Press simultaneously
Flashing
www.deltalabeffects.com
8
User’s Manual
3 Then press BANK– and BANK+
simultaneously to disable the
patch function. The ‘P.FU’
symbol will disappear.
Press simultaneously
Factory Reset
NOTE: The 48 user patches start as
duplicates of the 48 default patches.
1 Turn off the power.
2 Hold down STORE and
/
Buttons simultaneously,
then turn on the power.
The screen displays ‘RESET’
until the reset process is
finished. When finished, the
display window will show
‘01’ tone, its name, and the
effects chain.
WARNING: Using the
factory reset function will
wipe out all user data!
9
Bass Multi-Effects Pedal
Bass Multi-Effects Pedal
Tuner / Effects Bypass
1 Set the effect selection knob to ‘PLAY’.
2 Press PATCH+ and PATCH- switches simultaneously to enter
tuner mode. The LCD will display ‘TUNER’.
This also bypasses all effects.
NOTE: You can tune your bass strings without
the DBFX1 producing any sounds. Hold the
two switches longer to enter the MUTE tuning
mode. The LCD will display ‘MUTE’.
3 The LCD will display the notes:
A, B, C, D, E, F, G and . Symbols
“>” or “<” show the degree of
flatness or sharpness. When the
display shows >|<, the string
is a correctly tuned.
4 The tuner function will activate
in bypass or mute status. Press
PATCH+ or PATCH- to exit the
tuner mode.
5 Dial the knob to change pitch.
The default reference pitch is
set to 440 Hz. (This is usually the
“A” string on your bass.)
www.deltalabeffects.com
10
User’s Manual
Drum
NOTE: The DBFX1 has a built-in rhythm
function that plays realistic
drum sounds.
1 Dial the TYPE/PARAM/VOL
knob to PLAY, press the
button, and the PLAY
indicator will light up.
/
2 Press the TYPE/PARAM/
VOL dial to adjust these
parameters: rhythm pattern,
tempo, and rhythm volume.
NOTE: If no action is taken within 8
seconds, the LCD will redisplay the
patch name.
3 Dial the TYPE/PARAM/VOL
knob to set the value of
the parameter.
4 Press the
/ again to return
to the previous status.
11
Bass Multi-Effects Pedal
Bass Multi-Effects Pedal
Tap
NOTE: The rhythm tempo can be adjusted
from 40 to 250 BPM (beats per minute).
1 To change the rhythm tempo,
turn the EFFECT SELECTION
knob to PLAY. Then, continuously
press the TYPE/PARAM/VOL
knob until you reach the TEMPO
parameter. Dial the knob to set
the tempo.
2 To manually adjust the tempo,
hit the TAP button at least
twice to set the tempo.
NOTE: The first tap of the TAP button will
show the current tempo value on the
LCD. The DBFX1 will then automatically
detect the interval of the second and
subsequent key-presses, setting the
tempo accordingly.
www.deltalabeffects.com
12
User’s Manual
Master Volume
While in PLAY mode, rotate
the TYPE/PARAM/VOL knob
to adjust the master volume.
The range is from 0 to 100.
The default level is 70.
Expression Pedal
1 The pedal controls volume
when the light is off. When
the light is on, you can use
the pedal to control the wah
effect as a default or one
of 7 other parameters as
assigned by the user.
2 To activate the expression function, press down on the front of
the pedal until it activates the switch underneath it.
13
Bass Multi-Effects Pedal
Bass Multi-Effects Pedal
Expression Pedal Functions
The expression pedal controls various parameters in real-time.
To select which parameters it controls, make sure the EFFECT
SELECT knob is at PLAY mode. Press the TYPE/PARAM/VOL
knob, until “EXP” is displayed. To select the parameter, rotate
the TYPE/PARAM/VOL knob:
DISPLAYFUNCTION
UAH
Pedal wah
S.dr
Stomp drive
A.g.
Amp gain
PIU
EQ mid-frequency
PId
Polarity down
PIH
Modulation pitch
d.Fb
Delay feedback
d.L
Delay level
r.L.Reverb level
NOTE
Except for acoustic
Polarity up
Press the TYPE/PARAM/VOL knob until “POLAR” is displayed.
Rotate the TYPE/PARAM/VOL knob to choose whether the
pedal’s polarity is normal or reverse.
To switch back to normal operation, firmly press the pedal’s
toe until it activates the pedal switch. This will put you back to
pedal volume.
www.deltalabeffects.com
14
User’s Manual
Storing Programs
1 After editing any of the effect
programs, press the STORE button
to save your custom program. The
tone number and the patch name
will flash on the display.
2 You can select the tone that you
want to store by pressing BANK+/or PATCH +/-. You can save user
patches in banks A1–H6. To
change the patch name, press the
TYPE/PARAM/VOL dial to select
the letter to be changed. Choose
the new letter by dialing the knob.
3 Press the STORE button again
to confirm.
4 At any time, you can cancel the
edits to the patch and return to
the original parameters by dialing
the EFFECT SELECTION knob back
to PLAY and selecting a new
patch number.
15
Bass Multi-Effects Pedal
Bass Multi-Effects Pedal
Selecting Effects
DBFX1 patches are made up of 11 linked effect modules as
shown in the illustration below. You can use all effect modules
together or individually.
Effect Module
WAH
NOISE GATE
COMP.
on/off
DeltaLab
1960s Tube
Comp 1 Auto Touch
on/off
Bass Preamp
Flip Top
Wah
Comp 2 Auto Sweep
DeltaLab
1950s
vintage Wah
Comp 3
Tube Overdrive tube combo
DeltaLab
Slow
US Classic
Pedal Wah
1970s Classic
Attack
Overdrive
US Blue Solid
State Head
Deltlab
Rock Distortion 1970s British
Tube Bass
60s Fuzz
Head
Distortion
1970s US
US Modern Bass Tube Bass
Overdrive
Head
Bass Edge
1960s British
Distortion
Tube Bass
Head
70s Fuzz
Distortion
1970s Classic
US Solid State
Head
DISTORTION
AMP
EQ
MODULATION
DELAY
REVERB
4x10
Sine Chorus
Digital Delay
Spring
8x10
Tri-Chorus
Flange
Ping Pong
Delay
Room
4x12H
4x12M
Step Flange
Multi-Head
Delay
Plate
SPEAKER
1x15
Phase
2x15
Step Phase
1x18A
Tremolo
Folded Bass Cab
Pitch Shift
Hall
Reversed
Delay
Vibrato
Clop Slice
Octave
Ring Modulator
Modern US
Tube Bass
Head
•PLAY (you can change patch and set the rhythm)
•NOISE GATE
•COMPRESSOR
•WAH
•DISTORTION
•AMP SIMULATION
•EQ
1 Dial the EFFECT SELECTION knob
to choose the desired effect to be
adjusted. It will be displayed on
the LCD screen.
2 11 effects can be used simultaneously.
The effect symbols across the top of the
LCD screen indicate the status of each
effect in the chain.
Symbol displayed = Effect is on.
Symbol is off = Effect is bypassed.
Symbol flashing = Effect is being edited.
www.deltalabeffects.com
16
•SPEAKER SIMULATOR
•MODULATION
•DELAY
•REVERB
VOLUME
User’s Manual
3 You can dial the TYPE/PARAM/VOL
knob to adjust the desired effect.
4 If the EFFECT SELECT knob is
not set to PLAY, the unit is in
edit status. The EDIT symbol
will be displayed.
Parameters
Adjusting Parameters
1 All parameter adjustments
are performed by dialing the
TYPE/PARAM/VOL knob.
2 Press the TYPE/PARAM/VOL
knob to select the parameter
you want to adjust. Each time
the knob is pressed it will
display a different parameter.
3 Dial the TYPE/PARAM/VOL
knob to choose the parameter
value.
17
Bass Multi-Effects Pedal
Bass Multi-Effects Pedal
Noise Gate
1 NOISE GATE eliminates noise below a certain threshold.
It is most useful when not playing, completely eliminating
noise, hum, and crackles. It does not affect the overall color
of the tone.
2 Parameter 1 sets the signal strength (threshold) required to
enable or disable the noise gate range from 0 (opens easily)
to 100 (opens with a stronger input signal).
Type Name
LCD Display
Description
PARAM 1
PARAM 2
PARAM 3
Noise Gate
NG
Reduce Noise
Threshold
Release Time
Attack Time
Compressor
1 COMPRESSOR produces sustain or simple “smoothing” by com-
pressing the signal so that the high levels are suppressed while
raising low level signals.
2 The use of compression can enhance tone and articulation.
3 Parameter 1 is used to set the compressor threshold level. When
the input signal exceeds this level, compression will be applied.
4 Parameter 2 determines the volume level.
Type Name
LCD Display
Description
Compression
COMP
Balances the high and low Threshold
volume levels of the input
www.deltalabeffects.com
PARAM 1
18
PARAM 2
Volume Level
User’s Manual
Wah
1 The wah effect creates a unique tone by filtering
frequencies via the expression pedal.
2 Range: 0–100 (except for polarity, which will be
displayed as Up or Down).
Type Name
LCD Display
Description
PARA 1
PARA 2
PARA 3
Auto Wah
Sweep Wah
Pedal Wah
T.Wah
S.Wah
P.Wah
Auto Wah
Sweep Wah
Pedal Wah
Sensitivity
Speed
Polarity
Q
Q
/
Grade
/
/
Stomp
1 This unit contains models of 8 popular distortion stompboxes,
each of which can be tweaked just like the original model.
2 The distortion modules offer up to four parameters.
3 DRIVE controls the distortion level. LEVEL controls volume.
TONE determines the brightness of the tone.
4 Drive parameters can be adjusted from 1 thru 100.
5 Tone parameters can be adjusted from –50 thru +50.
6 Volume parameters can be adjusted from 1 thru 100.
7 Mix parameters can be adjusted from 0 thru 100.
8 Balance parameters can be adjusted from 0 thru 100.
19
Bass Multi-Effects Pedal
Bass Multi-Effects Pedal
Stomp
Type
LCD Description
Display
DeltaLab
Preamp
DLPRE
DeltaLab Tube
Overdrive
US Overdrive
TUBED
DeltaLab
Rock
Distortion
Vintage Fuzz
Modern Overdrive
Edge Distortion
Classic Fuzz
USAOD
ROCKD
VFUZZ
MODOD
EDGED
CFUZZ
PARA 1
PARA 2 PARA 3
PARA 4
The DeltaLab Preamp
boosts the lows and
highs yeilding a defined,
rich sound
Models DeltaLab
Tube Overdrive
Classic Overdirve w/
Tone and Mix
Models DeltaLab Rock
Distortion with higher
gain and cut
Late 60s Fuzztone
Modern Bass Overdrive
Level
/
/
/
Drive
Tone
Level
/
Drive
Tone
Mix
Level
Drive
Tone
Level
/
Drive
Drive
Level
Balance
/
/
Bass Distortion with a
bit of edge
70s Fuzz Distortion
/
Tone
Level
Drive
Tone
STOMP
AMP
Drive
Tone
/
EQ
WAH
CAB
MOD
COMP
GATE
Amp Sim
/
Level
PLAY
DELAY
REVERB
1 Amp Sim models the sound characteristics of several popular
and vintage amps.
Type Name
LCD Display
Vintage Flip Top
FLIPT
Vintage Tweed US
Description
PARA 1 PARA 2
PARA 3
Vintage 1960s Tube Flip Top
Gain
Level
/
TWEED
Late 1950s Vintage Tube Combo
Gain
Level
/
Blue SS Head
USBLU
1970s Classic US Blue Solid
State Head
Gain
Level
/
Classic British
Tube Head
UK70T
1970s British Tube Bass Head
Gain
Level
/
Classic US
Tube Head
US70T
1970s US Tube Bass Head
Gain
Level
/
Vintage British
Tube head
Classic US SS
Head
UK60T
1960s British Tube Bass Head
Gain
Level
/
Gain
Level
/
Gain
Level
/
Modern
Tube Head
US70S
US00T
1970s Classic US Solid State Head
Modern US Tube Bass Head
www.deltalabeffects.com
20
User’s Manual
EQ
1 EQ shapes the bass, low-
midrange, high-midrange and
treble tones of the output
signal.
2 Range of bass, midrange, and
treble: 50–50.
3 Range of mid-freq: 0–100.
Type Name
Equalizer
LCD Display
EQ
Description
PARAM
1
Adjust the tonal quality
PARAM PARAM
2
3
Low
Low
Mid
High
Mid
PARAM
4
High
Speaker
1 Speaker simulation models
various speaker sizes and
cabinet configurations.
21
Number
LCD Display
1
2
3
4
5
6
7
8
4x10
8x10
4x12H
4x12M
1x15
2x15
1x18A
Folded Bass
Bass Multi-Effects Pedal
Bass Multi-Effects Pedal
Modulation
•C
ontains
different effects, such as Chorus,
Phaser, Flanger, Pitch Shifter, Vibrato, Auto Riff,
Ring, Modulation, and more.
• The
Chorus effect combines the delay time and
amplitude modulation to thicken and
add shimmer.
• Phase
effect creates a whooshing and swirling
sound.
•T
he
Flanger effect creates a twisting, jet-airplanelike sound.
•A
Pitch Shift copies the incoming signal, then
shifts the pitch of the copied tones to a different
note. The shifted note is then mixed back with
the original tone. It will sound as if two basss
were playing different notes in harmony.
•T
he
Vibrato effect creates a slight
pitch modulation.
•T
he
Ring modulation effect creates a bell-like
sound by modulating the input signal.
Type Name
Classic Chorus
Stereo Chorus
Flanger
Step Flanger
Phaser
Random Phaser
Tremolo
Pitch Shifter
Vibrato
Clop Slice
Octave
Auto Ring
LCD Display
PARAM
1
PARAM
2
PARAM
3
PARAM
4
Sinch
Trich
Flang
Stepf
Phase
Stepp
Tremo
Pitch
Vibra
Clop
Octave
Ring
Rate
Rate
Rate
Rate
Rate
Rate
Type
Pitch
Rate
Type
Direct
Rate
Pre delay
Pre delay
Depth
Step
Depth
Peak
Speed
Cent
Depth
Speed
Oct1
Mix
Depth
Depth
Feedback
Feedback
—
—
Depth
Mix
—
—
Oct2
—
Level
Level
—
Mix
—
—
—
—
—
—
—
—
www.deltalabeffects.com
22
User’s Manual
Delay
• DELAY
functions like an echo effect. You can adjust the
delay time (the time between echoes) from 10 milliseconds
to 4 seconds, the feedback (the volume level of the echo),
and the level of effect.
Type Name
Full Range Delay
Ping Pong Delay
Multi Head Delay
Reversed Delay
LCD Display
Delay
PPD
MD
RD
Description
Delay from 10ms to 4000ms
Stereo delay
Multi tap delay
Reverse delay
PARAM
1
PARAM
2
PARAM
3
Time
Time
Time
Time
Feedback
Feedback
Feedback
Feedback
Level
Level
Level
Level
Reverb
•R
everberation
is the warm musical ambience from
listening to music in a hall or other natural environments.
The unit offers several different reverb effects, simulating different types of reverberations as if you are experiencing
a hall or a small room.
Type Name
Spring
Room Reverb
Hall Reverb
Plate Reverb
LCD Display
Spring
Room
Hall
Plate
Description
Classical spring
Room reverb
Hall reverb
Metal plate reverb
23
PARAM
1
PARAM
2
PARAM
3
Time
Time
Time
Time
Density
Density
Density
Density
Level
Level
Level
Level
Bass Multi-Effects Pedal
Bass Multi-Effects Pedal
Individual Effect Bypass
1 Press the PATCH+/BYPASS switch, the effect is
bypassed.
2
Press the PATCH+/BYPASS switch one more
time to turn the bypass function off.
www.deltalabeffects.com
24
User’s Manual
Specifications
Controls
AD Conversion
Store button
Back +/- button
Tap button
/ button
Effect Selection knob
Type/Param/Vol knob
Patch +/- foot switches
Expression pedal
Power switch
32 bit, 64x oversampling
DA Conversion
32 bit, 128x oversampling
Sampling Rate
48kHz
Display
5 characters (backlit LCD)
5 BCD
Weight
885g (excluding AC adaptor)
Patches
Dimensions
48 user and 48 default
Length 255mm x Width 162mm x
Height 60mm
Effect Types
54
Power supply
DC 9V negative center
Effect Modules
11
Connections
Input jack
Phones/Output jack
AC in jack
25
Bass Multi-Effects Pedal
Bass Multi-Effects Pedal
Warranty
One (1) Year Limited Warranty and Remedies.
Subject to the limitations below, DeltaLab™ warrants to the
original owner that the components of this product are free
from defects in workmanship and materials, subject to normal
use and service, for one (1) year from the date of purchase.
DELTALAB™ MAKES NO OTHER WARRANTIES, EXPRESSED
OR IMPLIED, INCLUDING, BUT NOT LIMITED TO, ANY IMPLIED
WARRANTY OF MERCHANTABILITY OR FITNESS FOR A
PARTICULAR PURPOSE OR ANY IMPLIED WARRANTY ARISING
OUT OF A COURSE OF DEALING, CUSTOM OR USAGE OF TRADE.
User is responsible for determining whether this product is fit
for a particular purpose and suitable for user’s application.
If the product is defective within the warranty period, user’s
exclusive remedy and manufacturer’s sole obligation will be, at
its option, to replace the product or refund the purchase price.
Except where prohibited by law, manufacturer and seller will
not be liable for any loss or damage arising from the product,
whether direct, indirect, special, incidental or consequential,
regardless of the legal theory asserted, including warranty,
contract, negligence or strict liability.
DeltaLab
P.O. Box 5111
Thousand Oaks, CA 91359-5111
All trademarks and registered trademarks mentioned herein
are recognized as the property of their respective holders.
www.deltalabeffects.com
26
0906-8991