1
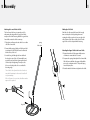
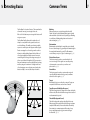
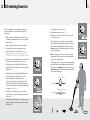
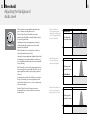
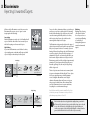
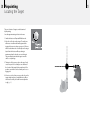
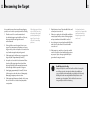
2 Heading Heading Heading
Quick Start
Discriminate Mode: (For detecting non-ferrous metals)
Ensure that the battery pack is fully charged. (pg. 14)
Set the mode switch to Disc (Discriminate). (pg. 27)
Turn the detector 'On' by turning the Threshold control
clockwise until it 'clicks'. Continue turning until the audio
tone becomes 'just' audible. (pg. 22)
Set the desired position of the Discriminate control. (pg. 28)
Set the Sensitivity control to Auto or at the maximum
manual setting without electrical interference. (pg. 25)
You are now ready to start searching!
Pinpoint/All Metals Mode: (For detecting all types
of metals)
Ensure that the battery pack is fully charged. (pg. 14)
Set the mode switch to Pinpoint/All Metals. (pg. 27)
Turn the detector 'On' by turning the Threshold control
clockwise until it 'clicks'. Continue turning until the audio
tone becomes 'just' audible. (pg. 22)
Set the Sensitivity control to Auto or at the maximum
manual setting without electrical interference. (pg. 25)
You are now ready to start searching!
Instruction Manual
Minelab is always interested in your opinions. If you have
any questions or comments regarding the Excalibur II or
any other Minelab product, please feel free to contact us via
your local Authorised Minelab dealer, or write to us:
The World Leader in Metal Sensing Technology
© Minelab Electronics Pty Ltd
From our origins in 1985, Minelab have specialised in advanced electronics
technologies. Our competitive advantage was created almost immediately with a
highly competent and innovative Research and Development team, inspired by the
genius of Mr. Bruce Candy.
Minelab Electronics Pty Ltd
PO Box 537, Torrensville Plaza
Adelaide, South Australia, 5031
Australia
Tel: +61 (0) 8 8238 0888
Fax: +61 (0) 8 8238 0890
Email: [email protected]
This commitment to innovation has enabled us to successfully market featurepacked Consumer coin and treasure detectors enjoyed by hobbyists worldwide
as well as high quality gold detectors used by both professionals and amateurs.
Minelab’s advanced technology is also incorporated in detection equipment
designed for military and humanitarian de-mining projects throughout the world.
This document contains proprietary
information which is protected by
copyright. Apart from any use as
permitted under the Copyright Act
1968, no part may be reproduced by
any process without written permission
from Minelab Electronics Pty Ltd, 118
Hayward Avenue, Torrensville, SA 5031,
Australia.
WARNING. This document contains
Minelab Electronics Pty Ltd rights,
technical data or restricted rights data,
or both.
Minelab International Ltd
Laragh, Bandon
Co. Cork
Ireland
Tel: +353 (0)23 885 2101
Fax: +353 (0)23 885 2106
Email: [email protected]
Minelab Americas
2777 Finley Rd, Unit 4
Downers Grove, IL 60515
USA
Tel: +1 630 401 8150
Fax: +1 630 401 8180
Email: [email protected]
For further product information
and detecting tips, refer to:
www.Minelab.com
Today Minelab has manufacturing, distribution and customer service operations
in Australia, Europe and the United States, and is an ISO 9001 Quality Endorsed
Company. ISO 9001 is a worldwide quality standard certification that ensures the
highest level of product quality for our customers.
Working for a Cleaner,
Greener Future
This device complies with
part 15 of the FCC rules
For Consumers within the European
Union: Do not dispose of this equipment
in general household waste.
Operation is subject to the following two
conditions: (1) this device may not cause
harmful interference, and (2) this device
must accept any interference received,
including interference that may cause
undesired operation.
The crossed out wheeled bin indicated
on this equipment is an indicator that
this unit should not be disposed of in
general household waste, but recycled
in compliance with local government
regulations or environmental requirements.
Please dispose of this equipment via a
recycling service or centre, or by returning
the unit to the respective Minelab or Halcro
outlet as appropriate for your unit. This
will enable the equipment to be disposed
of in an environmentally safe manner.
Disposal of unwanted electronic
equipment in landfilled waste may
contribute to adverse long term
environmental effect due to the
leaching of contaminating and toxic
substances contained within some
electronic equipment.
Disclaimer:
The Minelab metal detector discussed
in this operating manual has been
expressly designed and manufactured as
a quality hobbyist metal detector and is
recommended for use in coin, treasure and
general metal detection in non-hazardous
environments. This metal detector has not
been designed for use as a mine detector
or as a live munitions detection tool.
Please note:
Since there may be a variety of options
available for this detector, equipment
may vary according to the Model or
items ordered with your detector. Certain
descriptions and illustrations may also
differ (in this manual) from the exact Model
that you purchased. In addition, Minelab
reserves the right to respond to ongoing
technical progress by introducing changes
in design, equipment and technical
features at any time.
Item Number: 4901 - 0064
Revision: 4
Congratulations
on purchasing the
Minelab Excalibur II
Metal detecting is a fascinating and rewarding activity
enjoyed by people all over the world. By getting to know
your Excalibur II, you may become one of the many who
find gold and valuable treasure!
The Excalibur II is an amphibious machine performing
as well on land and the beach as it does underwater.
You can be confident in its ability to penetrate deeply
and discriminate accurately underwater, at depths of
up to 66 m (200ft).
With Minelab’s unique Broad Band Spectrum (BBS)
multi- frequency technology, this machine transmits at
17 individual frequencies simultaneously to give you the
depth, sensitivity and accuracy that you need.
While being extremely advanced, the Excalibur II is
also an easy-to-use detector having very few controls
that require adjustment after they have been set. The
Excalibur II will always operate at maximum performance
without the need to ground balance manually.
The Excalibur II includes a light slimline coil to reduce
detecting fatigue (you can choose 8" or 10" as standard),
a rechargeable NiMH battery pack to provide you
with maximum detecting time and a fluorescent
skidplate to guide you in poor visibility wading and
underwater conditions.
If you have any questions or comments regarding the
Excalibur II or any other Minelab product, then please
feel free to contact us via your local Authorised Minelab
Dealer or write to us directly.
Minelab wishes you every success as you
experience the excitement of discovery!
1
2 Contents
3
Quick Start
Back Cover
How Metal Detectors Work
4
BBS Technology
5
List of Parts
6
Assembly7
Adjusting the Detector for Comfortable Use
12
Charging the Battery Pack
14
Detecting Basics
Common Terms
Control Panel
Turning the Detector On
A Detecting Exercise
Item Number: 4901 - 0064
Revision: 3
16
17
18
19
20
Threshold / Adjusting the Background Audio Level
22
Volume / Setting the Volume of Target Signals24
Sensitivity25
Identifying Targets
26
Disc or Pinpoint/All Metals / Selecting a Mode
27
Discriminate / Rejecting Unwanted Targets
28
Pinpointing / Locating the Target
30
Recovering the Target
32
Taking Care of Your Detector
34
Taking Care of Your Battery
35
Troubleshooting36
Technical Specifications
37
Accessories38
Warranty39
Service Repair Form
40
4 How Metal
Detectors Work
Metal detectors create an electro-magnetic (em)
field, which penetrates the ground. Because metal is
conductive it causes a change in this field. The detector
senses this change and sends a signal back to the control
box, alerting the operator.
5
BBS
TECHNOLOGY
Broad Band Spectrum (BBS)
Most detectors on the market operate on a single or dual
frequency, ranging from 1 to 70 (kHz).
A metal detector’s em operating frequencies are
measured in kilohertz (kHz).
Although this technology has served the industry
well for years, Minelab has found a frequency which
works well in one area can often offer only marginal
performance when used in another location. Ground
mineralisation, trash content and target size all have an
effect on how effective a detector transmitting a single
frequency will operate.
Low frequency EM fields deeply penetrate the ground,
but sensitivity to smaller targets is low. High frequency
EM fields have less depth, but sensitivity to small
targets is high.
The Broad Band Spectrum (BBS) circuit automatically
transmits 17 frequencies simultaneously. This increased
frequency range means the signal received from the
detector coil is analysed from a wide range of responses.
The Excalibur II's multiple frequency operation provides
the advantages of both.
BBS technology allows the Excalibur II to locate targets
in the most challenging areas of high mineralisation and
trash, on the land, beach and underwater.
Metal detectors can determine the size, shape and
composition of metallic objects beneath the coil.
Typically, the larger the object, the easier it is to detect.
Single
Frequency
Dual
Frequency
Multiple
Frequencies
6 List of Parts
Assembly
7
Armrest
Headphones
Upper Shaft
Attaching the Armrest to the Upper Shaft:
If not already bolted to the upper shaft:
1 Ensure that the cup of the armrest is pointing in
the same direction as the handle. Slide the armrest
onto the end of the upper shaft aligning the shaft
and armrest holes.
Control Cylinder
Battery Pod
(includes NiMH cells)
2 Insert the short bolt through the armrest and
upper shaft holes.
3 Fasten the wing-nut onto the bolt.
Charger Adaptor Plug
and Cap
Finds Bag
(US, UK & Europe only)
Mains Charger
Short Lower Shaft
(Useful for diving)
Nylon Bolts (2)
Wingnuts (2)
Long Lower Shaft
Rubber Washers (4)
Attaching the Control Cylinder to the Upper shaft:
If not already clipped to the shaft:
1 Compress the lower spring loaded pin of the
upper shaft.
Warranty Card
Slimline Coil (8” or 10”)
(with Skidplate)
Instruction Manual
2 Ensure that the coil cable of the control cylinder is
pointing downwards. Slide the control cylinder onto
the upper shaft until both pins are compressed and
they reach the adjustment holes. The pins will spring
out and clip into place.
8 Assembly
9
Connecting the Battery Pack to the Upper Shaft:
Side-Mount Upper Shaft
(Available as an accessory)
1 Connect the cable from the control cylinder to the
battery pack, using the guide screw to align the
battery contacts correctly.
The alternate position of the pins allows the control
cylinder and battery to be attached on the side of the
shaft. The side-mount position allows you to detect
close to the ground and reduces the resistance when
wading or detecting underwater.
The control cylinder is attached to the side-mount
shaft using the same procedure as for the standard
upper shaft.
guide
screw
2 Firmly tighten the water exclusion seal by hand. This
seal must be firmly tightened to ensure that no water
enters the connection. Water in the connection can
cause instability and corrosion of contacts which will
void the warranty.
Minelab applies a silicone grease to the battery
connections during the manufacturing process. This may
need to be reapplied over time as part of your routine
detector maintenance. (pg. 35)
If the battery is not already clipped to the shaft:
3 Compress the middle spring loaded pin of the
upper shaft.
4 Ensure that the battery cable is pointing down. Slide
the battery onto the bottom of the shaft until the pin
reaches the adjustment holes. The pin will spring out
and clip into place.
10 Assembly
11
Attaching the Lower Shaft to the Coil:
Winding the Coil Cable:
The short lower shaft is most commonly used for
underwater detecting, while the long lower shaft is
mostly used for land detecting. Both the long and short
lower shafts are attached in the same way.
Wind the coil cable around the lower shaft enough
times to take up the slack (try sitting down and
rotating the shaft on your knee). Leave enough slack
at the bottom of the cable near the coil to allow the
angle of the coil to be adjusted while detecting.
1 Plug the two rubber washers into the holes on either
side of the lower shaft.
spring
loaded pin
2 Ensure that the spring loaded pin of the lower shaft
is pointing to the left. Slide the lower shaft into the
bracket on top of the coil.
Attaching the Upper Shaft to the Lower Shaft:
3 Insert the long bolt through the lower shaft and
the bracket on top of the coil. Fasten with the nut
provided, being careful not to damage the thread
of the nut by over-tightening. This may need to
be loosened to adjust the coil to a comfortable
detecting angle.
2 Compress the spring loaded pin of the lower shaft.
Slide the lower shaft into the upper shaft until the
pin reaches an adjustment hole. The pin will spring
out and clip into place.
The coil cable is directly wired into the coil and is not
removable. Any attempt to disconnect this cable will
void your warranty.
If the coil becomes loose over time, the rubber washers
may need to be replaced.
long bolt
1 Rotate the twistlock of the upper shaft counterclockwise to ensure that it is loosened.
3 Rotate the twistlock clockwise to tighten it on the shaft.
12 Adjusting the Detector
for Comfortable Use
For comfortable, long
term detecting, it is
important that you take
the time to adjust the
detector correctly.
Holding the Detector:
Grasp the handle of the
detector and rest your
forearm in the armrest.
Adjusting the Length of the Lower Shaft:
The correct length of the lower shaft should allow you
to swing the coil in front of your body without any
uncomfortable stretching or stooping. If the coil is too
far from your body it will be difficult to balance and
manoeuvre while detecting. If the coil is too close to your
body it may detect your digging tool or any other metal
that you are carrying, causing confusing sounds.
1 Rotate the twistlock of the shafts counter-clockwise to
ensure that they are loosened.
2 Compress the spring pins of the shafts and move them
up or down to suit. Once all shafts are clipped into
position, rotate twistlocks clockwise onto the shafts
until they are firmly clamped.
Adjusting the Position of the Armrest:
Align the adjustment holes so your elbow sits just above
the back of the armrest and so you can comfortably
grip the handle.
13
Short Hipmount Kit
(Available as an accessory)
The hipmount kit consists of a short shaft and belt
that allows you to wear the control cylinder and
battery pack on your waist or over your shoulder.
This takes weight off the shaft for a more
comfortable detecting session.
1 Detach the control cylinder and battery from the
main shaft.
2 Align the holes of the control cylinder and the
hipmount shaft.
3 Attach the control cylinder to the shaft with the
bolts (attached to the belt) and wingnuts.
4 Compress the middle spring loaded pin of the
short hipmount shaft.
5 Slide the battery onto the shaft until the pin
reaches the adjustment hole. The pin will spring
out and clip into place.
6 Comfortably tighten the belt around your waist.
Ensure you position the
hipmount shaft in a way which
does not cause excessive strain
on the cables.
Shaft is the
correct length
Shaft is too short
14 Charging the Battery Pack
The Excalibur II is supplied with a sealed battery pack
which contains 10 NiMH rechargeable cells. This pack
has been pressure tested to a depth of 66 m (200ft)
which makes it suitable for both land and underwater
detecting.
The batteries can be recharged without having to
remove them from the pack .
15
Alkaline Battery Pack (Available as an accessory)
The alkaline pack is water resistant but not waterproof
so is suitable for land and beach shallow-wading only.
This pack is not sealed and must be opened to replace
the batteries.
The Excalibur II is also supplied with an adaptor plug
and a mains charger (240v/230v/110v). The charger will
charge the batteries from local mains (AC) power outlets.
1 Unplug the battery cable from the battery pack (you
can leave the battery pack on the shaft).
2 Connect the charger into the adaptor plug.
3 Connect the adaptor plug to the battery pack using
the guide screw to align the battery contacts correctly.
4 Plug the charger into a power socket. For its first time,
allow the battery to charge for at least 16–17 hours
to ensure its peak performance while detecting.
A fully charged battery pack should provide you with
14–19 hours of detecting time.
An extra NiMH battery pack can also be purchased
separately as an accessory item.
Replacing Alkaline Batteries:
1 Ensure that the detector is switched off
before opening the alkaline battery pack.
2 Remove the cap of the battery pack.
3 Remove the battery cell compartment from
the battery pack and take out the
old batteries.
4 Install the new batteries, orientating the
positive (+) and negative (–) as shown.
Low Battery Alarm
When the batteries are nearing depletion, the threshold will gradually
increase to a loud continuous signal. This tone identifies that the NiMH
battery pack needs to be recharged or the alkaline batteries need to be
replaced. A fully charged battery pack ensures optimum performance.
5 Replace the compartment and the
battery pack cap.
Always use good quality alkaline batteries.
Rechargeable NiMH batteries cannot be used
in the Alkaline pack, as they do not provide
sufficient voltage.
16 Detecting Basics
The Excalibur II is a ‘motion’ detector. This means that the
coil must be 'moving' over a target to detect it.
If the coil is held stationary over a target the detector will
not give a response.
The Excalibur II will perform at its best when the coil
is kept close and parallel to the ground, beach, river/
sea bed at all times. This will increase detection depth,
response to small objects and help prevent false signals.
Practise sweeping the coil over the ground in a side-toside motion, while walking forward slowly. At the end
of each sweep slightly overlap the previous sweep to
ensure full ground coverage. An average sweep speed
is four seconds from left to right to left. If you sweep too
fast your discrimination accuracy will suffer and you may
miss deep targets. A variation in coil height at the end
of each swing may cause confusing sounds and reduce
detection depth, so an even, flat sweep is desirable.
Common Terms
Blanking
When sweeping over a rejected target, the threshold
‘blanks’ (becomes silent) indicating that a target is located
underneath the coil, but has been rejected by you. Blanking
is a useful way of distinguishing between desired and
undesired targets. (pg. 29)
Discrimination
Discrimination is the ability of a metal detector to identify
the user’s desired target (e.g. jewellery) and eliminate signals
from undesirable material (e.g. nails). The Discriminate
control allows you reject or 'ignore' certain targets. (pg. 28)
Electrical Interference
The detector may also produce sounds when the coil
is not over a target. These signals are caused by nearby
electromagnetic sources such as power lines and
phone towers. (pg. 19)
Ground Noise
The detector may also produce various random signals
caused by different minerals in the ground, sometimes
referred to as false signals. (pg. 19)
Targets
Buried metal objects are referred to as targets. Targets are
comprised of both ferrous and non-ferrous metals.
Target Response (Metal Object Response)
This is the term given to the change in the volume (and pitch
in Disc mode) of the threshold when a target is detected and
not discriminated (rejected).
Threshold (Background Sound)
This is the background sound produced by the detector.
When a target is detected, the threshold changes in volume
(and pitch in Disc mode). Listen to the threshold carefully.
Concentration is an important part of detecting. A very
deep or small target may only give a minor change to
the threshold. (pg. 22)
17
18 Control Panel
Turning the
Detector On
Discriminate
Controls which type of
targets (metal objects) the
detector will reject. (pg.
28)
Sensitivity
Increases/decreases the
detectors response to
its environment and to
targets. (pg. 25)
Volume
Controls the maximum
level of sound emitted by
the detector when a target
is detected. (pg. 24)
Threshold
Increases/decreases the
constant background
audio produced by
the detector. (pg. 22)
This control is also used to
turn the detector on/off.
Disc or Pinpoint/All
Metals
The Excalibur II can
operate in two different
modes. This control
allows you to switch
between Disc mode and
Pinpoint/All Metals mode.
(pg. 27)
19
The Threshold control is also used to turn the
detector on.
Turn the control clockwise until it clicks 'on'.
The Discriminate
function becomes
active when Disc
mode is selected.
It is best to only turn the detector on
when outdoors and away from sources
of electromagnetic interference such as
power lines, transmitters, electric fences
and phone towers. These sources may
cause the detector to perform erratically,
giving numerous false signals.
If the detector emits an overload sound,
move the coil away from any large metal
objects. Overloading is not harmful to the
electronics of the detector.
20 A Detecting Exercise
Before attempting to recover targets, it is important
to understand how to interpret the audio signals of
the detector.
1 Gather a collection of different metal objects, e.g. a
nail, pull-tab, aluminium foil, various coins, gold and
silver jewellery.
21
9 Switch the detector to Disc mode.
10 Turn the Discriminate control to 1.
11 Sweep the coil across the objects, one at a time, and
observe the sounds.
2 Remove all jewellery from your hands and wrists.
3 Take the detector outdoors, away from known
electrical interference or metal objects. If you are
getting signals from a clear patch of ground, there
could be buried metal objects. Try finding another area.
4 Lay objects in a line, sufficiently spaced apart to allow
the coil to pass between them, as shown. (pg. 21)
5 Turn the detector on, using the Threshold control.
Turn the Threshold clockwise until it reaches a stable,
audible 'hum'.
6 Switch the detector into Pinpoint/All Metals mode.
7 Turn the Sensitivity control clockwise to 5. The
detector may produce signals with the coil
motionless. These may not be target signals, but
signals caused from the surrounding environment.
You can overcome these false signals by reducing the
Sensitivity. (Sensitivity, pg. 25)
8 Sweep the coil across the objects, one at a time,
and observe the sounds of the detector as it detects
each object.
The Excalibur II should 'beep' on every target. Large
targets or targets close to the ground surface emit a
louder signal.
Take note that as the coil is passed over the nail, the
threshold ‘hum’ momentarily disappears (blanks), and
then returns with a lower pitch. This indicates that a
ferrous target is located underneath the coil, but has
been rejected by you.
12 Whilst sweeping the coil across the objects, turn the
Discriminate control progressively clockwise until the
detector rejects the pull-tab.
Take note that as the coil is passed over the pull-tab, the
threshold ‘hum’ momentarily disappears (blanks), and
then returns with a higher pitch. This indicates that a
non-ferrous target is located underneath the coil, but
has been rejected by you.
Target Response
Threshold
‘Blanking’ (No Sound)
Threshold
22 Threshold
Adjusting the Background
Audio Level
Threshold is the constant audible background audio
tone or 'hum' produced by the detector.
The level of the Threshold should be set low/to a
minimum, but still audible and stable. Ideally it should
be a smooth, gentle hum.
23
When the threshold is
too high, a faint signal is
masked, and only the peak
of the loud signal is audible
above the Threshold.
threshold level
Audio Range that
you are able to hear
Small targets or large deep targets may not produce
a distinct target signal, but may cause only a small
variation in the threshold.
If the Threshold level is set too high or too low, these
very small variations may be missed.
Listening for a target signal with a high threshold would
be like trying to hear a whisper within a crowded noisy
room. A high threshold level may also be uncomfortable
for your hearing.
With the threshold set
correctly, both target
signals are easily heard.
Audio Range that
you are able to hear
If the Threshold is set too low, the target signal needs to
be loud enough to become audible, therefore very soft
target signals from small or very deep targets may not
be heard.
threshold level
It is important to reset the Threshold level as conditions
change. For example, your ears may adjust to the low
levels of audio after an hour or so, or the conditions may
have become windy.
Turn the Threshold control clockwise to increase
the threshold level, or anti-clockwise to decrease the
threshold level.
A threshold level that is too
low does not allow faint
target signals to be heard.
Audio Range that
you are able to hear
threshold level
24 Volume
Setting the Volume
of Target Signals
The Volume control is used to adjust target
signal volume.
As you turn this control clockwise, the volume of target
signals will increase.
At the most clockwise position, the volume is set at the
maximum/loudest, position.
If the Volume control is set to maximum, all target
signals will be heard and will sound proportional to the
target size and depth. Maximum allows you to hear the
difference between a small and large target, but may be
uncomfortable to your hearing if a large target is found
close to the coil.
A low volume will be more comfortable on your hearing,
but you may risk missing small targets.
Try using a large and small target to adjust the volume to
a comfortable level.
The detector is able to produce an
extremely high volume if a large or
shallow target is located.
Protect your ears!
Sensitivity
25
Sensitivity is the detector’s level of response to its
environment and to targets. The Sensitivity control
allows you to adjust the level of sensitivity to suit the
ground conditions in which you are detecting.
Auto
At the most anti-clockwise position this control 'clicks'
into the Auto position. In this setting the Excalibur II will
automatically select its level of sensitivity to suit the
detecting conditions. Auto Sensitivity is recommended
when detecting areas of high or variable ground
mineralisation.
Manual
Turning the control clockwise will ‘click’ the Excalibur II
out of Auto and into Manual sensitivity. 1 is minimum, 10
is maximum sensitivity.
It is always recommended to adjust the manual
sensitivity as high as possible without producing false
signals. For example, turn the control anticlockwise until
false signals are heard, then slowly adjust clockwise until
the false signals ‘just’ stop. Setting the Excalibur II so
that it is ‘just’ stable, will ensure maximum depth and
sensitivity whilst still hearing faint signals. Set too high
and increased noise may mask faint signals. Set too low
and the detector may not hear faint signals.
The SUB AQUA gauge indicates the approximate level
of Manual Sensitivity recommended when detecting
underwater, on wet sand or concentrated black sand.
26 Identifying Targets
Disc or Pinpoint/All Metals
Selecting a Mode
27
In order to identify different targets, the Excalibur II rates
them along a scale. The conductivity and size of a target
determines where it will appear on the scale.
The Excalibur II can operate in two different modes.
This control selects either Disc (Discriminate) or
Pinpoint/All Metals mode.
High-conductivity targets, for example, a US quarter,
Australian $1 coin, 1£ coin or €.50 cent will produce a
high pitch signal.
Disc (Discriminate)
In Disc mode, the Discriminate control becomes active.
The Discriminate control is used to ignore various ferrous
objects. Typical ferrous objects encountered by treasure
hunters are nails, screws, washers and bits of wire. These
objects are generally not considered to be of value, so it
is a distinct advantage to be able to ignore them while
detecting. (pg. 28)
Low-conductivity targets, for example, small alloy
coins, foil, 9 carat and fine jewellery, will produce a low
pitch signal.
Pull-tabs, rings, and certain coins will produce an
intermediate pitch depending upon the object’s
conductivity.
Pinpoint/All Metals
In Pinpoint/All Metals mode, the detector will produce
a sound on all metallic targets, detecting both ferrous
and non-ferrous targets. In this mode the Discriminate
control has no effect and the Excalibur II will respond
with the same pitch to all types of metal.
The size of objects will have some effect on the
conductivity rating for targets. Generally, the larger the
target, the higher the conductivity rating and the higher
the pitch.
The signal response in the Pinpoint/All Metals mode
is much shorter than in Disc mode, making it easier to
poinpoint the exact location of a target before digging.
(pg. 30)
Ferrous targets contain a large amount of iron (e.g. iron
nails or steel). Generally, ferrous objects are not wanted,
so appear on the left side of the scale.
Non-ferrous targets have little or no iron content, such
as pure gold, silver, copper and bronze. Generally nonferrous targets are more valuable, so appear on the right
end of the scale.
Nail
Ferrous
Aluminium Foil
9K Gold Rings
Some Coins
Pull-tabs
18K Gold Rings, Brass,
Copper, Lead, Some Coins
Non-ferrous
28 Discriminate
Rejecting Unwanted Targets
29
In Disc mode, the Discriminate control becomes active.
Discriminate allows you to reject or 'ignore' certain
target signals while detecting.
You are also able to determine whether a rejected target
was ferrous or non-ferrous by the pitch of the returning
threshold after blanking. A rejected ferrous object will
cause the returning threshold pitch to be a low tone,
while a rejected non-ferrous object will cause the
returning threshold pitch to be higher.
Low setting
With the Discriminate control set to 1, the Excalibur II will
reject or 'blank' the threshold on ferrous metal objects
while still accepting non-ferrous metal objects.
The Discriminate setting must be relative to the types of
objects that you wish to hunt for and the amount of trash
that you are prepared to detect. For example, if you are
hunting for fine white gold rings and set the Discriminate
control to position 4, you may also find some types of
aluminium foil. If you do not want to dig old bottle caps
but do want to dig brass buttons and copper coins, the
Discriminate control should be set higher (approximately
at number 13). Note however, that by doing this, most
fine white gold rings, foil, and some yellow gold rings
will also be ignored.
High Setting
As you turn the Discriminate control further clockwise,
objects with greater conductivity will be ignored, while
objects of higher conductivity are still accepted.
Low Setting
Nail
Aluminium Foil
9K Gold Rings
Some Coins
Pull-tabs
18K Gold Rings, Brass,
Copper, Lead, Some Coins
Ferrous
Non-ferrous
Ferrous
Aluminium Foil
9K Gold Rings
Some Coins
Pull-tabs
The two objects treasure hunters most commonly wish
to ignore are aluminium foil and pull-tabs. These objects
both cover a significant range on the Discriminate
control. Setting the Discriminate control 'high' to
eliminate all unwanted items will cause you to ignore
a large range of valuable items. We recommend that
you only discriminate the most common trash items,
accepting the occasional unwanted target.
As pull-tabs are made from various metallic alloys, their
conductivity can vary. Discriminate control positions for
pull-tabs may range between 11 and 15.
High Setting
Nail
Blanking
Blanking is the silencing
of the threshold when
the coil is passed over a
rejected target. Blanking
is a useful way of
distinguishing between
wanted and unwanted
targets.
18K Gold Rings, Brass,
Copper, Lead, Some Coins
Non-ferrous
If the Excalibur II produces a high-pitched rapidly pulsing sound while
in Disc mode, the detector is being overloaded by a large piece of metal
close to the coil. Raise the coil slightly above the ground and pass it
over the area again to check the target. By lifting the coil away from the
ground, the Excalibur II is able to detect the object accurately.
30 Pinpointing
Locating the Target
The exact location of a target can be determined
by Pinpointing.
Once the approximate target location is known:
1 Switch the detector to Pinpoint/All Metals mode.
2Move the coil slowly over the target. The audio tone
will increase in volume while moving towards the
target and decrease in volume as you pass it. The tone
will be loudest when the coil is directly over the target.
Quite often the detector will be producing its
maximum volume for a broad area over the target.
This generally indicates that the target is near the
surface or is quite large.
3 Taking note of the response, reduce the span of each
successive pass of the coil until you are confident of
the location of the target. Make a mental note of the
position, or mark a line on the soil with your shoe or a
digging tool.
4 Move to one side so that you can pass the coil over the
target at right angles to your initial direction. When
the detector sounds you should know exactly where
to dig. (pg. 32)
31
32 Recovering the Target
It is essential to carry at least a small, strong digging
spade, shovel or sand scoop with you when searching.
1 Clear the area of loose surface material and
check that the target signal is still there. If it is not,
the target should be amongst the moved
surface material.
2 Take note if there are other signals close to your
target. This is important so that when you come to
dig your hole, you do not heap the loose sand/soil on
top of another target already in the ground.
3 If the target signal is still present, use your spade to
dig to a depth of approximately 50 mm (2").
4 Sweep the coil over the hole to determine if it has
been dug. If the target signal is not heard, then
the target should be in the material just removed.
Otherwise dig a little deeper and check again.
5 Start digging approximately 100 mm (4") in front
of the target to reduce the chance of damaging it.
Damaging a target may reduce its value. 6 If the target signal disappears from the hole, sweep
the coil over the loose sand/soil and pinpoint its
exact position.
33
When digging, avoid sharp
edges to the hole as they
can produce false signals,
potentially masking the
target. Slope the edges
of the hole to avoid any
problems.
7 Put the detector down. Take a handful of the sand/
soil and pass it over the coil.
8 If there is no signal, place the handful carefully in a
new pile, pinpoint the position of the target again,
and repeat with another handful of sand/soil.
Your hands and wrists
must be free of any metallic
jewellery and watches
when passing sand/soil
over the coil.
9 Once the target is in your hand, transfer half of the
sand/soil to the other hand. Test each handful
across the coil.
10 If the target is too small to see, drop the sand/soil
onto the top of the coil and with your finger move
any suspect objects. A target signal will only be
given when the target is moved.
Backfill Every Hole You Dig
Always refill any holes on the land and beach before leaving the
area. Help restore it to its original condition. Any rubbish you
recover should be taken away with you and disposed of properly.
Refilling holes and removing rubbish will help detector users
maintain a good reputation. This should lead to more areas
being readily accessible for detecting.
34 Taking Care
of Your Detector
Taking Care
of Your Battery
The Excalibur II is a high quality electronic instrument.
Take care of your detector in the following way:
• The NiMH battery pack has been sealed and pressure tested and should
not be disassembled.
• Visually check the lower end of both cylinders after entering the water. If
any water droplets or condensation are visible inside your Excalibur II,
turn it off and remove it from the water immediately. Remove your
batteries and contact your Minelab dealer immediately.
• Never allow the cables to be jerked or snagged. Excessive tension could
cause the watertight seals or cable to fail.
• The battery and control cylinder have been sealed and pressure tested.
Never open or tamper with the sealed electronics and battery cylinders,
as this will void the warranty.
• If water or condensation is present in the end caps through the small
screw, contact your Minelab dealer. If it appears outside the rubber O-ring
seal it is OK.
• Avoid rapid changes in temperature. Gradual warming and cooling will
keep the internal atmosphere stable. Extreme temperature swings may
cause a light condensation to appear on the cylinder walls for a short
time. Wait for this to disappear before using your Excalibur II.
• Never leave your Excalibur II in direct sunlight as it can reach very high
temperatures, causing irreparable damage to your coil.
• Salt deposits, very fine sand, and grit will accumulate on the Excalibur II.
Thoroughly rinsing your detector with fresh water after each use is
necessary. Disconnect the shafts, battery pack, and armrest, and flush
out all salt and sand, especially in the battery terminals. Also ensure that
the vent holes on each headphone diaphragm are rinsed and clear of
sediment. This is critical to allow for ear equalization when the Excalibur II
is used for underwater detection at depth.
• When disconnecting batteries, always grip the plug body, never the cable.
• As part of the manufacturing process, Minelab applies a silicone grease to
the battery cable connector pins. This prevents a build-up of residual
water and reduces the level of electrolysis between the two pins, which
in turn prolongs the serviceability of your unit. This grease should be
reapplied as part of your routine care and maintenance.
• It is recommended to recharge the battery every 3-6 months if not in
regular use.
• Do not immerse the battery in any liquid when disconnected from the
Excalibur II or allow water to enter.
• Do not use battery if there is condensation visible inside the battery pack.
• Do not use the battery if it is damaged or deformed.
• Do not charge the battery at temperatures above 45°C (113°F)
or below 0°C (32°F).
• Do not leave the battery in hot environmental conditions (e.g. on the
dashboard of your car or rear parcel shelf).
• Do not throw the battery or impact it in any way.
• Do not short-circuit the battery.
• Do not incinerate the battery.
• Return the battery to a Minelab authorised service centre for repair.
The use of non-approved components will VOID YOUR WARRANTY.
There are no user serviceable parts within this battery pack.
35
36 Troubleshooting
No sound
• Check that the detector is on. Try turning both
the Threshold and Volume controls to maximum.
• Check that the battery pack and power cable
Technical
Specifications
Detector
Transmission
1.5, 3, 4.5, 6, 7.5, 9 ... 25.5 kHz
Technology
BBS - Broad Band Spectrum Technology
Multiple Simultaneous Frequency
Coil (Standard)
8” or 10” Round Double D
Audio Output
Koss Headphones supplied - Impedance 8Ω
Length with standard shaft
Extended - 1220 mm (48")
Retracted - 1140 mm (45")
Length with diving shaft
Extended - 910 mm (36")
Retracted - 820 mm (32")
Weight (including NiMH battery)
Including 8" Coil - 2.1 kg (4.6 lbs)
Including 10" Coil - 2.3 kg (5.1 lbs)
are connected securely.
• Check that the battery is charged.
• Try using a different battery pack, available from
your Minelab dealer.
• Check for breaks, cracks or extreme kinks in the
cable assemblies.
Erratic Noises
• Reduce the Sensitivity by turning the control clockwise.
• Check that the battery is properly connected and
37
fully charged.
• Switch Sensitivity to the Auto position.
• Check for sand or grit between the skid plate and coil.
• Check for overhead power lines and other sources
Type
NiMH Battery Pack 1000 mAh
(Alkaline optional)
• Check that the controls turn to the correct limits
Output Voltage
13V when fully charged
Max discharge current is 1A
Capacity when fully charged
14 - 19 hours
Weight
0.3 kg (0.67lbs)
Operating temperature range
0°C to 45°C (32°F to 113°F)
Storage temperature range
-20°C to 40°C (-4°F to 104°F)
Battery charge temperature range:
0°C to 45°C (32°F to 113°F)
of electrical interference.
(marked on the decal). Also check that the ‘clicks’
are present on the Threshold, Disc, Pinpoint/All Metals
and Sensitivity controls.
Battery
38 Accessories
The following items are also available for purchase.
• Alkaline Battery Pack Housing (batteries not included)
• Hipmount Kit
• Side-Mount Shaft Kit
• 12V Vehicle Charger
• Wingnut and Bolt Packs
• Teardrop Washers
• Black Skid Plate
• Yellow Skid Plate
• Blue Minelab Cap
• Blue Minelab Polo Shirt
For more information on these and other Minelab
products call your Minelab dealer.
Warranty
There is a one-year parts and labour warranty for the
control box of the Excalibur II. Refer to your Warranty
Card for more details. The Excalibur II BBS coil is
warranted for one year. Refer to your supplier or Minelab
for service, either in or out of warranty.
Note: This warranty is not transferable, nor is it valid
unless the enclosed warranty registration card is
returned to Minelab, or an authorized Minelab regional
distributor, within 14 days of the original date of
purchase.
The Minelab warranty does not cover damage caused by
accident, misuse, neglect, alteration, modifications, or
unauthorised service. For specific details of the Minelab
warranty, refer to the 'Product Warranty Card'.
39
40 Service Repair Form
Today’s Date
Detector / Model
Serial Number
Purchased From
Purchase Date
Faulty Part(s)
Owner’s Name
Address
Telephone (
Fax (
) Day
Home
)
Email
Description of Fault
cut out or photocopy
Please explain how we can replicate the problem in order to fix your detector.