1
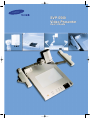
SVP-5500
Video Presenter
User’s Guide
Features
Various image control
Digital features on your Video Presenter provides useful and various
image controls including:
-Negative/positive image conversion
-Brightness and R/B color control
-Flicker reduction
-Image rotation up to 180o
-Image Freeze (SVP-5500DX only)
Input source selection
You can quickly switch between your computer presentation and your
document presentation with the INT/EXT button on the control panel or
on the remote control.
Flexible and rotatable head
The camera head and arm of your Video Presenter can be rotated up
to 180o to enable you to capture all images surround you.
Connection with PC
You can connect to PC with USB or RS-232C cable and store the projected
image into the computer. You can also edit the image on the computer with
the supplied SVP-5500 program. USB connection and SVP-5500 program is
available for SVP-5500DX only.
Custom user settings
To avoid any interruption of presentation to reset the visual presenter,
you can preset up to 8 customized settings in the memory and recall it
during the presentation simply.
Remote control
You operate your presenter through a hand-held remote control, with
buttons for adjusting the projected image and accessing all the
presenter’s features.
Optional accessories
To enhance your use of the presenter, LCD monitor and sub camera
are available. With the LCD monitor, you can view the image without
connecting to a monitor or TV.
The sub camera gives you the great ability to shoot precise angles and
close-up images even from a microscope.
Table of Contents
Safety Precautions ............................................................ 2
Unpacking .......................................................................... 3
Your video presenter ......................................................... 4
Front view ......................................................................... 4
Rear view .......................................................................... 5
Controls .............................................................................. 6
on the Control panel ......................................................... 6
on the Remote control ...................................................... 7
Setting up ........................................................................... 8
Connecting to output device ............................................ 10
TV or Monitor .................................................................... 10
Desktop computer ............................................................ 11
USB connection ............................................................. 11
RS-232C connection ..................................................... 11
Connecting external input ................................................ 10
AV device ......................................................................... 12
Computer .......................................................................... 13
Microphone ....................................................................... 13
Using the presenter ........................................................... 14
To see the image received from external device .............. 14
To project an object on the video presenter ..................... 16
Adjusting your image ........................................................ 19
Adjusting image size ......................................................... 19
Adjusting brightness ......................................................... 19
Adjusting image color ....................................................... 20
Positive and negative switching ........................................ 20
Rotating image ................................................................. 20
Saving image in memory .................................................. 21
Screen divide and image shift .......................................... 21
Saving custom user settings ............................................. 22
Reducing flicker ................................................................ 22
Optional accessories ........................................................ 23
LCD monitor ..................................................................... 23
Sub camera ...................................................................... 23
Storage ............................................................................... 24
Troubleshooting ................................................................ 26
Replacing fuse .................................................................. 27
Specification ...................................................................... 28
Safety precautions
Follow these safety instructions when setting up and
using your Video Presenter:
1. Do not place the presenter on an unstable cart,
stand, or table.
2. Do not use the presenter near water or sources of
heat.
3. Use the type of power source indicated on the
presenter. If you are not sure of the power
available, consult your dealer or power company.
4. Place the presenter near a wall outlet where the
plug can be easily unplugged.
5. Take the following precautions for the plug. Failure
to comply with these precautions could result in
sparks or fire: Do not insert the plug into an outlet
with dust present.
Insert the plug firmly into the outlet.
6. Do not overload wall outlets, extension cords, or
integral convenience receptacles. This can cause
fire or electric shock.
7. Do not place the presenter where the cord can be
walked on. It may result in fraying or damage to the
plug.
8. Unplug the presenter from the wall outlet before
cleaning. Use a damp cloth for cleaning. Do not use
liquid or aerosol cleaners.
9. Do not block the slots and openings in the presenter
case. They provide ventilation and prevent the
presenter from overheating. Do not put the
presenter on a sofa, rug, or other soft surface or in
a built-in installation, unless proper ventilation is
provided.
10. Never push objects of any kind through cabinet
slots. Never spill liquid of any kind into the
presenter.
11. Except as specifically explained in this User’s
Guide, do not attempt to service this product
yourself. Refer all servicing to qualified service
personnel. Opening or removing covers may
expose you to dangerous voltages and other
hazards.
12. Unplug the presenter during lightning storms or
when it will not be used for extended periods.
13. Do not place the presenter and remote control on
top of heat-producing equipment or in a heated
place, such as a car.
14. Unplug the presenter from the wall outlet and refer
servicing to qualified service personnel under the
following conditions:
• When the power cord or plug is damaged or
frayed.
• If liquid has been spilled into the presenter, or it
has been exposed to rain or water.
• If it does not operate normally when you follow
the operating instructions, or if it exhibits a distinct
change in performance, indicating a need for
service.
• If it has been dropped or the cabinet has been
damaged.
FCC Compliance Statement
This equipment has been tested and found to comply with the limits for a class A digital device, pursuant to part
15 of the FCC Rules. These limits are designed to provide reasonable protection against harmful interference
when the equipment is operated in a commercial environment. This equipment generates, uses, and can
radiate radio frequency energy and, if not installed and used in accordance with the instruction manual, may
cause harmful interference to radio communications. Operation of this equipment in a residential area is likely to
cause harmful interference in which case the user will be required to correct the interference at his own
expense.
2
Unpacking
When you unpack your Video Presenter, make sure that you have
all these components.
Remote
control
Audio/Video
cables
Power cable*1
This User’s
Guide
S-video
cable
Dust
cover
USB cable*2
Adapter lens and
lens cap
Diskette containing
SVP-5500 program and
USB driver, and its
User’s Guide*2
*1 The shape of power cable may differ, depending on your country.
*2 Available for SVP-5500DX only.
Optional accessories
Sub camera
LCD monitor
3
Your visual presenter
Front view
Camera head
Head lock button
Rotatable 120o to top or bottom and
270o to right or left.
Use the button to rotate the
camera head.
Lens adjuster
Use the switch to adjust the
lens angle.
Main lock
button
Arm
Use the switch to raise or
fold the main pole.
Head lamp
Head lamp
Control Panel
See page 6.
Light box
Handle
IR sensor
Receives the signals from the remote control.
Handle is located in the
bottom. Use it when you move
this unit.
4
Rear view
Power connector
Connects to AC power outlet (100240V AC, 50/60Hz, 2A).
5
2
1
VIDEO IN
VIDEO OUT
USB connector
(SVP-5500DX only)
CAUTION:
FOR CONTINUED PROTECTION
AGAINST A RISK OF FIRE,
REPLACE ONLY WITH T2A 250V FUSE.
SUB
CAMERA
1
100-240V AC, 50/60HZ, 2A
RS-232C
VGA IN
USB
LCD
S-VIDEO
MIC
2
AUDIO IN
1
2
AUDIO OUT
Connects optional microphone.
RS-232C jack
Used to connect to PC
through a serial port.
4
3
S-VIDEO jack
Sends video signals from your Visual
Presenter to a TV equipped with S-video
input terminal.
CAUTION:
1 VIDEO OUT 1, 2 jacks
Sends video signal from your Video
Presenter to a TV or monitor. The signal
from these two jacks are equivalent.
100-240V AC, 50/60HZ, 2A
RS-232C
VGA IN
USB
(SVP-5500DX only)
VIDEO IN
AUDIO OUT 1, 2 jacks
Sends audio signal from your Video
Presenter to a TV or monitor. The signals
from these two jacks are equivalent.
FOR CONTINUED PROTECTION
AGAINST A RISK OF FIRE,
REPLACE ONLY WITH T2A 250V FUSE.
3 VGA IN jack
1
MIC
Connects computer
VGA port using the monitor
cable
VIDEO OUT
2
1
AUDIO IN
2
AUDIO OUT
V
CAUTION:
4 LCD jack
Connects optional
LCD monitor.
2 VIDEO IN 1, 2 jacks
Receives video signal from external AV
device (such as VCR or camcorder). The
signal from these two jacks are
equivalent.
To see the signal from this jack, press
INT/EXT button on the remote control or
the control panel of this unit.
VIDEO IN
Receives audio signal from external AV
device (such as VCR or camcorder). The
signals from these two jacks are
equivalent.
1
CD
S-VIDEO
MIC
2
AUDIO IN
1
2
AUDIO OUT
SUB
CAMERA
1
RS-232C
VGA IN
USB
LCD
S-VIDEO
MIC
A
5 SUB CAMERA jack
VIDEO OUT
SUB
MERA
AUDIO IN 1, 2 jacks
FOR CONTINUED PROTECTION
AGAINST A RISK OF FIRE,
REPLACE ONLY WITH T2A 250V FUSE.
Connects optional
sub camera.
VIDEO IN
ROTECTION
F FIRE,
ITH T2A 250V FUSE.
SUB
CAMERA
1
2
5
Controls
You can find the same function buttons both on the control panel of your SVP-5500 and the
remote control. You can use any of them to perform the function.
on the Control panel
Allows to choose the signal input to be
displayed.
Used to turn
power on and off.
INT: Internal signal out from this unit.
EXT: External signal out from AV device (if
connected to this unit).
Enlarges or reduces
the image size on the
screen.
ZOOM
Turns the head lamps and/or
lightbox on or off.
INT/EXT
LAMP
2
AWC
Adjusts image color
automatically.
POWER
AF
IRIS
NEGA/POSI
5
FREEZE
(For SVP-5500DX only)
Keeps the current image
on the screen.
Adjusts the brightness of the
image
on the screen.
Allows to focus
automatically.
Switches image
negative or positive.
9
10
13
14
Installing Batteries in the Remote Control
Before using the remote control at first time, install batteries.
1. Remove the cover on the back
of the remote control.
2. Insert the batteries then
replace the cover.
Battery type:
AAA type 1.5V
6
8
on the Remote control
1 POWER
Turns power on and off.
2 INT/EXT
Allows to choose the signal input to be displayed.
3 NEGA/POSI
Switches image negative or positive.
1
4 LAMP
Turns the head lamps and/or lightbox on or off.
2
3
4
6
7
11
12
15
16
5 FOCUS
Allows to focus an object.
F: Used to focus an object which is in the far distance.
N: Used to focus an object being close.
AF: Used to focus automatically.
6 RED/BLUE/AWC
Adjusts the image color.
R +/- : Adjusts the red color.
B +/- : Adjusts the blue color.
AWC : Adjusts color automatically.
7 VOLUME
Adjusts the audio volume.
6 REVERSE
Puts the image on the screen into reverse. It rotates the image by
180o.
9 FREEZE (for SVP-5500DX only)
Keeps the current image on the screen.
10 WIDE/TELE
12 • Enlarges the image size.
• Reduces the image size.
11 OPEN/CLOSE
• Opens iris to increase the brightness.
• Closes iris to decrease the brightness.
13 EXIT
Stops current function and return to the normal mode.
14 ANTI-FLK
Reduces the flicker on the screen.
15 PRESET
• Saves the customized user setting values.
• Activates the preset user settings.
16 SAVE/RECALL (for SVP-5500DX only)
• Saves the projected image into the memory of this unit.
• Recalls the image from the memory.
DIVIDE (for SVP-5500DX only)
Divides the screen to see both of the current image and the image
recalled from the memory simultaneously on one screen.
SVP-5500ST users can find FREEZE, SAVE,
RECALL, DIVIDE, and SHIFT buttons, but the
buttons do not perform corresponding
functions. The buttons are activated in SVP5500DX only.
SHIFT (for SVP-5500DX only)
Shifts the recalled image shown in the divided screen from the left
to right to see the hidden portion of the image.
7
Setting up
While you pull the main lock button
toward the front of the presenter, lift the
arm.
Raise the head lamps at both sides.
Main lock button
Remove the lens cap.
Plug the power cord in.
230V
120V
8
Adjust the angle of the lamps properly.
Holding the head, adjust the angle of the
head.
Connect the output and another input device
properly according to your needs.
(See pages 10 through 13.)
9
Connecting to output device
TV or Monitor
Connect a TV or monitor to this presenter to display the projected
image using the AV cables or S-video cable.
If you use an optional microphone or if your presentation includes
sound effects which is received from AUDIO IN jack, you need to
connect the audio cable to AUDIO OUT jack.
5
4
3
2
1
0
Connection
Connect the yellow plug
to the video input and
white plug to the audio
input port.
Connect the yellow plug to the VIDEO OUT and
white plug to AUDIO OUT jack.
You may use 1 or 2 jack. The
signal from these jacks are
equivalent.
VIDEO IN
:
INUED PROTECTION
RISK OF FIRE,
NLY WITH T2A 250V FUSE.
1
VGA IN
VIDEO OUT
SUB
CAMERA
USB
LCD
S-VIDEO
MIC
2
AUDIO IN
1
2
AUDIO OUT
Or
If you have a TV or monitor equipped with Svideo terminal, you can connect to
S-video jack.
If you connect to S-video terminal, you may obtain
more clear image, but the signal from the external
AV source (if connected) is not available on this
terminal.
10
Desktop computer
For SVP-5500DX, connect a desktop PC using USB cable and install
the supplied SVP-5500 program. You can see the projected image
on the PC monitor and control the image as a graphic file using the
program.
RS-232C connection is available for advanced user. If you connect a
PC with RS-232C cable, you should set up your PC and make your
own program to control the projected image on PC. Ask your dealer
for further details.
5
4
3
2
1
0
USB connection
(SVP-5500DX only)
CAUTION:
FOR CONTINUED PROTECTION
AGAINST A RISK OF FIRE,
REPLACE ONLY WITH T2A 250V FUSE.
100-240V AC, 50/60HZ, 2A
RS-232C
VGA IN
SUB
CAMERA
USB
LCD
S-VIDE
Connect to the USB port on your
PC, then install the supplied
SVP-5500 program.
RS-232C connection
CAUTION:
FOR CONTINUED PROTECTION
AGAINST A RISK OF FIRE,
REPLACE ONLY WITH T2A 250V FUSE.
100-240V AC, 50/60HZ, 2A
RS-232C
VGA IN
SUB
CAMERA
USB
LCD
S-VIDE
Connect to the RS-232C
terminal on your PC.
RS-232C cable is not provided with the presenter. You can
obtain one from your computer dealer.
11
Connecting external input
AV device
If you want to use image from external video source such as as VCR,
camcorder, laser disk player, DVD player, or any other compatible AV
device, connect the device to your presenter. With the INT/EXT button on
the presenter, you can switch the input source during presentation from this
external source and the internal signal from the presenter.
If you wish to use audio, connect the audio cable between the AV device and
your presenter.
Connection
Connect the yellow plug to the
VIDEO IN and white plug to
AUDIO IN jack.
You may use 1 or 2 jack. The
signal from these jacks are
equivalent.
VIDEO IN
CAUTION:
FOR CONTINUED PROTECTION
AGAINST A RISK OF FIRE,
REPLACE ONLY WITH T2A 250V FUSE.
1
C, 50/60HZ, 2A
RS-232C
VGA IN
VIDEO OUT
SUB
CAMERA
USB
LCD
S-VIDEO
MIC
2
AUDIO IN
1
2
AUDIO OUT
Connect the yellow plug to the video
output and white plug to the audio
output port.
12
Computer
If you connect computer through VGA IN port, you can receive
video signal from the computer.
Connection
(SVP-5500DX only)
VIDEO IN
CAUTION:
FOR CONTINUED PROTECTION
AGAINST A RISK OF FIRE,
REPLACE ONLY WITH T2A 250V FUSE.
1
0/60HZ, 2A
RS-232C
VGA IN
VIDEO OUT
SUB
CAMERA
USB
LCD
S-VIDEO
MIC
2
1
2
AUDIO OUT
AUDIO IN
Connect to VGA IN terminal using
the VGA cable from the computer.
VGA IN terminal is available for
SVP-5500DX only.
Please set the refresh rate of
PC graphic card below.
Resolution
Refresh rate
640 480(VGA)
60 Hz
800 600(SVGA)
60 Hz
1024 768(XGA)
60 Hz
Connect to VGA port on the computer
equipped with XGA, SVGA, or VGA
graphic card.
Microphone
To enhance the presentation with the presenter’s voice guidance, use a
microphone. Microphone is not supplied with this presenter.
VIDEO IN
CAUTION:
FOR CONTINUED PROTECTION
AGAINST A RISK OF FIRE,
REPLACE ONLY WITH T2A 250V FUSE.
1
C, 50/60HZ, 2A
RS-232C
VGA IN
VIDEO OUT
SUB
CAMERA
USB
LCD
S-VIDEO
MIC
2
AUDIO IN
1
2
AUDIO OUT
Use a microphone
equipped with 6.3.
13
Using the presenter
To see the image received from external device
Set up your video presenter
properly.
(see page 8 and 9.)
Connect the input device from which you want to receive the image and
the output device on which you want to see the image.
(see pages 10 through 13.)
Turn the power of the input and output device, and the video presenter
on.
ZOOM
POWER
POWER
IRIS
When the video presenter is powered on, the head lamps turn on. To turn it off, press
LAMP button of the presenter.
14
INT/EXT
LAMP
LAMP
AWC
AF
NEGA/POSI
FREEZE
Effective range of the remote control
When using the remote control, always aim it directly
at the remote control receive window of your
video presenter. Refer to the figure at the
right side for acceptable range.
5m
30
30
5m
12m
Choose the video source with the INT/EXT
button of the presenter.
INT/EXT
INT/EXT
LAMP
AWC
AF
NEGA/POSI
FREEZE
• Each time you press the button, the display
shows EXT1 OUT, EXT2 OUT, AUX OUT, VGA
OUT, INT OUT.
• EXT1 OUT, EXT2 OUT
Choose this mode to see the image of the AV
device such as camcorder, video, laser disk
player, DVD player.
• AUX OUT
Choose this mode to see the image on the
optional sub camera.
• VGA OUT (available for SVP-5500DX only)
Choose this mode to see the image on the
computer connected to the VGA IN port.
• INT OUT
Choose this mode to see the image through
the lens of the video presenter.
If NO EXT SYNC is displayed, check if
the external input device is connected
properly.
Open the image on the AV
device or computer. Now
you see the image through
the TV or monitor.
If necessary, you can adjust the
audio volume using the volume
buttons on the remote control.
15
Using the presenter
Continued
To project an object on the video presenter
Set up your video
presenter properly.
(see page 8 and 9.)
Connect to a TV or monitor to display the image.
(see page 10.)
Turn the power of the output device and the video presenter on.
ZOOM
POWER
POWER
IRIS
Place the object on the lightbox, and adjust the head to face the object.
If there is no image on the TV or
monitor, check if the cable is
properly connected, and press the
INT/EXT button of the presenter to
select the input mode to INT OUT.
If you want to
rotate the image
displayed, use
this switch to
adjust the lens
position.
5
4
3
2
1
0
16
Select a proper lighting source with the LAMP button of the presenter.
Each time you press the button, head lamps on, lightbox on, then all
lighting off.
INT/EXT
LAMP
AWC
AF
NEGA/POSI
FREEZE
Head lamp. Use the head lamps to project paper
document and other material, and use lightbox lamp
to project transparencies.
5
4
3
2
1
Lightbox
0
Remove or attach the adapter lens according to the object projected.
Rotate the lens to
remove or attach it.
5
4
3
2
1
0
• Adapter lens is required when you project an
object placed on the lightbox. (Focusable
distance : 24-32 cm)
• Adapter lens must be removed to focus on the
object located over 80 cm away.
• You cannot focus on object properly when the
distance between the object and the camera is
out of range stated above.
17
Focus on the object.
• In most situations, it is better to use the automatic focus feature. Use AF button for
automatic focusing.
• In some conditions, however, automatic focusing may be inadequate. Then you must focus
manually. Press FOCUS F (FAR) button or FOCUS N (NEAR) button on the remote
control to focus on object being far away or on object being close to the camera lens.
INT/EXT
LAMP
AWC
AF
NEGA/POSI
FREEZE
Auto focusing is not work properly when you try to focus on objects in
conditions below.
In this case, adjust the focusing manually.
Object being too far away or too close to focus on. The automatic focusable
distance with the adapter lens attached is within 24 and 32 cm. Without the
adapter lens, the range is 80 cm to
Object in a dark area.
The background is too bright.
Image containing several objects at the same time; some objects being close to
the lens of this unit and others being far away.
Very shiny or glassy surface
Repetitive horizontal or vertical lines
Object reflecting a strong beam.
You see the image on the TV or
monitor.
5
• To use versatile image control features, see
pages 20 through 22.
4
3
2
1
0
For SVP-5500DX, to change the object projected during presentation, freeze the image
on the screen using FREEZE button of the presenter then change it. To cancel the
freezing, press EXT button on the remote control.
18
INT/EXT
LAMP
AWC
AF
NEGA/POSI
FREEZE
FREEZE
Adjusting your image
Use the control buttons on the remote control or on the control panel of the presenter to adjust the
projected image. Some of the main features are described below:
Adjusting image size
Press WIDE or TELE button on
the remote control to reduce or
enlarge the image size
displayed on the screen.
ZOOM
ZOOM
IRIS
You can also use ZOOM or
ZOOM button on the control
panel of the presenter to
achieve the same result.
WIDE
TELE
Adjusting brightness
ZOOM
Press IRIS
button on the
control panel or OPEN button
on the remote control to lighten
the overall image.
IRIS
Press IRIS
button on the
control panel or CLOSE button
on the remote control panel to
darken the overall image.
19
Adjusting image color
LAMP
AWC
AWC
NEGA/POSI
FREEZE
For automatic color adjustment,
press AWC button.
If you want to fine adjust, press
BLUE +/– or RED +/– button to
increase or decrease blue or red
color factor manually.
Hint:
To obtain best result, put the camera
lens facing the white paper and press
AWC button.
The color level
chosen will be
displayed.
Positive and negative switching
LAMP
AWC
NEGA/POSI
FREEZE
Press NEGA/POSI button. Each
time you press the button, POSI or
NEGA appears alternately on the
screen. Set to POSI to see normal
object and set to NEGA to see
negative film.
Positive
Negative
Rotating image
Press REVERSE button to turn the image upside
down. This button is available only on the remote
control.
Normal image
20
Reversed image
Saving image in memory
(for SVP-5500DX only)
You can save the image up to 8 frames into your video presenter's
memory. After saving you will be able to recall it.
To save the image into the memory, press SAVE button
and specify the memory location within 4 seconds using the
number keys from 1 through 8.
If you want to recall the saved image from memory, press
RECALL button and press the memory location number
within 4 seconds. If you press and hold down RECALL
button, all images saved in memory are displayed one by
one.
If you want to exit from the recall mode, press EXIT button.
The memory location numbers are printed on the right side of these
buttons. For example, if you want to save the image into memory
location 7, press Save then press AF button printed 7 at right side.
If you turn the power off, all the
saved images will be lost.
Screen divide and image shift
(for SVP-5500DX only)
You can see both the image of an object currently projected and the image saved in
memory simultaneously on one screen.
Press DIVIDE button and press the memory location
number within 4 seconds to recall the image you want to
see.
You can see the image of an
object currently projected at
right side.
The recalled image from
memory appears at left side.
Press SHIFT button to shift
the image from the left to
right. Each time you press the
button, a quarter of the image
will be moved from the left to
right.
To cancel this mode and return to normal mode,
press EXIT button.
21
Saving custom user settings
(for SVP-5500DX only)
After you adjust feature value, you can save the value for next time use. You can save up to 8
different custom user settings.
To save the current value, press Save button and
specify the memory location within 4 seconds using
the number keys from 1 through 8.
To recall your custom setting, press the Recall button
and press the memory location number within 4
seconds.
The memory location numbers are printed on the right
side of these buttons. For example, if you want to save
the image into memory location 7, press Save then press
AF button printed 7 at right side.
You can not save the setting on the REVERSE,
FREEZE, RECALL, DIVIDE buttons.
Reducing flicker
If your monitor screen flickers, press ANT-FLK
button. It will reduce the flicker on the screen.
22
Optional accessories
LCD monitor
This desktop LCD monitor allows
you to monitor the image
projected through your video
presenter.
1
The same image is displayed on
the TV or projector connected to
this unit.
VGA IN
USB
LCD
S-VIDEO
MIC
Connect to the LCD
socket on the back of this
presenter.
Sub camera
In addition to a main camera,
your video presenter offers a
small but very userful sub
camera as an option.
This camera gives you the great
ability to shoot precise angles
and close up images even from
a microscope.
Connect to the SUB
CAMERA socket on the back
of this presenter.
VIDEO IN
SUB
CAMERA
1
2
Hold the camera as shown
and shoot object freely.
23
Storage
Turn the power off and unplug the power
cord.
Fold the lamps on both sides completely.
24
Attach the lens cap.
Turn the head upside down.
While you pull the main lock button
toward the front of the presenter, fold the
head completely.
Use the handle when
you move it.
When you do not use it for a
long time, protect it with the
cover supplied.
25
Troubleshooting
Sometimes problems can be easily solved by checking a few basic things. Check
below before you call for help or take your video presenter to an authorized service
center.
Picture is not
displayed.
• Check that the brightness is proper. Adjust
the brightness if necessary.
See page 19.
• Check for the video cable connection.
• Check that the built-in fuse is blown.
• Check that the lens cap is removed.
Picture is not focused
on properly.
• Check that the proper lens is attached to the
camera.
• Press AF button to use automatic focusing
feature.
• Check that the object is not too close.
Picture of a slide or a
negative film is not
displayed.
PC does not
communicate using
USB.
26
• Check that an lightbox lamp turns on.
• Check that the camera lens faces the object.
• Check that a proper lens is attached to the
camera.
• Check that you set to NEGA or POSI properly
by pressing NEGA/POSI button.
• Make sure that SVP-5500 program is properly
installed on the PC.
• Make sure that the OS is Windows 98. The
program does not operate on Windows 95.
• For further details, refer to the User s Guide
came with the program.
Replacing fuse
1. Remove the fuse holder on the back of
this unit using a screw driver.
2. Remove the blown fuse and
replace it with a spare one.
Fuse in use
Spare
3. Replace the fuse holder.
The presenter does
not respond to the
remote control.
Head lamp does not
light up as soon as
the LAMP button is
pressed.
• Check the batteries in the remote control. If
they are used up, replace with new ones. See
page 6 to install the batteries.
• Remove the batteries from the remote control
if it will not be used for a month or more. This
will help prevent possible damage from
battery leakage. If leakage occurs, wipe up
the liquid inside the compartment and replace
the batteries with new ones.
• Built-in protection circuitry is activated to
protect the lamp circuit. It's normal.
27
Specifications
Specifications are subject to
change without notice.
Description
Specifications
Lens
Shooting area
Optical
system
Illumination
system
Focus
IRIS
Upper
Side arm type
Lower
Built-in light box
NTSC
Pickup device: 1/4 410,000 pixels IT CCD
Total pixels: 811 (H) x 508 (V)
Effective pixels: 768 (H) x 494 (V)
PAL
Pickup device: 1/4 470,000 pixels IT CCD
Total pixels: 795 (H) x 596 (V)
Effective pixels: 752 (H) x 582 (V)
SYNC system
Resolution
White balance
S / N ratio
Video output
Positive/Negative switching
Remote control
Image
Input selection
On-screen display
Image rotation
450 TVL
Manual / AWC (one-touch)
46 dB or more
C-Video (VBS 1.0 Vp-p/75Ω unbalance)
S-Video (Y : 1.0 Vp-p/75Ω unbalance, C : 0.3 Vp-p/75Ω unbalance)
Available
Supplied
4 (5 ) Channels (Internal 1, External 3 (4 ))
Available
MECHANICAL (180O MAX)
ELECTRICAL (180O)
Available
Image save
Available (8 Frames)
Image recall
Available (8 Frames)
Image divide
Available
Application software
Available (USB : full, 1/4, 1/16 mode)
Windows application in Windows 98 or later
Scan converter
Built-in (640 x 480, 800 x 600, 1024 x 768 : 3 Modes)
Preset function
Up to 8 user settings
Input terminal
Video (RCA/75Ω ) X 2, Audio (RCA) X 2, VGA (15 pin D-sub) X 1,
MIC (6.3 jack/optimal impedance 600Ω, 65dB) X 1
Output terminal
Video (RCA/75Ω) X 2, S-Video (MINI DIN 4P CON./75Ω) X 1,
Audio (RCA/optimal impedance 10KΩ or more, -10dB) X 2
PC interface
Built-in USB and RS-232C
Operating temperature/Humidity
+5 C ~+35 C / 30% ~ 90%
Power
AC 100V ~ 240V, 50/60Hz
Dimension (mm)
Wight
28
Internal SYNC
Image freeze
Image transfer to computer
General
F1.4~2.7 f=3.9~62.4, 16 X POWER ZOOM
Max : 210 x 297mm, Min : 18 x 24mm (without adaptor lens)
Max : 213 x 283mm, Min : 14 x 17.5mm (with adaptor lens)
Powered (one-touch auto focus)
Auto (with fine level adjustment)
In-use: 665(W) x 510(D) x 547(H)
Storage : 495(W) x 510(D) x 167(H)
8.3 kg
SVP-5500 DX only
SAMSUNG OPTO-ELECTRONICS AMERICA, INC.
40 Seaview Drwe, Secaucus N.J. 07094, U.S.A.
TEL: 1-800-762-7746, 1-201-902-0347
FAX: 1-201-902-9342
SAMSUNG TECHWIN CO. LTD
145-3 Sangdaewon 1-Dong, Jungwon-Gu,
Sungnam, Kyungki-Do, Korea 462-121
TEL : 82-31-740-8137~8141
FAX: 82-31-740-8145
SAMSUNG SAO PAULO OFFICE.
Rua Professor Manoelito de Ornellas 303 2-andar
Chacara Santo Antonio CEP:04719-040
SAO PAULO SP Brasil
TEL: 55-11-5642-0757
FAX: 55-11-5641-8023
http://www.samsungcamerausa.com