1
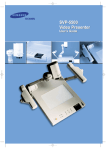
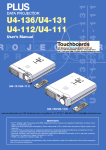
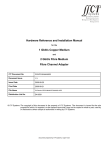
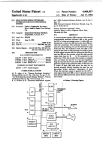
SVP-5500
Sof tware
User’s Guide
www.touchboards.com 205 Westwood Ave.Long Branch, NJ 07740 1-866-942-6273
[email protected]
Contents
Installing SVP-5500 Software .............................. 2
System requirements ............................................ 2
Installing software ................................................
Connecting SVP-5500 Video presenter to PC .........
Installing USB driver .........................................
Installing SVP-5500 program ..............................
2
3
3
5
Installation tips ....................................................
How can I determine if my computer’s
USB port is enabled? .........................................
How do I remove the USB driver and
SVP-5500 program? ..........................................
Can I update the USB driver for
SVP-5500 Video presenter? ................................
6
6
7
9
Running SVP-5500 Program ............................... 10
SVP-5500 View Panel and Main Panel overview ...... 12
Working with SVP-5500 Program ....................... 13
Using SVP-5500 Control panel .............................. 13
SVP-5500 Control panel overview ......................... 14
Saving the image into the computer HDD .............. 16
Printing the image .............................................. 18
Troubleshooting .................................................. 20
Installing SVP-5500 Software
The supplied SVP-5500 program diskette contains:
• USB driver
• SVP-5500 program
To control your SVP-5500 Video presenter on the PC, save
the images into the computer HDD, or print the images,
you must connect SVP-5500 Video presenter to the PC
through USB interface, then install the USB driver and SVP5500 program using the supplied program diskette. Follow
the procedure below.
System requirements
To install the SVP-5500 software, your computer must have
at least the following system configuration:
• IBM or IBM compatible computer with a Pentium or higher
processor
• Windows 98 or later
• Display: SVGA 800 x 600, 65536 colors or higher
• USB interface connector
• 16MB or higher RAM
• 3.5” floppy drive
Installing software
To install the software:
1. Connect your Video presenter to the PC with USB cable.
See the opposite page.
2. Install the USB driver. See page 3.
3. Install the SVP-5500 control program. See page 5.
Follow the instructions below to complete the installation:
2
1. Make sure that both the SVP-5500 Video presenter and
computer are turned ON.
2. Plug one end of the USB cable into the USB port on the
Video presenter.
3. Plug the other end into the USB port on the computer.
VIDEO IN
CAUTION:
FOR CONTINUED PROTECTION
AGAINST A RISK OF FIRE,
REPLACE ONLY WITH T2A 250V FUSE.
1
RS-232C
VGA IN
VIDEO OUT
SUB
CAMERA
USB
LCD
S-VIDEO
MIC
2
AUDIO IN
1
2
Installing SVP-5500 Software
Connecting SVP-5500 Video presenter to PC
AUDIO OUT
to USB port on the
computer
✔Note: For information connecting on other AV device, refer to the
User’s Guide which came with SVP-5500 Video presenter.
Installing USB driver
4. The Add New Hardware Wizard dialog box appears.
Click Next.
3
5. Put a checkmark on the Search for the best driver for
your device box and click Next.
6. Insert the SVP-5500 software diskette into your floppy
disk drive, then put a checkmark on the Floppy disk
drives box and Specify a location box then type x:\
(where x is the drive letter for the 3.5” floppy drive).
4
Installing SVP-5500 Software
7. Click Next. The USB driver will be installed.
8. Follow the instructions on the screen to complete the
installation.
Installing SVP-5500 program
9. From the Start menu, select Run, and type x:setup
where x is the letter of your floppy disk drive, and click
OK.
10. The Welcome window opens. Click Next.
5
11. Follow the instructions on the screen to complete the
installation. Restart your computer after the installation
is complete.
12. After the SVP-5500 software is properly installed, you
see the SVP55 icon created on the Windows desktop.
Installation tips
How can I determine if my computer’s USB port is
enabled?
1. In Windows 98, select Start ➝ Settings ➝ Control
Panel.
2. Double-click the System icon.
3. Click the Device Manager tab.
4. Click the plus (+) icon before the Universal serial bus
controller item.
6
Installing SVP-5500 Software
5. If you see a USB host controller and a USB root hub
listed, USB is properly enabled. If you have multiple
hubs on the USB chain, try connecting your Video
presenter to a different hub or to another USB device.
Also, make sure the cable connections are firm. (USB
hubs are hardware devices into which you can plug
multiple USB cables.)
If you do not see these devices listed, refer to your
computer’s documentation or contact the manufacturer
for more information on enabling and setting up USB.
How do I remove the USB driver and SVP-5500
program?
USB Driver:
1. In Windows 98, select Start ➝ Settings ➝ Control
Panel.
2. Double-click the System icon.
3. Click the Device Manager tab.
7
4. Click the plus (+) icon before the Universal serial bus
controller item.
5. From the Universal serial bus controller item, select
Samsung Video Presenter 5500, then click Remove.
6. In the Confirm Device Removal dialog box, click OK.
SVP-5500 program:
1. Select Start ➝ Settings ➝ Control Panel.
2. Double-click the Add/Remove Programs icon.
3. From the Programs list, click SVP55, then click
Add/Remove.
8
Yes. You can update the USB driver file for the Video
presenter if you have updated driver file. Do as follows:
1. In Windows 98, select Start ➝ Settings ➝ Control
Panel.
2. Double-click the System icon.
3. Click the Device Manager tab.
4. Click the plus (+) icon before the Universal serial bus
controller item.
Installing SVP-5500 Software
Can I update the USB driver for SVP-5500 Video
presenter?
5. From the Universal serial bus controller item, select
Samsung Video Presenter 5500, then click
Properties.
6. The Samsung Video Presenter 5500 Properties dialog box
opens. Click the Driver tab.
7. Click Update Driver. The Device Driver Update Wizard
screen opens. Follow the on-screen instructions to
complete the installation.
9
Running SVP-5500 Program
1. Make sure that your Video presenter is connected to the
PC and both are turned on.
2. Double-click the SVP55 icon (automatically placed on
the Windows desktop when you installed) to run.
double-click it.
You can also select SVP55 under its program group of
Start menu (Start ➝ Programs ➝ SVP55 ➝ SVP55).
10
For information on working with the SVP-5500 View
Panel and Main Panel, see page 12.
Running SVP-5500 Program
3. The SVP-5500 View Panel and Main Panel opens. The
image presented from the SVP-5500 Video presenter will
appear in the View Panel window.
✔Notes:
• SVP-5500 program does not run if the Video presenter is not
connected to the PC or not turned on.
• If the whole view of the SVP-5500 View Panel does not appear,
check if the graphic card on your PC supports 800 x 600 or
higher. To use this program, you must use Super VGA 800 x 600,
65536 colors or higher.
11
SVP-5500 View Panel and Main Panel
overview
View area.
Image presented from
the SVP-5500 Video
presenter appears in
this view area.
If you adjust the image
using the controls in
the desktop SVP-5500
Control panel, you will
see the applied result
in this area.
Captures the image
currently displayed in
the SVP-5500 View
Panel. When capturing
is complete, the
indicator next to the
Capture command
turns red. In this
status, you can save or
print the image.
Exits SVP-5500 program.
Opens or closes the SVP-5500 Control
panel. For details, see page 13.
Saves the captured image with BMP,
JPG format. For details, see page 16.
Prints the captured image.
For details, see page 18.
Allows you to select the screen
size: Full, Half, or Quarter.
12
With the SVP-5500 program, you can control and adjust the
image presented from your SVP-5500 Video presenter. You
can also save it as a graphic file and print the image
through the printer connected to the PC.
Using SVP-5500 Control panel
To adjust the image presented from the SVP-5500 Video
presenter, open the Control panel on your computer
desktop.
1. Run SVP-5500 program. For details, see page 10.
Working with SVP-5500 Program
Working with SVP-5500 Program
2. From the Main Panel, click Control. For details on the
control buttons in the desktop SVP-5500 Control panel,
see the following page.
3. To close the on-screen Control panel, click
on the
Control panel. Or, click Control in the Main Panel.
Displays the
current status.
Exits Control panel.
✔Note: The button functions on this desktop SVP-5500 Control
panel are equivalent to the buttons on the SVP-5500 Video
presenter and the SVP-5500 remote control. For further details
on the control buttons, refer to the User’s Guide which came
with the SVP-5500 Video presenter.
13
SVP-5500 Control panel overview
Click this arrow
repeatedly to
reduce the value.
Click and drag this arrow
to the value you want.
Click this arrow
repeatedly to increase
the value.
➝ Adjusts focus.
➝ Enlarges or reduces the image size on the
screen.
➝ Adjusts the brightness of the image on the
screen.
➝ Adjusts the audio volume.
➝ Adjusts the red color.
➝ Adjusts the blue color.
To adjust the setting value, click the button you want to
adjust, then slide the scroll bar at the left top of the
SVP-5500 Control panel to the value you want.
Current lamp indicator. The
currently selected lamp turns on.
➝ Turns the head lamps and/or
light box on or off.
Turns the
head lamp.
14
Turns off
all lamps.
Turns the light box.
Working with SVP-5500 Program
➝ Adjusts the image color automatically.
➝ Adjusts to focus automatically.
➝ Allows to choose the signal input to be
displayed.
• INT : Internal signal out from the SVP5500 Video presenter.
• EXT : External signal out from AV device
(If connected to the SVP-5500 Video
presenter)
➝ Turns image to positive.
➝ Turns image to negative.
➝ Saves the image into the memory of the SVP5500 Video presenter.
➝ Recalls the image from the memory of the
SVP-5500 Video presenter.
➝ Divides the screen to see both of the current
image and the image recalled from the
memory of SVP-5500 Video presenter
simultaneously on one screen.
➝ Shifts the recalled image shown in the divided
screen from the left to right to see the hidden
portion of the image.
You can save up to 8 frames into the SVP-5500 Video
presenter’s memory. If you select Save, Recall, or
Divide button, the Select Number dialog box appears.
Select the memory location number, click Exit.
15
➝ Reduces the flicker on the screen.
➝ Puts the image on the screen into reverse.
It rotates the image by 180o.
➝ Keeps the current image on the screen.
Click the button to activate the corresponding actions.
To cancel the action, click the button again.
➝ Cancels Reverse, Freeze, Divide, or Recall
mode and returns to the Standby mode.
Saves the customized setting values
➝ for next time use.
➝ Activates the preset user settings.
You can save up to 8 different custom user settings. If
you select Save or Execute button, the Select Number
dialog box appears. After you select the memory
location number, click Exit.
Saving the image into the computer
HDD
You can save the image currently displayed in the SVP5500 View Panel as a BMP or JPG format graphic file. Do as
follows:
1. Run SVP-5500 program. For details, see page 10.
2. The SVP-5500 View Panel displays image currently
presented from SVP-5500 Video presenter. To adjust the
image, open the on-screen SVP-5500 Control panel and
adjust the image. For details, see page 13.
16
3. When the desired image is displayed in the SVP-5500
View Panel, click Capture in the Main Panel. You see the
capture process on the screen.
5. Click Save in the Main Panel.
Specify the file path.
Working with SVP-5500 Program
4. When capturing is complete, the lamp next to the
Capture command in the Main Panel turns red.
Specify the file
name.
Specify the file
format. You can
select either
BMP or JPG.
Select the image size to store. The higher the resolution,
the finer the image detail, and the larger the file sizes.
6. Specify the file name, file format, and file path. Then,
click Save in the Save As dialog box. The image is saved
as a selected file format.
7. When completed, you must click Capture in the Main
Panel to release the capture mode. The lamp next to the
Capture command in the Main Panel turns off.
✔Note: If you do not release the Capture mode after you saving or
printing image, the SVP-5500 View Panel remains occupied with
the captured image. To view another object presented from SVP5500 Video presenter and view the result after you adjust
controls, you must release the Capture mode.
17
Printing the image
You can print the image currently displayed in the SVP5500 View Panel. Do as follows:
1. Run SVP-5500 program. For details, see page 10.
2. The SVP-5500 View Panel displays image currently
presented from SVP-5500 Video presenter. To adjust the
image, open the on-screen SVP-5500 Control panel and
adjust the image. For details, see page 13.
3. When the desired image is displayed in the SVP-5500
View Panel, click Capture in the Main Panel. You see the
capture process on the screen.
4. When capturing is complete, the lamp next to the
Capture command in the Main Panel turns red.
5. Click Print in the Main Panel.
Select paper size.
Select print
orientation.
Select paper feed
source.
Select print
margin.
18
Select print options and image size if necessary:
• Maintain aspect ratio : If you want to change the width value of image size while
at the same time automatically adjusting the length value (or vice verse) so that
their respective values are in proportion, select this option.
• Use full page : Select to print image to fit in the print page.
• Center on page : Select to print the image center on the print page. You cannot
specify Margins.
•Image size : Specify the image size to print.
printer you use.
6. Click OK. The Print dialog box opens.
Working with SVP-5500 Program
✔Note: Paper size and paper source items vary depending on the
✔Note: For further available print options, refer to your printer
User’s Guide.
7. Select print options and click OK to start printing.
8. After printing is complete, click Capture in the onscreen Main Panel to release the capture mode. If you do
not release the capture mode, the SVP-5500 View Panel
remains occupied with the captured image.
19
Troubleshooting
Symptom
SVP-5500 program fails
to run.
Solution
There may be a communication problem
between SVP-5500 Video presenter and
the computer. Exit SVP-5500 program
and do as follows:
• Unplug the USB cable, then plug it
back in.
• Close other unnecessary software
programs that are running (especially
programs related to USB
communication).
• If you turn the unit off, turn it back on
after at least 10 seconds.
The following error
message appeared:
“Fail to find USB device
driver. Check the USB
plug or the power of
SVP-5500 set.”
Your computer system could not find USB
driver.
• Check the USB cable connection.
• Make sure that SVP-5500 Video
presenter turns on.
• Check that USB driver is properly
installed. For information on installing
USB driver, see page 3.
• If you turn the unit off, turn it back on
after at least 10 seconds.
The following error
message appeared:
“There is a problem in
communication of USB.
Please disconnect the
plug of USB and
reconnect it.”
20
System error occurred and USB
communication has failed. Do as follows:
• Unplug the USB cable, then plug it
back in.
Solution
The following error
message appeared:
“There is a trouble in
USB communication.
Currently the program is
checking the system.
Please wait a moment.”
USB communication error occurred.
Exit SVP-5500 program, then do as
follows:
The following error
message appeared:
“Fail to allocate memory
or resource. Please exit
the program, and restart
it.”
There are too many programs that
are running.
The following error
message appeared:
“Fail to transfer the
image.”
USB communication error occurred
and an image transfer has failed.
Troubleshooting
Symptom
• Unplug the USB cable, then plug it
back in.
• Close other unnecessary programs.
• Exit SVP-5500 program, then run it
again.
• Restart your computer.
• Cancel the current task and wait
several minutes. Then start to save
it again.
• Unplug the USB cable then plug it
back it.
The following error
message appeared:
“Sorry, can’t save OOO
the format. Only support
bitmap or jpeg format.”
• You can save image as a BMP or
JPEG file format only. For details,
see page 17.
21
Symptom
The following error
message appeared:
“Library can’t operate
correctly.”
Solution
• There is an error occurred in the
Library which will be used to save an
image. Cancel the current task and
wait several minutes. Then start your
operation again.
• If you still have same problem,
uninstall the SVP-5500 program, then
reinstall the program. For details, see
page 8.
22
The following error
message appeared:
“Windows API can’t
operate correctly.”
• Windows printing error occurred. Check
if no printing task is spooled. If any,
wait until all printing tasks are done,
then try your printing again.
The following error
message appeared:
“Fail to print the image.”
• Windows printing error occurred. Check
if no printing task is spooled. If any,
wait until all printing tasks are done,
then try your printing again.
The following error
message appeared:
“Sorry to fail. Try it
again, please.”
• The operation you activated has failed.
Wait several minutes. Then start to
operate it again.
Troubleshooting
23
SAMSUNG OPTO-ELECTRONICS AMERICA, INC.
40 Seaview Drwe, Secaucus N.J. 07094, U.S.A.
TEL: 1-800-762-7746, 1-201-902-0347
FAX: 1-201-902-9342
SAMSUNG TECHWIN CO. LTD
145-3 Sangdaewon 1-Dong, Jungwon-Gu,
Sungnam, Kyungki-Do, Korea 462-121
TEL: 82-31-740-8137~8141
FAX: 82-31-740-8145
SAMSUNG SAO PAULO OFFICE.
Rua Professor Manoelito de Ornellas 303 2-andar
Chacara Santo Antonio CEP:04719-040
SAO PAULO SP Brasil
TEL: 55-11-5642-0757
FAX: 55-11-5641-8023
http://www.samsungcamerausa.com