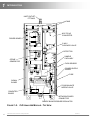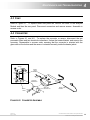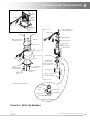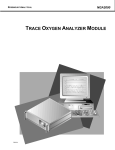
1
ROSEMOUNT ANALYTICAL
NGA2000
CHEMILUMINESCENSE DETECTOR
ANALYZER MODULE
748410-A
NOTICE
The information contained in this document is subject to change without notice.
Rosemount Analytical's system of NGA 2000 Modular Gas Analyzers and Controllers are patented, under U.S. Patent
5.787.015.
Teflon is a Registered Trademark of E.I. duPont de Nemours and Co., Inc.
Kynar is a Registered Trademark of Atochem North America, Inc.
Manual Part Number 748410-A
August 1999
Printed in U.S.A.
Rosemount Analytical Inc.
4125 East La Palma Avenue
Anaheim, California 92807-1802
CONTENTS
PREFACE
Purpose/Safety Summary.................................................................................P1
Glossary
....................................................................................................P5
Specifications - General....................................................................................P7
Specifications - Physical ...................................................................................P7
Specifications - Sample ....................................................................................P8
Specifications - Gas Connections.....................................................................P8
Customer Service, Technical Assistance and Field Service .............................P9
Returning Parts to the Factory ..........................................................................P9
Training
....................................................................................................P9
Documentation..................................................................................................P10
Compliances ....................................................................................................P10
SECTION 1. INTRODUCTION
1.1 Overview....................................................................................................1
1.2 Typical Applications ...................................................................................1
1.3 Theory of Technology ................................................................................1
1.4 Features ....................................................................................................2
748410-A
August 1999
Chemiluminescense Detector Analyzer Module
Rosemount Analytical NGA 2000
i
CONTENTS
SECTION 2. INSTALLATION
2.1 Unpacking ................................................................................................. 5
2.2 Assembly................................................................................................... 5
2.3 Location .................................................................................................... 5
2.4 Gases
.................................................................................................... 6
2.4.1 Overview ...................................................................................... 6
2.4.2 Connections................................................................................... 6
2.4.3 Specifications ................................................................................ 8
2.5 Electrical Connections............................................................................... 9
SECTION 3. STARTUP AND OPERATION
3.1 OVERVIEW............................................................................................... 13
3.2 Displays .................................................................................................... 13
3.2.1 Run Mode Display ......................................................................... 13
3.2.2 Menu Displays ............................................................................... 13
3.2.3 Help Displays................................................................................. 14
3.3 Startup Procedure ..................................................................................... 14
3.4 Binding .................................................................................................... 15
3.5 Calibration ................................................................................................. 17
3.6 Converter Temperature Adjustment Procedure ........................................ 18
3.7 Measurement of Converter Efficiency ....................................................... 20
3.7.1
3.7.2
3.7.3
3.7.4
3.7.5
3.7.6
Test Setup for Measurement of Conversion Efficiency.................. 20
Test Procedure .............................................................................. 20
Subnormal Conversion Efficiency.................................................. 22
Replacement of Converter............................................................. 24
Capillaries...................................................................................... 24
TEA Scrubber ................................................................................ 24
3.8 Routine Operation ..................................................................................... 25
ii
Chemiluminescense Detector Analyzer Module
Rosemount Analytical NGA 2000
748410-A
August 1999
CONTENTS
SECTION 4. MAINTENANCE AND TROUBLESHOOTING
4.1 Overview....................................................................................................27
4.2 Fuses
....................................................................................................27
4.3 Fans
....................................................................................................29
4.4 Converter ...................................................................................................29
4.5 Ozonator ....................................................................................................30
4.6 Printed Circuit Boards................................................................................30
4.7 Detector Disassembly................................................................................30
SECTION 5. REPLACEMENT PARTS
5.1 Replacement Parts ....................................................................................35
APPENDIX A. CLD IDENTIFICATION MATRIX
General Precautions for Handling an d Storing High Pressure Cylinders
Warranty
Field Service and Repair Facilities
748410-A
August 1999
Chemiluminescense Detector Analyzer Module
Rosemount Analytical NGA 2000
iii
CONTENTS
FIGURES
1-1 CLD Analyzer Module Flow Diagram .......................................................... 3
1-2 CLD Analyzer Module - Top View .............................................................. 4
2-1 Analyzer Module Installation into Instrument Platform ............................... 6
2-2 CLD Rear Panel Connections .................................................................... 7
2-3 Front Panel Controls and Electrical Connections....................................... 10
2-4 CLD Wiring Diagram .................................................................................. 11
2-5 Outline and Mounting Dimensions ............................................................. 12
3-1 Run Mode Display...................................................................................... 15
3-2 Main Menu Display..................................................................................... 15
3-3 Basic Controls Menu .................................................................................. 16
3-4 Expert Controls and Setup Menu ............................................................... 16
3-5 Technical Level Configuration Menu .......................................................... 16
3-6 Typical Help Screen ................................................................................... 17
3-7 Measuring Efficiency of NO2 to NO Converter........................................... 23
3-8 Conversion Efficiency as a Function of Converter Temperature................ 24
4-1 CLD Module Assembly............................................................................... 28
4-2 Converter Assembly................................................................................... 29
4-3 Detector Assembly ..................................................................................... 33
TABLES
2-1 Gas Specifications ...................................................................................... 7
3-1 CLD Analyzer Module Alarms ..................................................................... 14
iv
Chemiluminescense Detector Analyzer Module
Rosemount Analytical NGA 2000
748410-A
August 1999
PREFACE
PURPOSE/SAFETY SUMMARY
The purpose of this manual is to provide the procedures for the installation, operation and
maintenance of the Platform and the System Accessories of the NGA 2000 System.
Read this instruction manual completely before attempting to install any components into
the NGA 200 System.
WARNING: AUTHORIZED PERSONNEL
To avoid explosion, loss of life, personal injury and damage to this equipment
and on-site property, all personnel authorized to install, operate and service the
this equipment should be thoroughly familiar with and strictly follow the
instructions in this manual. SAVE THESE INSTRUCTIONS.
If this equipment is used in a manner not specified in these instructions, protective systems
may be impaired.
DANGER is used to indicate the presence of a hazard which will cause severe personal
injury, death, or substantial property damage if the warning is ignored
WARNING is used to indicate the presence of a hazard which can cause severe personal
injury, death, or substantial property damage if the warning is ignored.
CAUTION is used to indicate the presence of a hazard which will or can cause minor
personal injury or property damage if the warning is ignored.
NOTE is used to indicate installation, operation, or maintenance information which is
important but not hazard-related.
WARNING: ELECTRICAL SHOCK HAZARD
Do not operate without doors and covers secure. Servicing requires access to
live parts which can cause death or serious injury. Refer servicing to qualified
personnel. For safety and proper performance this instrument must be
connected to a properly grounded three-wire source of power.
748410-A
August 1999
Chemiluminescense Detector Analyzer Module
Rosemount Analytical NGA 2000
P1
PREFACE
WARNING: TOXIC AND OXIDIZING GAS
This module generates ozone which is toxic by inhalation and is a strong irritant
to throat and lungs. Ozone is also a strong oxidizing agent. Its presence is
detected by a characteristic pungent odor.
The module's exhaust contains both ozone and nitrogen dioxide, both toxic by
inhalation, and may contain other constituents of the sample gas which may be
toxic. Such gases include various oxides of nitrogen, unburned hydrocarbons,
carbon monoxide and other products of combustion reactions. Carbon
monoxide is highly toxic and can cause headache, nausea, loss of
consciousness, and death.
Avoid inhalation of the ozone produced within the module, and avoid inhalation
of the sample and exhaust products transported within the module. Avoid
inhalation of the combined exhaust products at the exhaust fitting.
Keep all tube fittings tight to avoid leaks. See section 2.4.3, page 9, for leak test
information.
Connect rear exhaust outlet to outside vent with stainless steel or Teflon line.
Check vent line and connections for leakage.
WARNING: PARTS INTEGRITY
Tampering or unauthorized substitution of components may adversely affect
safety of this product. Use only factory documented components for repair.
CAUTION: PRESSURIZED GAS
This module requires periodic use of pressurized gas. See General Precautions
for Handling and Storing High Pressure Gas Cylinders at the rear of this manual
WARNING: OVERBALANCE HAZARD
This analyzer module may tip instrument over if it is pulled out too far and the
Platform is not properly supported.
P2
Chemiluminescense Detector Analyzer Module
Rosemount Analytical NGA 2000
748410-A
August 1999
PREFACE
WARNING: INTERNAL ULTRAVIOLET LIGHT
Ultraviolet light from the ozone generator can cause permanent eye damage.
Do not look directly at the ultraviolet source. Use of ultraviolet filtering glasses
is recommended.
WARNING: TOXIC CHEMICAL HAZARD
The ozone generator lamp contains mercury. Lamp breakage could result in
mercury exposure. Mercury is highly toxic if absorbed through the skin or
ingested, or if vapors are inhaled.
Handle lamp assembly with extreme care. If the lamp is broken, avoid skin
contact and inhalation in the area of the lamp or the mercury spill.
Immediately clean up and dispose of the mercury spill and lamp residue as
follows:
•
Wearing rubber gloves and goggles, collect all droplets of mercury by means
of a suction pump and aspirator bottle with a long capillary tube. (Alternately,
a commercially available mercury spill clean-up kit, such as J.T. Baker product
No. 4439-01, is recommended.)
•
Carefully sweep any remaining mercury and lamp debris into a dust pan.
Carefully transfer all mercury, lamp residue and debris into a plastic bottle
which cab be tightly capped.
•
Label and return to hazardous material reclamation center. Do not place in
the trash, incinerate or flush down the sewer.
•
Cover any fine droplets of mercury in non-accessible crevices with calcium
polysulfide and sulfur dust
WARNING: HAND INJURY HAZARD
Do not place hands or fingers in the Platform front handles when front panel is
open. Dropping the front panel of the Platform while hand or fingers are inside
either handle can cause serious injury.
748410-A
August 1999
Chemiluminescense Detector Analyzer Module
Rosemount Analytical NGA 2000
P3
PREFACE
WARNING: POSSIBLE EXPLOSION HAZARD
Ensure that all gas connections are made as labeled and are leak free.
Improper gas connections could result in explosion or death.
CAUTION: OVER-VOLTAGE SPIKING
If this analyzer module is used with a non-Rosemount Analytical power supply,
adding Rosemount Analytical PN 903341 Current Protector in series with the 24V
positive power line will prevent over-voltage spiking and resultant fuse blowing
when powering up the instrument.
WARNING: POSSIBLE EXPLOSION HAZARD
This equipment is not designed and should not be used in the analysis of
flammable samples. Use of this equipment in this way could result in explosion
or death.
CAUTION: EXTERNALLY RESTRICT SAMPLE FLOW TO LESS THAN
2200 CC/MIN.
No restrictor is provided in the sample inlet of this module. For those users who
cannot externally limit sample flow, accessory restrictor PN 657300 is available
from Rosemount Analytical.
To obtain this accessory, call 800-441-7245.
P4
Chemiluminescense Detector Analyzer Module
Rosemount Analytical NGA 2000
748410-A
August 1999
PREFACE
GLOSSARY
Analyzer Module
The module that contains all sensor/detector components for development of a Primary
Variable signal; includes all signal conditioning and temperature control circuitry.
Backplane
The interconnect circuit board which the Controller Board, Power Supply, Analyzer Module
power and network cables, I/O Modules and Expansion Modules plug into.
Control Module
The Operator Interface plus the Controller Board.
Controller Board
The computer board that serves as the Network Manager and operates the Display and
Keypad.
Distribution Assembly
The Backplane and the card cages that hold I/O and Expansion Modules.
Expansion Module
A circuit board that plugs into the Backplane from the front of the Platform and performs
special features not related to I/O functions.
I/O Module
A circuit board that plugs into the Backplane from the rear of the Platform. Has a connector
terminal for communication with external data acquisition devices and provides an
input/output function.
Operator Interface
The Display and Keyboard.
Platform
Any workable collection of the following: Controller Board, Power Supply, Distribution
Assembly, Enclosure and Operator Interface.
748410-A
August 1999
Chemiluminescense Detector Analyzer Module
Rosemount Analytical NGA 2000
P5
PREFACE
Power Supply
Any of a variety of components that provides conditioned power to other NGA 2000
components, from the Power Supply Board that plugs into the front of the Backplane in a
stand-alone instrument to several larger ones that can power larger collections of modules
and components.
Primary Variable
The measured species concentration value from an Analyzer Module.
Secondary Variable
Data placed on the network by a module regarding current status, e.g., sample flow, source
voltage and other diagnostic information.
Softkeys
The five function keys located below the front panel display; they assume the function
displayed directly above each on the display, a function dictated by software.
System
Any collection of Analyzer Module(s), Platform(s), I/O Module(s) and Expansion Module(s).
P6
Chemiluminescense Detector Analyzer Module
Rosemount Analytical NGA 2000
748410-A
August 1999
PREFACE
SPECIFICATIONS - GENERAL
MEASUREMENT SPECIES:
RANGES:
REPEATABILITY:
MIN. DETECTABLE LEVEL:
NOISE:
LINEARITY:
RESPONSE TIME:
ZERO DRIFT:
(AT CONSTANT TEMPERATURE)
SPAN DRIFT:
(AT CONSTANT TEMPERATURE)
EFFECT OF TEMPERATURE:
AMBIENT TEMPERATURE:
POWER REQUIREMENTS:
NO, NOx
0 to 10 ppm through 0 to 10,000 ppm NO, NOx
±0.5% of fullscale (at constant temperature)
0.1 ppm
<1% of fullscale, peak to peak
±1% of fullscale
<1 sec. for 90% of fullscale for ranges of 25 ppm or
greater
<3 sec. for 90% of fullscale for ranges of less than
25 ppm
<±1% of fullscale/24 hours, <±2% of fullscale/week
<±1% of fullscale/24 hours, <±3% of fullscale/week
<2% of fullscale (over any 10°C ambient
temperature variation interval for a rate of change
no greater than 10°C/hour)
0°C to 45°C (32°F to 113°F)
24V DC 120W
SPECIFICATIONS - PHYSICAL
CASE CLASSIFICATION:
DIMENSIONS:
WEIGHT:
MOUNTING:
MAX. LENGTH OF LON
CABLE:
748410-A
August 1999
General purpose for installation in weatherprotected area
See Outline and Mounting Dimensions, Figure 2-4
8.1 kg (18 lbs.)
Inside a Platform or custom-installed in a panel
1600m (1 mile) between Analyzer Module and
Platform
Chemiluminescense Detector Analyzer Module
Rosemount Analytical NGA 2000
P7
PREFACE
SPECIFICATIONS - SAMPLE
TEMPERATURE:
TOTAL FLOW RATE:
PARTICLES:
DEWPOINT:
MATERIALS IN CONTACT
WITH SAMPLE:
0°C to 55°C (32°F to 131°F)
(Externally measured) 900 to 2200 cc/min. with
backpressure regulator pressure adjusted to 344 hPa
(5 psig)
Filtered to <2 microns
5.5°C below ambient temperature, no entrained liquid
Stainless steel, Teflon, glass, brass and neoprene
Optional: Stainless steel, Teflon, glass and Kynar
Clean, dry air or oxygen; flow rate: 1 L/min. maximum;
pressure: 689 hPa to 1034 hPa-gauge (10 to 15 psig);
maintain a constant pressure ±34 hPa (±0.5 psig)
OZONATOR GAS:
SPECIFICATIONS - GAS CONNECTIONS
OZONE AIR:
EXHAUST:
SAMPLE IN:
1/4” O.D. tube fitting, brass
1/4” O.D. tube fitting, stainless steel
1/4” O.D. tube fitting, stainless steel
See the Preface section of the Platform Components manual for specifications regarding
Platform-related components (e.g., case dimensions) and the Preface of the I/O Module
manual for specifications regarding I/O (e.g., relay outputs).
P8
Chemiluminescense Detector Analyzer Module
Rosemount Analytical NGA 2000
748410-A
August 1999
PREFACE
CUSTOMER SERVICE, TECHNICAL ASSISTANCE AND FIELD SERVICE
For order administration, replacement Parts, application assistance, on-site or factory repair,
service or maintenance contract information, contact:
Rosemount Analytical Inc.
Process Analytical Division
Customer Service Center
1-800-433-6076
RETURNING PARTS TO THE FACTORY
Before returning parts, contact the Customer Service Center and request a Returned
Materials Authorization (RMA) number. Please have the following information when you call:
Model Number, Serial Number, and Purchase Order Number or Sales Order Number.
Prior authorization by the factory must be obtained before returned materials will be
accepted. Unauthorized returns will be returned to the sender, freight collect.
When returning any product or component that has been exposed to a toxic, corrosive or
other hazardous material or used in such a hazardous environment, the user must attach an
appropriate Material Safety Data Sheet (M.S.D.S.) or a written certification that the material
has been decontaminated, disinfected and/or detoxified.
Return to:
Rosemount Analytical Inc.
4125 East La Palma Avenue
Anaheim, California 92807-1802
TRAINING
A comprehensive Factory Training Program of operator and service classes is available.
For a copy of the Current Operator and Service Training Schedule contact the Technical
Services Department at:
Rosemount Analytical Inc.
Phone: 1-714-986-7600
FAX: 1-714-577-8006
748410-A
August 1999
Chemiluminescense Detector Analyzer Module
Rosemount Analytical NGA 2000
P9
PREFACE
DOCUMENTATION
The following Chemiluminescense Detector Analyzer Module instruction materials are
available. Contact Customer Service or the local representative to order.
748410 Instruction Manual (this document)
COMPLIANCES
This product may carry approvals from several certifying agencies, including Factory Mutual
and the Canadian Standards Association (which is also an OSHA accredited, Nationally
Recognized Testing Laboratory), for use in non-hazardous, indoor locations.
FM
APPROVED
®
NRTL /C
97-C219
Rosemount Analytical Inc. has satisfied all obligations from the European Legislation to
harmonize the product requirements in Europe.
This product complies with the standard level of NAMUR EMC. Recommendation (May
1993).
NAMUR
This product satisfies all obligations of all relevant standards of the EMC framework in
Australia and New Zealand.
N96
P10
Chemiluminescense Detector Analyzer Module
Rosemount Analytical NGA 2000
748410-A
August 1999
INTRODUCTION
1
1.1 OVERVIEW
This manual describes the Chemiluminescence (CLD) Analyzer Module of Rosemount
Analytical's NGA 2000 Series of gas analysis components (See Figures 1-1 and 1-2).
The CLD Analyzer Module is designed to continuously determine the concentration of nitric
oxide and oxides of nitrogen (NO plus nitrogen dioxide [NO2]) in a flowing gaseous mixture.
The concentration is expressed in parts-per-million.
The CLD Analyzer Module is designed as a slide-in module (if configured in stand-alone
instrument fashion), removable from the front of the Platform, with gas connections made
from the rear. All electronics relative to sample detection and conditioning are included in
this module.
1.2 TYPICAL APPLICATIONS
The CLD Analyzer Module has specific applications in the following areas:
•
Oxides of nitrogen emissions from the combustion of fossil fuels in:
•
•
•
•
•
Vehicle engine exhaust
Incinerators
Boilers
Gas appliances
Turbine exhaust
Nitric acid plant emissions
De-NOx control system
Nitric oxide emissions from decaying organic material (e.g., landfills).
1.3 THEORY OF TECHNOLOGY
The CLD Analyzer Module uses the chemiluminescence method of detection. This
technology is based on NO's reaction with ozone (O3) to produce NO2 and oxygen (O2).
Some of the NO2 molecules thus produced are in an electronically excited state ((NO2* - the
"*" refers to the excitation)). These revert immediately to the ground state, with emission of
photons (essentially, red light). The reactions involved are:
748410-A
August 1999
Chemiluminescense Detector Analyzer Module
Rosemount Analytical NGA 2000
1
1
INTRODUCTION
NO + O3 → NO2* + O2
NO2* → NO2 + red light
As NO and O3 mix in the reaction chamber, the intensity of the emitted red light is
measured by a photodiode and is proportional to the concentration of NO in the original gas
sample.
To measure NOx (NO + NO2), any NO2 in the sample is reduced to NO (at <95% efficiency)
by being continuously passed through a heated bed of vitreous carbon (this occurs before
the sample gas is presented to the ozone). Any NO initially present in the sample passes
through this converter stage unchanged before being routed to the reaction chamber.
The photodiode generates a DC current, which is then amplified, conditioned and expressed
on the network as the Primary Variable.
1.4 FEATURES
Among the features included in the CLD Analyzer Module are: 1) ozonator air loss shutoff
and 2) NO/NOx mode capability.
2
Chemiluminescense Detector Analyzer Module
Rosemount Analytical NGA 2000
748410-A
August 1999
INTRODUCTION
CONNECTOR
1/8T-1/8NPT BRS
BULKHEAD REDUCER
1/4T - 1/8T BRS
1
OZONE GENERATOR
AIR RESTRICTOR
430cc/min @ 12 PSIG
MALE CONNECTOR
1/8T-3/8NPT BRS
OZONE AIR
CROSS
1/8T BRS
116 ID VITON BLK
MALE CONNECTOR
1/8T-3/8NPT BRS
NOx TO NO
CONVERTER
PRESSURE
SWITCH
PRESSURE SENSOR
30 PSIG AIR
CONNECTOR,GLASS
BLUE
TOP
CONNECTOR,
GLASS BLUE
VALVE
NC
ELBOW
1/8T-1/8MPT KYNAR
FLOW
BALANCE
VALVE
BYPASS
FLOW
SENSOR
ELBOW
1/8T-1/8MPT
KYNAR
NO
C
VENT CAPILLARY
70cc/min 4 PSIG
TEE 1/8T
KYNAR
SAMPLE
BULKHEAD REDUCER
1/4T - 1/8T SS
TEE
1/4T - 1/8FPT SS
OZONE
1/8 OD SS
PUMP CAPILLARY
1/8 OD TEFLON
TEE ASSEMBLY
1/8T-1/4MPT
REACTION
CHAMBER
ELBOW 1/8T
SS
BACK
PRESSURE
REGULATOR
REDUCER
1/4T - 1/8T SS
CROSS
1/8T SS
ELBOW
1/8T-1/4MPT
SS
TEE
1/8T
KYNAR
ELBOW 1/8T
SS
EXHAUST
1/8 OD SS
1
SAMPLE
TEE 1/8T
KYNAR
CONNECTOR, MALE
1/8T-3/8MPT SS
SAMPLE
PRESSURE
SENSOR
15 PSIG
REDUCING UNION
1/8T - 1/16T SS
EXHAUST
BULKHEAD
1/4T SS
CONNECTOR
1/4T SS
ELBOW
1/8T - 1/8MPT
SS
1
70 cc/min. 5 psig Capillary: PN 659657
200 cc/min. 5 psig Capillary: PN 659658
FIGURE 1-1. CLD ANALYZER MODULE FLOW DIAGRAM
748410-A
August 1999
Chemiluminescense Detector Analyzer Module
Rosemount Analytical NGA 2000
3
1
INTRODUCTION
INLET/OUTLET
FITTINGS
FANS
NO2 TO NO
CONVERTER
DRIVER BOARD
3-WAY
SOLENOID VALVE
DETECTOR
SAMPLE
CAPILLARY
OZONE
GENERATOR
FLOW SENSOR
POWER SUPPLY
BOARD
FUSE
SIGNAL
BOARD
FLOW BALANCE
NEEDLE VALVE
COMPUTER
BOARD
NETWORK/POWER
CONNECTOR
SAMPLE BACKPRESSURE REGULATOR
FIGURE 1-2. CLD ANALYZER MODULE - TOP VIEW
4
Chemiluminescense Detector Analyzer Module
Rosemount Analytical NGA 2000
748410-A
August 1999
INSTALLATION
2
2.1 UNPACKING
If the Chemiluminescence (CLD) Analyzer Module is received as a separate unit, carefully
examine the shipping carton and contents for signs of damage. Immediately notify the
shipping carrier if the carton or contents is damaged. Retain the carton and packing material
until all components associated with the CLD Analyzer Module are operational.
2.2 ASSEMBLY
If the CLD Analyzer Module requires assembly with other components (e.g., the Platform
and associated I/O Modules), do so at this time. Following the guides on the bottom left and
bottom center of the Platform, carefully slide the Analyzer Module halfway into place.
CAUTION: HAND INJURY HAZARD
Do not place hands or fingers in the Platform front handles when front panel is
open. Dropping the front panel of the Platform while hand or fingers are inside
either handle can cause serious injury.
Lift the spring-loaded pins on the front of the Analyzer Module, and carefully slide it the rest
of the distance. Secure the module in position by releasing the pins, which seat in the
available holes in the bottom of the case (see Figure 2-1). If the module and Platform are
difficult to assemble, remove the module, ensure the top cover of the module is firmly
seated on the hold-down screws, and repeat the assembly procedure.
Refer to Section 2-4 for electrical connections.
Install I/O Module(s) according to guidelines in the I/O manual. After startup and calibration
have been performed, secure the front panel with the six screws provided.
2.3 LOCATION
Install the CLD Analyzer Module in a clean, weather-protected, vibration-free location free
from extreme temperature variations and moisture. For best results, install the instrument
near the sample stream to minimize sample transport time.
The analyzer should be installed within ±15° of horizontal.
748410-A
August 1999
Chemiluminescense Detector Analyzer Module
Rosemount Analytical NGA 2000
5
2
INSTALLATION
ANALYZER MODULE GUIDES
PIN SEATS
DISENGAGED FRONT PANEL
FIGURE 2-1. ANALYZER MODULE INSTALLATION INTO INSTRUMENT PLATFORM
NOTE
Unrestricted air flow to the rear of the Analyzer Module is critical to its
performance and reliability.
Operating ambient temperature is 0oC to 45oC (32oF to 113oF). Temperature change should
not exceed 10oC (18oF) per hour. The same temperature range restrictions apply to the
location of the air and span gas cylinders.
2.4 GASES
2.4.1 OVERVIEW
See Table 2-1. The CLD Analyzer Module requires two cylinder gases: 1) breathing grade
air or oxygen and 2) a standard of accurately known composition for use as a span gas.
Each gas should be supplied from a cylinder equipped with a clean, non-corrosive,
two-stage regulator. A shutoff valve is recommended.
2.4.2 CONNECTIONS
(See Figure 2-2.) Connect inlet and outlet lines for sample, air, and exhaust to appropriately
labeled fittings on the rear panel, each of which is a 1/4-inch ferrule-type compression fitting.
Stainless steel or Teflon tubing is recommended for the sample line. Exhaust tubing should
be 1/4 inch (6.3 mm) or larger, and made of stainless steel or Teflon.
6
Chemiluminescense Detector Analyzer Module
Rosemount Analytical NGA 2000
748410-A
August 1999
INSTALLATION
MAXIMUM NOX
LEVEL IN PARTS
PER MILLION
GAS SUPPLIED TO
REAR PANEL AIR
INLET
SETTING ON OZONE
PRESSURE GAUGE
(PRESSURE VALUES:
GAUGE)
SETTING ON SAMPLE
PRESSURE GAUGE
(PRESSURE VALUES:
GAUGE)
800
Air
690 hPa (10 psig); provides
flow of approximately 500
cc/min. to ozone generator
344 hPa (5 psig); provides
flow of approximately 200
cc/min. to reaction
chamber
2,500
Air
690 hPa (10 psig); provides
flow of approximately 1000
cc/min. to ozone generator.
344 hPa (5 psig); provides
flow of approximately 70
cc/min to reaction
chamber.
10,000
Oxygen
1035 hPa (15 psig);
provides flow of
approximately 1000 cc/min
to ozone generator.
103 hPa (1.5 psig);
provides flow of
approximately 20 cc/min.
to reaction chamber.
2
CAUTION: EXTERNALLY LIMIT SAMPLE FLOW RATE TO LESS THAN 2200 CC/MIN.
TABLE 2-1. GAS SPECIFICATIONS
EXHAUST
EXHAUST FAN
OZONATOR AIR
SAMPLE IN
INTAKE FAN
FIGURE 2-2. CLD REAR PANEL CONNECTIONS
748410-A
August 1999
Chemiluminescense Detector Analyzer Module
Rosemount Analytical NGA 2000
7
2
INSTALLATION
2.4.3 SPECIFICATIONS
Calibration Gases
Either U.S.P. breathing grade air or nitrogen is recommended for use as zero gas. A mixture
of NO or NO2 in a background of nitrogen is recommended as span gas. For maximum
accuracy, the concentration of NO in the span gas should be about the same as that in the
expected sample stream.
Ozonator Source Gas
For analyzers with ranges less than 0 to 2,500 ppm, U.S.P. breathing grade air should be
used for generation of the ozone required for the chemiluminescence reaction. For ranges
greater than 0 to 2,500 ppm, breathing grade oxygen is required.
Sample
The sample must be clean and dry before entering the Analyzer Module. Sample should be
filtered for particulates down to two microns, and should have a dew point 5oC (13oF) below
coldest ambient temperature.
NOTE
At no time should sample flow exceed 2200 cc/min. Damage to internal
components may occur if this flow level is exceeded.
CAUTION: EXTERNALLY RESTRICT SAMPLE FLOW TO LESS THAN
2200 CC/MIN.
No restrictor is provided in the sample inlet of this module. For those users who
cannot externally limit sample flow, accessory restrictor PN 657300 is available
from Rosemount Analytical.
To obtain this accessory, call 800-441-7245.
Pressure
Between 690 and 1035 hPa-gauge (10 and 15 psig) of ozonator air (or oxygen, if
appropriate) should be present at the rear panel of the module. Bypass sample gas flow
rate should be between 700 and 2000 cc/min. with backpressure regulator pressure (see
Capillary Pressure in Current Measurement Parameters menu, which can be viewed by
selecting the PARMS softkey in Main Menu) adjusted to 344 hPa (5 psig).
Zero/span gases should be introduced at the SAMPLE IN fitting at normal sample inlet flow
rate.
8
Chemiluminescense Detector Analyzer Module
Rosemount Analytical NGA 2000
748410-A
August 1999
INSTALLATION
NOTE
2
At no time should ozonator gas pressure exceed 2070 hPa-gauge (30 psig).
Damage to internal components may occur if this pressure level is exceeded.
Leak Test
The CLD Analyzer Module is completely tested at the factory for gas leakage. The user is
responsible for testing for leakage only at the inlet and outlet fittings on the rear panel.
Periodically, the user should do an internal leak test (with a test procedure chosen by the
user).
Contaminants
White crystal deposits on the windows of the reaction chamber, and the clogging of
capillaries and vent are usually due to sample contaminates such as ammonia reacting with
the high ozone levels and NO components.
To eliminate the contaminates, the sampling system should be reworked or a preventive
maintenance program developed (if dropout is not excessive). Another source of crystalline
formation is contaminated air.
2.5 ELECTRICAL CONNECTIONS
NOTE
Electrical installation must be in compliance with National Electrical Code
(ANSI/NFPA 70) and/or any applicable national or local codes.
Refer to Figure 2-3. Two electrical connections are required on the Analyzer Module:
POWER and NETWORK. On the Analyzer Module, two NETWORK connectors are
available, either of which is appropriate for:
1. Interconnection with the Backplane of the Platform. (See instruction manual for the NGA
2000 Platform).
2. "Daisy-chaining" with other NGA 2000 components.
Connect Analyzer Module POWER to 24 VDC, 120 Watt power source, either the Platform
or external power source.
748410-A
August 1999
Chemiluminescense Detector Analyzer Module
Rosemount Analytical NGA 2000
9
2
INSTALLATION
Metering Valve
CLD
Flow
Regulator Adjust
Slot
Network1 Connection
LON
1
Network2 Connection
LON
Sample
Balance
2
1+
24V 2 3 GND
Power Connection
Fuse
Regulator
T 6A
250 V
FIGURE 2-3. FRONT PANEL CONTROLS AND ELECTRICAL CONNECTIONS
10
Chemiluminescense Detector Analyzer Module
Rosemount Analytical NGA 2000
748410-A
August 1999
INSTALLATION
2
HARNESS, EXPANSION I/O 655249
NC
POWER SUPPLY BOARD-LON/POWER
MODULE ASSEMBLY 657510
1
J2
J1
J1
J3
1
LON/PWR MODULE
656761
E3
E2
J5 3 2 1
1
1
J5
J6
E1
BLK
GRN
COMPUTER ANALYSIS BOARD 655520
J6
RED
J7
1
CABLE, CONTROLLER PWR 903034
J3
1
2
3
BLK
J9
CABLE, INTERNAL NETWORK 903035
J6
1 2
2
POWER SUPPLY
BOARD 657520
8
2
CABLE, FLOW SENSOR 655384
1
2
3
J11
RED
SAMPLE
PRESSURE
SENSOR
655254
J11
J4
7 6
J7 8
1 4 5 6 1 2 3 6
1
J2
BLK
WHT
GRN
RED
J3
SAMPLE
PRESSURE
SENSOR
655253
BLK
WHT
GRN
RED
1
FLOW
SENSOR
902931
1
10
PRESSURE
SWITCH
(NO) 8 PSIG
655215
CABLE DIGITAL I/O 655246
J2
3
12
BLK
GRN
ORN
BLK
10
BLK
WHT
RED
J1
9
*COAX
CABLE
J1
J13 1 2 3 4 5 6 7 8 9
HARNESS, SIGNAL POWER 655252
WHT
BLK
GRN
SHLD*
BLU
YEL
ORN
WIRE*
BRN
J13
7
1
SIGNAL BOARD 655580
5
4
3 J8
2
1
WHT
NC
1
J5
J3
J2
CABLE ANALOG I/O 903033
ORN
GRN
RED
J4
1
6
WHT BLK
BRN (NO)
12
YEL (COM)
7
HARNESS, DRIVER POWER 655243
RED
WHT
4 3 1
NO/NOx
SOLENOID
655263
J10
GRN
JUMPER
657162
RED
THERMOSTAT
657298
BLK 4
3
2
RED2
11
J2
BLK 4
33
2
RED 1
J1
WHT 2 1
WHT
SHLD
WHT
WHT
CONVERTER HEATER JACKET 655228
CONVERTER TEMPERATURE
SENSOR 655282
CABLE, DIAGNOSTICS 903032
WHT
RED
WHT
RED
DETECTOR
658160
THERMISTOR 655216
THERMOSTAT
PHOTODIODE SOCKET ASSEMBLY 655218
HEATERS
HEATER/THERMOSTAT ASSEMBLY 655235
OZONATOR
POWER
SUPPLY
657716
WHT
OZONATOR
659494
BLU
RED
YEL
CONVERTER
655250
SHLD
B
FAN 655245
1
2
3
4
5
6
7
8
B = YEL
C = RED
E = BLU
DRIVER BOARD
655620
J8
5
4
3
2
1
4
3
BRN 2
1
YEL
TRANSISTOR
2SD1308
E
655264
C
J4
BRN 2 1
J3
BRN
4
ORN 3
J9
ORN 2
1
J5
J12
3
12
J11
1
10
J2 10 2
J6
24
1
2
FAN 655245
FIGURE 2-4. CLD WIRING DIAGRAM
748410-A
August 1999
Chemiluminescense Detector Analyzer Module
Rosemount Analytical NGA 2000
11
2
INSTALLATION
8.4
[213]
4.1
[104]
8.2
[208]
.7
[18]
.8
[20]
1.5
[38]
2.5
[64]
.4
[10]
6.1
[155]
4.3
[109]
2.8
[71]
1.1
[28]
6.0
[152]
17.5
[445]
.5
1.3
[33]
[13]
4.1
[104]
.9
[23]
.9
[23]
Dimensions:
1.3
[33]
INCHES
[MM]
FIGURE 2-5. OUTLINE AND MOUNTING DIMENSIONS
12
Chemiluminescense Detector Analyzer Module
Rosemount Analytical NGA 2000
748410-A
August 1999
STARTUP AND OPERATION
3
3.1 OVERVIEW
Prior to initial startup, the user should leak test the module as outlined in Section 2.
For the remainder of this section, Analyzer Module interconnection with a Platform or some
interfacing component will be assumed. Display and Keypad information shall refer to that
which the user can expect to see and do with regard to the Front Panel of the Platform. (For
a complete description of Platform Front Panel controls and indicators, see Section 1 of the
Platform Components instruction manual.)
3.2 DISPLAYS
Three kinds of Display screens are available to the user (see Figures 3-1 through 3-6.):
•
Run Mode
•
Menu
•
Help
3.2.1 RUN MODE DISPLAY
The Run Mode is the normal mode of operation. In this mode, the Display will show current
gas measurement, the component of interest, the current operations of the softkeys, and a
graphic bar representing the displayed concentration as a percent of fullscale.
3.2.2 MENU DISPLAYS
The Menu structure enables the user to access data and functions, and put information onto
the network. From the Run Mode display, press the MENUS softkey to gain access to the
Main Menu.
The Main Menu (see Figure 3-2) is subdivided into three levels of control based generally on
which personnel is likely to use it: Basic Controls, Expert Controls and Setup, and Technical
Controls. (See Figures 3-3 through 3-5.) Many layers of the menu structure are described at
appropriate places throughout this manual.
From the Run Mode display, press the MENUS softkey to gain access to the Main Menu.
(See Figure 3-2.)
748410-A
August 1999
Chemiluminescense Detector Analyzer Module
Rosemount Analytical NGA 2000
13
3
STARTUP AND OPERATION
DISPLAY MESSAGE
DESCRIPTION
TYPE
BAROMETER
BLOCK FET
BLOCK THRESH
BLOK TEMP
CONV FET
CONV TEMP
CRUDE NOISE
LIN ERROR
N15 VOLTS
OZON PRES
P10 VOLTS
P12 VOLTS
P15 VOLTS
P24 VOLTS
P5 VOLTS
RAW SIGNAL
SAMP PRES
SVFLOW
PELT TEMP
SW ERROR
System Barometer
Heater Current
CLD Threshold Temperature
Block Temperature
Converter Heater Temperature
Converter Temperature
Calculated Noise
Linearizer Error
Power Supply, -15V
CLD Ozone Supply Pressure
Power Supply, +10V Ref
Power Supply, +12V
Power Supply, +15V
Power Supply, +24V
Power Supply, +5V
Raw Signal
Sample Pressure
Sample Bypass Flow
CLD Peltier Cooler Temperature
Software Error
WARNING
WARNING
WARNING
WARNING
WARNING
WARNING
WARNING
WARNING
WARNING
WARNING
WARNING
WARNING
WARNING
WARNING
WARNING
WARNING
WARNING
WARNING
FAILURE
FAILURE
TABLE 3-1. CLD ANALYZER MODULE ALARMS
3.2.3 HELP DISPLAYS
The Help structure is on-line "tutorial," context-sensitive and topic-interconnected, so that
the user can practically operate NGA 2000 without need of an instruction manual. Press the
INFO softkey for help. (See Figure 3-6.)
3.3 STARTUP PROCEDURE
Apply power to the CLD Analyzer Module. If it is associated with a Platform, do this by
plugging in the Platform to a power source. The Platform has no ON/OFF power button.
Once power has been supplied to the Platform, the CLD Analyzer Module will be energized.
If the user's system contains only one Analyzer Module, all system components, the
Controller Board and the network "self-install" (bind together) during initial startup. If the
system contains more than one Analyzer Module, the startup sequence will interrogate the
network to locate and identify all components on the network. The user will have to bind
appropriate combinations of components after the startup sequence.
14
Chemiluminescense Detector Analyzer Module
Rosemount Analytical NGA 2000
748410-A
August 1999
STARTUP AND OPERATION
3
After the warm-up period (about one hour for the CLD Analyzer Module), all modules are
completely functional. Establish that correct ozonator air pressure and sample flow rate are
within specifications (see the Specifications page in the Preface section of this manual).
Calibrate and adjust converter efficiency, and begin routine operation as the following
sections indicate.
3.4 BINDING
To achieve full coordination between Analyzer Modules and associated I/O Modules, the
user must bind those components together in the System Set Up portion of the Technical
Configuration Menu in software.
Analyzer PQ 322-14
23.2 ppm NO
0 ppm
50
Secondary Variable:
Secondary Variable:
Secondary Variable:
Secondary Variable:
Display
XXXX
XXX
XXXX
XXXX
Parms.
F1
F2
Menu
F3
Dual
F4
Info
F5
FIGURE 3-1. RUN MODE DISPLAY
23.2 ppm NO
Analyzer XXXXXXXX
Main Menu
Basic Controls
Expert controls and setup ...
(Operational configuration)
Technical level configuration ...
(Diagnostic and manufacturing/service)
Delete alarm message!
Display
F1
Parms.
F2
Info
F3
F4
F5
FIGURE 3-2. MAIN MENU DISPLAY
748410-A
August 1999
Chemiluminescense Detector Analyzer Module
Rosemount Analytical NGA 2000
15
3
STARTUP AND OPERATION
23.2 ppm NO
Analyzer XXXXXXXX
Basic Controls
Measurement range Numbers:
Range upper limit:
Range and functional control:
Calibration…
10 ppm
Local
Measurement mode:
Ozonator status:
NO
Powered
Status:
Home
Ready
NO/NOx
F1
F2
Zero
F3
Span
F4
Info
F5
FIGURE 3-3. BASIC CONTROLS MENU
23.2 ppm NO
Analyzer XXXXXXXX
Expert controls and setup
Expert analyzer controls ...
Auxiliary module controls ...
System set up ...
Analyzer module set up ...
Auxiliary module set up ...
Home
F1
Escape
F2
Info
F3
F4
F5
FIGURE 3-4. EXPERT CONTROLS AND SETUP MENU
23.2 ppm NO
Analyzer XXXXXXXX
Technical configuration menu
System set up ...
Service menus...
Diagnostic menus...
Other module diagnostic menus...
listing of all modules...
Status: normal
Home
F1
Info
F2
F3
F4
F5
FIGURE 3-5. TECHNICAL LEVEL CONFIGURATION MENU
16
Chemiluminescense Detector Analyzer Module
Rosemount Analytical NGA 2000
748410-A
August 1999
STARTUP AND OPERATION
23.2 ppm NO
3
Analyzer XXXXXXXX
Main Menu Help
The Main Menu for the analyzer system.
Note that this menu refers to the particular
analyzer selected from the run screen, when
used in a system. The softkey marked “HOME”
will always return you to this screen.
Help menu system...
Help on help...
Keyboard controls...
Editing controls...
Home
F1
Escape
F2
Map
F3
F4
F5
FIGURE 3-6. TYPICAL HELP SCREEN
3.5 CALIBRATION
Under the Expert Controls and Setup menu, use the ↓ arrow key to select Analyzer Module
Setup, then select Calibration Gas List. Input appropriate data here.
Under the Expert Controls and Setup menu, select Expert Analyzer Controls and then
Range Settings. Select the range that will be used during sample analysis.
Introduce zero gas into the SAMPLE INLET, and, after a stable reading is reached, do the
following:
1. If the multi-Analyzer Module, split Run Mode display is shown, use the arrow keys to
highlight the Analyzer Module to be calibrated and press the select key. The desired
Analyzer Module's Run Mode display is then shown.
2. Press the MENUS softkey to enter the Main Menu.
3. Make the following selections from the Main Menu: Expert Controls and Setup, Expert
Analyzer Controls, and Zero/Span Calibration.
4. Press the ZERO softkey to enter the Analyzer Zero menu.
5. Press the ZERO softkey and wait.
6. Introduce a suitable span gas into the SAMPLE INLET.
7. Press the SPAN to enter the Analyzer Span menu, press SPAN again and wait.
8. Press the HOME softkey to re-enter the Main Menu.
9. Press DISPLAY softkey for the Run Mode display.
748410-A
August 1999
Chemiluminescense Detector Analyzer Module
Rosemount Analytical NGA 2000
17
3
STARTUP AND OPERATION
It is recommended, after initial startup, that the CLD Analyzer Module is calibrated at least
once every eight hours. This practice should continue until experience indicates that some
other interval is more appropriate depending on the analytical accuracy required.
If the user is unable to calibrate the Analyzer Module (i.e., when ZERO or SPAN is initiated,
nothing happens), a possible solution relates to the use of an incorrect gas for zeroing or
spanning (e.g., using a high concentration gas to zero or a zero gas to span the Analyzer
Module). Simply recalibrating with the appropriate gas(es) will not correct the problem
because the ZERO OFFSET or SPAN FACTOR has been set to an extreme value in the
process.
To remedy the problem, do the following:
1. Select the following from the Main Menu: Expert Controls and Setup, Analyzer Module
Set Up, and Calibration Parameters.
2. Using the ↓ arrow, select Zero Ranges, press ENTER and, using the up/down arrows,
toggle to SEPARATE. Do the same for the Span Ranges selection. Do not press
ESCAPE at any time unless retention of prior settings is desired.
3. Return to the Main Menu and make the following selections: Expert Controls and Setup,
Expert Analyzer Controls, Zero/Span Calibration, FACTORS softkey, and Range 1 (2, 3,
4) Factors (do Steps 4 and 5 for each range).
4. Select Zero Offset, press ENTER, adjust the value to 32700 with the ↑ and ↓ arrow keys,
and press ENTER. Do not press ESCAPE at any time unless retention of prior settings is
desired.
5. Select Span Factor, press ENTER, adjust the value to 0.00015 with the ↑ and ↓ arrow
keys, and press ENTER. Do not press ESCAPE unless retention of prior settings is
desired.
6. Attempt to recalibrate the Analyzer Module according to the procedure outlined at the
beginning of Section 3.4. If recalibration fails, return to the Range Factors menu, readjust
Zero Offset and Span Factor values, and try calibrating again.
3.6 CONVERTER TEMPERATURE ADJUSTMENT PROCEDURE
The vitreous carbon converter used in this analyzer module must be checked periodically to
assure that it is working at peak efficiency. The efficiency of the converter is typically 95% to
98%, that is, 95% to 98% of the nitrogen dioxide introduced to the module is reduced to
nitric oxide. That is well above the 90% minimum required by the Environmental Protection
Agency. (Refer to 40 CFR 60, App. A, Method 20, Paragraph 5.6.)
Two conditions reduce the efficiency of the converter:
•
18
the converter is operating at too low a temperature and the efficiency drops or
Chemiluminescense Detector Analyzer Module
Rosemount Analytical NGA 2000
748410-A
August 1999
STARTUP AND OPERATION
•
3
the converter is operating at too high a temperature and the nitrogen dioxide is reduced
to nitrogen, which is not detectable by the chemiluminescence reaction.
Initially, an interval of one week between converter efficiency checks is recommended
because high temperature operation changes conditions inside the converter. The active
surface area of the vitreous carbon increases through use. Initially, when the surface area is
low, the temperature at which converter efficiency peaks is relatively high. This peak
temperature moves downscale as surface area increases, and less external energy is
required to cause adequate conversion.
The nominal range of converter operational temperatures is 300°C to 400°C (572°F to
752°F). The current converter temperature can be located in the Physical Measurement
menu by selecting the following from the Main Menu: Expert Controls and Setup, Analyzer
Module Setup and Physical Measurement Parameters.
Follow this procedure to optimize the operating temperature of the converter:
1. Power up the module and allow it to stabilize at operating temperature (about one hour).
2. Check the Converter Temperature in the Physical Measurements menu (as noted
above). Note the value for future reference.
3. Introduce a calibration gas of known (NO2) concentration into the analyzer and note the
concentration value determined when the full response has been achieved.
4. Change Converter Setpoint in the Temperature Control menu to 300°C by selecting the
following from the Main Menu: Technical Configuration Menu, Diagnostic Menus,
Analyzer Module Diagnostics, Temperature Control Parameters. Allow module 15
minutes to stabilize, recheck the concentration value and note the value for later use.
5. Increase the Converter Setpoint value by 20°C, wait 15 minutes, and note the
concentration value. Repeat this step until either a converter efficiency of between 95%
and 98% is obtained or the final 20°C increment produces an efficiency increase of less
than one percent.
6. Decrease the Converter Setpoint value by 5°C, which places the converter at a
temperature suitable for low ammonia interference and efficient NO2 conversion.
7. Recheck the Converter Temperature value in the Physical Measurements menu, and
compare it to the initially recorded value.
NOTE
Converter temperature is not a direct measure of converter efficiency.
Temperature measurement is for reference purposes only.
748410-A
August 1999
Chemiluminescense Detector Analyzer Module
Rosemount Analytical NGA 2000
19
3
STARTUP AND OPERATION
3.7 MEASUREMENT OF CONVERTER EFFICIENCY
It is the responsibility of the user to measure efficiency of the NO2-to-NO converter during
initial startup and thereafter at intervals appropriate to the application (normally once a
month).
The reactant material used in the converter provides the optimum combination of high
conversion efficiency and low ammonia interference. Unlike most competitive analyzers, the
NGA 2000 CLD Analyzer Module utilizes a reactant material that gradually becomes more
efficient at a given temperature. Thus, after a period of use, operation at a lower
temperature setpoint than initially required is certain.
3.7.1 TEST SETUP FOR MEASUREMENT OF CONVERSION EFFICIENCY
A typical setup for measurement of conversion efficiency is shown in Figure 3-7. The test
setup includes:
A cylinder of nitric oxide standard gas consisting of NO in N2
The concentration of NO in the standard gas should be about the fullscale value of the
range under test. The test sample supplied to the analyzer should contain a concentration of
NO comparable to that in the samples that are to be analyzed. Alternatively, a higher
concentration NO standard may be used if the test setup includes provision for diluting it
appropriately with zero air. Suitable standard gases are available from various suppliers.
Stainless steel cylinders are commonly used, but specially treated aluminum is preferred for
low parts-per-million NO samples.
An ozone generator utilizing an ultraviolet lamp, not a corona discharge
A corona discharge ozone generator is undesirable because it may produce oxygen atoms,
which can then combine with atmospheric nitrogen to form NO. The result can be an
erroneously high value for the measured conversion efficiency.
3.7.2 TEST PROCEDURE
1. Measure converter temperature in the sub-menu structure as described in Section 3.6.
Note present reading as a reference for comparison with subsequent readings.
2. Lower converter temperature to 300°C as described in Section 3.5, Step 4, and wait 15
minutes for temperature equilibration.
3. (See Figure 3-7) Connect the Model 958 Converter Efficiency Tester to the CLD Module,
and follow Steps 4 through 17 below (as adapted from 40 CFR 60):
4. Attach the NO/N2 supply to C2, the air supply to C1, and the CLD Module inlet fitting to
C3.
5. With the variable transformer off, switch the CLD Module to NO mode, and close valve
MV1.
20
Chemiluminescense Detector Analyzer Module
Rosemount Analytical NGA 2000
748410-A
August 1999
STARTUP AND OPERATION
3
6. Open valve MV2 until the CLD Module SAMPLE Pressure Gauge reaches operating
pressure and the BYPASS flowmeter indicates some bypass flow. Wait until stable
readings are obtained by the CLD Module.
7. Zero and span the Analyzer output to indicate the value of the NO concentration being
used. This value should be about 80% of fullscale. Record this concentration.
8. Open valve MV1 (air supply metering valve) and adjust to blend enough air to lower the
NO concentration (as noted above) about 10%. Record this concentration.
9. Power up the ozonator, and increase its supply voltage until the NO concentration noted
in Step 8 is reduced to about 20 percent of the concentration noted in Step 7. Wait for
stabilization. NO2 is now being formed from the NO + O3 reaction. There must always be
at least 10 percent unreacted NO at this point. Record this concentration.
10. Switch the CLD Module to NOx mode. Total NOx concentration is now output to the
network for display. Record this concentration.
11. Turn off the ozonator, and allow the Analyzer reading to stabilize. Total NOx
concentration of the dilute NO span gas initially used is displayed. Record this
concentration.
12. Close valve MV1. The NO concentration should be equal to or greater than the reading
in Step 7. This indicates whether the NO contains any NO2.
13. Calculate the efficiency of the NO converter by substituting the concen-trations obtained
during the test in the equation below:
% Efficiency =
1+
a-b
c-d
100
Where:
a = recorded concentration in Step 10
b = recorded concentration in Step 11
c = recorded concentration in Step 8
d = recorded concentration in Step 9
In the example in Figure 3-7B, the following calculations would apply:
% Efficiency = 1 +
80 - 85
80 - 20
100 = 92%
Efficiency checks should be made on each analyzer range, using an NO span gas
concentration appropriate to the instrument range.
748410-A
August 1999
Chemiluminescense Detector Analyzer Module
Rosemount Analytical NGA 2000
21
3
STARTUP AND OPERATION
NOTE
In the initial measurement, after lowering the temperature setpoint in Step 2, the
efficiency will normally be less than 92%.
14. Reset converter temperature setpoint 20°C higher, wait 15 minutes for temperature
equilibration, and measure conversion efficiency by repeating Steps 3 through 13.
Conversion efficiency should be improved.
15. Repeat Step 14 until: a) 95% to 98% efficiency is attained or b) the final 20°C converter
temperature adjustment yields an increase in efficiency of less than 1%.
16. Reset converter temperature setpoint 5°C lower. Converter temperature is now set to the
front edge of the plateau on the efficiency-vs.-temperature curve. (See Figure 3-8.) This
setting should provide the optimum combination of high conversion efficiency and low
ammonia interference.
17. Wait 15 minutes for temperature equilibration, and check converter temperature.
Compare present temperature with original value. Normally, converter temperature
should be in the range of 300°C to 400°C (572°F to 752°F).
3.7.3 SUBNORMAL CONVERSION EFFICIENCY
If a measured conversion efficiency of between 95% and 98% is unobtainable within the
normal temperature range, the most probable cause is depletion of the catalytic material
within the converter.
However, before concluding that the converter is defective, ensure that the conversion
efficiency measurement is accurate. Though the measured efficiency is less than the 95% to
98% range, the actual efficiency may be somewhat higher.
An apparent subnormal efficiency can be due to a problem external to the Analyzer Module,
perhaps located either within the test setup or between it and the Analyzer Module. Check
the following:
1. Leakage.
2. Loss of NO2 between test setup and Analyzer Module. Such loss can occur by reaction
with a rubber diaphragm in a pressure regulator or flow controller. Stainless steel
diaphragms are preferred. Loss can also occur during passage through filter media.
22
Chemiluminescense Detector Analyzer Module
Rosemount Analytical NGA 2000
748410-A
August 1999
STARTUP AND OPERATION
3
A. TYPICAL TEST SETUP
CONNECTOR C3
T1
OFF
FLOWMETER
FM2
115
VAC
ON
VARIABLE
TRANSFORMER
METERING
VALVE MV2
TO SAMPLE
INLET OF
CLD ANALYZER
MODULE
OZONATOR
UTILIZING
ULTRAVIOLET
LAMP
FLOW APPROXIMATELY
3 LITERS PER MINUTE
FLOWMETER
FM1
METERING
VALVE MV1
CONNECTOR
C2
CONNECTOR
C2
CONNECTOR
C1
STANDARD GAS:
NO IN N2 BACKGROUND
CAUTION: Externally limit sample
flow rate to less than 2200 cc/min.
ZERO AIR
ALL LINES AND FITTINGS STAINLESS STEEL OR TEFLON
B. TYPICAL TEST RESULTS
90
85
NO in
N2
a-b
OZONATOR OFF
AIR ADDED
80
OZONATOR
ON
c
c-d
a
b
(
a-b
% Efficiency = 100 1+
c-d
)
20
d
TO NOX
MODE
0
NO Mode
NOx Mode
FIGURE 3-7. MEASURING EFFICIENCY OF NO2 TO NO CONVERTER
748410-A
August 1999
Chemiluminescense Detector Analyzer Module
Rosemount Analytical NGA 2000
23
3
STARTUP AND OPERATION
About 97%
Final 2 degree
higher adjustment
Final 1 degree lower
adjustment
Converter
Efficiency
Converter Temperature
FIGURE 3-8. CONVERSION EFFICIENCY AS A FUNCTION OF CONVERTER
TEMPERATURE
3.7.4 REPLACEMENT OF CONVERTER
If the subnormal conversion efficiency is real, and not due to measurement error introduced
by the test setup, the converter must be replaced. See Section 4.
The usual cause of converter failure is destruction of a large part of the catalytic material by
excessive heat. This is due either to an excessively high temperature setpoint or failure of
the converter temperature control circuitry.
3.7.5 CAPILLARIES
Replacement vent and pump capillaries should be installed finger-tight. Use of a wrench can
constrict capillaries, thus changing flow rate. Sample capillary is metal; use a wrench for
tightening.
3.7.6 TEA SCRUBBER
The presence of NO2 in the NO cylinders can cause inaccurate converter efficiency values.
The TEA Scrubber accessory (P/N NL635741) can be used to remove residual NO2 from
the NO cylinders. Use of this accessory allows an NO2-free NO calibration gas.
24
Chemiluminescense Detector Analyzer Module
Rosemount Analytical NGA 2000
748410-A
August 1999
STARTUP AND OPERATION
3
3.8 ROUTINE OPERATION
The CLD Analyzer Module is designed to continuously analyze the sample stream.
Normally, it is never powered off except for servicing or for a prolonged shutdown.
Maximum permissible interval between calibrations depends on the analytical accuracy
required, and therefore cannot be specified. Initially, the instrument should be calibrated at
least once every eight hours. This practice should continue until experience indicates that
some other interval is more appropriate.
The Analyzer Module will not allow the user to increase the upper limit of a range beyond
the maximum range software setting. To change the Maximum Range value, select the
following from the Main Menu: Technical Configuration Menu, Service Menu, Manufacturing
Data, and Analyzer Module Data. Select Maximum Range, and use the arrow keys to scroll
the indicated value. The same applies for the Minimum Range value.
748410-A
August 1999
Chemiluminescense Detector Analyzer Module
Rosemount Analytical NGA 2000
25
3
STARTUP AND OPERATION
NOTES
26
Chemiluminescense Detector Analyzer Module
Rosemount Analytical NGA 2000
748410-A
August 1999
MAINTENANCE AND TROUBLESHOOTING
4
WARNING: ELECTRICAL SHOCK HAZARD
Disconnect power to the module(s) prior to replacing components.
This equipment should not be adjusted or repaired by anyone except properly
qualified service personnel.
4.1 OVERVIEW
The CLD Analyzer Module requires very little maintenance during normal operation.
Occasionally, the intake fan screen may require cleaning, refer to Section 4.3.
Also, the detector's reaction chamber and sapphire window may require cleaning, refer to
Section 4.7.
White crystal deposits on the windows of the reaction chamber and plugging of capillaries
and vent are usually due to sample contaminates such as ammonia reacting with the high
ozone levels and NO components. To eliminate the contaminates, the sampling system
should be reworked or a preventive maintenance program developed (if dropout is not
excessive). Another source of crystalline formation is contaminated air.
Several components may require replacement. These are discussed in the following
sections.
4.2 FUSES
The main power fuse may require replacement.
NOTE
Before replacing the fuse, remove power to the Analyzer Module.
See Figure 1-2 for the location of the Power Supply Board main power fuse, which protects
24 VDC input to the module.
748410-A
August 1999
Chemiluminescense Detector Analyzer Module
Rosemount Analytical NGA 2000
27
4
MAINTENANCE AND TROUBLESHOOTING
NO/NOx Solenoid
655263
Ozonator
659494
Thermostat
657298
Converter Assembly 655250
See Figure 4-2
Transistor
655264
Flow Sensor
902931
Driver
Board
655620
PCB Insulators
1
Fan Guard
Glass Tube
Connectors
Pressure Switch 655215
EMI Shield
Ozonator Power Supply
657716
Fan Guard
Signal
Board
655580
Sample
Pressure
Sensor
655253
Ozone 3
Pressure
Sensor
655254
Insulator
Fan
2
655245
Detector Assembly 658160
See Figure 4-3
Computer Analysis
Board 655520
Detector Case
Insulator
Power Supply
Board 657520
Flow Balance
Metering Valve
903207
Sample
Regulator
655269
Fuse, Power
903347
LON/Power
Module
3
Ground wires from ozonator shown.
2
Flow direction of intake fan (shown) is into case. Flow direction of exhaust fan is out of case.
1 Fan guard between fan and EMI filter is on the intake fan only (shown).
FIGURE 4-1. CLD MODULE ASSEMBLY
28
Chemiluminescense Detector Analyzer Module
Rosemount Analytical NGA 2000
748410-A
August 1999
MAINTENANCE AND TROUBLESHOOTING
4
4.3 FANS
Refer to Figure 4-1. To replace either rear panel fan, remove the cover of the Analyzer
Module and then the rear panel. Disconnect connectors and remove screws. Assemble in
reverse order.
4.4 CONVERTER
Refer to Figures 4-1 and 4-2. To replace the converter or sensor, disconnect the two
pneumatic tubes and two electrical connections. Unlace the heater blanket, and remove the
converter. Reassemble in reverse order, ensuring that the converter is oriented with the
glass cloth at the bottom and the sensor is oriented correctly inside the heater jacket.
ASSEMBLED SIDE VIEW
Sensor
Heater
Jacket
655228
Converter
Tube 655227
Glass
Cloth
Wrap with
aluminum foil
Sensor
655282
FIGURE 4-2. CONVERTER ASSEMBLY
748410-A
August 1999
Chemiluminescense Detector Analyzer Module
Rosemount Analytical NGA 2000
29
4
MAINTENANCE AND TROUBLESHOOTING
4.5 OZONATOR
Refer to Figure 4-1.To replace the ozonator, remove the two large straps and all tie-wraps,
and disconnect the one electrical connection. Reassemble in reverse order.
4.6 PRINTED CIRCUIT BOARDS
All four printed circuit boards can be replaced, if necessary. Refer to Figure 4-1 for location
of the Driver, Power Supply, Signal and Computer Boards.
To remove any PCB (except the Computer Board), disassemble the enclosure side first.
Ribbon and other cables are long enough to allow the entire side to be folded out from the
remainder of the components. This makes PCB removal much simpler.
Tag each connector and its location before disconnecting any wiring. This helps in
reassembly.
4.7 DETECTOR DISASSEMBLY
Refer to Figure 4-3.
Reaction Chamber Removal
Disconnect the stainless steel tubing lines at the Gyrolok fittings. Remove the (4) nuts
holding the Detector Assembly to the chassis. Disconnect the plug from connector J1 on
the Signal Board and remove the assembly from the chassis.
NOTE
Care should be taken to avoid getting heatsink compound on optical surfaces.
If this substance is removed during the disassembly process, a
zinc-oxide-filled, silicone grease (e.g., Dow Corning 340 or EG&G Wakefield
Engineering's Series 120 Thermal Joint Compound) be reapplied in the
reassembly of this component.
Although the heater and thermostat can be removed to facilitate handling, contact with the
white heatsink compound can be minimized by leaving these items in place. Remove the (2)
screws holding the top plate of the Detector , and move the plate along the wires and away
from the Detector .
Remove the (2) screws holding the tube assembly in place. Hold the tubing with one hand
while inverting the Detector Housing with the other, allowing the Reaction Chamber O-ring
and window to be removed from below.
30
Chemiluminescense Detector Analyzer Module
Rosemount Analytical NGA 2000
748410-A
August 1999
MAINTENANCE AND TROUBLESHOOTING
4
Reaction Chamber Installation
To reinstall, hold the housing in the inverted position while sliding the Reaction Chamber
O-ring and window into position and the tubing into the slot in the housing. Hold the
Reaction Chamber in place while rotating the housing upright. Replace the hold-down
screws.
NOTE
The procedure described above is for the purpose of maintaining the relative
positions of windows and O-ring to the Reaction Chamber during installation.
Replace the top cap and screws. Reverse the removal procedure to reinstall the Detector
Assembly into the Analyzer Module.
Photodiode Removal
Remove the Detector Assembly as described above. Invert the housing to access the
mounting bracket. Remove the (3) screws and shoulder washers from the bracket. Remove
the bracket, insulating disk and bottom plate as a unit to minimize the spread of the heatsink
compound.
Remove the (2) screws holding the lower section of the Detector Housing, then slide the
section along the cable and remove.
Remove the (2) screws holding the socket, thermistor and photodiode in place, being
careful not to lose the washers that are used as shims.
Grasp the socket and photodiode base while slowly rotating to separate the photodiode
from the housing. Some friction will be felt as an O-ring is used around the photodiode as a
seal.
Photodiode Installation
To replace the photodiode, carefully remove the diode from the green socket, and replace
with a new one. Before mounting the new diode, the top cap of the enclosure should be
temporarily removed and the (2) screws holding the Reaction Chamber loosened about two
turns. This allows air which is trapped between the O-ring seals to escape when the diode is
inserted. It also maintains the position of the O-ring and window in the upper compartment.
The new photodiode should be slowly inserted into the housing while gradually rotating the
body. This allows the O-ring to properly seat. Continue replacing screws, washers,
thermistors, etc., with the thicker shim (washer) on the opposite side of the socket from the
thermistor.
748410-A
August 1999
Chemiluminescense Detector Analyzer Module
Rosemount Analytical NGA 2000
31
4
MAINTENANCE AND TROUBLESHOOTING
Replace the lower section of the housing, then the bottom cover, insulator and bracket with
the shoulder washers and screws.
Re-tighten the screws in the Reaction Chamber (upper section). Replace the top cap and its
screws.
To reinstall in the Analyzer Module, reverse the procedure for removal as indicated above.
32
Chemiluminescense Detector Analyzer Module
Rosemount Analytical NGA 2000
748410-A
August 1999
MAINTENANCE AND TROUBLESHOOTING
4
Sapphire
Window
Reaction
Chamber
Photodiode
Thermistor
Assembly
Sample
Ozone
Photodiode Socket
Assembly
Exhaust
M3X0.5 x 25mm Screw (2)
3mm Spring Washer (2)
Detector Mounting
Bracket
Detector Header
Heater*
Heater*
Retainer Gasket
M3X0.5 x 16mm Screw (2)
3mm Spring Washer (2)
Thermostat*
Reaction Chamber
O-Ring 854540
Tubing Cover
Sapphire Window
Cushioning Gasket
O-Ring 876478
Photodiode
Cable
Lower Cover
Photodiode Assembly
(see detail below)
M3X0.5 x 20mm Screw (2)
3mm Spring Washer (2)
Insulator
(between Lower Cover
and Mounting Bracket)
Nylon Shoulder
Washers (3)
Detector Cover
M3X0.5 x 16mm
Screw (3)
Photodiode Case
Ground
M3X0.5 x 16mm Screw (2)
3mm Spring Washer (2)
*Heater/Thermostat Assembly 655235.
Photodiode
655258
Thermistor
655216
Thermistor Shim
Thermistor Spacer
No. 6 Flat Washer (2)
Photodiode Socket Assembly
Assembly of Photodiode
FIGURE 4-3. DETECTOR ASSEMBLY
748410-A
August 1999
Chemiluminescense Detector Analyzer Module
Rosemount Analytical NGA 2000
33
4
MAINTENANCE AND TROUBLESHOOTING
NOTES
34
Chemiluminescense Detector Analyzer Module
Rosemount Analytical NGA 2000
748410-A
August 1999
REPLACEMENT PARTS
5
CAUTION: PARTS INTEGRITY
Tampering with or unauthorized substitution of components may adversely
affect safety of this product. Use only factory-approved components for repair.
5.1 REPLACEMENT PARTS
NL655215
NL655245
NL655250
NL655253
NL655254
NL655263
NL655264
NL655269
NL659063
NL655287
NL655520
NL655580
NL655620
NL657298
NL657473
NL657520
NL657716
NL659494
NL658157
NL659657
NL659658
NL659753
NL659754
NL902931
NL903207
NL903347
748410-A
August 1999
Pressure Switch
Fan (Exhaust and Intake)
Converter (see below)
Sample Pressure Sensor
Ozone Pressure Sensor
NO/NOx Solenoid
Transistor Assembly
Regulator, Back Pressure – Brass/Neoprene
Regulator, Back Pressure – Stainless Steel/Viton
Prom
Computer Board
Signal Board
Driver Board
Thermostat 80°C
Pump Capillary
Power Supply Board
Ozonator Power Supply
Ozone Generator
Air Restrictor 430 cc/min 12 psig
Sample Capillary 70 cc/min. 5 psig
Sample Capillary 200 cc/min. 5 psig
Detector 70 cc/min.
Detector 200 cc/min.
Flow Sensor
Metering Valve
Fuse, Main Power 6A 250V
Chemiluminescense Detector Analyzer Module
Rosemount Analytical NGA 2000
35
5
REPLACEMENT PARTS
655250 CONVERTER REPLACEMENT PARTS
NL655228
NL655227
NL655282
Heater Jacket
Tube, Aged
Temperature Sensor
659753, 659754 DETECTOR REPLACEMENT PARTS
NL655235
NL655216
NL655258
NL854540
NL876478
36
Heater/Thermostat Assembly
Thermistor
Photodiode
O-Ring, Viton .739ID .875OD
O-Ring, Viton .737ID .943OD
Chemiluminescense Detector Analyzer Module
Rosemount Analytical NGA 2000
748410-A
August 1999
CLD IDENTIFICATION MATRIX
A
Each analyzer is configured per the customer sales order. Below is the CLD sales matrix
which lists the various configurations available.
To identify the configuration of an analyzer, locate the analyzer name-rating plate. The 12position sales matrix identifier number appears on the analyzer name-rating plate.
C
CHEMILUMINESCENCE NO/NOx ANALYZER - CLD
Code Language
A
English
X
Special
Code
A10
A20
B10
B20
C10
C20
Configuration Identifier
Calibrated Low Ranges: 0-10, 0-25, 0-100, 0-250 ppm
Calibrated High Ranges: 0-250, 0-1000, 0-2500, 0-10000
Calibrated Low Ranges: 0-10, 0-30, 0-100, 0-300 ppm
Calibrated High Ranges: 0-300, 0-1000, 0-3000, 0-10000 ppm
Calibrated Low Ranges: 0-10, 0-50, 0-100, 0-500 ppm
Calibrated High Ranges: 0-500, 0-1000, 0-5000, 0-10000 ppm
Code Materials
A00 Brass and Neoprene Back Pressure Regulator
B00 Stainless Steel and Viton Back Pressure Regulator
Brass and Neoprene Back Pressure Regulator with
Sample Inlet
C00
Restrictor (Recommended if External Flow Control Device
is not used.)
Stainless Steel and Viton Back Pressure Regulator with
Sample Inlet
D00
Restrictor (Recommended if External Flow Control Device
is not used.)
ZZZZ
C
748410-A
August 1999
A
A10
A00
ZZZZ
No Selection
Example
Chemiluminescense Detector Analyzer Module
Rosemount Analytical NGA 2000
A1
A
CLD IDENTIFICATION MATRIX
NOTES
A2
Chemiluminescense Detector Analyzer Module
Rosemount Analytical NGA 2000
748410-A
August 1999
GENERAL PRECAUTIONS FOR HANDLING AND
STORING HIGH PRESSURE GAS CYLINDERS
Edited from selected paragraphs of the Compressed
Gas Association's "Handbook of Compressed Gases"
published in 1981
Compressed Gas Association
1235 Jefferson Davis Highway
Arlington, Virginia 22202
Used by Permission
1. Never drop cylinders or permit them to strike each other violently.
2. Cylinders may be stored in the open, but in such cases, should be protected against
extremes of weather and, to prevent rusting, from the dampness of the ground. Cylinders
should be stored in the shade when located in areas where extreme temperatures are
prevalent.
3. The valve protection cap should be left on each cylinder until it has been secured
against a wall or bench, or placed in a cylinder stand, and is ready to be used.
4. Avoid dragging, rolling, or sliding cylinders, even for a short distance; they should be
moved by using a suitable hand-truck.
5. Never tamper with safety devices in valves or cylinders.
6. Do not store full and empty cylinders together. Serious suckback can occur when an
empty cylinder is attached to a pressurized system.
7. No part of cylinder should be subjected to a temperature higher than 125°F (52°C). A
flame should never be permitted to come in contact with any part of a compressed gas
cylinder.
8. Do not place cylinders where they may become part of an electric circuit. When electric
arc welding, precautions must be taken to prevent striking an arc against the cylinder.
Rosemount Analytical Inc.
4125 EAST LA PALMA AVENUE • ANAHEIM, CALIFORNIA 92807-1802 • 714-986-7600 • FAX 714-577-8006
JULY 1997 • 748525-C • PRINTED IN USA
(blank)
WARRANTY
Goods and part(s) (excluding consumables) manufactured by Seller are warranted to be free from
defects in workmanship and material under normal use and service for a period of twelve (12)
months from the date of shipment by Seller. Consumables, glass electrodes, membranes, liquid
junctions, electrolyte, o-rings, etc., are warranted to be free from defects in workmanship and
material under normal use and service for a period of ninety (90) days from date of shipment by
Seller. Goods, part(s) and consumables proven by Seller to be defective in workmanship and/or
material shall be replaced or repaired, free of charge, F.O.B. Seller's factory provided that the goods,
part(s) or consumables are returned to Seller's designated factory, transportation charges prepaid,
within the twelve (12) month period of warranty in the case of goods and part(s), and in the case of
consumables, within the ninety (90) day period of warranty. This warranty shall be in effect for
replacement or repaired goods, part(s) and the remaining portion of the ninety (90) day warranty in
the case of consumables. A defect in goods, part(s) and consumables of the commercial unit shall
not operate to condemn such commercial unit when such goods, part(s) and consumables are
capable of being renewed, repaired or replaced.
The Seller shall not be liable to the Buyer, or to any other person, for the loss or damage directly or
indirectly, arising from the use of the equipment or goods, from breach of any warranty, or from any
other cause. All other warranties, expressed or implied are hereby excluded.
IN CONSIDERATION OF THE HEREIN STATED PURCHASE PRICE OF THE GOODS, SELLER
GRANTS ONLY THE ABOVE STATED EXPRESS WARRANTY. NO OTHER WARRANTIES ARE
GRANTED INCLUDING, BUT NOT LIMITED TO, EXPRESS AND IMPLIED WARRANTIES OR
MERCHANTABILITY AND FITNESS FOR A PARTICULAR PURPOSE.
Limitations of Remedy. SELLER SHALL NOT BE LIABLE FOR DAMAGES CAUSED BY DELAY IN
PERFORMANCE. THE SOLE AND EXCLUSIVE REMEDY FOR BREACH OF WARRANTY SHALL
BE LIMITED TO REPAIR OR REPLACEMENT UNDER THE STANDARD WARRANTY CLAUSE. IN
NO CASE, REGARDLESS OF THE FORM OF THE CAUSE OF ACTION, SHALL SELLER'S
LIABILITY EXCEED THE PRICE TO BUYER OF THE SPECIFIC GOODS MANUFACTURED BY
SELLER GIVING RISE TO THE CAUSE OF ACTION. BUYER AGREES THAT IN NO EVENT
SHALL SELLER'S LIABILITY EXTEND TO INCLUDE INCIDENTAL OR CONSEQUENTIAL
DAMAGES. CONSEQUENTIAL DAMAGES SHALL INCLUDE, BUT ARE NOT LIMITED TO, LOSS
OF ANTICIPATED PROFITS, LOSS OF USE, LOSS OF REVENUE, COST OF CAPITAL AND
DAMAGE OR LOSS OF OTHER PROPERTY OR EQUIPMENT. IN NO EVENT SHALL SELLER BE
OBLIGATED TO INDEMNIFY BUYER IN ANY MANNER NOR SHALL SELLER BE LIABLE FOR
PROPERTY DAMAGE AND/OR THIRD PARTY CLAIMS COVERED BY UMBRELLA INSURANCE
AND/OR INDEMNITY COVERAGE PROVIDED TO BUYER, ITS ASSIGNS, AND EACH
SUCCESSOR INTEREST TO THE GOODS PROVIDED HEREUNDER.
Force Majeure. Seller shall not be liable for failure to perform due to labor strikes or acts beyond
Seller's direct control.
Rosemount Analytical
Rosemount Analytical Inc.
4125 EAST LA PALMA AVENUE • ANAHEIM, CALIFORNIA 92807-1802 • 714-986-7600 • FAX 714-577-8006
FEBRUARY 1997 • 7485189-C • PRINTED IN USA
(blank)
FIELD SERVICE AND REPAIR FACILITIES
Field service and repair facilities are located worldwide.
U.S.A.
To obtain field service on-site or assistance with a service problem, contact (24 hours, 7
days a week):
National Response Center
1-800-654-7768
INTERNATIONAL
Contact your local Rosemount Sales and Service office for service support.
FACTORY
For order administration, replacement Parts, application assistance, on-site or factory repair,
service or maintenance contract information, contact:
Rosemount Analytical Inc.
Process Analytical Division
Customer Service Center
1-800-433-6076
RETURNING PARTS TO THE FACTORY
Before returning parts, contact the Customer Service Center and request a Returned
Materials Authorization (RMA) number. Please have the following information when you call:
Model Number, Serial Number, and Purchase Order Number or Sales Order Number.
Prior authorization by the factory must be obtained before returned materials will be
accepted. Unauthorized returns will be returned to the sender, freight collect.
When returning any product or component that has been exposed to a toxic, corrosive or
other hazardous material or used in such a hazardous environment, the user must attach an
appropriate Material Safety Data Sheet (M.S.D.S.) or a written certification that the material
has been decontaminated, disinfected and/or detoxified.
Return to:
Rosemount Analytical Inc.
4125 East La Palma Avenue
Anaheim, California 92807-1802
Rosemount Analytical Inc.
4125 EAST LA PALMA AVENUE • ANAHEIM, CALIFORNIA 92807-1802 • 714-986-7600 • FAX 714-577-8006
JULY 1997 • 748190-G • PRINTED IN USA
(blank)
INSTRUCTIONS 015-748335-B
Rosemount Analytical
SAMPLE INLET FLOW RATE RESTRICTION
FOR NGA 2000 CLD ANALYZER MODULE
NOTICE
CAUTION
EXTERNALLY RESTRICT SAMPLE FLOW TO LESS THAN 2200 CC/MIN.
RESTRICTOR IS PROVIDED IN THE SAMPLE INLET OF THIS MODULE. FOR THOSE
USERS WHO CANNOT EXTERNALLY LIMIT SAMPLE FLOW, ACCESSORY RESTRICTOR PN
TO OBTAIN THIS
657300 IS AVAILABLE FROM ROSEMOUNT ANALYTICAL.
ACCESSORY, CALL 800-441-7245.
NO
Rosemount Analytical Inc.
4125 East La Palma Avenue • Anaheim, California 92807-1802 • (714) 986-7600 • FAX (714) 577-8006
June 1997
015-748335-B
Printed in U.S.A.
(blank)
INSTRUCTIONS 015-748430-A
Rosemount Analytical
ADDENDUM
CLD INSTRUCTION MANUAL 748410
This addendum serves as an amendment to the CLD Instruction Manual 748410. The
following information should be considered part of the manual, and supersedes any
conflicting information in the body of the manual.
Read this information and note the conflicts.
MENU DISPLAYS
Menu: 0 MAIN
Menu: 1 ANALSET
Rosemount Analytical Inc.
4125 EAST LA PALMA AVENUE • ANAHEIM, CALIFORNIA 92807-1802 • (714) 986-7600 • FAX: (714) 577-8006
AUGUST 1999 • 015-748430-A • PRINTED IN USA
ADDENDUM
Menu: 2 FLOCHEK
Menu: 3 ZEROI1
Menu: 4 FLOCHEKI1
2 of 44
Rosemount Analytical
August 1999
748430-A
ADDENDUM
Menu: 5 ANALOPI1
Menu: 6 ACALSET
Menu: 7 APARLST
748430-A
August 1999
Rosemount Analytical
3 of 44
ADDENDUM
Menu: 8 ANALSETI1
Menu: 9 CALLIST
Menu: 10 CALLISTI1
4 of 44
Rosemount Analytical
August 1999
748430-A
ADDENDUM
Menu: 11 ACALSETI1
Menu: 12 APARLSTI1
Menu: 13 AMMAN
748430-A
August 1999
Rosemount Analytical
5 of 44
ADDENDUM
Menu: 14 AMMANI1
Menu: 15 AMSVC
Menu: 16 AMSVCI1
6 of 44
Rosemount Analytical
August 1999
748430-A
ADDENDUM
Menu: 17 ADIAG
Menu: 18 AMPWR
Menu: 19 AM1V
748430-A
August 1999
Rosemount Analytical
7 of 44
ADDENDUM
Menu: 20 AMTEMP
Menu: 21 AMMISC
Menu: 22 AMTREND
8 of 44
Rosemount Analytical
August 1999
748430-A
ADDENDUM
Menu: 23 ADIAGI1
Menu: 24 RANGESETAM
Menu: 25 RANGESSETI1
748430-A
August 1999
Rosemount Analytical
9 of 44
ADDENDUM
Menu: 26 LINRANGE1
Menu: 27 LINRANGE2
Menu: 28 LINRANGE3
10 of 44
Rosemount Analytical
August 1999
748430-A
ADDENDUM
Menu: 29 LINRANGE4
Menu: 30 LINRANGE0
Menu: 31 AMPWRI1
748430-A
August 1999
Rosemount Analytical
11 of 44
ADDENDUM
Menu: 32 FLOCHEK1I1
Menu: 33 FILTER
Menu: 34 NONOXEFFIC
12 of 44
Rosemount Analytical
August 1999
748430-A
ADDENDUM
Menu: 35 AM1VI1
Menu: 36 AMTEMPI1
Menu: 37 AM2VA
748430-A
August 1999
Rosemount Analytical
13 of 44
ADDENDUM
Menu: 38 PLIMITSA
Menu: 39 TLIMITSA
Menu: 40 AMMISCI1
14 of 44
Rosemount Analytical
August 1999
748430-A
ADDENDUM
Menu: 41 NONOXEFFICI1
Menu: 42 ANALSIMPLE
Menu: 43 FILTERI1
748430-A
August 1999
Rosemount Analytical
15 of 44
ADDENDUM
Menu: 44 LINRANGE0I1
Menu: 45 PLIMITSAI1
Menu: 46 CALFACTORS
16 of 44
Rosemount Analytical
August 1999
748430-A
ADDENDUM
Menu: 47 AMHELPINDEX
Menu: 48 LINRANGE1I1
Menu: 49 CALFACTORSI1
748430-A
August 1999
Rosemount Analytical
17 of 44
ADDENDUM
Menu: 50 CALLIST2
Menu: 51 APARLST2
Menu: 52 APARLST4
18 of 44
Rosemount Analytical
August 1999
748430-A
ADDENDUM
Menu: 53 APARLST5
Menu: 54 APARLST6
Menu: 55 APARLST7
748430-A
August 1999
Rosemount Analytical
19 of 44
ADDENDUM
Menu: 56 LISTNOTES
Menu: 57 AMMISC2
Menu: 58 AMMISCI2
20 of 44
Rosemount Analytical
August 1999
748430-A
ADDENDUM
Menu: 59 MPARMS
Menu: 60 MPARMS2
Menu: 61 DISPLAY
748430-A
August 1999
Rosemount Analytical
21 of 44
ADDENDUM
Menu: 62 ANALSET2
Menu: 63 AMHELPINDEX2
Menu: 64 MPARMSI1
22 of 44
Rosemount Analytical
August 1999
748430-A
ADDENDUM
Menu: 65 AMPWR2
Menu: 66 ANALSETI2
Menu: 67 AMMISC3
748430-A
August 1999
Rosemount Analytical
23 of 44
ADDENDUM
Menu: 68 SOFT_DIAGS
Menu: 69 CALI1
Menu: 70 AM2VB
24 of 44
Rosemount Analytical
August 1999
748430-A
ADDENDUM
Menu: 71 LINFUNCT
Menu: 72 POLYSETUP
Menu: 73 MIDPOINT1
748430-A
August 1999
Rosemount Analytical
25 of 44
ADDENDUM
Menu: 74 POLYGAS1
Menu: 75 POLYSETI1
Menu: 76 POLYGAS2
26 of 44
Rosemount Analytical
August 1999
748430-A
ADDENDUM
Menu: 77 POLYGAS3
Menu: 78 POLYGAS4
Menu: 79 POLYGAS5
748430-A
August 1999
Rosemount Analytical
27 of 44
ADDENDUM
Menu: 80 POLYGAS6
Menu: 81 POLYGAS7
Menu: 82 POLYGAS8
28 of 44
Rosemount Analytical
August 1999
748430-A
ADDENDUM
Menu: 83 POLYGAS9
Menu: 84 POLYGAS0
Menu: 85 MIDPOINT2
748430-A
August 1999
Rosemount Analytical
29 of 44
ADDENDUM
Menu: 86 MIDPOINT3
Menu: 87 MIDPOINT4
Menu: 88 EXP_CAL
30 of 44
Rosemount Analytical
August 1999
748430-A
ADDENDUM
Menu: 89 EXP_CAL_DAT
Menu: 90 EXP_CAL_DATI
Menu: 91 UNITS
748430-A
August 1999
Rosemount Analytical
31 of 44
ADDENDUM
Menu: 92 UNITSI1
Menu: 93 POLYSETI2
Menu: 94 POLYSETI3
32 of 44
Rosemount Analytical
August 1999
748430-A
ADDENDUM
Menu: 95 ZEROI3
Menu: 96 TWEAKI1
Menu: 97 ANALSETI3
748430-A
August 1999
Rosemount Analytical
33 of 44
ADDENDUM
Menu: 98 RESET
Menu: 99 STORE
Menu: 100 INIT
34 of 44
Rosemount Analytical
August 1999
748430-A
ADDENDUM
Menu: 101 RFACTORSI
Menu: 102 RFHIST
Menu: 103 RFHIST2
748430-A
August 1999
Rosemount Analytical
35 of 44
ADDENDUM
Menu: 104 RFACTORS
Menu: 105 R2FACTORS
Menu: 106 RN3FACTORS
36 of 44
Rosemount Analytical
August 1999
748430-A
ADDENDUM
Menu: 107 RFHIST3
Menu: 108 RFHIST4
Menu: 109 RN4FACTORS
748430-A
August 1999
Rosemount Analytical
37 of 44
ADDENDUM
Menu: 110 STOREPVA
Menu: 111 ZERO_NOW2
Menu: 112 SPAN_NOW2
38 of 44
Rosemount Analytical
August 1999
748430-A
ADDENDUM
Menu: 113 NEW_CONV
Menu: 114 FLOWBALANCE
Menu: 115 FLOWBALCALC1
748430-A
August 1999
Rosemount Analytical
39 of 44
ADDENDUM
Menu: 116 FLOWBALCALC2
Menu: 117 FLOWBALI1
Menu: 118 FLOWBALI2
40 of 44
Rosemount Analytical
August 1999
748430-A
ADDENDUM
Menu: 119 DIAG_VOLTS_
Menu: 120 AMPWR_CLD2
Menu: 121 AMPWRI1_CLD2
748430-A
August 1999
Rosemount Analytical
41 of 44
ADDENDUM
Menu: 122 AM2VA2
Menu: 123 ALARM1
Menu: 124 ABOUT
42 of 44
Rosemount Analytical
August 1999
748430-A
ADDENDUM
Menu: 125 ABOUT1
Menu: 126 MANDATA
748430-A
August 1999
Rosemount Analytical
43 of 44
ADDENDUM
NOTES
44 of 44
Rosemount Analytical
August 1999
748430-A