1
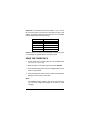
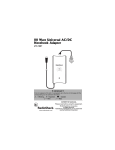
CONTENTS
Preparation ......................................................................... 4
Charging the Power Pack’s Built-in Battery ................. 4
Selecting the Right Adaptaplug ................................... 6
Using the Power Pack ......................................................... 7
Replacing the Fuse ............................................................. 8
Care .................................................................................... 9
Specifications .................................................................... 10
1
Universal Rechargeable Ni-MH Power
Pack for 3/4.5/6/7.5/9 Volt DC Devices
OWNER’S MANUAL — Please read before using this equipment.
Your RadioShack Universal Rechargeable Ni-MH Power Pack
can be used as a portable energy source for low-voltage DC devices that have a DC jack such as a digital camera, PDA (Personal Data Assistant), portable MD/CD/DVD player, and so on. The
power pack’s built-in battery has a capacity of 3650 mAh and fully
charges in only 4 to 5 hours. The amount of run time for the product you are powering depends on the output voltage you select
(see Page 7). You can charge the power pack at any location with
an AC input voltage between 100V and 240V.
Its other features include:
User-Adjustable Voltage Settings — lets you select the specific
output voltage (3V, 4.5V, 6V, 7.5V, or 9V) by simply setting a
switch.
Interchangeable Adaptaplug™ Connectors — five RadioShack
Adaptaplug adapters are included with your power pack for connecting it to most devices. Additional Adaptaplugs are available
from your local RadioShack store.
Charging Indicator — lights when the built-in battery is charging.
Battery Power Indicator — lets you know when the battery power is low.
© 2001 RadioShack Corporation.
All Rights Reserved.
RadioShack, RadioShack.com, and Adaptaplug are
trademarks used by RadioShack Corporation.
Full Battery Protection — stops charging automatically preventing overcharging which can damage the built-in battery. Protection
includes peak voltage detection, negative Delta V protection, a
charging control timer, and a thermal sensor cut-off.
Internal Battery Protection — prevents the internal battery being
discharged from becoming too low to operate and limits current to
prevent draining the battery if a short-circuit occurs.
Carrying Pouch with Belt Clip — lets you store the power pack
and conveniently carry it anywhere.
WARNING: To reduce the risk of fire or shock hazard, do not expose
this product to rain or moisture.
CAUTION
RISK OF ELECTRIC SHOCK. DO NOT OPEN.
!
CAUTION: TO REDUCE THE RISK OF ELECTRIC SHOCK, DO
NOT REMOVE COVER OR BACK. NO USER-SERVICEABLE
PARTS INSIDE. REFER SERVICING TO QUALIFIED PERSONNEL.
This symbol is intended to alert you to the presence of uninsulated dangerous voltage within the
product’s enclosure that might be of sufficient
magnitude to constitute a risk of electric shock. Do
not open the product’s case.
!
This symbol is intended to inform you that important operating and maintenance instructions are
included in the literature accompanying this product.
2
Your power pack is ETL listed to UL standards and meets all applicable FCC standards.
FCC STATEMENT
This device complies with Part 15 of the FCC Rules. Operation is
subject to the following two conditions: (1) This device may not
cause harmful interference, and (2) this device must accept any
interference received, including interference that may cause undesired operation.
Warning: Changes or modifications to this unit not expressly approved by RadioShack may cause interference and void the user’s authority to operate the equipment.
Note: This equipment has been tested and found to comply with
the limits for a Class B digital device, pursuant to Part 15 of the
FCC Rules. These limits are designed to provide reasonable protection against harmful interference in a residential installation.
This equipment generates, uses, and can radiate radio frequency
energy and, if not installed and used in accordance with the instructions may cause harmful interference to radio communications. However, there is no guarantee that interference will not
occur in a particular installation. If this equipment does cause
harmful interference to radio or television reception, which can be
determined by turning the equipment off and on, the user is encouraged to try to correct the interference by one or more of the
following measures:
• Reorient or relocate the receiving antenna.
• Increase the separation between the equipment and receiver.
Consult your local RadioShack store if the problem still exists.
3
IMPORTANT SAFETY INSTRUCTIONS
1. SAVE THESE INSTRUCTIONS. This manual contains important safety instructions for power pack RadioShack Cat. No.
23-047.
2. Before using the power pack, read all the instructions and
cautionary markings in this manual, on the power pack and
on the products that you use with the power pack.
3. WARNING. Avoid charging a fully-charged power pack.
Doing so can damage the power pack or cause it to lose
some of its storage capacity.
4. Charge the power pack in an area between 65° to 80°F (18°
to 27°C). Charging the power pack in hot areas can permanently reduce the power pack’s power capacity.
5. Do not expose the power pack to rain, snow, or excessive
moisture.
PREPARATION
Charging the Power Pack’s Built-in Battery
Charge the built-in battery for about 4–5 hours to fully charge it.
Using AC Power (100–240V AC)
1. Slide the switch on the top of the power pack to CHARGE.
2. Lift the plug from the recess on the back of the power pack
and plug it into an AC outlet.
4
Warning: To prevent electric shock, do not use this polarized plug
with an extension cord, receptacle, or other outlet unless you can
fully insert the blades to prevent blade exposure.
Using Vehicle Battery Power (12V DC)
Caution: Use only the supplied power cord. If your power cord is
lost or damaged, you can replace it with Cat. No. 270-1533 or
270-032.
1. Slide the switch on the top of the power pack to CHARGE.
2. Insert the supplied coiled power cord’s barrel plug into the
12V DC INPUT jack on the side of the power pack.
3. Insert the cord’s cigarette-lighter plug into your vehicle’s
cigarette-lighter socket.
Notes:
• The CHARGING indicator lights while the built-in battery is
charging and turns off when charging is complete.
• If the power pack does not charge or operate properly when
using DC power, be sure the cigarette-lighter socket is clean
and the supplied coiled power cord’s plug is securely inserted
into the socket. You might also need to replace your vehicle’s
cigarette-lighter socket fuse.
5
Selecting the Right Adaptaplug
The Adaptaplug allows you to match the size and polarity of your
portable device’s DC input jack. RadioShack stores offer a variety
of Adaptaplugs; select the one that fits your portable device. The
power pack comes with five Adaptaplugs. The colors and sizes
are:
Type
Color
A
Yellow
Outer Diameter
(2.3 mm)
Inner Diameter
(0.7 mm)
B
Yellow
(4.0 mm)
(1.7 mm)
C
Yellow
(4.7 mm)
(1.7 mm)
H
Orange
(3.4 mm)
(1.3 mm)
M
Blue
(5.5 mm)
(2.1 mm)
Notes:
• The power pack’s voltage must be set for exactly the same
voltage your portable device requires.
• The power pack’s current (mA) for the selected output voltage
must equal or exceed the current your portable device
requires (see Page 7).
1. Use a flat-blade screwdriver to set OUTPUT VOLTAGE SELECTOR on the back of the power pack to the correct setting for
your portable device (3V, 4.5V, 6V, 7.5V, or 9V).
2. If the power jack is marked
, align TIP on the power
cord with + on the Adaptaplug. If the power jack is marked
, align TIP on the power cord with – on the Adaptaplug.
6
Important: Your portable device must be rated 3, 4.5, 6, 7.5 or 9V
DC and must require no more than the rated output current of this
adapter. The following table shows the maximum current available
from this adapter for each output voltage.
Output Voltage
3V
Maximum Current
2000mA
4.5V
2000mA
6V
1500mA
7.5V
1200mA
9V
1000mA
Caution: Be sure to set the correct tip polarity. Incorrect tip polarity can damage the portable device or the power pack.
USING THE POWER PACK
1. Set the switch to the correct setting for your portable device
(3V, 4.5V, 6V, 7.5V, or 9V).
2. Slide the switch on the top of the power pack to OPERATE.
3. Insert the barrel plug at the end of the supplied cable into the
device to be powered.
4. Insert the plug at the other end of the cable into the DC OUTPUT jack on the top of the power pack.
Notes:
• The POWER indicator appears green when the built-in battery has a full charge and changes to red when it needs
charging.
7
• The power pack has no output when set to CHARGE.
• To save battery power, always set the power pack to CHARGE
when it is not in use.
REPLACING THE FUSE
If the power pack stops operating when using the cigarette-lighter
adapter, follow these steps to replace the 2-amp fuse.
1. Turn the metal ring counterclockwise then remove the metal
ring and tip.
2. Remove the fuse. If it is blown or broken, replace it with a 2A,
fast blow fuse.
Caution: Do not use a fuse with ratings other than those
specified here. Doing so might damage your power pack.
3. Insert the tip into the metal ring and place the ring on
the cigarette-lighter adapter, then turn the ring clockwise to
tighten it.
8
CARE
Keep the power pack dry; if it gets wet, wipe it dry immediately.
Use and store the power pack only in normal temperature environments. Handle the power pack carefully; do not drop it. Keep the
power pack away from dust and dirt, and wipe it with a damp cloth
occasionally to keep it looking new.
Modifying or tampering with the power pack’s internal components
can cause a malfunction and invalidate its warranty. If your power
pack is not performing as it should, take it to your local RadioShack store for assistance.
9
SPECIFICATIONS
Maximum Power Consumption (Input) ............................................... 10W
Input Voltage ................................ 12V DC or 100–240 V AC, 50 or 60Hz
Output Voltage .............................................. 3V, 4.5V Maximum 2000 mA
6V Maximum 1500 mA
7.5V Maximum 1200 mA
9V Maximum 1000 mA
Battery Capacity ........................................................................ 3650 mAh
Full Charging Time .................................................................... 4–5 hours
1
Dimensions ........................................................ 4 1/3 × 2 13/16 × 1 /2 Inches
(110 × 72 × 38 mm)
Weight .................................................................... Approximately 14.1 oz
(400 g)
Specifications are typical; individual units might vary. Specifications are
subject to change and improvement without notice.
10
NOTES
11
Limited Ninety-Day Warranty
This product is warranted by RadioShack against manufacturing defects in material
and workmanship under normal use for ninety (90) days from the date of purchase
from RadioShack company-owned stores and authorized RadioShack franchisees
and dealers. EXCEPT AS PROVIDED HEREIN, RadioShack MAKES NO EXPRESS
WARRANTIES AND ANY IMPLIED WARRANTIES, INCLUDING THOSE OF MERCHANTABILITY AND FITNESS FOR A PARTICULAR PURPOSE, ARE LIMITED IN
DURATION TO THE DURATION OF THE WRITTEN LIMITED WARRANTIES CONTAINED HEREIN. EXCEPT AS PROVIDED HEREIN, RadioShack SHALL HAVE NO
LIABILITY OR RESPONSIBILITY TO CUSTOMER OR ANY OTHER PERSON OR
ENTITY WITH RESPECT TO ANY LIABILITY, LOSS OR DAMAGE CAUSED DIRECTLY OR INDIRECTLY BY USE OR PERFORMANCE OF THE PRODUCT OR
ARISING OUT OF ANY BREACH OF THIS WARRANTY, INCLUDING, BUT NOT
LIMITED TO, ANY DAMAGES RESULTING FROM INCONVENIENCE, LOSS OF
TIME, DATA, PROPERTY, REVENUE, OR PROFIT OR ANY INDIRECT, SPECIAL,
INCIDENTAL, OR CONSEQUENTIAL DAMAGES, EVEN IF RadioShack HAS
BEEN ADVISED OF THE POSSIBILITY OF SUCH DAMAGES.
Some states do not allow limitations on how long an implied warranty lasts or the exclusion or limitation of incidental or consequential damages, so the above limitations
or exclusions may not apply to you.
In the event of a product defect during the warranty period, take the product and the
RadioShack sales receipt as proof of purchase date to any RadioShack store. RadioShack will, at its option, unless otherwise provided by law: (a) correct the defect
by product repair without charge for parts and labor; (b) replace the product with one
of the same or similar design; or (c) refund the purchase price. All replaced parts and
products, and products on which a refund is made, become the property of RadioShack. New or reconditioned parts and products may be used in the performance
of warranty service. Repaired or replaced parts and products are warranted for the
remainder of the original warranty period. You will be charged for repair or replacement of the product made after the expiration of the warranty period.
This warranty does not cover: (a) damage or failure caused by or attributable to acts
of God, abuse, accident, misuse, improper or abnormal usage, failure to follow instructions, improper installation or maintenance, alteration, lightning or other incidence of excess voltage or current; (b) any repairs other than those provided by a
RadioShack Authorized Service Facility; (c) consumables such as fuses or batteries;
(d) cosmetic damage; (e) transportation, shipping or insurance costs; or (f) costs of
product removal, installation, set-up service adjustment or reinstallation.
This warranty gives you specific legal rights, and you may also have other rights
which vary from state to state.
RadioShack Customer Relations, 200 Taylor Street,
6th Floor, Fort Worth, TX 76102
We Service What We Sell
03A01
23-047
12/99
4301-4110-1
Printed in China