1
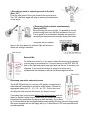
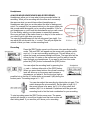
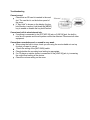
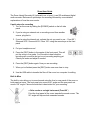
Zoom User Guide
The Zoom Handy Recorder H2 (referred to as a ‘zoom’) is an SD card based digital
audio recorder. Below are 8 quick steps for recording followed by more detailed
explanations of how the zoom works.
8 quick steps for recording
1. Turn on the zoom by sliding the [POWER] switch on the left side
panel
2. If you’re using an external mic or recording sound from another
source, plug that in
3. If you’re using the internal mic, activate the mic you want to use - Front 90° /
Surround 2CH / Surround 4CH / Rear 120° using the arrow keys on the front
panel
4. Put your headphones on!
5. Press the [REC] button in the centre of the front panel. This will
put the zoom in cue mode. You’ll be able to hear what the
recording will sound like but you’re not recording anything yet.
Check you levels and adjust if needed.
6. Press the [REC] button again. Now you are recording.
7. When you’re finished press the [REC] button one more time to stop
8. Use the USB cable to transfer the files off the zoom to a computer for editing.
Built In Mics
The built-in mics allow you to record sound using the front or rear panel of the zoom or
both panels at once. The front panel mic covers a 90° angle and the rear panel mic
covers 120° angle. Choose the side that is best suited for your recording.
● Solo vocals or a single instrument (Front 90°)
Point the front panel of the zoom towards the sound source. The
90° angle will help exclude unwanted sounds.
● Recording a band or capturing sounds in the field
(Rear 120°)
Point the rear panel of the zoom towards the sound source.
The 120° directivity angle will help in capturing the ambience
of the venue.
● Recording front and back simultaneously
(Surround 2CH)
By positioning the zoom upright, it is possible to record
sound coming both from the front and back of the unit.
This is great for a conversation between two people or
recording an instrument and a singer facing each other.
To select the mic you want to use press the mic pattern
keys on the front panel. An indicator light will show you
which mic setting is selected.
External Mic
For better mic control or if you want to direct the sound more precisely
you can plug in an external mic. Connect the mic to the [EXT MIC IN]
jack on the right side panel (see right) and use the mic to conduct your
interview. If you know the location is going to be noisy use a
unidirectional mic because it will pick up less background noise.
Recording from other external sources
The [LINE IN] jack lets you connect a CD player, mixing board or
other external component to record its output signal. Connect an
appropriate cable (eg 3.5 – 3.5, 3.5 – xlr, 3.5 – rca) to the zoom
and plug the other end into the source you want to record.
If recording from a mixing desk befriend the sound person and ask
them for the best quality output. Make sure you contact the venue
beforehand for permission and show up nice and early. If you show
up 2 minutes before the band/performance starts asking for a line into the mixing board
the sound engineer will not be happy with you. It also makes CiTR look unprofessional
and disorganized.
Headphones
ALWAYS WEAR HEADPHONES WHILE RECORDING!
Headphones allow you to hear what is being recorded while it is
recording. What you’re recording with the zoom isn’t necessarily
the same as what you would hear without headphones on.
Headphones also give you an idea about the level of background
noise. For example if a car passes behind you the zoom might pick
this up and make the speech you’re recording inaudible. If you’ve
got headphones on you’ll hear this disturbance and you can correct
it in the field by asking your interviewee to repeat their answer.
Once you get back to the station there is no way to fix the audio so
you need to get it right when you record.
You can plug headphones into the left side panel (see right). You
can adjust the volume with the +/- control. This will just adjust the
volume of what you hear, not the recording level.
Recording
Press the [REC] button once to put the zoom into recording standby
mode. The word REC will appear on the screen with a pause symbol
next to it. You are not recording anything yet. This will allow you to
adjust the levels and assess background noise. The input level will be
shown by the VU meter on the screen and you’ll be able to hear the
input through your headphones. If you want to exit from this mode
press the [PLAY] button underneath the [REC] button.
You can adjust the recording level by pressing the
<< and >> buttons either side of the [REC] button.
When you press these buttons the current recording
level will show up on the screen and increase or
decrease as you adjust it. Set the level as high as
possible but so that the VU meter does not exceed 0 (dB) during the
loudest parts. The setting range is 0 – 127.
You can also adjust the recording by altering the mic gain. This
switch changes the mic sensitivity. Set the gain to high (H) if
the sound source is far away, low (L) if it is very close and
medium (M) if it is in-between. Experiment with the gain and
recording level to find the best combination for your recording.
To start recording press the [REC] button once more. The pause
symbol will change to a round rec symbol and the time counter will
start ticking down. If you see this you’ll know you’re recording.
On the right is a breakdown
of everything you will see on
the screen when recording.
Checking your recording
Once you’ve recorded everything you want to press the [REC]
button again to stop the recording. As soon as you do this your
recording will be saved on the zoom’s SD card as an mp3. To
listen back to your recording just press the [PLAY/PAUSE] button
beneath the [REC] button. Press [PLAY/PAUSE] again to stop
playback.
Transferring files to a computer
When you’re finished with the zoom you
need to transfer your mp3 files off and delete
them from the SD card. Connect the zoom to
a computer using the USB cord (see right)
and then turn the zoom on. A pop up box will
appear on the screen and you’ll be able to
drag and drop your files to a folder on your
computer or another external storage device.
The USB cord connects to the zoom of the
right hand side. One you’ve transferred your
files to a computer or external storage device make sure you
delete them from the zoom to keep the space free for the next
person to use it.
Batteries
The zoom operates using AA battery power.
Make sure the batteries have full power before
recording anything and always be sure to carry
spare batteries with you. To insert batteries
remove the rear panel.
Troubleshooting
Cannot record
Check that an SD card is inserted in the card
slot. The card slot is on the bottom panel of
the zoom.
If "Key Hold" is shown on the display, the key
hold function is active. Hold down the [MENU]
key to enable or disable the key hold function.
Cannot use built-in mics/external mic,
If anything is connected to the [EXT MIC IN] jack or [LINE IN] jack, the built-in
mics do not operate and the mic pattern cannot be selected. Disconnect all other
equipment.
Cannot hear recorded sound, or sound is very weak.
When using the built-in mics, check you are using the most suitable mic set up
for what you want to record
Check the setting of the [MIC GAIN] switch
Check whether the recording level setting is appropriate
If a CD player or similar device is connected to the [LINE IN] jack, try increasing
the output level setting of the device.
Check the volume setting on the zoom