1
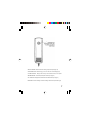
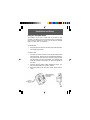
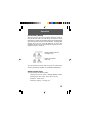
VoiceAnnounce® 2025T Corded Speakerphone with Talking Caller ID and Call Waiting Deluxe Table of Contents Introduction ................................................................................... 4 Features ....................................................................................... 5 Important Safety Instructions ....................................................... 8 Check the Package Contents ..................................................... 10 Connecting the Telephone .......................................................... 10 Using the Desk/Wall Stand .......................................................... 11 Setup Your Personal Preferences ............................................. 12 Adjusting the Handset Volume ................................................... 13 Adjusting the Speakerphone Volume ......................................... 13 Adjusting the Ringer Volume ...................................................... 13 Adjusting the VoiceAnnounce Caller ID Volume ........................ 13 Making a Call ............................................................................... 14 Receiving a Call .......................................................................... 14 Using the Speakerphone ............................................................ 14 Using the Muting Function .......................................................... 14 Call Summary Display ................................................................. 15 Status Light ................................................................................. 15 Call Waiting ................................................................................. 16 Caller ID ....................................................................................... 17 VoiceAnnounce® Caller ID ......................................................... 18 Recording Names to the Phonebook .......................................... 18 Menu Options .............................................................................. 19 Phonebook .................................................................................. 20 Voice Mail Message Waiting Indicator ........................................ 22 Maintenance ............................................................................... 23 Troubleshooting and FAQs ........................................................ 23 FCC Part 68 and ACTA Information ............................................ 24 FCC Part 15 Radio Interference Statement ................................ 26 Canadian Telecom Statement ..................................................... 26 Manufacturers 1-Year Limited Warranty ................................... 27 VoiceAnnounce® 2025T Corded Speakerphone Customer Information Guide Introduction The VoiceAnnounce 2025T corded speakerphone supports ad vanced communications features for convenience, security, and improved access to today’s popular telephone network services. VoiceAnnounce® Caller ID and Call Waiting ID VoiceAnnounce caller ID lets you know who’s calling without you having to run to the phone. The caller’s identity is announced over the built-in speaker for incoming calls, and over the speaker or handset for call waiting calls. You can adjust the volume of the announcement and/or disable the announcement (see the section on setting up your personal preferences). Call Management Options (Call Waiting Deluxe) The call management options put you in charge of your calls. You can send the waiting caller a message asking them to hold, add the incoming caller into your conversation, drop the existing call and answer the new call, or send the call to voice mail. Hands-Free Speakerphone Talk while you do other things or let others participate in the call - all with the push of a button. You can MUTE the microphone if you just want to listen to the call. Please read this manual for proper installation instructions and to find out about all of the product’s valuable features. 4 Features The VA2025T has advanced features that give you more control over your incoming and call-waiting calls, and improves access to popular telephone network services: • VoiceAnnounce Caller ID and Call Waiting ID • Announces calls by recorded name or telephone number • “Whispers” the name or number of a call-waiting caller over the handset • Easy “one touch” name recording • Identify the caller without interrupting what you’re doing • Hands-Free speakerphone • Powerful call waiting management options • Caller ID memory for up to 99 calls • Built-in Phonebook for up to 20 frequently called numbers • Dial back callers at the touch of a key • Backlighted Keypad • English and Spanish selectable display and audible announce ments • Notifies you to voicemail messages (requires voicemail service available from the telephone company.) 5 VOLUME CONTROL - Sets the speaker volume (see page 13) RINGER CONTROL - Sets the ringer volume (see page 13) ANSWER/DIAL - Make and Answer Calls (see page 14) HANG-UP - Press the END key to end a call or cancel a menu selection (see page 14) MENU - Choose call management and other options (see page 19) OK/RECORD - Make a selection, press to record a name while reviewing caller ID log (p18) 6 SCROLL UP/DOWN - Review entries in the call log and phonebook (see page 15) STATUS INDICATOR - Indicates ringing, in-use, new calls, voice mail messages (p15) CALLER ID DISPLAY - Displays call summary, caller ID, dialed number, menu options SPEAKER ON/OFF - Controls the speakerphone function (see page 14) CLR - Deletes the last digit entered, deletes the caller ID information (see page 17) DIALING KEYS - Use for dialing a number and entering numbers into the phonebook (p 14) 7 Important Safety Instructions When using your telephone equipment, basic safety precautions should always be followed to reduce the risk of fire, electric shock and injury to persons, including the following: 1. 2. 3. 4. 5. 6. 7. 8. 8 Read and understand all instructions. Follow all warnings and instructions marked on the product. Unplug this product from the wall outlet before cleaning. Do not use liquid cleaners or aerosol cleaners; use a damp cloth for cleaning. Do not use this product near water for example, near a bath tub, wash bowl, kitchen sink, or swimming pool, or in a wet base ment. Do not place this product on an unstable cart, stand or table, as the product may fall, causing serious damage to the product. Slots and openings in the cabinet and the back or bottom of this product are provided for ventilation (to protect it from overheat ing) and should not be blocked or covered. The openings should never be blocked by placing this product on a bed, sofa, rug or other similar surface. This product should never be placed near or over a radiator or heat register. This product should never be placed in a built-in installation unless proper ventilation is pro vided. This product should be operated only from the type of power source indicated on the marking label. If you are not sure of the type of power supply to your home, consult your dealer or local power company. Do not allow anything to rest on the power cord. Do not place this product where the cord will be abused by people walking on it. 9. 10. 11. 12. 13. 14. Do not overload wall outlets and extension cords, as this can result in the risk of fire or electric shock. Never push objects of any kind into this product through cabinet slots, as they may touch dangerous voltage points or short out parts, resulting in the risk of fire or electric shock. Never spill liquid of any kind on the product. To reduce the risk of electric shock, do not disassemble this prod uct, but take it to a qualified serviceman, when service or repair work is required. Opening or removing covers may expose you to dangerous voltage or other risks. Incorrect reassembly can cause electric shock when this product is subsequently used. Unplug this product from the wall outlet and refer servicing to a qualified service personnel under the following conditions: a) when the power supply cord or plug is damaged or frayed; b) if liquid has spilled into the product; c) if the product has been exposed to rain or water; d) if the product does not operate normally when you follow the operating instructions (adjust only those controls that are discussed in the operating instructions, as improper ad justment of other controls may result in damage, often requiring extensive work by a qualified technician to restore the product to normal performance); e) if the product has been dropped or the cabinet has been damaged; f) if the product exhibits a distinct change in performance. Avoid using a telephone (other than a cordless type) during an electrical storm. There may be a remote risk of electric shock from lightning. Do not use the telephone to report a gas leak in the vicinity of the leak. Save these instructions 9 Installation and Setup Check the Package Contents Check the package contents to make sure you have the following items: Handset, Desk/Wall stand, and power adapter. The VA2025T does not take any batteries, but requires use of the included power adapter. When there is a power outage, the product’s memory (including settings and caller ID information) is saved, however only the basic telephone functions will operate. Connecting the Telephone The VA2025T has an integrated telephone and power cord, mak ing it easy to install and operate without getting tangled in lots of wires. 1. Plug the telephone cord into the telephone jack on your wall, or into the TELEPHONE port on the back of your answering machine. 2. Plug the power adapter into a 120V wall outlet and the power connector into the jack on the end of the integrated telephone/ power cord. Please make sure the outlet is not controlled by a wall switch, as this could cause your phone to not work properly. 3. Press the TALK key and listen to the handset to make sure you hear a dialtone. Press the END key to hang-up. 10 Installation and Setup Using the Desk/Wall Stand The VA2025T comes with a cradle that can be desk or wall mounted. The stand is only for convenience and is not necessary for the product’s operation. If you like, you can leave the handset loose on a table, desk, or counter top. For DESK USE: 1. Simply flip open the stand on the back of the cradle and place the handset in the cradle. For WALL USE: 1. Fold open the stand and remove the magnetic plate located behind the stand. Remove the non-magnetic plate located in the pocket on the front of the stand. Insert the magnetic plate into the pocket on the front of the stand. The magnetic plate holds the handset in place when you return the handset to the stand. 2. Close the stand by folding it back towards the cradle. You will hear a snap when it is locked in position. 3. Mount the cradle to the wall using screws and/or wall an chors. 11 Installation and Setup Setup Your Personal Preferences Before starting to use the telephone, take a few minutes to set up the options so that the telephone works the way you want it to work. These options are saved in memory and restored even if you move the telephone or lose power. 1. Press the MENU key until you see SETUP displayed on the screen, then press OK 2. Press the MENU to scroll through the following options. RINGER - Select from three ringer patterns. You will hear the ring as you press OK CID VOL - Select from High, Medium, Low, and Off to set the audio volume for the talking caller ID announcement. You will hear a “beep” indicating the volume each time you press the OK key. You will hear “beep-beep” when the volume is turned off. CW SPKR (ON/OFF) - Call Waiting calls are announced over the speaker CW HSET (ON/OFF) - Call Waiting calls are announced over the handset CW NAME (ON/OFF) - Call Waiting calls are announced only if the calling party’s name is recorded in the phonebook CWD OPTION (ON/OFF) - Enables Call Waiting Deluxe call management features VM CHECK (ON/OFF) - Check for voice mail message status VM BEEP (ON/OFF) - Audible voice mail message waiting indicator LANGUAGE (ENGLISH/SPANISH) - Language for display and audio prompts. Beeps once for English. Beeps twice for Spanish. DIAL (TONE/PULSE) - Dialing mode (most customers use TONE). Beeps once for Tone mode. Beeps twice for Pulse mode. 3. Press the OK key to change the setting. The option setting is indicated on the display as well as audibly. For settings that are ON, you will hear a single beep. For settings that are OFF, you will hear two beeps. 4. Press the END key when done. 12 Installation and Setup Adjusting the Handset Volume The handset volume can be adjusted to high, medium, and low set tings. Press the TALK key to turn on the handset, listen for dialtone, and press the VOLUME UP/DOWN control on the left side of the handset near the ear piece. You will hear the volume change as you press the control. You can adjust the handset volume anytime you are using the handset. Adjusting the Speakerphone Volume The speakerphone volume can be adjusted to high, medium, and low settings. Press the SPKR key to turn on the speakerphone, listen for dialtone, and press the VOLUME UP/DOWN control on the left side of the handset near the ear piece. You will hear the volume change as you press the control. You can adjust the speakerphone volume any time you are using the speakerphone. Adjusting the Ringer Volume The ringer volume can be adjusted to high, medium, low, and OFF settings. While the phone is not being used (not on a call), press the VOLUME UP/DOWN control on the left side of the handset near the ear piece. The ringer volume setting is displayed as you press the control. The “Ringer OFF” symbol (bell icon) is displayed when the ringer volume is turned OFF. Adjusting the VoiceAnnounce Caller ID Volume See the section on Setting Up Your Personal Preferemces to set the caller ID announcement volume to High, Medium, Low, or OFF. 13 Operation Making a Call When you make a call, the number you are dialing appears on the display. There are several ways to dial a number: Press TALK, listen for dialtone and dial the number Press SPKR, listen for dialtone and dial the number Dial the number, then press TALK (like on a mobile phone) Press the TALK key twice fast (TALK-TALK) to re-dial Dial from the Phonebook (see Phonebook function) To hang-up, press the END key. Receiving a Call When the phone is ringing, you can answer the call by pressing the TALK key to use the handset, or the SPKR key to use the speakerphone. To hang-up, press the END key. Using the Speakerphone When you are on the phone, pressing the SPKR key will switch you between using the handset and using the speakerphone. Pressing SPKR will not hang-up the call. To hang-up, press the END key. Using the MUTE Function To MUTE the microphone while you are using the handset or speak erphone, press the MENU key until you see the MUTE ON option and press OK. To turn off the MUTE, press the MENU key until you see the MUTE OFF option and press OK. 14 Operation Call Summary Display When the phone is not in-use, the display shows the number of new calls and total calls in the caller ID log, as well as the current date and time. Please note the date and time are set automatically if you have caller ID, and can not be set manually. The display also indicates when you have voice mail waiting (if you have voice messaging service from your local telephone company) and if the telephone’s ringer is turned off. Message Waiting Indicator (envelope icon) Ringer OFF indicator (bell icon) You can review the incoming caller ID log from the call summary screen by pressing the SCROLL UP and SCROLL DOWN keys. Status Indicator Light The light indicates the following status: Flashing Fast (1/4 sec on/off) - Message Waiting Indicator Flashing Slow (1sec on/off) - New Calls in Call log Steady On - Phone in use Flashing to Ringing - Incoming Call 15 Operation Call Waiting Call Waiting is a special service available from your telephone company. When you are on the phone, you will be alerted to another call coming in when you hear the a “beep beep” over the handset. If you have call waiting ID (also a special service from your tele phone company), the call waiting call will be identified on the dis play. The VA2025T will also announce the caller’s telephone num ber or name (if the name is recorded in the Phonebook) over the speaker, or privately “whisper” it to you over the handset. See the section on “Setting up your Preferences” to enable or disable the call waiting announcement features. When you receive a call waiting call, you have several options based on the telephone service you have. Answer the Call - press the TALK key to connect to the incoming call and put your existing call on hold. Pressing the TALK key again will connect you back to the first call, and put the call waiting call on hold. Tell Caller to HOLD - press the MENU key until you see HOLD displayed, then press OK. This tells the incoming call to please hold. To connect to the caller, press the TALK key. CONFERENCE the caller into your conversation - press the MENU key until you see CONFERENCE displayed, then press OK. Later, you can drop the first call or last call from the conference by pressing the MENU key and selecting DROP FIRST or DROP LAST. You can hang-up the call completely by pressing END. Send the call to VOICE MAIL - press the MENU key until you see TO VMAIL on the display, then press OK. The call will be sent to voice mail (requires subscription to telephone company voice mail service.) Important Note: The HOLD, CONFERENCE, and TO VMAIL options are only avail able in areas that support these call waiting deluxe features. Check with your local telephone company for availability. The “TO VMAIL” option requires a subscription to the telephone com pany voice mail service. 16 Operation Caller ID The VA2025T works with the caller ID service available from your telephone company. Depending on the service you have, the caller’s telephone number -or- telephone number and name will be displayed when the phone rings, between the first and second ring. Incoming Calls When the phone rings, the caller’s identity will be displayed and announced between the first and second rings. If you have a name recorded in the Phonebook that matches the number of the incoming call, the VA2025T will announce the caller’s name instead of the number. Call Waiting Calls If you subscribe to Call Waiting Caller ID service, the caller’s name and number will be displayed when you receive a call waiting call. In addition, the caller’s name or number can be announced over the handset or speaker. Please see the sec tion on setting up your personal preferences (page 12). Review Incoming Calls The VA2025T will store 99 calls in the call log. The call log can be reviewed when in the Call Summary mode by pressing SCROLL UP (to review calls from newest to oldest) or SCROLL DOWN (to review calls from oldest to newest). Deleting Calls While reviewing calls in the call log, you can delete a call from the call log by pressing the CLR key. You can delete all the calls from the call log by pressing and holding the CLR key for 4 seconds. 17 Operation VoiceAnnounce® Caller ID In addition to displaying the Caller ID information, the VA2025T can also announce the caller’s identity. For incoming calls, the caller’s identity is announced over the builtin speaker between the first and second ring. For call waiting calls, the caller’s identity is announced over the speaker and/or over the handset ear piece immediately following the call waiting tone. See the section on Setting Up Your Personal Preferences to con figure the VoiceAnnounce Caller ID features the way you like them. Calls are announced in the following ways: Telephone Number - if the caller’s name is not in your PHONEBOOK, the caller’s 10-digit telephone number is announced Number Unknown - announces “Number Unknown” when the telephone company has not been able to identify the call Number Blocked - announces “Number Blocked” when the caller has elected to block their telephone number. (You can advise callers to “unblock” their caller ID by dialing *82 before calling you.) Recorded Name - if you have recorded a name for a caller, the caller will be announced by name instead of their number. You can record names for up to 20 callers, and they are stored in the on-board phonebook along with the caller’s displayed name and telephone number. Recording Names to the Phonebook Recording names for frequent callers is easy and can be done anytime you are reviewing the call log or when you are using the MENU. The easiest way is to simply press and hold the OK/REC key while the caller ID information is being displayed, then wait for the beep and speak the name. When you release the OK/REC key, the VA2025T will play back the recording. You can record it over again by repeating the steps. If you hear two beeps, it means the PHONEBOOK memory is full (see section on PHONEBOOK to learn how to delete names to free up memory.) 18 Operation Menu Options The VA2025T has several options that can be selected by press ing the MENU key. The following MENU options are available: REVIEW CALLS - Review calls from the caller ID log (up to 99 calls) PHONEBOOK - Review and manage names and numbers of frequent callers ENTER NUMBER - Manually enter a number and name into the PhoneBook. DIAL - Dial a number from the PhoneBook. RECORD NAME - Record a name to a PhoneBook entry. This recorded name will be announced instead of the the tele phone number when you get a call from this person. SETUP - Setup your personal preferences When you have a call waiting, additional call management options are available by pressing the MENU key. These are discussed in the section on Call Waiting. When you are using the telephone, you will also see an option to MUTE the microphone. This is discussed in the section on using the mute function. 19 Operation Phonebook The VA2025T has an on-board PHONEBOOK that lets you store the names and telephone numbers of up to 20 people, along with a recording of their name. Press the MENU key until you see PHONEBOOK displayed. Press OK. Use the SCROLL UP/DOWN keys to review entries in the PhoneBook. Dialing from the PHONEBOOK If you want to call one of the entries in the PHONEBOOK, first locate the entry using the PHONEBOOK. Next press the MENU key until DIAL is displayed, then press OK. Now use the MENU keys to select the dialing mode. The number to be dialed will be displayed in the screen along with the words OK TO DIAL. If the number is right, press OK to start dialing. If additional dialing numbers are required, such as the area code, press the MENU key to select additional dialing options. When you are ready to dial, press OK. To cancel, press END. Recording a Name People in your PHONEBOOK can be announced by name when they call you. To do this, record their name in your own voice. Hold the OK/REC key while the PHONEBOOK information is being dis played, then wait for the beep and say the name. When you release the OK/REC key, the VA2025T will play back the recording. You can record it over again by repeating the steps. Deleting a PhoneBook entry You can delete a entry in the PHONEBOOK by pressing and holding the CLR key while the entry is being displayed. 20 Operation Enter Number and Names to the PHONEBOOK You can manually enter telephone numbers and names into the PHONEBOOK. To do this, press the MENU key until ENTER NUM BER is displayed. Press OK. Entering the Number into the Phonebook Enter the full 10 digit telephone number of the person you want to add to the PhoneBook, for example 603 225 2990. If you make a mistake, you can press the CLR key to delete the last digit. When done, press OK. Entering the NAME into the Phonebook Using the letters above each key as a guide, press the key for the first character of the name until you see the character you want, then wait - after a second the blinking cursor will move to the next character position. Repeat until you have spelled the name. If you make a mistake, you can press the CLR key to delete the last character. When done, press OK. This table shows how the keys map to the corresponding letters and symbols for entering a name: Key Letters and Symbols 1 <space> . , ? ! - “ ‘ ( ) 1 2 A B C 2 3 D E F 3 4 G H I 4 5 J K L 5 6 M N O 6 7 P Q R S 7 8 T U V 8 9 W X Y Z 9 0 0 + & @ / $ % 21 Operation Recording the Name into the Phonebook Finally, record the caller’s name so the VA2025T will announce the caller’s name instead of their telephone number. When you hear the “beep”, speak the caller’s name into the handset mouth piece. After the name is recorded, it will be re-played so you can hear it. If you want to record over it, press the MENU key until you see the word PHONEBOOK displayed and press OK. Use the SCROLL UP/ DOWN keys to find the entry in PHONEBOOK. When you see the entry that you want to record over, press and hold the OK/REC key. After you hear the “beep” speak the caller’s name and release the OK/REC key when you’re done. You will hear the recording replayed over the speaker. If you want to re-record it, hold down the OK/REC key again and repeat the process. When done, press END to return to the call summary. Voice Mail Message Waiting Indicator If you subscribe to your telephone company’s voice messaging service, the VA2025T can let you know when you have mes sages waiting. The Amber light on the handset near the ear piece flashes fast and the envelope icon on the display is turned on indicating messages are waiting. The product also supports an audible message waiting indicator, and will beep twice every minute while messages are waiting. Please refer to the section on setting up your personal prefer ences (page 12) to configure the VM BEEP option. If you do not subscribe to telephone company voice mail, you can disable the feature. Please refer to the section on setting up your personal preferences (page 12) to configure the VM CHECK op tion. Note: This features requires subscription to voice messaging services from your local telephone company. This feature is not compatible with residential telephone answering machine equip ment or answering services. 22 Operation Maintenance Clean the outside of the telephone with a soft damp cloth. Do not use any type of abrasive pad, scouring powder, or solvent such as alcohol or benzene, as they may damage the finish on the plastic housing. Troubleshooting and FAQs If you experience problems with this product, please read through the following frequently asked questions to see if your problem can be solved right here. Additional FAQs and troubleshooting tips can be found online by visiting www.classco.com Q: Why doesn’t my telephone ring on incoming calls? A: Check if the ringer volume is turned off (bell icon displayed) and that the telephone plug is connected to your telephone jack. Q: Why are calls not being announced by name? A: Check to make sure you have subscribed to caller ID service. In addition, the caller’s name needs to be recorded into the on-board phonebook. Also make sure the caller ID announcement volume is turned on. Q: Why aren’t Call Waiting calls identified? A: Check that you have subscribed to Call Waiting ID service. This is not the same as having call waiting and having caller ID. Q: Will my telephone work during a power outage? A: The basic telephone functions will work, but the display and speakerphone functions will not work. 23 FCC Part 68 and ACTA Information This equipment complies with the Part 68 rules and with Technical Requirements for Connection of Equipment to the Telephone Network adopted by the Administrative Council for Terminal Attachments (ACTA). We are required to provide you with the following information. 1. Product identifier and REN information The label on the back or bottom of this equipment contains, among other things, an identifier indicating product approval and the Ringer Equiva lence Number (REN). This information must be provided to your local telephone company upon request. For equipment approved prior to July 23, 2001, the product identifier is preceded by the phrase “FCC Reg No.” and the REN is listed separately. For equipment approved after that date, the product identifier is preceded by “US” and a colon (:), and the REN is encoded in the product identifier without a decimal point as the sixth and seventh characters following the colon. For example, the product identifier US:AAAEQ03T123XYZ would indicate an REN of 0.3. The REN is used to determine how many devices you may connect to your telephone line and still have them ring when you are called. In most, but not all areas, the sum of all RENs should be five (5.0) or less. You may want to contact your local telephone company for more information. 2. Connection and use with the nationwide telephone network The plug and jack used to connect this equipment to the premises wiring and the telephone network must comply with the applicable Part 68 rules and technical requirements adopted by ACTA. A compliant telephone cord and modular plug is provided with this product. It is designed to be connected to a compatible modular jack that is also compliant. An RJ11 jack should normally be used for connecting to a single line and an RJ14 jack for two lines. See Installation Instructions in the user’s manual. This equipment may not be used with Coin Telephone Lines or with Party Lines. If you have specially wired alarm dialing equipment connected to your telephone line, ensure the connection of this equipment does not disable your alarm equipment. If you have questions about what will disable alarm equipment, consult your telephone company or a qualified installer. 24 3. Repair instructions If this equipment is malfunctioning, it must be unplugged from the modular jack until the problem has been corrected. Repairs to this telephone equipment can only be made by the manufacturer or its authorized agents. For repair procedures, follow the instructions outlined under the Limited Warranty. 4. Rights of the telephone company If this equipment is causing harm to the telephone network, the telephone company may temporarily discontinue your telephone service. The telephone company is required to notify you before interrupting service. If advance notice is not practical, you will be notified as soon as possible. You will be given the opportunity to correct the problem and the telephone company is required to inform you of your right to file a complaint with the FCC. Your telephone company may make changes in its facilities, equipment, operation, or procedures that could affect the proper functioning of this product. The telephone company is required to notify you if such changes are planned. 5. Hearing aid compatibility If this product is equipped with a handset, it is hearing aid compatible. 6. Programming/testing of emergency numbers If this product has memory dialing locations, you may choose to store police, fire department and emergency medical service telephone numbers in these locations. If you do, please keep three things in mind: a. We recommend that you also write the telephone number on the directory card, so that you can still dial the emergency number manually if the memory dialing feature doesn’t work. b. This feature is provided only as a convenience, and the manufacturer assumes no responsibility for customer reliance upon the memory feature. c. Testing the emergency telephone numbers you have stored is not recommended. However, if you do make a call to an emergency number, you must remain on the line and briefly explain the reason for the call before hanging up. Programming/testing of emergency numbers should be performed during off-peak hours, such as in the early morning or late evening, when the emergency services tend to be less busy. 25 FCC Part 15 Radio Interference Statement This equipment has been tested and found to comply with the limits for a class B digital device, pursuant to Part 15 of the FCC Rules. These limits are designed to provide reasonable protection against harmful interference in a residential installation. This equipment generates, uses, and can radiate harmful radio frequency, and if not installed and used in accordance with the instructions, may cause harmful interference to radio communications. How ever, there is no guarantee that interference will not occur in a particular installation. If this equipment does cause harmful interference to radio or television reception, which can be determined by turning the equipment off and on, the user is encouraged to try to correct the interference by one or more of the following measures: reorient or relocate the receiving antenna; increase the separation between the equipment and receiver; connect the equipment to an outlet on a circuit different from that to which the receiver is connected; consult the dealer or an experienced radio/TV technician for help. Canadian Telecom Statement Notice: The Canadian Industry and Science Canada label identifies certified equipment. This certification means that the equipment meets certain telecommunications network protective, operational and safety requirements. The department does not guarantee that the equipment will operate to the user’s satisfaction. Before installing this equipment, users should ensure that it is permissible to be con nected to the facilities of the local telecommunications company. The equipment must also be installed using an acceptable method of connection. In some cases, the company’s inside wiring associated with a single line individual service may be extended by means of a certified connector assembly (telephone extension cord). The customer should be aware that compliance with the above conditions may not prevent degradation of service in some situations. Repairs to certified equipment should be made by an authorized Canadian maintenance facility designated by the supplier. Any repairs or alterations made by the user to this equipment, or equipment malfunctions, may give the telecommunications company cause to request the user to disconnect this equipment. Caution: Users should not attempt to make such connections themselves, but should contact the appropriate electric inspection authority, or electrician, as appropriate. The load number (LN) assigned to each terminal device denotes the percentage of the total load to be connected to a telephone loop which is used by the device to prevent overloading. The termination on a loop may consist of any combination of devices sub ject only to the requirement that the total of the load numbers of all the devices does not exceed 100. 26 Manufacturers 1-Year Limited Warranty Who Is Covered? You must have proof of purchase to exchange the product. A sales receipt or other document showing the date that you purchased the product is considered proof of purchase. What Is Covered? Coverage begins the day you buy your product. For one year thereaf ter, a defective or inoperative product will be replaced with a new, re newed or comparable product at no charge to you. A replacement product is covered only for the original warranty period. When the warranty on the original product expires, the warranty on the replace ment product also expires. What Is Excluded? Your warranty does not cover: • labor charges for installation or setup of the product and adjustment of customer controls on the product. • product replacement because of misuse, accident, unauthorized repair or other cause not within the control of ClassCo Inc. • a product that requires modification or adaptation to enable it to op erate in any country other than the country for which it was designed, manufactured, approved and/or authorized, or repair of products damaged by these modifications. • incidental or consequential damages resulting from the product. (Some states do not allow the exclusion of incidental or consequen tial damages, so the above exclusion may not apply to you.) 27 FOR CUSTOMER SERVICE CALL CLASSCO TOLL FREE: (888) 252-7726 or visit product support on-line at www.classco.com Copyright © 2005 ClassCo Inc. All Rights Reserved ClassCo® and VoiceAnnounce® are trademarks of ClassCo Inc. This product is protected under the following US Patents: 5526406, 6038443 and Patents Pending Printed in China Rev. 2E 0504DL