1
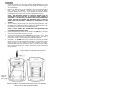
ClassCo Public Safety Messaging
PSM585
User Guide
ClassCo® Model PSM585
Your system for public
warning, community news and
information, featuring
VoiceAnnounce® Caller ID
and Call Waiting ID.
Introduction
ClassCo Model PSM585 uses the latest notification technology to keep you
advised of public safety notices, weather advisories, community news, and
information that may affect or be of interest to you and your family. The PSM585
installs easily by connecting it to your telephone line. It uses an AC adapter for
power, and batteries for backup and emergency use if the power goes out. In
addition, the Model PSM585 is compatible with caller ID and call waiting ID
services available through your local telephone company. If you have these
services, the PSM585 will display and announce incoming calls and call waiting
calls. The VoiceAnnounce® caller ID feature saves you the trouble of running to
the phone, and announces when the call is unknown or blocked. You can
program the unit to associate frequent callers with audible categories (like
“friends” or “family”). The category can be announced instead of the telephone
number to help identify important calls. If you don’t have these services, you can
contact your local telephone company to have them activated.
During emergencies, the PSM585 will sound an alarm and announce the nature
of the emergency. You can stop the alarm sound by pressing any button on
the unit. The PSM585 stores all messages in memory for later review.
Please read this manual for proper installation instructions and to find out about
all the valuable features the PSM585 offers.
Features
•
VoiceAnnounce® public safety notification (example “Weather Warning”)
•
Displays time stamped public safety notification messages
•
Colored lights provides visual indication of messages received
•
Built-in EAS alarm and auxiliary alarm output port
•
Logs messages for later review
•
VoiceAnnounce® caller ID for incoming and call waiting calls (requires caller
ID services from your local telephone company.)
•
Displays caller ID name, number, date, and time
•
Identifies unknown calls (often telemarketers), and blocked calls
•
Store the name, number, date and time of 99 calls in a call log.
•
Dial back callers at the touch of a key
•
Visual and Audible voicemail message waiting indicator
•
Bilingual display and announcement functions - user selected
•
You can program your unit to identify frequent callers by audible categories:
Friends, Family, Work, School, Don’t Answer, It’s for you (male and female
voices), Dog Barking (woof)*
*Note: Some customers use this category to identify their kid’s friends, or
maybe a pesky salesman.
Important Safety Instructions 1.
2.
3.
4.
5.
6.
7.
8.
9.
10.
11.
12.
13.
14.
15.
When using your telephone equipment, basic safety precautions should
always be followed to reduce the risk of fire, electric shock and injury to
persons, including the following:
Read and understand all instructions.
Follow all warnings and instructions marked on the product.
Unplug this product from the wall outlet before cleaning. Do not use liquid
cleaners or aerosol cleaners; use a damp cloth for cleaning.
Do not use this product near water for example, near a bath tub, wash bowl,
kitchen sink, or swimming pool, or in a wet basement.
Do not place this product on an unstable cart, stand or table, as the product
may fall, causing serious damage to the product.
Slots and openings in the cabinet and the back or bottom of this product are
provided for ventilation (to protect it from overheating) and should not be
blocked or covered. The openings should never be blocked by placing this
product on a bed, sofa, rug or other similar surface. This product should
never be placed near or over a radiator or heat register. This product
should never be placed in a built-in installation unless proper ventilation is
provided.
This product should be operated only from the type of power source
indicated on the marking label. If you are not sure of the type of power
supply to your home, consult your dealer or local power company.
Do not allow anything to rest on the power cord. Do not place this product
where the cord will be abused by people walking on it.
Do not overload wall outlets and extension cords, as this can result in the
risk of fire or electric shock.
Never push objects of any kind into this product through cabinet slots, as
they may touch dangerous voltage points or short out parts, resulting in the
risk of fire or electric shock. Never spill liquid of any kind of the product.
To reduce the risk of electric shock, do not disassemble this product, but
take it to a qualified serviceman, when service or repair work is required.
Opening or removing covers may expose you to dangerous voltage or other
risks. Incorrect reassembly can cause electric shock when this product is
subsequently used.
Unplug this product from the wall outlet and refer servicing to a qualified
service personnel under the following conditions: a) when the power supply
cord or plug is damaged or frayed; b) if liquid has spilled into the product; c)
if the product has been exposed to rain or water; d) if the product does not
operate normally when you follow the operating instructions (adjust only
those controls that are discussed in the operating instructions, as improper
adjustment of other controls may result in damage, often requiring extensive
work by a qualified technician to restore the product to normal
performance); e) if the product has been dropped or the cabinet has been
damaged; f) if the product exhibits a distinct change in performance.
Avoid using a telephone (other than a cordless type) during an electrical
storm. There may be a remote risk of electric shock from lightning.
Do not use the telephone to report a gas leak in the vicinity of the leak.
Save these instructions.
Installation
Inside the package you will find the ClassCo Model PSM585 unit, users
guide, a phone cord, four “AA” batteries (may already be installed) and an
AC power adapter.
1.
Remove the battery door on the underside of the unit by sliding the door
back. Install 4 “AA” batteries. Please be sure to follow the battery
orientation diagram shown below. (If the batteries are already installed,
please be sure to remove the tab next to the upper battery contact.)
NOTE: THE BATTERIES SERVE AS A BACKUP DURING LOSS OF
POWER AND ALLOW THE UNIT TO FUNCTION UNTIL POWER IS
RESTORED. IT IS IMPORTANT TO MAKE SURE THE BATTERIES ARE
FRESH. BE SURE TO CHANGE THE BATTERIES ONCE A YEAR OR
WHEN THE LOW BATTERY CONDITION IS INDICATED ON THE
DISPLAY.
2.
The AC adapter provides power to the unit during normal operation. Plug
the adapter into a standard 120VAC household jack and the connector into
the power jack at the top of the unit (see diagram below.)
NOTE: A SOFT “CHIRP” MAY SOUND UNTIL THE TELEPHONE LINE
IS CONNECTED IN THE NEXT STEP.
3.
Use the supplied phone cord to connect between the LINE jack on the back
of the unit and the telephone jack on your wall.
4.
Connect your telephone set to the PHONE jack on the back of unit. (This
also applies if connecting the base of a cordless phone.) This step is
required if you want to use call waiting ID and dial back features.
5.
OPTIONAL: An ALARM output port is provided for connecting to external
devices such as an X10 PowerHouse™ Module or a central alarm panel.
During an alarm, the two contacts on the alarm connector are “closed.”
When the alarm stops, the contacts are “open.” Push down on the orange
tabs to insert a connection wire. Refer to instructions specific to the device
being connected.
Plug AC adapter into standard 120VAC wall jack
Plug into
telephone
jack on wall
CAUTION: REMOVE TELEPHONE CORD FROM “LINE” JACK BEFORE
INSTALLING OR REPLACING BATTERIES.
Operation
After installation, your unit is ready to receive messages. However, you must
have caller ID or call waiting ID service from your local telephone company in
order for the caller ID features to work.
Messages are classified as Safety, Informative, and Caller ID messages.
Caller ID messages are usually received following the first ring. Safety and
Informative messages can be received following a normal ring, or a very short
ring, or without any ring at all.
About Alarms
Some Safety messages will result in the device sounding an alarm and a public
safety announcement such as “Weather Warning.”
The alarm and
announcements will continue until the condition abates or is cleared by the
emergency management authority in your area.
NOTE: PRESSING ANY KEY WILL IMMEDIATELY STOP THE ALARM
AND ANNOUNCEMENTS FROM SOUNDING.
There are several different alarm sounds, ranging from soft “chirps” to loud
attention signals, much like the sound broadcast by TV stations in the event of an
emergency. After 15 minutes, all alarms will continue only as a soft “chirp” until
they are cleared.
Safety Messages / Red Light. Safety messages are sent by the
emergency management authority in your area to notify you of a
condition where public safety is a concern. Safety messages are
usually accompanied by an alarm and an audible public safety
announcement, and are indicated by a flashing RED light. The red
light will continue to flash until a button is pressed while the message is being
displayed. The red light will stay on until the condition is cleared.
NOTE: THE ALARM SOUND AND ANNOUNCEMENTS WILL STOP
AFTER THE EMERGENCY CONDITION HAS CLEARED. THIS
HAPPENS AUTOMATICALLY AFTER A CERTAIN AMOUNT OF TIME.
Safety messages can be displayed with up to four lines of text and a “call back”
telephone number. Only two lines are displayed on the LCD at any time. When
more lines of text are available, the down-arrow icon on the LCD will be on.
Pressing the MORE key will scroll down to the additional lines.
The call back number is the number to call if you want more information about
the message. It can be dialed directly on any telephone, or dialed automatically
by picking up the phone attached to the unit and pressing the DIAL key.
Informative Messages / Yellow Light. Informative messages serve a
variety of purposes, including community news and information that
may effect your family or be of interest to you. Informative messages
are indicated by a flashing YELLOW light, and may be accompanied by
a soft “chirp” alerting you to a new message. You can stop the “chirp”
from sounding by pressing any button. You can also disable the “chirp” (see
section titled “Setup Options.”) Informative messages are stored in memory and
can be deleted by you any time.
Like Safety messages, Informative messages can be received with up to four
lines of text and a call back number. The yellow light is also used for advising you
of specific device conditions, including low battery, no AC power, or no telephone
service. When one of these conditions exists, a message will be displayed and
the yellow light will be on solid.
Caller ID Messages / Voice Mail Indication / Green Light. The
green light is used for two telephone company services: Caller ID
and Voicemail. If you do not subscribe to these services, the green
light will remain off. The green light will flash if you have new
voicemail and it will remain on solid if you have new Caller ID
messages that have not yet been reviewed. If both conditions exist, the green
light will flash.
The PSM585 is compatible with both FSK and stuttered dialtone systems for
indicating that voicemail message is waiting. When a message waiting is
detected, the unit displays a message waiting “envelope” icon on the LCD, and
will flash the green light. You can choose to have an audible notification (beep
every minute) by selecting the MSG WAIT BEEP option (See section titled
“Setup Options.”)
VoiceAnnounce® Caller ID for Incoming Calls
When the phone rings, the caller’s 10-digit telephone number, audible category
(such as “friends” or “family”), “number unknown”, or “number blocked” is
announced. The telephone number, name listing (for caller ID deluxe customers)
and date and time of the call will also be displayed.
Sometimes the unit will display and announce NUMBER UNKNOWN or
NUMBER BLOCKED. Number unknown means that the telephone company
sends no information about the calling party. Often times this means that the call
is originating from a telemarketer.
Number Blocked means that the caller has decided not to have his or her caller
ID information sent to you. You can advise callers to “Un-Block” by dialing *82
before calling you.
You can disable the call announcement feature by turning the volume off (see
section titled Operating Modes.) Caller ID messages are stored in memory and
can be deleted by you at any time.
NOTE: TURNING THE VOLUME OFF WILL STOP CALLS FROM
BEING ANNOUNCED.
THIS WILL ONLY EFFECT CALLER ID
ANNOUNCEMENTS AND WILL NOT AFFECT PUBLIC SAFETY
ALARMS AND ANNOUNCEMENTS.
If after a call, or while reviewing the call log, you would like to assign the phone
number to one of the audible categories, press the MODE key until SELECT
CATEGORY is displayed. Then press the FWD/REV keys until you hear the
desired category* and finally press the PROGRAM key to assign the caller to the
selected category. From now on when that caller calls you, your unit will speak
out the caller’s category, instead of their number.
* Audible categories are: Friends, Family, Work, School, Don’t Answer, “It’s
for you” (male and female voices), and Dog Barking (woof)
VoiceAnnounce® Caller ID for Call Waiting
If you subscribe to Call Waiting ID service, PSM585 will announce and display
information about your call waiting calls. In order for the unit to identify these
calls, you must be talking on the telephone that’s plugged into the PHONE jack
on the back of the unit. If you want, you can setup the unit to announce only call
waiting callers that have an audible category associated with their phone number
(see section titled Setup Options.)
If you are on another extension using a telephone that supports call-waiting ID,
the PSM585 will announce the identity of the call-waiting caller. This feature is
especially handy if you’re expecting a call when someone else is on the phone.
Operating Modes
There are seven operating modes in the PSM585. Normally, the unit is in
standby mode, waiting for a message. You can go to other modes by pressing
the MODE key. The modes are:
Review Safety – Displays stored Safety messages
Review Info – Displays stored Informative messages
Review Calls – Displays and Announces Caller ID messages (Caller ID Only)
Review Categories – Review/Change category associations (Caller ID only)
Enter Number – Manually enter phone number for a category (Caller ID only)
Select Category – Associate caller to an audible category (Caller ID only)
Adjust Volume – Change volume with FWD/REV keys (Caller ID only)
Standby Mode
The unit will automatically return to standby mode after 20-seconds of inactivity.
In standby mode, the unit displays the number of new Safety and Informative
messages stored in the message log, and the number of new Caller ID
messages stored in the call log.
NOTE: IF THERE IS A SAFETY MESSAGE THAT HAS NOT BEEN
CLEARED BY THE EMERGENCY MANAGEMENT AUTHORITY, THAT
SAFETY MESSAGE WILL APPEAR ON THE DISPLAY INSTEAD OF THE
MESSAGE SUMMARY.
The PSM585 stores Safety, Informative, and Caller ID messages in separate
message logs. You can review the message logs at any time by selecting the
desired review mode using the MODE key. Or you can review all new Safety
messages, followed by new Informative messages and new Caller ID messages
by pressing the FWD or REV keys while the message summary is being
displayed. The REV key reviews messages from newest to oldest. The FWD
key reviews messages from oldest to newest.
Reviewing and Deleting Safety Messages
The PSM585 will store up to 10 Safety messages, each containing up to four
lines of message text and a call back number, along with the date and time of the
message. Use the REV key to review messages from newest to oldest. Use the
FWD key to review messages from oldest to newest. A Safety message that is
still active (red light on) cannot be deleted. When the red light is off, you can
delete a Safety message by pressing the DELETE key. Holding down the
DELETE key for more than 2-seconds will delete all the messages in the log.
Only two lines are displayed on the LCD at any time. When more lines of text
are available, the down-arrow icon the LCD will be on. Pressing the MORE key
will scroll down to the additional lines.
Reviewing and Deleting Informative Messages
The PSM585 will store up to 25 Informative messages, each containing up to
four lines of message text and a call back number, along with the date and time
of the message. Use the REV key to review messages from newest to oldest.
Use the FWD key to review messages from oldest to newest. You can delete the
Informative messages from the log at any time by pressing the DELETE key.
Holding down the DELETE key for more than 2-seconds will delete all the
messages in the log.
Only two lines are displayed on the LCD at any time. When more lines of text
are available, the down-arrow icon the LCD will be on. Pressing the MORE key
will scroll down to the additional lines.
Reviewing and Deleting Caller ID Messages
Your PSM585 will store up to 99 caller ID messages, providing you with the
name and/or number of the last 99 callers. This information is recorded in the call
log as soon as it is received between the first and second ring, even when you
are away from home or choose not to answer a call, or when you get a call
waiting call, provided you have call waiting ID service.
You may review the call log while in standby mode or in REVIEW CALLS mode.
Simply push one of the FWD/REV keys to scroll through each call record – the
caller ID information is displayed on the screen, and if you are in REVIEW
CALLS mode the date, time, audible category, and phone number are
announced. If you push the REV key you will scroll from the most recent call
received backwards to the oldest call in the call log. If you push the FWD key you
will scroll beginning with the oldest call in the log to the most recent one. If you
hold down either review key for more than 2-seconds, the unit will announce the
number of new calls in the call log followed by the date, time, and phone number
of each call.
You can delete a call by pressing the DELETE key while the call is displayed on
the screen. Holding down the DELETE key for more than 2-seconds will delete
all the calls in the log.
Dial Back
You can dial back callers directly from the call log. Use the REV/FWD keys to
locate the person you want to call. With the call information displayed on the
screen, pick up the phone like you normally do to make a call, but instead of
dialing, press the MODE/DIAL key on the caller ID unit. If you’re placing a call
that requires dialing only 7-digits, press the MODE/DIAL key again to complete
the call. If 10-digit or 1+10-digit dialing is necessary to place the call, use the
FWD/REV keys to select the appropriate dialing method, then press the
MODE/DIAL key to complete the call.
Assigning Categories for Callers
What are the Categories? Up to 99 numbers can be associated with any of the
following audible categories: Friends, Family, Work, School, Don’t Answer, “It’s
for you (male & female voices)”, and Dog Barking (woof)
Do you want to assign categories to some of the numbers in your caller ID unit?
If you do that, the categories of those people will be announced instead of their
numbers when they call you.
Press the MODE key so that REVIEW CALLS appears on the display screen of
the caller ID unit. Then press one of the FWD/REV keys at a time to review the
numbers and/or names of the people in the call log.
1.
If the number and/or name of the person to assign to a category appears in
the call log, use the FWD/REV keys to display it. Then go to step 3.
2.
If the number and/or name of the person to assign to a category does not
appear in the call log, press the MODE key until XXX-XXX-XXXX ENTER
NUMBER appears on the display screen of the caller ID unit. Press the
PROGRAM key to select the first digit of the desired number. To move to
the second digit of the desired number, press the FWD key. Use the
PROGRAM key to select a number, then use the FWD key to move to the
next digit. (Note: you can also use the REV key to go to previous digits.)
When the complete number for which you want to select a category appears
on the display screen of the caller ID unit, go to the next step
3.
With the desired number on the display screen of the caller ID unit, press
the MODE key until SELECT CATEGORY appears on the display screen.
4.
Press either FWD/REV key until the category you want for the caller is
announced.
5.
Press the PROGRAM key to assign the category to the caller.
How do I review what I’ve Programmed?
Press and release the MODE key until REVIEW CATEGORY appears on the
display screen. Then press one of the FWD/REV keys to scroll through the
numbers for which you have programmed categories. You’ll hear the category
programmed for each number announced as you scroll through the numbers.
How Do I Delete What I’ve Programmed?
Follow the steps above to review what you’ve programmed until you hear the
caller you want to delete. Then press the DELETE key. The category
association with that caller will be deleted.
Setup Options
You can customize the way your PSM585 works. Hold down the MODE key and
momentarily press the PROGRAM key to enter SETUP MODE. You can change
the option by pushing the PROGRAM key, and can go to the next option by
pressing the MODE key.
RESET – Pressing PROGRAM will cause the unit to enter factory reset state,
clearing memory, displaying software version, performing a memory test and displaying results. ENGLISH -- ON/OFF (Factory ON) Switches English language ON or OFF for all display and announcement functions.
MSG WAIT BEEP -- ON/OFF (Factory OFF) Unit beeps to as audible alert to
message waiting (voice mail) indicator CW CATEGORY – ON/OFF (Factory OFF) Announces only category, or Number Unknown, or Number Blocked for call waiting callers.
SDT DETECT – ON/OFF (Factory OFF) Detects stuttered dial tone for message waiting indication.
EAS ANNOUNCE -- ON/OFF (Factory ON) Announces Public Safety Notice
corresponding to the received EAS code in Safety messages.
DEVICE ALARM – ON/OFF (Factory ON) Chirp sounds when Telephone service or AC power is lost, or battery is low.
NEW INFO ALERT – ON/OFF (Factory ON) Chirp sounds to indicate new
PSM Informative messages.
NEW MSG ALERT -- ON/OFF (Factory OFF) Chirp sounds after any new
message is received CWID DETECT -- ON/OFF (Factory ON) Enables/Disables Caller ID with Call
Waiting feature (requires applicable caller ID services)
Troubleshooting
Having problems? Before contacting ClassCo or your dealer, check the following
list of suggestions. You might be able to solve the problem yourself.
Q: Unit Is Not Responding Properly to Commands.
Remove batteries. Unplug AC adapter for ten seconds then restore power.
Replace batteries.
Q: It’s not announcing calls or messages
Make sure the volume is set correctly (see ADJUST VOLUME mode) Call the telephone company to make sure caller ID service has been activated and is working with your line properly.
Make sure the batteries are good or the power cord is correctly plugged in.
Make sure the phone line coming from the wall is going to the LINE jack on the unit and the phone cord coming from your phone is going to the PHONE jack
on the unit.
Let the phone ring twice before answering, as caller ID information is
announced between the first and second rings.
If you see the words DATA ERROR it means the message is not being properly received by your unit. This could be a problem with the phone company’s service or with your unit. Check your connections first.
Q: It’s not announcing call-waiting calls
Make sure the volume is set correctly (see ADJUST VOLUME mode) Make sure you’re talking on the phone plugged into the back of the caller ID
unit
Make sure the phone line coming from the wall is going to the LINE jack on the unit and the phone cord coming from your phone is going to the PHONE jack
on the unit.
If you have another call waiting ID device, try unplugging it.
Call the telephone company to make sure call waiting ID service has been
activated and is working with your line properly.
FCC Information
Your caller ID unit has been registered with the Federal Communications Commission
(FCC), and it complies with the standards set forth in part 68 of the FCC rules. The FCC
requires that we provide the following information.
Connection And Use:
The FCC requires you to use a modular telephone jack. This equipment may not be used
with party line service or coin-operated telephone lines.
Notification Of The Telephone Company
The FCC requires that upon request of your local telephone company you provide the
following information: the line to which you will connect the caller ID unit (your phone
number), the caller ID units FCC registration number and ringer equivalence number (REN)
(located on the back of your caller ID unit), and the USOC jack required (USOC RJ-11C or
RJ-11W). (note: the REN is useful in determining how many devices you may connect to
your telephone line and still have all of them ring when someone calls your telephone
number. in most, but not all areas, the sum of all RENs should be five or less. Contact your
local telephone company for more information.)
Problems And Repairs
If your caller ID unit is malfunctioning, the FCC requires you to completely disconnect it until
the problem has been solved. If your caller ID unit is harming the nationwide telephone
network, the telephone company may temporarily discontinue your telephone service. The
telephone company will try to notify you before discontinuing service. If advance notice isn’t
possible, the telephone company will notify you as soon as possible. you’ll be given the
opportunity to correct the problem, and you’ll be informed of your right to file a complaint with
the FCC.
Your local telephone company may make changes in facilities, equipment or operations that
affect the proper functioning of your caller ID unit. If such changes are planned, you’ll be
notified and advised of your right to file a complaint with the FCC.
Radio Interference Statement
This equipment has been tested and found to comply with the limits for a class B digital
device, pursuant to Part 15 of the FCC Rules. These limits are designed to provide
reasonable protection against harmful interference in a residential installation.
This
equipment generates, uses, and can radiate harmful radio frequency, and if not installed and
used in accordance with the instructions, may cause harmful interference to radio
communications. However, there is no guarantee that interference will not occur in a
particular installation. If this equipment does cause harmful interference to radio or television
reception, which can be determined by turning the equipment off and on, the user is
encouraged to try to correct the interference by one or more of the following measures:
reorient or relocate the receiving antenna; increase the separation between the equipment
and receiver; connect the equipment to an outlet on a circuit different from that to which the
receiver is connected; consult the dealer or an experienced radio/TV technician for help.
Canadian Statement
Notice: The Canadian Industry and Science Canada label identifies certified equipment. This
certification means that the equipment meets certain telecommunications network protective,
operational and safety requirements.
The department does not guarantee that the
equipment will operate to the user’s satisfaction.
Before installing this equipment, users should ensure that it is permissible to be connected to
the facilities of the local telecommunications company. The equipment must also be
installed using an acceptable method of connection. In some cases, the company’s inside
wiring associated with a single line individual service may be extended by means of a
certified connector assembly (telephone extension cord). The customer should be aware
that compliance with the above conditions may not prevent degradation of service in some
situations.
Repairs to certified equipment should be made by an authorized Canadian maintenance
facility designated by the supplier. Any repairs or alterations made by the user to this
equipment, or equipment malfunctions, may give the telecommunications company cause to
request the user to disconnect this equipment.
Caution: Users should not attempt to make such connections themselves, but should
contact the appropriate electric inspection authority, or electrician, as appropriate.
The load number (LN) assigned to each terminal device denotes the percentage of the total
load to be connected to a telephone loop which is used by the device to prevent overloading.
The termination on a loop may consist of any combination of devices subject only to the
requirement that the total of the load numbers of all the devices does not exceed 100.
Limited Warranty
Who Is Covered?
You must return a completed product registration card within 30 days of receiving
your unit in order to be covered by the manufacturer’s limited warranty.
What Is Covered?
Coverage begins the day you receive your product. For one year thereafter, a
defective or inoperative product will be replaced with a new, renewed or
comparable product at no charge to you. A replacement product is covered only
for the original warranty period. When the warranty on the original product
expires, the warranty on the replacement product also expires.
What Is Excluded?
Your warranty does not cover:
• labor charges for installation or setup of the product and adjustment of
customer controls on the product.
• product replacement because of misuse, accident, unauthorized repair or
other cause not within the control of ClassCo Inc.
• a product that requires modification or adaptation to enable it to operate in any
country other than the country for which it was designed, manufactured,
approved and/or authorized, or repair of products damaged by these
modifications.
• incidental or consequential damages resulting from the product. (Some states
do not allow the exclusion of incidental or consequential damages, so the
above exclusion may not apply to you.)
Where Is Exchange Available?
Contact ClassCo at (888) 252-7726 (888-CLASSCO), or your dealer to arrange
exchange. (In USA, Puerto Rico and U.S. Virgin Islands, all implied warranties,
including implied warranties of merchantability and fitness for a particular
purpose, are limited in duration to the duration of this express warranty. But,
because some states do not allow limitations on how long an implied warranty
may last, this limitation may not apply to you.)
How To Get Out-Of-Warranty Exchange
Contact ClassCo Inc. at (888) 252-7726 (888-CLASSCO) to obtain the cost of
out-of-warranty exchange. This warranty gives you specific legal rights. You may
have other rights which vary from state to state.
Copyright © 2002 ClassCo Inc.
All Rights Reserved
ClassCo® and VoiceAnnounce® are trademarks of ClassCo Inc.
Printed in China
Rev. B 0302DL