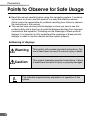
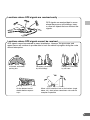
1
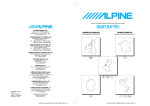
R
R
SERIAL NUMBER:
INSTALLATION DATE:
INSTALLATION TECHNICIAN:
PLACE OF PURCHASE:
ALPINE ELECTRONICS, INC.
Tokyo office: 1-1-8 Nishi Gotanda,
Shinagawa-ku, Tokyo 141-8501, Japan
Tel.: (03) 3494-1101
ALPINE ELECTRONICS OF AMERICA, INC.
19145 Gramercy Place, Torrance,
California 90501, U.S.A.
Tel.: 1-800-ALPINE-1 (1-800-257-4631)
1-888-NAV-HELP (1-888-628-4357)
ALPINE ELECTRONICS OF CANADA, INC.
Suite 203, 7300 Warden Ave. Markham,
Ontario L3R 9Z6, Canada
Tel.: 1-800-ALPINE-1 (1-800-257-4631)
ALPINE ELECTRONICS OF AUSTRALIA PTY. LTD.
6-8 Fiveways Boulevarde Keysborough,
Victoria 3173, Australia
Tel.: (03) 9769-0000
NVE-N852A
DVD Car Navigation System
ALPINE ELECTRONICS GmbH
Kreuzerkamp 7-11 40878 Ratingen,
Germany
Tel.: 02102-45 50
ALPINE ITALIA S.p.A.
Via C. Colombo 8, 20090 Trezzano Sul
Naviglio MI, Italy
Tel.: 02-48 47 81
ALPINE ELECTRONICS FRANCE S.A.R.L.
(RCS PONTOISE B 338 101 280)
98, Rue De La Belle Etoile, Z.I. Paris Nord Il
B.P. 50016 F-95945, Roissy,
Charles De Gaulle Cedex, France
Tel.: 01-48 63 89 89
ALPINE ELECTRONICS OF U.K., LTD.
13 Tanners Drive, Blakelands,
Milton Keynes MK14 5BU, U.K.
Tel.: 01908-61 15 56
Yamagata Printing
Co., Ltd.
2-6-34, Takashima,
Nishi-ku, Yokohama,
Kanagawa, Japan
ALPINE ELECTRONICS DE ESPAÑA, S.A.
Portal De Gamarra 36, Pabellón 32
01013 Vitoria (Alava)-Apdo. 133, Spain
Tel.: 34-45-283588
Designed by ALPINE Japan
Printed in Japan (Y)
68P41262Y44-O
HARDWARE MANUAL
Please read before using this equipment.
PRECAUTIONS
IMPORTANT INFORMATION, PLEASE READ CAREFULLY BEFORE USING THIS PRODUCT.
This product is intended to safely provide turn by turn instruction to get you to a
desired destination. Please read the following precautions to ensure that you use
this navigation system correctly.
✵ This product is not a substitute for your personal judgment. Any route suggestions made by this navigation system may never supersede any local traffic regulations or your personal judgment and/or knowledge of safe driving practices. Do
not follow route suggestions if the navigation system instructs you to perform an
unsafe or illegal maneuver, places you in an unsafe situation, or routes you into
an area which you consider unsafe.
✵ Glance at the screen only when necessary and safe to do so. If prolonged
viewing of the screen is necessary, pull over in a safe and legal manner and location.
✵ Do not input destinations, change settings, or access any functions requiring a
prolonged view of the monitor and/or remote control while you are driving. Pull
over in a safe and legal manner and location before attempting to access the
system.
✵ Do not use the navigation system to route you to emergency services. Not all
locations of emergency service providers such as police and fire stations, hospitals, and clinics are contained in the database. Please use your own judgment and
your ability to ask for directions in these situations.
✵ The map database contained within the media (DVD-ROM) in which it is stored
is the most recent map data available at the time of production. Because of
changes in streets and neighborhoods, there may be situations where the navigation system may not be able to route you to your desired destination. In these
cases, use your own personal judgment.
✵ The map database is designed to provide you with route suggestions, it does
not take account the relative safety of a suggested route, or of factors which may
affect the time required to reach your destination. The system does not reflect
road closures or construction, road characteristics (i.e. type of road surface,
slope or grade, weight or height restrictions, etc.), traffic congestion, weather
conditions, or any other factors which may affect the safety or timing of your
driving experience. Use your personal judgment if the navigation system is unable
to provide you with an alternate route.
2
✵ There may be situations where the navigation system may display the vehicle’s
location erroneously. Use your own driving judgment in this situation, taking into
account current driving conditions. Please be aware that in this situation, the
navigation system should correct the vehicle’s position automatically; however,
there may be times where you may have to correct the position yourself. If this is
the case, pull over in a safe and legal manner and location before attempting
operation.
✵ Make certain that the volume level of the monitor is set to a level which still
allows you to hear outside traffic and emergency vehicles.
✵ Position the monitor so that glancing at the screen can be performed quickly
and easily by the driver. If any adjustments are necessary, pull over in a safe and
legal manner and location.
✵ The monitor used with this system should not be placed in a location which
hinders the driver’s view of any critical elements necessary to operate the vehicle
properly (i.e. the road, mirrors, instruments, vehicle’s surroundings). In addition,
the monitor should not be placed in a location which may obstruct the air bags
should they deploy.
✵ Remember to wear your seat belt at all times when the car is in motion. This
will help you avoid impact with anything in the car’s interior, including the system
itself.
✵ Be sure to reset the system before starting operation whenever the system is
reinstalled on another vehicle. The navigation system measures the distance with
the speedometer pulse. Since the speedometer pulses depend on the vehicle
manufacturer and the tire size, when you buy a new vehicle or replace your tires,
the speedometer pulses are compared with the distance measured with GPS
waves and the distance coefficient is automatically recalibrated.
✵ Do not use a portable telephone or transceiver near the system. Using them
may cause noise or operating error to the system, or prevent for the portable
telephone or transceiver from proper communications. Use them away from the
system.
✵ Please make certain that any other person who intends on using this navigation system reads these precautions and the following instructions carefully.
✵ If there is anything in the manual which you do not understand or are uncertain
about the operation of the navigation system, please contact your local Alpine
authorized navigation dealer or 1-888-NAV-HELP before using the navigation
system.
✵ Should the system become necessary for service or repair, make sure the DVDROM is removed from the main unit. Place the DVD-ROM in its case and ship it
along with the main unit.
3
Precautions
Points to Observe for Safe Usage
a Read this manual carefully before using this navigation system. It contains
instructions on how to use this product in a safe and effective manner.
Alpine cannot be responsible for problems resulting from failure to observe
the instructions in this manual.
a This manual uses various pictorial displays to show you how to use this
product safely and to alert you to potential dangers resulting from improper
connections and operation. Following are the meanings of these pictorial
displays. It is important to fully understand the meanings of these pictorial
displays in order to use this manual and the system properly.
a Meaning of displays
Warning
This symbol will precede important instructions. Failure to heed them can result in serious injury or death.
Caution
This symbol precedes important instructions. Failure
to heed them can result in injury or property damages.
Tips
4
This indicates supplementary explanation of operation of this
system.
Warning
DO NOT OPERATE ANY FUNCTION THAT TAKES YOUR ATTENTION AWAY FROM SAFELY DRIVING YOUR VEHICLE.
Any function that requires your prolonged attention should only be performed after coming to a complete stop. Always stop the vehicle in a
safe location before performing these functions. Failure to do so may
result in an accident.
MINIMIZE DISPLAY VIEWING WHILE DRIVING.
Viewing the display may distract the driver from looking ahead of the
vehicle and cause an accident.
DO NOT FOLLOW ROUTE SUGGESTIONS IF THE NAVIGATION
SYSTEM INSTRUCTS YOU TO PERFORM AN UNSAFE OR ILLEGAL MANEUVER, OR PLACES YOU IN AN UNSAVE SITUATION OR
AREA.
This product is not a substitute for your personal judgment. Any route
suggestions by this system should never supersede any local traffic
regulations or your personal judgment or knowledge of safe driving practice.
KEEP SMALL OBJECTS SUCH AS BATTERIES OUT OF THE
REACH OF CHILDREN.
Swallowing them may result in serious injury. If swallowed, consult a
physician immediately.
DO NOT DISASSEMBLE OR ALTER.
Doing so may result in an accident, fire or electric shock.
USE THE CORRECT AMPERE RATING WHEN REPLACING FUSES.
Failure to do so may result in fire or electric shock.
5
Precautions
Warning
USE THIS PRODUCT FOR MOBILE 12V APPLICATIONS.
Use for other than its designed application may result in fire, electric
shock or other injury.
DO NOT PLACE HANDS, FINGERS OR FOREIGN OBJECTS IN INSERTION SLOTS OR GAPS.
Doing so may result in personal injury or damage to the product.
Caution
DO NOT MIX NEW BATTERIES WITH OLD BATTERIES. INSERT
WITH THE CORRECT BATTERY POLARITY
Do not mix new batteries with old batteries and do not replace with other than
specified batteries. When inserting the batteries, be sure to observe proper polarity
(+ and –) as instructed.
Battery rupture or chemical leakage can cause an injury or equipment malfunction.
HALT USE IMMEDIATELY IF A PROBLEM APPEARS
Failure to do so may cause injury or damages to the product. Return it to
your authorized Alpine dealer or the nearest Alpine Service Station for
repairing.
CAUTION
CAUTION-Laser radiation when open, DO NOT STARE INTO BEAM
(Bottom side player)
6
Table of
Contents
Precautions
Precautions ................................................................................ 2
Points to Observe for Safe Usage ............................................ 4
Warning/Caution ........................................................................ 5
Preface
Navigation systems ................................................................... 8
Before Using This
System
Remote control (RUE-4136)
Names of Parts ....................................................................... 10
Remote Control Reference Guide for Head Unit ................ 11
Remote Control Reference Guide for AV Head Unit .......... 12
Replacing the batteries ......................................................... 13
Remote Control Holder Installation ..................................... 13
Main unit
Inserting the DVD-ROM ......................................................... 14
Removing the DVD-ROM ....................................................... 14
Operation
Turning the System On ........................................................... 15
Reference
In case of difficulty .................................................................. 16
Error messages ........................................................................ 17
Specifications ........................................................................... 18
7
Preface
Navigation systems
This navigation system uses three different sensing devices to determine the present location
and to track the progress of the vehicle. These three sensors are: a GPS (Global Positioning
System) sensor which uses satellites to determine the current position of the vehicle, a gyroscope which determines which direction the vehicle turns, and speedometer pulses which
determine how far the vehicle has traveled. Because this system incorporates a gyroscope
and a speed sensor, the system will be able to display the vehicle's position and track the
vehicle's progress even in areas where the GPS signal may be blocked.
All map data is contained on a removable DVD-ROM. This system integrates this unique map
database with the sensors to automatically plot out a route when a destination is entered.
While driving, the navigation system guides you along the route with pictorial displays and
verbal prompts.
GPS (Global Positioning System)
This system receives signals from 3 or more
GPS satellites (operated by the United States
Department of Defence). They orbit at an
altitude of 13,100 miles (21,000 kilometers) and
determine the vehicle’s position through principles of triangulation.
Error from the actual position of the
vehicle
There may be a delay before the
actual vehicle's position is displayed
Determination of the present vehicle's
position starts when the ignition key is
turned to the ACC or ON positions and
ends when the key is turned OFF. When
the key is first turned to the ACC or ON
positions, there is a slight delay of approximately one to two minutes before the
present vehicle's position can be displayed.
When GPS signals can be received from four or
more satellites, three dimensional positioning
(the latitude, longitude, and altitude) of the
vehicle can be determined. In this case, the
error from the actual position of the vehicle is in
the range of 100 to 655 feet (30 to 200 meters).
When GPS signals can only be received from
three satellites, only two dimensional positioning (latitude and longitude) can be determined,
resulting in a slightly increased error. When
GPS signals can only be received from less
than three satellites, positioning of the vehicle
through GPS is not possible. In addition to the
inherent errors from GPS, the error rate can
also be increased if the United States Department of Defense deliberately changes the
accuracy rate.
Gyroscope
8
The gyroscope is a sensor that accurately
measures the angle by which the direction of
a vehicle or other moving body changes.
Gyroscopes are used in inertial navigation
systems for airliners and ships. In this navi-
gation system, the gyroscope is used together with the speed sensor, making it
possible to display the present position of the
vehicle even in locations where GPS signals
may be blocked.
Locations where GPS signals are received easily
GPS signals are received best in areas
where there are no tall buildings, trees,
or other tall objects that can obstruct the
signals.
Locations where GPS signals cannot be received
GPS signals cannot be received in areas listed below. However, the gyroscope and
speed sensor will continue to provide data to track the vehicle’s progress along the route
without interruption.
In tunnels and indoor
parking lots
On the bottom level of
double-decker expressways
Locations surrounded
by tall buildings
Locations surrounded
by tall trees
When a GPS satellite is low on the horizon (angle
below 10°), obstructions sometimes make normal
reception impossible
9
Before Using This System
Remote control (RUE-4136)
Names of the Parts
Remote Control transmitter
Transmits the remote control signals.
Aim toward the display monitor for
operation.
Joystick/ENTER button
Status indicator
Selects highlighted items within menus
and moves map displays and vehicle
position icon. Press the ENTER button
to select any highlighted function,
screen icon or street segment.
Illuminates when remote is
transmitting.
MP/RG button
Toggles between Detailed Map
Display and Basic Guide Display
during guidance. Switches
directly to Map when not in
guidance.
Zoom/Quick Scroll buttons
Changes map magnification ratio
upward or downward in 9 steps
(1/32, 1/16, 1/8, 1/4, 1/2, 2, 8, 32
and 128 miles). Scroll through
street, city or category listings a
page at a time.
MODE button
S
VO
L.
E
RS
OU
AUDIO/NAV.button
ENTER
/
MP
/RG
MENU button
A PROC.
M
Switches between Audio and
Navigation operations.
Pressing this button illuminates
the highlighted portion of the
display.
BAN
D
E
UT
VOICE
MENU
CANC.
VOICE button
Initiates vocal instruction for next
route maneuver or repeats last
instruction.
Cancels current display screen
and switches back to previous
screen with menus.
3
PLAN
5
6
N/H button
9
Toggles between North Up and
Heading Up orientation.
4
.
7
8
OP/C
DEL.
ON/OFF
0
L
Displays list of the streets
currently set for the route. To
return to the guidance mode,
press the MP/RG button.
CANC. button
DTR 2
1
N/H
Displays the main menu bar.
LIST
FUN
C
LIST button
Press this button to input
numerals using the numeric
keypad. The numerals can be
input while the status indicator
blinks.
OK
DEL. DEST
V SEL.
PLAN button
Allows you to advance to the next
destination in Today's Plan list.
DTR (DETOUR) button
Automatically recalculates route
if a road block or traffic
congestion is encountered.
Numeric Keypad
Deletes the character previously
input.
Use these buttons to enter Phone
numbers, address numbers or
street names containing numbers
(i.e., 42nd St.).
ON/OFF button
OK button
DEL button
Turns the pictorial display on or
off.
Executes numeral inputtings and
starts searching.
DEL DEST. button
Deletes current destination.
Tips
a If an operation is not accepted, the navigation system beeps.
a The Alpine head unit can be operated with the remote control.
For details, refer to pages 11 and 12.
a After pressing the MODE button, the following buttons will be pressed while the status
indicator is blinking : numerals (0 to 9), DEL., and OK.
10
Note: Due to continuous product improvement, specifications are subject to change.
Remote control (RUE-4136)
Remote Control Reference Guide for Head Unit
When you use the Alpine Head Unit, you can operate it with the remote control (supplied with
NVE-N852A.) Change AUDIO/NAV. Switch, on the side of the remote control, to AUDIO.
S
VO
L.
E
RS
OU
2
ENTER
/
%
M
A PROC.
BAN
D
E
UT
VOICE
DTR 2
3
PLAN
4
5
6
7
8
DEL.
0
Button
1
:/J
2
3
4
5
6
7
8
9
!
"
#
$
%
&
VOL.
A PROC.
SOURCE
MUTE
BAND
FUNC.
OP./CL.
9
8
ON/OFF
V SEL.
Numeric Keypad
AUDIO/NAV.
MODE
$
9
OP/C
L
No.
N/H
6
FUN
C
ON/OFF
"
CANC.
.
8
9
MENU
LIST
1
7
&
4
3
5
MP
/RG
1
OK
!
DEL. DEST
V SEL.
#
Description
PUSH: PLAY/PAUSE
Radio mode: Preset Selection (C/B), SEEK UP/DOWN (@/A)
CD/MD Player/Changer mode:
Disc Selection (C/B), Music Sensor (@/A), BW/FF (@/A Hold)
Tape Mode: Program Sensor (C/B), REW/FF (@/A Hold)
Volume Control
Audio Processor
Source Selection
Audio Mute
Radio Band Selection
−
−
Display Angle DOWN (only pressing MODE button.)
Display Angle UP (only pressing MODE button.)
Power ON/OFF
−
−
Switching AUDIO/NAV. Switch to AUDIO side.
Operates 9 to ! (Flashes the Status Indicator for 5 seconds.)
11
Before Using This System
Remote control (RUE-4136)
Remote Control Reference Guide for AV Head Unit
When you use the Alpine head unit with the monitor, you can operate the AV head unit with
the remote control (supplied with NVE-N852A.) Change AUDIO/NAV. Switch, on the side of
the remote control, to AUDIO.
S
VO
L.
E
RS
OU
2
ENTER
/
%
M
A PROC.
BAN
D
E
UT
VOICE
LIST
DTR 2
3
4
5
6
7
8
Button
1
:/J
2
3
4
5
6
VOL.
A PROC.
SOURCE
MUTE
BAND
7
FUNC.
8
9
!
"
#
OP./CL.
9
8
ON/OFF
V SEL.
$
Numeric Keypad
(1 to 6)
%
&
AUDIO/NAV.
MODE
$
9
OP/C
DEL.
0
L
12
No.
N/H
6
FUN
C
ON/OFF
"
CANC.
.
8
9
MENU
PLAN
1
7
&
4
3
5
MP
/RG
1
OK
!
DEL. DEST
V SEL.
#
Description
PUSH: PLAY/PAUSE (CVA-1003)
PUSH: Changes the modes as follows: Volume/Bass/Treble/Fader
(CVA-1005/CVA-1006/IVA-C800/IVA-C801)
PUSH hold: PLAY/PAUSE
(CVA-1005/CVA-1006/IVA-C800/IVA-C801)
Radio mode: Preset Selection (C/B), SEEK UP/DOWN (@/A)
CD/MD Player/Changer mode:
Disc Selection (C/B), Music Sensor (@/A), BW/FF (@/A Hold)
Tape Mode: Program Sensor (C/B), REW/FF (@/A Hold)
Volume Control
Audio Processor
Source Selection
Audio Mute
Radio Band Selection
This function button has the same function as the following models: CVA-1003/CVA-1005/CVA-1006/IVA-C800/IVA-C801.
Indash Display OPEN/CLOSE (only pressing MODE button.)
Indash Display Angle DOWN(only pressing MODE button.)
Indash Display Angle UP(only pressing MODE button.)
Power ON/OFF
Switching V.SEL
This numeric keypad has the same function of the preset buttons
(1 to 6) as the following models: CVA-1003/CVA-1005/CVA-1006/
IVA-C800/IVA-C801.
Switching AUDIO/NAV. Switch to AUDIO side.
Operates 8 to ! (Flashes the Status Indicator for 5 seconds.)
Remote control (RUE-4136)
Tips
a Avoid dropping this remote control or placing it in pants pockets. Doing so may cause
damage to the case or buttons, shorten battery life or cause the system to malfunction.
a To clean this device, wipe it with a dry cloth. (If it is extremely dirty, wipe it with a wrung
damp cloth.) Never use benzene, paint thinner or harsh chemicals which can cause
deterioration of the case or paint.
a Do not expose this remote control to direct sunlight (i.e. on the dashboard) for extended
periods of time.
Replacing the batteries
Use two AAA-type batteries.
1
Open the cover
Opening the battery cover.
Push on the cover and slide it as
indicated by the arrows then the
cover will be removed.
2
Replace the
batteries
Replacing the battery.
Remove the old batteries. Insert
new ones matching the (+) and (–)
polarities as shown in the diagram
inside the remote control.
Note: Attach the blue protective paper side
of double-sided tape onto the console
box, etc.
Close the cover
Closing the cover.
Push the cover in the arrow
direction until a click is heard.
Remote
Control
Remote Control Holder Installation
• If direct sunlight reaches the remote control
mounted on the holder, remove the remote
control from the holder and put it in the
glove compartment.
• If double-sided adhesive tape cannot install
the holder securely, use screws.
3
Remote Control
Holder
Reinforcing Screws
Double-Sided
Adhesive Tape
(Before attaching
the tape, make
sure the mounting location is
free from dust or
dirt.)
Protective Paper
Console Box etc.
13
Before Using This System
Main unit
DVD-ROM compartment
door
a Keep the door closed except when
changing the DVD-ROM.
a Before inserting or removing the DVDROM, always turn the ignition key to
ACC or ON. You cannot remove or
Tips
insert the DVD-ROM with the ignition
key turned OFF.
a Do not insert any DVD Video discs or
map DVD-ROM.
Inserting the DVD-ROM
1
Press the door in gently
then slide it downwards.
If a DVD-ROM is already in the main
unit, the DVD-ROM is automatically
ejected part way.
2
Insert the DVD-ROM with
the label side facing up.
As you partially insert the DVDROM into the unit, it is automatically
pulled into the navigation system.
Tips
3
1
Press the door in gently
then slide it downwards.
The DVD-ROM is automatically ejected part way.
If the DVD-ROM is not removed, it is
automatically drawn back into the
player after a while.
Caution Never close the door while the
DVD-ROM is being unloaded.
Doing so could scratch the DVDROM or damage the player.
Do not touch the surface of
the disc directly with your
fingers.
Close the door.
Be sure to close the door to prevent
dust from getting inside.
Tips
14
Removing the DVD-ROM
a The DVD-ROM is a delicate device. Avoid dropping or scratching
it.
a Keep the DVD-ROM away from dust and moisture.
Operation
Turning the System On
1
Turn the ignition key to the ACC or ON
position.
The opening screen appears on the
monitor display.
2
Insert your DVD-ROM. For instructions
on inserting the DVD-ROM, see page 14.
3
After completing the above steps,
please refer to the DVD-ROM user's
guide to learn more about your navigation system software.
15
Reference
Reference
In case of difficulty
If you encounter a problem, please review the items in the following checklist. This guide will help
you isolate the problem if the unit is at fault. Otherwise, make sure the rest of your system is
properly connected or consult your authorized Alpine dealer.
Symptom
Solution
Blown fuse
Replace with a fuse of the same rating.
Ambient temperature over
122°F (50°C)
Lower the temperature in the vehicle
below 122°F (50°C) by driving with the
windows open or air conditioner on.
Moisture condensation
Allow enough time for condensation to
evaporate (about 1 hour, depending on
ambient temperature and humidity).
The present
vehicle position
cannot be
measured
correctly.
The vehicle position
changed after the ignition
was switched off.
• Movement on a ferry boat
• Rotation of a parking lot
turntable
• Movement by tow truck
Drive the vehicle in an area of good GPS
reception to allow the unit to recalibrate
itself.
Vehicle position
is displayed
incorrectly on
the screen
Poor satellite configuration
Move to a location where GPS satellite
reception is easy.
Screen not
displayed
The navigation monitor is
turned off.
No operation/
No display
16
Cause
Measurement is 2 dimensional
Press the ON button on the remote
control.
"CANNOT READ The disc is dirty.
DISC" is disThe pickup lens is dirty.
played for a
certain operation.
Clean the disc.
Unstable operation
Replace the remote control batteries.
The remote control batteries
are wearing out.
Have the pickup lens cleaned periodically.
Error messages
Various messages are displayed on the screen during operation. In addition to the messages
telling you the current status or providing guidance for the next maneuver, the following error
messages may appear. If one of these error messages is displayed, carefully follow the instructions in the solution column.
Message
Cause
Solution
Please insert DVDROM/map data disk.
• The disc has been removed.
• There was no disc in the
system when the power was
switched on.
Insert the disc (sold
separately).
DVD-ROM unreadable.
Please check DVDROM.
• A disc that the system cannot
read has been loaded.
• The disc is dirty or upside
down.
Insert the map disc.
• The disc cannot be read
because of condensation.
Take out the disc, check if it
was upside down, clean it if
necessary, then re-insert it.
Take out the disc, allow
enough time for condensation
to evaporate (about 1 hour),
then re-insert the disc.
DVD-ROM being
checked.
• A disc was just inserted
• Vibration or the like made it
impossible to read the disc.
When the disc check is
complete, the following screen
is displayed automatically.
Menu inoperable while
driving. Please bring
vehicle to stop at safe
place and pull parking
brake before using this
function.
• The MENU button was
pressed while the vehicle was
running.
• A menu selection operation
was carried out while the
vehicle was running.
Move the vehicle to a safe
location, stop, and engage the
parking brake, then carry out
this operation.
17
Reference
Specifications
Power requirement
14.4 VDC (11 – 16 V allowable)
negative ground
Operating temperature (main
unit)
14°F to 122°F (–10°C to +50°C)
Antenna type
Micro-strip planar antenna
Reception frequency
1575.42 ± 1 MHz
Reception sensitivity
–130 dB max.
Reception method
Parallel 12 channels
Typical: 1.0 A
Current consumption
Maximum: 2 A
Wave length: 655 nm
Pickup
Laser Power: CLASS II
External dimensions (W × H × D)
Navigation unit
Antenna
Remote control
Weight
3 × 2 × 7—"
9
7—
16
4
(196 × 50 × 191.5 mm)
5
9 × 2"
1— × —
8
16
(42 × 14 × 51 mm)
13 × 4—"
21
2 × 1—
32
32
(51 × 36 × 118 mm)
Navigation unit
3 lbs. 4 oz
(1.474 kg)
Antenna
4.6 oz
(0.13 kg)
Remote control
2.1 oz
(0.060 kg)
Accessories
Product
Installation parts
Antenna
Remote control
Batteries (AAA)
Power connector
Display connector
18
Q'ty
Product
Q'ty
1 set
1 set
1 set
2
1
1
Hardware Manual, card
1 set
Note
19