1
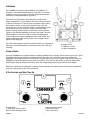
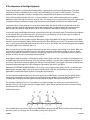
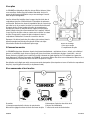
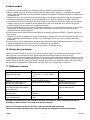
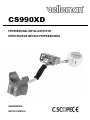
CS990XD
PROFESSIONAL METAL DETECTOR
DÉTECTEUR DE MÉTAUX PROFESSIONNEL
USER MANUAL
NOTICE D’EMPLOI
CS990XD – PROFESSIONAL METAL DETECTOR
1.Introduction
To all residents of the European Union
Important environmental information about this product
This symbol on the device or the package indicates that disposal of the device after its lifecycle could harm the
environment. Do not dispose of the unit (or batteries) as unsorted municipal waste; it should be taken to a
specialized company for recycling. This device should be returned to your distributor or to a local recycling service.
Respect the local environmental rules.
If in doubt, contact your local waste disposal authorities.
Thank you for choosing Velleman! Please read the manual thoroughly before bringing this device into service. If the device was
damaged in transit, do not install or use it and contact your dealer.
C.SCOPE® detectors are recognised as the finest detectors available. They are designed with lasting quality, high
technology, and above all, value for money. The only way to realise this value is to carefully study and understand the
instruction manual. You will then be able to obtain all the advantages designed into your detector. It is also strongly
recommended that you experiment with the detector’s operation in air using various test samples, in order to learn to identify
and understand the detector’s capabilities and responses. Always remember that becoming a good metal detectorist is like
becoming a good photographer of fisherman, that is, although it is an advantage to buy the best equipment, having bought it,
patience and hours of practice are needed to become proficient.
2.Description
A. battery compartment
B. upper stem and handle grips
C. control box
D. stem connecting nut
E. cable
F. lower stem
G.search head and fastener
3.Assembly
Insert the lower stem into the upper stem. Tuck the cable into the cable slots in the lower stem to prevent it trailing over the
search head. Rotate the lower stem to wrap the cable around the stems and take up any slack and twist the stem lock to hold
the lower stem in position.
CS990XD
3
VELLEMAN
4.Batteries
The CS990XD is powered by eight AA batteries (not supplied). It is
advisable to use standard alkaline batteries to start with. You can then
evaluate the sort of use you give the detector and decide whether the
investment in rechargeable batteries is justified.
The batteries should be fitted in the holder which is located in the
battery compartment. To fit new batteries first check if the power switch
on the unit is switched off. Then loosen the two captive screws located
in the battery cover (do not fully remove these from the cover) and
remove the cover. Inside is the battery holder. Lift out the battery holder
and detach the plug on the connector. Load the holder with eight
batteries ensuring that each battery is inserted the correct way round
(direction of the batteries alternating as shown on the holder). Roll each
individual battery to ensure it is located correctly and making proper
contact. Replace the connector making sure that it is well-seated, and
put the loaded holder in the housing. Fit the cover and tighten the two
captive screws finger tight.
Note: Zinc-carbon batteries should not be left in the detector for long periods
where they could leak. Remember to remove them at the end of the day’s
searching.
H. charger socket
I. headphones socket
J. battery compartment
5.How It Works
Inside the CS990XD are two separate detectors operating simultaneously. An “inland” detector which is factory set to ignore
mineralised inland ground and gives a positive response to all metals, and a “beach/disc” detector operating at the
(adjustable) wet salt sand exclude level, which gives a negative response to iron. By using the switches on the front of the
CS990XD to combine the signals from the above two detectors, it is possible for the operator to detect all targets whilst
eliminating the effects of the ground, and at the same time distinguishing between the good and the reject targets.
Detection is indicated by the loudspeaker sounding off (the loudspeaker is located in the rear of the battery compartment),
and by the moving meter needle (in the facia panel).
6.The Controls and What They Do
K. signal meter
L. on/off switch and tune control
M.level control and battery check
CS990XD
N. ground exclusion switch
O.retune push button
P. disc mode switch
4
VELLEMAN
• On/Off Switch and Tune Control
This control is a combined on/off switch and rotary tune control. Fully anticlockwise to the clicked position is power off.
To turn the detector on, rotate the control clockwise from its indented off position. To tune the detector, adjust the control to
give the preferred level of audio (from the internal loudspeaker or headphones). For best performance, the audio should be
adjusted to threshold, when the sound is just beginning to break through, since this is when the ear is most sensitive to small
changes, and it is important to maintain this threshold when searching to achieve the maximum depth.
The meter gives a visual indication of the audio level (unless battery check or meter disc is selected) and will read midscale
when tuned at threshold.
The tune control is used in conjunction with the retune button which should be depressed when making adjustments to the
controls.
• Retune Push Button
Should the audio level change during searching other than resulting from a target, such as from drift occurring from warming
up, press (and release) the retune button to recover the threshold sound as set on the tune control. The retune button should
also be held down when making adjustments to any of the detector’s controls.
• Ground Exclusion Switch and Disc Mode Switch
Firstly, what is ground exclusion?
On some sites mineralisation caused by iron oxides makes it difficult to operate a detector successfully. The effect of these
minerals is termed ground effect. In practice, if the detector is not correctly adjusted, the signal alters if the search head is not
swept at a constant height above the ground. However, by operating the detector at the correct exclude point this ground
signal can be eliminated. The elimination of this signal is known as ground effect exclusion or simply ground exclusion. When
operated at the inland ground exclude point, all metals give a positive response so this is sometimes called all-metal mode.
What is discrimination (disc)?
Like mineralised ground, metals and wet salt sand too, have a characteristic exclude point. By operating the detector at the
beach exclude point, iron and small ferrous items produce a negative response, but valuable targets still produce a positive
signal. By operating at a higher exclude point, still small pieces of silver (aluminium) paper will also produce a negative
(reject) signal.
• Level Control
The discrimination level of the beach/disc detector in the CS990XD is centred at about that of wet salt sand but can be varied
from iron reject through aluminium foil reject by adjusting the level control. (The level control also adjusts the exclude point of
the meter disc and meter + audio disc.)
• Inland and Disc Mode Switch
With inland selected the CS990XD operates at a fixed level of ground discrimination. This inland ground exclude point is
factory set on the CS990XD. All metal targets will produce an increase in audio volume in this mode regardless of the level
control setting. The beach/disc detector remains operating and can be selected to drive the meter or control the audio pitch
by selection on the disc mode switch. The level of discrimination of the beach/disc detector can be adjusted by the level
control.
The inland mode is used on mineralised inland sites and can be used in conjunction with any one of the disc modes
described below.
By selecting the meter disc mode the meter needle moves to the right for good targets and to the left for reject targets.
By selecting the meter + audio disc mode the meter moves to the right for good targets and to the left for reject targets and
the audio pitch increases for good targets and decreases for reject targets.
CS990XD
5
VELLEMAN
By selecting none the meter needle moves to the right for all targets and the pitch remains constant.
• Beach and Disc Mode Switch and Level Control
Due to the varying nature of beach soils (the salinity and wetness) the CS990XD is equipped with an adjustable level of
ground exclude in beach mode. It is the mode best suited to beach detecting where fine adjustment of the level control is
required to exclude wet sand.
By selecting the meter disc mode the meter needle moves to the right for good targets and to the left for reject targets.
By selecting none the meter needle moves to the right for good targets and to the left for reject targets (same as meter disc
since it is ion beach mode).
Selecting meter + audio disc gives a pitch increase to good targets, reject targets are ignored.
The inland detector plays no part when beach mode is selected and is switched off.
Only use the beach mode on the beach or at inland sites where there is no mineralisation and where you do not wish the
detector to sound off over iron.
It should be apparent from the above that the level control acts primarily as ground exclude control in beach mode, and
secondly varies the discrimination point when operating in meter disc or meter + audio disc mode.
• Battery Check
A battery condition indicator is provided on the detector. To do this for the first time prior to reading the remainder of the
operating instructions proceed as follows: turn the power on/off, tune control on. Turn the level control fully anticlockwise to
the battery check position. The meter will indicate in the green battery symbol area if the batteries are good. Rechargeable
batteries will not read as high into the green as standard batteries even when fully charged. They also give less indication of
discharge in the meter during use. Remember to switch out the battery check function when you have checked the batteries.
7.General Hints
• Detection Range
Your CS990XD is a top performance detector but adverse soil conditions can significantly reduce the depth of detection.
Detection ranges will vary depending on the size of the object, the length of time an object has been buried, and the type of
ground the object is buried in.
The best ground conditions are well compacted soils and coins can be found at the greatest depth if the object has been
buried for some time and the coin has interacted with the salts in the ground, thereby appearing larger to the detector. Worst
conditions for detecting are on loosely compacted or freshly dug ground or when the object has only recently been buried. In
these conditions detection range will be reduced. Ninety percent of all artefacts are found within 15cm of the surface.
• Anomalies
Iron, unlike a coin, occurs in a multitude of shapes and sizes and as result it is possible that large pieces of iron may give a
positive reading. Confusing signals can occur in the first few centimetres below the search head, and are typically
characterised by a double signal from the same object, usually iron, which often ranges from a strong positive to a strong
negative signal. To overcome these problems simply raise the search head, retuning if necessary, and rescan until a clear
signal of rejection or acceptance is obtained.
• Headphones
Use stereo headphones or mono but not stereo switched to mono. Use of headphones is recommended as it eliminates
extraneous noises and will extend battery life. Insertion of headphones automatically mutes the loudspeaker. The 6.35mm
(¼”) headphones socket is located on the front of the battery compartment.
CS990XD
6
VELLEMAN
8.The Importance of the Right Approach
Treasure hunting can be a profitable and rewarding hobby, if approached in a patient and diligent manner. Time spent
researching to locate a worthwhile site for a search can be time-wasting if your search is hasty and erratic. To achieve
maximum results is important to decide on your approach to any particular site in advance of the actual search.
Tactics will be decided by the type of the site – it is more profitable to scan a small area thoroughly than to conduct a
haphazard search of the total site. However, when the site is too far away for you to make several return visits, a plan should
be adopted which gives maximum coverage, at the same time as indicating the most likely area for detailed search.
Your detector alone is not a guarantee of successful treasure hunting. Any detector needs an operator and for the best
results the operator needs the right approach, attitude and technique. Many a beginner neglects the importance for preplanning and research before using his detector in the field, and patience and technique during the actual search.
A successful search should begin with research some time before the day of the actual search. The extent and thoroughness
of your research will be one of the major factors in the success of your detecting. You should aim to get as complete an
understanding as possible of the local history and geography.
The key of the choice of site is to think of people. Where have people congregated over the past few hundred years? What
were their customs and pursuits? Where did they spend money? Where did they carry money? The answers are not Roman
sites, nor are they associated with mystical treasure stories of crocks of gold. Rather, they are assuming places like footpaths
and ancient rights-of-way, old houses and so on.
When you have chosen your site, allocate a whole day from early in the morning to early evening for the search. Make sure
you have all the equipment you are likely to need. Your detector should be checked before starting out, and you should
always carry a spare set of batteries. You will also need a strong, sharp trowel. It is also a good idea to have a set of lines
and pins so that you can lay out your search area scientifically.
Most beginners make the mistake of rushing about hoping to chance upon a rare find. If, for example, there happened to be
a valuable ring that was buried 10cm deep on the site you were searching, if you rushed about haphazardly and quickly on
the site, the odds would be very much against you finding it. On the other hand, if you pegged out the area scientifically and
searched slowly and thoroughly, the odds of finding the ring would be very much in your favour.
Remember, BE PATIENT and WORK SLOWLY. Do not try to cover too large an area, restrict yourself to a small area and
work through it thoroughly. Make a note of the position and the extent of the area, and the when you return you can start
again further on without missing any ground or covering the same area twice.
It is also important to keep the detector as close to the ground as possible. Ideally, you should “iron” the ground with the
search head of the detector, so that you do not lose any detection range. Similarly, if you work slowly and carefully you
should be able to distinguish the faint signals as well as the clear-cut signals and further increase your finds.
The technique of getting the best out of your detector is not learnt overnight. You need to get as much experience as
possible so that you can recognise every kind of signal. Indeed, a good detector operator can often tell you what is being
detected before it is unearthed.
Search head position:
It is essential that the search head is kept as close and parallel to the ground as in B. Do not hold the search head too high
above the ground, or at an angle as in A, C and D as you may miss out on finds.
CS990XD
7
VELLEMAN
9.Code of Conduct
1. Do not trespass. Ask permission before venturing on to any private land.
2. Respect the Country Code. Do not leave gates open when crossing the fields, and do not damage crops or frighten
animals.
3. Do not leave a mess. It is simple to extract a coin or other small objects buried a few inches under the ground without
digging a great hole. Use a sharpened trowel or knife to cut a neat circle or triangle (do not remove the plug of earth
entirely from the ground): extract the object, replace the soil and grass carefully and evenly.
4. Help to keep your country tidy. Bottle tops, silver paper and tin cans are the last thing you should throw away. You could
well be digging them up again next year. Do yourself and the community a favour by taking the rusty iron and junk you find
to the nearest litter bin.
5. If you discover any live ammunition or any lethal objects such as an unexploded bomb or mine, do not touch it. Mark the
site carefully and report the find to the local police.
6. Report any unusual historical finds to the landowner.
7. Familiarise yourself with the law relating to the archaeological sites. Remember it is illegal for anyone to use a metal
detector on a scheduled ancient monument unless permission has been obtained from the Historic Buildings and Ancient
Monument Commission for England or the Secretary of State for the Environment in Scotland and Wales.
8. Remember that when you are out with your metal detector, you are an ambassador for your hobby. Do nothing that may
give it a bad name.
9. The law relating to treasure finds must be followed. Contact the authorities and inform yourself.
10. Care for Your Detector
When not in use your detector should be stored in a dry and warm environment. If it is not to be used for a certain length of
time it is advisable to remove the batteries to avoid leakage which could cause serious damage. The working life of your
detector will be shortened by careless use or neglect of the unit. Think of your detector as a scientific instrument. Your
detector is designed to withstand rugged handling on any terrain, but misuse or lack of due attention will tell in the end. After
using your detector in a hostile environment (salt water, sand, etc.) the exterior parts should be rinsed with clean fresh water,
paying particular attention to the head and stems, then carefully wipe dry.
11. Troubleshooting
Problem
Meter needle does not move as you
adjust the tune control
Meter needle appears to be stuck
New batteries fitted but unit will not
switch on
New batteries fitted but battery check
reading indicates low
Detector is switched on but appears
not to be working
Detector does not work on
headphones
Possible Cause
The detector is in meter disc mode or
meter + audio disc mode
The level control switch has been left
in battery check position
Batteries are not making contact in the
battery holder
One battery inserted incorrectly
Headphone adapter left in headphone
socket
Stereo/mono headphones switched to
mono
Solution
Switch mode to none
Switch out battery check mode
Remove the battery holder and roll out
the individual batteries in the holder
Remove the battery holder and
reverse incorrect battery
Remove the adapter
Switch headphone to stereo
Use this device with original accessories only. Velleman nv cannot be held responsible in the event of damage or
injury resulted from (incorrect) use of this device.
For more info concerning this product, please visit our website www.velleman.eu.
The information in this manual is subject to change without prior notice.
CS990XD
8
VELLEMAN
CS990XD – PROFESSIONAL METAL DETECTOR
1.Introduction
Aux résidents de l'Union européenne
Des informations environnementales importantes concernant ce produit
Ce symbole sur l'appareil ou l'emballage indique que l’élimination d’un appareil en fin de vie peut polluer
l'environnement. Ne pas jeter un appareil électrique ou électronique (et des piles éventuelles) parmi les déchets
municipaux non sujets au tri sélectif ; une déchèterie traitera l’appareil en question. Renvoyer les équipements
usagés à votre fournisseur ou à un service de recyclage local. Il convient de respecter la réglementation locale
relative à la protection de l’environnement.
En cas de questions, contacter les autorités locales pour élimination.
Nous vous remercions de votre achat ! Lire la présente notice attentivement avant la mise en service de l’appareil. Si
l’appareil a été endommagé pendant le transport, ne pas l’installer et consulter votre revendeur.
Les détecteurs de métaux C.SCOPE® sont des détecteurs mondialement connus comme étant des détecteurs haute qualité
intégrant une technologie supérieure et d’un excellent rapport qualité-prix. Vous réaliserez l’ampleur de votre achat en lisant
attentivement cette notice qui vous expliquera comment profiter de toutes les fonctions de ce détecteur. Nous vous
conseillons d’expérimenter avec son fonctionnement à l’extérieur en utilisant de nombreux échantillons afin d’apprendre à
identifier les signaux émis par le détecteur. N’oubliez pas que le chemin du prospecteur compétent est similaire à celui du
photographe ou du pêcheur : s’il est toujours un avantage à acheter le meilleur matériel sur le marché, c’est sans aucun
doute la patience et des heures de prospection qui seront la clef du succès…
2.Description
A. compartiment des piles
B. haut de canne et poignée
C. unité de commande
D. raccord des cannes
E. câble
F. bas de canne
G.disque et raccord
3.Assemblage
Insérez le bas de canne dans le haut de canne. Passez le câble dans les fentes du bas de canne afin d’éviter qu’il ne traîne
sur le disque. Tournez le bas de canne pour que le câble s’enroule autour de la canne. Resserrez et tournez le raccord de la
canne afin de fixer le bas de canne.
CS990XD
9
VELLEMAN
4.Les piles
Le CS990XD est alimenté par huit piles de type R6 (not incluses). Nous
vous conseillons d’utiliser des piles alcalines standards. Au fur et à
mesure de la fréquence d’utilisation vous pourrez envisager à investir
dans des piles rechargeables.
Les piles doivent être installées dans le support de piles situé dans le
compartiment des piles. Vérifiez d’abord si l’interrupteur de puissance
est désactivé. Desserrez les deux vis imperdables dans le couvercle (ne
pas retirer les vis du couvercle) et retirez le couvercle afin de découvrir
le support de piles. Sortez le support de piles du compartiment et
déconnectez. Insérez les huit piles dans le support en respectant la
polarité (direction des piles comme mentionné sur le support). Veillez à
ce que les pôles des piles soient en contact avec les bornes en roulant
les piles. Reconnectez le support de piles et replacez-le dans le
compartiment. Réinstallez le couvercle et serrez les deux vis.
Remarque : Ne laissez jamais des piles salines (zinc-carbone) dans le
détecteur pendant une période prolongée afin d’éviter tout risque
d’écoulement. Retirez-les du détecteur après usage.
5.Comment sa marche
H. prise de recharge
I. prise pour casque
J. compartiment des piles
Le CS990XD intègre deux détecteurs séparés fonctionnant simultanément : un détecteur de terre « inland » pré-calibré qui
ignore le sol minéralisé et qui donne un signal positif à tous les métaux, et un détecteur de plage « beach/disc » avec un
niveau d’exclusion (réglable) pour le sable salé mouillé et donnant un signal négatif au fer. En combinant les signaux des
deux détecteurs à l’aide des commandes du CS990XD, vous pourrez détecter des cibles tout en éliminant les effets de sol et
simultanément faire une distinction entre une cible à accepter ou à rejeter.
Une détection est indiquée par un bip sonore provenant du haut-parleur (le haut-parleur se trouve à l’arrière du compartiment
des piles), et par l’aiguille du vumètre (su le panneau frontal).
6.Les commandes et leur fonction
K. vumètre
N. interrupteur d’exclusion des effets de sol
L. interrupteur marche/arrêt et bouton de syntonisation
O.bouton de réinitialisation
M.bouton de réglage de niveau et témoin de niveau des piles P. sélecteur de mode de discrimination
CS990XD
10
VELLEMAN
• Interrupteur marche/arrêt et bouton de syntonisation
Ce bouton combine l’interrupteur marche/arrêt et un syntoniseur. Tournez ce bouton entièrement vers la gauche pour
éteindre le détecteur.
Allumez le détecteur en tournant le bouton vers la droite : vous entendrez un déclic. Syntonisez en ajustant le bouton
jusqu’au niveau audio souhaité (depuis le haut-parleur ou le casque d’écoute). Pour les meilleurs résultats, ajustez l’audio
jusqu’au seuil (là où le son commence à être audible). Il est important de maintenir ce seuil lors de la détection afin d’obtenir
la profondeur maximale.
Le vumètre affiche une indication visuelle du niveau audio (sauf si le témoin de niveau des piles ou la discrimination est
activé) en plaçant l’aiguille au milieu lorsque le détecteur est syntonisé sur le seuil sonore.
Utilisez le bouton de syntonisation en combinaison avec le bouton de réinitialisation.
• Bouton de réinitialisation
Enfoncez (et relâchez) le bouton de réinitialisation afin de réinitialiser le seuil sonore lors d’une modification du niveau audio
résultant d’un phénomène autre que la découverte d’une cible. Maintenez enfoncé le bouton de réinitialisation lorsque vous
actionnez une des commandes.
• Interrupteur d’exclusion des effets de sol et Switch and Disc Mode Switch
D’abord, qu’est-ce que l’exclusion des effets de sol ?
Certains sites rendent la détection difficile à cause de la minéralisation du sol due aux oxydes de fer. Cet effet est
communément appelé l’effet de sol. En réalité, si le détecteur n’est pas bien calibré, le signal modifie lorsque vous ne
balayez pas le disque à ras le sol. Cependant, en calibrant le détecteur, vous éliminerez ce signal provenant du sol. On
appelle l’élimination du signal l’exclusion des effets de sol. En mode terre, tous les métaux donnent un signal positif.
Qu’est-ce que la discrimination (disc) ?
Tout comme un sol minéralisé, les métaux et le sable salé mouillé ont également un point d’exclusion. En utilisant le
détecteur en mode plage, le fer et les éclats ferreux donneront un signal négatif contrairement aux objets dis de valeurs qui
donneront un signal positif. Un calibrant le détecteur sur un point d’exclusion plus élevé, les petits objets en argent
(aluminium) donneront également un signal négatif.
• Niveau de discrimination
Le niveau de discrimination du détecteur de plage du CS990XD est pré-calibré sur du sable salé mouillé mais peut être
calibré sur un niveau de rejection d’éclats de fer ou d’aluminium. (Le bouton de réglage de niveau calibre également le point
de discrimination « meter disc » et « meter + audio disc ».)
• Mode terre et sélecteur de mode de discrimination
En mode terre, le CS990XD fonctionne à un niveau de discrimination fixe étalonné par le fabricant. Toutes les cibles
métalliques émettront un signal sonore supérieur quel que soit le niveau instauré. Le détecteur de plage reste activé et peut
être sélectionné pour alimenter le vumètre ou pour régler le niveau sonore avec le sélecteur de mode de discrimination. Le
niveau de discrimination du détecteur de plage peut être réglé avec le bouton de réglage de niveau.
Le mode terre est utilisé pour la détection sur un terrain minéralisé et peut fonctionner en combinaison avec un des modes
de discrimination ci-dessous.
Sélection du mode « meter disc » : l’aiguille se déplace vers la droite pour des cibles à accepter et vers la gauche pour des
cibles à rejeter.
Sélection du mode « meter + audio disc » : l’aiguille se déplace vers la droite pour des cibles à accepter et vers la gauche
pour des cibles à rejeter. Le niveau sonore augmente pour des cibles à accepter et diminue pour des cibles à rejeter.
Sélection du mode « none » : l’aiguille se déplace vers la droite pour toutes les cibles et le niveau sonore reste constant.
CS990XD
11
VELLEMAN
• Mode plage et sélecteur de mode de discrimination et bouton de réglage de niveau
Le CS990XD possède un niveau de discrimination ajustable en mode plage, ce qui s’avère pratique lors de la prospection
sur du sable. À cause de la nature variante du sable (salinité et humidité) un peaufinage du niveau de discrimination peut
éliminer les signaux provenant du sable.
Sélection du mode « meter disc » : l’aiguille se déplace vers la droite pour des cibles à accepter et vers la gauche pour des
cibles à rejeter.
Sélection du mode « none » : l’aiguille se déplace vers la droite pour des cibles à accepter et vers la gauche pour des cibles
à rejeter (identiquement au mode « meter disc » puisque le détecteur se trouve en mode plage).
Sélection du mode « meter + audio disc » : le niveau sonore augmente pour des cibles à accepter et les cibles à rejeter sont
ignorés.
Le détecteur de terre ne joue aucun rôle en mode plage et sera donc désactivé.
N’utilisez le mode plage que sur les plages et sur des terrains sans minéralisation et là où vous ne désirez pas que le
détecteur vous signale la présence d’un objet ferreux.
Bref : le bouton de réglage du niveau sert principalement comme éliminateur des effets de sol en mode plage et comme
régulateur de niveau de discrimination en mode « meter disc » ou « meter + audio disc ».
• Témoin de niveau des piles
Le détecteur est équipé d’un témoin de niveau des piles. Effectuez un essai avant chaque détection : allumer le détecteur à
l’aide de l’interrupteur marche/arrêt et placer le bouton de syntonisation sur le mode de témoin de niveau des piles. L’aiguille
se positionne dans le niveau vert si les piles sont assez puissantes. Notez que des piles rechargeables n’afficheront jamais
un niveau aussi que celui de piles standards, même lorsqu’elles sont entièrement rechargées. Elles afficheront également un
niveau d’use inférieure. N’oubliez pas de désactiver la fonction après la vérification du niveau des piles.
7.Quelques tuyaux
• Plage de détection
Votre CS990XD est un détecteur de métaux haute qualité. Cependant, des conditions de sol difficiles peuvent
considérablement réduire la profondeur de détection. La plage de détection varie selon la taille de la cible, la période
d’enterrement de la cible et le type de sol dans lequel la cible est enterrée.
Les sols les plus propices à la prospection sont des sols bien compacts. Vous détecterez une pièce de monnaie à une
grande profondeur, la cible ayant réagit avec les minéraux dans le sol et émettant ainsi un signal plus fort. Les sols
diminuant la plage de détection sont des sols moins compacts ou fraîchement labourés, ou lorsque la cible a été enterrée
récemment. Quatre-vingt-dix pourcent des trouvailles sont font à une profondeur de 15 cm.
• Anomalies
Le fer, contrairement à une pièce de monnaie, se présente sous diverses formes. Par conséquent, il est possible qu’un objet
en fer de grande taille émette un signal positif. Des signaux perturbants peuvent se situer à quelques centimètres sous le
disque et sont caractérisés par un double signal positif et négatif, généralement provenant du fer. Pour y remédier, levez
simplement le disque, réinitialisez si nécessaire, et balayez jusqu’à ce que le signal indique clairement une rejection ou une
acceptation.
• Casque d’écoute
Utilisez un casque stéréo ou mono et évitez un casque stéréo utilisé en mono. Nous conseillons l’utilisation d’un casque
puisqu’il élimine les bruits étrangers et prolongera la durée de vie des piles. Le raccordement d’un casque coupera
automatiquement le haut-parleur. La prise 6,35 mm (¼”) se trouve sur la partie frontale du compartiment des piles.
CS990XD
12
VELLEMAN
8.L’importance d’une bonne approche
La chasse au trésor est un loisir lucratif à condition de le pratiquer avec dévouement et de la patience. Le temps consacré à
la recherche d’un site qui en vaut la peine peut être très long si votre recherche est précipitée et mal organisée. Il est donc
important de préparer votre approche.
Cette approche dépendra du type de site – vous aurez plus de succès en scrutant un petit bout de parcelle de manière
profonde qu’en balayant nonchalamment un champ entier. Dessinez un plan indiquant les parcelles déjà scrutées et les
parcelles propices aux trouvailles.
Un bon détecteur ne garantit pas du succès dans votre chasse au trésor. Tout détecteur est tributaire de son prospecteur. Il
faut donc nécessairement avoir une bonne approche, une bonne attitude et une excellente technique. Trop de débutants
négligent l’importance d’une préparation et d’une recherché au préalable avant de s’aventurer sur un site, et de la patience
et de la technique sur le site-même.
Commencez par planifier votre recherche. La profondeur de votre recherche est un facteur majeur du succès. Essayez de
comprendre le plus possible de l’histoire et la géographie locales.
Il s’agit donc de choisir le site en étudiant un peuple. Quel lieu pourrait avoir été choisi comme lieu de rencontre ? Quelles
étaient les habitudes ? Où ce peuple a-t-il dépensé de l’argent ? Ne cherchez pas sur des sites présumés Romains mais
préférez les vieux sentiers, anciennes maisons, etc.
Une fois le site choisi, réservez une journée entière à partir du petit matin jusqu’au soir pour la recherche. Contrôlez votre
détecteur avant de partir. Veillez à emmener le matériel nécessaire tout comme un jeu de piles de rechange, une truelle, de
la corde et des piquets pour délimiter les parcelles…
La plupart des débutants espèrent trouver une pièce de grande valeur. Une bague enterrée à une profondeur de 10 cm dans
un champ restera introuvable si vous vous y précipitez sans préparation. En répartissant le champ en parcelles et en
balayant lentement et profondément, vous aurez plus de chance de déterrer la pièce.
N’oubliez pas d’être PATIENT et de PROCÉDER LENTEMENT. Ne couvrez pas de superficie trop étendue, limitez-vous à
une petite parcelle et balayez profondément. Notez les parcelles déjà scrutées afin d’éviter de les scruter une deuxième fois.
Avant tout il est important de tenir le disque de manière correcte, c’est à dire à ras du sol. Idéalement, balayez avec le
disque à ras du sol de manière régulière est pas trop lente. Vous distinguerez les signaux faibles des signaux plus forts, ce
qui augmentera les chances d’une trouvaille.
La technique de balayage exige beaucoup d’exercice et ne s’apprend pas du jour au lendemain. Il faut acquérir le plus
d’expérience possible afin de reconnaître toutes sortes de signaux. Un prospecteur expérimenté devine la nature de la cible
avant même de l’avoir déterrée !
Position du disque :
Tenez le disque à ras le sol comme illustré (B). Évitez de balayer à une hauteur trop importante (C) ou dans un angle (A, D)
afin de na pas manquer les signaux émis par une cible.
CS990XD
13
VELLEMAN
9.Code de conduite
1. N’entrez sur les terrains qu’après avoir demandé et obtenu la permission du propriétaire ou du gardien.
2. Dans les champs et les prés, refermez les barrières que vous avez franchies, surtout s’il y a des animaux à proximité.
Restez le plus discret possible vis-à-vis des animaux. Respectez les plantations, ne pénétrez pas dans un champ en train
ou ayant déjà levé.
3. Rebouchez les trous que vous faites lors de votre prospection. Les performances du matériel actuel vous permettent de
localiser précisément une monnaie ou un objet. Ne faites pas un trou de 50 cm sur 50 cm pour extraire une pièce !
4. Votre passion à une vocation écologique. Laissez les endroits où vous détectez exempts des déchets que vous avez pu
extraire et prévoyez un sac à déchets à cet effet. Mieux vaut les jeter à la poubelle que de les retrouver enfouis à la
prochaine détection. Ne jetez surtout pas vos piles dans la nature !
5. Prévenez immédiatement la police locale ou la gendarmerie nationale si vous vous trouvez confrontés à un objet suspect
(obus, bombe ou grenade non explosés). Laissez l’objet sur place sans y toucher, mais ne le laissez jamais sans
surveillance dans les endroits fréquentés.
6. En cas de découverte fortuite d’objets pouvant intéresser l’archéologie, informez-en la DRAC ou, à défaut, la mairie du
lieu concerné.
7. Familiarisez-vous avec la législation sur les sites archéologiques. N’oubliez qu’il est interdit d’effectuer des fouilles sur un
terrain pouvant intéresser la préhistoire, l’histoire, l’art ou l’archéologie sans en avoir reçu au préalable l’autorisation
préfectorale.
8. Prenez à cœur votre rôle d’ambassadeur des prospecteurs. Donnez une image positive de la prospection : c’est de votre
attitude que dépendra peut-être la survie et/ou la reconnaissance de votre passion !
9. Apprenez la législation sur la découverte fortuite de trésor auprès des autorités locales.
10. Entretien de votre détecteur
Stockez votre détecteur dans un endroit sec et à l’abri du froid après usage. Pour éviter tout risque d’écoulement, retirez
d’abord les piles si vous n’emploierez pas le détecteur pendant une période prolongée. Sa durée de vie sera
considérablement écourtée en négligeant le détecteur. Considérez-le comme un instrument scientifique. Bien qu’il soit conçu
pour un usage dans des circonstances rudes dans tous les environnements et dans tous les climats, un mauvais usage et le
manque d’entretien détériora le détecteur. Nettoyez l’extérieur du détecteur, et en particulier le disque et la canne, avec de
l’eau claire après un usage dans sur terrain hostile (eau salée, sable, etc.). Essuyez avec un chiffon sec.
11. Problèmes et solutions
Problème
Aiguille du vumètre immobile lors du
réglage the tune control
Aiguille du vumètre semble être
bloquée
Détecteur ne s’allume pas après
insertion de nouvelles piles
Témoin de niveau des piles indiquant
une faible puissance après insertion
de nouvelles piles
Détecteur est allumé mais ne semble
pas fonctionner
Détecteur ne semble pas fonctionner
avec casque d’écoute
Cause probable
Détecteur en mode de discrimination
« meter disc » ou « meter + audio
disc »
Bouton de réglage de niveau en mode
témoin de niveau des piles
Piles insérées incorrectement
Une des piles insérée incorrectement
Casque d’écoute connecté au
détecteur
Casque d’écoute stéréo/mono en
mono
Solution
Placez l’interrupteur sur « none »
Désactivez le mode témoin de niveau
des piles
Retirez le support des piles et
réinsérez dûment les piles
Retirez le support des piles et
réinsérez dûment la pile
Déconnectez le casque d’écoute
Placez le casque d’écoute en mode
stéréo
N’employer cet appareil qu’avec des accessoires d’origine. SA Velleman ne sera aucunement responsable de
dommages ou lésions survenus à un usage (incorrect) de cet appareil.
Pour plus d’information concernant cet article, visitez notre site web www.velleman.eu.
Toutes les informations présentées dans cette notice peuvent être modifiées sans notification préalable.
CS990XD
14
VELLEMAN