1
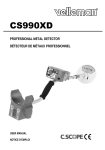
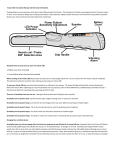
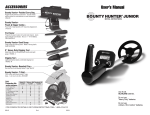
CS990XD
PROFESSIONAL METAL DETECTOR
DÉTECTEUR DE MÉTAUX PROFESSIONNEL
USER MANUAL
NOTICE D’EMPLOI
CS990XD – PROFESSIONAL METAL DETECTOR
1.Introduction
To all residents of the European Union
Important environmental information about this product
This symbol on the device or the package indicates that disposal of the device after its lifecycle could harm the
environment. Do not dispose of the unit (or batteries) as unsorted municipal waste; it should be taken to a
specialized company for recycling. This device should be returned to your distributor or to a local recycling service.
Respect the local environmental rules.
If in doubt, contact your local waste disposal authorities.
Please read the manual thoroughly before bringing this device into service. If the device was
damaged in transit, do not install or use it and contact your dealer.
C.SCOPE® detectors are recognised as the finest detectors available. They are designed with lasting quality, high
technology, and above all, value for money. The only way to realise this value is to carefully study and understand the
instruction manual. You will then be able to obtain all the advantages designed into your detector. It is also strongly
recommended that you experiment with the detector’s operation in air using various test samples, in order to learn to identify
and understand the detector’s capabilities and responses. Always remember that becoming a good metal detectorist is like
becoming a good photographer of fisherman, that is, although it is an advantage to buy the best equipment, having bought it,
patience and hours of practice are needed to become proficient.
2.Description
A. battery compartment
B. upper stem and handle grips
C. control box
D. stem connecting nut
E. cable
F. lower stem
G.search head and fastener
3.Assembly
Insert the lower stem into the upper stem. Tuck the cable into the cable slots in the lower stem to prevent it trailing over the
search head. Rotate the lower stem to wrap the cable around the stems and take up any slack and twist the stem lock to hold
the lower stem in position.
CS990XD
4.Batteries
The CS990XD is powered by eight AA batteries (not supplied). It is
advisable to use standard alkaline batteries to start with. You can then
evaluate the sort of use you give the detector and decide whether the
investment in rechargeable batteries is justified.
The batteries should be fitted in the holder which is located in the
battery compartment. To fit new batteries first check if the power switch
on the unit is switched off. Then loosen the two captive screws located
in the battery cover (do not fully remove these from the cover) and
remove the cover. Inside is the battery holder. Lift out the battery holder
and detach the plug on the connector. Load the holder with eight
batteries ensuring that each battery is inserted the correct way round
(direction of the batteries alternating as shown on the holder). Roll each
individual battery to ensure it is located correctly and making proper
contact. Replace the connector making sure that it is well-seated, and
put the loaded holder in the housing. Fit the cover and tighten the two
captive screws finger tight.
Note: Zinc-carbon batteries should not be left in the detector for long periods
where they could leak. Remember to remove them at the end of the day’s
searching.
H. charger socket
I. headphones socket
J. battery compartment
5.How It Works
Inside the CS990XD are two separate detectors operating simultaneously. An “inland” detector which is factory set to ignore
mineralised inland ground and gives a positive response to all metals, and a “beach/disc” detector operating at the
(adjustable) wet salt sand exclude level, which gives a negative response to iron. By using the switches on the front of the
CS990XD to combine the signals from the above two detectors, it is possible for the operator to detect all targets whilst
eliminating the effects of the ground, and at the same time distinguishing between the good and the reject targets.
Detection is indicated by the loudspeaker sounding off (the loudspeaker is located in the rear of the battery compartment),
and by the moving meter needle (in the facia panel).
6.The Controls and What They Do
K. signal meter
L. on/off switch and tune control
M.level control and battery check
CS990XD
N. ground exclusion switch
O.retune push button
P. disc mode switch
• On/Off Switch and Tune Control
This control is a combined on/off switch and rotary tune control. Fully anticlockwise to the clicked position is power off.
To turn the detector on, rotate the control clockwise from its indented off position. To tune the detector, adjust the control to
give the preferred level of audio (from the internal loudspeaker or headphones). For best performance, the audio should be
adjusted to threshold, when the sound is just beginning to break through, since this is when the ear is most sensitive to small
changes, and it is important to maintain this threshold when searching to achieve the maximum depth.
The meter gives a visual indication of the audio level (unless battery check or meter disc is selected) and will read midscale
when tuned at threshold.
The tune control is used in conjunction with the retune button which should be depressed when making adjustments to the
controls.
• Retune Push Button
Should the audio level change during searching other than resulting from a target, such as from drift occurring from warming
up, press (and release) the retune button to recover the threshold sound as set on the tune control. The retune button should
also be held down when making adjustments to any of the detector’s controls.
• Ground Exclusion Switch and Disc Mode Switch
Firstly, what is ground exclusion?
On some sites mineralisation caused by iron oxides makes it difficult to operate a detector successfully. The effect of these
minerals is termed ground effect. In practice, if the detector is not correctly adjusted, the signal alters if the search head is not
swept at a constant height above the ground. However, by operating the detector at the correct exclude point this ground
signal can be eliminated. The elimination of this signal is known as ground effect exclusion or simply ground exclusion. When
operated at the inland ground exclude point, all metals give a positive response so this is sometimes called all-metal mode.
What is discrimination (disc)?
Like mineralised ground, metals and wet salt sand too, have a characteristic exclude point. By operating the detector at the
beach exclude point, iron and small ferrous items produce a negative response, but valuable targets still produce a positive
signal. By operating at a higher exclude point, still small pieces of silver (aluminium) paper will also produce a negative
(reject) signal.
• Level Control
The discrimination level of the beach/disc detector in the CS990XD is centred at about that of wet salt sand but can be varied
from iron reject through aluminium foil reject by adjusting the level control. (The level control also adjusts the exclude point of
the meter disc and meter + audio disc.)
• Inland and Disc Mode Switch
With inland selected the CS990XD operates at a fixed level of ground discrimination. This inland ground exclude point is
factory set on the CS990XD. All metal targets will produce an increase in audio volume in this mode regardless of the level
control setting. The beach/disc detector remains operating and can be selected to drive the meter or control the audio pitch
by selection on the disc mode switch. The level of discrimination of the beach/disc detector can be adjusted by the level
control.
The inland mode is used on mineralised inland sites and can be used in conjunction with any one of the disc modes
described below.
By selecting the meter disc mode the meter needle moves to the right for good targets and to the left for reject targets.
By selecting the meter + audio disc mode the meter moves to the right for good targets and to the left for reject targets and
the audio pitch increases for good targets and decreases for reject targets.
CS990XD
By selecting none the meter needle moves to the right for all targets and the pitch remains constant.
• Beach and Disc Mode Switch and Level Control
Due to the varying nature of beach soils (the salinity and wetness) the CS990XD is equipped with an adjustable level of
ground exclude in beach mode. It is the mode best suited to beach detecting where fine adjustment of the level control is
required to exclude wet sand.
By selecting the meter disc mode the meter needle moves to the right for good targets and to the left for reject targets.
By selecting none the meter needle moves to the right for good targets and to the left for reject targets (same as meter disc
since it is ion beach mode).
Selecting meter + audio disc gives a pitch increase to good targets, reject targets are ignored.
The inland detector plays no part when beach mode is selected and is switched off.
Only use the beach mode on the beach or at inland sites where there is no mineralisation and where you do not wish the
detector to sound off over iron.
It should be apparent from the above that the level control acts primarily as ground exclude control in beach mode, and
secondly varies the discrimination point when operating in meter disc or meter + audio disc mode.
• Battery Check
A battery condition indicator is provided on the detector. To do this for the first time prior to reading the remainder of the
operating instructions proceed as follows: turn the power on/off, tune control on. Turn the level control fully anticlockwise to
the battery check position. The meter will indicate in the green battery symbol area if the batteries are good. Rechargeable
batteries will not read as high into the green as standard batteries even when fully charged. They also give less indication of
discharge in the meter during use. Remember to switch out the battery check function when you have checked the batteries.
7.General Hints
• Detection Range
Your CS990XD is a top performance detector but adverse soil conditions can significantly reduce the depth of detection.
Detection ranges will vary depending on the size of the object, the length of time an object has been buried, and the type of
ground the object is buried in.
The best ground conditions are well compacted soils and coins can be found at the greatest depth if the object has been
buried for some time and the coin has interacted with the salts in the ground, thereby appearing larger to the detector. Worst
conditions for detecting are on loosely compacted or freshly dug ground or when the object has only recently been buried. In
these conditions detection range will be reduced. Ninety percent of all artefacts are found within 15cm of the surface.
• Anomalies
Iron, unlike a coin, occurs in a multitude of shapes and sizes and as result it is possible that large pieces of iron may give a
positive reading. Confusing signals can occur in the first few centimetres below the search head, and are typically
characterised by a double signal from the same object, usually iron, which often ranges from a strong positive to a strong
negative signal. To overcome these problems simply raise the search head, retuning if necessary, and rescan until a clear
signal of rejection or acceptance is obtained.
• Headphones
Use stereo headphones or mono but not stereo switched to mono. Use of headphones is recommended as it eliminates
extraneous noises and will extend battery life. Insertion of headphones automatically mutes the loudspeaker. The 6.35mm
(¼”) headphones socket is located on the front of the battery compartment.
CS990XD
8.The Importance of the Right Approach
Treasure hunting can be a profitable and rewarding hobby, if approached in a patient and diligent manner. Time spent
researching to locate a worthwhile site for a search can be time-wasting if your search is hasty and erratic. To achieve
maximum results is important to decide on your approach to any particular site in advance of the actual search.
Tactics will be decided by the type of the site – it is more profitable to scan a small area thoroughly than to conduct a
haphazard search of the total site. However, when the site is too far away for you to make several return visits, a plan should
be adopted which gives maximum coverage, at the same time as indicating the most likely area for detailed search.
Your detector alone is not a guarantee of successful treasure hunting. Any detector needs an operator and for the best
results the operator needs the right approach, attitude and technique. Many a beginner neglects the importance for preplanning and research before using his detector in the field, and patience and technique during the actual search.
A successful search should begin with research some time before the day of the actual search. The extent and thoroughness
of your research will be one of the major factors in the success of your detecting. You should aim to get as complete an
understanding as possible of the local history and geography.
The key of the choice of site is to think of people. Where have people congregated over the past few hundred years? What
were their customs and pursuits? Where did they spend money? Where did they carry money? The answers are not Roman
sites, nor are they associated with mystical treasure stories of crocks of gold. Rather, they are assuming places like footpaths
and ancient rights-of-way, old houses and so on.
When you have chosen your site, allocate a whole day from early in the morning to early evening for the search. Make sure
you have all the equipment you are likely to need. Your detector should be checked before starting out, and you should
always carry a spare set of batteries. You will also need a strong, sharp trowel. It is also a good idea to have a set of lines
and pins so that you can lay out your search area scientifically.
Most beginners make the mistake of rushing about hoping to chance upon a rare find. If, for example, there happened to be
a valuable ring that was buried 10cm deep on the site you were searching, if you rushed about haphazardly and quickly on
the site, the odds would be very much against you finding it. On the other hand, if you pegged out the area scientifically and
searched slowly and thoroughly, the odds of finding the ring would be very much in your favour.
Remember, BE PATIENT and WORK SLOWLY. Do not try to cover too large an area, restrict yourself to a small area and
work through it thoroughly. Make a note of the position and the extent of the area, and the when you return you can start
again further on without missing any ground or covering the same area twice.
It is also important to keep the detector as close to the ground as possible. Ideally, you should “iron” the ground with the
search head of the detector, so that you do not lose any detection range. Similarly, if you work slowly and carefully you
should be able to distinguish the faint signals as well as the clear-cut signals and further increase your finds.
The technique of getting the best out of your detector is not learnt overnight. You need to get as much experience as
possible so that you can recognise every kind of signal. Indeed, a good detector operator can often tell you what is being
detected before it is unearthed.
Search head position:
It is essential that the search head is kept as close and parallel to the ground as in B. Do not hold the search head too high
above the ground, or at an angle as in A, C and D as you may miss out on finds.
CS990XD
9.Code of Conduct
1. Do not trespass. Ask permission before venturing on to any private land.
2. Respect the Country Code. Do not leave gates open when crossing the fields, and do not damage crops or frighten
animals.
3. Do not leave a mess. It is simple to extract a coin or other small objects buried a few inches under the ground without
digging a great hole. Use a sharpened trowel or knife to cut a neat circle or triangle (do not remove the plug of earth
entirely from the ground): extract the object, replace the soil and grass carefully and evenly.
4. Help to keep your country tidy. Bottle tops, silver paper and tin cans are the last thing you should throw away. You could
well be digging them up again next year. Do yourself and the community a favour by taking the rusty iron and junk you find
to the nearest litter bin.
5. If you discover any live ammunition or any lethal objects such as an unexploded bomb or mine, do not touch it. Mark the
site carefully and report the find to the local police.
6. Report any unusual historical finds to the landowner.
7. Familiarise yourself with the law relating to the archaeological sites. Remember it is illegal for anyone to use a metal
detector on a scheduled ancient monument unless permission has been obtained from the Historic Buildings and Ancient
Monument Commission for England or the Secretary of State for the Environment in Scotland and Wales.
8. Remember that when you are out with your metal detector, you are an ambassador for your hobby. Do nothing that may
give it a bad name.
9. The law relating to treasure finds must be followed. Contact the authorities and inform yourself.
10. Care for Your Detector
When not in use your detector should be stored in a dry and warm environment. If it is not to be used for a certain length of
time it is advisable to remove the batteries to avoid leakage which could cause serious damage. The working life of your
detector will be shortened by careless use or neglect of the unit. Think of your detector as a scientific instrument. Your
detector is designed to withstand rugged handling on any terrain, but misuse or lack of due attention will tell in the end. After
using your detector in a hostile environment (salt water, sand, etc.) the exterior parts should be rinsed with clean fresh water,
paying particular attention to the head and stems, then carefully wipe dry.
11. Troubleshooting
Problem
Meter needle does not move as you
adjust the tune control
Meter needle appears to be stuck
New batteries fitted but unit will not
switch on
New batteries fitted but battery check
reading indicates low
Detector is switched on but appears
not to be working
Detector does not work on
headphones
Possible Cause
The detector is in meter disc mode or
meter + audio disc mode
The level control switch has been left
in battery check position
Batteries are not making contact in the
battery holder
One battery inserted incorrectly
Headphone adapter left in headphone
socket
Stereo/mono headphones switched to
mono
Solution
Switch mode to none
Switch out battery check mode
Remove the battery holder and roll out
the individual batteries in the holder
Remove the battery holder and
reverse incorrect battery
Remove the adapter
Switch headphone to stereo
Use this device with original accessories only. annot be held responsible in the event of damage or
injury resulted from (incorrect) use of this device.
The information in this manual is subject to change without prior notice.
CS990XD