1
E
Data Editor for PX-5S
User’s Guide
Use this manual in combination with the
User’s Guide that comes with the Instrument.
DATAEDITORPX5-E1A
Contents
Introduction............................................................................ 4
What is Data Editor?........................................................................................................... 4
MIDI Data Communication Function Precautions............................................................ 4
Minimum Computer Operating Environment ................................................................... 5
Use of This Software .......................................................................................................... 5
Getting Ready, Starting Up, Shutting Down........................ 6
Getting Ready...................................................................................................................... 6
Starting Up Data Editor ...................................................................................................... 6
Exiting Data Editor.............................................................................................................. 7
Screen Content ................................................................................................................... 7
Parameter Edit Mode ............................................................. 8
What you can do in this mode... ........................................................................................ 8
Important! ............................................................................................................................ 8
Screen Content ................................................................................................................... 9
Stage Setups ..................................................................................................................... 12
Tone ................................................................................................................................... 12
Mixer................................................................................................................................... 12
System Setting .................................................................................................................. 13
Operation Procedures ...................................................................................................... 13
Transfer Mode ...................................................................... 15
What you can do in this mode... ...................................................................................... 15
Important! .......................................................................................................................... 15
Data Editor Window (Transfer Tab) ................................................................................. 15
Using the Transfer Tab..................................................................................................... 17
2
Phrase Convert Mode.......................................................... 19
What you can do in this mode... ...................................................................................... 19
Important! .......................................................................................................................... 19
Screen Content ................................................................................................................. 19
Phrase Convert Mode Operations ................................................................................... 21
Package Edit Mode .............................................................. 23
What you can do in this mode... ...................................................................................... 23
Important! .......................................................................................................................... 23
Screen Content ................................................................................................................. 23
Using the Package Edit Tab............................................................................................. 25
Package Transfer Mode ...................................................... 27
What you can do in this mode... ...................................................................................... 27
Important! .......................................................................................................................... 27
Screen Content ................................................................................................................. 27
Using the Package Transfer Tab ..................................................................................... 28
Preference Mode.................................................................. 30
What you can do in this mode... ...................................................................................... 30
Screen Content ................................................................................................................. 30
Configuring Settings ........................................................................................................ 31
TIPS....................................................................................... 32
Shortcut Key List .............................................................................................................. 32
Using the Mouse’s Right Button to Scroll ...................................................................... 32
Using a USB Flash Drive to Transfer Data between the Instrument
and a Computer................................................................................................................. 33
User Data Reference............................................................ 34
Error Messages.................................................................... 35
3
Introduction
What is Data Editor?
Data Editor is application software that lets you perform the following operations on your computer.
z Manipulate Instrument* parameters from your computer.
z Open and edit data files created on the Instrument or on your computer.
z Save Instrument user data on your computer.
z Transfer user data files from your computer to the Instrument.
z Convert SMF format files to phrase data files.
* PX-5S (Referred to as “the Instrument” in this manual.)
• Do not use any other applications, disconnect your computer’s USB cable, remove your computer’s USB flash
drive, disconnect the MIDI cable, or turn any peripheral connected to your computer on or off while Data Editor is
running. Doing so not only will cause Data Editor to operate abnormally, it also can corrupt data and cause
malfunction of the Instrument and/or your computer.
MIDI Data Communication Function Precautions
MIDI Data Communication Functions
Data Editor includes MIDI data communication functions. Note the precautions below when using MIDI data communication
functions.
z Your computer must be connected to the Instrument to use MIDI data communication functions. See the Instrument’s User’s
Guide for details about how to connect the Instrument to a computer using USB. For information about connecting the
Instrument to a computer using a MIDI interface, see the user documentation for the MIDI interface you are using.
z To use MIDI data communication functions, you need to configure MIDI settings for Data Editor and the Instrument. For
information about the MIDI settings of Data Editor, see “MIDI Settings” on page 31 of this manual. For the Instrument’s MIDI
settings, configure system MIDI settings as shown below.
• USB Connection
USB Out Select: KEY
USB In Enable: On
• MIDI Interface Connection
MIDI Out Select: KEY
MIDI In Enable: On
z Data Editor does not support simultaneous use of a USB connection and MIDI interface connection.
z As a general rule, use Data Editor to connect a single computer to a single Instrument. Attempting to connect multiple
Instruments or multiple computers may result in malfunction of Data Editor and/or the Instrument (due to software and
hardware settings, connections, etc.), and corruption of Instrument data.
Bulk Dump Data Transfer
Data Editor has a bulk dump data transfer function for using MIDI data communication to transfer user data and other data
between the computer and the Instrument. Note the precautions below when using the bulk dump data transfer function.
z Instrument note on and other operations are disabled while bulk dump data transfer is in progress, so normal Instrument
operation is not possible. Keep this in mind when using it during live performances.
z Do not perform keyboard, button, or other operations while a bulk dump data transfer operation is in progress. Such
operations can cause operation problems with Data Editor and/or the Instrument, and can corrupt data in Instrument
memory.
4
Minimum Computer Operating Environment
■ Supported Operating Systems
Windows® XP (SP2 or higher) *1
Windows Vista® *2
Windows® 7 *3
Windows® 8 *4
Mac OS® X (10.5.X, 10.6.X, 10.7.X, 10.8.X) *5
*1: Windows XP Home Edition
Windows XP Professional (32bit Versions)
*2: Windows Vista (32bit Versions)
*3: Windows 7 (32bit Versions, 64bit Versions)
*4: Windows 8 (32bit Versions, 64bit Versions)
*5: Intel Mac only
■ Display Settings
Resolution : At least 800 × 600 pixels
Color
: Windows OS: At least 16bit
• The above minimum computer operating environment does not guarantee proper operation of this software.
Use of This Software
• All rights to the software (this Software) revert to CASIO COMPUTER CO., LTD.
• Distribution of any version of this Software created by altering the structure, content, or any other aspect of the original
Software is prohibited.
• This Software is provided “as is,” and CASIO makes no express warranty concerning the suitability of the Software functions
for any particular purpose. NOTE THAT IN NO EVENT SHALL CASIO BE LIABLE FOR ANY DAMAGES WHATSOEVER
(INCLUDING, WITHOUT LIMITATION, DAMAGES FOR LOSS OF PROFITS, BUSINESS INTERRUPTION, LOSS OF
INFORMATION) ARISING OUT OF THE USE OF OR INABILITY TO USE THIS SOFTWARE, EVEN IF CASIO HAS BEEN
ADVISED OF THE POSSIBILITY OF SUCH DAMAGES.
• You are granted the right to use this Software free of charge. You are also granted the right to distribute this Software freely,
as long as such distribution is not for profit.
• Note that CASIO will not provide any support for this Software or its functions.
• The contents of this Software are subject to change without notice.
• The screen shots shown in this manual may differ from the screen contents produced by your computer.
• Except as authorized under GNU LESSER GENERAL PUBLIC LICENSE Version 2.1 (LGPL), you are not allowed to modify
this Software without permission from CASIO.
• This Software uses the LGPL version Qt Library, and performs operations by dynamically linking to the Qt library. You can
obtain the Qt library from http://qt-project.org/.
• For the full text of the LGPL, see the LGPL.txt file that is included with the files distributed with this Software.
5
Getting Ready, Starting Up, Shutting Down
Getting Ready
Windows Users
1. Download the Data Editor software file from the CASIO website to your computer.
2. Uncompress the file.
This will create a folder named “CASIO DataEditor for PX-5S” on your computer.
Mac Users
1. Download the Data Editor software file from the CASIO website to your computer.
2. Open the file.
This will create an image named “CASIO DataEditor for PX-5S”.
Copy the image to the application folder.
Starting Up Data Editor
Windows Users
1. On the Instrument, display the stage setup selection screen. If there is an ongoing
recording operation or if there is a paused recording operation, cancel it.
You may not be able to transfer or delete data if you start up Data Editor while the Instrument is in any other configuration.
2. Quit all other applications running on your computer.
Data Editor will not run correctly if any other application is running on your computer.
3. Double-click the “CASIO DataEditor for PX-5S” folder.
4. Inside the folder, double-click “DataEditorPX5S.exe”.
This will start up Data Editor.
Mac Users
1. On the Instrument, display the stage setup selection screen. If there is an ongoing
recording operation or if there is a paused recording operation, cancel it.
You may not be able to transfer or delete data if you start up Data Editor while the Instrument is in any other configuration.
2. Quit all other applications running on your computer.
Data Editor will not run correctly if any other application is running on your computer.
3. In the application folder, double-click “CASIO DataEditor for PX-5S”.
This will start up Data Editor.
6
Exiting Data Editor
Click the close (×) button in the title bar of the Data Editor window.
• A confirmation dialog box will appear if you try to exit Data Editor while it is transferring data or performing some other
process. Click the [Yes] button to terminate the process and exit Data Editor.
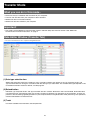
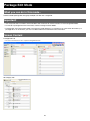
Screen Content
• The screen shot below is from a computer running Windows XP.
(1) Title bar
“<Disconnected>” is displayed in the title bar when there is no connection between the computer and Instrument.
(2) Mode selection tabs
Click the tab for the mode you want to select. For details about modes, see the applicable sections in this manual.
7
Parameter Edit Mode
What you can do in this mode...
• Manipulate Instrument parameters from your computer.
• Open and edit data files created on the Instrument or with Data Editor on your computer.
• Save edited contents as a file that is supported by the Instrument.
Important!
• This mode uses the MIDI data communication function and bulk dump data transfer function. See “MIDI Data
Communication Function Precautions” on page 4.
• Some parameters cannot be changed using Data Editor. To change such parameters, use Instrument operations.
• Depending of the Instrument status, some parameters cannot be changed.
8
Screen Content
• The screen shot below is from a computer running Windows XP.
• Data selector dialog box (Stage Setting Edit)
(1) Category tabs
Clicking a tab switches to the applicable category.
(2) Data selector button
Selects Instrument preset data and user data numbers.
(3) Data name box
Shows the name of the data. To change the data name, input a new name here.
(4) Undo button
Undoes the last operation.
(5) Redo button
Redoes the last undone operation.
(6) Open file button
Opens a data file created by the Instrument or this software.
(7) Save file button
Saves the data file being edited.
9
(8) Save user data button
Saves data as Instrument user data.
(9) Reset button
Returns data to its pre-edited state.
(10) Reload button
Click to reflect the Instrument status in the software.
■ Using the Tabs
• Clicking a tab displays the applicable editing items.
• Right-clicking a tab displays a menu. Selecting “Detach” on the menu displays the tab contents in a new window.
• Closing the window returns it to the tabs.
■ Using the Controllers
Dials
• Rotating a dial changes its setting. Drag the mouse pointer upwards or downwards across a dial to rotate it.
• Right-clicking a knob displays a menu. Selecting “Default” on the menu returns the applicable parameter to its initial
default setting.
• After selecting a dial, pressing the Enter key or selecting “Show Input Box” on the menu displays a box that can be
used to input a specific value.
Sliders
• Dragging the slider with the mouse pointer changes its setting.
• Right-clicking a slider displays a menu. Selecting “Default” on the menu returns the applicable parameter to its initial
default setting.
Illuminated Buttons
(OFF) /
(ON)
• Clicking a button toggles it between settings. The color of the button changes depending on its status.
• Right-clicking a button displays a menu. Selecting “Default” on the menu returns the applicable parameter to its initial
default setting.
Item Selection Boxes
• Items that can be input are displayed in a menu. Click the down arrow button to the right of the box to display the
menu.
• You can narrow down the list of candidates by entering text directly into the box.
• Right-clicking the box displays a menu. Selecting “Default” on the menu returns the applicable parameter to its initial
default setting.
Radio Buttons
• Clicking a button selects its parameter.
• Right-clicking a button displays a menu. Selecting “Default” on the menu returns the applicable parameter to its initial
default setting.
10
Sync Button
(Absolute Mode, OFF) /
(Absolute Mode, ON)
(Relative Mode, OFF) /
(Relative Mode, ON)
• Click to toggle syncing between enabled and disabled.
• Right-clicking the button displays a menu.
• Selecting “Sync All On” on the menu enables all syncing.
• Selecting “Sync All Off” on the menu disables all syncing.
• Selecting “Absolute Mode” on the menu enters the absolute sync mode.
• Selecting “Relative Mode” on the menu enters the relative sync mode.
• In the absolute sync mode, changing a parameter of a group for which syncing is enabled will cause the same
parameter to be changed to the same value for all groups that have syncing enabled.
• In the relative sync mode, changing a parameter of a group for which syncing is enabled will cause the same
parameter to be changed by the same amount for all groups that also have syncing enabled.
Key range panel
• The key range panel can be used to view and change the key range of each stage setup zone.
• There are four bars above the keyboard, indicating Zone 1 to Zone 4 from top to bottom. The color of the bars changes
in accordance with the enable status of each zone.
• A key range can be changed by dragging the end of a bar.
Area Buttons
• Clicking a button switches to the applicable area. (In the above illustration, “1” is selected.)
Expandable Buttons
Clicking a button with a plus (+) or minus (–) symbol expands or closes the list of available options.
• Clicking a button with a plus (+) symbol expands its list of available option items.
• Clicking a button with a minus (–) symbol closes its list of available option items.
11
Stage Setups
• This mode can be used to open stage setup data (.ZPF) files.
• Edited data can be saved as a stage setup data file.
• For information about editable parameters, see “To edit a stage setup” in the Instrument’s User’s Guide (Tutorial).
• Zone parameters can be synced.
Tone
• Displayed tabs and controllers depend on the tone selected with “(2) Data selector button”.
• For details, see the explanations for each tone below.
■ Melody
• Selecting a “Melody” tone on the data selector dialog box enters the Melody Editing Mode.
• This mode can be used to open Melody tone data (.ZTN) files.
• Edited data can be saved as a melody data file.
• For information about editable parameters, see “Editable Melody Tone Parameters” in the Instrument’s User’s Guide
(Tutorial).
■ Drum
• Selecting a “Drum” tone on the data selector dialog box enters the Drum Editing Mode.
• This mode can be used to open Drum tone data (.ZDR) files.
• Edited data can be saved as a drum data file.
• For information about editable parameters, see “Editable Drum Tone Parameters” in the Instrument’s User’s Guide
(Tutorial).
• Instrument parameters can be synced.
■ Hex Layer
• Selecting a “Hex Layer” tone with the data selector enters the Hex Layer Editing Mode.
• This mode can be used to open hex layer tone data (.ZLT) files.
• Edited data can be saved as a hex layer tone data file.
• For information about editable parameters, see “Editable Hex Layer Tone Parameters” in the Instrument’s User’s Guide
(Tutorial).
• Layer parameters can be synced.
Mixer
• For information about parameters that can be configured, see “Other Useful Functions (Tutorial)” in the Instrument’s User’s
Guide (Tutorial).
• The following items cannot be used with the mixer: “(2) Data selector button”, “(3) Data name box”, “(6) Open file button”,
“(7) Save file button”, “(8) Save user data button”, “(9) Reset button”.
• Part parameters can be synced.
12
System Setting
• For information about editable parameters, see the following items in the Instrument’s User’s Guide.
• MIDI: User’s Guide (Tutorial) “Other Useful Functions (Tutorial)”
• Sound Generator: User’s Guide (Tutorial) “Other Useful Functions (Tutorial)”
• Phrase Rec: User’s Guide (Basics) “Recording and Playing Back Phrases”
• General: User’s Guide (Basics) “System Settings”, User’s Guide (Tutorial) “Other Useful Functions (Tutorial)”
• The following items cannot be used with system setting screen: “(2) Data selector button”, “(3) Data name box”, “(6) Open
file button”, “(7) Save file button”, “(8) Save user data button”, “(9) Reset button”.
Operation Procedures
■ Selecting Instrument Data
This operation cannot be used with the “Mixer” or “System Setting” screen.
1. Click “(2) Data selector button”.
• This will display the data selector dialog box.
2. On the data selector dialog box that appears, select the desired data and then click [OK].
• This recalls the selected data and reflects it on the Instrument as well.
• “(2) Data selector button” shows the area number.
• This software stores edits for each individual preset data and user data.
• Changing a parameter will cause an exclamation mark (!) to appear to the left of the area number displayed by “(2) Data
selector button”.
• An exclamation point (!) to the left of area number on the data selector dialog box indicates data has been edited.
• To discard edits and restore preset data or user data, click “(9) Reset button”.
■ Opening a File
This operation cannot be used with the “Mixer” or “System Setting” screen.
1. Click “(6) Open file button”.
• This displays a file selection screen.
2. Select the file you want to open.
13
■ Naming Data
This operation cannot be used with the “Mixer” or “System Setting” screen.
1. Input the desired name into “(3) Data name box” and then press the [Enter] key.
• The name you assign is used by the Instrument as the data name.
• The characters shown below can be used in a data name. Any character that is not included in the table below will
automatically be replaced with an underscore (_).
■ Saving Edits to a File
This operation cannot be used with the “Mixer” or “System Setting” screen.
1. Click “(7) Save file button”.
• On the file naming screen that appears, assign a name and save the file.
• A file saved with this software can be transferred to the Instrument with the software’s Transfer Mode or Package Transfer
Mode, or by using an USB flash drive.
■ Saving Edits as Instrument User Data
This operation cannot be used with the “Mixer” or “System Setting” screen.
1. Click “(8) Save user data button”.
• This will display the area selection screen.
2. Select the area where you want to save the data and then click [OK].
14
Transfer Mode
What you can do in this mode...
• Save user data you created on the Instrument to your computer.
• Transfer user data files from your computer to the Instrument.
• Delete user data in Instrument memory.
• Delete user data files stored on your computer.
Important!
• This mode uses the MIDI data communication function and bulk dump data transfer function. See “MIDI Data
Communication Function Precautions” on page 4.
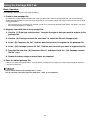
Data Editor Window (Transfer Tab)
• The screen shot below is from a computer running Windows XP.
(1) Data type selection box
Selects the target data type for the mode you are in. The files and data that appear on the “(5) Computer file list” and
“(6) Instrument data list” change in accordance with the data type you select here. The available data types depend on the
connected Instrument model. For details, see the page 34.
(2) Reload button
Refreshes “(5) Computer file list” and “(6) Instrument data list” contents. Note that in the Transfer Mode, Data Editor does
not refresh the lists automatically when you change user data by performing an operation on the Instrument, or when you
perform a data file folder (page 30) operation on your computer without using Data Editor. After performing such operations,
click the reload button to refresh the lists.
(3) Trash
Use trash to delete Instrument data and computer files.
15
(4) Memory usage bar
Shows the current memory usage status of the Instrument’s memory. This bar is displayed when “Phrase” is selected by the
“(1) Data type selection box”. Maximum allowable memory usage is 100%.
(5) Computer file list
Lists data stored in the computer data folder (page 30).
(6) Instrument data list
Lists user data stored in Instrument memory.
(7) All process progress bar
Shows how many processes have been completed out of the total number of processes being performed. This bar is
displayed while processes are being performed.
(8) Individual process progress bar
Shows the progress of the current process. This bar is displayed while a process is being performed.
(9) Cancel button
Cancels an ongoing data transfer or data delete process. This button is displayed while a process is being performed.
16
Using the Transfer Tab
Transferring Data from the Instrument to a Computer
1. Use the “(1) Data type selection box” to select the type of data you want to transfer.
2. In the “(6) Instrument data list”, find the data you want to transfer.
3. Drag the data you want to transfer from the “(6) Instrument data list” and drop it into the “(5)
Computer file list”.
The files you drag and drop are placed in a queue, and transferred one-by-one. The saved file appears in the “(5) Computer
file list” as each process is completed.
• The displayed size of a transferred file in the “(5) Computer file list” may be different from the displayed size of the
same file in the “(6) Instrument data list”.
Transferring User Data from a Computer to the Instrument
1. Use the “(1) Data type selection box” to select the type of data you want to transfer.
2. In the “(5) Computer file list”, find the data you want to transfer.
3. In the “(6) Instrument data list”, find the area to which you want to transfer the data.
4. Drag the data you want to transfer from the “(5) Computer file list” and drop it into the
“(6) Instrument data list”.
The files you drag and drop are placed in a queue, and transferred one-by-one. The saved file appears in the
“(6) Instrument data list” as each process is completed. If the destination area you select already contains data, a
confirmation dialog box will appear before the transfer process is executed. Note that overwriting data causes the previous
data to be deleted. Click the [Yes] button to overwrite the existing data with the new data.
• The displayed size of transferred data in the “(6) Instrument data list” may be different from the displayed size of
the same data in the “(5) Computer file list”.
17
Deleting Instrument User Data
1. Use the “(1) Data type selection box” to select the type of data you want to delete.
2. In the “(6) Instrument data list”, find the data you want to delete.
3. Drag the data you want to delete from the “(6) Instrument data list” and drop it into
“(3) Trash”.
The files you drag and drop are placed in a queue, and deleted one-by-one. The deleted data is removed from the
“(6) Instrument data list” as each process is completed.
Deleting User Data from a Computer
1. Use the “(1) Data type selection box” to select the type of data you want to delete.
2. In the “(5) Computer file list”, find the file you want to delete.
3. Drag the data you want to delete from the “(5) Computer file list” and drop it into “(3) Trash”.
This performs the same operation as that performed on your operating system when you discard something with trash.
Renaming a User Data File on Your Computer
1. In the “(5) Computer file list”, select the file you want to rename and then double-click it.
2. This will change to the file name editing mode. Enter the new name.
3. After you are finished entering a name, press the [Enter] key on your computer keyboard.
• The file name you specify here is not reflected in the file name displayed on the Instrument screen. Changing the
file name displayed by the Instrument is not supported by the Transfer Mode. To change the display file name, use
the Parameter Edit Mode or the Instrument name editing function. For details about changing the file name
displayed by the Instrument, see the Instrument’s User’s Guide.
Canceling a Transfer or Delete Process
Click the “(9) Cancel button” while a transfer or Instrument data delete process is being performed. This will cause a
confirmation dialog box to appear. Click the [Yes] button to confirm you want to cancel.
This will cancel the ongoing process and also discard any files in the transfer or delete queue.
• Processes that have already been completed cannot be canceled.
18
Phrase Convert Mode
What you can do in this mode...
• Convert SMF format 0 or 1 MIDI files to phrase data and save the data.
Important!
• Even if a particular MIDI file is SMF format 0 or 1, it may not be able to be converted properly due to other reasons.
• To transfer a converted phrase data file to the Instrument, use the Transfer Mode.
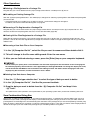
Screen Content
• The screen shot below is from a computer running Windows XP.
• The bottom of the screen appears as shown below while conversion is in progress.
(1) Reload button
Refreshes “(3) MIDI file list” and “(4) Phrase data file list” contents. In the Phrase convert Mode, Data Editor does not
automatically refresh screen contents if any operation is performed on the computer data file folder (page 30) that does not
originate from Data Editor. After performing such an operation, click the reload button to refresh the list content.
(2) Trash
Deletes MIDI files and phrase data files.
(3) MIDI file list
Lists MIDI files stored in the computer’s data file folder (page 30).
(4) Phrase data file list
Lists phrase data files stored in the computer’s data file folder (page 30).
(5) Conversion channel selection box
Specifies the channel to be converted to a phrase data file.
19
(6) Conversion start point selection box
Specifies the start point for conversion to a phrase data file.
(7) Conversion start measure specification box
Specifies the phrase data file conversion start measure. This item appears only when “Selected Measure” is selected for
“(6) Conversion start point selection box”.
(8) Conversion end point selection box
Specifies the phrase data file conversion end point.
(9) Conversion end measure specification box
Specifies the phrase data file conversion end point. This item appears only when “Selected Measure” is selected for “(8)
Conversion end point selection box”.
(10) Event filter setting panel
Specifies specific events in a MIDI file to be omitted when converting the MIDI file to a phrase data file. “Passing Events” on
the left is a list of events that will be converted. “Blocking Events” on the right is a list of events that will be omitted.
(11) All process progress bar
Shows how many conversions have been completed out of the total number of conversions being performed. This progress
bar is displayed only while a conversion process is in progress.
(12) Individual process progress bar
Shows the progress of the current conversion process. This progress bar is displayed only while a conversion process is in
progress.
(13) Cancel button
Cancels the conversion process. This button is displayed only while a conversion process is in progress.
20
Phrase Convert Mode Operations
To convert a MIDI file to a phrase data file
1. In the “(3) MIDI file list” find the MIDI file you want to convert.
2. Drag the file from the “(3) MIDI file list” to the “(4) Phrase data file list”.
The files you drag and drop are queued, and conversion processes are performed in sequence. Each time a process is
complete, the converted file will appear in the “(4) Phrase data file list”.
Changing Conversion Process Settings
■ To specify the channel to be converted
Use the “(5) Conversion channel selection box” to specify the channel within the MIDI file whose data you want to use when
converting to a phrase data file. Any data other than the selected channel is ignored.
■ To specify the conversion start point
Use the “(6) Conversion start point selection box” to specify from where the process should be performed when converting the
channel specified by the “(5) Conversion channel selection box”.
• Beginning of the Song
Converts starting from the beginning of the data.
• 1st Note
Converts starting from the first note.
• 1st Event
Converts starting from the first valid event.
• Selected Measure
Converts starting from the beginning of the measure specified by the “(7) Conversion start measure specification box”.
■ To specify the conversion end point
Use the “(8) Conversion end point selection box” to specify up to where the process should be performed when converting the
channel specified by the “(5) Conversion channel selection box”.
• End of the Song
Converts up to the end of the data.
• Last Event
Converts up to the last valid event.
• Selected Measure
Converts up to the end of the measure specified by the “(9) Conversion end measure specification box”.
• The phrase beat is the same as the beat of the conversion start point.
• If there is a change in the beat between the conversion start point and the conversion end point, conversion
continues to be performed using the beat of the conversion start point.
• The phrase length is a multiple of the measure length. If the conversion result ends within a measure, a blank is
appended up to the end of the measure.
21
■ To specify events to be omitted from a conversion
1. In the “Passing Events” list on the left of the “(10) Event filter setting panel”, select an event
you want to omit.
2. Click the double right arrow (>>) button in the middle of the “(10) Event filter setting panel”.
This will move the selected event from the “Passing Events” list to the “Blocking Events” list of events to be omitted.
■ To specify events to be included in a conversion
1. In the “Blocking Events” list on the right of the “(10) Event filter setting panel”, select an
event you want to include.
2. Click the double left arrow (<<) button in the middle of the “(10) Event filter setting panel”.
This will move the selected event from the “Blocking Events” list to the “Passing Events” list of events to be included.
Events that can be included or excluded are those listed below.
• Note On/Off
• Pitch Bend
• Control Change Number 000 to 101
To delete a MIDI file or a phrase data file
1. In the “(3) MIDI file list” or “(4) Phrase data file list”, find the file you want to delete.
2. Drag the file from the “(3) MIDI file list” or “(4) Phrase data file list” to “(2) Trash”.
This is the same as discarding something with trash on your computer system.
To rename a MIDI file or a phrase data file
1. In the “(3) MIDI file list” or “(4) Phrase data file list”, select the file you want to rename and
then double-click it.
2. This will change to the file name editing mode. Enter the new name.
3. After you are finished entering a name, press the [Enter] key on your computer keyboard.
• The file name you specify here is not reflected in the file name displayed on the Instrument screen. To change the
name of the file displayed by the Instrument, use the rename function on the Instrument.
• For details about changing the file name displayed by the Instrument, see the Instrument’s User’s Guide.
To cancel conversion
• Click the “(13) Cancel button” while a process is being performed. This will cause a confirmation dialog box to appear. Click
the [Yes] button to confirm you want to cancel.
This will cancel the ongoing conversion process and also discard all subsequent queued processes as well.
22
Package Edit Mode
What you can do in this mode...
Create and edit package files that group multiple user files into a single file.
Important!
• Your computer does not need to be connected to the Instrument to use the functions in the Package Edit Mode.
• To transfer a package file to the Instrument, use the Package Transfer Mode.
• Package files are native to Data Editor and cannot be used directly by an Instrument. To use the files that make up a
package file on an Instrument, you must use Data Editor to transfer them to the Instrument.
Screen Content
Package Edit Tab
• The screen shot below is from a computer running Windows XP.
All Category Tab
23
(1) Data type selection box
Selects the target data type for the mode you are in. The files that appear on the “(8) Computer file list” and “(10) Package
content file list” change in accordance with the data type you select here. The available data types depend on the connected
Instrument model. For details, see the page 34.
(2) New package file button
Creates a new package file.
(3) Open package file button
Opens an existing package file and displays its contents.
(4) Save package file button
Saves the package file being edited.
(5) Reload button
Click to refresh the “(8) Computer file list” with the newest information. Note that in the Package Edit Mode, Data Editor does
not refresh the list automatically when you perform a data file folder (page 30) operation on your computer without using
Data Editor. After performing such an operation, click the reload button to refresh the list.
(6) Trash
Use trash to delete computer files or to delete user data files from a package file.
(7) Memory capacity bar
This bar appears when “Phrase” is selected with the “(1) Data type selection box”. After you transfer the package file you
are editing to the Instrument, it shows the approximate memory usage for the currently selected data type (Phrase). You
cannot include a file that would cause memory capacity to exceed 100%.
(8) Computer file list
Lists data stored in the computer data folder (page 30).
(9) Package content file view tabs
Use these tabs to switch between two different views of the files inside a package. The Current Category tab shows a
“(10) Package content file list”, while the All Category tab shows a “(11) Package content file tree” of all the files in the
package.
(10) Package content file list
Lists the files in the package file being edited.
(11) Package content file tree
Displays all of the user data in the package file being edited in data type tree format. Package file editing is not supported
while the package content file tree view is selected.
24
Using the Package Edit Tab
Basic Operation
The following is the basic flow for package file editing.
1. Create a new package file.
To create new package file immediately after starting up Data Editor, click the Package Edit tab. This will immediately
enable package file editing. To discard the package file you are currently editing and create a new one, click the “(2) New
package file button”.
• If the package file you are editing has not been saved yet, a confirmation dialog box will appear. For details, see “Save
Confirmation Dialog Box” on page 26.
2. Register user data files to the package file.
1. Use the “(1) Data type selection box” to select the type of data you want to register to the
package file.
2. Use the “(9) Package content file view tabs” to select the Current Category tab.
3. In the “(8) Computer file list”, find the data file you want to register to the package file.
4. In the “(10) Package content file list”, find the area to which you want to register the file.
5. Drag the file from the “(8) Computer file list” and drop it into the “(10) Package content
file list” area.
6. Repeat the above steps as many times are required.
3. Save the edited package file.
Click the “(4) Save package file button”. This will display a dialog box for assigning a name to the package file. Specify a
name and save the file.
• The file name extension for package files is “.ZPK”.
Use of a file with a file name extension other than “.ZPK” is not supported.
25
Other Operations
■ Deleting a File Registered to a Package File
Drag the data you want to delete from the “(10) Package content file list” and drop it into “(6) Trash”.
■ Re-editing an Existing Package File
Click the “(3) Open package file button”. This will display a dialog box for selecting a package file to edit. Select the package file
you want to edit.
• If the package file you are editing has not been saved yet, a confirmation dialog box will appear.
For details, see “Save Confirmation Dialog Box” on page 26.
■ Removing a File Registered to a Package File
Drag the data you want to remove from the “(10) Package content file list” and drop it into the “(8) Computer file list”. This
removes the file from the package file and saves it in the data file folder (page 30).
■ Viewing All the Files Registered to a Package File
Select the All Category tab with the “(9) Package content file view tabs” to display the “(11) Package content file tree”. This
provides a view of all of the files registered to a package file, without the need to change the data type with the “(1) Data type
selection box”.
■ Renaming a User Data File on Your Computer
1. In the “(8) Computer file list”, select the file you want to rename and then double-click it.
2. This will change to the file name editing mode. Enter the new name.
3. After you are finished entering a name, press the [Enter] key on your computer keyboard.
• The file name you specify here is not reflected in the file name displayed on the Instrument screen. Changing the
file name displayed by the Instrument is not supported by the Package Edit Mode. To change the display file name,
use the Parameter Edit Mode or the Instrument name editing function. For details about changing the file name
displayed by the Instrument, see the Instrument’s User’s Guide.
■ Deleting User Data from a Computer
1. Use the “(1) Data type selection box” to select the type of data you want to delete.
2. In the “(8) Computer file list”, find the file you want to delete.
3. Drag the data you want to delete from the “(8) Computer file list” and drop it into
“(6) Trash”.
This performs the same operation as that performed on your operating system when you discard something with trash.
Save Confirmation Dialog Box
Clicking the “(2) New package file button” or “(3) Open package file button”, or attempting to exit Data Editor after you have
edited but not yet saved a package file will display a confirmation dialog box asking if you want to save your edits. Click the
[Cancel] button on the dialog box to close the dialog box and return to the package file you are currently editing. Click the [Yes]
button to display a dialog box for assigning a name to the package file. Assign a name and save the file. Click the [No] button to
discard the changes you have made to the package file you are editing without saving them.
26
Package Transfer Mode
What you can do in this mode...
Transfer package data created with the Package Edit Mode to an Instrument.
Important!
• This mode uses the MIDI data communication function and bulk dump data transfer function. See “MIDI Data
Communication Function Precautions” on page 4.
Screen Content
Package Transfer Tab
• The screen shot below is from a computer running Windows XP.
The bottom of the screen appears as shown below while transfer is in progress.
(1) Reload button
Click to refresh the “(3) Computer file list” with the newest information. Note that in the Package Transfer Mode, Data Editor
does not refresh the list automatically when you perform a data file folder (page 30) operation on your computer without
using Data Editor. After performing such an operation, click the reload button to refresh the list.
(2) Trash
Use trash to delete package files.
(3) Computer file list
Lists package files stored in the computer data folder (page 30).
(4) Instrument image
Shows the currently connected Instrument model.
27
(5) Send package file button
Select a package file in the “(3) Computer file list” and then click this button to transfer the files inside the package file to the
Instrument.
(6) All process progress bar
Shows how many files have been transferred out of the total number of files registered in the package file. This progress bar
is displayed only while a transfer process is being performed.
(7) Individual process progress bar
Shows the progress of the current transfer process. This bar shows the transfer status of each individual file within the
package file. It does not show the overall progress of package file transfer. This progress bar is displayed only while a
transfer process is being performed.
(8) Transfer cancel button
Cancels an ongoing package file transfer operation. This button is displayed only while a transfer process is being
performed.
Using the Package Transfer Tab
Transferring from a Computer to the Instrument
There are two different methods that can be used to transfer a package file from your computer to the Instrument.
■ Drag and Drop Transfer
1. In the “(3) Computer file list”, find the package file you want to transfer to the Instrument.
2. Drop the package file onto the “(4) Instrument image”.
3. In response to the confirmation dialog box that appears, click the [Yes] button.
■ Button Operation Transfer
1. In the “(3) Computer file list”, select the package file you want to transfer to the Instrument.
2. Click the “(5) Send package file button”.
3. In response to the confirmation dialog box that appears, click the [Yes] button.
Either of the above operations will cause the “(7) Individual process progress bar” to appear and file transfer will start. Transfer
will not be performed if you click the [No] button on the confirmation dialog box instead of the [Yes] button. You can click the “(8)
Transfer cancel button” at this time to cancel the transfer operation.
• Depending on the number of files registered to the package file, package file transfer may take some time to
complete. Perform this operation when you have enough time to wait for the process to complete.
• Except for the cancel operation, all other operations are disabled while a package file is being transferred.
28
Deleting a Package File from a Computer
1. In the “(3) Computer file list”, find the file you want to delete.
2. Drag the file from the “(3) Computer file list” and drop it into “(2) Trash”.
This performs the same operation as that performed on your operating system when you discard something with trash.
Renaming a Package File on Your Computer
1. In the “(3) Computer file list”, select the file you want to rename and then double-click it.
2. This will change to the file name editing mode. Enter the new name.
3. After you are finished entering a name, press the [Enter] key on your computer keyboard.
Canceling a Transfer Process
Click the “(8) Transfer cancel button” while a transfer is being performed. This will cause a confirmation dialog box to appear.
Click the [Yes] button to confirm you want to cancel.
29
Preference Mode
What you can do in this mode...
• Configure MIDI device settings.
• Configure folder settings.
Screen Content
• The screen shot below is from a computer running Windows XP.
(1) Auto Search
Selecting this check box enables auto Instrument search and connect.
(2) MIDI device reload button
Reloads the MIDI device.
(3) MIDI IN device
Specifies the MIDI IN device.
(4) MIDI OUT device
Specifies the MIDI OUT device.
(5) Adjust MIDI OUT interval button
Depending on the connection path between the computer and Instrument, the MIDI OUT interval from the computer to the
Instrument may be too short, which will make it impossible to send MIDI messages correctly. If this happens, you can adjust
the interval by pressing this button.
(6) Data File Folder
Shows the path to each file’s storage folder. The files in this folder are displayed in the computer file list in each mode.
(7) Data file folder path browse button
Displays a dialog box for specifying the path to the file storage folder.
30
Configuring Settings
■ MIDI Settings
• Select the “(1) Auto Search” check box when using a USB connection between the Instrument and computer. This will cause
the computer to automatically search for and connect to the Instrument.
• When using a MIDI connection between the Instrument and computer, clear the “(1) Auto Search” check box and configure
“(3) MIDI IN device” and “(4) MIDI OUT device” settings manually.
■ To adjust the MIDI OUT interval
1. Configure MIDI settings to connect the Instrument with the computer.
2. Press the “(5) Adjust MIDI OUT interval button”. In response to the confirmation message
that appears, press “Yes”.
This performs the adjustment process.
IMPORTANT! : The adjustment process can take up to two minutes.
• After the adjustment process is complete, a value will appear to the right of the “(5) Adjust MIDI OUT interval button”
indicating to how many milliseconds the interval has been adjusted.
• If interval calibration fails for some reason, the message “Calibration Failed” will be displayed. If this happens, it could
mean that Data Editor is not operating correctly. Check the connection between the Instrument and computer.
■ To configure folder settings
• Click the “(7) Data file folder path browse button” and then configure folder settings.
31
TIPS
Shortcut Key List
Description
Shortcut Button
Undo
Ctrl + Z
Redo
Ctrl + Y
Open File
Ctrl + O
Save File
Ctrl + S
Save User Data
Ctrl + W
Reset
Ctrl + R
Reload
Ctrl + E
Data Selector
Ctrl + D
• On a Macintosh, press the Command key in place of Ctrl above.
Using the Mouse’s Right Button to Scroll
In each mode, display areas may have scroll bars as shown below. You can scroll such areas up, down, left, or right by holding
down the mouse’s right button and dragging the mouse pointer on the screen in the desired direction.
32
Using a USB Flash Drive to Transfer Data between the Instrument and
a Computer
User data files that have been saved to a USB flash drive on the Instrument can be copied to the data file folder (page 30). This
will make the files available to Data Editor. Also, user data files that have been saved from the Instrument to a computer using
Data Editor can be copied to a USB flash drive. Then the USB flash drive can be inserted into the Instrument’s USB port. This
will allow direct access to the files by the Instrument.
Important!
• Use a USB flash drive that has been formatted on the Instrument.
• Package files cannot be used directly by the Instrument.
• If a user data file name on the USB flash drive is longer than eight characters (excluding the file name extension), the
Instrument will display a different file name. Change the file name so it is no more than eight characters long.
• The Instrument cannot display file name characters other than those shown in the table below. Change the file name so it
contains only the allowable characters shown below.
0
A
K
U
(
1 2 3
B C D
L M N
V W X
) - ^
4
E
O
Y
{
5 6
F G
P Q
Z S
} @
7
H
R
&
~
8
I
S
_
`
9
J
T
'
• Lower case characters are allowed, but the Instrument does not distinguish between upper case and lower case.
Copying Files in the Data File Folder to a USB Flash Drive
Files in the data file folder that appear in the computer file list in each mode can be dragged outside of the Data Editor window.
Dragging a file from the computer file list to the USB flash drive’s MUSICDAT folder will copy the file to the USB flash drive.
Copying a File from a Folder on Your Computer to the Data File Folder
A file in a folder outside of Data Editor can be dragged to the computer file list to copy it to the list. To copy a user data file
stored on a USB flash drive by the Instrument to the Data Editor data file folder (page 30), open the USB flash drive’s
MUSICDAT file and then drag the file you want to copy to the Data Editor computer file list.
• Note that you will not be able to copy a file if it has a file name extension that is not supported by Data Editor.
33
User Data Reference
Icon
File name
extension
Data Type
Stage Setting
.ZPF
Stage Setup
Melody Tone
.ZTN
Melody Tones
Hex Layer Tone
.ZLT
Hex Layer Tone
Drum Tone
.ZDR
Drum Sounds
Arpeggio
.ZAR
Arpeggios
Phrase
.ZPH
Phrase
Song Sequencer
.ZSQ
Song Sequencer
Remarks
–
–
–
–
–
The overall memory capacity of the Phrase area is
limited, so certain Instrument conditions can make
transfer impossible.
34
–
Error Messages
Operation errors, Instrument status problems, Data Editor operating environment problems, and other factors can cause error
messages to appear during operation. Look up the error message in the list below and perform the required action as noted.
Message
Cause
Required Action
Already Running
A different instance of Data
Editor is already running.
Use the already running instance of Data Editor.
Bulk Dump is Disabled
The Instrument’s bulk dump
data transfer function has
been disabled for some
reason.
On the Instrument, display the stage setup selection screen. If
there is an ongoing recording operation or if there is a paused
recording operation, cancel it.
Communication Error
An error occurred during
communication with the
Instrument.
• Check the connection between the computer and
Instrument.
• Make sure the Instrument MIDI settings and Data Editor
MIDI settings match.
• On the Instrument, display the stage setup selection screen.
If there is an ongoing recording operation or if there is a
paused recording operation, cancel it.
• If another application is running, exit it.
• Make sure there is only one computer connected to the
Instrument. Do not have multiple computers connected to
the Instrument.
• Do not perform any keyboard operations while data
communication is in progress.
• If you are connected via a USB hub or extension cable,
change to a direct connection.
• If the above actions do not resolve the problem, try turning
the Instrument off and then back on again. Also try
restarting Data Editor.
File Read Error
An error occurred during a file
or folder read operation.
• Check to make sure the file or folder you are trying to read
actually exists.
• Check to make sure the file or folder you are trying to read
is readable.
• Check if the file is being used by another application.
• Check to make sure that the paths to the data file folder do
not contain any illegal characters.
• If either path contains illegal characters, change the data file
folder to a folder whose path is made up only of supported
single-byte alphanumeric characters.
File Write Error
An error occurred during a file
or folder write operation.
• Check to make sure the location where you are trying to
create the file or folder actually exists.
• Check to make sure the file or folder you are trying to write
to actually exists.
• Check to make sure the file or folder you are trying to write
to is writable.
• If you are trying to write to a USB flash drive, check to make
sure that its protect switch is not in the write protect position.
• Check if the file is being used by another application.
• Check to make sure that available computer or USB flash
drive memory space is sufficient.
• Check to make sure that the paths to the data file folder do
not contain any illegal characters.
• If either path contains illegal characters, change the data file
folder to a folder whose path is made up only of supported
single-byte alphanumeric characters.
35
Message
File Format Error
Memory Full
Cause
Required Action
The format of the file is not
supported by Data Editor.
The file is not supported by Data Editor. Use a different file.
The file is corrupted.
The file is unusable. If the same data is still available on the
Instrument, re-save the data and use it.
User data memory is full.
• If the message appears in the Package Edit Mode:
No more phrase data files can be transferred to the
Instrument. Delete phrase data you do not need from the
package file.
• If the message appears in another mode (not the Package
Edit Mode):
Delete phrase data you do not need from Instrument
memory to free up memory space.
File Too Large
• If the message appears in
the Phrase Convert mode:
The conversion produced
phrase data that exceeds
the maximum allowable size
supported by the Instrument.
• If the message appears in the Phrase Convert mode:
Change the conversion start point, conversion end point,
and/or event file settings so the size of the phrase data is
within the maximum allowable size.
• If the message appears in
another mode (not the
Phrase Convert mode):
Attempting to transfer a user
data file to the Instrument or
to register a package file that
exceeds the maximum
supported size.
• If the message appears in another mode (not the Phrase
Convert mode):
The file is not supported by the Instrument. Use a different
file.
Piano Data Is Different
The data on the Instrument
may be different from the
displayed data.
Click the reload button to refresh the screen contents.
Phrase Convert Error
The conversion start point or
end point could not be
specified because there is no
valid event in the MIDI file, etc.
• Check the phrase conversion settings.
• Select a MIDI file that contains valid events.
36
MA1304-A
DATAEDITORPX5-E1A