1
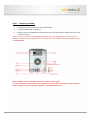
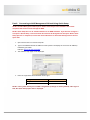
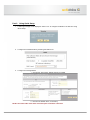
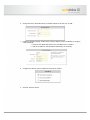
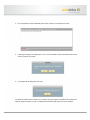
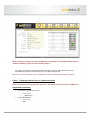
actiNAS Cube RDX® Quick Setup Guide Part 1: Preparing the NAS Part 2: Connecting to NAS Management GUI and Using Quick Setup Part 3: Using Quick Setup Part 4: Preparing internal user or domain accounts NOTE: By default, LAN0 (eth0) is set to DHCP. If a DHCP server is available or detected, LAN0 will be assigned a DHCP IP address. If a DHCP server is not available, LAN0 will use the default IP address 172.16.0.1 subnet mask 255.255.0.0, and LAN0 needs to be reconfigured to a suitable setting applicable to your network. Or configure a remote computer to be able to connect to IP address 172.16.0.1. Part 1: Preparing the NAS i. Connect the power cord to the AC Power Input Socket. ii. Connect network cable to LAN0 port. iii. Press the Power On/Off Switch the front panel to power the NAS. Wait for at least 3 minutes for the system to start up. Note: The current IP address of LAN0 (eth0) is displayed in the LCD display panel. If a DHCP server is available, a DHCP IP will be assigned to eth0. If not, eth0 will use the default IP address 172.16.0.1 subnet mask 255.255.0.0. Note: If a DHCP server is available, skip Part 1.1 and proceed to Part 2. If a remote computer is able to connect to IP address 172.16.0.1 (after making necessary changes in network setting of remote computer), skip Part 1.1 and proceed to Part 2. Part 1.1: Manually changing network settings of eth0 to suit your LAN. a. Press the Down button . The LCD will show 00000000 as Password (default). b. Press the Select button is displayed. several times to select eight zeros until the Network Information menu • Press the Select button . The LCD will show “eth0 IP” and “172.016.000.001”. • Press the Select button address is highlighted. . The LCD will display “Set eth0 IP”. The first number in the IP c. To change the number, press or . When completed, press number. If the number does not have to be changed, just press Repeat step (c) to change all the other numbers in the IP address. d. The LCD will display “Submit Network Setting (Yes/No)”. Press back to eth0 IP. e. Press • f. to save the setting. It will go . The eth0 Netmask will be displayed. Press to modify eth0 Netmask. The LCD will show “Set eth0 Netmask”. The first number is highlighted. To change the number, press • • to move to the next to move to the next number. or . When done, press to move to the next number. If the number does not have to be changed, just press to move to the next number. Repeat step (f) to change all the other numbers in the Netmask. g. The LCD will display “Submit Network Setting (Yes/No)”. Press back to eth0 Netmask. to save the setting. It will go • Press a few times until the Gateway_0 option is displayed. • Press to modify Gateway. It will show “Set Gateway_0” and the first number is highlighted. h. To change the number, press number. or . When complete, press to move to the next • • If the number does not have to be changed, just press to move to the next number. Repeat step (h) to change all the other numbers in the Gateway. • The LCD will display “Submit Network Setting (Yes/No)”. Press to save the setting. It will go back to Gateway_0. The eth0 network configuration is set. Press EXIT twice to go back to the main menu. • Part 2: Connecting to NAS Management GUI and Using Quick Setup NOTE: The NAS Management GUI requires Adobe Flash Player to be installed in the remote computer that will be used to manage the NAS. NOTE: Quick Setup will use all available disk drives as RAID members. If you want to configure a hot spare in Quick Setup, remove the disk drive that will be designated as hot spare. When Quick Setup process is completed, reinsert the unused disk drive. It will automatically become the hot spare disk. 1. Open web browser in a remote computer. 2. Type in the address field the IP address of eth0 (check LCD display for the current IP address) followed by port 3000. Example: http://192.168.1.222:3000 3. The actiNAS Login page will be displayed. 4. Enter the Login Name and Password. Click “Login”. Entity Login Name Password Default admin 00000000 NOTE: If the system initially has no NAS configuration (settings are factory default), after login to GUI, the Quick Setup option will be displayed. Part 3: Using Quick Setup 1. A warning message will be displayed. Select “Yes” to configure the NAS for the first time using Quick Setup. 2. Configure the software RAID by selecting the RAID level. 3. Configure the Storage/Share. i. Change the “Home Size” default capacity if needed. ii. Rename the default share, if necessary. NOTE: The share folder name does not allow space in-between characters. b. Change the size of the default share if needed. Default Home Size min. is 1GB. c. In Network Adaptor settings, enable DHCP option (if DHCP server is available) or configure network settings. i. Enter the new NAS Host Name in the Host Name box, if needed. ii. Edit the IP address, Subnet Mask and Gateway, as necessary. d. Configure the Service option. Enable the Services as needed. e. Click the “Execute” button. 4. The configurations will be initialized. Wait for few minutes to complete the process. 5. A warning message will be displayed. “Yes” is recommended to reboot the NAS and free some memory used by the system. 6. A message will be displayed. Click “OK”. The NAS will restart. Wait for about 3 to 4 minutes, then login again. If IP address was changed in Network Adapter settings, re-login to actiNAS administration page using the new IP address. NOTE: The NAS is ready for use while the RAID set is initializing in the background (Note that the “Without initializing” option was not selected in Step 2). If any disk drive has been removed before Quick Setup, reinsert the unused disk drive. It will automatically become as unused disk and you can define as spare disk. Refer to the user’s manual for more information on how to manage and configure the NAS. Part 4: Preparing internal user or domain accounts Note: The following is the specification and rule for characters which are allowed in actiNAS now. Supported characters: • • Local account password and name: o A-‐Z, a-‐z, 0-‐9, o -‐_~@#$%^&*() Joined ADS password o A-‐Z, a-‐z, 0-‐9, o !#$% actidata GmbH, Limited 3 - Years Product Warranty What this warranty covers. actidata GmbH warrants to the original purchaser of this product, that the product shall be free of defects in design, assembly, material-, or workmanship! What the period of coverage is. actidata GmbH warrants the actidata actiNAS Cube RDX product for three years from date of purchase. What will we do to correct problems? Product Warranty. actidata GmbH will repair or replace, at its option, any defective product free of charge (excluding shipping charges for the product). actidata GmbH reserves the right to discontinue any of its products without notice, and disclaims any limited warranty to repair or replace any such discontinued products. In the event that actidata GmbH is unable to repair or replace the product (for example, because it has been discontinued), actidata GmbH will offer either a refund or a credit toward the purchase of another product from actidata GmbH in an amount equal to the purchase price of the product as evidenced on the original purchase receipt as discounted by its natural use. What is not covered by this warranty? All above warranties are null and void if the actidata GmbH product is not provided to actidata GmbH for inspection upon actidata GmbH's request at the sole expense of the purchaser, or if actidata GmbH determines that the actidata GmbH product has been improperly installed, altered in any way, or tampered with. • The warranty does not apply to: o installation applications, e.g. overloading of the products; o making unauthorized changes; o the use of force or-, damage caused by outside influences. o damages by not following the instructions for use or repair of third parties; o damage from improper transport or improper packing, which are incurred in returning the product to actidata GmbH; o if caused by improper installation of additional items of damage or inoperable; o if damages are incurred, which are traced back due to external influences or the failure of any other installed product; o normal wear and tear The actidata GmbH Product Warranty does not protect against acts of God such as flood, lightning, earthquake, war, vandalism, theft, normal-use wear and tear, erosion, depletion, obsolescence, abuse, damage due to low voltage disturbances (i.e. brownouts or sags), non-authorized program-, or system equipment modification or alteration. How to contact service and proceed? To obtain service for your actidata GmbH product, please carry out the following steps: 1. Contact actidata GmbH Customer Service at Alter Hellweg 111 44379 Dortmund: or call +49 (0) 231 96 36 32 - 35, within 15 days of the occurrence. Be prepared to provide the following information: • The part number and serial number of the actidata GmbH product. • Where you purchased the product. • When you purchased the product. • Copy of original receipt. 2. Your actidata GmbH Customer Service Representative will then instruct you on how to forward your receipt and actidata GmbH product and how to proceed with your claim. The actidata GmbH product must be sent to the actidata offices. We recommend you, to choose a carrier that assigns tracking numbers. actidata GmbH is not responsible for packages that are lost. Your recovery may not be treated if actidata GmbH is not the product is replaced. The cost of shipping must be borne by the customer completely! Send the product with a carrier that gives you a tracking number to the address below; actidata GmbH reserves the right to review the damaged actidata GmbH product. All costs of shipping the actidata GmbH product to actidata GmbH for inspection shall be borne solely by the purchaser. If actidata GmbH determines, in its sole discretion, that it is impractical to ship the damaged equipment to actidata GmbH, actidata GmbH may designate, in its sole discretion, an equipment repair facility to inspect and estimate the cost to repair such equipment. The cost, if any, of shipping the equipment to and from such a repair facility and of such estimate shall be borne solely by the purchaser. Damaged equipment must remain available for inspection until the claim is finalized. Whenever claims are settled, actidata GmbH reserves the right to be subrogated under any existing insurance policies the purchaser may have. How state law relates to the warranty? This warranty contains the sole warranty of actidata GmbH. There are no other warranties, expressed or, except as required by Law, implied, including the implied warranty or condition of quality, merchantability or fitness for a particular purpose, and such implied warranties, if any, are limited in duration to the term of this Warranty. Some states do not allow limitations on how long an implied warranty lasts, so the above limitations may not apply to you. In no event shall actidata GmbH be liable for incidental, special, direct, indirect and consequential or multiple damages such as, but not limited to, lost business or profits arising out of the sale or use of any actidata GmbH product, even advised of the possibility of such damages. This warranty gives you specific legal rights, and you may also have other rights, which may vary from state to state. Some states do not allow the exclusion or limitation of incidental, consequential, or other damages, so the above limitations may not apply to you. FCC Statement. NOTE: This equipment has been tested and found to comply with the limits for a Class B digital device, pursuant to part 15 of the FCC Rules. These limits are designed to provide reasonable protection against harmful interference in a residential installation! This equipment generates uses and can radiate radio frequency energy and, if not installed and used in accordance with the instructions, may cause harmful interference to radio communications. However, there is no guarantee that interference will not occur in a particular installation. If this equipment does cause harmful interference to radio or television reception, which can be determined by turning the equipment off and on, the user is encouraged to try to correct the interference by one of the following measures: • Reorient or relocate the receiving antenna. • Increase the separation between the equipment and receiver. • Connect the equipment into an outlet on a circuit different from that which the receiver is connected. actidata GmbH , -is not responsible for any interference caused by unauthorized modifications to this equipment. Such modifications could void the user's authority to operate this equipment. EU statement. This Class B digital apparatus complies with European EN55022. The test facility has been accredited/accepted (audited or listet) by the following related bodies in compliance with ISO 17025, EN45001 and specified testing scopes. actidata GmbH Contact Alter Hellweg 111 Phone: +49 (0) 231/ 96 36 32 -0 Dortmund District Court Register Number: HRB 22276 D-44379 Dortmund Fax: +49 (0) 231/ 96 36 32 -11 Ust-IdNr.: DE-815 104 071 [email protected] Managing Director www.actidata.com Gudmundur Einarsson Frank Roszyk