1
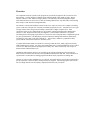
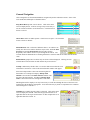
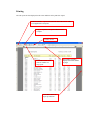
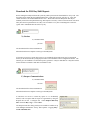
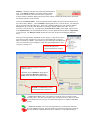
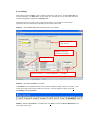
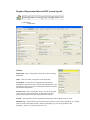
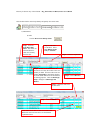
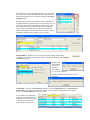
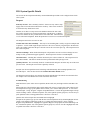
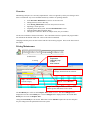
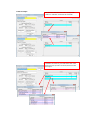
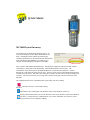
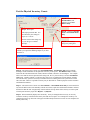
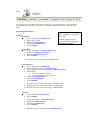
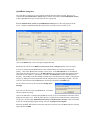
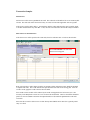
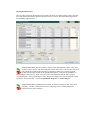
By Bob Kefauver DISCLAIMER Compatible Software Systems (CSS), Pepperell MA, designs and develops the programs described in this manual. Cherry Systems is an authorized CSS distributor. This manual was written exclusively by Cherry Systems based on the current CSS software at the time of writing. No guarantee is made on the accuracy, adequacy or completeness of any information. Cherry Systems, Robert K. Kefauver and CSS are not responsible for any errors or omissions or the results obtained from use of such information. At all times a restorable backup of CSS data should be maintained. Nothing in this manual obligates or requires Compatible Software Systems to design or write its programs to conform to the operation of the programs as described in this manual. This is a user manual. It is not a design specification. CSS from time to time may change its software in anyway it chooses which may make all or any part of this user manual incorrect or incomplete. © 2007 - 2010 Cherry Systems. All rights reserved. Overview The Compatible Software Systems (CSS) programs are specifically designed for the convenience store that sells fuel. CSS has interfaces available for the following Point of Sale (POS) systems - Wayne Nucleus, Gilbarco G-Site, Gilbarco Passport, Retalix, Verifone Ruby and Verifone Sapphire/Topaz. These POS interfaces are used to receive daily accounting and PLU/UPC sales data and to send scanning data, fuel prices and other POS configuration data. The software is divided into modules because not all stores require or need to use a complete accounting system. That may be the purview of outside accountants and payroll services. And some stores are a part of larger business where the general accounting is performed at a higher corporate level. Most convenience stores use at a minimum the two core modules - Dailybook and Inventory Management (Nucleus, G-Site, Passport, Retalix, Ruby and Sapphire). These modules contain the very specific accounting and record keeping requirements of a convenience store along with many configuration options for your specific business. The Dailybook program contains fuel management functions and the daily accounting of sales, cash, credit cards, paidouts etc. The inventory module is a perpetual inventory system and also contains the interfaces to the POS system. A portable data terminal (PDT) is available for receiving vendor deliveries, taking a physical inventory audit and making price checks. For major general distributors like Coremark and McLane invoices can be received via e-mail or Easylink for posting to the inventory files. Other vendors may offer receipt via Internet FTP or bulletin board service. QuickBooks and Peachtree interfaces are available for the general accounting and payroll functions. These interfaces read and write directly to the QuickBooks and Peachtree data files. Also available is an export interface so that other accounting programs like MAS 90 may import the accounting data. CSS may be run on a single standalone PC or a network. Passwords may be setup to limit certain users to specific operations. There are built in backup and restore programs. The backup program will warn the user if a backup has not been successfully completed in the last twenty four hours. General Navigation CSS is designed to use the standard Windows navigation keystrokes and mouse actions. Some of the lesser understood techniques are illustrated below. Drop Down Boxes present a list of choices. Click on the down arrow to display the list. If the list is long if may be necessary to use the vertical scroll bar to see all the choices. Click the item on the list to select it. Check Boxes enable or disable options. Check boxes are square. Click with the mouse to check or uncheck. Diamond Boxes offer a selection of different choices. In CSS there are usually two choices for each box but there may be more. Both the Show In-Active box and the Show Plu/Upc box have three choices. Repeatedly click with the mouse to cycle through all the choices. The red mark inside the diamond has no meaning other than a visual clue that the click has selected another value. Radio Buttons grouped in a box allow only one choice of those displayed. Clicking on a non selected button will select that one and unselect the previous choice. Lookup is indicated by the three dots. It is used to find an item when the exact information is not known. Click on the dots and another window will appear. Select the lookup method. Then enter the starting data for that method. For example if lookup by Plu/Upc Item Number is chosen then in the Data Selection window enter the start of the UPC number. If lookup by Plu/Upc Item Name is chosen then enter the starting letters of the name. Matching data will be displayed. It may be necessary to scroll down through the list or if the item is not found reselect the method or starting data. To use this effectively by name it is important to be consistent when naming PLU’s and UPC’s. Calendars are available anytime a date is requested. Click on the down arrow to display the calendar. Dates that are grayed mean there is no applicable data for this report on those dates. In this example there is no applicable data after October 12. Grayed Out Selections indicate the item is currently not available. In this example the tabs are grayed out while the fuel product is being edited. Once Save or Cancel is selected the tabs will become available. Also in this example the Blending section of the screen is grayed out because this product is not being blended. If the check box Blended is checked this would become available. Grids display rows of items like a spreadsheet. Data entry grids such as for credit card batches and invoice line items allow a single row to be selected and/or deleted. To select a row, click on the small box to the left of the grid. The row will be highlighted. Once the row is highlighted, press the keyboard Delete key to delete the row. In this example if a new credit card batch was entered for the wrong day it needs to be deleted by this technique. A row can not be deleted if it has never been saved into the database. A row is automatically saved when the cursor goes to the next row or all required data has been entered and the mouse is clicked elsewhere on the screen. Moving Columns on some data entry grids is possible. The below grid is for entering Last Cost for many items at once. It would be better if the Retail column on the far right was placed next to the Last Cost data entry column on the far left. CSS will allow this by dragging and dropping. Double click and hold on the header of the Retail column and drag it next to the Last Cost column The above grid was rearranged to first display the Item Name, then the Last Cost data entry column then the Retail column. Printing All CSS reports are first displayed on the screen and then can be printed or copied. Table of Contents – opens a list on the left side of the screen. This is not applicable to all reports. Copy to clipboard - and paste to MS Word for example. Zoom in or Out Use Find to search for a name or number in a long report. Scroll Bar to move the report up and down Page number currently displayed and total number of pages Dailybook Data Entry Download the POS Day/Shift Reports Before starting the Dailybook the POS system day/shift reports must be downloaded for use by CSS. The day/shift reports contain the fuel and department sales, credit cards received, sales tax, etc. They also contain the sales of each individual PLU/UPC item. With a little effort the Dailybook data may be manually entered from the printed hard copy POS reports if necessary. However the PLU/UPC sales most likely have not been printed and even if they were it would be a very time consuming task to enter the typical 500 to 1000 different items sold every day. N) Nucleus 0). Communications Click on . The download will be almost instantaneous. When the download is complete exit and go to the Dailybook. If CSS does not receive a certain day report or it is accidentally deleted the report may be regenerated directly on the Nucleus POS by using Export Archives from the Back Office Configuration window. The Nucleus gives no feedback as to when this report is generated. It may be immediate or it may take an hour for the Nucleus to schedule it and make it available to CSS. P) Passport Communications 0). Communications Click on The download will be almost instantaneous. When the download is complete exit and go to the Dailybook. If CSS does not receive a certain day report or it is accidentally deleted, CSS can request that the report be regenerated by using the Request Files on the 1. Configure tab. Check Request Shift /Day Files. Enter the Day’s Ago. Click on Save. The Passport limits how many past days are available to number set up in the Manager Workstation – Setup - Store Options – Logging- Days worth of detailed sales. Getting Started Every day will be processed by using buttons Accept, Input, Print and Close. For any one day buttons Accept, Input and Print can be accessed and executed as many times as necessary. Button Close can be only fully executed once. After the day is closed it cannot be reopened. Some changes are allowed to items that do not affect cash over/short. These changes are specified in the section Changing a Closed Dailybook. There are many sections to Input – fuel, department sales, car wash sales, EFT, A/R, etc. Only rarely would one store use all the sections. If a section is not needed then simply just skip it. Before the day can be processed with data integrated from the POS system, the POS end of day report must be downloaded from the POS system to the back office PC. Step 2. Check the Days to Process and if OK click on Accept. Step 1. Enter the date the books are being done for. Step 4. Click on Input to go to the next screen. Step 3. This may be used to help track the competition. Enter the data before clicking on Input. STEP 1. Enter the Day to Process. There are two dates near the top left of the screen. The Last Closed Date is the last day the books were done for. The Day to Process is the day you are doing the books for. The Day to Process may be but is usually not the current day’s date. For example if the POS end of day is done at 11:00 PM on August 14 that is the Day to Process even though the actual data entry may be done on August 15. If the POS end of day is done at 6:00 AM on August 15 then August 14 would still be the Day to Process because that is the day that contains the bulk of the business transactions. STEP 2. Check the number of Days to Process and click the Accept button. The Last Closed Date is subtracted from the Day to Process to calculate the number of Days to Process. It normally is one day because the daily accounting is done one day at a time. CSS can combine multiple days into one but it is best to do each day on its own to have a correct history for sales, etc. When the day is closed the Day to Process automatically becomes the Last Closed Date ready to do the next day’s books. There is a security option in Configuration – Users to prevent changing the Last Closed Date and from accepting a Process Date that would be more than one day. When accepting the date, CSS checks the Day to Process against the current accounting month. If they are not the same month a warning message is displayed. Without good reason, this should be answered No and the month closed before proceeding. STEP 3. If using Competition Fuel Pricing enter it. This allows entry of one or more competitor’s fuel pricing to be recorded in the Dailybook. Entries may be done for all grades and all service levels – full, self and mini. The Competition Fuel Pricing data may be included when printing the Fuel Track report. Access this report by going to 4) Management – 1) Fuel Track. STEP 4. Click the Input button to continue to the next screen. STEP 9A. Check that CSS has received the individual UPC/PLU sales. If the Plu/Upc Activity is red with $0.00 then CSS has NOT received the item by item sales necessary to update the inventory balance On-Hand. When a physical inventory audit is conducted the shrink will be distorted by the amount of this day’s non fuel sales. Also look for Unknown UPC’s. If this is displayed CSS has found items sold on the POS but are not in the CSS inventory database. Click on Submit to display/print the UPC’s sold for the day. The Unknown UPC’s are listed at the end of the report. These UPC’s should be added to the CSS inventory database BEFORE the day is closed so that the balances on hand get updated with this day’s data. It is not necessary to start the day over. A sample report titled UPC/PLU’s Sold is in the sample reports section. If the Unknown UPC’s are not added before the day is closed, add them later and then use Adjustments to enter the sales. The Plu/Upc Activity includes the sales value of all items including the unknown items. This report can be printed by department or sales category. It may also be tens of pages long. To make it quicker to review just a certain department or category a Table of Contents is available. Click on the TOC icon in the upper left hand corner of the screen after the report is displayed. Jump to a specific department or sales category by clicking on it. Click on the TOC icon. Click a department or category. Step 9A. Check for Plu/Upc Activity and Unknown UPC’s. Optionally click on Submit to display/print a report of all Error! Reference source not found. and to determine the Unknown UPC’s. Step 9B. Click Proceed to confirm your selection and to continue on. OPERATIONS HINT: Have your vendors set aside one of the new items to make data entry easier. Also have your cashiers, after a customer leaves, to either write down an item that did not scan or go get one off the shelf and place in a small box behind the counter. OPERATIONS HINT: Never use open department keys on the POS for items that have Track Balance checked. Nucleus, Passport, G-Site and Verifone POS systems all have the capability to handle unknown UPC’s without use of open department keys. Fuel Delivery Multiple fuel deliveries may be entered for any one day. CSS will perform all the calculations necessary for taxes, etc. Sometimes besides the base cost and gallons there is a variable or fixed charge like a load charge that CSS can not calculate. This needs to be entered also. CSS will stop and prompt for this type of charge. After entering the invoice check the CSS calculated total against the invoice. There may be a few cents difference due to rounding and calculations involving hundredths of a cent. Neither the IRS nor your accountant is going to argue about 4 cents on a $15,000 invoice. However if the fuel invoice will be sent to QuickBooks, Peachtree or another accounting program it is recommended that a manual Adjust Rounding field be set up in fuel taxes and the difference entered in this field. If CSS is setup to sell fuel on consignment then there is no prompt for the Purch Cost. If using Consignment Cost, use the Misc Fuel button to enter the per gallon cost of consignment fuel and enter the gallons here. If using Consignment CPG then enter the gallons here. (The CPG profit is setup in Maintenance – Fuel). If the fuel invoice contains only net gallons enter the net gallons for both gross and net. If using an accounting interface to send CSS data to a third party accounting program enter net for both gross and net. STEP 13A. Enter fuel deliveries. Verify the CSS Invoice Total against the actual fuel invoice. Step 13A. Click on Add to enter a fuel invoice. Enter the invoice and verify this total against the actual fuel invoice. Step 13B. Click on Exit after all fuel invoices have been entered. When fuel taxes change, they can be added or changed in 2. File Maintenance, 0-Fuel, Fuel Taxes. STEP 13B. After the delivery is complete, click on Exit. The Inventory screen will automatically appear. 8. Accounting This is the last screen for Input. There is usually no data entry on this screen. If needed, Sales Tax can be entered manually. The Sales Tax is for store items only. The sales tax (if any) associated with fuel is calculated and displayed separately as Fuel Sales Tax. More than one sales tax category can be setup and entered here. For example some Arizona tax jurisdictions have two different rates depending on the taxable product sold. STEP 25. Check the Sales Tax against the POS report(s) or it manually. Step 25. Verify or enter sales tax. Step 26. Verify cash over/short is acceptable. Fuel Sales Tax Total to Account For - Total Accounted For = Over/Short STEP 26. Check that Over/Short is acceptable. If Over/Short is not acceptable determine what is incorrect and add, change or delete as necessary. Click on any tab to jump to that section to make the corrections. After the changes are made, click on 8. Accounting to check Over/Short. STEP 27. When the Over/Short is acceptable click on 9. Exit to return to the Process Dailybook screen to print and close the day. Changing a Closed Dailybook Changes should not be made for any data that affects cash over/short. Fuel invoices and tank inventory readings may be changed after close because they do not affect cash over/short. Fuel Invoices 8. Fuel Purchases Check revised total Select date of invoice. Click on Retrieve. Select invoice if more than one is displayed. Make changes and click on Save. Making a change here in gallons will update the Inventory Reconciliation Log report and the Daily Report. Only taxes that were available when the invoice was first entered can be changed. A new tax that was setup after this invoice was posted will not appear. CSS Calculations Fuel Margins CSS calculates a true fuel margin. The prepaid sales tax paid to the fuel supplier is backed out from the cost of the fuel. The sales tax included in the retail dispenser sales is also backed out before calculating the difference between the sales and the costs. If the fuel gallons sold for the day does not exceed the fuels gallons in the ground at the beginning of the day CSS uses the cost of the fuel in the ground at the start of the day as the one and only basis for the margin and profit calculations. However if the fuel gallons sold for the day exceeds the starting fuel gallons it will calculate a weighted average cost of the fuel in the ground with what was needed from the delivery to equal the total fuel sales. For example say the day was started with 6000 gallons of unleaded in the ground and the cost is $2.00 per gallon. If sales for the day were 3000 gallons CSS would use the $2.00 per gallon as the cost to calculate the cents per gallon margin and the gross profit. Let us take another example. Say the day was started with 2000 gallons of unleaded in the ground and the cost is $2.00 per gallon. Then let’s say 5000 gallons more were bought at $2.50 per gallon. If sales for the day were 3000 gallons CSS would cost the fuel as follows. 2000 gallons @ $2.00 = $4000 1000 gallons @ $2.50 = $2500 Total cost for fuel sold $6500 or $2.167 per gallon Fuel costs sometimes move so fast that the CSS margins may not seem correct. This is usually because a quick manual calculation uses the last cost. So if fuel costs are quickly rising, the margins based on last cost may seem low compared with what CSS is calculating. The opposite is true. If fuel costs are quickly falling, the fuel margins based on last cost may seem high compared with what CSS is calculating. This also is dependent on how often deliveries are made. A station receiving multiple deliveries in a day will not see this difference like a station receiving weekly deliveries. CSS also has the ability to factor in credit card fees to the costs and profits of fuel. If actual credit card fees are known and input each day they can be used. CSS also has the ability to use an estimation of credit cards fees. CSS can also add in fuel taxes that are not part of the fuel invoice – only California UST as far as the author knows. When viewing/reporting the fuel Costs of Goods and fuel profit in CSS these costs will be added to the costs and subtracted from the profits. Sales Tax Sales tax on fuel sold is always calculated by CSS because the POS does not report it. If it is wrong the tax rate needs to be changed in CSS. This can be done in 5) Preferences, 0. Fuel Options. Prepaid sales tax on fuel purchased is calculated by CSS when the fuel invoice is entered. If this is wrong the invoice total as calculated by CSS will not match the actual invoice total. This can be corrected in 2) Maintenance, 0. Fuel, and then click on Fuel Taxes. For non fuel sales CSS is usually setup to use the exact sales tax as reported by the POS system so that all data is consistent. However it is possible that the taxable sales as reported by CSS may not correspond with the tax collected. For example CSS reports taxable sales as $2950.50 and the tax collected as $244.89. At 8.25% times $2950.50 the calculated tax is $243.42. Required Department Info and POS System Specific 2) Maintenance 2. Department Nucleus Department – This is a drop down selection list to edit an existing department. Name – This is the name or description of the department. Is Fuel Dept – Nucleus mixes fuel departments with non fuel departments. This should only be checked if the department is a fuel department so that CSS on reports and drop down selection lists does not include this department. Product Code – This is oil company specific. It is the host product code used by the credit card network. It must match exactly the product code assigned to the same department in the Nucleus. Taxable – This determines if items assigned to this department will be charged sales tax or not. Minimum Age – This determines age based purchase restrictions on items in this department. It is usually used for tobacco and alcohol products. Enter the minimum age in years to buy products in this department. If there is no age restriction enter zero. PLU/UPC Maintenance Advanced Lookup Lookup Item Number (Long Format) CSS provides two ways to look up the UPC code in maintenance, invoicing, etc. The first is by using the actual UPC on the product. The second way for UPC-E codes is to enter the equivalent UPC-A code. This is very helpful in at least two situations. Vendor invoices almost always use the UPC-A code even though what is on the product may be the UPC-E code. For example, a Bud 12oz can on a vendor invoice is listed as 01820000016 while the UPC on the can is actually 0180162. The second is when the POS system (e.g. Ruby) only supports UPC-A codes and this is what is found on the POS report itself or on the Daily Book PLU/UPC Sales Activity report. From the Sales Activity Report this is especially helpful in the case of unknown items. To lookup an item the long UPC-A number, the Lookup by Selection should be PLU/UPC Item Number (Long Format). As the UPC-A code is entered CSS will start narrowing down the possible UPC-E codes in the database. Sorting the Lookup Once items are shown on the lookup screen, CSS can further assist the lookup with sorting in any of the columns. For example if looking up Anheiser products, most which begin with 018, after entering the 018, CSS will allow a sort of the displayed items. So if looking for a ring top 6 pack, clicking on the Pkg column heading will re-sort the displayed list by the Pkg number. Before clicking on the Pkg After clicking on Pkg Point and click on Pkg This may be done on any of the columns – Pkg, Item Name, On Hand, Last Cost and Retail. CSS also has a built in aid to help identify and quickly de-activate items. 2) Maintenance 8) Other Click on De-Activate Plu/Upc Items. Step 1. Enter the Sales Date Older Than. This filters out all items that have sales more recently than this date. Step 2. This is the second filter. Select Zero Balance Items Only or All Items. Step 3. Select the department. Step 4. On this screen items can be deactivated even if they do not have a non zero quantity on hand. For items with a non zero quantity On-Hand this determines whether or not the shrink dollars will be included for accounting purposes. Click on Shrink Qty Only to change it to Shrink Qty and Dollars. Step 5. Click on Retrieve. Step 6. Check the items to be de-activated. Step 7. Click on Submit. Items with a check mark are linked to another item. Both items will be de-activated. See the detailed explanation below. The Passport only accepts predefined qualifiers. For that reason there is also a three dot look up adjacent to the right of the field. When needed qualifiers may be added by clicking on the Setup Qualifiers button. Passport also has a quirk with qualifiers. Notice in the table to the right that the Base qualifier code of 0 represents one unit. For some design reason when setting up items with qualifier codes representing more than one unit, Passport requires a qualifier code of 1 also representing one unit. This results in the CSS database containing an extra item that is not needed by CSS but nevertheless required for the Passport to work correctly. Setup Qualifiers – Qualifiers may be setup as needed by clicking on this button. This button is only active before starting or after completion/cancellation of an Add Item or Get Item operation. Qualifiers can only be added or deleted. A qualifier of code number 0 or 1 can never be deleted. Any other qualifiers currently in use can not be deleted. Vendor Item - Used only for Get Item and only active when in Vendor Item mode. Vendor Item (aka Item Number) is the CSS term used for the vendor’s reference number usually found on the vendor’s invoice. See Item Number below for more detail. As the number is typed the items starting to match that number are displayed. At anytime the vertical scroll bar may be used and an item selected by clicking on it. POS System Specific Details The screens for the Passport and the Ruby contain additional options that can be configured from a back office system. Passport Item may be Sold – This is normally checked. Some users may want to setup supply items to be tracked and valued in the inventory. These items would not be checked as they should not be sold. Another use for this is to setup items in the database ahead of the time when they will be offered for sale such as promotional or seasonal items. Add those items to the database as time permits and leave this unchecked. When the item is to be sold check and upload. When the promotion or season is over uncheck and upload. The Passport term for this is Active for Sale. Cashier must enter Price Manually – This may be for something that is sold by weight for example such as produce. A scale would weigh and price the item or the service deli may weigh and price the macaroni salad. The cashier would enter the price from the scale or the service deli price tag. The Passport term for this is Price Required. Allow Food Stamps – When checked the Passport will permit this item to be sold in exchange for food stamps or other governmental support payments. The Passport term for this is Food Stampable. Allow Discounts – Checking this will allow discounts by the cashier on this item. The Passport term for this is Discountable. This must be checked to allow promotional/combo pricing to work. Quantity Allowed – This is normally checked. If unchecked the Passport will allow only one of this item per sales ticket. The Passport term for this is Quantity Allowed. Passport uses the term Qualifier instead of Package and automatically allows multiple quantities for a discounted price. These are discussed in the Common PLU/UPC Details section. The Passport itself also allows more pricing and control methods than CSS controls from the back office. For example a Fee and a Return Price can be associated with an item. Troubleshooting Multi-Pack Items (UPC with a non zero qualifier) Do Not Sell, Only the Single with the Same Bar Code Sells When using Price Check both the single and the multi-pack item are recognized but when scanned to sell the Passport does not pop up the qualifier menu to allow you to sell the multi-pack item. To correct this on the Passport - Setup – Register - Register Group Maintenance. Click on the applicable Register Group and click Change. On the “Transaction Options” tab, in the Qualifier options group box, clear the “Key in pack quantities before scanning qualified item” check box. Click Save. Qualifier List on the Passport does not Default Item to Highlight Passport has an option to pop up a list with the base item and qualifiers and by default highlights the base (single) or the qualifier (multi-pack) in the list. To change this on the Passport - Setup - Register Register Group Maintenance. Highlight the applicable Register Group option and click Add/Change. On the “Transaction Options” tab, in the Qualifier options group box, select or clear the “Highlight first item in qualifier list at POS” check box. Click Save. Understanding UPC’s Types UPC is the acronym for Universal Product Code. This is a number in a specific format. The number can be represented by a bar code symbol. A bar code symbol consists of patterns of black vertical bars with white spaces and numbers at the bottom. The thickness of the bars and the distance between them define the numbers contained in the bar code. In the United States all retail items will be bar coded in one of three general formats: UPC – Universal Product Code EAN – European Article Numbering GS1 Databar UPC-A codes take the form as shown to the right. UPC-E codes are compressed UPC-A codes to take up less space on the package. The EAN system is a symbology developed for international businesses. The two versions, EAN 8 and EAN 13, are variations of the original UPC coding system. GS1 Databar extends the number of digits to 14 and provides options and formats to accommodate regulatory needs as well as convenience and product safety checks for the retailer. For example, GS1 Databar can have the numbering for tracking and tracing items through the supply chain. Another variation can have an “expiration” or “best used by” date. The GS1 Databar can also take up less space on the package than a UPC or EAN code. A major driver of this code is the growth of bar coded coupons both in number and complexity. Offers that specify if you buy two of item A and two of item B you get a 50% discount on item C simply cannot be handled by the cashier. The cashier must be able to scan the coupon and let the POS system do the work. GS1 US (the governing body of USA bar code usage formerly known as the Uniform Code Council) declared that as of January 1, 2005 all companies must be capable of processing and scanning EAN-8 and EAN-13 bar codes. This declaration is known as Sunrise 2005. On January 1, 2010 another “sunrise” requires processing and scanning of the GS1 Databar symbology. For simplicity CSS uses the term UPC whether the bar code is UPC, EAN or GS1 Databar. CSS uses the term PLU (part lookup or price lookup) for a user defined reference number. This is usually used for such non bar coded items as fountain drinks, coffee, hot dogs, etc. It may also be used in lieu of the bar code on the item for convenience purposes. POS systems continue to evolve and not all systems and older versions of some systems do not process and scan all these codes. If the POS system can use the code so can CSS. CSS cannot force the POS system to do what it is not designed to do. For detailed information on bar codes the following link maybe helpful. http://www.gs1.org/bar codes The below bar codes are all the same product - Winston Box King . CSS Entry CSS Length UPC-E 0123123 7 Digits UPC-A 01230000012 11 Digits EAN-8 01231236 8 Digits EAN-13 0012300000123 13 Digits Type Bar Code GS1 Databar Here are some more examples of the GS1 Databar barcode. Not Yet Applicable Reports and What to Look For The linkage data can be printed for review and to use as a work sheet. Sales Linkages 3) Reports 7. Config Select the PLU/UPC Sale Linkages report. Select the Linkage Department. Bob's Super Express Plu/Upc Item Pkg Item Description Monday, May 07, 2007 Retail Qty to Transfer Qty to Receive Linked Plu/Upc Item Description Retail 0263041 Newport Kb $4.39 10 1 Cigs-brnd Ct 02610000307 1 Newport Box $42.51 02610000647 1 Newport Box $42.51 02820015020 1 Chesterfeild Nonfilter Ct $40.99 0285022 Chesterfield King Size $4.39 10 1 00330006518 1 Pall Mall Ks $39.99 0433163 Pall Mall Ks $4.39 10 1 01230018613 1 Eclipse Menthol $39.99 0123863 Eclipse Menthol $2.49 10 1 Newport Ks $39.99 1. Look1 for missing linked PLU/UPC’s 0263641 Newport Kings Soft Pack $4.39 10 1 02610000367 02610000517 1 Kent-gl Ks $39.99 0265141 Kent Gl King Soft $4.39 10 1 02720001116 1 Capri Lt 120 Box - Carton $39.99 0272162 Capri-l 120b $4.39 10 1 02720001163 1 Capri $39.99 0272382 Capri-l 100b $4.39 10 1 02720001164 1 Capri-ml 100b $39.99 0272392 Capri-ml 100b $4.39 10 1 02720003250 1 Capri-ul 100b $39.99 0276602 Capri-ul $4.39 10 1 02720003251 1 Capri-ulm 100b $39.99 0276612 Capri Men Ult Lgt 100 Box $4.39 10 1 02820010400 1 B&h 100s $39.99 0288402 B H 100 Soft $4.39 10 1 02820010416 1 B & H Reg King $39.99 0288412 B & H Box King $4.39 10 1 02820010426 1 B&h-m 100b $39.99 0288422 B&h-m 100b $4.39 10 1 02820010520 1 B&h-ml 100s $39.99 0288522 Unknown Linked Item $0.00 10 1 02820010710 1 Merit Ks $39.99 0288712 Unknown Linked Item $0.00 10 1 02820010760 1 Merit 100s $39.99 0288762 Merit 100s $4.39 10 1 02820010900 1 B H Light $39.99 0288902 B/h L 100 $4.39 10 1 0281102 B&h-ul 100b $4.39 10 1 2. Look1 for Unknown Linked Item.$39.99 B&h-ul 100b 02820011100 02820011110 1 B&h-mul 100b $39.99 0281112 B&h-mul 100b $4.39 10 1 02820011200 1 Merit King $39.99 0281202 Merit Box King $4.39 10 1 02820011800 1 Merit Ul-box King $39.99 0281802 Merit Ultra Light Box $4.39 10 1 02820011830 1 Merit-ul 100s $39.99 0281832 Merit Ul 100 Box $4.39 10 1 04330002058 1 Carlton Menthol 100 Box $39.99 0433363 Carlton Ment $4.39 10 1 04330002068 1 Carlton 100b $39.99 0433353 Carlton 100 100 $4.39 10 1 Carlton 100s $39.99 to 0433053 3. Look1 for two different cartons linked 04330002908 1 Carlton Box $39.99 0433863 the same1 pack. 04330006518 Pall Mall King Soft Ct $39.99 0433163 Unknown Linked Item $0.00 10 1 Carlton Box $4.39 5 1 Pall Mall Ks $4.39 10 1 02820010050 1 Parliment-l King $33.49 0288052 Parliment-l King $3.84 10 1 02820010500 1 Paliament-l 100s $33.49 0288502 Parliament-l $3.84 10 1 02820010640 1 Virgina-l 100b $33.49 0288652 Virginia-ml 100b $3.84 10 1 02820010650 1 Virgina-ml 100b $33.49 0288652 Virginia-ml 100b $3.84 10 1 02820011600 1 Virginia-ul $33.49 0281602 Virginia-ul 100b $3.84 10 1 04330002078 Page 1 of 4 Sale Linkages 4. Look for incorrect Qty to Transfer and Qty to Receive. Price Changes Overview Maintaining retail prices is a extremely important task. This is recognized by CSS as price changes can be done seven different ways to accommodate almost any workflow or operating situation: In the PLU/UPC Maintenance screen for one item at a time During inventory invoice data entry In the Pricing Maintenance screen for many items at one time Importing a vendor price file Depending on the POS system, in the Promo Maintenance screen. With the Portable Data Terminals (PDT) Through the Central Price Book for multiple stores (not yet available). The first two methods are discussed elsewhere. The Central Price Book is a separate CSS program and is not included in this manual at this time. Here are the other four methods. Changing retail fuel prices can also be done from the CSS inventory program. This is in the last section of this chapter. Pricing Maintenance 2) Maintenance 4. Pricing Step 1. Select category. Department Item Sub-group Vendor Data Collector Step 3. Enter a Search Price or leave $0.00 to display all items from the selection. Step 2. Select the item from the category. Step 5. Click on Retrieve. Step 4. Enter a Replace Price (the Search Price must be greater than $0.00) or leave $0.00. The New Retail price will be set at the Replace Price unless it is zero. The current Margin will be displayed next to the current Retail price. The new Margin will be displayed next to the current New Retail price for a non zero Replace Price. Change the New Retail price as needed. When done click on Submit to update the CSS files and place the price changes into the upload file for the POS system. Combo Examples The same Personal Size Pizza list is used by both combos so customer can choose the size drink. Customer can select any two items from each of the three Item Lists (a total of six items) and receive the $9.99 price. PDT Price Checks and Price Changes Only the Symbol MC1000, Symbol MC3000 and AML M5900 PDT’s can be used. The older AML M3000 and M5000 PDT’s do not have this capability. The PDT’s have two functions to assist with correcting and managing retail prices. Price Check simply displays the current retail price of an item and no data can be changed or saved. Price Change will display the current price and allow a change to be saved and transferred to CSS. Price Check and Price Change can be done on both UPC and PLU items. The Lookup Files in the PDT must be current. To create the Lookup Files for the MC1000 and MC3000, see the chapter titled PDT Invoice Entry. If the Price Check will be used to check quantity on hand then make sure that Include Balance in Lookup (Yes) is checked when uploading the Lookup Files to the PDT. SYMBOL MC1000 and MC3000 To create the Lookup Files for the M5900, see the chapter titled Physical Inventory Audit. If the Price Change will be used to check quantity on hand then make sure that Include On-Hand (Yes) is selected checked when uploading the Lookup Files to the PDT. AML M5900 Price Check Using the MC1000 Select 1. Inventory. Select 3. Price Change. . Select 0. Price Check. Process Invoice Common Elements to all Three Methods – Manual, Vendor Worksheet, Portable/Edi An item may be entered by using: 1) the Vendor Item number or 2) the Plu/Upc and Pkg qty or 3) lookup to find the item Exit may be used anytime to go do other work and then return to finish the invoice. Total cost and unit cost for this line item for this invoice. Unit cost paid for this item on the last invoice. If the Last Cost is in red then the cost has changed on this invoice. Click here to select a line for deletion. Then press the Delete key. If the invoice has a new item, create it here. Options – See text below. Any line item can be deleted by clicking on the small gray box at the beginning of the line item to turn it dark blue and then pressing the DELETE key on the keyboard. A Vendor Item or Plu/UPC Number may be entered and the item is not recognized by CSS so a new item needs to be created. CSS requires that valid information be entered on the line before anything else can be done, so clicking on Create New Plu/Upc does not work. Press the Escape key to erase the line and then click on Create New Plu/Upc. MC3000 Physical Inventory The Lookup Files in the MC3000 should be current. To create the Lookup File see the chapter titled PDT Invoice Entry. If during the actual count the person doing the counting is permitted to see the theoretical book balance then make sure that the Include Balance in Lookup (Yes) is checked when uploading the Lookup Files to the PDT. Note to former AML M3000 and M5000 users. The Physical Lookup File loaded to the PDT could be customized to contain only certain departments. With the MC3000 this is not necessary. The customization can be done anytime up until Build Physical is executed in the 6) Physical – 0) Start Physical tab. This makes the whole process easier. Invoices do not need to be downloaded from the PDT to change the Lookup File. The same UPC Lookup File is always used for both receiving and the physical inventory. And it is not necessary for very large stores because of the greater amount of memory in the MC3000. All communications between CSS and the PDT require MCL Link to be running. Start MCL Link if it is not already running. When MCL Link is running this icon should be visible in the Windows system tray. If using USB communications, the icon for Microsoft Active Sync should be visible in the Windows system tray. If using RS-232C communications, (even with a USB to RS-232 converter), Active Sync does not have to be installed or running. Post the Physical Inventory Counts Step 10. Choose to Post Shrink Dollars (and balances) or just Post Balance Only. Step 9. Print report. This report prints all data. It is not affected by the settings in steps 10, 11 and 12. For that reason when doing step 13 you will get a reminder message. Step 11. Choose to Post All Items or Post Shrink Items Only. Step 12. If necessary, change the posting date. Step 13. Click on Post Physical Inventory. CSS reminds you to print the Shrinkage Report if you have not done so. Step 10. The usual course of action is to Post Shrink Dollars. Post Balance Only will not include shrinkage counts and dollars for this particular inventory in the reports. Post Balance Only is usually used when the CSS theoretical book counts, balance on hand, is known to be meaningless. For example when a store that has been in operation starts using CSS, the very first inventory is used in Post Balance Only mode. Another example is a CSS user who does not try to maintain an accurate balance on hand. The CSS inventory system is used only to maintain items for scanning at the POS system and to collect UPC sales data. However a periodic inventory may be desirable for valuation purposes such as insurance and financial statements. Step 11. The usual course of action is to Post All Items. If Post Shrink Items Only is selected and if for any item the PDT count (or the manually entered corrections) equals the CSS theoretical balance on hand, then the fact that the item was physically counted will not show up in that UPC’s history or on the reprint of an Physical Inventory report in 3. Reports – 9) Physical. Step12. This automatically displays the current day. It may be changed when necessary to correctly record the inventory in the PLU/UPC history files and various reports. For example, the inventory was completed two days ago but some of the paperwork like Dailybook and/or invoices was not completed for that day until today. Select: Close the last day of the month exactly like every other day. Then print the reports. The Credit Batch Report should always be printed if credit card discounts and net batch amounts were entered for each batch. Print Management Reports 3) Reports 0. Fuel Sales 1. Choose Select Report - Monthly Sales. 2. Choose Service - Self. 3. Enter the Period Beginning date. 4. Enter the Period Ending date. 5. Click on Submit. This is a suggested set of reports only. All reports can be reprinted at any time. Samples of these reports are provided starting at page Error! Bookmark not defined.. 1. Fuel Other 1. Choose Select Report - Fuel Reconciliation Log. 2. Enter the Accounting Period Month. 3. Enter the Accounting Period Year. 4. Click on Submit. 5. Repeat the above for Select Report - Fuel Purchases. 2. Non-Fuel Sales 1. Choose Select Report - Monthly Sales. 2. Choose Select Sales Category - Department Sales. 3. Click on Report By Sales Group to change to Report By Product. 4. Under Options: a. Click on Day Detail to set to No. b. Click on Report Day Total to set to No. 5. Enter the Period Beginning date. 6. Enter the Period Ending date. 7. Click on Submit. 8. Repeat the above for Select Sales Category - Inventory Sales. 9. Repeat the above for Select Sales Category - Carwash Sales. 10. Repeat the above for Select Sales Category - Other Income. 3. General 1. Choose Select Report - Batch Credit. 2. Click on Submit. 3. 4. 5. 6. Choose Select Report - Cash Disbursements. Enter the Period Beginning date. Enter the Period Ending date. Click on Submit. 7. Repeat the above for Select Report - EFT Disbursements QuickBooks Integrator Any of the three sections may be sent separately and apart from the others as needed. However it is recommended that Send Inventory/Activity always be done concurrently with Send Dailybook Activity so that in QuickBooks the sales correspond to the cost of good sold. Both the Send Inventory/Activity and Send Dailybook Activity have a date range displayed on the screen. CSS has not implemented the date range feature. Each day must be sent one by one. Click on the Build button. This will compile all applicable data. Based upon the outcome of the Build, the Cancel, Post, Error and Report buttons will be activated. If errors are detected, then the Error button will be enabled and the error must be corrected before posting. Click on the Error button to display a list of errors. If the Edit Allowed box is checked then click on that line and correct the error. If the Edit Allowed box is not checked then most likely the debits and credits are out of balance. This must be corrected in the Maintenance section of the Dailybook or Inventory. This usually results from adding something new to the Dailybook, for example, a cash paid out category, or adding an inventory department without assigning all the general ledger accounts. After the errors are corrected click on the Cancel button. Reselect the check boxes and Build again. For more detail on errors see the section titled Posting Error Messages. If no errors are detected, click on the Post button. You will be asked to confirm the posting. Click on the Yes button. Assuming that QuickBooks is ready to receive the transmission the status will be displayed as the data is sent. When the whole process is completed successfully then the red check marks will go away, the dates under Send Dailybook Activity and Send Inventory Activity will be incremented by one day, and the Posting Progress message will read – Posting Process Complete. Whenever the Error button has been activated, make the corrections, click on Cancel, make the selections again and click on Build. Transaction Samples Fuel Invoices Fuel Invoices will be sent to QuickBooks as a Bill. The credit side of the Bill will be an Accounts Payable account. The debit side will be the fuel inventory or COGS account and if applicable sales tax payable. If the invoices will be paid in full (i.e. not netted out with the credit cards) then they can be paid by check or an EFT transaction like any other Bill. If not, the next section describes how the EFT may be handled. EFT Notices for Fuel Purchases If the fuel invoices will be paid less the credit cards, then for each EFT enter a Credit as shown below: The Credit Amount is the sum of the fuel invoices being paid. Rent, gift card sales or other charges from the oil company/jobber on the EFT Notice should be included as separate line items. The Credit Amount will equal the total of the fuel invoices being paid. After the Credit is saved, apply the Credit to the fuel invoices Bills. Since credit cards receivable will be reduced by the credit cards applied to the fuel invoice(s) it is not necessary in the Dailybook to enter fees or net for the credit card batches. However the batches should be paid so as not to accumulate and so that the unpaid batches in CSS match the QuickBooks credit cards receivable. EFT’s that do not involve fuel invoices or other already entered Bills can be entered as a general journal entry or a check. Clearing the Fuel Invoices After a Credit is entered for the EFT notice, the balance due to the oil company/jobber will be correct but the Credit transaction should be applied to the fuel invoice(s) to remove the cleared detail and just show the outstanding unpaid invoices. OPERATIONS HINT: The above shows a mixture of bills from different vendors. This screen would be easier to use if it only showed the bills from the fuel vendor. CSS will allow bills to be sent to different accounts payable accounts by assigning a vendor type to specific accounts payable general ledger accounts in the QuickBooks Integrator. To do this, in QuickBooks 1) assign a unique vendor type (e.g. Fuel) to the fuel vendor on the Additional Info tab and 2) setup an “Accounts Payable – Fuel” general ledger account. Retrieve the changes into CSS and assign the vendor type Fuel to Accounts Payable – Fuel on the QuickBooks Integrator - 3. Send Config tab. . OPERATIONS HINT: QuickBooks has the ability to memorize transactions that will be used repeatedly. The EFT credit transaction can be easily setup with zero dollar amounts and memorized for use again and again. Compatible Software Systems Building Blocks to Better Management