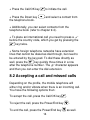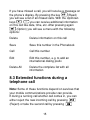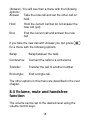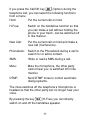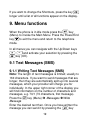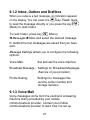
1
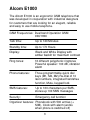
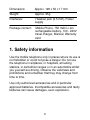
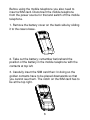
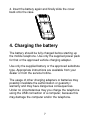
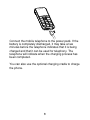
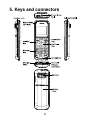
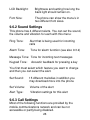
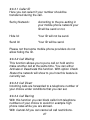
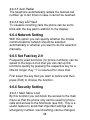
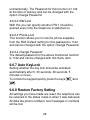
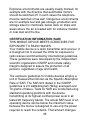
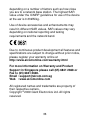
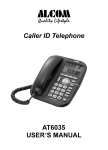
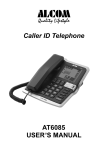
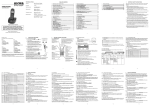
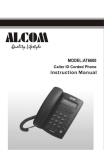
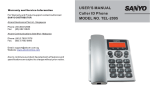
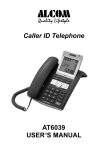
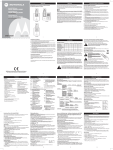
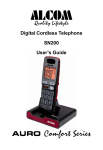
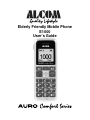
Elderly Friendly Mobile Phone
E1000
User’s Guide
Content
1. Safety information . . . . . . . . . . . . . . . . . . . . . . . . . . 4
2. General information . . . . . . . . . . . . . . . . . . . . . 5
3. Inserting the SIM card and the battery . . . . . . . . . . 5
4. Charging the battery . . . . . . . . . . . . . . . . . . . . . . . 7
5. Keys and connectors. . . . . . . . . . . . . . . . . . . . . . 9
6. Display and status symbols . . . . . . . . . . . . . . . . . .10
7. Switching on and off, key lock, emergency call
functions . . . . . . . . . . . . . . . . . . . . . . . . . . . . . .11
8. Basic call functions . . . . . . . . . . . . . . . . . . . . . . . 13
9. Menu functions . . . . . . . . . . . . . . . . . . . . . . . . . . . 19
10. Optional Accessories . . . . . . . . . . . . . . . . . . 30
11 Care and user information . . . . . . . . . . . . . . . . 30
12. Additional safety information / SAR value . . . . . 32
2
Alcom E1000
The Alcom E1000 is an ergonomic GSM telephone that
was developed in cooperation with industrial designers
for customers that are looking for an elegant, reliable
and easy to use mobile telephone.
GSM Frequencies: Dual band Operation GSM
900/1800
Talk time:
Up to 120 Minutes
Standby time:
Up to 170 Hours
Display:
Black and White Display with
amber backlit for maximum contrast
Ring tones:
16 different polyphonic ringtones
Powerful speaker: 100 dB, vibration
alarm
Phone features:
Three programmable quick dial
keys (M1, M2, M2),Re-Dial of 10
last numbers, integrated handsfree
function, Mute, keypad lock
SMS features:
Up to 160 characters per SMS,
stores up 100 SMS messages
Security:
Emergency call function
Organizer features: Phonebook with 500 entries (+
SIM), Clock with alarm (works
when phone is switched off)
3
Dimensions:
Approx. 128 x 50 x 17 mm
Weight:
Approx. 95g
Interfaces:
Headset jack (2.5 mm), Power
supply
Package content:
Mobile Phone, 750 mAh Li-Ion
rechargeable battery, 100 - 240V
travel charger, Manual, Warranty
card
1. Safety information
Use the mobile telephone only in places where its use is
not forbidden or could not pose a danger: Do not use
the telephone in airplanes, in hospitals, at fuelling
stations, in demolition ranges or in an automobile whilst
you yourself are driving. Observe the valid laws and
prohibitions and remember that they may change from
time to time.
Use only authorized accessories and in particular
approved batteries. Incompatible accessories and faulty
batteries can cause damages, even explosions.
4
2. General information
This mobile telephone has been developed for
operation in EGSM 900 and 1800 networks – further
information on the services in these networks are
available from your mobile communications provider.
On direction of the mobile communications provider
certain functions of this mobile telephone may have
been deactivated or modified. For further information,
please contact your mobile communications provider.
This mobile telephone is not water proof – therefore
keep it away from liquids. Keep the telephone, the
power pack, the SIM card and other accessories out of
the reach of children. Small parts might come loose that
may be swallowed. When disconnecting cables, always
pull by the plug and never by the cable. This telephone
may be serviced and repaired only by authorized
dealers.
3. Inserting the SIM card and the
battery
To protect the battery during transport it is not inserted
in the mobile telephone. In case the dealer from whom
you purchased the telephone has not already inserted
the battery, follow the following steps.
5
Before using the mobile telephone you also need to
insert a SIM card. Disconnect the mobile telephone
from the power source for that and switch off the mobile
telephone.
1. Remove the battery cover on the back side by sliding
it to the case‘s base.
2. Take out the battery; remember beforehand the
position of the battery in the mobile telephone with the
contacts at top left.
3. Carefully insert the SIM card then: In doing so the
golden contacts have to be placed downwards so that
you cannot see them. The notch on the SIM card has to
be at the top right.
6
4. Insert the battery again and finally slide the cover
back onto the case.
4. Charging the battery
The battery should be fully charged before starting up
the mobile telephone. Use only the supplied power pack
for that or the approved vehicle charging adapter.
Use only the supplied battery or the approved substitute
type. Appropriate instructions are available from your
dealer or from the service hotline.
The usage of other charging adapters or batteries may
possibly invalidate the authorization or guaranty /
warranty and may have dangerous consequences.
Under no circumstances may you charge the telephone
using the USB connection of a computer, because this
may damage the computer and/or the telephone.
7
Connect the mobile telephone to the power pack. If the
battery is completely discharged, it may take a few
minutes before the telephone indicates that it is being
charged and that it can be used for telephony. The
telephone will indicate when the charging process has
been completed.
You can also use the optional charging cradle to charge
the phone.
8
5. Keys and connectors
9
6. Display and status symbols
The display has three areas: The status of the mobile
telephone is indicated in the top area, the middle area
shows call numbers or text messages, and selection
functions in the menu or for the function keys are
displayed at the bottom.
The status symbols in the top area have the following
meaning:
Battery level
Signal strength of the GSM network
Alarm active
Headset connected
Keypad locked
Roaming
10
Call divert active
Missed call
New SMS received
Microphone muted
Phone muted
Only ringtone
Only vibration
Vibration then ringtone
Vibration and ringtone
7. Switching on and off, key lock,
emergency call functions
The SIM card has to be inserted before using the
mobile telephone. Refer to chapter 3.
Press the Power/End
key for about three seconds
till the telephone switches itself on. You are then
requested to enter the telephone code and/or the SIM
code.
11
The telephone code can be issued by you as you wish
and protects the telephone from unauthorized user. The
telephone code is 1122 at delivery and does not need to
be entered the first time it is switched on.
With the PIN code that you get together with the SIM
card you can protect the SIM card from user by
unauthorized persons. The PIN2 code that you get
together with certain SIM cards is needed for accessing
certain services. In case you enter the PIN or PIN2
code erroneously three times in a row, you are
requested to enter the PUK or the PUK2 code. Contact
your mobile communications provider if you do not
know these codes.
To switch off the mobile telephone press the Power/End
key as well until the telephone switches itself off.
7.1 Keypad lock
The key lock prevents the accidental activating of keys
or the making of calls for example when carrying the
mobile telephone in your pants pocket.
The key lock is activated by pressing the
key for
about three seconds. The key lock is indicated then by
the
symbol in the display‘s status line.
12
The key lock can also be activated automatically when
the telephone is not used for a certain duration. This
duration can be specified in the menus.
To unlock the keypad, quickly press the keys
and
in succession.
7.2 Emergency Call Function
If you press the emergency call key
for a little
more than a second, then a preset number is dialed
automatically and the telephone switches into handsfree
mode.
The alarm number and the quick dial keys
can be set in the menus.
and
Further information can be found in chapter 9.2.
8. Basic call functions
8.1 Making calls
There are several ways to make a call:
+ Enter the telephone number with the prefix and if
necessary the country code as well.
+ Redial: Press the Call/OK key
to view a list of the
last numbers called. Use the Up/Down keys
to select the desired number.
13
+ Press the Call/OK key
to initiate the call.
+ Press the Down key
the telephone book.
and select a contact from
+ Additionally, you can select contacts from the
telephone book (refer to chapter 9.4).
+ To place an international call you need to press a „+“
before the country code, which you get by pressing the
key twice.
+ Some foreign telephone networks have extension
lines that cannot be dialed as dial-through, but need to
be entered by the key pad. To dial these directly as
well, press the
key quickly three times in a row
after the telephone number .The „p“ character appears
and then you can enter the dial extension.
8.2 Accepting a call and missed calls
Depending on the profile, the mobile telephone will
either ring and/or vibrate when there is an incoming call.
You have the following options then:
To accept the call, press the Call/OK key
To reject the call, press the Power/End key
To end the call, press the Power/End key
14
.
.
as well.
If you have missed a call, you will receive a message on
the phone’s display. By pressing the key
(Read)
you will see a list of all missed calls. With the Up/Down
keys
you can receive additional information
on this call like date, time, etc. After pressing again
(Option) you will see a menu with the following
options:
Delete
Delete information on this call
Save
Save this number in the Phonebook
Call
Call this number
Edit
Edit this number, e.g. to add an
international dialing prefix
Delete All
Delete the complete list with all
information
8.3 Extended functions during a
telephone call
Note: Some of these functions depend on services that
your mobile communications provider can provide.
If during a running call another call comes in, you can
either reject the new incoming call by pressing
(Reject) or take the second call by pressing
15
(Answer). You will see then a menu with the following
options:
Answer
Take the new call and set the other call on
hold.
Hold
Hold the current call but do not answer the
new call (yet).
End
End the current call and answer the new
call.
If you take the new call with Answer you can press
for a menu with the following options:
Swap:
Swap between the calls
Conference:
Connect the calls to a conference
Transfer:
Transfer the call to another number
End single:
End a single call
The other options in this menu are described in the next
chapter.
8.4 Volume, mute and handsfree
function
The volume can be set to the desired level using the
volume control keys.
16
If you press the Call/OK key
(Option) during the
telephone call, you can select the following functions
from a menu:
Hold:
Put the current call on hold.
H-Free:
Switch on the handsfree function so that
you can make a call without holding the
phone in your hand - can be switched off
in like manner.
New Call:
Put the current call on hold and make a
new call (Conference).
Phonebook:
Switch to the Phonebook during a call to
search for or add a contact.
SMS:
Write or read a SMS during a call.
Mute:
Mute the microphone, the other party
cannot hear you; is switched off in like
manner.
DTMF:
Send DTMF tones to control automatic
dialog systems.
The mute switches off the telephone‘s microphone or
headset so that the other party can no longer hear your
voice.
By pressing the key
(H-Free) you can directly
switch on and off the handsfree speaker.
17
8.5 Profiles
This phone provides two profiles: General Profile and
Silent Profile.
The General profile works according to the settings for
ringtone, alarm, keytones and SMS alert that you have
set in the menu or have been defined as factory
settings.
The Silent profile deactivates all acoustic signals.
Incoming calls are only shown by the blinking display.
This profile is useful when you are sitting in a restaurant
or during a meeting so that other people will not be
bothered.
You can switch between the profiles by pressing the
key as long as the phone shows the swap between
the profiles.
If you have activated the General profile and you want
to mute an incoming call, briefly press the
key.
8.6 Shortcuts
The three functions that you use most can be defined
as shortcuts so that you can access them quickly.
To see a list of the Shortcuts press the Up key
.
Select the function you want and execute it by pressing
the key
(Open).
18
If you want to change the Shortcuts, press the key
longer until a list of all functions appear on the display.
9. Menu functions
When the phone is in idle mode press the
key
(Menu) to invoke the Main Menu. Press the Power/End
key
to exit the menu and return to the telephone
mode.
In all menus you can navigate with the Up/Down keys
and activate your selection by pressing the
key (OK).
9.1 Text Messages (SMS)
9.1.1 Writing Text Messages (SMS)
Note: The length of text messages is limited; usually to
160 characters. If you want to send messages that are
longer, then they are automatically split up into several
messages, which your provider will charge you for
individually. In the upper right corner of the display you
will find information on the number of characters and
messages, e.g. 70/1 (70 characters, first message).
Press the
key (Menu) Messages Write
Message
Enter the desired text then. Once you have written the
message you can send it by pressing the
key
19
(Send) along with a selection of further options from a
menu:
Send only:
Send the text message, manual
entry of the call number or selection
from the telephone book.
Save and Send:
Send message and save it in folder
Outbox.
Save:
Save the message in the draft box.
Send to Many:
Send text message to many
recipients
Send by group:
Send text message to a group
By pressing the key
you can choose between
different input modes for the text entry. The selected
function is indicated at the top left of the display:
abc:
Entry only in small letters
ABC:
Entry only in capital letters
123:
Entry of numerals
Text input: Keep pressing the respective key until the
desired letter appears on the display. To get an „L“ for
example, you have to press the key
three times.
Use the Up/Down keys
to move to any
position in your message.
Note: A selection of the most important special
characters is presented when you press the
key.
20
9.1.2 Inbox, Outbox and Draftbox
When you receive a text message, an indication appears
on the display. You can press the
key (Read) twice
to read the message directly or you press the key
(Back) to read it later.
To read it later, press key
(Menu)
MessagesInbox and select the desired message.
In Outbox the text messages are saved that you have
sent.
Message Settings allows you to configure the following
options:
Voice Mail:
Set and call the voice mail box
Broadcast Message: Settings for Broadcast Messages
(Service of your provider)
Profile Setting:
Settings for messages like
service center number and
storage duration
9.1.3 Voice Mail
Voice messages come from the electronic answering
machine that is provided by your mobile
communications provider. Contact your mobile
communications provider to learn how it is set up.
21
You have two options to listen to your voice mail
messages:
Press the „1“ key for a little longer than a second or go
thru the menu as follows: Press
key (Menu)
Messages Messages Settings Voice Mail
Connect to Voice Mail
To set the Voice Mail details please choose the option
<empty> or press
key (Edit).
9.2 Set M1/M2/M3
The phone numbers that should be accessible as quick
dial
and
or as emergency number
must
be stored as contacts in the phonebook before.
For the emergency number
you can choose with
the option Handsfree if the phone should switch
automatically into handsfree mode after the connection
has been established.
9.3 Clock & Alarm
9.3.1 Time & Date
Setting of the time and date, selection of the formats
and separation characters for time and date. Also you
can set here the home city for your time zone.
If the battery was removed, then it may be necessary to
reset the time and date.
22
9.3.2 Alarm
The telephone features a wakeup function. You can set
it to go off only once or repeatedly on a weekly
schedule, ringing on weekdays that are set by you.
Three different alarm times can be specified.
To end the alarm press
the key or the Power/End
key otherwise the alarm will be repeated after 5
minutes.
The alarm also functions when the telephone is
switched off. When you confirm the alarm then, you are
asked if you want to switch on the telephone.
Please make sure that the phone is not switched to the
Silent profile, otherwise you may not hear the alarm!
9.3.3 Show Time & Date
If this menu is set to „On“ the phone will display time
and date while not being in a call.
9.4 Phonebook
Under contacts you can store telephone numbers and
names either in the telephone or on the SIM card.
9.4.1 Search
Enter the first letter of the searched for name. If
necessary, you may have to press the respective
23
numerical key several times for a certain letter, e.g.
press the key
twice for the letter „E“. The
corresponding names are listed on the display. By
pressing the Call/OK key
you can call up the
respective contact.
9.4.2 Add new
Using this function you can add another contact with
name and telephone number.
9.4.3 Delete All
Use this function to delete all contacts in the telephone
or on the SIM card all at once.
9.4.4 Copy All
This function can be used to copy the contacts from the
SIM card to the telephone or vice versa. This function is
useful for instance when you want to transfer contacts
from one telephone via the SIM card to another
telephone.
9.4.5 Caller Group
Manage Caller Groups (Friends, Family, VIP, Business,
Others) with its members and different ring tones.
9.4.6 Settings
Memory Status: This function shows how much
memory for new contacts is still
available in the telephone and on the
SIM card. There are SIM cards
24
available with various memory
capacities. Ask your mobile
communications provider.
Fields:
Define the fields in the contacts of the
phonebook.
My vCard:
Here you can save your personal
contact data and send it as a text
message.
9.5 Calendar
By pressing the Up/Down key
you can select
the desired date. By pressing the
key (Option) you
can also jump directly to the date by choosing Jump To
Date.
9.6 Phone Settings
9.6.1 Display Settings
Language:
Language of the menu navigation
Greeting Text:
Brief message that is displayed
when the telephone is switched on
Screen Saver:
Animation that will be started if the
phone has not been used for a
while.
Set contract of the display
Contrast:
25
LCD Backlight:
Brightness and setting how long the
back light should remain on.
Font Size:
The phone can show the menu’s in
two different font sizes.
9.6.2 Sound Settings
This phone has 4 different alerts. You can set the sound,
the volume and vibration for each with this menu:
Ring Tone:
Alarm Tone:
Alert that is being used for incoming
calls
Tone for alarm function (see also 9.3.2)
Message Tone: Tone for incoming text messages
Keypad Tone:
Acoustic feedback for pressing a key
You first must select which feature you want to change
and then you can select the alert.
Set Sound:
15 different melodies in addition you
may download more into the phone
Set Volume:
Volume of the alert
Alert Type:
Vibration settings for this alert
9.6.3 Call Settings
Most of the following functions are provided by the
mobile communications network and can be not
accessible or partly being disabled.
26
9.6.3.1 Caller ID
Here you can select if your number should be
transferred during the call.
Set by Network:
According to the pre-setting in
your mobile phone network your
ID will be send or not.
Hide Id:
Your ID will not be send.
Send Id:
Your ID will be send.
Please not that some mobile phone providers do not
allow hiding the ID.
9.6.3.2 Call Waiting
This function allows you to put a call on hold and to
make another call at the same time. You can either
Activate or Deactivate this function. With option Check
Status the network will show to you how this feature is
currently set.
9.6.3.3 Call Divert
Incoming calls are forwarded to a telephone number of
your choice under conditions that you can set.
9.6.3.4 Call Barring
With this function you can block calls from telephone
numbers of your choice to avoid for example high
phone rates while you are abroad.
With Cancel All you can cancel all call restrictions.
27
9.6.3.5 Auto Redial
The telephone automatically redials the desired call
number up to ten times in case it cannot be reached.
9.6.3.6 Key LED flash
To visualize incoming calls the phone can be set to
blink with the key pad in addition to the display.
9.6.4 Network Setting
With this option you can specify whether the mobile
communications network should be selected
automatically or whether you want to do the selection
manually.
9.6.5 Set Fast key 2-9
Frequently used functions (no phone numbers) can be
saved to the keys 2-9 so that you can call up this
functions quickly by pressing the respective key for a
little bit longer. Key “1” is reserved for voice mail.
First select the key that you want to define and then
press (Edit) to choose the function.
9.6.6 Security Setting
9.6.6.1 Main Menu Lock
By this function you can block the access to the main
menu so that the phone only can be used for phone
calls and access to the Shortcuts (see 8.6). This is a
useful feature to avoid that important settings (like
emergency number, sound setting) can be changed
28
unintentionally. The Password for this function is 1122
at the time of delivery and can be changed with the
option Change Password.
9.6.6.2 SIM Lock
With this you can specify whether PIN 1 should be
queried every time the telephone is switched on.
9.6.6.3 Phone Lock
This function allows you to lock the phone separate
from the SIM. Default setting for this password is 1122
and can be changed with the option Change Password.
9.6.6.4 Change Password
The default password for the above mentioned function
is 1122 and can be changed with this menu item.
9.6.7 Auto KeyLock
Setting whether the key lock should be activated
automatically after 5, 30 seconds, 60 seconds, 5
minutes or never.
and
To unlock the keypad quickly press the keys
.
9.6.8 Restore Factory Setting
All settings you have made are reset; the telephone can
be returned to the status it was in when it was delivered.
All data like phone numbers, text messages or contacts
will be lost.
29
9.6.9 SIM Toolkit
Here you may find options that are provided by your
mobile phone service via the SIM card and that may be
charged to your phone bill.
10. Optional Accessories
The following genuine optional accessories are
available for the senior phone:
- Desktop charging cradle
- High capacity battery (1050mAh / 750mAh)
- Wired headset with microphone and one touch
receive call button
11. Care and user information
This telephone was developed and manufactured with
utmost care. Please observe the following user
instructions so that you can use the telephone for a long
time and do not invalidate the warranty conditions:
+ Keep the telephone away from moisture and liquids.
The telephone has various openings (e.g. for the
loudspeaker) through which liquids can enter into the
inside and thereby destroy the electronics.
30
+ Do not use or store the telephone in dirty
environments: Particles may enter into the inside and
block mechanical components such as the keys.
+ Do not use or store the telephone at high
temperatures, because this may damage the battery or
cause the plastic parts to deform.
+ Keep the telephone also away from low temperatures:
When the telephone returns to normal temperatures
condensation may form inside that can cause damages.
+ Do not open the telephone except for inserting the
battery and the SIM card.
+ Avoid mechanical loads such as shaking or dropping:
This may damage the mechanical components or the
display.
+ Do not use any aggressive cleansers, because they
may harm the telephone‘s surfaces.
+ Do not paint the telephone or stick things on it. This
may block the mechanics and the keys for example can
no longer be pressed.
+ Do not modify the electronics of the mechanics of the
telephone. This forfeits all licenses.
+ In case you send in the telephone for repair, you
should if possible make a backup of all data (telephone
book, notes, etc.).
31
The notes above also apply to the supplied accessories.
In case the telephone does not function properly, bring
it for repair only to an authorized service shop.
12. Additional safety information
/ SAR value
Keep the telephone and the supplied accessories out of
the hands of children, because small parts can get
loose that can be swallowed by the children.
Ambient conditions
Please be sure to observe all valid regulations for the
use of mobile telephones and switch it off when use is
not permitted. Use the telephone only in the usual
manner. The telephone meets all the radiation criteria
when it is held to the ear in the usual manner or at a
distance of at least 2.5 cm from the ear.
If you are using a bag or a belt holster, it should not
contain any metal and keep the safety distance
mentioned above. In some cases transmission of data
(e.g. text messages) is delayed until connection to the
mobile communications network has sufficient quality.
Make sure that even in the event of a delayed
transmission the safety distance prescribed above is
kept. The telephone contains magnetic components:
This can attract metallic objects and the telephone
should not be held in the vicinity of hearing aids.
Furthermore, credit cards or other magnetic storage
32
media should be kept away from the telephone,
because otherwise the data can be damaged.
Medical equipment
Any form of radio transmission, and this includes mobile
telephones, can influence the function of medical
equipment, in particular when these are not screened
well enough. Switch the telephone off therefore in the
vicinity of medical equipment – especially when
requested to do so by appropriate signs.
Pacemakers
The manufacturers of pacemakers recommend a
minimum distance of 16 cm/ 7 inches between a mobile
telephone and the pacemaker to avoid malfunctions by
interferences. This recommendation is also supported
by independent scientific research.
People that carry a pacemaker should therefore
observe the following instructions:
++Always keep a minimum distance of 16 cm/ 7 inches
between the telephone and the pacemaker.
++Do not transport the telephone in a breast pocket or
near the pacemaker.
++During the telephone call, hold the telephone against
the ear that is further away from the pacemaker.
++If there is any indication of interference, switch off the
telephone immediately.
33
Hearing devices and hearing aids
Some digital hearing devices can basically be disturbed
by mobile telephones.
In this case please contact the hearing device
acoustician.
Use in automobiles and airplanes
The radio signals of mobile telephones can basically
interfere with the electronic systems of automobiles and
airplanes. Use the telephone therefore only in
automobiles when this is explicitly permitted and
observe the respectively valid regulations.
Do not deposit the telephone or other parts in the
vicinity of airbags. Airbags are inflated very quickly and
the telephone can cause serious injuries when being
hurled about.
The use of telephones in airplanes is generally not
permitted at the date of this print. Switch off your
telephone when you board an airplane. These
regulations may be changed in the future. Information
on the current status can be gathered from your airline
or your mobile communications provider.
Explosive environments
Switch off the telephone if you are in an environment
where there is a risk of explosion. Observe all the
pertinent regulations, because voltage peaks can trigger
explosions in these environments that can cause
serious, even fatal, injuries. Switch off the telephone
therefore also in the vicinity of fuelling stations.
34
Explosive environments are usually clearly marked, for
example with the directive that automobile motors
should be switched off. In such cases the telephone
must be switched off as well. Dangerous environments
are for example fuel and gas storage, production and
storage sites for chemicals, below deck on ships and
areas where the air is loaded with for instance metallic
or coal dust and the like.
CERTIFICATION INFORMATION (SAR)
THIS MOBILE DEVICE MEETS GUIDELINES FOR
EXPOSURE TO RADIO WAVES.
Your mobile device is a radio transmitter and receiver. It
is Designed not to exceed the limits for exposure to
radio waves recommended by international guidelines.
These guidelines were developed by the independent
scientific organization ICNIRP and include safety
margins designed to assure the protection of all
persons, regardless of age and health.
The exposure guidelines for mobile devices employ a
unit of measurement known as the Specific Absorption
Rate or SAR. The SAR limit stated in the ICNIRP
guidelines is 2.0 watts/kilogram (W/kg) averaged over
10 grams of tissue. Tests for SAR are conducted using
standard operating positions with the device
transmitting at its highest certified power level in all
tested 26 frequency bands. The actual SAR level of an
operating device can be below the maximum value
because the device is designed to use only the power
required to reach the network. That amount changes
35
depending on a number of factors such as how close
you are to a network base station. The highest SAR
value under the ICNIRP guidelines for use of the device
at the ear is 0.332W/kg.
Use of device accessories and enhancements may
result in different SAR values. SAR values may vary
depending on national reporting and testing
requirements and the network band.
Due to continuous product development all features and
specifications are subject to change without prior notice,
please register your warranty online at
http://www.alcomonline.com/warranty.html
For more Information on Warranty and Product
Support in Singapore please call (65) 6841 2668 or
Fax to (65) 6841 2628.
Email : [email protected]
Web : www.alcomonline.com
All registered names and trademarks are property of
their respective owners.
©
Copyright 2009 Giant Electronics Ltd. All rights
reserved.
36