1
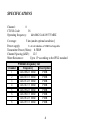
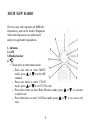
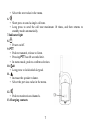
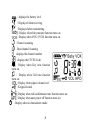
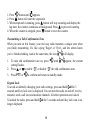
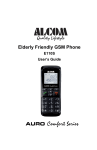
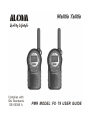
SAFETY AND GENERAL INFORMATION
Important Information for Safe and Efficient Operation
Please read this information before using your radio.
Safety and General
1. Do not transmit more than 50% of time. It is important as the radio generates
measurable RF energy exposure only when transmitting.
2. Do not open the radio. Any unauthorized modification may invalidate the
guarantee.
3. Radio frequency signals transmitted may cause interference to hearing aids.
4. Turn off the radio when near medical equipment.
5. This product should not be used by people with pacemakers.
6. Do not use the radio when driving a vehicle or operating machinery.
7. Do not use the radio when on board aircraft.
8. Do not hold the antenna when transmitting.
9. Do not use the radio when the antenna has damaged.
2
10. Turn off the radio and remove the batteries if you are not going to use it for a
long time.
11. Do not attempt to charge alkaline batteries.
OPERATIONAL CAUTIONS
1. Never dispose of batteries in a fire. There is a serious risk of explosion and /or
the release of highly toxic chemicals.
2. Do not expose your product to direct sunlight, extreme cold or place it near
heating appliances.
3. Do not submerge any part of your product in water and do not use it in damp,
humid or wet conditions.
4. Do not expose your product to fire, explosive or other hazardous conditions.
For example, at petrol stations or areas where explosive products are used.
3
SPECIFICATIONS
Channel:
8
CTCSS-Code:
38
Operating frequency:
446.00625-446.09375 MHZ
Coverage:
5 km (under optimal condition)
Power supply:
3 x AAA Alkaline or NiMH rechargeable
Transmitter Power (Watts): 0.5ERP
Channel Spacing (kHZ):
12.5
Water Resistance:
Up to 15o according to the IPX2 standard
Channel
1
2
3
4
5
6
7
8
PMR446 frequency list
Frequency
Description
446.00625 MHz
PMR
446.01875 MHz
PMR
446.03125 MHz
PMR
446.04375 MHz
PMR
446.05625 MHz
PMR
446.06875 MHz
PMR
446.08125 MHz
PMR
446.09375 MHz
PMR
4
YOUR NEW RADIO
The two-way radio operates on PMR446
frequencies, and can be used in Singapore
where the frequencies are authorized,
subject to applicable regulations.
1. Antenna
2. LCD
3.Headset socket
4.
• Short press to enter menu mode
-- Press one time to enter MENU
mode, press
or
to select RF
channel.
-- Press two times to enter CTCSS
mode, press
or
to set CTCSS code.
-- Press three times to enter Baby Monitor mode, press
or deactivate.
-- Press four times to enter Call Tone mode, press
or
tone.
5
or
to activate
to set a new call
-- Press five times to enter VOX Section mode, press
or
to activate
IVOX function with a sensitivity level or deactivate IVOX function.
Note: When you use the unit with a headset accessory, press
or
only
can select sensitivity level.
-- Press six times to enter Squelch Level mode, press
or
to set squelch
level.
-- Press seven times to enter Dual channel scan mode, press
or
to set
dual scan channel or disable it.
-- Press eight times to enter Auto Power Off mode, press
or
to set auto
power off time or disable it.
-- Press nine times to enter Key Tone mode, press
or
to enable or
disable it.
-- Press ten times to enter Chronometer mode, press
to start counting or
to reset the counter.
-- Press eleven times to enter Roger Beep mode, press
or
to enable or
disable it.
-- Press twelve times to exit MENU mode.
It will be automatically exited the menu mode if you have not pressed any
key for several seconds when you in any mode.
5.
• Decrease the speaker volume.
6
• Select the next value in the menu.
6.
• Short press to send a single call tone.
• Long press to send the call tone maximum 10 times, and then returns to
standby mode automatically.
7.Indicator light
8.
• Power on/off.
9. PTT
• Push to transmit, release to listen.
• Pressing PTT has 60 seconds limit.
• In menu mode, push to confirm selection.
10.
• Long press to lock/unlock keypad.
11.
• Increase the speaker volume.
• Select the previous value in the menu.
12.
• Push to monitor/scan channels.
13.Charging contacts
7
: displays the battery level
: Displayed when receiving.
: Displayed when transmitting.
: Display when baby monitor function turns on.
: Display when VOX / IVOX function turns on.
: Channel scanning
: Dual channel Scanning
: displays the channel number
: displays the CTCSS Code
: Display when Key tone function
turns on.
: Display when Call tone function
turns on.
: Display when adjust volume level.
: Keypad locked
: Display when talk confirmation tone function turns on.
: Display when auto power off function turns on.
: Display when in chronometer mode.
8
: Squelch level indication.
TURNING YOUR RADIO ON AND OFF
Press and hold
to turn your radio on. The radio chirps and the display will show
all feature icons that your radio has available for a brief period. The display will
show the current channel 1 - 8 and interference eliminator code 0 - 38.
Press and hold
to turn your radio off.
TALKING AND LISTENING
Please read this manual carefully before using your new radio to ensure that you
operate it both correctly and safely.
Your radio has 8 channels. If you are in a group and you wish to talk to each other,
all radios must be set to the same channel and interference eliminator code
(CTCSS). If you experience interference and need to change channel, ensure that
you change the channel and code of all radios in your group.
• For maximum clarity, hold radio 5 to 7 centimeters from mouth.
• Press and hold PTT key and speak into the microphone. LED indicator light
glows continuously when transmitting.
• To receive messages, release PTT key
Volume
Press
in standby mode to increase the speaker volume. The volume level is
9
displayed.
Press
in standby mode to decrease the speaker volume.
Time-out Timer
The time-out timer feature helps extend battery life by preventing accidental
transmission. The radio will emit a continuous warning tone after PTT is pressed
for 60 continuous seconds and will stop transmitting.
Channel Busy Indicator
When a channel is busy, the LED flashes twice per second.
Channel
1. Press
button the channel number will begin to flash.
2. Use
or
button to change channel.
3. Press PTT button to set the new channel or
to continue set up.
Select CTCSS Code
CTCSS help minimize interference by providing you with a choice of code
combinations. The two radios must be of same channel and CTCSS code in order
to communicate.
1. Press
2. Press
until the code number begins to flash.
or
to change the code.
10
3. Press PTT to set new code or
to continue set up.
You can specify a different code for each channel.
1. To set a channel and CTCSS code combination, press
to select the channel.
and then press
or
2. Press
again and then press
or
to select a CTCSS code.
3. Press PTT to exit the menu and save the channel and code combination.
To set another channel and code combination, repeat these steps.
Note: You must set the CTCSS to 0 on a radio that uses CTCSS to communicate
with other radios that do not have CTCSS.
Monitor
There are multiple channels shared among all users on the “take turn” basis. For
uninterrupted communication, do not talk on a channel if someone else is currently
talking on it. To check for activity on a channel before you talk, press and hold
key. If you hear static, the channel is clear to use.
To exit the function, release
key.
Baby Monitor function
One of the units can be set as Baby monitor. The radio will transmit a signal when
11
it is activated by the crying baby or another sound in the room (VOX).
The PMR will no longer be able to receive signals to avoid that your baby is
disturbed during his sleep.
The other PMR must be set to the same channel and CTCSS code to receive the
signal from the Baby Monitor.
To set your radio as baby monitor
1. Press
until
appears.
2. Press
or
button set baby monitor sensitivity level to 1/2/3 to turn baby
monitor function ON.
3. Press PTT or
to confirm the setting.
Note:
1. At standby mode, when speak into the microphone, the radio will automatically
transmit like IVOX does.
2. The radio can’t receive or press any key will not generate key tones for the cause
of bothering the baby.
To disable baby monitor function
1. Press menu button until
appears.
2. Press
or
until OF appears.
3. Press PTT to confirm the setting or
to continue set up.
12
Setting and Transmitting Call Tone
Your radio can transmit ten different call tones to other radios in your group so you
can alert them that you want to talk.
To set a call tone:
1. With the radio on, press
until the current call tone setting flashes and
display.
2. Press
or to change and hear the call tone.
3. Press PTT to confirm the setting or
to continue set up.
To transmit your call tone to other radios set to the same channel and Interference
Eliminator Code as your radio, press
button.
Note: This radio has 10 call tones. Setting the call tone to 0 disables the call tone
feature.
Hands Free Use (VOX)
VOX allows you to transmit hands free by talking while using optional headset
accessories connected to the radio.
Note: Many accessories (sold separately) are available for your radio.
1. Turn the radio off.
2. Insert the plug of the headset accessory firmly into the accessory jack.
3. Turn the radio on and
is displayed.
4. Lower the radio volume before placing the accessory on your head or in your
ear.
13
5. To transmit, speak into the accessory microphone. There is a short delay
between the time you start talking and radio transmission.
6. To receive, stop talking.
To disable VOX operation, press PTT or remove the VOX accessory.
Hands Free Use (IVOX)
This function allows you to transmit ‘hands-free’ by taking into the radio
microphone without using any headset accessory.
1. Press
2. Press
button until
appears
or
to ‘ ’ to disable the IVOX or enable IVOX by level 1, 2 or 3.
3. Press PTT to confirm the setting or
to continue set up.
4. At standby mode, to transmit, speak into the radio microphone. To receive, stop
talking.
To disable IVOX operation, briefly press PTT.
Setting VOX and IVOX Sensitivity Levels
Adjusting your radio’s VOX and IVOX microphone sensitivity level helps to
minimize the possibility of unintended noises triggering a transmission, and
enhances the ability to pick up quiet voices. If a headset is fitted to your radio these
instructions will help you to adjust the VOX sensitivity.
1. Press
until
and a flashing number appears in the centre of the
14
display. With the headset connected you will see ‘ ’ in the top right corner of
the display. Without the headset you will see ‘ ’.
2. Press
or
to select the sensitivity level:
1 = Low Sensitivity (for noisy environments)
2 = Medium Sensitivity (for most environments)
3 = High Sensitivity (for quiet environments)
3. Press PTT to confirm the setting or
to continue set up.
Note: When you connect a VOX headset, the radio will automatically be set to the
last chosen VOX sensitivity level. If IVOX is activate, the radio will automatically
select IVOX level.
Setting Squelch Level
The adjustable Squelch allows you to optimize the radios sensitivity. It also allows
you to increase the sensitivity and receive weaker signals. There are 4 decreasing
levels of sensitivity.
1. Press
2. Press
until
appears.
or
button to adjust the squelch levels.
3. Press PTT to confirm the setting or
to continue set up.
Note: Level 1 (SQL and one bar icon display) is the most sensitive level, which
means the radio can receive very weak signal. While at level 4, the radio can only
15
receive at strong signal.
Channel Scan
Use scanning to monitor channels and codes for transmissions or to find someone
in your group who has accidentally changed channels.
To start scanning, briefly press key. The scan indicator
is shown.
When the radio detects channel activity, it stops scanning and you can hear the
transmission. To respond to the transmission, press PTT within 5 seconds.
To exit the function, press key again.
Note: If your radio’s Interference Eliminator Code is set to 0 while scanning, the
radio checks for activity on each channel regardless of the code used on the
channel. If your radio’s Interference Eliminator Code is set to 1-38 and ignores
channels using code 0.
Scan Advance
If scan stops on a channel that you don’t want to listen, briefly press
button to resume scanning for the next active channel.
or
Removing Channels form the Scan List
To remove a undesired channel so the radio does not stop on it while scanning,
press and hold
or
for at least 3 seconds, then release. This temporarily
removes the channel from the scan list. You may remove more than one channel in
16
this way.
To restore the channel, turn the radio off and then back on.
Note: You cannot remove the channel which your radio was set to (called your
home channel) when you start scanning.
Dual Channel Scan
In stand-by, the PMR is set on one set channel with CTCSS code. The PMR will
only receive signals transmitted on that channel and CTCSS code. Dual Channel
Monitor allows you to monitor a second channel with CTCSS code.
To set dual channel and code
1. Press
2. Press
until
display.
or
button will increase or decrease the dual channel.
3. Press
again and then press
code number.
or
button will increase or decrease the dual
4. Press PTT to save the dual channel and code combination or
up.
To start dual scan, briefly press
key. The scan indicator
to continue set
is shown.
When the Dual Channel Monitor function is activated,
will shown on the
display. The PMR will switch sequentially between the standby channel + CTCSS
and the Dual Channel + CTCSS. When there is activity on the Dual Channel +
CTCSS, the active channel will be displayed for 5 seconds. Within this period, you
17
have the possibility to answer the transmission.
To disable the dual channel scan
Repeat the setup 1 and 2,and then roll-over at ‘
disabled.
’ which means the dual scan is
Automatic Power Off (APO)
To save energy, you can activate the Automatic Power Off function. In case you
forgot to power off the unit, it will switch off automatically after the set time.
1. Press
until
appears.
2. Press
or
button to adjust the automatic power off time or disable the
function with the section ‘ ’.
3. Press PTT to confirm the setting or
to continue set up.
Keypad tone
Once enable this function, the unit will beep briefly, when a button is pressed.
1. Press
2. Press
button until
appears, the current setting flashes.
or
button to enable ‘ ’ or disable ‘ ’ the key tone.
3. Press PTT to confirm the setting or
to continue set up.
Chronometer
The unit has a chronometer function (mm:ss).
18
1. Press
button until
appears
2. Press
button will start the stopwatch.
3. When stopwatch is running, press
button will stop counting and display the
lap time, the counter continuous at background. Press
to proceed counting.
4. When the counter is stopped, press
button to reset the counter.
Transmitting a Talk Confirmation Tone
When you turn on this feature, your two-way radio transmits a unique tone when
you finish transmitting. It’s like saying 'Roger' or 'Over', and lets others know
you’ve finished talking. And at the same time, the icon
will display.
1. To turn talk confirmation tone on, press
until
appear, the current
setting flashes.
2. Press
or to enable ‘ ’ or disable ‘ ’ the talk confirmation tone.
3. Press PTT or
to confirm and return to standby mode.
Keypad Lock
To avoid accidentally changing your radio settings, press and hold
for 3
seconds until key lock icon is displayed. You can turn the radio on and off, receive,
transmit, send a call tone and monitor channels. All other operations are locked.
To unlock the radio, press and hold
for 3 seconds and until key lock icon is no
longer displayed.
19
Battery Meter
The battery icon shows the battery charge level from full
to
empty. If
the battery has one segment left, the radio will chirps periodically after you release
the PTT key. The radio powers off when the voltage drops below a predetermined
level to protect the rechargeable battery.
Note: Remove the batteries before storing your radio for extended periods of time.
Batteries corrode over time and may cause permanent damage to your radio.
20
Warranty Information
How to get product support and warranty service:
Alcom Electronics Pte Ltd.
37,Kallang Pudding Road,
Blk—B Tong Lee Building,
#05-08,Singapore 349315
PH: 65 8412668, FAX: 65 68412628
E-mail: [email protected]
www.alcomonline.com
21
What Is Not Covered By The Warranty
1. Defects or damage resulting from use of the Product in other than its normal
and customary manner or by not following the instructions in this user manual.
2. Defects or damage from misuse, accident or neglect.
3. Defects of damage from improper testing, operation, maintenance, adjustment,
or any alteration or modification of any kind.
4. Breakage or damage to aerials unless caused directly by defects in material
or workmanship.
5. Products disassembled or repaired in such a manner as to adversely affect
performance or prevent adequate inspection and testing to verify any
warranty claim.
6. Defects or damage due to range.
7. Defects or damage due to moisture, liquid or spills.
8. All plastic surfaces and all other externally exposed parts that are scratched or
damaged due to normal use.
9. Products rented on a temporary basis.
10. Periodic maintenance and repair or replacement of parts due to normal usage,
wear and tear.
2
22