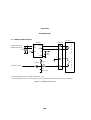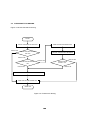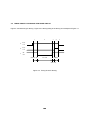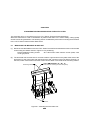
1
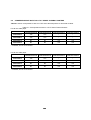
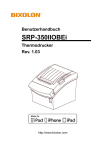
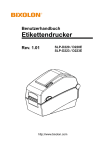
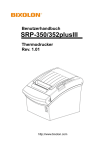
ACU F SERIES
AUTOCUTTER UNIT
TECHNICAL REFERENCE
U00060421405
Seiko Instruments Inc.
ACU F AUTOCUTTER UNIT TECHNICAL REFERENCE
Document Number
First Edition
Second Edition
Third Edition
Fourth Edition
Fifth Edition
Sixth Edition
U00060421405
August 2001
January 2002
June 2002
September 2004
January 2005
August 2005
Copyright © 2001, 2002, 2004, 2005 by Seiko Instruments Inc.
All rights reserved.
Seiko Instruments Inc. (SII) has prepared this manual for use by SII personnel, licensees, and
customers. The information contained herein is the property of SII and shall not be reproduced in whole
or in part without the prior written approval of SII.
SII reserves the right to make changes without notice to the specifications and materials contained
herein and shall not be responsible for any damages (including consequential) caused by reliance on the
materials presented, including but not limited to typographical, arithmetic, or listing errors.
SII has not investigated the intellectual property rights of the sample circuits included in this manual.
Fully investigate the intellectual property rights of these circuits before using.
SII is a trademark of Seiko Instruments Inc.
PREFACE
This reference manual describes the specifications and basic operating procedures for the ACU F
Series Autocutter Unit (hereinafter referred to as “ACU F Series”) complied with RoHS directive.
The ACU F Series (complied with RoHS directive) has the following eight types of autocutters that are
classified by their cutting width, cutting method, and supported thermal printer.
ACUF224A-E (for 58 mm width paper, partial cut)
ACUF224B-E (for 58 mm width paper, full cut)
ACUF224C-E (for 58 mm width paper, partial cut)*
ACUF224D-E (for 58 mm width paper, full cut)*
ACUF324A-E (for 80 mm width paper, partial cut)
ACUF324B-E (for 80 mm width paper, full cut)
ACUF324C-E (for 80 mm width paper, partial cut)*
ACUF324D-E (for 80 mm width paper, full cut)*
*: Only the following four LTPF series thermal printer mechanisms are supported; other models are not
supported.
Refer to “6.6 CORRESPONDENCE WITH OUR LTP F SERIES THERMAL PRINTERS.”
LTPF247E-C432-E
LTPF247F-C432-E
LTPF347E-C576-E
LTPF347F-C576-E
This manual usually describes information common to any autocutter, and each information with the
name if information is different.
Chapter 1 “Precautions” describes safety, design and operational precautions. Read it thoroughly
before designing so that you are able to use the product properly.
iii
TABLE OF CONTENTS
Section
Page
CHAPTER 1
PRECAUTIONS
1.1
1.2
SAFETY PRECAUTIONS..................................................................................................1-1
DESIGN AND HANDLING PRECAUTIONS .....................................................................1-2
1.2.1 Design Precautions.................................................................................................1-2
1.2.2 Handling Precautions..............................................................................................1-2
1.2.3 Precautions on Discarding......................................................................................1-2
CHAPTER 2
FEATURES
CHAPTER 3
SPECIFICATIONS
3.1
3.2
3.3
GENERAL SPECIFICATIONS ..........................................................................................3-1
PAPER CUTTING CONDITIONS......................................................................................3-2
DETECTOR (CONTROL SWITCH) AND MOTOR SPECIFICATIONS............................3-3
CHAPTER 4
DRIVE METHOD
4.1
4.2
4.3
4.4
SAMPLE DRIVE CIRCUIT ................................................................................................4-1
MOTOR DRIVE SEQUENCES..........................................................................................4-2
FLOWCHART FOR DRIVING...........................................................................................4-3
TIMING CHART FOR DRIVING FOR DRIVE CIRCUIT ...................................................4-4
iv
CHAPTER 5
CANCELING MOTOR (MOVABLE BLADE) LOCK
CHAPTER 6
CONSIDERATIONS WHEN MOUNTING THE AUTOCUTTER
6.1
6.2
6.3
6.4
6.5
6.6
MOUNTING THE MOVABLE BLADE UNIT ......................................................................6-1
MOUNTING FIXED BLADE ..............................................................................................6-2
THE AUTOCUTTER MOUNTING DIRECTION ................................................................6-2
CONSIDERATIONS FOR OUTER CASE DESIGN ..........................................................6-3
CONSIDERATIONS FOR USING .....................................................................................6-5
CORRESPONDENCE WITH OUR LTP F SERIES THERMAL PRINTERS.....................6-8
CHAPTER 7
APPEARANCE
v
FIGURES
Figure
Page
3-1
Paper Cutting.....................................................................................................................3-2
4-1
4-2
4-3
Sample Drive Circuit..........................................................................................................4-1
Flowchart for Driving..........................................................................................................4-3
Timing Chart for Driving ....................................................................................................4-4
5-1
Removing the Movable Edge ............................................................................................5-1
6-1 Mounting the Autocutter Unit .............................................................................................6-1
6-2-1 Mounting Fixed Blade Unit
(ACUF224A-E, ACUF224B-E, ACUF324A-E, ACUF324B-E) ...........................................6-2
6-2-2 Mounting Fixed Blade Unit
(ACUF224C-E, ACUF224D-E, ACUF324C-E, ACUF324D-E) ..........................................6-3
6-3 Mounting Direction.............................................................................................................6-4
6-4 Sample Outer Case Design (Fixed Blade Unit Side).........................................................6-5
6-5 Sample Outer Case (Movable Blade Unit Side) ................................................................6-6
6-6 Using Paper Efficiently When Cutting ...............................................................................6-7
7-1
7-2
7-3
7-4
Appearance (ACUF224A-E, ACUF224B-E) ......................................................................7-2
Appearance (ACUF324A-E, ACUF324B-E) ......................................................................7-3
Appearance (ACUF224C-E, ACUF224D-E)......................................................................7-4
Appearance (ACUF324C-E, ACUF324D-E)......................................................................7-5
vi
TABLES
Table
Page
3-1
3-2
General Specifications.......................................................................................................3-1
Terminal Assignment.........................................................................................................3-3
4-1
Motor Drive Sequences (For Figure 4-1 Drive Circuit) ......................................................4-2
6-1
Correspondence with our LTPF Series Thermal Printers..................................................6-8
vii
CHAPTER 1
PRECAUTIONS
1.1 SAFETY PRECAUTIONS
The autocutter is an exclusive autocutter for SII’s LTP F Series thermal printer mechanism.
When it is used in a combination of the printer other than the LTP F Series printer, safety, cutting quality
and life of the autocutter may not be guaranteed.
For safe use, design the product, taking into consideration, the following precautions.
Make sure the precautions are written in the User’s Guide etc. so that the users are notified of them.
•
Paper cutting:
Cut paper when the paper feeding has stopped completely.
•
Temperature-rise of the motor:
If current continues to flow to the motor spindle (movable blade), when the motor spindle is stopped
by external factors, the motor may overheat and cause a burnout of the motor and the burn on the
personnel. Therefore, protect the motor by driving the motor according to the flowchart for driving
shown in Figure 4-2.
Also, allow cooling by designing clearance between the motor and the outer case.
•
Blade part:
In the ACU F Series, a part of the movable blade and the fixed blade are placed outside of the
autocutter so that paper can be set separately of the autocutter. The movable blade protrudes from
the autocutter during cutting.
Design a structure such as a shutter in the outer case to prevent the user from touching the blades
during cutting or while replacing paper, or else provide sufficient warnings.
Ex: Put up warning labels where they can be easily seen.
•
Moving part:
Warn the user not to touch the motor lock release knob during the operation of the autocutter.
•
Sharp edges of the autocutter:
The cutting surface of metal parts may cause injury to the user. Provide warnings to alert users to
this danger. Ex: Put up warning labels where they can be easily seen.
•
Fixed blade:
The fixed blade has sharp edges and is therefore dangerous. Warn users not to touch the fixed blade
directly.
Ex: Put up warning labels where they can be easily seen.
1- 1
1.2 DESIGN AND HANDLING PRECAUTIONS
1.2.1
Design Precautions
•
Connect the FG line to the screw hole on the back of the autocutter and connect it to the FG (Frame
Ground) to prevent abnormal operation due to electrostatics.
•
In the ACU F Series, a part of the movable blade and the fixed blade are placed outside of the
autocutter so that paper can be set separately of the autocutter. The movable blade protrudes from
the autocutter during cutting.
Design the outer case to prevent the user from touching the bIades during cutting or while replacing
paper, or else provide sufficient warnings.
•
If the movable blade and fixed blade are not placed at proper position, cutting failure or paper jam
may be caused. Therefore, pay special attention to it when designing the outer case.
For position relation between the movable blade unit and fixed blade unit, see CHAPTER 6
CONSIDERATIONS WHEN MOUNTING THE AUTOCUTTER.
•
Paper jam may be caused depending on electrostatic, humidity or size of diameter of paper curling
direction tendency in some shape of the paper outlet. Pay special attention to it when designing the
outer case.
1.2.2
Handling Precautions
•
Never loosen screws which fasten the parts of the autocutter. If the screws are loosened, the
adjustment of the autocutter may be lost.
•
The autocutter should be handled only after completely stopping an activation to the autocutter.
•
Label paper or carbon paper is not available. When label paper, carbon paper and/or the paper of
thickness other than specified paper thickness are used, high cutting quality and long life of the
autocutter cannot be guaranteed.
•
The autocutter is not water-proof. Prevent contact with water and do not operate with wet hands as it
may damage the autocutter or cause a short circuit or fire.
•
The autocutter is not dust-proof. If the autocutter is used in dusty places, high cutting quality and long
life of the autocutter cannot be guaranteed.
1.2.3
Precautions on Discarding
When discarding used autocutters, discard them according to the disposal regulations and rules of each
respective district.
1- 2
CHAPTER 2
FEATURES
The ACU F Series is a sliding type freely adjustable automatic cutter.
This autocutter enables freely paper setting by separating fixed blade and movable blade.
2- 1
CHAPTER 3
SPECIFICATIONS
3.1
GENERAL SPECIFICATIONS
Table 3-1 lists the general specifications of the autocutter.
Table 3-1 General Specifications
Item
Specifications
Model number
ACUF224A-E
∗3
ACUF224C-E
Cutting method
Applicable paper width
Cutting condition
ACUF224B-E
ACUF324A-E
ACUF324B-E
∗3
∗3
∗3
ACUF224D-E
ACUF324C-E
ACUF324D-E
Sliding type
60 mm
82 mm
One point left
One point left
without cutting
Full cut
without cutting
Full cut
(Leave 2±0.5mm)
(Leave 2±0.5mm)
Applicable paper thickness
Paper curling direction tendency
Motor
∗1
Drive voltage
60 to 80 µm
Fixed blade side
DC24 V ± 10 %
DC5 V ±10 %
Detector
(Control switch)
Startup current
Minimum paper cutting length
Minimum paper winding diameter
Operating time
∗2
Cutting frequency
Operational life
Operating temperature/ humidity
Storage temperature/ humidity
External dimensions (mm)
(W×D×H)
Mass
∗1
∗2
∗3
∗4
Max. 1.2 A
10 mm
Ø18 mm
600 msec max./cycle
30 cuts/minute at maximum
∗4
1,000,000 cuts
0°C to 50°C
35 % to 85 % (no condensation)
-20°C to 60°C
35 % to 90 % (no condensation)
80 × 64 × 19 (mm)
102 × 64 × 19 (mm)
Approx. 130 g
Approx. 150 g
Drive voltage indicates value measured at connector pins.
Should be 2 sec/cycle.
The mounting method on the platen unit is deferent. (Refer to "6.2 MOUTING FIXED BLADE")
As per the following conditions
Paper: PD160R-N (Oji Paper Co., Ltd.)
Paper insertion angle: Within 15°from the direction vertically to the paper inlet
Paper curling direction: Fixed blade side
Paper cutting environment: Room temperature and humidity
Voltage between the motor terminals: 24 V Cutter installation dimensions and position: Position (A) shown in Figure 6-3
Other: Do not wipe out grease applied on the movable blade guideway.
3- 1
3.2
PAPER CUTTING CONDITIONS
This autocutter has two types of paper cutting methods: full cutting and leaving one point without cutting.
Figure 3-1 indicates full cutting method and cutting method of leaving one point without cutting.
2mm
Full cutting
(ACUF224B-E,ACUF324B-E,
ACUF224D-E,ACUF324D-E)
Leaving one point without cutting
(ACUF224A-E,ACUF324A-E,
ACUF224C-E,ACUF324C-E)
Figure 3-1 Paper Cutting
3- 2
3.3
DETECTOR (CONTROL SWITCH) AND MOTOR SPECIFICATIONS
(1) Detector.................. for detecting the home position
• Rated voltage
• Rated current
DC5 V±10%
0.1 mA (Operation range: 0.04 to 100mA)
(2) Motor
• Rated voltage
• Rated current
DC24V±10%
1.2A (max)
(3) Connecting Terminal
Connector
• Model:51021-0400 (MOLEX)
• Color:
White
∗
Recommended connectors:
53047-0410 Straight type (MOLEX)
53048-0410 Right angle type (MOLEX)
Table 3-2 Terminal Assignment
Pin No.
Colors of lines
1
Red
(positive pole)
Black
(negative pole)
White
White
2
3
4
3- 3
Functions
Motor drive signal
Motor drive signal
Detector output
Detector output
CHAPTER 4
DRIVE METHOD
4.1 SAMPLE DRIVE CIRCUIT
Cutter Unit
TA8428K
1
A (Motor Drive Signal)
B (Motor Drive Signal)
2
10kΩ
6
OPEN
IN1
IN2
(Connector)
3
1
OUTA 5
2
M
OUTA
VP
+
GND
4
O
T
O
7
NC
M
R
VP
35V
100µF
3
+5V
S
E
74HC14
3.3kΩ
1kΩ
S (Detector output)
+
N
4
S
O
R
16V
2.2µF±10%
∗
∗
Recommended Motor Driver: TA8428K (TOSHIBA Co., Ltd.)
Use the capacitor as shown in the above figure to prevent the switch from malfunctioning as a result of chattering.
Figure 4-1 Sample Drive Circuit
4- 1
4.2 MOTOR DRIVE SEQUENCES
Table 4-1 lists the motor drive sequences.
Table 4-1 Motor Drive Sequences (For Figure 4-1 Drive Circuit)
Input Terminal
Sequence
Cut
Brake
Standby
Connecting Terminal
A
B
1
2
H
H
L
L
H
L
H
L
OFF
L
L
OFF
4- 2
4.3 FLOWCHART FOR DRIVING
Figure 4-2 shows flowchart for driving.
START
Detector ON
START THE MOTOR ACTIVATION
MAKE THE MOTOR DRIVER OFF
DETECTOR OFF WITHIN
500 msec
ROTATE THE MOTOR IN REVERSE
Detector OFF
Detector OFF
DETECTOR ON WITHIN
1 sec
Detector OFF
DETECTOR ON
WITHIN 1 sec
Detector ON
Detector ON
BRAKE THE MOTOR FOR 100 msec WITHIN 2 msec
MAKE THE MOTOR DRIVER OFF
DRIVE OUT
Figure 4-2 Flowchart for Driving
4- 3
4.4 TIMING CHART FOR DRIVING FOR DRIVE CIRCUIT
Figure 4-3 shows timing for driving. Figure 4-3 is driving timing in the driving circuit sample of Figure 4-1.
1
2
3
4
High
A
Low
High
B
Low
ON
S
OFF
500msec max.
1sec max.
100msec
2msec max.
Figure 4-3 Timing Chart for Driving
4- 4
5
CHAPTER 5
CANCELING MOTOR (MOVABLE BLADE) LOCK
If the autocutter locks up due to a paper jam while cutting paper, power off the unit immediately and
perform the following procedure manually to return the movable blade to its standby position.
Tear off the transparent film from the upper surface of the autocutter, and turn the motor lock release
knob (herein after reffred to as “knob”) for motor rotation that can be seen from the hole with your fingers.
Or, insert a Philips screwdriver in the hole shown below and turn the cross recess at the extremity of the
knob on the motor spindle to move the movable blade from the paper passing space, and promptly
remove the external factor that caused the jam. (Figure 5-1)
Knob
Transparent
film
Figure 5-1 Removing the Movable Blade
5- 1
Knob
CHAPTER 6
CONSIDERATIONS WHEN MOUNTING THE AUTOCUTTER
The autocutter is for an exclusive use of our LTP F Series Thermal Printer Mechanism.
When this autocutter is used in combination of printers other than LTP F Series safety, cutting quality
and life cannot be guaranteed. The following shows considerative points when mounting the autocutter
to the LTP F Series Thermal Printer Mechanism.
6.1
MOUNTING THE MOVABLE BLADE UNIT
(1) Mount the movable blade unit to the LTP F Series Thermal Printer Mechanism with recommended
screws using the dowels shown in Figure 6-1 for positioning.
Recommended mounting screws:
JIS 1188 W Pan head machine screw (small, crest
circle type) M3×6.
(2) The autocutter has a screw hole for a screw to attach a ground wire on the plate at the back of the
autocutter. Fix the ground wire with the M2.6 screw and connect it to the FG (Frame Ground). At
this time, select such screws so that the screws can be within 3 mm inside of the mounting surface.
Positioning bosses
Screw hole for mounting the GND wire (M2.6)
Screws
Figure 6-1 Mounting the Autocutter Unit
6- 1
6.2
MOUNTING FIXED BLADE
The fixed blade mounting differs on the model. Refer to Figure 6-2-1 for ACUF224A-E, ACUF224B-E,
ACUF324A-E, ACUF324B-E; refer to Figure 6-2-2 for ACUF224C-E, ACUF224D-E, ACUF324C-E,
ACUF324D-E.
Mount the fixed blade unit to the platen unit with recommended screws, adjusting so that the bosses of
the platen unit can be inserted into the holes for positioning shown in Figures 6-2-1 and 6-2-2 in the
fixed blade unit.
Recommended screws: JIS 1188 W Pan head machine screw (small, crest circle type) M2×4
Positioning hole
Screws
Figure 6-2-1 Mounting Fixed Blade Unit (ACUF224A-E, ACUF224B-E, ACUF324A-E, ACUF324B-E)
6- 2
Holes for positioning
Fixed blade unit
Platen unit
爪
Claws
Adjust so that the
bosses of the
platen unit can
be inserted into
holes for
positioning.
Screws
Figure 6-2-2 Mounting Fixed Blade Unit (ACUF224C-E, ACUF224D-E,
ACUF324C-E, ACUF324D-E)
6- 3
6.3
THE AUTOCUTTER MOUNTING DIRECTION
Mount the autocutter as shown in Figure 6-3 (A), (B) and (C).
When the autocutter is used in the posture shown in Figure 6-3 (D), paper powder will get into the drive
portion and may cause malfunction. Therefore, do not mount the autocutter in the posture shown in
Figure (D).
When the ACUF224B and ACF324B are mounted as shown in (C), be sure to perform the next print
and/or cutting after removing the cut paper. Failure to do so cause a paper jam etc.
Figure 6-3 Mounting Direction
6- 4
6.4
CONSIDERATIONS FOR OUTER CASE DESIGN
(1) The outer case of the paper outlet side of the autocutter should be designed so that the paper does
not go between the printer mechanism, autocutter and the cutter case.
(2) The outer case should not change the paper loading direction sharply in the area of the paper outlet.
(3) The outer case should be designed so that the user’s fingers or other objects will not be inserted into
the paper outlet.
(4) When the position relation between the movable blade unit and fixed blade unit is not proper, cutting
failure or paper jam may occur. Pay special attention when designing the outer case.
(5) When thermal paper with a small diameter of curl in paper’s curled characteristics is used, paper
jam may occur between the autocutter and the outer case.
When using the thermal paper with a small amount of paper’s curled characteristics, pay special
attention when designing the outer case.
(6) Perform layout so that the outer case position comes to the same position as the tip of the fixed
blade insofar as possible when designing the outer case in the platen unit side. The following
example indicates that the outer case position is lowered by 1.5 mm (C = 1.5 mm) from the fixed
blade.
(7) Design the outer case so that a given space is kept on the upper surface of the movable unit. (See
Figure 6-5)
Figure 6-4 shows a sample outer case design when the autocutter is mounted to the LTP F Series
thermal printer mechanism.
Center of reference hole for
mounting the platen unit
Center of reference hole for
mounting the platen unit
Center of reference hole for
mounting the platen unit
Figure 6-4 Sample Outer Case Design (Fixed Blade Unit Side)
6- 5
unit: mm
Unit: mm
Figure 6-5 Sample Outer Case (Movable Blade Unit Side)
6- 6
6.5
CONSIDERATIONS FOR USING
(1) Do not back feed paper after cutting paper using the autocutter because it will cause a paper jam.
(2) To prevent paper from jamming, feed paper or print feed 7 mm or more after cutting paper.
(3) To make the most efficient use of paper, as shown in Figure 6-6, print the area A for the next print
portion after printing area B, and then cut the paper.
(4) When mounting the autocutter to the LTP F Series, the distance between the cut position and the
heat element of the thermal head is approximately 13 mm. Do not print on the cut position.
Execute a paper cutting after printing
PRINT AREA A
PRINT AREA B
PRINT AREA A
and the next
.
PRINT AREA B
ONE-TIME
PRINTING AREA
Cut position
PRINT AREA A
Print start position.
PRINT AREA B
Figure 6-6 Using Paper Efficiently When Cutting
(5) Do not print continuosly over the print area A and the print area B. It causes a little gap between the
print area A and the print area B.
(6) The motor for the autocutter must drive in the normal rotation. (See page 3-3 (3) Connecting
Terminal and Chapter 4 Drive Method) Driving in the reverse rotation causes cutting failure.
6- 7
6.6
CORRESPONDENCE WITH OUR LTP F SERIES THERMAL PRINTERS
Table 6-1 shows correspondence with our LTPF series thermal printers for autocutter models.
Table 6-1 Correspondence with our LTP F Series Thermal Printers
For 58 mm width paper
LTPF247A-C432-E
LTPF247B-C432-E
LTPF247E-C432-E
LTPF247F-C432-E
ACUF224A-E
Yes
Yes
*
*
ACUF224B-E
Yes
Yes
*
*
ACUF224C-E
No
No
Yes
Yes
ACUF224D-E
No
No
Yes
Yes
LTPF347A-C576-E
LTPF347B-C576-E
LTPF347E-C576-E
LTPF347F-C576-E
ACUF324A-E
Yes
Yes
*
*
ACUF324B-E
Yes
Yes
*
*
ACUF324C-E
No
No
Yes
Yes
ACUF324D-E
No
No
Yes
Yes
*: Installable, but not recommended.
For 80 mm width paper
*: Installable, but not recommended.
6- 8
CHAPTER 7
APPEARANCE
Figure 7-1 shows the appearance and the external dimensions of the ACUF224A-E and ACUF224B-E
autocutter models.
Figure 7-2 shows those of the ACUF324A-E and ACUF324B-E autocutter models.
Figure 7-3 shows those of the ACUF224C-E and ACUF224D-E autocutter models.
Figure 7-4 shows those of the ACUF324C-E and ACUF324D-E autocutter models.
7- 1
(Movable blade guide)
Shield finger
Knob
Arrow (Concare
shape) Depth 0.3
Knob
(Movable blade guide)
Rib
(Cut width)
2 (Uncut width)
Inspection seal (red)
Burring
Half blanking
Burring
Shield finger
Burring
Inspection seal (red)
(Cut position)
Unit: mm
General tolerance of unit exterior: ±0.8
Tolerance between screw and boss: ±0.5
Leaving one point without cutting: Only ACUF224A-E is available.
Figure 7-1 Appearance (ACUF224A-E, ACUF224B-E)
7- 2
Burring
Half blanking
7- 3
2 (Uncut width)
Burring
Inspection seal (red)
Burring
(Cut width)
Inspection seal (red)
(Cut position)
Unit: mm
General tolerance of unit exterior: ±0.8
Tolerance between screw and boss: ±0.5
Figure 7-2 Appearance (ACUF324A-E, ACUF324B-E)
Leaving one point without cutting: Only ACUF324A-E is available.
Knob
(Movable blade guide)
shape) Depth 0.3
Arrow (Concare
Knob
Depth from surface A: 3.7
(Movable blade guide)
Rib
Depth from surface A: 4.7
Burring
Half blanking
Shield finger
M2.6 (burring)
7- 4
(Cut width)
Inspection seal (red)
2 (Uncut width)
Burring
Inspection seal (red)
(Cut position)
Unit: mm
General tolerance of unit exterior: ±0.8
Tolerance between screw and boss: ±0.5
Leaving one point without cutting: Only ACUF224C-E is available.
Figure 7-3 Appearance (ACUF224C-E, ACUF224D-E)
Shield finger
Knob
(Movable blade guide)
Depth 0.3
Arrow (Concare shape)
Knob
(Movable blade guide)
Rib
Burring
Half blanking
7- 5
2 (Uncut width)
Burring
Inspection seal (red)
Burring
(Cut width)
Inspection seal (red)
(Cut position)
Unit: mm
General tolerance of unit exterior: ±0.8
Tolerance between screw and boss: ±0.5
Leaving one point without cutting: Only ACUF324C-E is available.
Figure 7-4 Appearance (ACUF324C-E, ACUF324D-E)
Knob
Arrow (Concare
(Movable blade guide)
shape) Depth 0.3
Knob
(Movable blade guide)
Rib
Depth from surface A: 3.7
Depth from surface A: 4.7