1
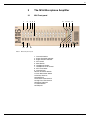
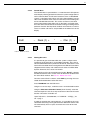
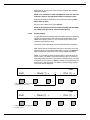
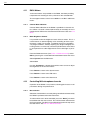
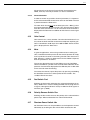
M16
Remote Controlled
Microphone Amplifier
M16
Remote Controlled Microphone Amplifier
Installation & User Manual
i
Table of Contents
Table of Contents ................................................i
Introduction .......................................................iii
Features .............................................................iv
Using the M16 Manual ......................................iv
Declaration of conformity .................................v
1
Important Safety Instructions ........................1-1
1.1
1.2
1.3
1.4
1.5
1.6
2
Important information .....................................2-1
2.1
2.2
2.3
2.4
3
Unpacking ............................................................... 2-1
Operational considerations...................................... 2-2
2.2.1 AC mains voltage .......................................... 2-2
Cleaning .................................................................. 2-2
Installation ............................................................... 2-2
The M16 Microphone Amplifier ......................3-1
3.1
3.2
3.3
3.4
3.5
3.6
3.7
Revision MA2005-7
Mains Cable ............................................................ 1-1
Changing the fuse ................................................... 1-1
Fuse Types.............................................................. 1-2
Servicing.................................................................. 1-3
Do not remove any covers ...................................... 1-3
Safety checklist ....................................................... 1-3
M16 Front panel ...................................................... 3-1
M16 Rear Panel ...................................................... 3-2
Connecting up your M16 ......................................... 3-3
3.3.1
Mains power............................................. 3-3
3.3.2
Ground stud ............................................. 3-3
3.3.3
Audio Connections ................................... 3-3
3.3.4
Power On ................................................. 3-4
Standalone operation .............................................. 3-4
3.4.1
Channel LED indicators ........................... 3-4
3.4.2
PFL switch................................................ 3-4
3.4.3
MUTE switch ............................................ 3-5
3.4.4
Channel Control Section .......................... 3-5
3.4.5
Single Channel Selection ......................... 3-5
3.4.6
Multiple Channel Selection....................... 3-5
3.4.7
Channel Control Section Parameters....... 3-6
Headphones ............................................................ 3-7
MADI Output............................................................ 3-7
3.6.1
Connecting the MADI Output ................... 3-8
3.6.2
MADI Setup.............................................. 3-8
3.6.3
Sample Frequency Selection ................... 3-8
3.6.4
MADI Channel Selection .......................... 3-8
3.6.5
Word Clock............................................... 3-9
Monitoring the PFL bus on multiple M16 units ........ 3-9
M16 Microphone Amplifier
ii
4
Remote control of the M16 ............................ 4-1
4.1
4.2
4.3
4.4
4.5
4.6
4.7
4.8
4.9
4.10
4.11
4.12
4.13
4.14
4.15
4.16
4.17
4.18
Introduction ..............................................................4-1
RS-485 Communications Protocol........................... 4-1
CADAC RM16 Remote Mic Amp. Controller ........... 4-1
Front Panel ..............................................................4-2
Rear Panel............................................................... 4-2
Connections.............................................................4-2
4.6.1
RM16 Power.............................................4-2
4.6.2
Remote Control Comms Backbone..........4-3
Single M16, RM16 System Connections ................. 4-4
Multiple M16, RM16 System Connections............... 4-4
Power On Sequence ............................................... 4-5
RM16 configuration .................................................4-5
4.10.1 Configuring the system.............................4-5
4.10.2 Control Menu............................................ 4-7
4.10.3 Naming M16 units ....................................4-7
4.10.4 Naming M16 channels.............................. 4-8
4.10.5 System Integrity........................................ 4-9
RM16 Meters ......................................................... 4-10
4.11.1 Channel Mute indication......................... 4-10
4.11.2 Meter Brightness Control........................4-10
Controlling M16 microphone channels ..................4-10
4.12.1 M16 selection ......................................... 4-10
4.12.2 Channel Selection ..................................4-11
Gain Control .......................................................... 4-11
Mute....................................................................... 4-11
Pad Switch: Pad .................................................... 4-11
Polarity Reverse Switch: Rev ................................ 4-11
Phantom Power Switch: 48v..................................4-11
High Pass Filter: .................................................... 4-12
M16 Specifications .................................. SPEC1
Appendices ................................................APP-1
Connector wiring.................................................APP-1
CADAC USB ReProgramming Utility..................APP-4
M16 Software Version ........................................APP-8
Warranty ....................................... WARRANTY-1
Index ....................................................... INDEX-1
M16 Microphone Amplifier
Revision MA2005-7
iii
Introduction
Thank you for purchasing the M16 Remote Controlled Microphone
Amplifier from CADAC Electronics plc.
CADAC is renowned for supplying arguably the highest quality audio
mixing consoles for the world-wide professional audio industry for
over 36 years. In all these years the driving force behind the company’s research and development program has been to strive for products that not only provide the exact functionality required but also
exceptional audio performance and reliability. This can be attested
throughout the world, with many hundreds of CADAC consoles
working day in day out in many of the world’s premier venues and
tours.
For over 30 years CADAC has been receiving high praise for its very
natural sounding microphone amplifier, and the release of the new
CADAC M16 encompasses the sound of that classic amplifier in a
compact 19” 3U rack multi-channel format that is equally suitable for
live, broadcast, as well as general applications. The M16 has been
engineered to deliver exceptional quality and reliability. Premium
quality performance is maintained throughout the signal path, resulting in a very wide bandwidth, flat frequency response, impressive
phase response and generous headroom.
We trust that the CADAC M16 will bring many years of satisfaction
and thank you for your patronage.
The CADAC team
Revision 2005-7
M16 Microphone Amplifier
iv
Features
■ 16 channels of high performance microphone amplifiers.
■ Ideal solution for touring, broadcast or recording applications
■
■
■
■
■
■
■
■
when high quality microphone amplifiers are required.Each
channel output is provided with an integral 3-way active splitter.
Each output is designed to drive over long cable lengths in
excess of 500m
All channels are fitted with a switchable high pass filter.
An optical MADI output is provided to allow multi-channel connection to digital consoles or workstations.
High build quality with hand tuned Common Mode Rejection and
Balanced circuitry on all I/O.
Front Panel control of all parameters, or remote control options.
Up to 32 x M16 units can be connected to one control system.
Audio interfaces directly with the CADAC D16, 16 x 16 Digital
Mix Matrix via dedicated buss link connectors.
Designed to exceed current EMC directives, and immune from
receiving or transmitting radio frequency interference.
Using the M16 Manual
In order to obtain the most out of your M16, please read the User
Manual carefully.
Prior to installing and using the M16, it is also important that you
have read both Safety Instructions and Important Information.
If you still have a problem that cannot be resolved by referring to this
manual, then please contact your local CADAC distributor.
All information provided within this user manual is provided in good
faith. CADAC follows a policy of continual product development;
changes to equipment specification may be made without prior notice.
M16 Microphone Amplifier
Revision MA2005-7
v
Declaration of conformity
The Directives covered by this Declaration
89/336/EEC Electromagnetic Compatibility directive, amended by
92/31/EEC & 93/68/EEC
The Products Covered by this Declaration
M16 remote controlled microphone amplifier.
RM16 remote controller
The Basis on which Conformity is being Declared
The products identified above comply with the requirements of the
above EU Directives by meeting the following standards:
BS EN 55103-1:1997
Electromagnetic compatibility - Product
family standard for audio, video, audiovisual and entertainment lighting control
apparatus for professional use.
Part 1 – Emissions
BS EN 55103-2:1997
Electromagnetic Compatibility - Product
family standard for audio, video, audiovisual and entertainment lighting control
apparatus for professional use.
Part 2 – Immunity
BS EN 60065:1998
Audio, Video and similar electronic apparatus. Safety requirements.
Signed:............................
Authority: General Manager
Date: 24 January 2005
Attention!
The attention of the specifier, purchaser, installer, or user is drawn
to special measures and limitations to use which must be observed
when these products are taken into service to maintain compliance
with the above directives. Details of these special measures and limitations to use are available on request, and are also contained in the
M16 Installation & User manual.
Revision 2005-7
M16 Microphone Amplifier
vi
M16 Microphone Amplifier
Revision MA2005-7
1-1
1
Important Safety Instructions
1.1
Mains Cable
The supplied IEC mains cable must be correctly terminated before
use. Use only an approved AC plug or power distribution device.
Safety ground must be connected at all times.
Safety Earth = Green/Yellow
Live = Brown
Neutral = Blue
1.2
Changing the fuse
To avoid the risk of fire, use only the recommended fuse type as indicated in this manual and on the M16. Do not short-circuit the fuse
holder.
Before changing the fuse, always switch off the unit and remove the
IEC mains cable.
NOTE: Both Live and Neutral are fused, therefore the M16 fuse
holder contains TWO fuses. Do not make the mistake of thinking that one is a spare!
To replace a fuse, remove the fuse holder (located adjacent to the
IEC mains socket) by pulling the tab that projects slightly over the lip
of the socket.
Fuse holder
FIG 1-1. Remove the fuse holder
Revision MA2005-7
M16 Microphone Amplifier
1-2
Replace the blown fuse with an identical type. See Fuse Types below for further details.
Fuses
FIG 1-2. Replace the fuse
Refit the fuse holder, taking care to align it properly. The guide arm
of the fuse holder slots into the power connector assembly.
Fuse holder
FIG 1-3. Refit the fuse holder
Once in place, push the fuse holder home and confirm that it is fully
seated.
Push in fuse holder
FIG 1-4. Push the fuse holder
home
1.3
Fuse Types
Live: 90v - 250v: 2A Type T
Neutral: 90v - 250v: 2A Type T
M16 Microphone Amplifier
Revision MA2005-7
1-3
1.4
Servicing
There are no serviceable parts contained within the M16. Refer all
servicing to your CADAC distributor.
1.5
Do not remove any covers
Within the M16 are areas where high and dangerous voltages are
present. Removing any covers will invalidate warranty.
1.6
Safety checklist
■ Install in accordance with CADAC’s instructions.
■ Do not place the apparatus on an unstable or uneven surface.
■ Do not insert objects through any apertures. Doing so could
■
■
■
■
■
■
■
■
■
■
■
Revision MA2005-7
result in damage to the unit or electric shock.
Do not use this apparatus near water.
Do not block any of the ventilation openings
Do not install near any heat sources.
Do not install near naked flames.
Protect the mains cable from being stressed or pinched.
For optimum results, do not use the M16 on the same electrical
circuit as industrial equipment, such as motors, stage machinery
or any other equipment that causes noise or switching transients
on the mains circuit.
Unplug this apparatus during lightning storms or when unused
for long periods of time.
Adjust only those controls that are covered by the operating
instructions.
Use only the mains cable provided with the M16. Other cables
may not have sufficient current rating.
Do not operate this unit with the cover removed.
Unplug the unit before cleaning.
M16 Microphone Amplifier
1-4
M16 Microphone Amplifier
Revision MA2005-7
2-1
2
Important information
2.1
Unpacking
The packaging for the M16 is designed to safely contain and protect
the M16 from the rigours and stresses usually experienced during international shipment. Specially designed mouldings cushion and
support the M16, while also providing space to incorporate and protect the optional RM16 and PSU. Space is provided to safely include
additional M16 specific items.
The M16 packaging contains:
■ 1 x M16
■ 1 x set of rack mounting ears + fitting screws
■ 1 x IEC mains cable (either fitted with UK or US style plug, or
unwired depending on country of use)
■ 1 x BNC T-Piece Connector
■ 1 x BNC Terminator
■ 1 x operations manual
Optional RM16 if included within the M16 packaging:
■ 1 x optional RM16
■ 1 x optional RM16 power block (Wall Wart)
■ 1 x optional IEC mains cable (either fitted with UK or US style
plug, or unwired depending on country of use)
Please retain packaging until all items are accounted for and found
to be operating correctly.
Revision MA2005-7
M16 Microphone Amplifier
2-2
2.2
Operational considerations
AC mains voltage
The M16 is intended for use throughout the world and therefore the
internal power supply allows operation through the following AC
mains voltages:
Mains voltage: 90v - 250v AC
Mains frequency: 50/60Hz
AC mains connection
The rear panel of the M16 houses the AC mains inlet on an IEC style
connector. The mains cable supplied with the M16 is also fitted with
a moulded IEC connector. Excluding UK and USA models, no plug
has been fitted to this mains lead, therefore this will need to be wired
(see 1.1.Mains Cable). Obtain professional advice from a qualified
electrician if unsure.
2.3
Cleaning
Before cleaning the M16, make sure the unit is switched off and the
mains plug is removed from the socket.
Only use a mildly damp cloth to clean the M16. Never use any domestic or commercial cleaning agents as these can cause damage
to external surfaces and components.
2.4
Installation
When fixing the M16 into any 19” rack mount frame, take into account the stresses that can be exerted on the rack ears if they are
the only means of support. Damage to the chassis could especially
occur during transportation if the M16 is not supported on rails within
a flight case. CADAC strongly recommends that as well as fixing the
M16 to the frame via the rack ears, support rails also be employed.
M16 Microphone Amplifier
Revision MA2005-7
3-1
3
The M16 Microphone Amplifier
3.1
M16 Front panel
1
2
18
16
3 4 5
17
8
9 10
11
12 13 14 15 7
6
FIG 3-1. M16 front panel layout
1. Channel Number
2. Signal Overload Indicator
3. Signal Present Indicator
4. PFL Switch
5. Mute Switch
6. Headphone Socket
7. Headphone Level Control
8. PFL Level Meter
9. Channel Gain
10.Gain Increment Switch
11.Gain Decrement Switch
12.Polarity Reverse
13.Pad Switch
14.Phantom Power Switch
15.High Pass Filter Switch
16.Remote Indicator
17.USB Indicator
18.USB port
Revision MA2005-7
M16 Microphone Amplifier
3-2
3.2
M16 Rear Panel
11
1
2
3
4
5
15
6 7 8 9
12
10
13
14
FIG 3-2. M16 rear panel layout
1. Mains Inlet, Fuse and Power switch
2. Ground Stud
3. RS-485 Remote Communications Output Connector
4. RS-485 Remote Communications Input Connector
5. Word Clock BNC Connector
6. Word Clock Input/Output Selector Switch
7. Fibre Optic Output Connector (Tx) for MADI Output.
8. Fibre Optic Input Connector (Rx). Not Used.
9. 64/32 56/28 MADI Protocol Switch.
10.96kHz, 48kHz Sample Rate Switch.
11.PFL IN
12.PFL OUT
13.Analogue Microphone Level Input Connectors
14.Analogue Line Level Output Connectors
15.Additional Analogue Outputs on 2 x 37-Way D-sub Connectors
M16 Microphone Amplifier
Revision MA2005-7
3-3
3.3
Connecting up your M16
3.3.1
Mains power
Make sure that your IEC power connector is wired correctly (see 1.1
Mains Cable).
Fit the IEC cable to the rear power connector on the M16, making
sure that it is fitted securely and the cable is stress free.
3.3.2
Ground stud
The M16 has been designed to fully comply and exceed current
EMC directives (immunity from electro-magnetic radiation and radio
frequency interference). However, for optimum performance it is
also important to take into consideration the entire audio system and
minimize the potential for excessive ground loops occurring between
equipment and interference being induced within audio cabling.
A Ground Stud is provided on the rear panel of the M16 to allow connection to other audio devices in order to minimize ground potentials, as well as providing a connection point for the use of Parallel
Earth Conductors, which can reduce induced noise within audio cabling by up to 80% if used correctly.
System wiring and grounding techniques fall well outside the scope
of this User Manual, however, there are a number of reference
sources available. More information on this topic can also be found
on the Cadac Sound Check Zone at www.cadac-sound.com.
3.3.3
Audio Connections
Inputs
Connect the microphone input cables to the respective XLR-3F connectors on the rear panel of the M16, making sure that all the connectors mate securely.
Analogue Outputs
Each channel is provided with an active 3-way splitter. One set of
outputs (channels 1 - 16) is available on XLR-3M connectors, while
the remaining two sets of outputs are available on two 37-way D-sub
connectors (female). For D-sub wiring details, please see Connector wiring in Appendices.
NOTE: All three outputs are balanced and designed to drive
over long cable lengths in excess of 500m, with little degradation in audio performance. The three outputs are level compensated, whereby if one leg is shorted to ground, the other leg
doubles its amplitude to compensate.
Revision MA2005-7
M16 Microphone Amplifier
3-4
MADI
See MADI Output, 3.6 MADI Output, for details on using the MADI
digital audio interface.
3.3.4
Power On
Power on the M16 using the main power switch located on the rear
panel adjacent to the IEC connector.
NOTE: The M16 retains the latest settings of every microphone
parameter in non-volatile memory. Therefore these settings are
not lost when the unit is not powered and are automatically recalled when power is applied.
NOTE REGARDING THE USE OF I/O CABLES: The overall performance of the entire audio system is determined by the quality of the audio cables used. Make sure that microphone and
line level audio cables are of high quality with proper shielding
in place. When using a multi-core snake, CADAC recommend
the use of individually shielded twisted pairs with an overall
braided shield.
3.4
Standalone operation
In standalone operation, all controls are accessed via the front panel
Channel Control Section (see 3.4.4 Channel Control Section).
3.4.1
Channel LED indicators
LEDs are provided on each channel for visual indication of signal
present and signal overload conditions.
The red Signal Overload LED illuminates when the channel signal
level reaches +18dBu, giving ample warning of a potential overload
condition with at least 3dB of headroom to spare. The signal is
sourced pre MUTE / post HPF.
The green Signal Present LED illuminates when the audio signal on
that specific channel exceeds -36dBu. The signal is sourced pre
MUTE / post HPF.
3.4.2
PFL switch
An internal balanced PFL bus is provided and can be accessed via
the front panel headphone socket as well as on the rear panel
mounted 1/4” TRS balanced PFL OUT output socket. PFL selection
is via 16 PFL switches located on the front panel. These switches illuminate when enabled. See 3.7 Monitoring the PFL bus on multiple
M16 units for further information.
The PFL switches are also used to assign the Channel Control Section to the desired microphone channel (see 3.4.7 Channel Control
Section Parameters).
M16 Microphone Amplifier
Revision MA2005-7
3-5
3.4.3
MUTE switch
16 MUTE switches are also provided to allow the operator to mute
any of the 16 microphone channels. When enabled, these switches
are illuminated red.
3.4.4
Channel Control Section
The M16 Channel Control Section provides complete control over all
microphone channel parameters.
While it is possible to control a single channel, the M16 also provides
the ability to quickly select and simultaneously control multiple channels.
3.4.5
Single Channel Selection
Using the bank of PFL switches, select the channel that requires alteration. This assigns the Channel Control Section to the selected
microphone channel.
Example:
Control of Channel 5 parameters
Select channel 5’s PFL switch. The PFL switch will illuminate and the
Channel Control Section will be assigned to channel 5.
3.4.6
Multiple Channel Selection
Using the bank of PFL switches, select the first channel that requires
the parameter change(s). Keeping this switch pressed, select the
other channels that are required to be simultaneously controlled. All
the selected PFL switches will illuminate.
NOTE: Once two or more channels are selected, the ‘x’ indicator located at the bottom of the Channel Gain Indicator in the
Channel Control Section is illuminated. This indicates that multiple channels are now being controlled via the Channel Control
Section.
Example:
Selecting Channels 1 to 5 for multi-channel control
Press and hold the PFL switch for channel 1. While holding down
channel 1 PFL switch, select channels 2, 3, 4 and 5 PFL switches.
All five PFL switches are now illuminated as is the ‘x’ indicator in the
Channel Control Section.
Clearing multiple channel selections
To clear a multiple channel selection, simply press any PFL switch.
NOTE: When either a single or multiple channel selection is
made, it is possible to monitor the channel(s) via the headphone socket or the rear panel PFL OUT output connector.
Revision MA2005-7
M16 Microphone Amplifier
3-6
3.4.7
Channel Control Section Parameters
The Channel Control Section consists of the following features:
■
■
■
■
■
■
■
■
PFL Level
Channel Gain
Increment and Decrement Switches
Phase Reverse Switch
Pad Switch
Phantom Power Switch
High Pass Filter (Low Rumble Filter) Switch
Headphone Socket and Level Control
PFL Level
Any selection of the PFL switches on the front panel will route the selected channel or channels to the PFL bus. A mono sum level indication is provided on the 20-segment PFL meter. The meter scale is
from -36dBu to +21dBu in 3dB increments with yellow LEDs assigned from -36dBu to +6dBu and red LEDs from +9dBu to +21dBu.
Channel Gain Indicator
The Channel Gain Indicator displays the gain setting for the selected
channel or group of channels. Gain is controlled in 5dB steps via the
Increment and Decrement switches to the right of the Gain Indicator.
NOTE: When multiple channels are selected, the ‘x’ indicator at
the bottom of the Channel Gain Indicator is illuminated.
Increment and Decrement Switches: Inc Dec
Use these controls to set the gain of the selected channel(s).
Pressing Inc increases the current gain setting by 5dB up to a maximum of 60dB
Pressing Dec decreases the current gain setting by 5dB to the minimum gain setting of 10dB
NOTE: The microphone amplifier employs circuitry to minimize
any unpleasant clicks when altering the gain setting.
Polarity Reverse Switch: Rev
Enabling the Rev switch reverses the polarity of the selected microphone channel(s).
Pad Switch: Pad
Enabling the Pad switch attenuates the selected microphone channel(s) by -20dB. This is useful if feeding the M16 with very high line
level signals, although the M16 can accept +11dBu line level signals
at minimum gain (+10dB).
M16 Microphone Amplifier
Revision MA2005-7
3-7
Phantom Power Switch: 48v
48v Phantom Power can be provided on each microphone channel
individually by enabling the 48v switch. When enabled, the 48v
switch will illuminate. To cancel Phantom Power, simply press the
48v switch again.
NOTE: Phantom Power provides up to 14mA load current per
microphone.
NOTE: Good operating practice is to Mute a particular channel
before enabling or disabling Phantom Power. This prevents the
potential for any audio thumps occurring.
High Pass Filter:
To enable the selected channel’s high pass filter to remove any low
frequency rumble, press the High Pass Filter switch. Once enabled,
the switch will illuminate. To deactivate the High Pass Filter, press
the switch again.
The High Pass Filter is fixed at 60Hz with a 12dB/octave slope.
3.5
Headphones
A headphone socket is provided on the M16 front panel. The headphone output is sourced from the PFL bus, therefore any PFL selection can be monitored on the headphones.
The headphone circuitry is designed to drive a load of 150 ohms upwards. Headphone impedances below 150 ohms can still be used,
however, the audio level will be reduced.
It is possible to bus link the PFL bus of multiple M16 units. See section 3.7 Monitoring the PFL bus on multiple M16 units.
3.6
MADI Output
The M16 is provided with a MADI output connector as standard.
MADI (Multi-channel Audio Digital Interface) is a digital protocol that
enables multiple channels to be transmitted over a single coaxial cable or fibre optic link.
The M16 utilises the fibre optic link, therefore extending the available
transmission length to over 1000m, avoiding any radio frequency interference issues that can occur with long cable runs of unbalanced
coaxial cable and also reducing the weight and size of the cable
drum.
Using MADI allows direct digital connection to a wide variety of digital audio consoles and digital audio workstations (DAWs) that are
commonly available today. Note, however, that some digital consoles, and DAWs, may require optional hardware in order to accept
an optical MADI data stream. Please check with the appropriate
manufacturer for further details.
Revision MA2005-7
M16 Microphone Amplifier
3-8
3.6.1
Connecting the MADI Output
The MADI optical Duplex SC housing is located beneath the PFL
bus link connectors on the rear panel of the M16. This comprises of
two optical connection points, one transmit (Tx) and the other receive (Rx). See FIG 3-2. M16 rear panel layout.
NOTE: The receive (Rx) feature on the M16 is NOT implemented.
Carefully remove the cover from the duplex SC housing. This will reveal the two optical connection points. Take care to store the cover
in a safe place.
Take the optical cable and carefully insert the mating connector into
the transmit (Tx) connector on the M16, making sure that the locating key on the cable connector housing is aligned with the locating
slot on the transmit (Tx) connector. Once correctly inserted, the optical connector housing should lock into place.
NOTE: Confirm that the optical connector is securely locked in
place and that it is correctly located in the transmit (Tx) connector.
NOTE: The M16 Mute switches only operate on the analogue
output section. It is not possible to mute channels on the MADI
output.
Connect the other end of the optical cable to the receiving device.
3.6.2
MADI Setup
The M16 supports both 56 channel MADI and 64 channel Extended
MADI protocols, as well as 48kHz and 96kHz sampling frequencies.
Selection of which protocol and sampling frequency to use is determined by the capabilities of the receiving device (check with the
manufacturer of that device to determine the MADI specifications).
Selection of the MADI parameters is made via two momentary
switches on the rear panel located adjacent to the MADI Duplex SC
housing. Any settings are stored and automatically recalled upon
powering on the unit.
3.6.3
Sample Frequency Selection
Selection of either 48kHz or 96 kHz sampling frequency is available
on the M16.
Toggle the 48k - 96k momentary button to select the desired sampling frequency. LED indication provides confirmation of selection.
3.6.4
MADI Channel Selection
In 48kHz sampling mode, the M16 can support both 56 channel
MADI and 64 channel extended MADI protocols.
Toggle the 64/32 56/28 momentary button to select the desired
MADI format. This will be either 64 or 56 channels respectively. LED
indication provides confirmation of selection.
M16 Microphone Amplifier
Revision MA2005-7
3-9
In 96kHz sampling mode, the number of channels available on the
MADI data stream is halved.
Toggle the 64/32 56/28 momentary button to select the desired
MADI format. This will be either 32 or 28 channels respectively. LED
indication provides confirmation of selection.
NOTE: The M16 is a 16 channel unit, therefore when transmitting over MADI, only MADI channels 1 to 16 will be used. No audio data will be transmitted on channels 17 and above.
3.6.5
Word Clock
While the M16 is designed to comply with MADI protocol (AES102003), it also provides Word Clock functionality to enable establishing an accurate lock to external digital audio equipment.
A single un-terminated word clock BNC connector is provided on the
rear panel of the M16 and this can be switched to either transmit internally generated word clock or receive external word clock. If word
clock is required to daisy chain across multiple units, then a standard
BNC T-piece should be employed (not supplied). The device at the
end of the word clock chain will require termination with a 75ohm
load. If this device is the M16, then it is necessary to fit a 75ohm terminator (not supplied) onto the BNC T-piece.
Toggle the CLK IN/OUT momentary button located next to the Word
Clock BNC connector to select whether Word Clock is externally
sourced (IN) or internally generated (OUT). LED indication provides
confirmation of selection.
NOTE: Make sure there is no external word clock being received into the M16 when selecting Word Clock OUT i.e. internally generated.
3.7
Monitoring the PFL bus on multiple M16 units
When using multiple M16 units, it is possible to link the PFL busses
together. The benefit of this is the ability to simultaneously solo any
channel within the entire system and monitor the entire PFL bus via
one headphone socket.
To enable this facility, daisy chain the PFL OUT connector of the first
unit (connector is located on the rear panel) to the PFL IN connector
of the second unit. Repeat this until all units are linked together. The
last M16 in the chain is where the headphones are to be connected
in order to monitor the entire PFL bus. The PFL OUT connector of
the last M16 in the chain can also be used to connect to an external
monitoring system. See FIG 3-2. M16 rear panel layout.
When operating in this way any PFL selection made on the unit at
the head the chain will be metered on every PFL-meter within the
system. Note, however, that if a PFL switch is selected on a unit further down the PFL chain, then only that and all subsequent units will
meter the signal, i.e. the PFL signal path is not bidirectional.
Revision MA2005-7
M16 Microphone Amplifier
3-10
M16 Microphone Amplifier
Revision MA2005-7
4-1
4
Remote control of the M16
4.1
Introduction
The M16 is designed to allow remote control of all audio parameters
via the CADAC RM16 Remote Microphone Amp. Controller.1
4.2
RS-485 Communications Protocol
The M16/RM16 communications protocol is based on the bi-directional RS-485 standard. Therefore, when using the recommended
communications cable as specified by CADAC, remote control distances of up to 500m can be achieved.
Since CADAC cannot foresee what remote cable length would be required for any given application, the RM16/M16 package does not
include an RS-485 remote communications cable.
NOTE: As with audio cable, the quality of control performance
is very dependent on the quality of interconnecting cable used.
In the case of the remote communications cable, properly
shielded 100 ohm digital audio cable should be specified. This
is the same cable as specified for AES/EBU audio data.
4.3
CADAC RM16 Remote Microphone Amp. Controller
The RM16 is a dedicated remote controller, designed to operate in
conjunction with the M16 Remote Controlled Microphone Amplifier.
The RM16 provides full control over every feature in the Channel
Control Section (see section 3.4.4 Channel Control Section), while
also providing the ability for engineers to operate single or multiple
M16 units that can be located up to a distance of 500 metre away
from the remote control unit. See 4.2 RS-485 Communications Protocol.
The RM16 is designed to control a maximum of 32 x M16s, or an impressive 512 premium CADAC microphone amplifiers!
In order to provide a versatile control system, a total of 4 x RM16 remote controllers can also be integrated into one control system.2
This provides the ability to simultaneously meter a total of 64 channels, or allow remote control of all microphone channels from a variety of locations.
Example: In a theatre application, various productions may switch
front of house operation between the FOH pit and the control room.
In this instance, it is possible to install two RM16s into the control
system. One located in the control room and the other in the FOH pit.
1.
2.
Revision MA2005-7
The ability to remote control the M16 via the D16 and SAM has now been removed.
This feature is not currently implemented. Please contact your local Cadac representative for further information concerning this feature.
M16 Microphone Amplifier
4-2
4.4
Front Panel
3
4
2
6
1
7
5
8
9
FIG 4-1. Layout of RM16 front
panel
1.
2.
3.
4.
5.
6.
7.
8.
9.
4.5
FIG 4-2. Layout of RM16 rear
panel
Channel Number
20 Segment LED Meter
Pad Switch
Polarity Reverse Switch
Phantom Power Switch
High Pass Filter Switch
Microphone Gain/Mute/Character Selection Control
Control Menu Screen
Control Soft Keys
Rear Panel
3
2
1
1. DC Power Connector
2. Remote Control In Connector
3. Remote Control Out Connector
4.6
Connections
4.6.1
RM16 Power
Power for the RM16 is supplied via an external 6v DC 3.3A/20W
power adapter.The power adapter is designed to operate through
the following AC mains voltages.
Mains Voltage:
100v - 240v AC
Mains Frequency: 50/60Hz
M16 Microphone Amplifier
Revision MA2005-7
4-3
Mains power for the power adapter is supplied via a separate 3 pin
IEC mains cable. Before connecting the IEC mains cable to the power adapter, make sure it is wired correctly (see 1.1 Mains Cable)
Fit the IEC mains cable to the power connector on the small power
adapter, making sure that it is fitted securely and the cable is stress
free.
Insert fully the power adapter’s DC power connector into the RM16
external power socket (Ext. Power). For system integrity the DC
power connector is fitted with an integral locking collar to avoid inadvertently removing it from the RM16.
4.6.2
Remote Control Communications Backbone
Communications interconnection between RM16 and M16 (plus other CADAC rack units) is made via standard XLR-3 connectors. This
is to allow simple integration within existing facilities employing studio tie-lines.
For ease of understanding, the remote control connections on both
the RM16 and M16 are labelled In and Out. However, it is worth
knowing that these two connectors are actually wired in parallel,
therefore providing a robust communications backbone. If any device connected to this backbone loses connection, for whatever reason, then the entire communications backbone remains intact,
allowing all other devices to continue operation.
Revision MA2005-7
M16 Microphone Amplifier
4-4
4.7
Single M16, RM16 System Connections
Using 100 ohm digital audio cable, connect one end to the OUT
XLR-3M connector located on the rear panel of the RM16.
FIG 4-3. Rear panel of RM16
Connect the other end of the communications cable into the RS-485
IN XLR-3F connector located on the rear panel of the M16.
FIG 4-4. Rear panel of M16
4.8
Multiple M16, RM16 System Connections
Using a 100 ohm digital audio cable, terminated with XLR-3 connectors, connect one end to the OUT XLR-3M connector, located on the
rear panel of the RM16.
FIG 4-5. Rear panel of RM16
Connect the other end of the communications cable into the RS-485
IN XLR-3F connector located on the rear panel of the first M16 of the
system. Any M16 can be assigned to be the first in the chain.
FIG 4-6. Rear panel of M16
It is then a simple process of daisy-chaining additional M16s or
RM16 controllers together, by connecting RS-485 OUT XLR-3M of
M16 #1 to RS-485 IN of M16 #2 etc. Maximum configuration of a single system is 32 x M16 and 4 x RM16 devices.
M16 Microphone Amplifier
Revision MA2005-7
4-5
4.9
Power On Sequence
There is no requirement for a specific power-on sequence. Any unit
within the system can be powered in any order.
4.10
RM16 configuration
4.10.1
Configuring the system
If configuring an M16/RM16 system for the first time, or having added additional M16 or RM16 units to the communications backbone,
an interrogation sequence, via one RM16, will need to be initiated.
This is referred to as Enumeration.
Note: When connecting an RM16 to an M16 for the first time,
the Remote LED on the M16 front panel may flash. This is indicating that the connected system requires Enumeration.
If using multiple RM16s within a system, choose just one to run the
interrogation sequence. The information obtained will automatically
be forwarded to the other RM16s within the system.
■ From the RM16 Root menu (see FIG 4-7. RM16 root menu)
select Edit by pressing the associated illuminated button below
the menu.
■ Select System from the Edit menu.
■ Select Enumerate from the System Configuration and Testing
menu.
■ Select Yes from the Enumerate Units and Allocate Addresses
menu.
The message Enumeration beginning - Please wait... is displayed.
This initiates the interrogation process. Each M16 and RM16 in the
system will return its own unique serial number and a unique address will be allocated to that unit. As this happens the following
messages appear for each unit found:
M16 Serial Number ##### has replied
Allocating Address $$ to Ser No. #####
(where ##### is the serial number and $$ is address number)
Once every unit on the communications backbone has been interrogated and an address assigned, the RM16 will display:
Enumeration ended - You may continue
■ Press Return to return to the Edit menu.
■ Press Return to return to the Root menu
NOTE: This interrogation process is only required when an existing system is modified or a system has been newly configured.
Revision MA2005-7
M16 Microphone Amplifier
4-6
NOTE: If in a sub-menu and no buttons on the RM16 are
pressed for a period of 30 seconds, the Control Menu will return
to the Root menu.
M16 Microphone Amplifier
Revision MA2005-7
4-7
4.10.2
Control Menu
The Control Menu is presented on a 2 x 40 character LCD alphanumeric display allowing operational control of system configuration as
well as Remote Rack and Channel selection. Once an M16/RM16
system is configured, the primary use of the Control Menu is to provide visual feed-back of the status of each M16, while enabling control of selected M16 channels. This screen is known as the Root
menu and provides information such as the M16’s assigned name,
the name of the selected channel and the current gain setting for that
particular channel. Soft key labels for Rack and Channel, as well as
access to further sub-menus are provided on the bottom row of the
display.
10dB
Edit
–
Rack (1) +
*
– Chn (1) +
FIG 4-7. RM16 root menu
4.10.3
Naming M16 units
It is possible to give each M16 within the system a unique name
(maximum of 16 characters) via the RM16 controller. The name is
stored in EEPROM memory within the M16 itself, therefore the rack
name will be recalled when interrogated via the RM16. Each M16 is
shipped from the factory with a default rack name of CADAC M16
System. However, this can be over-written.
Select which rack is to be named by pressing the - Rack ( ) + buttons
located beneath the menu screen. This will increment or decrement
the active Rack number. See FIG 4-7. RM16 root menu.
Once the correct Rack is chosen, select Edit by pressing the associated illuminated buttons below the menu.
Press RackName from the Edit menu.
Using the << and >> keys, scroll the cursor ^ to the desired location.
Using the Character Selection Control (Gain Control), select the
character required. Use the >> key to advance to the next character
location. Characters available are:
space!”#$%&’0*+,-./0123456789:;<=>[email protected][¥]^_`abcd....xyz{l}→
In order to speed up the naming process, it is possible to clear any
selected character by pressing the Character Selection Control. This
will automatically insert a space and move the cursor to the next
character.
Revision MA2005-7
M16 Microphone Amplifier
4-8
Repeat the process for each character.
Once complete, press Return.
Select Yes to save the new name into the selected rack or No to
abandon the edits.
NOTE: If no selection is made, the RM16 will time-out and automatically return to the Root menu without saving the name.
Selecting YES will be followed by the confirmation message New
Name Sent To Rack.
To return to the Root menu, press Return.
NOTE: If the selected rack is not communicating with the RM16,
the edited name will not be stored and will be lost.
4.10.4
Naming M16 channels
It is possible to give each of the 16 channels within an M16 a unique
name (maximum of 8 characters) via the RM16 controller. This name
is stored in EEPROM memory within the M16 itself, therefore all
channel names will be recalled when interrogated via the RM16.
Each M16 is shipped from the factory with a default name for each
channel:
Chan 1; Chan 2 etc., however these may be over-written.
Select the Rack containing the channels that require naming by
pressing the - Rack ( ) + buttons located beneath the menu screen.
This will increment or decrement the active rack number. See FIG 47. RM16 root menu
Once the correct Rack is chosen, select the required channel by
pressing the - Chn ( ) + buttons located beneath the menu screen.
This will increment or decrement the active Channel number.
Select Edit by pressing the associated illuminated button below the
menu.
Press ChnName from the Edit menu.
Using the << and >> keys, scroll the cursor ^ to the desired location.
Using the Character Selection Control (Gain Control), select the
character required. Use the >> key to advance to the next character
location. Characters available are:
space!”#$%&’0*+,-./0123456789:;<=>[email protected][¥]^_`abcd....xyz{l}→
In order to speed up the naming process, it is possible to clear any
selected character by pressing the Character Selection Control.
This will automatically insert a space and move the cursor to the next
character.
Repeat the process for each character.
Once complete, press Return.
M16 Microphone Amplifier
Revision MA2005-7
4-9
Select Yes to save the new name into the selected rack or No to
abandon the edits.
NOTE: If no selection is made, the RM16 will time-out and automatically return to the root menu without saving the name.
Selecting Yes will be followed by the confirmation message New
Name Sent To Rack.
To return to the Root menu, press Return.
NOTE: If the selected rack is not communicating with the RM16,
the edited name will not be stored and will be lost.
4.10.5
System Integrity
It is possible to confirm that the communications system is operating
correctly by either looking at the front panels of the M16s, or the
RM16 menu display. This is a very useful feature as these units
could be some distance apart.
To confirm correct operation over the communications backbone:
M16: Check that the red Remote indicator on the front panel is illuminated. When using multiple M16s within a system, the Remote
LED will illuminate when that rack is selected within the RM16.
RM16: It is possible to check communication to each M16 via the
menu screen. If an M16 is not communicating, then an asterisk (*)
will be displayed next to the rack number in the Root menu. To scroll
through the racks, press the - Rack ( ) + buttons located beneath the
menu screen. See fig below. If an M16 is communicating properly,
no asterisk will be displayed.
10dB
Edit
– Rack (1) +
*
–
Chn (1) +
FIG 4-8. M16 not communicating,
indicated by the asterisk (*)
10dB
Edit
– Rack (1) +
–
Chn (1) +
FIG 4-9. M16 communicating (the
asterisk is gone)
Revision MA2005-7
M16 Microphone Amplifier
4-10
4.11
RM16 Meters
16 channel meters are provided on the RM16, therefore providing
comprehensive metering for every channel on the selected M16.
The 20 segment meter scale is from -36dBu to +21dBu in 3dB increments.
4.11.1
Channel Mute indication
Channel Mute indication on the RM16 is provided via channel meters. When a channel is muted (either locally or remotely) the associated channel LED on the channel meter illuminates. See also 4.14
Mute.
4.11.2
Meter Brightness Control
It is possible to alter the brightness levels of these meters. This is a
useful feature as ambient lighting varies according to where a performance is held. For example, an outdoor festival may be held in
very bright conditions, thereby requiring very bright and highly contrasting meters, or conversely a theatrical performance where there
is an importance for audio equipment to emit as little light as possible.
From the RM16 root menu (see FIG 4-7. RM16 root menu) select
Edit by pressing the associated illuminated button below the menu.
Select System from the Edit menu.
Select User
Use the - Brightness + buttons beneath the menu screen to adjust
the brightness of the channel meters.
Press Return to return to the System menu.
Press Return to return to the Edit menu.
Press Return to return to the Root menu
4.12
Controlling M16 microphone channels
Operation of the RM16 is very intuitive, allowing quick access to all
parameters during live performance.
4.12.1
M16 selection
Selection of which M16 is currently being controlled and metered by
the RM16 is performed from the Root menu.
To select which rack is to be controlled, press the - Rack ( ) + buttons
located beneath the menu screen. This will increment or decrement
the Rack number. The Rack name will be displayed in the top row of
the Root menu. See FIG 4-7. RM16 root menu
M16 Microphone Amplifier
Revision MA2005-7
4-11
All 16 channels of the chosen Rack will then be metered on the
RM16, while any channel parameter can also be controlled.
4.12.2
Channel Selection
In order to control any particular channel parameter, it is important
to first select the desired channel to be active on the RM16. The task
is performed from the Root menu.
To select which channel is to be enabled, press the - Chn ( ) + buttons located beneath the menu screen. This will increment or decrement the active channel from 1 to 16. The active channel number is
displayed on the Root menu in addition to that channel’s current gain
setting.
4.13
Gain Control
Gain control is via a rotary encoder. Once the desired channel is active, rotate the Gain controller to alter the microphone amplifier gain.
Gain is controlled in ±5dB steps from 10dB to 60dB. Active channel
gain is displayed in the Root menu.
4.14
Mute
In general applications, when using an M16 to feed a mixing console, it would be common practice for the console operator to simply
mute a particular channel on the mixing console rather than on the
M16. However, if muting an M16 channel via the RM16 is required,
then the procedure is as follows:
To mute the desired channel via the RM16, press the Gain/Mute
control and hold for a period of two seconds. Mute indication of the
particular channel will be displayed on the RM16 by the +21dBu LED
on the channel meter illuminating.
To unmute the channel, repeat the process by pressing and holding
the Gain/Mute control for a further period of two seconds. The
+21dBu LED will also clear.
4.15
Pad Switch: Pad
Enabling the Pad switch attenuates the selected microphone channel by -20dB. This is useful if feeding the M16 with very high line level signals, although the M16 can accept +11dBu line level signals at
minimum gain (+10dB).
4.16
Polarity Reverse Switch: Rev
Enabling the Rev switch reverses the polarity of the selected microphone input. When enabled the Rev switch will illuminate.
4.17
Phantom Power Switch: 48v
48v Phantom Power can be provided on each microphone channel
individually by enabling the 48v switch. When enabled, the 48v
Revision MA2005-7
M16 Microphone Amplifier
4-12
switch will illuminate. To cancel Phantom Power, simply press the
48v switch again.
NOTE: Phantom Power provides up to 14mA load current per
microphone.
NOTE: Good operating practice is to Mute a particular channel
before enabling or disabling Phantom Power. This prevents the
potential for any audio thumps occurring.
4.18
High Pass Filter:
To enable the selected channel’s High Pass Filter to remove any low
frequency rumble, press the High Pass Filter switch. Once enabled,
the switch will illuminate. To deactivate the High Pass Filter, press
the switch again.
GENERAL NOTE: Communication is bi-directional, so it is possible to alter settings directly on the M16 and the RM16 (if selected to that channel). Any changes made directly to the M16
will be reflected in the RM16. This applies to Gain, Pad, Phase,
Reverse, Phantom Power and High Pass Filter settings.
M16 Microphone Amplifier
Revision MA2005-7
SPEC-1
M16 Specifications
NOTE: 0dB = 0.775V RMS without reference to impedance. Unless otherwise stated, all specifications given below apply
to the frequency range 20Hz to 20kHz. All noise measurements are RMS and made with a DIN audio band filter (–3dB
points at 22Hz and 22kHz) in circuit.
Microphone Input
Input impedance
Maximum input level (10dB gain with PAD out)
Maximum input level (20dB gain with PAD in)
CMRR
Signal to noise: (10Hz-20kHz)
1k2
+21dBu
+21dBu
Dynamic range:
better than 100dB
–97dBu at 10dB gain
–67dBu at 60dB gain
120dB
Frequency response: (10dB Gain, 200 ohm source)
Gain range:
10Hz to 100kHz ±0dB
10dB to 60dB
Equivalent input noise with 200 ohms source impedance (DIN bandwidth)
Measured with gain at 60dB
–127dB
Measured with gain at 10dB
–107dB
Total harmonic distortion, gain set at +10dB
Crosstalk: (10dB gain, input level 0dBu)
Phantom power
0.003% (1kHz)
–80dB at 10kHz
+48VDC, 14mA (per channel)
High Pass filter
–3dB frequency
Slope
60Hz
–12dB per octave
Analogue outputs (all outputs are electronically balanced)
Impedance:
Nominal load impedance:
Nominal output level:
Max output level:
Output balance:
Digital output
Protocol:
Format:
Sample rate:
MADI (Multi-channel Audio Digital Interface)
Compliant to AES-10-2003
Operational modes
Synchronization:
Connectors
Analogue inputs:
Analogue outputs:
Revision MA2005-7
33 ohm in series with 1000uF
(balanced)
600 ohms
0 dBu
+22.5dBu into 600 ohms
>70dB (10Hz to 20kHz)
56 channel at 48kHz (±12.5% varispeed)
28 channel at 96kHz (±12.5% varispeed)
64 channel at 48kHz
32 channel at 96kHz
Word clock (selectable Internal/External)
Duty cycle 50% (TTL level)
Termination BNC, 75 ohms impedance
16 x XLR-3F (pin 2 hot)
Split 1: 16 x XLR-3M
Split 2: 37-way Dsub
Split 3: 37-way Dsub
PFL In:
PFL Out:
1/4” TRS Jack (balanced)
1/4” TRS Jack (balanced)
MADI Output:
SC Duplex
Remote In:
Remote Out:
XLR3F, RS-485
XLR3M, RS-485
Computer Interface:
USB Type B downstream
M16 Microphone Amplifier
SPEC-2
General
Power requirements:
Power Consumption:
Operating Temperature:
Dimensions in mm (WxHxD):
Unit weight:
Average shipping weight:
90 - 250VAC 50/60Hz
110VA
0° to 40°C
3RU x 420mm (inc. projections)
8kG (18lbs)
12kG (26lbs)
Accessories:
Options:
Operation manual, USB cable
RM-16 remote control unit
EMC
Complies with:
M16 Microphone Amplifier
EN55103-1: Emissions
EN55103: Immunity
Revision MA2005-7
APP-1
Appendices
Connector wiring
M16: wiring for XLR-3F (Microphone Input)
Pin 1: COMMON
Pin 2: Audio +
Pin 3: Audio –
M16: wiring for XLR-3M (Line Level Output)
Pin 1: COMMON
Pin 2: Audio +
Pin 3: Audio –
M16: wiring for 37-way D-sub female connector
(Line Level OUT 2)
Pin 1: Output 2-1 Audio +
Pin 20: Output 2-1 Audio –
Pin 2: Output 2-2 Audio +
Pin 21: Output 2-2 Audio –
Pin 3: Output 2-3 Audio +
Pin 22: Output 2-3 Audio –
Pin 4: Output 2-4 Audio +
Pin 23: Output 2-4 Audio –
Pin 5: Output 2-5 Audio +
Pin 24: Output 2-5 Audio –
Pin 6: Output 2-6 Audio +
Pin 25: Output 2-6 Audio –
Pin 7: Output 2-7 Audio +
Pin 26: Output 2-7 Audio –
Pin 8: Output 2-8 Audio +
Pin 27: Output 2-8 Audio –
Pin 9: Output 2-9 Audio +
Pin 28: Output 2-9 Audio –
Pin 10: Output 2-10 Audio +
Pin 29: Output 2-10 Audio –
Pin 11: Output 2-11 Audio +
Pin 30: Output 2-11 Audio –
Pin 12: Output 2-12 Audio +
Pin 31: Output 2-12 Audio –
Pin 13: Output 2-13 Audio +
Pin 32: Output 2-13 Audio –
Pin 14: Output 2-14 Audio +
Pin 33: Output 2-14 Audio –
Pin 15: Output 2-15 Audio +
Pin 34: Output 2-15 Audio –
Pin 16: Output 2-16 Audio +
Pin 35: Output 2-16 Audio –
Revision MA2005-7
M16 Microphone Amplifier
APP-2
M16: wiring for 37-way D-sub female connector
(Line Level OUT 3)
Pin 1: Output 3-1 Audio +
Pin 20: Output 3-1 Audio –
Pin 2: Output 3-2 Audio +
Pin 21: Output 3-2 Audio –
Pin 3: Output 3-3 Audio +
Pin 22: Output 3-3 Audio –
Pin 4: Output 3-4 Audio +
Pin 23: Output 3-4 Audio –
Pin 5: Output 3-5 Audio +
Pin 24: Output 3-5 Audio –
Pin 6: Output 3-6 Audio +
Pin 25: Output 3-6 Audio –
Pin 7: Output 3-7 Audio +
Pin 26: Output 3-7 Audio –
Pin 8: Output 3-8 Audio +
Pin 27: Output 3-8 Audio –
Pin 9: Output 3-9 Audio +
Pin 28: Output 3-9 Audio –
Pin 10: Output 3-10 Audio +
Pin 29: Output 3-10 Audio –
Pin 11: Output 3-11 Audio +
Pin 30: Output 3-11 Audio –
Pin 12: Output 3-12 Audio +
Pin 31: Output 3-12 Audio –
Pin 13: Output 3-13 Audio +
Pin 32: Output 3-13 Audio –
Pin 14: Output 3-14 Audio +
Pin 33: Output 3-14 Audio –
Pin 15: Output 3-15 Audio +
Pin 34: Output 3-15 Audio –
Pin 16: Output 3-16 Audio +
Pin 35: Output 3-16 Audio –
M16: wiring for 1/4” TRS
(PFL bus)
Tip:
PFL Audio +
Ring:
PFL Audio –
Sleeve:
COMMON
M16/RM16: wiring for XLR-3F, XLR-3M,
(RS-485 Remote Control I/O)
Pin 1:
COMMON
Pin 2:
DATA +
Pin 3:
DATA –
M16 Microphone Amplifier
Revision MA2005-7
APP-3
M16: wiring for USB connector
Pin 1:
N/C
Pin 2:
DATA +
Pin 3:
DATA –
Pin 4:
COMMON
Shell:
COMMON
Important notes:
All CADAC products are Common Bonded. This is part of the
design procedure to ensure compliance with the European
EMCD (Electro Magnetic Compliance Directive): BSEN55103-1
(Emissions) and BSEN55103-2 (Immunity).
Common Bonding means a single conductive structure for all
reference, signal and power return currents.
COMMON = Safety Earth, GROUND, 0V, GND bonded together.
All ‘D sub’ connectors used for external connections should
be purchased with a conductive shell and the cable shield
MUST be bonded to the shell.
Revision MA2005-7
M16 Microphone Amplifier
APP-4
CADAC USB ReProgramming Utility
CADAC will, from time to time, release firmware updates for the M16
in order to improve performance and enhance facilities.
Your local CADAC distributor will keep you informed when such updates are available.
The following sections explains how to install the new firmware into
the M16 using the USB ReProgramming Utility.
Before any update can take place, it is important to make sure that
neither SAM Configuration nor Sound Automation Manager is running on the system. If either of these applications is active, then it
must be closed.
NOTE: Prior to updating the M16 Flash Memory with new
firmware, it is important to make sure that ALL Windows applications are closed.
When SAM is running, it takes control of the USB port and retains
control even when the application has been closed. It is therefore important to make sure that control over the USB is released, in order
for the reprogramming application to operate correctly.
Releasing the SamUSB port
On the Windows taskbar, right-click on the SamUSB icon and click
on Exit. This releases the USB Port.
M16 Microphone Amplifier
Revision MA2005-7
APP-5
Running the Sam ReProgramming Utility
Make sure that the M16 is switched on and the USB cable is connected to both computer and M16.
■ Click on the Start button on the Windows Taskbar.
■ Select All Programs > Sound Automation Manager > USB
ReProgramming Utility.
The reprogramming application SamFlasher will open.
Revision MA2005-7
M16 Microphone Amplifier
APP-6
SamFlasher will interrogate the USB port and display which devices
are attached. In this case it will be the M16.
Details of the M16 will be displayed, giving Unit ID, Unit Description,
Unit Serial Number and currently installed firmware version.
To install the new firmware version, first highlight the unit that requires updating by clicking over the Unit ID number. This will highlight the unit and display the unit serial number within the File box.
Click on the Load File button and select the path to allow SamFlasher to locate the update program.
The file will follow the naming format below and has a .bin extension:
M16_Vxxx.bin (where xxx represents the firmware version.
NOTE: The file can either be received from your local distributor, or downloaded via the Sound Check Zone on the CADAC
website (www.cadac-sound.com)
M16 Microphone Amplifier
Revision MA2005-7
APP-7
Once selected, the file details will be displayed in the File box, giving
file description, file size and date of release.
With the file location specified and the desired unit for firmware update highlighted, left-click on the START button. This will initiate reprogramming of the firmware.
IMPORTANT: WHEN UPDATING FIRMWARE, DO NOT RUN ANY
OTHER PROGRAMS, ALSO DO NOT REMOVE POWER OR ANY
CONNECTIONS, OTHERWISE THE FIRMWARE UPDATE WILL
BE INTERRUPTED AND THE M16 MAY NO LONGER OPERATE.
IF THIS HAPPENS, THE UNIT WILL NEED TO BE RETURNED TO
CADAC OR YOUR LOCAL DISTRIBUTOR.
Once the M16 has been successfully updated, the unit will reboot itself and after several seconds USB communications will be re-enabled. SamFlasher will then display the new installed firmware
version.
Further confirmation can be obtained by viewing the firmware version via the M16 front panel menu as detailed in the following section.
Repeat this process for any additional M16 units.
Click OK to close the program.
Revision MA2005-7
M16 Microphone Amplifier
APP-8
M16 Software Version
To check the software/firmware version of the M16 make sure that
no PFL switches are enabled and simulteneously press and hold the
Inc, Dec and Rev buttons on the front panel. The version numbers
will be displayed for both the M16 control software and the MADI
firmware.
The +18dB LEDs indicate the MADI firmware version while the 36dB LEDs indicate the control firmware version. In both cases the
16 LEDs across the front panel display two 8-bit binary numbers with
the Most Significant Bit to the left. This display allows the firmware
versions to be read as v.vv.
The example below shows a MADI version of 1.01 and the control
software revision of 1.02.
M16 Microphone Amplifier
Revision MA2005-7
APP-9
Revision MA2005-7
M16 Microphone Amplifier
APP-10
M16 Microphone Amplifier
Revision MA2005-7
Warranty-1
Warranty
Dear Customer,
We thank you for having purchased this CADAC product and hope
you will have many years of service from it.
Your CADAC product is warranted for a period of 12 months from the
date of original purchase to be free from defects in material and
workmanship. In the event that the product proves defective and requires service within the 12 month warranty period, CADAC, or its
appointed distributor will, without charge for labour or parts, repair or
(at CADAC’s discretion) replace the product or its defective parts
within the terms and conditions set out below.
Conditions
The warranty is valid only at the premises of the manufacturer, or the
authorised distributor, and is provided on a pre-paid RTB (return to
base) basis.
This warranty will not reimburse nor cover damage sustained as a
result of modifications that have been made to the product without
the prior written consent of CADAC.
The warranty does NOT cover any of the following:
■ Transport costs and all risks of transport relating directly and
indirectly.
■ Damage resulting from misuse, including but not limited to:
a) failure to use the product for its normal purpose or in
accordance with instructions detailed in the Installation and User
manual
b) installation or use of the product in a manner inconsistent with
national technical and safety standards in force.
c) improper or incorrect installation of software.
■ Repair made by the customer himself or a non-authorized repair
company.
■ Accidents, lightning, water, fire or improper ventilation or any
cause beyond the control of CADAC.
■ Defects in the system into which this product is incorporated.
Revision MA2005-7
M16 Microphone Amplifier
Warranty-2
M16 Microphone Amplifier
Revision MA2005-7
INDEX-1
Index
Numerics
64/32 56/28 MADI protocol switch 3-2
96kHz, 48kHz sample rate switch 3-2
A
AC mains connection 2-2
AC mains voltage 2-2
Additional Analogue outputs on 2 x 37-way D-Type connectors 3-2
Analogue Line Level Output Connectors 3-2
Analogue Microphone Level Input Connectors 3-2
Analogue Outputs 3-3
Audio Connections 3-3
C
Changing the fuse 1-1
Channel Control Section 3-5
Channel Control Section Parameters 3-6
Channel LED indicators 3-4
Channel Number 3-1
Channel Selection 4-11
Cleaning 2-2
Clearing multiple channel selections 3-5
CMRR SPEC1
Configuring the system 4-5
Connecting the MADI Output 3-8
Connecting up your M16 3-3
Control Menu 4-7
Controlling M16 microphone channels 4-10
D
Digital output SPEC1
Do not remove any covers
1-3
E
EMC
SPEC2
F
Fibre Optic input connector (Rx) 3-2
Fibre Optic output connector (Tx) for MADI output 3-2
Front panel 3-1
Fuse Types 1-2
Revision MA2005-7
M16 Microphone Amplifier
INDEX-2
G
Gain Control 4-11
Gain decrement Switch 3-1
Gain Increment Switch 3-1
Gain Selection Meter 3-1, 3-6
Ground Stud 3-2
Ground stud 3-3
H
Headphone Level Control 3-1
Headphone Socket 3-1
Headphones 3-7
High Pass Filter 3-7
HP 4-12
High Pass filter SPEC1
High Pass Filter Switch 3-1
I
Increment and Decrement Switches
Inc Dec 3-6
Inputs 3-3
Installation 2-2
M
M16 selection 4-10
MADI 3-4
MADI Channel Selection 3-8
MADI Output 3-7
MADI Setup 3-8
Mains Cable 1-1
Mains Inlet and Power switch 3-2
Mains ON Indicator 3-1
Mains power 3-3
Meter Brightness Control 4-10
Microphone Amp. Controller 4-1
Microphone Input SPEC1
Monitoring the PFL bus on multiple M16 units 3-9
Multiple M16, RM16 System Connections 4-4
MUTE switch 3-5
Mute Switch 3-1
N
Naming M16 channels 4-8
Naming M16 units 4-7
O
Operational considerations
M16 Microphone Amplifier
2-2
Revision MA2005-7
INDEX-3
P
packaging 2-1
Pad Switch 3-1
Pad 3-6, 4-11
PFL IN 3-2
PFL Input Meter 3-1
PFL Meter 3-6
PFL OUT 3-2
PFL Switch 3-1
PFL switch 3-4
Phantom Power Switch 3-1
48V 3-7, 4-11
Phase Reverse Switch
Rev 4-11
Polarity Reverse 3-1
Polarity reverse 3-1
Polarity Reverse Switch 4-2, 4-11
Power On 3-4
Power On Sequence 4-5
R
Rear Panel 3-2
Remote Control Communications Backbone 4-3
Remote control of the M16 4-1
Remote control options 4-1
Remote Indicator 3-1
RM16 configuration 4-5
RM16 Front Panel 4-2
RM16 Meters 4-10
RM16 Power 4-2
RM16 Rear Panel 4-2
RS-485 Communications Protocol 4-1
RS-485 Remote Communications Input Connector 3-2
RS-485 Remote Communications Output Connector 3-2
Running the Sam ReProgramming Utility APP-5
S
Safety checklist 1-3
Sample Frequency Selection 3-8
Servicing 1-3
Signal Overload Indicator 3-1
Signal Present Indicator 3-1
Single Channel Selection 3-5
Single M16, RM16 System Connections 4-4
Specifications SPEC1
Standalone operation 3-4
System Integrity 4-9
T
To replace a fuse 1-1
Revision MA2005-7
M16 Microphone Amplifier
INDEX-4
U
Unpacking 2-1
Updating M16 Firmware APP-4
USB Indicator 3-1
USB ReProgramming Utility APP-4
W
Word Clock 3-2, 3-9
Word Clock BNC Connector 3-2
Word Clock Input/Output selector switch
M16 Microphone Amplifier
3-2
Revision MA2005-7
CADAC Electronics
One New Street
Luton
Bedfordshire
LU1 5DX
England
Tel +44 (0) 1582 404 202
Fax +44 (0) 1582 412 799
email: [email protected]
web: http://www.cadac-sound.com
While every effort has been taken to ensure the accuracy of the contents in this manual, CADAC equipment is being subject to continuous
development, hence the information in this manual may not reflect latest product updates.
© Copyright CADAC Electronics plc 2005