1
bathroom, by means of an equipotential bonding of 4 mm2 wire, according
to the local current requirements.
IMPORTANT NOTE
1.7 AIR SUPPLY
For the effective operation of the system, sufficient air should be able to
be drawn into the unit. If this is not possible (at the rear side of the bath,
for example), the housing of the bath should be provided with air gaps or a
grid with a minimum capacity of 40 cm2.
If a grid is mounted in the bathroom, it has to meet the splashproof
requirements and should only be removable using tools. The grid or air
gaps should always be kept free of towels, etc., while bathing.
Failure to provide a service access panel and air ventialation violates the
manufacturers instalation requirements.
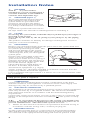
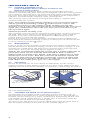
1.8 SUPPORT/CASING ACCESS
The technical parts of the system bath should remain accessible via a
service access panel (figure 3). Consequently the access panel should be
completely removable. This panel should only be opened whilst Whisper
Whirlpool is not in operation.
3
Tiling Strip
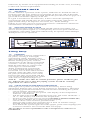
1.9 FINISHING
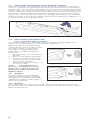
You should use a silicon compound in
the joints, creating a watertight,
permanently elastic finishing joint.
This joint allows the material to settle.
Before making the joint, read the
instructions on the silicon compound
container - the use of tileing strip to
flash the bath edge to contact with
wall edges is recommended.
When installing the system bath
in a niche and/or finishing with a
horizontal row of tiles which extend
partially under the edge of the bath,
the joint (a minimum of 4 to 5 mm)
between the edge of the bath and the
row of tiles should likewise be sealed
with silicon compound (figure 4).
4
NOTE: Make sure that no cement particles, pieces of silicon glue
etc. fall into the jets or into the piping system. It will be virtually
impossible to remove them!
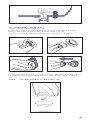
1.10 CHECK PRIOR TO BUILDING & SHEETING IN
Although your system was fully tested in the factory before being
dispatched, damage may occur during transport or installation. Therefore
the following procedure should be carried out after installing the system:
-
Check whether the bath is clean
Switch on the power to the system. The display of the temperature
indicator will indicate .
Fill the bath with water to well above the jets. The water should be ±
38 °C. The display will indicate the temperature
Switch on the system (see the section INSTRUCTIONS FOR USE)
Now check whether the system functions properly
Check all the water seals for possible leaks
Then put the system into operation for at least 10 minutes and go
through all the functions at least once
Now check the system again for leaks (pipes, joints and couplings) for
at least 10 minutes. Do not let the bath run empty!
The producer is not responsible for the consequences of incorrect
installation.
4