1
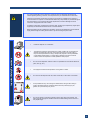
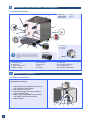
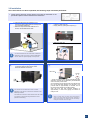
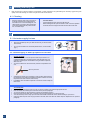
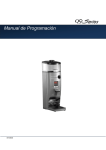
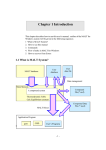
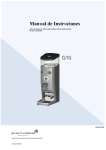
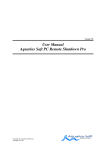
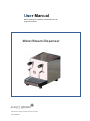
User Manual
Before operating this equipment, read the instructions for
usage and connection.
Water/Steam Dispenser
08556000
Manufacturer of Espresso coffee machines since 1952
Ver.12-09/2012
WARNING
RISK OF FIRE OR ELECTRIC SHOCK
DO NOT OPEN
!
WARNING. TO REDUCE THE RISK OF FIRE OR ELECTRIC SHOCK.
DO DOT REMOVE COVER (OR BACK)
NO USER – SERVICEABLE PARTS INSIDE
REPAIR SHOULD BE DONE BY AUTHORIZED SERVICE PERSONNEL ONLY
0.
Index
1. Safety Indications
2
1.1 Symbols . . . . . . . . . . . . . . . . . . . . . . . . . . . . . . . . . . . . . . . . . . . . . . . 2
1.2 Safety Instructions . . . . . . . . . . . . . . . . . . . . . . . . . . . . . . . . . . . . . . . . 2 - 3
2. General Description of the Water / Steam Dispenser
4
2.1 General Overview. . . . . . . . . . . . . . . . . . . . . . . . . . . . . . . . . . . . . . . . . 4
3. Installation and Start-up
4
3.1 Prior to Installation . . . . . . . . . . . . . . . . . . . . . . . . . . . . . . . . . . . . . . . . . 4
3.2 Installation . . . . . . . . . . . . . . . . . . . . . . . . . . . . . . . . . . . . . . . . . . . . . . . 5
4. Cleaning and daily care
6
4.1 Cleaning. . . . . . . . . . . . . . . . . . . . . . . . . . . . . . . . . . . . . . . . . . . . . . . . . 6
5. Hot water and steam supplies
6
5.1 Hot water supply for teas . . . . . . . . . . . . . . . . . . . . . . . . . . . . . . . . . . . 6
5.2 Steam supply to heat up liquids or boil milk . . . . . . . . . . . . . . . . . . . . . . 6
6. Warning signals
7
7. Guarantee conditions
7
8. Contact information
7
1
1.
Safety Indications
1.1 Symbols
!
WARNING
May cause injuries
i
INFORMATION
Important or useful information
RISK OF ELECTRIC SHOCK
May cause injuries
We ask you to carefully read this instruction manual before operating your new water/steam dispenser for the first time.
Keep these instructions in a safe place where you can consult them when necessary.
The inappropriate use of this machine exempts Quality Espresso from any liability.
1.2 Safety instructions
Installation
Transport
Storage
Placement
Electrical
connection
2
•
The Dispenser should only be installed by authorized technical personnel. The manufacturer
declines any liability for possible injuries caused by inappropriate installation
•
The use of gloves is recommended to manually move the machine to its installation site
•
The Dispenser should be stored in areas with a temperature higher than 5º C.
•
In the event of storage or transport of the machine in temperatures lower than 0º C, and in order to
prevent freezing, the Dispenser’s hydraulic circuit should be emptied first.
•
In the event of freezing, the Dispenser should be placed in an area with a temperature higher than
10º C to wait for unfreezing. Under no circumstances should the machine be connected to the
electrical circuit before it is unfrozen.
•
It is recommended that the Dispenser is installed in a spacious area, free of air currents and with a
solid base. Avoid installing the machine on a wet or hot surface.
•
Regulate the height of the Dispenser with the support legs. Maximum inclination cannot be greater
than 1º between any of its axes.
•
Check that all of the electrical connection characteristics comply with the voltage, frequency and
wattage indications described on the Dispenser’s specification plate. This plate is located on the
chassis under the drainage tray
•
We consider the Dispenser to be installed correctly when it has been connected to a magnetothermic omnipolar circuit breaker appropriate to the Dispenser’s power, along with a differential
that does not exceed a residual current of 30 mA.
•
The Dispenser must be installed in accordance with the current electrical regulations of your area.
You must make ensure that the electrical installation is reliably grounded in accordance with the
aforementioned regulations. The company declines any liability for possible injuries caused by a
defective installation or incorrect ground connection.
•
Extension cords or outlet adapters of any kind should not be used to connect the Dispenser to the
power supply. The connection cable should never be rolled up, but instead it should be fully
extended to avoid possible overheating.
Manipulation
-
Any internal manipulation of the dispenser, except that which is specifically described in this
manual regarding cleaning processes, must be performed by an authorized service technician.
-
Cleaning and preventive maintenance according to the frequency indicated for the machine or
service technician is required. The manufacturer declines any responsibility for possible damage to
the machine due to non-compliance with these requirements, as well as damage due to the
incorrect or inappropriate use of the machine.
-
All machine components, including the connection cable, should only be replaced by original parts
supplied by the authorized service technician or the manufacturer.
-
Before proceeding with any maintenance operations, disconnect the dispenser from the electrical
supply either through the mains general switch or by disconnecting the power cable..
•
Install the dispenser on a solid base.
•
The dispenser should be used exclusively by adults. Children do not recognize the
dangers associated with machines, hence it should be kept out of their reach or
they should be prevented from using it. People with physical or sensory disabilities
or decreased mental capacity, or people without experience should not use this
machine without the supervision of staff qualified for that purpose.
•
Do not use this dispenser outdoors unless it is protected from the external elements
(wind, rain, fog, etc.).
•
The equipment should not be exposed to running water or steam.
•
Do not touch the dispenser with wet, moist or bare feet, or with moist or wet hands.
•
Avoid possible burns by not touching the outlets before, during or after serving a
product. Be careful with the containers used to serve the products (cups, jars,
glasses, etc.) because they may be hot.
•
Do not pour water or insert wet containers into the upper part of the machine. The
water may filter through the ventilation orifices and cause damage to the machine or
the people using it.
Important Safety Precautions
!
!
!
!
3
General Description of the Water / Steam Dispenser
2.
2.1 General Overview
Water supply:
Element wattage:
Boiler capacity:
2
1
Tap water
2,500 W
5 L.
3
12
4
11
10
5
6
9
8
A = 360 mm
B = 290 mm
C = 480 mm
7
A
i
Level indicator
Verify the level indicator and empty the tray if
necessary. These machines drain the water through
the drain tray, without being externally connected to a
general drain. For this reason they incorporate a level
indicator.
1 - Hot Water Tap
2 - Steam Tap
3 - Steam arm protector
4 - Boiler level light
3.
B
C
9 - Drain tray
10 - Boiler Pressure Gauge
11 - Hot Water Outlet
12 - Hot Water Outlet handle
5 - Power switch
6 - Steam arm
7 - Feet
8 - Drip tray
Installation and Start-up
3.1 Prior to Installation
Verify before Installing:
1. Water supply tube (supplied with machine)
from network to water softener.
2. Stopcock with 3/8” G exit.
3. Grounded plug protected with a magnetothermic circuit breaker.
4. Water supply tube (supplied with machine)
from water softener to the machine
5. Water softener
4
2
1
3
4
4
1
5
2
3.2 Installation
Once the machine has been unpacked, the following steps should be performed:
• Check that the electricity supply voltage is the same as that listed on the
specification plate and in the machine’s documentation.
• Place the machine on the workbench, and
connect the water supply tube from the stopcock
(1) to the water softener (2).
• Drain the output of the water softener into a
bucket, until the water flows clean.
1
• Connect the output of the water softener to the
machine’s water input (3).
• Supply water by opening the stopcock (1).
2
3
4
2
1
1
• Open the steam tap.
2
i
It is recommended to use water with a hardness
between 5-8 dHº (8-14 fHº) to avoid calcification
and to obtain an optimal quality of the product.
• Connect the dispenser plug to the appropriate
connection base according to the current
electrical standards of the area.
3
• Press the main power switch.
4
Main switch
i
- At this moment the boiler will be automatically filled
with water, process that is indicated by the led located
next to the main power switch.
Once the filling process has finished, the indicator will
turn off and the boiler heating cycle will start. This
process lasts for approximately 15 minutes, and at
this moment the steam tap should be closed.
After this time and with pressure Reading of
approximately 1.3 bars on the gauge, the machine is
ready to work.
You should not use extension cords or outlet
adapters of any kind to connect the machine to the
electricity network.
The network connection cable should never be rolled
up; instead, it should be fully extended to avoid
possible overheating.
Water level LED
indicator
i
If an adequate water level is not detected in the boiler
within a certain time, the water level LED indicator
(next to the main power switch) will blink, indicating a
water level warning. This warning can be cancelled by
turning the machine off and on again.
5
Cleaning and Daily Care
4.
•
Keep the machine in optimal conditions of cleanliness is a daily requirement for guaranteeing the necessary hygiene and good
quality of the final beverage, as well as a longer service life for the machine.
4.1 Cleaning
-
Keep the machine clean using a wet cloth or
a sponge moistened with a soapy solution.
Use mild and non-corrosive detergents, and
cloths that do not scratch. Take special care
of the areas related with the product, steam
arm, hot water output.
5.
Practical Advice
-
Avoid reheating the milk. Heat up small amounts.
Before heating the milk open the steam to drain. Once the operation
is finished, drain once again and clean the tune with a wet cloth.
Hot water and steam supplies
5.1 Hot water supply for teas
•
Open the hot water tap until you obtain the amount you want and then
close the tap.
•
To move the hot water arm and avoid possible burns, use the handle
(Fig.1)
Fig.1
5.2 Steam supply to heat up liquids or boil milk
•
•
To heat up liquids:
Drain the steam arm. To do so open the steam tap until there is no
condensed water left in the tube and then close the steam tap. This
operation must always be carried before using the steam output and
after each use.
To move the steam arm use the silicone protector incorporated to the
arm.
Silicone protector
•
•
•
•
•
•
•
•
6
Submerge the steam arm to the bottom of the container used and open
the steam tap at will until the temperature desired is reached. Once this
temperature has been reached, close the tap.
Immediately clean the steam output with a wet cloth in order to keep the
latter clean.
To emulsify milk:
Choose a suitable jug for the amount of milk you want to emulsify, fill it with the appropriate amount.
Drain the steam arm, following the instructions of the previous paragraph.
To move the steam arm use the silicone protector incorporated to the arm.
Place the nozzle of the steam arm on the side of the jug, approximately 0.5 cm above the milk.
Turn the steam tap until it is fully open and wait until the milk increases its volume, without heating it up too much.
Close the steam tap and once the jug has been removed, drain and clean the steam output as explained in the previous
paragraph.
6.
Warning Signals
Level Alarm
Warning
•
7.
The machine has an alarm warning when, due to any reason, the water volume inside the boiler cannot be
reached.
Examples:
•
•
- There is no water available in the system
- Failure of the water supply pump /electro-valve.
The alarm is indicated by the blinking of the water load indicator (led next to the general power switch)
The alarm is stopped by turning off the machine by means of the general power switch and turning it on again.
If the fault continues, after a certain time, the alarm will be repeated.
Guarantee conditions
All components of the machine are guaranteed for 12 months (from installation) against any defect that affects correct operation.
The GUARANTEE exclusively covers replacement of parts with manufacturing defects. Under no circumstances does it imply
complete replacement of the machine.
This guarantee does not cover glass, rubber or plastic components or electrical parts that cause damage or affect the operation of
other components, due to fluctuations in the mains voltage supply nor parts that are worn out by normal use.
Any machines that may have been manipulated by unauthorized personnel or those with indications of incorrect use, will forfeit all
conditions of this GUARANTEE.
Only authorized TECHNICAL SERVICES are able to offer guaranteed repairs using ORIGINAL parts. Any labour, travel and lodging
costs for the repair of any product are at the user's expense.
8.
Contact Information
Contact Address
Quality Espresso S.A.
Manufacturer of espresso coffee machines since 1952
Motores, 1-9
08040 Barcelona
Tel.
+93 223 12 00
Fax
+93 223 20 17
Export Tel. +34 933 946 305
Export Fax +34 933 322 111
www.qualityespresso.net
e-mail: [email protected]
7