1
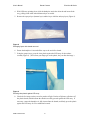
User's Manual
Dental Camera
Evolution M-Series
Document ID: PUB-113
Revision B
User's Manual
Dental Camera
Evolution M-Series
The names of any providers and patients used in
illustrations or examples in this document are
fictitious.
Every effort has been made to ensure this manual is
accurate, complete, and useful. Please let us know if
you have any suggestions for improvement using one
of the following means of contact:
AFHCAN
Training Department
4000 Ambassador Drive
Anchorage, AK 99508
Phone: 877 885-5672
Fax: 907 729-2269
Email: [email protected]
Copyright © 2006 Alaska Native Tribal Health Consortium (ANTHC). All rights reserved. No part of this
publication may be reproduced, stored in a retrieval system, or transmitted, in any form, or by any means,
including photocopying, electronic, mechanical, recording or otherwise, without the prior written permission
of Alaska Native Tribal Health Consortium.
PUB-113 Rev B.doc
ii
User's Manual
Dental Camera
Evolution M-Series
Table of Contents
Section
Title
Page
Preface ............................................................................................................................................ v
About this Document .................................................................................................................. v
Related Documents ..................................................................................................................... v
For More Information ................................................................................................................. v
Section 1 – Introduction ................................................................................................................ 1
1.1 Becoming Familiar with the Dental Camera ........................................................................ 1
1.1.1 Functional Description.................................................................................................. 1
1.1.2 Main Components ......................................................................................................... 1
1.1.3 Hardware Controls and Indicators ................................................................................ 3
1.1.3.1 Handpiece .............................................................................................................. 3
1.1.3.2 Backpack ............................................................................................................... 4
1.1.4 Dental Camera Features in the AFHCAN Software ..................................................... 4
1.2 Particulars of the AFHCAN Installation .............................................................................. 6
1.3 Warnings and Cautions ........................................................................................................ 6
Section 2 – Operation .................................................................................................................... 7
2.1 Basic Operating Procedures ................................................................................................. 7
2.1.1 Preparation .................................................................................................................... 7
2.1.2 Placing the Sheath on the Handpiece ............................................................................ 7
2.1.3 Estimate the Focus ........................................................................................................ 9
2.1.4 Obtain an Image ............................................................................................................ 9
Section 3 – Clinical Considerations............................................................................................ 11
3.1 Guidelines for Clinical Success ......................................................................................... 11
3.2 Common Mistakes ............................................................................................................. 11
3.3 Tips and Tricks .................................................................................................................. 11
Section 4 – Routine Maintenance ............................................................................................... 13
4.1 Care and Cleaning .............................................................................................................. 13
4.1.1 Cleaning the Lens Area and LED Array ..................................................................... 13
4.1.2 Cleaning Other External Surfaces............................................................................... 13
4.2 Replacement Items ............................................................................................................. 13
4.3 Elementary Troubleshooting .............................................................................................. 13
Appendix A – Capture Button................................................................................................ A-15
A.1 Functional Description of the Capture Button .............................................................. A-15
A.2 Working with the Capture Button ................................................................................. A-16
A.2.1 Unfreezing the Image............................................................................................. A-16
A.2.2 Viewing Images in the Camera's Internal Memory ............................................... A-16
A.2.3 Overwriting Patient Images with Other Images .................................................... A-16
A.2.4 Capturing a Stored Image into an AFHCAN Case ................................................ A-17
PUB-113 Rev B.doc
iii
User's Manual
Dental Camera
Evolution M-Series
List of Illustrations
Figure
1
2
3
4
5
6
7
8
9
Title
Page
Handpiece and camera module............................................................................................ 2
Backpack ............................................................................................................................. 2
Protective sheath.................................................................................................................. 3
Range of focus adjustments ................................................................................................. 4
Capture button ..................................................................................................................... 4
Example of Video Picture screen ........................................................................................ 5
Placing sheath on handpiece................................................................................................7
Packaging layers with sheath removed................................................................................ 8
Pressing clear plastic against LED array ............................................................................. 9
List of Tables
Table
1
2
3
Title
Page
Functions of Video Picture screen buttons ......................................................................... 5
Focus positions of the lens chamber .................................................................................... 9
Troubleshooting guidelines ............................................................................................... 13
PUB-113 Rev B.doc
iv
User's Manual
Dental Camera
Evolution M-Series
Preface
About this Document
This document is part of the set of user manuals provided with the AFHCAN Cart. These user
manuals, covering various topics, are normally assembled into a binder delivered with each Cart.
This modular design has the following advantages:
• the set of manuals provided with your cart includes documents for the specific peripheral
devices installed
• each document is a stand-alone publication, so as new devices or features are added to the
Cart, new manuals can be added to the existing binder
• user information that is common to all items of equipment does not need to be repeated in
each module, but can be covered in separate modules and referenced as needed
Related Documents
This document assumes you have read the introductory hardware and software manuals included
in this binder.
The original manuals provided with the equipment were included in a set of materials delivered
with the AFHCAN Cart. Those manuals can be used to supplement the information provided in
this document. Be aware, however, that items installed on an AFHCAN Cart may have been
modified slightly, so the features as described in the original product manuals may not apply.
For More Information
This document describes the equipment to a level of detail that will meet most user's needs in the
context of clinical use of the AFHCAN Cart. For more information, contact AFHCAN Customer
Support:
AFHCAN Customer Support
Phone: 888 449-4435
Fax: 907 729-2269
email: [email protected]
Additional information about the Dental Camera can be found on the manufacturer's website:
http://www.digi-doc.com/
PUB-113 Rev B.doc
v
User's Manual
PUB-113 Rev B.doc
Dental Camera
vi
Evolution M-Series
Section 1 – Introduction
1.1 Becoming Familiar with the Dental Camera
This manual describes the principal features and operation of the Evolution M-Series Dental
Camera, Model EVOM-150, as installed on an AFHCAN Cart.
1.1.1 Functional Description
The Dental Camera is designed to produce detailed, close-up images of teeth, gums, or intra-oral
lesions. The camera can also be focused to produce images of a full smile or full face. The
camera generates a video image that can be frozen and saved into a case as a digital photograph.
Once a digital photo is captured and saved into a case, it can be displayed on the Case screen
using the standard image display tools available in the AFHCAN software.
1.1.2 Main Components
The Dental Camera consists of the following items:
• handpiece and camera module
• backpack mounting unit
• disposable, hygienic sheaths
• S-video cable
• AC power cord
• power adapter
The handpiece, cable, and camera module are assembled as a unit (Figure 1). The handpiece is a
stainless steel cylinder that includes an array of LEDs as a light source, optics, and a video
camera. The cable is covered in protective plastic. The camera module and the backpack
contain the electronics that operate the camera and generate the video signals. These video
signals are sent to the video capture card on the Cart's computer.
The backpack includes a mounting bracket that allows the unit to be installed behind the
touchscreen monitor (Figure 2). The electronics module is inserted into the backpack. At the
opposite end of the backpack are a power switch, a power connection, and two video connections.
An S-video cable connects between the backpack and the video capture card in the Cart's
computer.
The AC power cord, power adapter, and S-video cable are installed as part of the Cart's electrical
wiring.
PUB-113 Rev B.doc
1
User's Manual
Dental Camera
Figure 1
Handpiece and camera module
Figure 2
Backpack
PUB-113 Rev B.doc
2
Evolution M-Series
User's Manual
Dental Camera
Evolution M-Series
In clinical use, the camera assembly is covered with a disposable protective sheath (Figure 3).
The dental sheath performs two functions: 1) it affords hygienic protection for each patient, and
2) it prevents saliva or other fluids from damaging the camera and LED array.
Figure 3
Protective sheath
The sheath consists of the following layers:
• outer packaging which is peeled away after handpiece is inserted into sheath, including the
following two layers:
-
a clear top layer with a clear blue tab on the end
-
an opaque bottom layer (used after removal to press the sheath against the LED array)
• plastic sheath, consisting of the following layers:
-
a top layer with a white plastic tab that can be used to pull the sheath over the
handpiece
-
a bottom layer that works with the top layer to provide a durable cover that protects the
instrument as it is handled
-
a clear plastic external layer
Once the sheath is installed on the camera, the two outside packaging layers are peeled away. At
the tip of the sheath, one side has a clear plastic area that is pressed against the LED array and
optics. Be sure to follow the procedure for placing the sheath on the camera in Section 2.
1.1.3 Hardware Controls and Indicators
1.1.3.1 Handpiece
There are two user controls and one special feature on the handpiece:
• focus adjustment
• camera memory capture button (not used)
• automatic on-off feature
The focus adjustment can be made by extending or retracting the lens chamber with the thumb
and index finger. The full range of motion is very small, about 1/16 inch (Figure 4). Extending
the lens chamber (lengthening the barrel) moves in for close-ups (about 1/4 inch from object),
while pulling in or retracting the lens chamber permits full facial images to be made. A red circle
is a reference point indicating the approximate focus point for including two tooth surfaces in an
image.
PUB-113 Rev B.doc
3
User's Manual
Dental Camera
Evolution M-Series
Figure 4
Range of focus adjustments
The capture button (Figure 5) loads images into the camera's internal memory (located in the
backpack). In the AFHCAN installation, the capture button is not the recommended means for
capturing an image into an AFHCAN case. However, because this button is still active and can
sometimes affect the process of capturing an image, it is described in Appendix A.
Figure 5
Capture button
The automatic on-off feature is built into the camera handle and the cradle where the camera is
normally stowed. Lifting the camera out of its cradle automatically turns the camera and LED
array on. Placing the camera in the cradle turns the camera off.
1.1.3.2 Backpack
There is one control on the backpack: the On/Off power switch. When the camera is not in use, it
can be turned off.
1.1.4 Dental Camera Features in the AFHCAN Software
Pressing the Dental Camera button on the Add To Case screen brings up the Video Picture
screen (Figure 6). The Video Picture screen applies to various devices such as the Video
Otoscope or other peripherals that generate a video image sent to the video capture card.
PUB-113 Rev B.doc
4
User's Manual
Dental Camera
Evolution M-Series
Figure 6
Example of Video Picture screen
Table 1 describes the functions of the buttons in the right bar area.
Table 1
Functions of Video Picture screen buttons
Button
Function
Captures the image currently in the central viewing area as a new
image, and creates a thumbnail of that image. The image in the central
viewing area may be a live image, a frozen image, or even one of the
existing images brought up for viewing. After an image has been
captured, the system returns to a live image in the central viewing area.
Switches the image displayed in the central viewing area to the live
video feed from the dental camera. When the image is live, there will be
a steady white border around the central viewing area.
Temporarily freezes the image in the central viewing area so it can be
examined. When the image is frozen, the border around the central
viewing area will flash red and white. A frozen image can then be
captured by pressing the Take Picture button. A live video feed from
the dental camera can be brought up in the central viewing area by
pressing the Live button.
The Rotate button works only when a thumbnail image has been
selected for viewing. Each time the Rotate button is pushed, the image
is rotated 90 degrees clockwise. The rotated version of the image is
what will be saved in the case.
PUB-113 Rev B.doc
5
User's Manual
Dental Camera
Button
Evolution M-Series
Function
Saves all the images with a green checkmark and a name into the case,
and goes to the Case screen.
Returns to the Add To Case screen. If images have been captured, a
message will appear advising that images will be lost and inviting you to
confirm your decision.
1.2 Particulars of the AFHCAN Installation
An off-the-shelf Dental Camera comes with a remote control that gives users the ability to view
images in the camera's memory, turn the LED array off and on, and take other actions. Because
its operating frequency can interfere with the wireless network serving the Cart, the remote
control is not included in the installation kit. Because the remote is not included, the antenna on
top of the backpack may be removed.
There are two video outputs coming out of the backpack: an S-video connection, and a composite
video connection. When installed on an AFHCAN Cart, the composite video is used.
1.3 Warnings and Cautions
Please observe the following points:
• Never touch the lens and LED array with your fingers.
• Never use the Dental Camera on a patient without a protective sheath. Because the lens
and LED array are not sealed, it is impossible to adequately clean this area of the camera if
it has been contaminated with body fluids. Contaminated cameras have to be returned to
the manufacturer for cleaning.
• The lens area is not submersible, and can be cleaned only with a damp cotton swab.
PUB-113 Rev B.doc
6
Section 2 – Operation
2.1 Basic Operating Procedures
2.1.1 Preparation
Start the case and prepare the patient as follows:
1. On the Add To Case screen, press the Dental Camera button.
2. Obtain the handswitch or the footswitch as desired for capturing images.
Note: The patient can be given handswitch and allowed to participate.
Pressing the Take Picture button on the screen may be difficult to
reach when holding the Dental Camera still.
3. Position yourself and the patient so you can see the screen and handle the instrument in the
patient's mouth.
Note: If full smile or full face shots are desired, take them before
placing the sheath on the handpiece. This gives you the clearest
possible image.
2.1.2 Placing the Sheath on the Handpiece
Place the protective sheath on the handpiece as follows:
1. Lift the handpiece from the cradle. The LED array should illuminate.
If it does not illuminate, ensure the power switch on the back of the backpack is set to
the ON position.
2. Orient the sheath so the opaque side is down and the blue tab is up and towards you
(Figure 7).
Figure 7
Placing sheath on handpiece
3. Lift the blue tab, then lift white tab under the blue tab.
PUB-113 Rev B.doc
7
User's Manual
Dental Camera
Evolution M-Series
4. With LED array pointing down, slide the handpiece under the white tab and insert all the
way, pulling on the white tab and bottom layer as needed.
5. Remove the opaque layer (bottom layer) and the layer with blue tab (top layer) (Figure 8).
Figure 8
Packaging layers with sheath removed
6. Ensure the handpiece is inserted all the way to the end of the sheath.
7. Using the opaque layer, press the clear plastic against the LED array for about three
seconds (Figure 9). (If oils from your finger get on the plastic, they can blur the image.)
Figure 9
Pressing clear plastic against LED array
8. Check the live image on the screen for patches of light. Patches of light are reflections off
the plastic sheath, which indicate the sheath is not fully pressed against the LED array. If
necessary, ensure the handpiece is fully inserted into the sheath, and firmly press the plastic
against the LED array for a few additional seconds.
PUB-113 Rev B.doc
8
User's Manual
Dental Camera
Evolution M-Series
2.1.3 Estimate the Focus
Since the range of travel for the focus adjustment is very small, it is possible to fine-tune the
focus with your thumb and index finger as you are using the instrument. Table 2 provides some
reference points that can be used as a starting position:
Table 2
Focus positions of the lens chamber
Desired View
Instrument Position
Approximate Focus Distance
full face
fully retracted
10 inches or more
full smile
almost fully retracted
3 inches
two teeth
on red circle
1 inch
extreme close-up
fully extended
1/4 inch
2.1.4 Obtain an Image
Note: because the image is reversed, it takes practice to handle the
instrument and obtain the desired image on the screen.
1. Wearing disposable gloves, brace the instrument or one of your fingers against the patient's
teeth as needed to steady the image.
2. Fine tune the focus by extending or retracting the lens chamber.
3. Capture one or more images by using the handswitch or footswitch, or by pressing the Take
Picture button on the screen.
4. On the Video Picture screen, click on a thumbnail to display the image in the central
viewing area.
5. If you plan to save this image into the case, give the image a helpful title. If a green
checkmark does not appear in the box beside the thumbnail, click on the box to place the
checkmark.
6. If there are images you want to discard, click on a green checkmark to delete it.
7. When you are ready to save the selected images to a case, press the Save button.
8. When done with this patient, remove the protective sheath and discard. Place the
handpiece in the cradle.
PUB-113 Rev B.doc
9
User's Manual
PUB-113 Rev B.doc
Dental Camera
10
Evolution M-Series
Section 3 – Clinical Considerations
These pointers are a supplement to your clinical training and experience, not a replacement for it.
Emphasis here is on refining your clinical success in using the AFHCAN Cart.
3.1 Guidelines for Clinical Success
• steady the camera by bracing one of your fingers (or the camera itself) against the upper or
lower teeth
3.2 Common Mistakes
• white patches in the image may be due to the sheath pulling away from the LED array on
the camera and reflecting light
• blurry image can be caused by dental sheath being on backwards
• a frozen image can be caused by accidentally pressing the capture button on the handpiece;
press the capture button again to unfreeze the image (Refer to Appendix A for details)
3.3 Tips and Tricks
For extra-oral images (full smile or face images), a better image can be obtained if a protective
sheath is not on the handpiece.
PUB-113 Rev B.doc
11
User's Manual
PUB-113 Rev B.doc
Dental Camera
12
Evolution M-Series
Section 4 – Routine Maintenance
4.1 Care and Cleaning
4.1.1 Cleaning the Lens Area and LED Array
The area around the lens and the LED array is a very sensitive part of this instrument. It is not
sealed, and entry of liquids into this area requires that the unit be sent back to the factory. Clean
only when absolutely necessary. Clean only with a damp cotton swab.
4.1.2 Cleaning Other External Surfaces
In general, external surfaces of the Dental Camera may be wiped down with alcohol prep pad or
damp cloth with mild detergent.
Do not use glutaraldehyde or any abrasive cleanser. Do not autoclave.
4.2 Replacement Items
This Dental Camera has no fuses, lights, or other parts that can be replaced by the user.
4.3 Elementary Troubleshooting
Table 3 provides some basic trouble-shooting guidelines. If these guidelines are not sufficient to
solve the problem, contact AFHCAN Customer Support at 1-888-449-4435.
Table 3
Troubleshooting guidelines
Problem
LED's do not illuminate when
handpiece is lifted out of
cradle
Possible Solutions
• ensure camera module is pushed fully into its slot in the
backpack
• ensure power On/Off switch behind backpack is turned on
• ensure plug from power adapter is fully inserted into jack on
backpack
• ensure cart power switch is on
blurry images
• ensure you are holding the instrument steady
• focus the image by moving the lens chamber very slowly
• once the focus is established, ensure the instrument does not
move closer or farther away from the subject
• ensure the sheath is not on backwards (the side with a clear
plastic window must be over the lens area)
• ensure the sheath has been pressed against the lens area
and LED array
• carefully clean lens area with a damp cotton swab
PUB-113 Rev B.doc
13
User's Manual
Dental Camera
Problem
Evolution M-Series
Possible Solutions
white patches in image
• ensure the sheath has been pressed against the lens area
and the LED array
video image does not appear
on the screen
• ensure the video cable is securely attached to the video
output connector on the backplane
• try one of the other video input buttons on the Add To Case
screen
the video image does not
change
PUB-113 Rev B.doc
• if a letter F appears on the screen, press the capture button
on the handpiece to return to a live video feed
14
Appendix A – Capture Button
AFHCAN does not recommend using the capture button on the handpiece for the following
reasons:
• it adds unnecessary steps to the process of capturing an image into a case
• it can create the opportunity for images from a previous patient to be added to the wrong
case
• it can cause delays if the camera module's limited memory capacity is maxed out
• it can be generally confusing to users
Although its use is not recommended, there may be situations where some information about the
capture button will be helpful. This appendix presents a functional description of the capture
button as well as some procedural guidelines for its use.
A.1 Functional Description of the Capture Button
The capture button works in conjunction with the Dental Camera's internal memory, which is
located in the backpack. The video output of the Dental Camera originates a direct feed from the
camera (live video), or it originates from a still image stored in the camera's memory. In either
case, if the AFHCAN software is ready to display a live image, it will display the video output
supplied by the Dental Camera. The AFHCAN software cannot distinguish a live video feed
from a memory-based video feed.
When the Dental Camera is first lifted out of its cradle, it generates a live image as the video
output. If the Video Picture screen is displayed by the software and the Live button has been
pressed, the live image from the Dental Camera is displayed on the screen. Whenever the Dental
Camera is producing a live image, it will display a small letter L on the image.
When the capture button is pressed, a video image is stored in the camera's memory. This video
image will immediately replace the live image as the source of the video output, meaning the
image in memory is displayed on the screen instead of a live image. The Dental Camera replaces
the small letter L with an F indicating the image has been frozen. Pushing the capture button
again returns the camera to a live image, and an L will be displayed. Each time F is displayed,
another image is captured into the camera's memory. Up to 12 images can be captured into the
camera's memory. Pushing the capture button again after 12 images have been stored will result
in the camera displaying a Memory Full message on the screen. Even with the camera's memory
full, a live image can be displayed, and images can be captured into a case in the usual way.
Since the AFHCAN software does not distinguish between a live video signal and a video signal
originating in the camera's memory, either type of image can be captured into the AFHCAN
software. Any video signal presented to the video capture card can be captured any time by the
AFHCAN software.
The Memory Full message can be cleared by turning the Digital Camera's power off for a
moment. With power back on, pressing the capture button allows new images to be placed in
PUB-113 Rev B.doc
15
User's Manual
Dental Camera
Evolution M-Series
memory. Existing images are still present, but with each succeeding press of the capture button, a
new image replaces an old image.
Note: As the camera is presently configured, there is no way to simply
erase existing images from memory. If actual patient images have
been captured, for some reason, the only way to clear them from
memory is to overwrite them with miscellaneous images.
With the camera in the cradle, pushing the capture button steps through the images still resident
in the camera's memory. These images are displayed on the screen along with the letter M (for
memory) and a sequence number from 01 to 12, indicating which image is being displayed. The
AFHCAN software is able to capture any or all of these images into a case, if desired.
A.2 Working with the Capture Button
A.2.1 Unfreezing the Image
If the capture button is accidentally pressed during use, it will store an image into the camera's
internal memory. In addition, the video image will be frozen, as indicated by a small letter F on
the screen, and the image just captured into memory will be displayed. However, the AFHCAN
software will still handle the incoming video signal as a live signal.
Note: When the AFHCAN software is responsible for freezing an
image, the frame around the central viewing area will flash red. If the
frame around the central viewing area is white, the AFHCAN software
is simply passing along the image provided on the incoming video
signal.
To return to a live image, press the capture button again. A live video feed will be displayed, and
a small letter L will appear on the screen.
A.2.2 Viewing Images in the Camera's Internal Memory
To view images in the camera's memory, proceed as follows:
1. Place the handpiece in the cradle.
2. Press the capture button repeatedly to step through the images in memory. The screen will
display the letter M and a sequence number to identify the image.
A.2.3 Overwriting Patient Images with Other Images
The Dental Camera retains images in its internal memory even after power is turned off. If
images of a patient have been captured, it is a good practice not to leave patient images stored in
the camera's memory because it may compromise patient confidentiality and creates an
opportunity to load the wrong images into the current case.
To overwrite existing images in the camera's memory, proceed as follows:
1. Reach behind the backpack and turn the camera's on/off switch to OFF, then turn it back
on. This step ensures you can overwrite all the images.
PUB-113 Rev B.doc
16
User's Manual
Dental Camera
Evolution M-Series
2. Aim the camera at a blank surface such as a sheet of paper or some other non-medical
subject.
3. Press the capture button repeatedly until the MEMORY FULL message is displayed on the
screen.
Note: the Dental Camera can store 12 images in its internal memory,
so the capture button must be pressed 24 times to replace all the
images. Each of the 12 images requires one press to freeze and capture
the image, and one press to return to a live feed.
A.2.4 Capturing a Stored Image into an AFHCAN Case
Although this is not the recommended method, it is possible to bring an image stored in the
camera's internal memory into an AFHCAN case. Proceed as follows:
1. Place the handpiece in the cradle.
2. Ensure the AFHCAN software is ready to receive the image by pressing the Live button on
the Video Picture screen.
3. Press the capture button on the handpiece as needed to step through the images until the
desired image appears on the screen.
4. Press the Take Picture button on the screen. A thumbnail of the image will appear.
PUB-113 Rev B.doc
17
User's Manual
PUB-113 Rev B.doc
Dental Camera
18
Evolution M-Series
Index
frozen, 11, 16
live, 15
overwrite, 16
title, 9
unfreeze, 16
video, 15
white patches, 11, 14
lens
clean, 13
live button, 5
live video feed, 14
memory full message, 15
on off feature, 4
power adapter, 1, 13
power cord, 1
jack (image), 2
power switch, 7, 13
cart, 13
on/off, 4
red circle. See focus
rotate button, 5
save button, 6, 9
sheath, 1, 6, 7, 9, 11, 13
functions, 3
image, 3
layers, 3
placement on handpiece, 7
take picture button, 5, 9
trouble shooting, 13
video capture card, 1, 15
video feed
live, 15
memory based, 15
video picture screen, 4, 9
video picture screen buttons, 5
warnings, 6
add to case screen, 4, 7
AFHCAN
customer support, 13
installation, 4, 6
software, 15, See
back button, 6
backpack, 1, 15
image, 2
cable
S video, 1
camera
contaminated, 6
camera module, 1, 13
image, 2
memory, 15
capture button, 4, 14
functional description, 15
not recommeded, 15
cleaning, 6, 13
external surfaces, 13
lens, 13
dental camera
components, 1
functional description, 1
internal memory, 17
dental camera button, 4, 7
discard image, 9
focus, 3, 13
adjustments (image), 3
close up, 3
estimate, 9
fine tune, 9
full face image, 3
red circle, 3
two surfaces, 3
footswitch, 7, 9
freeze button, 5
full face, 7, 9
full smile, 7, 9
functional description. See dental camera functional
description
handpiece, 1, 7, 14
controls, 3
features, 3
image, 2
handswitch, 7, 9
image
blurry, 11, 13
discard, 9
erase, 15
extra-oral, 11
from memory to AFHCAN case, 17
PUB-113 Rev B.doc
19
User's Manual
PUB-113 Rev B.doc
Dental Camera
20
Evolution M-Series