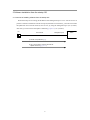
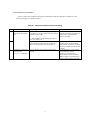
1
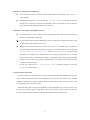
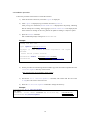
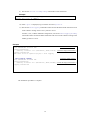
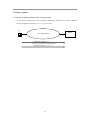
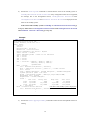
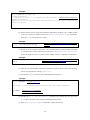
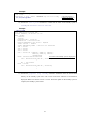
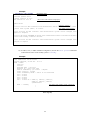
SOFT-AM-0486_R4 AX6700S/AX6600S/AX6300S Software Update Guide July 2011 (Edition 7) 1 Preface This manual explains how to update the basic software from an older version to a newer version. This manual also describes how to install the basic software on a new BCU, CSU, or MSU for AX6700S, AX6600S, or AX6300S series switches, respectively. Read this manual carefully before updating or installing the software. For details about the terms used in this manual, how to handle devices, and how to connect to an operation terminal, see the Configuration Guide or other manuals. For details about the manual organization, see the Quick Start Guide. Trademarks Windows is a registered trademark of Microsoft Corporation in the United States and other countries. Other company and product names in this document are trademarks or registered trademarks of their respective owners. Editions history September 2006 (Edition 1) November 2006 (Edition 2) January 2007 (Edition 3) October 2008 (Edition 4) April 2009 (Edition 5) October 2009 (Edition 6) July 2011 (Edition 7) Copyright All Rights Reserved, Copyright (c), 2006, 2011, ALAXALA Networks, Corp. Notes Information in this document is subject to change without notice. 2 Contents 1 Overview ..................................................................................................................................................4 1.1 Overview of updating and installing software....................................................................................4 2 Software installation from the startup OS ............................................................................................6 2.1 Overview of installing software from the startup OS .........................................................................6 2.2 Preparations for installation................................................................................................................7 2.3 Notes on installation ...........................................................................................................................8 2.4 Connecting to the Switch....................................................................................................................9 2.5 Installation procedure .......................................................................................................................10 3 Software update .....................................................................................................................................13 3.1 Overview of updating software from a remote terminal...................................................................13 3.2 Preparing to update...........................................................................................................................14 3.3 Actions to be taken if there is insufficient free space in the internal flash memory .........................14 3.4 Notes on updating the software ........................................................................................................15 3.5 Update procedure..............................................................................................................................17 Appendix ...................................................................................................................................................25 3 1 Overview 1.1 Overview of updating and installing software There are two ways to set up the software: (1) Perform a software installation from the startup OS, or (2) perform a software update. Each way has a different purpose and procedure. Select whichever is more suitable for your situation based on the following figure. When the flash memory contains the startup OS#1 (1) Installation from the startup OS (Chapter 2) When the basic software is already installed in the flash memory (2) Software update (Chapter 3) #1: After you log in to the Switch, if the command prompt is BOOT-INST-OS>, it indicates that the startup OS is running. 4 Installing from the startup OS Installing from the startup OS means to install software for the first time from the internal flash memory that contains the startup OS. The internal flash memory in a newly purchased BCU for AX6700S series switches, CSU for AX6600S series switches, or MSU for AX6300S series switches, contains dedicated software (the startup OS) used for the purpose of starting up the Switch. After you log in to the Switch, if the command prompt is BOOT-INST-OS>, then the startup OS is running. In this case, before using the Switch, you must install the basic software according to the procedure described in this manual. To install the basic software from the startup OS, you must transfer the update file shown in Table 1-1 to the Switch and execute the ppupdate command. The update file is the same for all AX6700S, AX6600S, and AX6300S series switches. For details about the procedure, see Chapter 2. Update operation Update means updating an older version of your software to a later version. To update the software, you must transfer the update file shown in Table 1-1 to the Switch and execute the ppupdate command. In this case, the configuration, user information, such as login accounts and passwords, and optional license information are all inherited. The update file is the same for all AX6700S, AX6600S, and AX6300S series switches. For details about the procedure, see Chapter 3. Table 1-1 Files used to update software No. 1 2 File name#1 AX63SAxxxxx-yyy.img.gz AX63Sxxxxx-yyy.img.gz Abbreviated name OS-S OS-SE #1: xxxxx-yyy represents the version (xxxxx) and the build number (yyy). Example: If the version is 10.2 and the build number is 158, the file name is 1002-158. For OS-SE Ver. 10.2 Build158, the file name is AX63S1002-158.img.gz. 5 2 Software installation from the startup OS 2.1 Overview of installing software from the startup OS While the startup OS is running, the IP address of the management port is set to 192.168.0.1/24. To perform a software installation from the startup OS (hereafter an installation), you must first transfer the update file from a remote terminal, such as a PC, by using the management port (see 1) below). After that, you must execute the update command (ppupdate, see 2) below). PC Management port IPv4 network 192.168.0.1/24 1) Transfer the update file (ftp). 2) Log in to the Switch, and then execute the update command (ppupdate). 6 Switch 2.2 Preparations for installation Table 2-1 shows the conditions required for an installation. Make sure that these conditions are met before attempting to install the software. Table 2-1 Required conditions before installing No. 1 Installation operation Conditions required for transferring the update file 2 3 Conditions required for executing the ppupdate command Conditions Procedure The Switch#1 that will be updated must be Connect a remote terminal to the accessible over an IPv4 network from a remote network so that IP communication terminal, such as a PC. between the terminal and the Switch is possible. #1: The IP address of the management port is set to 192.168.0.1/24. FTP client software must be running on the Obtain FTP client software and remote terminal, and files must be able to be install it on the remote terminal. written to the Switch by the put statement. (In Windows 95 and later, the FTP software provided with the OS can be used.) Login to the Switch must be possible from a Use an RS-232C crossover cable console. with D-sub 9-pin female connectors on both ends to connect the PC to the Switch. In addition, prepare communication software, such as HyperTerminal. 7 2.3 Notes on installation (1) Notes on the startup OS The startup OS is dedicated software for installing the basic software. After you log in to the Switch, BOOT-INST-OS> is displayed for the prompt, indicating that the startup OS is running. The startup OS starts up only the BCU, CSU, or MSU on AX6700S, AX6600S, or AX6300S series switches, respectively. The startup OS does not start up NIFs. As a result, you must use the management port to transfer the update file. In a BCU, CSU, or MSU redundant configuration, use the management port of the active system. When the startup OS is running, the IP address of the management port is set to 192.168.0.1/24. For the host connected to the Switch, specify an IP address other than 192.168.0.1 that belongs to the network 192.168.0.0/24. Note that after installation is complete, when the Switch is restarted, the IP address 192.168.0.1/24 is automatically deleted. The configuration cannot be changed. The commands listed in Table 2-2 cannot be used. Table 2-2 Commands that cannot be used in the startup OS No. 1 Category Configuration 2 3 4 5 6 7 8 9 10 11 12 13 14 15 16 17 18 19 Management of BSUs and NIFs Management port Ethernet Device redundancy Command configure copy startup-config copy running-config erase configuration show running-config show startup-config activate bsu activate nif inactivate bsu inactivate nif activate mgmt inactivate mgmt test interface mgmt activate inactivate synchronize activate standby inactivate standby redundancy force-switchover 8 Remarks The configuration cannot be changed. Same as above Same as above Same as above The configuration cannot be displayed. Same as above ------------The command cannot be executed. (2) Notes on transferring the update file A file must be transferred via FTP in binary mode. Otherwise, execution of the ppupdate command fails. Transfer the file named k.img to the directory /usr/var/update in the Switch. If the file already exists, overwrite it. If the file is transferred to the wrong location or with an incorrect name, delete the file, and then transfer the file correctly. (3) Notes on executing the ppupdate command Do not delete the k.img file unless it is specified in the procedure. The file cannot be restored when the command abnormally ends. Do not turn the power off while updating the software. If the power is turned off, restart it and conduct the procedure again from the start. Multiple users cannot concurrently execute the ppupdate command. If the command is already being executed when you attempt to execute it, the command aborts with the message another user is executing now. However, if the ppupdate command ends abnormally (for example, the command is forced to stop by pressing Ctrl + C, or a forced logout occurs because communication software is terminated), this message might be issued and you will not be able to execute the command again, even though only one instance of the command is being executed. In this case, execute the rm /tmp/ppupdate.exec command, and then execute the ppupdate command again. 2.4 Connecting to the Switch Connect a remote terminal (PC) to the Switch by using an Ethernet cable and RS-232C crossover cable. Connect the Ethernet cable to the management port of the Switch. In a BCU, CSU, or MSU redundant configuration, connect both the Ethernet cable and RS-232C crossover cable to the corresponding ports of the active system. While the startup OS is running, the IP address of the management port is set to 192.168.0.1/24. For the remote terminal, specify an IP address other than 192.168.0.1 that belongs to the network 192.168.0.0/24 so that the terminal can perform IP communication with the Switch. 9 2.5 Installation procedure Follow the procedure shown below to install the software: 1) After the Switch is turned on, wait until login: is displayed. 2) After login: is displayed, log in with the user name operator. After you log in to the Switch, BOOT-INST-OS> is displayed for the prompt, indicating that the startup OS is running. After logging in, if BOOT-INST-OS> is not displayed, the basic software is running. In this case, perform an update according to 3 Software update. 3) Enter the enable command. The command prompt changes to BOOT-INST-OS#. Example : Loading from dev0 100% login: operator (Log in as operator.) Copyright (c) 20XX ALAXALA Networks Corporation. All rights reserved. Please install product software. BOOT-INST-OS> enable BOOT-INST-OS# (Execute the enable command.) (The prompt changes to BOOT-INST-OS#.) 4) See the procedure for transferring files described in Appendix to transfer an update file to the /usr/var/update directory in the Switch. (This operation must be performed in binary mode.) 5) Execute the ls -l /usr/var/update/ command, and confirm that the size of the k.img file is the same as the source file. 6) Enter the cd /usr/var/update command to change the directory. Example BOOT-INST-OS# ls -l /usr/var/update total 18994 -rwxrwxrwx 1 root wheel XXXXXXXX Sep 15 21:45 k.img BOOT-INST-OS# cd /usr/var/update 10 (Check the file size.) (Change the directory.) *** Installation on the standby system *** In a BCU, CSU, or MSU single configuration, go to step 8). 7) Execute the ppupdate k.img standby command. Installation from the internal flash memory in the standby system starts. The version of the basic software to be installed is displayed. Make sure that the version is correct. Example BOOT-INST-OS# ppupdate k.img standby Software update start Current version is 1.0 New version is 10.2 (Installation starts.) (The version of the software is displayed.) Update done. BOOT-INST-OS# (Installation is complete.) *** Installation on the active system *** 8) Execute the ppupdate k.img active command. Installation from the internal flash memory in the active system starts. The version of the basic software to be installed is displayed. Make sure that the version is correct. Example BOOT-INST-OS# ppupdate k.img active (Installation starts.) Software update start Broadcast Message from operator@BOOT-INST-OS (??) at 22:29 UTC... *********************************************** ** UPDATE IS STARTED. ** *********************************************** Current version is 1.0 New version is 10.2 (The version of the software is displayed.) 100% |*************************************| 20999 KB Update done. Broadcast Message from operator@BOOT-INST-OS (??) at 22:30 UTC... *********************************************** ** UPDATE IS FINISHED SUCCESSFULLY. ** *********************************************** BOOT-INST-OS# (Installation is complete.) 11 508.17 KB/s 00:00 ETA 9) Execute the reload no-dump-image command to restart the Switch. Example BOOT-INST-OS# reload no-dump-image Restart OK? (y/n): y (Enter y.) 10) After login: is displayed, log in with the user name operator. 11) Execute the show logging command to make sure that the abbreviated name and version of the software running on the active system are correct. In a BCU, CSU, or MSU redundant configuration, execute the show logging standby command to make sure that the abbreviated name and version of the software running on the standby system are correct. Example > show logging (Check the active system.) Date 20XX/09/15 22:34:37 UTC System information AX6304S, OS-SE Ver. 10.2 (Build:158), MSU1(active) (Check the displayed information.) Logging information KEY 09/15 22:34:37 operator(tty00):> show logging : : > show logging standby (Check the standby system.) Date 20XX/09/15 22:34:44 UTC System information AX6304S, OS-SE Ver. 10.2 (Build:158), MSU2(standby) (Check the displayed information.) Logging information : : The installation procedure is complete. 12 3 Software update 3.1 Overview of updating software from a remote terminal From a remote terminal, such as a PC, transfer the update file to the Switch (see 1) below), and then execute the update command (ppupdate) (see 2) below). PC Switch IPv4 or IPv6 network 1) Transfer the update file (ftp). 2) Log in to the Switch, and then execute the update command (ppupdate). 13 3.2 Preparing to update Table 3-1 shows the conditions required for updating the software. Make sure these conditions are met before updating the software. Table 3-1 Required conditions before update No. 1 Update operation Conditions required for transferring the update file 2 3 4 5 Conditions required for executing the ppupdate command Conditions The Switch must be accessible from a remote terminal, such as a PC. Procedure Connect a remote terminal to the network so that IP communication between the terminal and the Switch is possible. FTP client software must be running on the remote terminal, and files must be able to be written to the Switch by the put statement. The Switch must be configured in the configuration to communicate with remote terminals via FTP. Obtain FTP client software and install it on the remote terminal. In Windows, the FTP software provided with the OS can be used. Set ftp-server in the configuration. If access list information exists in line vty mode, the Switch must be set to allow access from remote terminals. If the update file cannot be transferred because the internal flash memory capacity is insufficient, see Available capacity on the internal flash memory must be sufficient to receive the transferred update file. Use the show system command to confirm that the free capacity of the user area in the internal flash memory of both BCU 1 and BCU 2 for an AX6700S series switch, CSU 1 and CSU 2 for an AX6600S series switch, or MSU 1 and MSU 2 for an AX6300S series switch is larger than the update file by 1,000 KB or more. Login to the Switch that will be updated must be possible from a remote terminal or a console. 6 The user must have administrator-level permissions (enable). 7 In a BCU, CSU, or MSU redundant configuration, the license information between the active and standby systems must match. 3.3 Actions to be taken if there is insufficient free space in the internal flash memory. For login from a remote terminal via Telnet, the Switch must be set to support the Telnet functionality. (Use the line vty command to make this in the configuration.) To execute the ppupdate command, use the enable command to become an administrator. If the license information does not match, use the synchronize command to synchronize the information, and then use the reload command to restart the standby system. 3.3 Actions to be taken if there is insufficient free space in the internal flash memory Use the rm command to delete all files in /usr/var/core/. Execute the erase protocol-dump unicast all command. Execute the squeeze command. Reduce the number of user files saved in the user area. 14 3.4 Notes on updating the software (1) Notes on transferring the update file A file must be transferred via FTP in binary mode. Otherwise, execution of the ppupdate command fails. Transfer the file named k.img to the directory /usr/var/update in the Switch. If the file already exists, overwrite it. If the file is transferred to the wrong location or with an incorrect name, delete the file, and then transfer the file correctly. (2) Notes on executing the ppupdate command Do not delete the k.img file unless it is specified in the procedure. The file cannot be restored when the command abnormally ends. In a BCU, CSU, or MSU single configuration, the Switch restarts after the update. In a BCU, CSU, or MSU redundant configuration, system switching is performed during the update process. During the system switchover, communication via the Switch is temporarily suspended. In addition, after the update, the active and standby roles are switched between the boards of the active and standby systems. In a BCU, CSU, or MSU redundant configuration, a "no-stop" software update functionality is available by which software can be updated without interrupting communication. For details about conditions for the no-stop software update functionality, see the Configuration Guide. In a BCU, CSU, or MSU redundant configuration, perform a system switchover when the status of the standby system is standby or software version discord. The status of the standby system can be checked by using the show system command. Do not turn the power off while updating the software. If the power is turned off, restart it and conduct the procedure again from the start. When the update is performed in a BCU, CSU, or MSU redundant configuration, the following log data might be collected from a system other than the updated system. (This does not imply that a problem has occurred.) For the AX6700S series: E5 BCU xxxxxxxx 2314:xxxxxxxxxxxx Fatal error detected on other system. This system (BCUx) is active. For the AX6600S series: E5 CSU xxxxxxxx 2314:xxxxxxxxxxxx Fatal error detected on other system. This system (CSUx) is active. For the AX6300S series: E5 MSU xxxxxxxx 2314:xxxxxxxxxxxx Fatal error detected on other system. This system (MSUx) is active. 15 Note: The values of x, xxxxxxxx, and xxxxxxxxxxxx vary depending on the status of the active system. Note: These log messages will be displayed in the following cases: - When a version of the software earlier than 11.2 is installed on the active system and is updated - When a version of the software earlier than 10.5 is installed on the standby system and is updated Multiple users cannot concurrently execute the ppupdate command. If the command is already being executed when you attempt to execute it, the command aborts with the message another user is executing now. However, if the ppupdate command ends abnormally (for example, the command is forced to stop by pressing Ctrl + C, or a forced logout occurs because communication software is terminated), this message might be issued and you will not be able to execute the command again, even though only one instance of the command is being executed. In this case, execute the rm /tmp/ppupdate.exec command, and then execute the ppupdate command again. The ppupdate command cannot be executed in configuration mode. Back up the configuration before updating the software. After editing the configuration online, if the file has not been saved, use the save configuration command to save the file to flash memory before updating the software. If you do not execute the save command, when the Switch is restarted, the Switch returns to the state existing before the configuration was changed. The configuration stored in the internal flash memory is also used for the new version. If the number of configuration definitions being stored is too large, inheriting the configuration file might take a while. When downgrading, if there are any configuration items not supported by the downgraded version, those configuration items are deleted and the Switch runs without them. 16 3.5 Update procedure The update procedure updates an older version of the software to a newer version. To update the software: 1) Log in to the Switch, using the user-defined ID (for example, operator). After logging in, if the command prompt is BOOT-INST-OS>, then the startup OS is running. In this case, perform an installation according to the procedure described in 2 Software installation from the startup OS. 2) Enter the enable command. The command prompt changes to #. Example login: operator : (Log in as operator.) Copyright (c) 20XX ALAXALA Networks Corporation. All rights reserved. > enable # (Execute the enable command.) (The command prompt changes to #.) 3) Execute the show system command. Confirm that the free capacity of the user area in the internal flash memory of both BCU 1 and BCU 2 for an AX6700S series switch, CSU 1 and CSU 2 for an AX6600S series switch, or MSU 1 and MSU 2 for an AX6300S series switch is larger than the update file by 1,000 KB or more. Example # show system Date 20XX/09/19 22:32:13 UTC System: AX6304S, OS-SE Ver. 10.2 : : MSU1 : active : : Flash user area config area used 21,135kB 15kB free 72,146kB 19,029kB total 93,281kB MC : notconnect MSU2 : standby : : Flash user area used 21,123kB free 72,158kB MC total 93,281kB : notconnect : : 19,044kB config area 15kB 19,029kB 19,044kB # 17 dump area area total 0kB 21,150kB 20,678kB 111,853kB (Check the free capacity of the user area.) 20,678kB 133,003kB dump area area total 0kB 21,138kB 20,678kB 111,865kB (Check the free capacity of the user area.) 20,678kB 133,003kB 4) See the procedure for transferring files described in Appendix to transfer the update file named k.img to the /usr/var/update directory in the Switch. (This operation must be performed in binary mode.) 5) Execute the ls -l /usr/var/update/ command, and confirm that the size of the k.img file is the same as the source file on the terminal. 6) Enter the cd /usr/var/update command to change the directory. Example # ls -l /usr/var/update total 21040 -rwxrwxrwx 1 root wheel # cd /usr/var/update XXXXXXXX Sep 19 22:27 k.img (Check the file size.) (Change the directory.) In a BCU, CSU, or MSU redundant configuration, go to step 7). In a BCU, CSU, or MSU single configuration, go to step 18). *** Update in a BCU, CSU, or MSU redundant configuration *** 7) Execute the ppupdate k.img standby command. Installation from the internal flash memory on the standby system starts. The version of the basic software to be installed is displayed. Make sure that the version is correct. When the update on the standby system is complete, the standby system restarts. Example # ppupdate k.img standby Software update start Current version is 10.2 New version is 10.2.A (Installation starts.) (The version of the software is displayed.) Update done. # (The update is complete.) 09/19 22:34:22 E5 MSU 01300438 2314:0b0600000000 Fatal error detected on other system. This system (MSU1) is active. (The standby system restarts.) # 09/19 22:34:22 E3 MSU 01300412 2314:1b0100000000 System status changed from duplex to simplex. # 09/19 22:34:58 E3 SOFTWARE 01300462 1001:14e800000000 There is mismatch between active and standby software version. # 09/19 22:35:01 E3 MSU 01300413 2314:09a900000000 System status changed from simplex to duplex. # 18 8) Execute the show system command to confirm that the status of the standby system is standby or software version discord. If any configuration items are not supported, for example, due to the downgraded version, configuration discord or both configuration discord and software version discord are displayed for the status of the standby system. If the status of the standby system is standby or software version discord, go to step 9). If the status is configuration discord or both configuration discord and software version discord, go to step 19). Example # show system Date 20XX/09/19 22:37:24 UTC System: AX6304S, OS-SE Ver. 10.2 Node : Name= Contact= Locate= Elapsed time : 00:06:30 Machine ID : 0012.e220.5300 Device redundancy cpu status : duplex Power control : normal Power redundancy-mode : check is not executed PS1 = active PS2 = active PS3 = active PS4 = active Fan : active No = FAN1(1), FAN1(2), FAN1(3), FAN2(4), FAN2(5), FAN2(6) Speed=normal MSU1 : active CPU : AX-F6300-51A [MSU-1A , 80200020] Boot : 20XX/09/19 22:31:05 , power on , 0 times restart PSP : active Lamp : STATUS LED=green , ACTIVE LED=green , SYSTEM1 LED=green System operation panel : No error Board : CPU=PowerPC 667MHz , Memory=1,048,576kB(1024MB) Management port: unused Temperature : normal(24degree) Flash : user area config area dump area area total used 21,135kB 15kB 0kB 21,150kB free 72,146kB 19,029kB 20,678kB 111,853kB total 93,281kB 19,044kB 20,678kB 133,003kB MC : notconnect MSU2 : software version discord (The status of the standby system is displayed.) CPU : AX-F6300-51A [MSU-1A , 80200020] : : 9) Execute the show logging standby command to make sure that the updated software is running. 19 Example # show logging standby Date 20XX/09/19 22:37:41 UTC System information AX6304S, OS-SE Ver. 10.2.A (Build:162), MSU2(standby) (Check the displayed information.) Logging information EVT 09/19 22:35:01 E3 MSU 01300413 2314:0e8000000000 System status changed from simplex to duplex. : : 10) Ensure that the capacity required to transfer the update file to the BCU, CSU, or MSU module in the active system is available. Execute the rm /usr/var/update/k.img command to delete the k.img file in the active system. Example (Execute the rm /usr/var/update/k.img command.) (Enter y.) # rm /usr/var/update/k.img remove '/usr/var/update/k.img'? y # 11) Perform a system switchover of the BCU, CSU, or MSU module for the AX6700S, AX6600S, or AX6300S series switch, respectively. Execute the redundancy force-switchover command. Replaces the active system with the standby system in a redundant configuration. Example # redundancy force-switchover SBY:# (Execute the redundancy force-switchover command.) (The command prompt changes to SBY:#.) 12) After the active and standby systems are switched over, log in to the new active system, using the user-specified ID (for example, operator). 13) Execute the enable command. The command prompt changes to #. Example login: operator : (Log in as operator.) Copyright (c) 20XX ALAXALA Networks Corporation. All rights reserved. > enable # (Execute the enable command.) (The command prompt changes to #.) 14) Execute the ls -l /usr/var/update/ command, and confirm that the size of the k.img file is the same as the source file transferred to the Switch. 15) Enter the cd /usr/var/update command to change the directory. 20 Example # ls -l /usr/var/update total 21040 -rwxrwxrwx 1 root wheel # cd /usr/var/update XXXXXXXX Sep 19 22:27 k.img (Check the file size.) (Change the directory.) 16) Execute the show system command to confirm that the status of the standby system is standby or software version discord. Example # show system Date 20XX/09/19 22:41:24 UTC System: AX6304S, OS-SE Ver. 10.2.A Node : Name= Contact= Locate= Elapsed time : 00:06:30 Machine ID : 0012.e220.5300 Device redundancy cpu status : duplex Power control : normal Power redundancy-mode : check is not executed PS1 = active PS2 = active PS3 = active PS4 = active Fan : active No = FAN1(1), FAN1(2), FAN1(3), FAN2(4), FAN2(5), FAN2(6) Speed=normal MSU1 : software version discord (The status of the standby system is displayed.) CPU : AX-F6300-51A [MSU-1A , 80200020] : : MC : notconnect MSU2 : active CPU : AX-F6300-51A [MSU-1A , 80200020] : : 17) Execute the ppupdate k.img standby command. Installation from the internal flash memory on the standby system starts. The version of the basic software to be installed is displayed. Make sure that the version is correct. When the update on the standby system is complete, the standby system restarts. 21 Example # ppupdate k.img standby Software update start Current version is 10.2 New version is 10.2.A (Installation starts.) (The version of the software is displayed.) Update done. # (Update is complete.) 09/19 22:41:22 E5 MSU 01300438 2314:0b0600000000 Fatal error detected on other system. This system (MSU1) is active. (The standby system restarts.) # 09/19 22:41:22 E3 MSU 01300412 2314:1b0100000000 System status changed from duplex to simplex. # 09/19 22:41:58 E3 SOFTWARE 01300462 1001:14e800000000 There is mismatch between active and standby software version. # 09/19 22:41:01 E3 MSU 01300413 2314:09a900000000 System status changed from simplex to duplex. # 18) In a BCU, CSU, or MSU redundant configuration, execute the show system command to confirm that the status of the standby system is standby. Example > show system Date 20XX/09/19 22:40:36 UTC System: AX6304S, OS-SE Ver. 10.2.A Node : Name= Contact= Locate= Elapsed time : 00:00:31 Machine ID : 0012.e220.5300 Device redundancy cpu status : duplex Power control : normal Power redundancy-mode : check is not executed PS1 = active PS2 = active PS3 = active PS4 = active Fan : active No = FAN1(1), FAN1(2), FAN1(3), FAN2(4), FAN2(5), FAN2(6) Speed=normal MSU1 : standby (The status of the standby system is displayed.) : : Go to step 20). 22 *** Update when one or more configuration items are not supported in a BCU, CSU, or MSU single configuration or a BCU, CSU, or MSU redundant configuration *** 19) Execute the ppupdate k.img active command. Installation from the internal flash memory on the active system starts. The version of the basic software to be installed is displayed. Make sure that the version is correct. After the update of the active system is complete, the active system restarts automatically. In a BCU, CSU, or MSU redundant configuration, a system switchover occurs. After the restart, log in to the Switch again. Example # ppupdate k.img active (Installation starts.) Software update start Broadcast Message from operator@ (??) at 22:38 UTC... *********************************************** ** UPDATE IS STARTED. ** *********************************************** Current version is 10.2 New version is 10.2.A (The version of the software is displayed.) Automatic reboot process will be run after installation process. Do you wish to continue? (y/n) y (Enter y.) 100% |*************************************| 21009 KB 502.42 KB/s 00:00 ETA Update done. Broadcast Message from operator@ (??) at 22:39 UTC... *********************************************** ** UPDATE IS FINISHED SUCCESSFULLY. ** *********************************************** # ROM 00.11.26 configuration.) ............... (Update is complete.) (The active system restarts. System switching occurs in a BCU, CSU, or MSU redundant BOOT 00.11.00 current version=ROM 00.11.26(26) new version =ROM 00.11.26(26) Not changed. Loading from dev0 100% login: operator (Log in after the restart.) Copyright (c) 20XX ALAXALA Networks Corporation. All rights reserved. > 23 *** Version after update *** 20) Execute the show logging command to make sure that the abbreviated name and version of the software running on the active system are correct. In a BCU, CSU, or MSU redundant configuration, execute the show logging standby command to make sure that the abbreviated name and version of the software running on the standby system are correct. The procedure is complete. Example > show logging Date 20XX/09/19 22:40:50 UTC System information AX6304S, OS-SE Ver. 10.2.A (Build:162), MSU2(active) Logging information : : > show logging standby Date 20XX/09/19 22:40:58 UTC System information AX6304S, OS-SE Ver. 10.2.A (Build:162), MSU1(standby) Logging information : : 24 (Check the active system.) (Check the displayed information.) (Check the standby system.) (Check the displayed information.) Appendix - Example procedure for transferring an update file: 1) Open the command prompt window on your PC. 2) Move to the directory containing the update file. 3) Use the dir command to check the file name and size. 4) Execute the ftp command to connect to the Switch. 5) When asked to enter a user name, enter your login name for the Switch. If the startup OS is running, enter operator. 6) When asked to enter a password, enter your password. If the startup OS is running, press the Enter key without entering a password. 7) Enter bin to transfer the software in binary mode. 8) Transfer the software to the /usr/var/update directory in the Switch (file name, k.img). 9) Enter bye. C:¥tmp>dir (When the software to be updated is located in the c:¥tmp directory) : 20XX/09/15 12:03 21,503,812 AX63S1002-158.img.g (Check the file name and file size.) : 3) C:¥tmp>ftp 192.168.0.1 (Specify the IP address of the Switch. When the startup OS is running, specify 192.168.0.1.) 4) Connected to 192.168.0.1. 220 192.168.0.1 FTP server (NetBSD-ftpd) ready. User (192.168.0.1:(none)): operator (Specify the login name for the Switch. When the startup OS is running, specify operator.) 5) 331 Password required for operator. Password: ******* (Specify the password. When the startup OS is running, press the Enter key.) 6) 230Please install product software. 230 User operator logged in. ftp> bin 200 Type set to I. ftp> put AX63S1002-158.img.gz /usr/var/update/k.img (The file name of the AX63S1002-158.img.gz file varies depending on the type and version of the basic software. See Table 2-1.) 8) ftp> bye 25


![to a copy of the presentation! [ PDF 3659 kB ]](http://vs1.manualzilla.com/store/data/005993145_1-0ef1bf04b92f9350e985abe9a695cb4d-150x150.png)