1
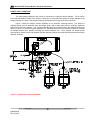
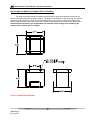
Model A15/82
Fluoride Monitor
Home Office
Analytical Technology, Inc.
6 Iron Bridge Drive
Collegeville, PA 19426
Ph: (800) 959-0299
(610) 917-0991
Fax: (610) 917-0992
Email: [email protected]
European Office
ATI (UK) Limited
Unit 1 & 2 Gatehead Business Park
Delph New Road, Delph
Saddleworth OL3 5DE
Ph: 0800-018-4020
+ 44 (0) 1457-873-318
Fax: + 44 (0) 1457-874-468
Email: [email protected]
PRODUCT WARRANTY
Analytical Technology, Inc. (Manufacturer) warrants to the Customer that if any part(s) of
the Manufacturer's products proves to be defective in materials or workmanship within the
earlier of 18 months of the date of shipment or 12 months of the date of start-up, such
defective parts will be repaired or replaced free of charge. Inspection and repairs to
products thought to be defective within the warranty period will be completed at the
Manufacturer's facilities in Collegeville, PA. Products on which warranty repairs are
required shall be shipped freight prepaid to the Manufacturer. The product(s) will be
returned freight prepaid and allowed if it is determined by the manufacturer that the part(s)
failed due to defective materials or workmanship.
This warranty does not cover consumable items, batteries, or wear items subject to
periodic replacement including lamps and fuses.
Gas sensors, except oxygen sensors, are covered by this warranty, but are subject to
inspection for evidence of extended exposure to excessive gas concentrations. Should
inspection indicate that sensors have been expended rather than failed prematurely, the
warranty shall not apply.
The Manufacturer assumes no liability for consequential damages of any kind, and the
buyer by acceptance of this equipment will assume all liability for the consequences of its
use or misuse by the Customer, his employees, or others. A defect within the meaning of
this warranty is any part of any piece of a Manufacturer's product which shall, when such
part is capable of being renewed, repaired, or replaced, operate to condemn such piece of
equipment.
This warranty is in lieu of all other warranties (including without limiting the generality of
the foregoing warranties of merchantability and fitness for a particular purpose),
guarantees, obligations or liabilities expressed or implied by the Manufacturer or its
representatives and by statute or rule of law.
This warranty is void if the Manufacturer's product(s) has been subject to misuse or
abuse, or has not been operated or stored in accordance with instructions or if the serial
number has been removed.
Analytical Technology, Inc. makes no other warranty expressed or implied except as
stated above.
ATI Model A15/82 Fluoride Monitor with Auto-Calibration
TABLE OF CONTENTS
UNPACKING ..................................................................................................................................................................... 4
INTRODUCTION .............................................................................................................................................................. 5
SPECIFICATIONS ............................................................................................................................................................ 7
INSTALLATION ............................................................................................................................................................... 8
SAMPLE INLET OVERFLOW ...................................................................................................................................... 11
BUFFER AND CALIBRATION STANDARD BOTTLE HOLDERS .............................................................................. 12
REAGENT AND FLUORIDE STANDARD PICKUP TUBING CONNECTION............................................................. 13
ELECTRICAL CONNECTIONS .................................................................................................................................... 14
START-UP ....................................................................................................................................................................... 16
FRONT PANEL LOCK .................................................................................................................................................. 17
CONFIGURATION ......................................................................................................................................................... 18
CHEMISTRY MODULE STARTUP .............................................................................................................................. 21
SENSOR INSTALLATION............................................................................................................................................ 21
FLOW STARTUP .......................................................................................................................................................... 21
AUTOMATIC CALIBRATION VALVE ........................................................................................................................ 22
OPERATION ................................................................................................................................................................... 23
CALIBRATION ............................................................................................................................................................. 23
AUTOMATIC CALIBRATION ..................................................................................................................................... 25
MIXING FLUORIDE BUFFER SOLUTION................................................................................................................... 25
FLUORIDE CALIBRATION STANDARD .................................................................................................................... 26
CONTROL & ALARM OUTPUTS ................................................................................................................................ 27
CONTROL RELAYS ..................................................................................................................................................... 27
ALARM RELAY ........................................................................................................................................................... 28
MAINTENANCE ............................................................................................................................................................. 29
BUFFER REPLENISHMENT ........................................................................................................................................ 29
SENSOR MAINTENANCE ........................................................................................................................................... 29
PUMP MAINTNANCE .................................................................................................................................................. 29
SPARE PARTS - MODEL A15/82 .................................................................................................................................. 31
2
O&M Manual
Rev-G (6/10)
ATI Model A15/82 Fluoride Monitor with Auto-Calibration
TABLE OF FIGURES
Figure 1 - Fluoride Monitoring System ........................................................................................ 6
Figure 2 - Panel Mount Dim & Installation .................................................................................. 8
Figure 3 - NEMA 4X Wall Mount Dim. ........................................................................................ 9
Figure 4 - Fluroide Montior Chem Module ................................................................................ 10
Figure 5 - Sample Inlet and Drain Chamber ............................................................................. 11
Figure 6 - Buffer Bottle Holder Dim........................................................................................... 12
Figure 7 - Reagent Pickup Tubing Assy ................................................................................... 13
Figure 8 - Fluoride Monitor Electrical Connections ................................................................... 14
Figure 9 - Figure 9 Chemistry Module Power Connection ........................................................ 15
Figure 10 - Calibration hook-up diagram .................................................................................. 24
Figure 11 - Pump Tubing Assy ................................................................................................. 30
3
O&M Manual
Rev-G (6/10)
ATI Model A15/82 Fluoride Monitor with Auto-Calibration
UNPACKING
When you receive your Fluoride Monitor, open the shipping package and inspect the contents to be sure
that all items have been received. The items shipped will depend on the type of system ordered. The following
is a list of items normally supplied with submersible systems:
Quantity 1 – Model A15/82 Fluoride Monitor Electronics, NEMA 4X (if ordered)
Quantity 1 – Fluoride Monitor Chemistry Module
Quantity 1 – Combination Fluoride/Reference Electrode
Quantity 1 – Sample Inlet Overflow Assembly
Quantity 1 – 100 PPM Fluoride Standard, 500 cc bottle
Quantity 2 – Standards bottles, 1 PPM & 10 PPM
Quantity 1 – Miscellaneous Spare Parts Kit
Quantity 1 – Fluoride Buffer Powder in gallon container
Quantity 2 – Buffer/Calibration Standard bottle holder (not supplied if stainless mounting plate is ordered)
Quantity 1 - Operation & Maintenance Manual
In addition to the standard items listed above, any additional spare parts or spare sensors that were ordered
separately will be included. Compare the contents of the shipping container with the packing list. The items
listed above are the standard components that are included with every standard A15/82 monitor. Any other
items will be listed separately on the packing list. Check the contents of the shipping container carefully to insure
that nothing is overlooked. Should you find anything missing from the shipment, immediately contact the ATI
sales department by calling either 800-959-0299 or 610-917-0991. If you prefer, you may send a fax describing
the error to 610-917-0992.
4
O&M Manual
Rev-G (6/10)
ATI Model A15/82 Fluoride Monitor with Auto-Calibration
INTRODUCTION
The Model A15/82 is an on-line monitoring system designed for the continuous measurement of the
fluoride ion (F-) in aqueous solutions. The monitoring system provides measurements between 0.1 and 1000
PPM. The unit is set up at the factory for a default range of 0-10 PPM, but can be changed to higher ranges of
0-100 or 0-1000 PPM by proper field calibration. The analog output signal may be spanned for smaller ranges
within the overall operating ranges if desired. A15/82 monitors are designed to operate on sample temperatures
from 0° to 50 °C. Because water is flowing through the chemistry module at a low rate, this unit cannot be
exposed to temperatures below 0° C.
The basic sensing element used in the monitor is a fluoride ion selective electrode (ISE). This sensor
contains a lanthanum fluoride crystal that generates a voltage proportional to the activity of fluoride ion in
solution. A silver/silver chloride reference electrode contained in the same sensor body provides the second half
of the measurement cell. Because ISE electrodes respond to activity rather than concentration, a small amount
of buffer is metered into the sample to provide a constant background condition. With other parameters held
constant, fluoride activity and fluoride concentration are closely related.
A temperature element in the
measuring chamber provides automatic temperature compensation for the system.
A15/82 monitors incorporate an automatic calibration feature that maintains high measurement accuracy
over long operating periods. The automatic calibration system feeds a known fluoride standard into the system
at an operator programmable frequency such as every 24 hours, every 3 days, or some other convenient
interval. Automatic calibration can be done at any interval between 1 and 999 hours. During calibration, analog
output and relays are held at the values measured just before initiation of the calibration sequence. An alarm
relay can be used to indicate a calibration failure.
Fluoride monitoring system includes 3 parts, an electronic display unit (panel or wall mount), a chemistry
module, and a sample inlet and drain chamber. A typical fluoride system installation is shown in Figure 1. A
stainless steel mounting panel is available (part number 00-1261) that simplifies installation and locates analyzer
components in their proper relative positions. In addition, the plate contains a convenient pan for locating the
reagent and calibration standard.
5
O&M Manual
Rev-G (6/10)
ATI Model A15/82 Fluoride Monitor with Auto-Calibration
Figure 1 - Fluoride Monitoring System
6
O&M Manual
Rev-G (6/10)
ATI Model A15/82 Fluoride Monitor with Auto-Calibration
SPECIFICATIONS
ELECTRONIC MONITOR
Range:
Accuracy:
Repeatability:
Drift:
Display:
Calibration:
Calibration Standard:
Control Relays:
Control Mode:
Analog Output:
Operating Conditions:
Power:
Enclosure:
0-1.00 PPM Minimum, 0-1000 PPM Maximum
± 5% of Span
± 2% of Span
< 0.1 PPM per month
16 character alphanumeric backlit LCD
Automatic calibration at operator programmable interval.
Operator programmable
One SPDT relay, 5A @ 220 VAC resistive.
Programmable deadband and time delay.
On/Off with variable deadband and time delay
Isolated 4-20 mA, 600 ohm maximum load. Programmable
output span. Output may be inverted.
0-50° C., 0-95% R.H. non-condensing.
110/220 VAC ±10%, 50/60 Hz.
Panel mount standard, NEMA 4X (PPO) wall mount optional.
CHEMISTRY MODULE
Fluoride Sensor:
Sensor Cable:
Response Time:
Sample Pump:
Buffer Pump:
Buffer:
Calibration Valve:
Measurement Chamber:
Temperature Limits:
Recommended Sample Rate:
Sample Inlet:
Sample Drain:
Power:
Combination Fluoride/Reference Ion Selective Electrode
10 feet standard
T90 = 90 seconds
Internal Tubing Pump, 6 cc./min.
Internal Tubing Pump, 0.06 cc/min.
Acetate Buffer at pH 5.3
Sample/Standard selector pinch valve, 12 VDC
Cast Acrylic
0-50° C.
10-20 GPH at Inlet Overflow Assembly
¼” I.D. Hose Barb
½” I.D. Hose Barb
120 VAC, 60 Hz., 220 VAC, 50 Hz. Optional
7
O&M Manual
Rev-G (6/10)
ATI Model A15/82 Fluoride Monitor with Auto-Calibration
INSTALLATION
The main installation requirements for the ATI Fluoride Monitor are mechanical installation of the monitor
chemistry module, and sample inlet overflow chamber, connection of power to both monitor and chemistry
module, and connection of sample and drain piping to the sample overflow chamber supplied with the system.
Figure 1 on page 6 shows a schematic of a typical installation of a complete system mounted on the optional
stainless steel plate. The monitor must be located within 5 feet of the chemistry module due to the limited sensor
cable length. If the optional stainless steel mounting plate was purchased, all components mount to this plate,
with the plate mounted to a wall. If the stainless plate was not supplied, buffer and standard holders must also be
mounted.
Figure 2 provides details on the mechanical installation of the standard panel mount electronic assembly.
The panel cutout must be made accurately as the cutout tolerance is small. Panel mounting brackets are
included with the monitor and are attached as shown below.
6.10"
155mm
3.78"
96mm
.34"
8.6mm
5.46"
139mm
3.54"
90mm
3.78"
96mm
FRONT VIEW
SIDE VIEW
3.60"
91.4mm
3.60"
91.4mm
MOUNTING BRACKETS
(TYPICAL 2 PLACES)
PANEL CUTOUT
MOUNTING BRACKET INSTALLATION
Figure 2 - Panel Mount Dim & Installation
8
O&M Manual
Rev-G (6/10)
ATI Model A15/82 Fluoride Monitor with Auto-Calibration
The optional NEMA 4X wall mount enclosure is a molded plastic unit that bolts directly to a wall or other
flat surface. The enclosure is supplied with special mounting bracket for convenience in mounting the enclosure.
A hinged door on the front of the enclosure provides access to operating controls, and a hinge on the back
section is provided for convenience in wiring the unit.
Figure 3 - NEMA 4X Wall Mount Dim.
9
O&M Manual
Rev-G (6/10)
ATI Model A15/82 Fluoride Monitor with Auto-Calibration
The chemistry module contains the components required to condition the sample and measure the
fluoride concentration under stable conditions. This package includes sample and buffer pumps, the fluoride
ISE, and a sensor flow chamber. Figure 4 provides dimensions for this unit, which is designed for wall
mounting.
Figure 4 - Fluroide Montior Chem Module
10
O&M Manual
Rev-G (6/10)
ATI Model A15/82 Fluoride Monitor with Auto-Calibration
SAMPLE INLET OVERFLOW
The water sample supplied to the monitor is connected to a special overflow chamber. This is done to
insure that the sample flowrate to the monitor is sufficient to insure that fresh sample is always available at the
sample pickup point. Most of the sample flowing to this assembly will simply go directly to the drain.
Figure 5 shows the sample overflow assembly on its aluminum mounting bracket. The bracket is
supplied to hold the inlet assembly under the sample pump, and to allow waste from the chemistry module to
flow back into the drain chamber. The overflow assembly should be mounted close to the chemistry module (as
shown in Figure 5) to minimize system response time. Mounting further from the chemistry module will increase
the sample transport time, thereby increasing the monitor response time. Once mounted, the sample pickup
tube should be placed into the inlet chamber and the chemistry module drain tube should be placed into the drain
chamber as shown.
Figure 5 - Sample Inlet and Drain Chamber
11
O&M Manual
Rev-G (6/10)
ATI Model A15/82 Fluoride Monitor with Auto-Calibration
BUFFER AND CALIBRATION STANDARD BOTTLE HOLDERS
Two bottle mounting brackets are supplied so that the buffer and fluoride standard solution can be
located conveniently below the chemistry module. The brackets are designed for wall mounting, and will hold
one gallon plastic containers. When mounting these brackets, be sure to leave enough room between the
bottom of the chemistry module and the top of the bracket so that the bottles can be lifted from the brackets.
Note that these brackets are not supplied when the stainless steel mounting panel containing the
reagent shelf is ordered with the analyzer.
Figure 6 - Buffer Bottle Holder Dim.
12
O&M Manual
Rev-G (6/10)
ATI Model A15/82 Fluoride Monitor with Auto-Calibration
REAGENT AND FLUORIDE STANDARD PICKUP TUBING CONNECTION
A special rubber stopper with a ceramic support tube is supplied for the buffer and fluoride standard
bottles. If necessary, adjust the ceramic tube so that it does not hit the bottom of the solution bottles. A length of
pickup tubing is supplied for each of these pickup assemblies with a small filter attached to one end of the buffer
tubing. The buffer tubing is black while the fluoride standard tubing is translucent. After the buffer solution is
ready, feed the end of the tubing opposite the filter up through the ceramic tube. Then insert the tube assembly
into the solution and press the rubber stopper in place. When assembled, the reagent delivery system should
conform to Figure 5 on page 6.
After the reagent bottles have been placed into the brackets or on the mounting panel shelf, attach the
other end of the pickup tubing to the connectors on the reagent pump. The reagent pump has two small barb
connectors on the right side. Press the pickup tube carefully onto each of these barbs, being careful not to pull
on the pump tubing. The tubing from the buffer bottle can be shortened if there is an excess once mounting is
complete.
Figure 7 - Reagent Pickup Tubing Assy
13
O&M Manual
Rev-G (6/10)
ATI Model A15/82 Fluoride Monitor with Auto-Calibration
ELECTRICAL CONNECTIONS
Wiring connections to the A15/82 are made to the back of the monitor. The terminal blocks on the back
of the monitor are pluggable terminals for ease of wiring. Power and alarm relay connections are made to the
lower terminal block while sensor and analog output connections are made to the upper block. A cable coming
from the combination sensor is installed in the chemistry module at the factory. The cable has a center conductor
and a shield. Refer to Figure 8 for a detail of the terminal connections on the rear of the fluoride monitor.
1: AC POWER – NEUTRAL
2: AC POWER - 110V – HOT
3: AC POWER - 220V – HOT
4: AC – GROUND
5: RELAY A - NORMALLY OPEN
6: RELAY A – COMMON
7: RELAY A - NORMALLY CLOSED
8: RELAY B - NORMALLY OPEN - BRN
9: RELAY B – COMMON - WHITE
10: RELAY B - NORMALLY CLOSED
11: ALARM RELAY C/D - NORM OPEN
12: RELAY C/D – COMMON
13: ALARM RELAY C/D - NORM CLOSED
14:
15:
16:
17:
18:
19:
20:
21:
22:
23:
24:
25:
Figure 8 - Fluoride Monitor Electrical Connections
14
O&M Manual
Rev-G (6/10)
4-20 mA OUTPUT CHANNEL 1 (+)
NOT USED
4-20 mA OUTPUT CHANNELS 1 & 2 (-)
NOT USED
NOT USED
NOT USED
NOT USED
REFERENCE ELECTRODE - SHIELD
FLUORIDE ELECTRODE – CENTER COND.
TEMPERATURE - RED
TEMPERATURE - BLK
TEMPERATURE - GRN
ATI Model A15/82 Fluoride Monitor with Auto-Calibration
The fluoride chemistry module requires AC power for operation of internal sample and buffer pumps. An
AC power cord is supplied. Permanent wiring should be made to the terminals shown in Figure 9 below. The
sensor wire is an unbroken coaxial wire running directly into the monitor. In addition, a separate 5 conductor
cable is supplied for connection of the temperature element and the automatic calibration control between
chemistry module and monitor.
Figure 9 - Figure 9 Chemistry Module Power Connection
15
O&M Manual
Rev-G (6/10)
ATI Model A15/82 Fluoride Monitor with Auto-Calibration
START-UP
Prior to operation, recheck electrical connections to be sure everything is in accordance with Figure 8
and Figure 9. If everything is in order, power may be applied. When power is turned on, the display will come
up with a program and version number, which will remain on the display for a few seconds. The display will then
change to a display of the fluoride value and an indication of the status of control relays. This is the main
operating display, and should look like the display below:
D1
MAIN DISPLAY
XX.XX ppm oA
The XX.XX portion will be numbers. The initial values could be almost anything, depending on whether
the sensor has been connected and what the condition of the sensor is. The values are not important at this
point. The display may indicate arrows to the left or right, but this should not be of concern until sample is
flowing. The next portion of the display indicates control relay status. The letter A refers to control relay A as
marked on the back of the monitor. An open square (o) indicates a deactivated relay while a solid square (n)
indicates an activated relay. More information on the control relays is provided in a later section of this manual.
Note that if the automatic calibration feature of this system is disabled, relay B status will also be displayed.
Beyond the main display, a series of alternate displays are available to the operator. These displays may be
selected by pressing the MODE key on the front panel. It is a good idea to step through the displays to become
familiar with each one. Many of these alternate displays serve as a starting point for programming functions
described later in this manual. The alternate display sequence is as follows:
D2
ppm
D3
NUMBER OF CALIBRATION POINTS
2 point cal
X
-
FLUORIDE ISE VOLTAGE OUTPUT
20.0° C
SAMPLE TEMPERATURE DISPLAY
XX.X mV
D4
TEMP:
D5
THERMOC.
D6
SA X.XXPPM oL
D7
AL X.XX/X.XX
D8
CLEANING: OFF
CLEANING FUNCTION TURNED OFF
D9
AUTO CAL
AUTOMATIC CALIBRATION ENABLED
D10
O1 4.0mA/ 0.00 F
D11
CONFIGURATION
ACCESS TO SETUP ROUTINES
D12
IC7685.010
PROGRAM AND RELEASE NUMBER
TEMPERATURE COMPENSATION OFF
ON
F-
RELAY A SETPOINT AND FUNCTION
ALARM RELAY SETPOINTS
-
R2.20
ANALOG #1 OUTPUT INDICATION
16
O&M Manual
Rev-G (6/10)
ATI Model A15/82 Fluoride Monitor with Auto-Calibration
FRONT PANEL LOCK
The key switches on the front panel of the monitor can be used for both changing the display and for
calibrations and setpoint adjustments. When the monitor is shipped from ATI, all functions are accessible.
However, the adjustment and calibration functions can be locked in order to prevent unauthorized adjustments to
the instrument. When the front panel is locked, the MODE key will still allow the display to be stepped through
the alternate displays but will not allow settings to be altered.
To lock (or unlock) the keyboard, press the MODE key until “CONFIGURATION” is displayed. Press the
CAL key once and the display will change to “KB UNLOCKED”. Use the UP key to select “KB LOCKED” and
press ENTER. The UPDATE message will appear briefly and the “LCD CONTRAST” message will appear.
Press the MODE key 3 times to return to the main display.
17
O&M Manual
Rev-G (6/10)
ATI Model A15/82 Fluoride Monitor with Auto-Calibration
CONFIGURATION
The electronics for the Fluoride system are designed to be as flexible as possible. A number of
programming functions are provided in the CONFIGURATION menu and are protected by an access number,
which must be entered to allow changes in these settings. Some settings are for factory use only, while others
are used for customer selection of certain operating parameters.
Press the MODE key until the display reads CONFIGURATION and then press CAL. The display will
read “KB UNLOCKED (OR LOCKED)”. Press ENTER twice and the display will read “ACCESS NR.: 0”. To
gain access to the configuration routines, the access number must be entered using the UP or DOWN keys. The
default access number is 0, so you can enter the configuration menu by simply pressing ENTER. This number is
programmable and can be set to any 3 digit number desired. Remember to record any custom access number
entered into the unit in a location where you can always find it. Should you lose your access number, call ATI for
assistance with a bypass sequence.
1.
Type of Ion: X- This routine allows selection of the type of ISE sensor connected to the monitor. The
monitor will accept a variety of ion selective electrodes. The fluoride sensor is a negatively charged
monovalent ion, so the factory setting is X-. The setting should not be changed.
2.
Measure U: PPM This routine allows selection of the units of measurement. The factory setting is
parts-per-million. A selection of mg/l can be made if desired by using the UP or DOWN arrows to select
that unit of measurement and then pressing ENTER.
3.
SCALE: 10.00 ppm This routine allows selection of the overall display range. 10.00 is the default, but
ranges of 100.0 and 1000 can be selected if desired. Select using the UP or DOWN keys and then press
ENTER.
4.
LARGE S RT: 2.0s This routine allows for electronic damping of the analog output signals. This
monitor contains a 2 stage response time filter. This allows the instrument to change rapidly in response
to a large change while changing only slowly when the variations are small. The “LARGE S RT” refers to
the response time to a large concentration change. The default setting is 2 seconds. This value can be
increased to as much as 20 seconds by using the UP arrow.
5.
SMALL S RT: 10.0s This routine allows for electronic damping of small changes in the input signal.
This eliminates rapid changes in the display due to minor variations in the pH value. The default setting
is 10 seconds. This value can be increased to as much as 20 seconds by using the UP arrow.
6.
CAL OUT1: 4-20 mA This routine allows programming of the analog output signal. Either a 4-20 or 020 mA output may be selected by using the UP key. The default is 4-20 mA. If a zero based voltage
output is required, the 0-20 mA output may be used in conjunction with a shunt resistor across the
connection terminals on the back of the instrument. Once a selection is made, press ENTER.
7.
CAL P1: XX.XX ppm: Analog outputs are adjusted to an overall operating range, such as 0-2 ppm or 05 ppm. The CAL P1 routine allows assignment of the zero value for the output. Normally, this value will
be 00.00 ppm fluoride. However, you can offset the 4 mA point if desired by using the UP key. Press
ENTER when the proper value has been selected.
8.
CAL P2: XX.XX ppm: The CAL P2 routine allows assignment of the full scale value for the output. For
a fluoride output, this would be the 20 mA value for the output, such as 1.00 for a range of 0-1 ppm.
Press ENTER when the proper value has been selected.
18
O&M Manual
Rev-G (6/10)
ATI Model A15/82 Fluoride Monitor with Auto-Calibration
9.
SET A F.: LO (OR HI) This routine allows the function of setpoint A to be defined as either low or high.
When LO is selected, relay A acts like a low alarm, with the relay activating when the measured fluoride
is below the setpoint. When HI is selected, the relay acts like a high alarm, activating when fluoride is
above the setpoint. Setpoints are programmed in another routine described later in this manual.
10.
SET B F.: LO (OR HI) This routine allows the function of setpoint B to be defined as either low or high
similar to relay A described in 7 above. Note that relay B cannot be used as an alarm relay when the
automatic calibration function is used. When the Auto Cal is activated, relay B is used for
initiating the calibration sequence.
11.
AL SET A: OFF A separate alarm relay is provided in the monitor which is independent of relays A and
B. It is marked C/D on the back of the instrument. This relay can be used to actuate an emergency
alarm should the fluoride concentration remain outside of the A setpoint for some fixed period of time.
The default for this function is off. If you want to use this function, use the UP key to select ON and then
press ENTER. The display will change to “TIME SET A: 60 M”. Use the UP or DOWN key to select the
time period after which you want the C/D relay to actuate. For instance, if you have already defined
relay A as a low alarm with a setpoint of 0.50 ppm and want to activate an additional alarm if fluoride
remains below 0.5 for more than 30 minutes, press the UP key until the display indicates 30 M and then
press ENTER. This function can be extremely useful for applications where the A relay is being used for
control, since it provides an alarm if the control function does not maintain the desired value for some
period of time.
12.
AL SET B: OFF This routine is similar to 8 above, but with respect to relay B. It associates the alarm
relay with the operation of relay B as described above.
13.
AL CALIBR.: OFF This routine allows the alarm relay (relay C) to be used to indicate failure of the
automatic calibration sequence. Set this function to ON if you wish to use the C relay for this purpose.
14.
AL RELAY: ACT (OR DEA) This routine allows the C/D relay to be defined for normal or fail-safe
operation. Select ACT (activated) for normal operation. This refers to the fact that the relay coil is not
normally energized and energizes on alarm condition. Select DEA (deactivated) for fail-safe operation.
This can be useful if this relay is to be used for a power failure indication. Note that the C and NC relay
indications on the wiring diagrams refer to the contact designations in fail-safe operating mode. If normal
operation is selected, the NC contacts become NO contacts.
15.
AL TYPE: CONT or FLASH This routine gives the option, when alarm is activated, to hold the relay coil
continuously of have the coil flash (cycle between energized and de-energized). The sub menu when AL
TYPE is set to FLASH, allows for the selection of slow, med, or fast flashing.
16.
CLEAN: DISABLED The automatic cleaning feature is not implemented in the fluoride monitor. This
function should not be changed.
17.
CLEANING T: 15.0” Not used. Do not adjust.
18.
HOLDING T: 3.O’ Not used. Do not adjust.
19.
CALIBR.: AUTO This routine allows you to specify whether the automatic calibration feature will be run
automatically based on the internal timer, manually at the option of the operator, or disabled. The
default is AUTO. If you wish, you can use the UP or DOWN keys to set the calibration function to
Manual or Disabled.
19
O&M Manual
Rev-G (6/10)
ATI Model A15/82 Fluoride Monitor with Auto-Calibration
20.
CALIBR. T: 3.0’ This routine specifies the amount of time that fluoride standard will be fed into the
chemistry module during the automatic calibration routine. The default is 3 minutes, which is the
recommended interval. Do not set this value for less than 2 minutes. A longer interval can be used if
desired, but is not normally necessary.
21.
HOLDING T: 1.0’ This routine specifies the period of time after completion of the automatic calibration
during which the analog and relay outputs are held. The default is 1 minute, but can be extended if
desired.
22.
STAND.: 1.02PPM The fluoride standard used to calibrate the monitor can be any fluoride value within
the operating range. The default is 1 PPM because it is normally close to the desired operating value for
most drinking water fluoridation systems. However, the value can be adjusted if a different standard is
used.
23.
ZERO MAX 10 mV When the automatic calibration is complete, the monitor analyzes the zero offset of
the sensor compared with a value calculated during a manual 2-point calibration. If the sensor has
drifted more than 10 mv, an alarm is activated. The zero drift allowed can be increased, but 10 mv is
adequate for fluoride sensors.
24.
Change A Nr.: No/Yes: This routine allows you to enter your own access code number. Changing the
access number will restrict access to the configuration menu by anyone who does not know the number
you enter. To change the number, press UP to change the display to YES and press ENTER. Use the
UP or DOWN arrow to set the number you want and then press ENTER.
When you press ENTER, the display will show “Confirm Nr.: 0”. To change the access number, the
number must be entered twice. Use the UP or DOWN arrows to set the same number again and then
press ENTER. After the second entry, the new number will be stored and must be used to gain access to
the configuration menu from then on.
20
O&M Manual
Rev-G (6/10)
ATI Model A15/82 Fluoride Monitor with Auto-Calibration
CHEMISTRY MODULE STARTUP
After mechanical and electrical installation is complete, the system is ready for operation. The chemistry
module should be placed in operation first. The electronics do not need to be powered during chemistry module
startup, but can be powered if desired. No harm will result provided that relays or outputs are not being used for
control.
SENSOR INSTALLATION
Before applying power to the chemistry module, the combination fluoride/reference electrode must be
installed. The electrode is shipped dry in the electrode box. The fluoride electrode box contains a polishing strip
which must be saved for ongoing maintenance. Keep the polishing strip where it will not be lost.
As shipped, the fluoride electrode does not contain reference filling solution. The solution is supplied in a
separate bottle along with a plastic dropper used to fill the electrode. Near the top of the electrode is a black
plastic sleeve that covers the fill port. Pull the sleeve down so the fill hole is accessible and fill the reference
chamber with electrolyte using the plastic dropper. Push the sleeve back up over the fill hole and the sensor is
ready for use.
The fluoride electrode slides into the flow block on the front of the chemistry module. The fluoride
sensor should be kept dry with the protective cover in place until it is time to put the analyzer into permanent
service. The cable for connection to the monitor is already installed. The cable screws onto the back of the
fluoride sensor and connects the sensor directly to the monitor. This is a high impedence signal, and this cable
cannot be spliced.
FLOW STARTUP
After the electrode is installed, check that the inlet tubing and drain connections to the inlet chamber are
complete and that the drain tubing is connected to a permanent drain. See Figure 5 for piping details. Turn on
the inlet sample flow using the flow control valve installed on the sample line. Adjust the flow so that water is
overflowing from the inlet chamber into the drain chamber. The rate at which water overflows this chamber will
determine the response time of the monitor. Keeping the overflow running at about 200 cc/min. will provide good
sample exchange. The inlet flow can be adjusted to a lower rate if desired, but this will increase the sample
transport time to the pickup tube for the analyzer.
When flow has been established at the inlet chamber, place the sample pickup tube into the inlet
chamber and place the drain tube into the drain chamber. Check to see that the buffer container is mounted,
that buffer solution is in place, and that the buffer pickup tubing is connected. When these items are checked,
power can be applied to the chemistry module. Note that the fuse assembly inside the chemistry module can be
used to turn power on and off. Open the rear compartments of the chemistry module and pull the fuse holder out
to disconnect power.
When power is applied, the two pumps will activate. Sample will be pulled out of the overflow chamber
through 1/16” ID tubing which is routed through the top section of the pinch valve. Buffer will be metered into a
“T” fitting prior to the sensor flow block to adjust the sample to optimum conditions for measurement. The
measured sample will exit the side of the sensor flow block and drain by gravity into the drain side of the
overflow assembly below. It is recommended that you verify that buffer is being delivered to the mixing tee at
startup. To do this, remove the sample pickup tube from the overflow chamber inlet so that no sample is being
pumped. Then disconnect the buffer tube from the mixing tee and allow the chemistry module to run for about
10 minutes. You should see small droplets of buffer coming out of the buffer delivery tube (use a paper towel to
catch the droplets as they drip from the tube). After verifying that buffer is flowing, connect the tube to the tee
and put the sample pickup tube into the overflow inlet. At this point, sample should begin to pump into the
system.
21
O&M Manual
Rev-G (6/10)
ATI Model A15/82 Fluoride Monitor with Auto-Calibration
AUTOMATIC CALIBRATION VALVE
A 2-way pinch valve is mounted on the bottom of the chemistry module between the sample and reagent
pumps. This valve is not required for operation, but is used to automatically switch calibration standard into the
measuring cell when called for by the monitor. Tubing from the calibration standard is routed through the bottom
section of the pinch valve (normally closed) and then into a “Y” fitting prior to the reagent injection point. To
adjust tubing in the pinch valve, you may push on the bottom of the valve to manually pinch off the top tube and
open the bottom tube. Tubing should be permanently connected to the fluoride standard bottle as shown in
Figure 1.
22
O&M Manual
Rev-G (6/10)
ATI Model A15/82 Fluoride Monitor with Auto-Calibration
OPERATION
With the chemistry module in operation and power turned on to the monitor, the system should now be
displaying a fluoride concentration from the sample. The value measured initially will probably be fairly close to
the actual value, but the monitor is not factory calibrated. While the monitor contains an automatic calibration
feature, a manual 2-point calibration must be done at startup.
The calibration procedure will require preparation of two fluoride standards. A 500 cc bottle of 100 PPM
fluoride standard is supplied with the monitor system. Standards of 1 PPM and 10 PPM should be prepared for
use in calibration. Two bottles are supplied for holding the mixed standards. You will also need a pipette and a
volumetric cylinder for mixing your standards.
For mixing the 1 PPM standard, pipette 1 cc. of the 100 PPM standard into a 100 cc volumetric flask.
Dilute to 100 cc using either unfluoridated drinking water or distilled water. Using unfluoridated water from the
system has the advantage of producing a standard with the same background composition of the water you will
be monitoring. If this is not feasible, distilled water can be used instead as there will be little real difference in the
end result. Pour the mixed standard into the 1 PPM standards bottle and then rinse the volumetric flask with
distilled water.
For the 10 PPM standard, pipette 10 cc. of the 100 PPM standard into the volumetric flask and dilute to
100 cc. as before. Pour this standard into the bottle marked 10 PPM. Keep these two standards bottles capped
for use in calibration checks as needed.
CALIBRATION
The fluoride monitor electronics is designed to allow up to a 5 point calibration for ion selective sensors.
For fluoride measurement, only a two point calibration is necessary. The standards are fed into the chemistry
module using an extension tube supplied with the unit. Remove the sample pickup tube from the overflow
chamber and connect the extension tube. A barb fitting is supplied on the extension tube for this purpose.
Follow the procedure below.
1. Place the extended pickup tube into the 1 PPM standard mixed previously and allow the standard to be
pumped into the chemistry module.
2. Press the MODE key on the monitor once and the display will indicate “ppm X point cal”. Press the CAL key
once and the display will read “CAL POINT Nr. 1”. Press CAL again and the display will read “CAL P1: X.X
mV”. This display shows the current mv. signal from the fluoride sensor (this value will normally be around
+40 mV for the glass electrode and -350 mV for the polymer sensor.)
3. After the 1 PPM standard has been flowing for 5 minutes, the mv. signal should be stable to within a few
tenths of a millivolt. Press ENTER and the display will indicate “P1 DECADE: 100.0”. Press the DOWN
arrow and the display will read “P1 VALUE: 10.00”. Press ENTER and then use the DOWN arrow to adjust
the value to 1.00 (hold button down and display will scroll down). Then press ENTER.
4. The display will now indicate “CAL POINT Nr. 2”. Remove the standards pickup tube from the 1PPM
standards bottle and place it into the 10 PPM standards bottle. Allow the system to run for about 5 minutes
on the 10 PPM standard.
5. Press CAL and the display will read “CAL P2: X.X PPM”. As before, the millivolt value should be fairly
stable after the 10 PPM standard has been flowing for 5 minutes (this value will normally be around -15 mV
23
O&M Manual
Rev-G (6/10)
ATI Model A15/82 Fluoride Monitor with Auto-Calibration
for the glass electrode and -405 mV for the polymer sensor). Press ENTER and the display will indicate “P2
DECADE: 100.0”. Press the DOWN key once to change it to “P2 DECADE: 10.00” and press ENTER.
The display will change to “P2 VALUE: 10.00”. Since the value of the standard is 10 PPM, no adjustment is
necessary. Simply Press ENTER.
6. The display will change to “CAL POINT Nr. 3”. Press ENTER and the display will indicate “END POINT
CAL?”. Press ENTER and the calibration will be updated. After completion of the calibration, disconnect the
pickup tube extension and place the pickup tube back into the overflow chamber. The monitor will then
resume sample measurements as soon as sample reaches the flow block.
This concludes the full calibration procedure using two standards. This procedure should be completed
about once every 3-6 months to verify the slope of the sensor.
Figure 10 - Calibration hook-up diagram
24
O&M Manual
Rev-G (6/10)
ATI Model A15/82 Fluoride Monitor with Auto-Calibration
AUTOMATIC CALIBRATION
The A15/82 Fluoride Monitor performs an automatic calibration adjustment as often as the user desires.
This automatic calibration routine corrects the monitor for small changes caused by electrode drift. Fluoride ISE
sensors are quite stable over long periods of time when used in buffered samples, but electrode drift could cause
errors of 0.1 – 0.2 PPM if not adjusted every week or two. The automatic calibration routine delivers a fluoride
standard into the system and corrects the analyzer zero offset to correct for drift. As a default, the monitor is
programmed to provide this function every 48 hours. This is actually more often than necessary, but will insure
that the analyzer operates at optimum accuracy on a continuous basis. The frequency of this calibration is
adjustable by the operator.
The automatic calibration routine takes about 4 minutes. During this time, the 4-20 mA signal is locked
at the output value just before the routine activates. The user may start this routine manually at any time to
verify that the calibration routine is functioning properly. To do so, press the MODE key on the monitor until the
display reads “AUTO CAL”. Press CAL and the display will read “NEXT CYCLE: XXX h”, which tells you the
number of hours until the next automatic cycle begins. Press ENTER and the display indicates “CAL CYC.:
WAITING”. Press the DOWN arrow and the display reads “CAL CYC.: START”. Press ENTER and the
calibration cycle will activate. The display will flash back and forth between the fluoride concentration display
and a display of “CALIBRAT. CYCLE”. This will continue for 3 minutes (assuming no change in the default
timing for calibration) and then will switch to “
“. If the calibration should fail due to excessive drift of the
sensor (which could be caused by buffer feed failure, calibration standard feed failure, or sensor drift), a
“CALFAIL Z –XXXmV”, which indicates that the zero offset is beyond the 10 mv. limit set in the Configuration.
Should you encounter a calibration fail error, perform the manual 2-point calibration procedure on page 23. If
this is not successful, polish the fluoride sensor as described on page 28 (Sensor Maintenance). If this does not
resolve the problem, replace the fluoride ISE.
To program the frequency for the automatic calibration, press MODE until the display reads “AUTO
CAL”. Press CAL and the display will read “NEXT CYCLE: XXX h”, which tells you the number of hours until the
next automatic cycle begins. Press ENTER and the display indicates “CAL CYC.: WAITING”. Press ENTER
again and the display indicates “AC REPETIT.: XXh”, with XX indicating the current frequency setting. Use the
UP or DOWN keys to adjust this setting to the number of hours desired between automatic calibration routines.
The frequency can be set to any number of hours between 1 and 999. When you have adjusted the frequency,
press ENTER and the new frequency will be stored.
MIXING FLUORIDE BUFFER SOLUTION
The buffer solution used in the A15/82 Fluoride Monitor is designed to adjust the sample pH to about 5.3
and to provide a relatively stable ionic strength in the sample to allow stable fluoride measurement. The buffer
solution can be purchased from ATI or can be mixed by the user if desired.
To prepare the buffer solution, you will need sodium acetate and white vinegar. Place 1000 grams of
sodium acetate trihydrate (Fisher Scientific #S207-10) in a gallon reagent container. Fill the container with pure
white vinegar and allow to sit for a few hours until the acetate has completely dissolved.
25
O&M Manual
Rev-G (6/10)
ATI Model A15/82 Fluoride Monitor with Auto-Calibration
FLUORIDE CALIBRATION STANDARD
The automatic calibration routine uses a fluoride standard that must be prepared in a 1 gallon container
and connected as shown in Figure 5. A 1 gallon container of fluoride standard will last in excess of 6 months
assuming if calibration is done every 24 hours and in excess of 1 year if calibration is done every 48 hours. This
standard must be mixed by the user during startup of the system.
Normally, the automatic calibration standard should be around 1 PPM. The solution can be mixed easily
using the 100 PPM standard supplied with the system. Start with a 1 gallon bottle of spring water or distilled
water. Open the gallon container and pour about 100 cc into a clean container. Measure 40 cc. of 100 PPM
standard into a graduated cylinder and pour this into the gallon bottle. Fill the gallon container to about the
bottom of the neck with the water poured into the separate container. This solution will be 1.00 to 1.05 PPM
fluoride and can be used for the automatic calibration procedure.
Another option for an automatic calibration solution is to use “fluoridate spring water” purchased from a
supermarket. Spring water with fluoride added is widely available. The only limitation here is that the exact
value of this solution must be determined. This is easily done using the analyzer to make the measurement.
After completion of the two-point calibration described on page 23, place the sample pickup tube into the
purchased fluoridated spring water. Allow this sample to run for 5 minutes. Record the measured value on the
bottle.
NOTE: Once the value of the “fluoridated spring water” has been determined, you must enter this value
in the step 21 of the configuration. If you do not enter the correct value into the configuration,
the automatic calibration routine will adjust the monitor incorrectly.
26
O&M Manual
Rev-G (6/10)
ATI Model A15/82 Fluoride Monitor with Auto-Calibration
CONTROL & ALARM OUTPUTS
The Fluoride Monitor is equipped with four relay outputs. Two of these outputs are designated control
relays, a third is used for alarm functions, and the fourth is used to activate a cleaning cycle. The cleaning cycle
function is not implemented in this design as it is not needed for drinking water measurements. The two control
relays are both available only if the Auto Cal feature is disabled. Normally, only relay A is available as a control
relay. Relay B is used to activate the automatic calibration cycle. Relay output wiring is made at the rear of the
monitor as shown in the diagram on page 14.
CONTROL RELAYS
The relays designated control relays may be used for either alarm functions or control functions. Each of
the two relays is SPDT with a 220 VAC 5A resistive contact rating. Each control relay can be programmed as
either a high or a low alarm, and the hysteresis and time delay can also be set.
To program control relays, proceed as follows:
1.
Press the MODE key until SA appears on the left side of the display. The full display will indicate “SA
X.XXppm oLO” This refers to setpoint A and indicates the current setting for control relay A. X.XX is
the current setpoint, o(or n) indicates the current status of the relay, and LO(or HI) indicates a low or
high alarm function.
2.
Press the CAL key once and the display will read “CAL SA S: X.XX”. The value of X.XX is the setpoint
for that relay. Use the UP and DOWN keys to adjust the value to the desired setpoint. Then press the
ENTER key.
3.
The display will now read “CAL SA I: 0.00”. I is the setpoint hysteresis or deadband for that relay. Use
the UP and DOWN keys to adjust the deadband to the desired value. A value of at least 0.05 is
recommended to avoid relay cycling at the actuation point. When the value is set, press the ENTER
key.
4.
The display will now read “CAL SA D: 0.0s”. D is the delay time for relay actuation. Use the UP and
DOWN keys to select the desired delay time in seconds. The maximum delay time is 99.9 seconds.
When the selection is made, press the ENTER key.
5.
The display will return to the original “SA X.XXppm oLO”. Press the MODE key to access the “SB
X.XXppm oLO” display.
6.
The steps outlined in 1-4 above should be repeated for SB to program operation of relay B.
27
O&M Manual
Rev-G (6/10)
ATI Model A15/82 Fluoride Monitor with Auto-Calibration
ALARM RELAY
The A15/82 contains a relay designated as an alarm relay. This relay may be used to warn of various
conditions that might indicate operational problems. The relay will activate on either high or low fluoride
conditions, and can be used to indicate failure of the control relays to maintain proper control. This relay is
designated “C” on the wiring schematic, and the function of the relay with respect to its association with relays A
and B is covered in the Configuration section of this manual.
The alarm relay will always activate if either a high or low fluoride condition exists. The setpoints for this
alarm are programmable. If an alarm condition is detected, the relay will activate and the LCD display will flash
either “ALARM: MIN” or “ALARM: MAX”. The default values are 0.00 for low alarm and 10.00 for high alarm.
To program the Alarm Relay for different low and high setpoints, proceed as follows:
1.
Press the MODE key until the display show AL at the left side. The numbers shown to the right of AL are
the current set points for that relay. Note that there are two of them. This relay will activate if the
fluoride concentration goes below the low setpoint or above the high setpoint.
2.
Press the CAL key and the display will read “CAL AL L: X.XX”. Use the UP and DOWN keys to adjust
the X.XX value to the desired low alarm setpoint. Then press ENTER.
3.
The display will now read “CAL AL H: X.XX”. Again, use the UP and DOWN keys to select the high
setpoint, and then press ENTER.
4.
The display will now read “CAL AL D: 0.0s”. D represents the alarm delay. Use the UP or DOWN keys
to set the alarm delay value between zero and 25 seconds. Then press ENTER and the display will
return to the starting point for this routine.
This alarm relay may also activate if the automatic calibration function fails. If the relay is to be used in
this way, this function must be activated by changing configuration number 13 to “ON”. The default is “OFF”.
28
O&M Manual
Rev-G (6/10)
ATI Model A15/82 Fluoride Monitor with Auto-Calibration
MAINTENANCE
The A15/82 Fluoride Monitor will generally provide unattended operation over long periods of time. With
proper care, the system should continue to provide measurements indefinitely. For reliable operation,
maintenance on the system must be done on a regular schedule. Keep in mind that preventive maintenance on
a regular schedule is much less troublesome than emergency maintenance that always seems to come at the
wrong time.
BUFFER REPLENISHMENT
The buffer solution used in the fluoride monitor must be replenished as needed. A gallon of buffer will
run the monitor for about 45 days. Larger containers of buffer may be used to extend the refill time. Buffer
should be mixed on site using the procedure found in this manual.
SENSOR MAINTENANCE
Over time, the response of the fluoride sensor can become sluggish or show excessive measurement
drift due to adsorption of impurities on the face of the sensor. To clean the sensor of fats, oils and organics,
gently rub the sensor tip with a cotton swab and ethyl alcohol. To remove inorganic residues, place the sensor tip
in a 0.1 M HCl solution for 12 hours. Another recommended way to clean the sensor is by placing toothpaste on
filter paper and rub the sensor tip gently. Once cleaning is done, rinse the face of the sensor with distilled water
and then immerse the tip in a small amount of the 100 PPM fluoride standard for about 5 minutes.
Should the fluoride system be shut down for a length of time it will be nessary to remove the sensor,
rince the sensor with de-ionized water and replace the protective cap.
PUMP MAINTNANCE
Peristaltic pump tubing should be changed every 6 months. One set of replacement tubing is supplied
with the unit and additional tube sets are available in packages of 5 (see spare parts list). If tubing wear or
leakage is noted in less than 6 months, tubing should also be replaced immediately. It is unlikely that buffer feed
tubing will require more frequent replacement, but grit in the incoming sample can cause wear on the sample
tubing, shortening the replacement interval.
Turn off power to the chemistry module prior to tubing replacement. Before replacing buffer tubing,
remove the buffer pickup tube from the buffer bottle and place the end into distilled or clean tap water. Allow the
system to run for 10 minutes to purge the buffer inside the tubing with the clean water. Always wear eye
protection when disconnecting buffer tubing as buffer can cause stinging of the eyes.
Replacement of pump tubing is very simple with the quick loading pump heads used in this system.
Follow the procedure below for both the sample and acid pump heads. Turn off power to the chemistry module
prior to replacing pump tubes.
1. Remove the tubing clamp plate from the rear of the pump. This is done by gently pressing in on the sides of
the plate and pulling it backward. See Figure 11 for an exploded view.
2. Pull the tube retaining blocks out of the slots on the top and bottom of the pump. The tubing and blocks will
come free from the pump drive.
29
O&M Manual
Rev-G (6/10)
ATI Model A15/82 Fluoride Monitor with Auto-Calibration
3. Replacement tubes are precut to the proper length. For acid feed tubes, place the tubing into the retaining
blocks and reinstall the bottom block. Pull the tube around the roller and install the top block.
4. Sample tube replacement is essentially the same. However, first disconnect the sample pickup tubing from
the inlet fitting and the outlet tubing from the outlet side of the pump. Remove the tubing clamp plate and
push the tube holders out of their slots. Push on the tubing from inside the retaining block so that the fitting
slides out of the block. Pull the old tubing off the fitting and replace with a new tube, making sure that the
tubing is pushed onto the connector up to the stop. Push the fittings back into the retaining blocks and put
the blocks back into the slots. Put the clamp plate onto the back of the pump and reconnect the sample inlet
and outlet tubing.
Figure 11 - Pump Tubing Assy
30
O&M Manual
Rev-G (6/10)
ATI Model A15/82 Fluoride Monitor with Auto-Calibration
SPARE PARTS - MODEL A15/82
PART NO.
00-1214
03-0181
63-0045
63-0057
45-0131
42-0042
05-0044
05-0045
44-0193
23-0002
03-0189
54-0007
54-0008
54-0009
54-0010
54-0011
54-0012
54-0013
09-0028
36-0031
44-0137
44-0194
44-0114
03-0252
03-0264
03-0236
03-0265
00-1343
DESCRIPTION
Complete Fluoride monitor electronics, panel mount
NEMA 4X case assembly, (ABS)
Sensor cable, 10 ft.
Fluoride Sensor
Sensor Flow Block
Sensor Chamber O-Ring
Sample pump tubing (pkg. 5)
Buffer pump tubing (pkg. 10)
Silicon tubing, 1/16” I.D., 1/8” O.D. (per foot)
Fuse, 2A
Buffer Feed Assembly
Tube Holder – 1 channel (Sample Pump)
Tube Holder – 2 channel (Reagent Pump)
Pressure plate
Pump motor for sample pump, 120 VAC
Pump motor for buffer pump, 120 VAC
Pump motor for sample pump, 220 VAC
Pump motor for buffer pump, 220 VAC
Fluoride Buffer, Gallon container with acetate powder (requires vinegar)
12VDC Solenoid/Pinch Valve
1/16” ID barbed Y-Fitting
1/16” Female Luer Fitting
Tube Connector
Reagent Pump Assembly, 120V (w/molex conn.)
Sample Pump Assembly, 120V (w/molex conn.)
Reagent Pump Assembly, 220V (w/molex conn.)
Sample Pump Assembly, 220V (w/molex conn.)
RTD Temperature Assembly
31
O&M Manual
Rev-G (6/10)