1
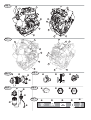
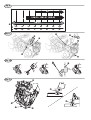
GB
To drain water from fuel filter:
Fig. 4
1. With engine STOPPED place a drain pan under fuel
filter and loosen drain valve approximately 1 turn. Water
should drain. If necessary, operate priming pump to
drain water, but only until fuel flows from valve.
2. Tighten drain valve.
3. Start engine.
4. Ensure warning light goes out.
5. Check for leaks.
To replace fuel filter:
1.
2.
3.
4.
5.
6.
7.
8.
9.
10.
11.
Drain fuel tank or close fuel shut-off valve.
Disconnect sensor wire.
Remove drain valve and discard o-ring.
Remove fuel filter with filter wrench.
Screw new filter on by hand until gasket contacts
housing. Then tighten 1/3 turn more.
Install drain valve with new o-ring.
Connect sensor wire.
Open fuel shut-off valve.
Operate priming pump to bleed air from fuel line.
Start engine.
Check for leaks.
Oil and Oil Filter
Checking Oil Level
Fig. 10
Check oil every 8 hours of operation or daily, before starting
engine.
1. Place equipment level and clean around dip stick.
2. Remove dipstick, wipe with clean cloth, insert
FULLY.
3. Remove dipstick and check oil level. Oil should be at
the F" mark .
4. If oil is required, follow Steps 6 thru 11 below
Changing Oil / Oil Filter
Fig. 11
With engine off, but still warm.
1. Position equipment so that engine oil drain plug is
lowest point on engine.
2. Clean around oil drain plug and oil fill cap , then
remove allowing oil to drain completely.
3. Remove oil filter .
4. Before installing new filter, apply fresh oil to filter gasket.
Reinstall filter by hand, once gasket contacts adapter
tighten 3/4 turn more.
5. Reinstall drain plug, torque to 34.5 Nm (25.5 ft. lbs.)
6. Place equipment level.
See OIL RECOMMENDATIONS section.
CAUTION:
Used oil is a hazardous waste product. Do not discard
with household waste. Check with your local authorities,
service center, or dealer for safe disposal/recycling
facilities.
Tune-Up Specifications
Valve Clearance (cold engine)
Intake . . . . . . . . . . . . . . . . . . . 0.2 mm (0.008 in.)
Exhaust . . . . . . . . . . . . . . . . . . 0.2 mm (0.008 in.)
SERVICE AND PARTS
Authorized Briggs & Stratton 3/LC Service Dealer’s carry a
stock of Genuine Briggs & Stratton Parts and are equipped
with special service tools. Other parts may not perform as
well, may damage the engine, result in injury, or void your
warranty. Trained mechanics assure expert repair service
on all B&S engines.
When you purchase equipment powered by a B&S engine,
you are assured of highly skilled, reliable service at more
than 30,000 Authorized Service Dealers worldwide, including more than 6,000 Master Service Technicians.
Locate your nearest Authorized Briggs & Stratton 3/LC
Service Dealer by viewing our locator map at :
www.briggsandstratton.com
STORAGE
WARNING
WHEN STORING FUEL OR EQUIPMENT
WITH FUEL
• DO NOT store near a furnace, stove, water heater
or other appliances which uses a pilot light or other
ignition source because they can ignite fuel vapors.
Engines stored over 30 days need special attention.
CAUTION: Running fuel tank dry is not recommended.
1. Fill fuel tank FULL to prevent condensation from
forming.
2. A Diesel Fuel Microbiocides Additive should be
3.
4.
5.
6.
7.
8.
9.
used to prevent bacteria and fungi from growing in
the fuel tank. Follow additive manufacturer’s instructions for proportions. Run engine for a short time to
circulate the additive through the fuel system.
Change oil. See MAINTENANCE section.
Remove all glow plugs.
Pour 3 cc (1/2 teaspoon) engine oil into each glow
plug hole.
Crank engine over slowly to distribute oil.
Replace glow plugs.
Clean engine. See MAINTENANCE section − Cleaning Debris from Engine
Store in a clean and dry area.
An illustrated Briggs & Stratton 3/LC Engine Shop Manual
MS-1055 includes common specifications and detailed
information covering adjustment, tune-up and repair of the
B&S 3/LC Engine. Order manual from an Authorized
Briggs & Stratton Service Dealer.
Partial List of Genuine
BRIGGS & STRATTON Parts
Part
Part No.
Oil 1.4 liter (48 oz.) (1.5 qt.) . . . . . . . . . . . . . .
Oil Filter . . . . . . . . . . . . . . . . . . . . . . . . . . .
Air Cleaner Cartridge . . . . . . . . . . . . . . . . . . .
Fuel Filter Element . . . . . . . . . . . . . . . . . . . .
100028
820314
820263
820311
ENGINE IDENTIFICATION NUMBERS
(EIN/Serial Number)
To get replacement parts or technical assistance in the
future write your engine Model, Type, and Code numbers
along with the Date of Purchase here. These numbers are
located on your engine. See ENGINE COMPONENTS.
Model
Type
Code
Month
Oil capacity:
Max. 3.3 liters (3.50 qts) when changing Oil & Oil Filter
Max. 3.1 liters (3.25 qts) when changing Oil only
CAUTION: When filling or adding oil.
To prevent oil from overrunning into breather and
damaging engine upon start-up, proper venting is
necessary.
7. To provide proper venting, remove dipstick and place
on a clean surface. Also maintain a clearance between the oil fill device and the oil fill hole in the
valve cover.
8. SLOWLY refill with a high quality detergent oil.
9. Replace and tighten oil filler cap and dipstick firmly.
10. Run engine at idle for 5 minutes, stop engine, wait
3 minutes, then recheck oil level. If required, add oil to
bring level to F" mark.
Fig. 10 Item 11. Check for oil leaks around plug and filter.
4
Day
Year