1
830 Parkview Drive North, El Segundo, CA 90245
Tel: 310 747 3232 Fax: 310 747 3233
WWW.UNIVOIP.COM
OfficeConnect
Administrator Reference Guide
Release 5.0
Note: The information contained in this document is the property of UniVoIP, Inc. and
Broadview Networks, Inc. and is disclosed to you on the condition that you maintain the
information strictly confidential. You are hereby warned that the information disclosed is
subject to change without notice or the assumption of any liability on the part of UniVoIP,
Inc. or Broadview Networks, Inc.
© 2009-2012 UniVoIP, Inc. and Broadview Networks, Inc. All rights reserved.
Contents
Welcome ............................................................................................1
What's New in Release 5.0 ...............................................................1
DECT Headsets ........................................................................................... 1
Distinctive Ringing ....................................................................................... 1
Introduction ........................................................................................3
Language Settings ................................................................................4
Setting Language for Auto Attendants .................................................4
Setting Language for phone display of users or locations ...........................4
Setting Language for a voice mail box .................................................4
Administering the phone system ..............................................................6
Administrator privileges ..................................................................6
Quick start for the phone system .......................................................7
Activate location phones ............................................................................... 7
Customizing your phone system .........................................................9
Administering a phone system with other phones .................................. 10
Users and locations ...................................................................... 11
View users and locations .............................................................................. 12
Add a user ............................................................................................... 12
Add a location ........................................................................................... 15
Modify a user or location .............................................................................. 16
Disable access for a user or location ................................................................ 17
Enable a user or location .............................................................................. 17
Edit user on the user's behalf ......................................................................... 18
Edit location on the location's behalf ............................................................... 18
Delete a user or location .............................................................................. 19
View user or location site ............................................................................. 19
Profiles .................................................................................... 19
Phone key profiles ...................................................................................... 20
Permission profiles ..................................................................................... 30
Managing user features ................................................................. 34
Reset PIN ................................................................................................. 35
Enabling and disabling voice mail .................................................................... 35
Reset voice mail PIN ................................................................................... 36
Configure permissions .................................................................................. 36
Assign a phone key profile ............................................................................ 36
Assign a phone number ................................................................................ 37
Login/logout ............................................................................................. 37
Managing group features ............................................................... 38
Call group limits ........................................................................................ 40
View call groups ........................................................................................ 41
Assign users to a call group ........................................................................... 41
Lock members to a call group ........................................................................ 41
Configure call group call coverage ................................................................... 42
Final
i
Add a broadcast group ................................................................................. 43
Modify a broadcast group .............................................................................. 44
Add a call pickup group ................................................................................ 45
Modify a call pickup group ............................................................................ 45
Add a hunt group ....................................................................................... 45
Modify a hunt group .................................................................................... 47
Change the order of a hunt group member list .................................................... 48
Add a monitor group ................................................................................... 48
Modify a monitor group ................................................................................ 49
Add a rollover group ................................................................................... 49
Modify a rollover group ................................................................................ 50
Delete a call group ..................................................................................... 50
ACD Applications ......................................................................... 51
Overview ................................................................................................. 51
Managing Permissions .................................................................................. 51
External directory/speed dials ........................................................ 52
View the external directory/speed dial list ........................................................ 52
Search external directory/speed dial list ........................................................... 52
Add an external directory/speed dial entry ........................................................ 52
Modify an external directory/speed dial entry .................................................... 53
Delete an external directory/speed dial entry .................................................... 53
Auto attendant ........................................................................... 54
Managing the auto attendant ......................................................................... 54
Auto attendant menus ................................................................................. 57
Recording audio prompts and greetings ............................................................. 60
Example – Create a custom auto attendant ........................................................ 64
Example – Create a custom auto attendant for voice mail access .............................. 72
Incoming call routing ................................................................... 76
View incoming call routing details ................................................................... 76
Configure incoming call routing ...................................................................... 77
Enable Emergency Override Routing ................................................................. 78
Disable Emergency Override Routing ................................................................ 79
Example – Configure incoming call routing ......................................................... 79
Business hours ............................................................................ 81
View business hours details ........................................................................... 82
Configure your business hours details ............................................................... 82
Extension ranges .........................................................................
Configure Ring Tones ...................................................................
Configure hold announcement ........................................................
Configure account code entry .........................................................
Configure zero-out destination ........................................................
Site Details ...............................................................................
Phones .....................................................................................
83
83
84
85
86
86
87
Configure Mitel 5485 paging unit ..................................................................... 87
Unassign phone ......................................................................................... 87
View phone inventory list ............................................................................ 88
Print phone inventory list ............................................................................. 88
View/modify phone details ........................................................................... 88
Delete a phone .......................................................................................... 89
Reset device ............................................................................................. 89
Assign phone ............................................................................................. 90
Fax ......................................................................................... 90
ii
Final
Configure fax extension ............................................................................... 90
Handling lists ............................................................................. 91
Sorting lists .............................................................................................. 91
Printing lists ............................................................................................. 91
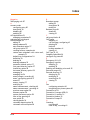
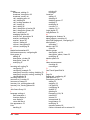
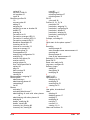
Index .............................................................................................. 99
Feedback on Documentation ............................................................... 103
Final
iii
iv
Final
Welcome
Congratulations on acquiring your new OfficeConnect telephone system!
The OfficeConnect system provides all the features that small businesses
use, without the up-front cost and ongoing maintenance inherent in owning a
traditional system.
OfficeConnect also provides the ability to self-manage your telephone system
through an intuitive graphical interface that runs on your web browser.
As an administrator, you can easily add telephone users, set their phone
configurations, manage how inbound calls will be routed, and control various
other features.
Individual users can customize features on their phones, such as setting up
their own call coverage.
What's New
in Release
5.0
The following changes are available in Release 5.0:
DECT Headsets
OfficeConnect now supports DECT (Digital European Cordless
Telecommunications) handsets and headsets on the Mitel 5330 and 5340.
Distinctive Ringing
OfficeConnect now supports Distinctive Ringing, which gives subscribers the
ability to choose between pre-defined ring tones. Distinctive Ringing allows
users to
•
set the ringing tone on their phone to differentiate it from other stations
near by (Distinctive Ringing by Station)
•
differentiate based on whether the call originated from internal or external
(Internal / External Distinctive Ringing)
•
differentiate between calls targetted directly at their extension versus
group calls (Call Type Distinctive Ringing)
To enable Distinctive Ringing, users are can select from nine available tones
for the following configurations:
Final
•
Internal call direct
•
Internal call via group
•
External call direct
•
External call via group
Welcome 1
For each of these choices, users can select one ringing tone from a dropdown
of standard ringing tones on the My Phone page. Additionally, users are able
to ring their phone with the selected option, so that can hear what they are
selecting.
For more information, see “Configure Ring Tones” on page 83.
2
Welcome
Final
Introduction
This document is a reference guide for the administration of the phone
system. It describes how to customize your phone system features to suit
your business.
The administration of the phone system is completed through a web
administration interface that enables you to make changes such as:
•
Adding and editing call permission profiles
•
Adding and editing phone key profiles
•
Configuring an auto attendant
•
Configuring incoming call routing
•
Adding and editing call groups and their information
•
Customizing your phone system
This information is also accessible online in the web administration interface
by selecting the Help button at the top or bottom of any page. Context
sensitive help is available by selecting the
Final
icon on any page.
Introduction 3
Language Settings
If configured by your service provider, you can configure language settings for
users as well as for auto attendants.
For details of the configurable language settings for individual users, refer to
the section "Setting your Language" in the Mitel IP Phone Reference Guide.
Setting
Language
for Auto
Attendants
When you add or edit an auto attendant, you can select a language (or pair of
languages) from the pull-down list. This determines the language to be used
by all the default prompts for that auto attendant. Depending on how your
service provider has configured your system, you may also be able to choose
a pair of languages for a bilingual auto attendant.
Note that you may still need to record your personal prompts in the
appropriate language.
If you create submenus for your auto attendant, you must also select the
appropriate language for that submenu.
See the section Auto attendant on page “Auto attendant” on page 54. for
details of setting up the auto attendants.
Setting
Language
for phone
display of
users or
locations
Setting
Language
for a voice
mail box
4
Language Settings
When adding or editing a user/location, you can specify the default language
to be used for their phone display. Simply select the appropriate "Language
for Phone" from the pull-down list. See the section Users and locations on
page “Users and locations” on page 11. for details on managing users and
locations.
When adding a user or location, you can also add a voice mailbox to the user.
The language specified in "Language for Phone" will also be used for the
voice mail prompts to the user (or location). See the section Users and
locations on page “Users and locations” on page 11. for details on managing
users and locations.
The language used for the voice mail prompts to the user (or location) will not
be changed if you change the "Language for Phone" field. The telephone user
can change the language for the voice mail prompts via the web interface.
See the Mitel IP Phone Reference Guide for details.
Final
The language used for default prompts to callers who want to deposit a
message in a voice mailbox is set for your company by the Service Provider.
Contact your Service Provider if you wish to change this.
Final
Language Settings 5
Administering the phone system
This section describes how to administer the phone system. To get your
phone system working quickly, refer to the section Quick start for the phone
system on page “Quick start for the phone system” on page 7.. Then, before
making too many changes to the default settings, read Customizing your
phone system on page “Customizing your phone system” on page 9..
Administrator
privileges
Only users with administrator privileges can administer the phone system. An
administrator has access to the Company Settings menus in the web
administration interface, and can therefore create and maintain the following:
•
Users and locations
•
Profiles
•
External directory/speed dial entries
•
Call groups
•
Auto attendants
•
Incoming call routing
•
Business details
•
Phone inventory
To give a user administrator privileges, follow these steps:
1
Select Users and Locations in the left menu.
2
Select the Last Name for the user.
3
Check the Administrator Privileges check box in the Permissions
section.
4
Click Save.
To remove administrator privileges from a user, follow these steps:
6
1
Select Users and Locations in the left menu.
2
Select the Last Name for the user.
3
Clear the Administrator Privileges check box in the Permissions
section.
4
Click Save.
Administering the phone system
Final
Quick start
for the
phone
system
This section describes how to get your phone system working with minimal
set up by using default settings.
To quickly set up your phone system using defaults, follow these steps:
1
Add permission profiles. See page “Permission profiles” on page 30..
2
Add users. See page “Add a user ” on page 12..
3
Add locations. See page “Add a location” on page 15..
4
Add an auto attendant. See page “Add auto attendant” on page 55..
5
Set up incoming call routing. See page “Incoming call routing” on
page 76..
6
Notify users. New users automatically receive their extension and PIN by
email if your business has been configured with this option. You may want
to also provide them with instructions for getting started.
Contact your service provider for information on how your business has
been configured for PIN notification. If you are not configured for PIN
notification by email, it is your responsibility to provide the users with their
extension and the PIN that was displayed when you added them.
7
Activate location phones. See page “Activate location phones” on
page 7..
Once your phone system is working, you can customize it to suit your
company’s needs. Refer to Customizing your phone system on page
“Customizing your phone system” on page 9..
Activate location phones
To activate location phones, log in each telephone that you have added at a
location and follow these steps.
The network icon connector is identified by the
symbol.
Mitel IP phones
Activate the Mitel 5330/5340, 5224/5324, 5212/5312 and 5304 IP phones with
the following procedure:
1
Depending on whether your network is configured with Power Over
Ethernet (POE), do the one of the following:
• With POE—Connect the Ethernet cable to the network LAN jack and
to the network icon connector of the phone.
•
Final
Without POE
Administering the phone system 7
a Connect one end of an Ethernet cable to the network LAN jack and the
other to network icon connector of the power supply.
b
Connect one end of an Ethernet cable to the phone icon connector on
your power supply and the other end to the network icon connector
on the phone.
c
Plug the phone power pack into a power outlet.
2
If you also need to connect your computer to the LAN, connect an
Ethernet cable from your computer's network port to the phone port
marked PC.
3
If you have a Mitel 5330/5340, or 5224/5324 IP phone do the following. If
you have the Mitel 5212/5312 or 5304 IP phone, go to step 4:
a Wait for the Information Area display to show "Logged Out"
b
Press the ACTIVATE softkey. The Information Area display will show:
Extension
Quit
c
Enter your extension. If you have login/logout privileges, the
Information Area display will show:
PIN
d
Enter your PIN.
e
Press the ENTER softkey. The Information Area display will show:
Extension: xxx
Quit
where xxx is the extension of your phone.
4
If you have a Mitel 5212/5312 or 5304 IP phone do the following. If you do
not go to the next step:
a Wait for the phone to display the following (this may take 30 seconds
or more):
Logged Out
*00
b
To log into your phone, press *00 on the phone keypad. The display
will show:
Extension
8
Administering the phone system
Final
c
Enter your extension. If you have login/logout privileges, the display
will show:
PIN
Enter PIN press #
d
Enter your PIN.
e
Press the # key. The display will show:
Extension: xxx
Quit
where xxx is the extension of your phone.
You have now successfully activated the phone, and can make calls.
Customizing
your phone
system
If you used the quick start procedures, your phone system is working using
default settings. Now you should customize these to suit your company’s
personality and image. The following guide directs you to the various
procedures to help you customize your system:
Do you want call permissions to change depending on the time of day?
This is useful if you want to allow long distance or international calls only
during regular business hours. To do this you must setup your business hours
and permission profiles appropriately.
•
Refer to sections
- Business hours on page “Business hours” on page 81.
- Permission profiles on page “Permission profiles” on page 30.
Do you want the auto attendant to use different prompts from the
defaults provided?
•
Refer to section Auto attendant on page “Auto attendant” on page 54.
Do you want the auto attendant to change depending on whether your
business is open or closed?
This is normally used to provide callers with the business hours while your
business is closed. To do this, you must set up your business hours, add
multiple auto attendants, and change your incoming call routing to select a
different auto attendant depending on the business hours.
•
Refer to sections
- Business hours on page “Business hours” on page 81.
- Auto Attendant on page “Auto attendant” on page 54.
- Incoming call routing on page “Incoming call routing” on page 76.
Do you want incoming calls to ring at multiple phones?
This will help to ensure that calls do not go unanswered. To do this, you must
set up a call group and route incoming calls to that call group.
•
Final
Refer to sections:
Administering the phone system 9
- Managing group features on page “Managing group features” on
page 38.
- Incoming call routing on page “Incoming call routing” on page 76.
Do you want an administrator to monitor another user’s phone?
This will help administrators to manage a manager’s calls. To do this, you
must set up a monitor group and program phone keys to Monitor.
• Refer to section Managing group features on page “Managing group
features” on page 38.
Administering
a phone
system with
other phones
The following phones use the Minet protocol and therefore are closely
integrated with the product:
•
Mitel 5212 IP phone
•
Mitel 5224 IP phone
•
Mitel 5304 IP phone
•
Mitel 5312 IP phone
•
Mitel 5324 IP phone
•
Mitel 5330 IP phone
•
Mitel 5340 IP phone
Other phones that use the SIP protocol are also supported with this product.
The following functionality is supported for subscribers using SIP phones:
•
Basic incoming and outgoing calls
•
Call Hold
•
Call Display
•
Multiple Line Appearances may be possible
•
Callers List and/or Redial List may be implemented on the phone
•
Primary members of Monitor Groups
•
Speed dial (must be programmed on the phone, not through the system's
web interface)
•
Access to voice mail is possible through the auto attendant
•
The phone may have a message waiting lamp and/or icon to indicate the
presence of voice messages
•
Call transfer
Due to limits on hairpin calls (external incoming calls connected to
external outgoing calls), an incoming call to a SIP phone which does a
blind call transfer to a twinned phone may be dropped when the external
twinned target answers the call.
10
Administering the phone system
Final
•
Three way calling
•
Twinning (simultaneous ringing portion, not the pullback capability)
The following web administration capabilities are supported for SIP Phones:
•
Call Coverage
•
Call Group membership
•
Access to external and Internal directories
•
Personal details information (including auto attendant name recording)
For administrators, the following capabilities are supported on SIP phones:
•
Management of SIP phone subscribers membership in any call group
•
Management of permission profiles for SIP phone subscribers
•
Viewing of Phone inventory including SIP phones
SIP phone hardware may have any of the following features:
•
Call display
•
Fixed feature keys
•
Programmable keys
•
Soft keys
•
Hands-free Speakerphone
•
Conference module
•
Power over Ethernet (POE) support
•
Two port switch
•
Message waiting lamp
The activation procedure for a SIP phone depends on the type of phone being
used. Contact your service provider or the appropriate document for details.
Administration for a phone system with SIP phones must include creation of
an auto attendant that includes a menu item configured for voice mail retrieval
because the message button on other phones is not integrated with the phone
system. See Configure auto attendant menu options on page “Configure auto
attendant menu options ” on page 57. and Example - Create a custom auto
attendant for voice mail access on page “Example – Create a custom auto
attendant for voice mail access” on page 72. for details.
Contact your service provider for the list of supported SIP phones.
Users and
locations
Final
Users represent the people within your company, while locations represent
telephones that are not associated with any single user. For example, a
telephone in a conference room or a main reception area is entered into the
phone system as a location.
Administering the phone system 11
Users have Personal Identification Numbers (PINs), while locations do not.
Therefore, locations cannot log in to the web interface (since a PIN is
required). Locations are also not represented in the Auto Attendant Company
Name Directory.
In order for the users and locations within your company to have full phone
service, you must enter them into the system and assign them an extension.
You will also maintain other user or location-specific information, such as
whether or not a user or location has voice mail and what types of calls can be
made from a user or location telephone.
View users and locations
To view a list of users and locations, follow these steps:
1
Select Users and Locations in the left menu.
A list of all of the users and locations that have been entered into your
system appears.
2
Select the Last Name to view detailed information for the user or location.
If the service provider has enabled the dynamic site support capability for
this user, three non-editable fields will be visible. The fields are:
• Allow User to Create Dynamic Site—This checkbox indicates that
the service provider has enabled this capability for this user.
• Dynamic Site CLID—This is this Calling Line ID which will be
transmitted to the far end to indicate where the call is coming from. Note
that the Outgoing Caller ID field above will still be used to determine
whether this number is transmitted. This Dynamic Site CLID takes the
place of the regular "Outgoing Calling Line ID" of a regular static site.
For phones using dynamic sites which make emergency (911) calls, the
Dynamic Site CLID will always be transmitted to the far end.
• Max Call Count for Dynamic Site—this is the maximum number of
concurrent external calls that will be allowed for the dynamic site. External
calls include calls to a tenant auto attendant and the voice mail system.
Add a user
To add a user, follow these steps:
12
1
Select Users and Locations in the left menu.
2
Select Add User from the Add list.
3
In the User Information section, enter information in the following fields:
Administering the phone system
Final
• First Name: (optional) The new user's first name. This will be
displayed in the Internal Directory on the web and on the phones.
• Home Phone: (optional) The new user's home phone number. This
information is stored for your reference.
• Last Name: (mandatory) The new user’s last name. This will be
displayed in the Internal Directory on the web and on the phones.
• Mobile Phone: (optional) The new user's mobile phone number. This
information is stored for your reference.
• Email: (optional) The new user's email address. Users will receive
their extension and PIN by email if your business has been configured
with this option.
4
In the Phone Information section, enter information in the following
fields:
• Extension: (mandatory) The new user’s telephone extension. Select
an Extension for the new user from the Extension list. The Extension list
displays the next five available extensions for users and locations. You
can enter a different valid extension by selecting Other from the Extension
list and typing the extension of your choice in the text box.
You cannot modify the extension once the user has been added.
• Language for Phone: (mandatory) The language selected here will
be used for the user's phone display and any announcements or prompts
generated by the system. The languages listed here are the languages
supported by your service provider.
• Direct Dial Phone Number: (optional) Select a number from the list of
available phone numbers to dedicate one of your company phone
numbers to the new user.
• Outgoing Caller ID: (optional) This field defines what external parties
will see on their displays when this user calls them. Select Use Site
Number to use the default number defined by your Service Provider
(shown at the bottom of your Business Details page). Select Private to
restrict the presentation of the number to the external party. Select any
number from your list of company phone numbers to use that number for
the outgoing caller ID.
• Handsfree Answerback: (optional) Check this box to turn on the new
user to program one of their keys to turn on the Handsfree Answerback
feature for the user (without using one of their programmable memory
keys) (see Memory key configuration options for profiles on page
“Memory key configuration options for profiles” on page 20.).
• User Locked to Phone: (optional) Check the check box to lock the
user to the telephone. This prevents the user from logging out of the
phone. See Login/logout on page “Login/logout” on page 37.. This is
recommended for phones that do not have Login/logout capability.
Final
Administering the phone system 13
• Hold Announcement: (optional) Select an announcement from the
pull-down list to be played to callers when the user puts a call on hold.
5
In the Services section, check the following boxes (optional):
• Allow Dialing from Auto Attendant by Extension: Check this box to
allow calls to be transferred to this extension by the auto attendant. (See
Auto attendant on page “Auto attendant” on page 54..)
• Accessible from Auto Attendant Name Directories: Check this box
to allow calls to be transferred to this extension from the auto attendant's
Last Name and First Name directories. (See Auto attendant on page
“Auto attendant” on page 54..)
• Enable Twinning: Check this box to give the new user the Twinning
feature
• Enable Voice Mail: Check this box to give the new user voice mail.
See Enabling and disabling voice mail on page “Enabling and disabling
voice mail” on page 35.. This will also set the user's call coverage to
redirect unanswered calls to voice mail after four rings.
6
In the Permissions section, enter information in the following fields
(optional):
• Administrator Privileges: Check this box to give the new user
administrator privileges. See Administrator privileges on page “Quick start
for the phone system” on page 7..
• Permission Profile Name: Select a permission profile from the list.
The “Unassigned” profile, which supports emergency and internal call
types, is assigned by default.
7
In the Phone Keys section, enter information in the following field:
• Profile Name: Select a phone key profile from the list. The "System
Settings default" profile is assigned by default.
8
Do one of the following:
•
Click Save.
• Select Save and Edit... to continue adding or to edit user settings.
For example, you can record the auto attendant announcement name by
selecting the Record button that now appears on the page. See Record
auto attendant name on page “Record the auto attendant name
announcement” on page 61..
If the new user's PIN is displayed to you, it is your responsibility to
communicate this information to the user. The PIN notification method for
your company is configured by your system administrator. Contact your
system administrator for information on how your business has been
configured.
14
Administering the phone system
Final
Add a location
To add a location, follow these steps:
1
Select Users and Locations in the left menu.
2
Select Add Location from the Add list.
3
In the Location Information section, enter information in the following
fields (mandatory):
• Name: The location name. Displayed in the Internal Directory on the
web and on the phones.
4
In the Phone Information section, enter information in the following
fields:
• Extension: Select an xExtension for the location from the Extension
list. The Extension list displays the next five available extensions for users
and locations. You can enter a different valid extension by selecting Other
from the Extension list and typing the extension of your choice in the text
field.
You cannot modify the extension once the location has been added.
• Language for Phone: The language selected here is used for the
location's phone display and any announcements or prompts generated
by the system. The languages listed here are the languages supported by
your service provider.
• Outgoing Caller ID:(optional) This field defines what external parties
will see on their displays for a call from this location. Select Use Site
Number to use the default number defined by your Service Provider
(shown at the bottom of your Business Details page). Select Private to
restrict the presentation of the number to the external party. Select any
number from your list of company phone numbers to use that number for
the outgoing caller ID.
• Location locked to Phone: Checking this check box prevents users
from logging in and out of the location phone.
• Handsfree Answerback: (optional) Check this box to turn on the new
user to program one of their keys to turn on the Handsfree Answerback
feature for the user (without using one of their programmable memory
keys) (see Memory key configuration options for profiles on page
“Memory key configuration options for profiles” on page 20..
• Hold Announcement: (optional) Select an announcement from the
pull-down list to be played to callers when the location puts a call on hold.
5
In the Services section, enter information in the following fields:
• Allowing Dialing from Auto Attendant by Extension:Check this box
to allow calls to be transferred to this extension by the auto attendant.
(See Auto attendant on page “Auto attendant” on page 54..)
Final
Administering the phone system 15
• Accessible from Auto Attendant Name Directories: Check this box
to allow calls to be transferred to this extension from the auto attendant's
Last Name and First Name directories. (See Auto attendant on page
“Auto attendant” on page 54..)
• Check the Enable Voice Mail check box to give the location voice
mail. This will also set the location’s call coverage to redirect unanswered
calls to voice mail after four rings.
6
Select a permission profile from the Profile Name list in the Permissions
section. The Unassigned profile is assigned by default.
7
Select a phone key profile from the Profile Name list in the Phone Keys
section. The System Settings default profile is assigned by default.
8
Do one of the following:
•
Click Save.
• Click Save and Edit... to continue adding or to edit location settings.
For example, you can record the auto attendant announcement name by
selecting the Record button that now appears on the page. See Record
auto attendant name on page “Record the auto attendant name
announcement” on page 61..
Users do not require a PIN to log in to a location phone.
If you create a location that is to be used by a Mitel 5201 IP Phone, you
will not be able to print the phone label. This is because printing a label on
a Mitel 5201 IP Phone requires that you log in to the web interface using
that extension and PIN of the phone. Since locations do not have PINs,
you cannot log in as the phone. The solution to this is to create a User
instead of a Location.
Modify a user or location
To modify the information related to an existing user or location, follow these
steps:
16
1
Select Users and Locations in the left menu.
2
Select the Last Name for the selected user or location.
3
Modify information in the fields as required.
4
Click Save.
Administering the phone system
Final
Disable access for a user or location
Disable access for a user or location when you want to remove phone system
access from users or locations without permanently removing them from the
system.
To disable access for a user or location, follow these steps:
1
Select Users and Locations in the left menu.
2
Select one or more Users or Locations by checking their corresponding
check boxes. To select all entries in the list, check the check box in the
heading row.
3
Select Disable Selected. Disabled users will remain in the list, but the
user information is marked with strikethrough lines.
Once access is disabled, users are automatically unassigned from their
telephones as soon as the phone is in an idle state. They are prevented
from making or receiving calls.
A user with access disabled cannot log in to a telephone or the web
administration interface.
System administrators cannot disable their own accounts.
Enable a user or location
You can enable disabled users or locations to restore access to their phone
system.
To enable a disabled user or location, follow these steps:
1
Select Users and Locations in the left menu.
2
Select one or more Users or Locations by checking the corresponding
check boxes. To select all entries in the list, check the check box in the
heading row.
3
Select Enable Selected. The enabled user or location is displayed in the
list without strikethrough lines.
Enabled users are not assigned to phones by default but must log in to an
available telephone to make and receive calls.
Enabled users can log in to the web administration interface.
Final
Administering the phone system 17
Edit user on the user's behalf
Using Edit User on the User's Behalf, a system administrator can log in to
the web administration as other users and make changes for them.
The following menus are displayed in the left pane when you log in as another
user: My Personal Details, My Phone, My Call Coverage, My Call Groups,
Internal Directory, and External Directory. The My Dynamic Site menu is
displayed if configured by the service provider.
To edit more user settings, follow these steps:
1
Select Users and Locations in the left menu.
2
Select the Last Name for the selected user.
3
Select the Edit User on the User's Behalf link at the top of the page.
Logged in as User Name is displayed in the top left corner of the screen
to remind you that you are logged in as another user.
4
Once you finish making changes to the user’s settings, click Save on the
applicable page.
5
Select Previous Level at the top right corner of the page.
You are now logged back into your original session.
Edit location on the location's behalf
Using Edit Location on the Location's Behalf, a phone system
administrator can log in to the web administration as a location and make
changes for the location.
To edit more location settings, follow these steps:
1
Select Users and Locations in the left menu.
2
Select the Last Name for the selected location.
3
Select the Edit Location on the Location's Behalf link at the top of the
page. “Logged in as Location Name” is displayed in the top left corner of
the screen to remind you that you are logged in as the selected location.
4
Once you finish making changes to the location settings, click Save on
the applicable page.
5
Select Previous Level at the top right corner of the page.
You are now logged back into your original session.
18
Administering the phone system
Final
Delete a user or location
Deleting users or locations permanently removes them from the system.
To delete a user or location, follow these steps:
1
Select Users and Locations in the left menu.
2
Select one or more Users or Locations by checking the corresponding
check boxes. To select all entries in the list, check the check box in the
heading row.
3
Click Delete Selected.
4
Click OK.
You cannot delete a user or location if incoming call routing for one of
your company phone numbers is configured to use that user or location.
To delete the user or location in this case, you must change the incoming
call routing configuration for that phone number to use a different
extension.
Deleting users or locations automatically unassigns them from their
telephones – once their phones are idle – and they can no longer make or
receive calls.
Deleted users cannot log in to telephones or to the web administration
interface.
System administrators cannot delete their own system accounts.
A deleted user or location phone extension can be re-assigned to other
users or locations.
Deleting a user affects any Phone key profiles, Phone Key Mappings, and
Auto Attendants that directly reference the user or location.
View user or location site
If your business has more than one site (office), you can view the user or
location site from the users and locations list page.
If a user or location is not logged in to a phone, their site is unknown to
the system and the text "Logged Out" is displayed.
Profiles
Final
Profiles are used to store preset configurations for phone system features.
This enables consistent, quick, and easy deployment of these features to
phone system users.
Administering the phone system 19
Phone key profiles
This section describes phone key configuration options and how to create and
maintain phone key profiles.
Phone key profiles store preset memory key configurations. You can choose
different profiles for different users to make using their phones faster and
easier to use.
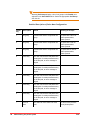
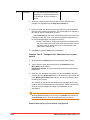
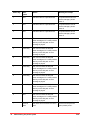
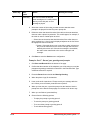
Memory key configuration options for profiles
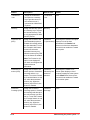
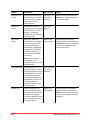
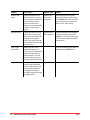
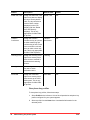
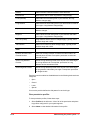
The following table lists the features that can be programmed on a memory
key when creating a phone key profile. Options that require an LED memory
key are labeled LED.
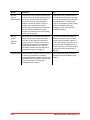
Feature
Description
Default Label
Details
Account Code
Assign the Account Code
option to a memory key so
that an account code can
be assigned to a call
before or during the call.
Note: The Account Code
option is not displayed if
the Account Codes
feature is not enabled for
your business.
ACD Log In/
Out
Use the ACD Log In/Out
feature to turn ACD Log
In/Out. Activate this
feature by pressing the
programmed key on the
phone.
This feature only affects ACD.
Company
Speed Dial
Assign the Company
Speed Dial option to a
memory key to dial one of
the phone numbers in
your External Directory by
pressing the memory key.
Note: The Company
Speed Dial option is not
displayed if you have not
configured the system
with speed dials.
Selecting the Company Speed
Dial option displays a list of the
names in your External Directory
in the Details field. Select one of
the names from this list to enable
the Company Speed Dial option.
20
Administering the phone system
Account Code
1) Leave the Details box blank if
you want users to be prompted
for an account code after
selecting the Account Code key.
2) Type an account code in the
Details box if you want the
Account Code key to behave like
an Account Code Speed Dial
key. In this case, when the
Account Code key is selected,
the account code that you enter
is automatically assigned to the
call.
Final
Feature
Conference
Unit
Description
Assign the Conference
Unit option to a memory
key to provide control of
the conference unit if
connected to a Mitel 5340
IP phone
Default Label
Details
Conference
Unit
N/A
Directory
Assign the Directory option
to a memory key to access
the internal directory. This
is only appropriate for Mitel
5304 IP phones.
Directory
N/A
Forward to AA
(LED)
Assign the Forward to AA
(Auto Attendant) option to
forward all incoming calls to
the Auto Attendant. To turn
the Forward to AA feature
on and off, select the
associated memory key.
When the memory key LED
is lit, the feature is enabled.
Forward to
***(AA Number)
Selecting the Forward to AA option
displays a list of the Auto
Attendants in the Details field.
Select one of the Auto Attendants
from this list to enable the Forward
to AA option.
Note: The Forward to AA
option is not displayed if
you have not configured the
system with auto
attendants.
Forward to Coworker (LED)
Assign the Forward to Coworker option to forward all
incoming calls to a coworker. To turn the Forward
to Co-worker feature on and
off, select the associated
memory key. When the
memory key LED is lit, the
feature is enabled.
Forward to,
followed by the
extension
selected.
Selecting the Forward to Coworker option displays a list of
company employees in the system
in the Details field. Select a user
from this list to enable the Forward
to Co-worker option.
Forward to
Coverage (LED)
Assign the Forward to
Coverage option to forward
all incoming calls directly to
the call coverage you have
set up. To turn the Forward
to Coverage feature on and
off, select the associated
memory key. When the
memory key LED is lit, the
feature is enabled.
Forward to
Coverage
None
Final
Administering the phone system 21
Feature
Description
Default Label
Details
Forward to
Number (LED)
Assign the Forward to
Number option to forward
all incoming calls to a user
defined phone number. To
turn the Forward to Number
feature on and off, select
the associated memory key.
When the memory key LED
is lit, the feature is enabled.
Forward to,
followed by the
number
entered in the
Details field.
Selecting the Forward to Number
option displays a text box in the
Details field. Type the phone
number that you want to have your
calls forwarded to into the text box
to enable the Forward to Number
option.
Assign the Forward to
Prompt option to forward all
incoming calls to a user
defined phone number.
Forward
Forward to
Prompt (LED)
Note: To forward to an external
number, users must have
permission to make that external
call and Redirect Inbound Call to
External Number permission.
To turn the Forward to
Prompt feature on, select
the associated memory key
and, using the phone keys,
type in the number you
would like to have your calls
forwarded to. When the
memory key LED is lit, the
feature is enabled.
Note: To forward to an external
number, users must have
permission to make that external
call and Redirect Inbound Call to
External Number permission.
To turn the Forward to
Prompt feature off, select
the associated memory key
and then the second
FWDOFF softkey.
Handsfree
Answerback
(LED)
Assign the Handsfree
Answerback option to a
memory key so that your
phone can automatically
answer an intercom call and
set up a two-way speech
path.
Handsfree
Answerback
Incoming Calls
List
Assign the Incoming Calls
List option to a memory key
to allow you to see the list of
recently received incoming
calls to your extension. This
has the same function as
the CALLS softkey.
Incoming Calls
List
22
Administering the phone system
Final
Feature
Description
Default Label
Details
Intercom to CoWorker
Assign the Intercom to CoWorker option to a memory
key to allow you to make a
page directly to a coworker's phone.
Intercom to ***
(extension
number)
Select a user or location from the
Details list to enable the Intercom
to Co-Worker option.
Intercom to
Prompt
Assign the Intercom to
Prompt option to a memory
key to allow you to make a
page to a co-worker's
number that you enter after
pressing the key.
Intercom to
Prompt
Join/Leave
Group
Assign the Join/Leave
Group option to a memory
key to join and leave the
selected Call Group by
selecting the programmed
memory key. The memory
key LED is lit when you
have joined the selected
Call Group.
Name of the
selected group
Selecting Join/Leave Group
displays available call groups from
the Details list. Select a call group
from the list to enable the Join/
Leave Group option.
Note: The Join/Leave
Group option is not
displayed if there are no call
groups defined.
Line appearance
Line Appearance keys are
required in order to receive
incoming calls and to make
outgoing calls. Your phone
will normally have two or
three pre-programmed Line
Appearances. The LED on
the programmed key
indicates the status of the
Line Appearance.
Number of the
new line in
sequence.
Monitor Call
Assign the Monitor Call
option to a memory key to
allow call monitoring for an
existing monitor group.
The user of the phone must
be a secondary member of
the monitor group.
Monitor Call
and extension
Final
Selecting Monitor Call displays
available monitor groups in the
Details list. Select a monitor group
from the list to enable the Monitor
Call option.
Administering the phone system 23
Feature
Description
Default Label
Details
Monitor CallSilent
Assign the Monitor Call Silent option to a memory
key to allow call monitoring
for an existing monitor
group.The user of the
phone must be a secondary
member of the monitor
group.
Monitor CallSilent and
extension
Selecting Monitor Call -Silent
displays available monitor groups
in the Details list. Select a monitor
group from the list to enable the
Monitor Call - Silent option.
Monitor Phone
Assign the Monitor Phone
option to a memory key to
allow call monitoring for an
existing monitor group.
User of the phone must be
a secondary member of the
monitor group.
Monitor Phone
and extension
Selecting Monitor Phone displays
available monitor groups in the
Details list. Select a monitor group
from the list to enable the Monitor
Phone option.
One Touch
Speed Dial
Assign the One Touch
Speed Dial option to a
memory key to allow instant
dialling of a pre-defined
phone number. The user
makes a call by pressing
the associated memory key.
Page
Assign the Page option to a
memory key to allow the
user to make a page to all
of the phones at the site.
The page is broadcast
through the speaker of each
available phone.
24
Administering the phone system
Type the number that you want to
speed dial in the Details box.
Page
Final
Feature
Description
Default Label
Details
Park/Retrieve
Assign the Park/Retrieve
option to put a call on hold
at a park location such that
it can be retrieved from any
other phone at your
business that has a
memory key configured with
the Park/Retrieve option.
When you are on an active
call, selecting a memory
key programmed with the
Park/Retrieve feature will
park the call. When your
phone is idle, selecting a
memory key programmed
with the Park/Retrieve
feature will allow you to
retrieve a parked call by
entering the park location.
Park/Retrieve
N/A
Pickup
Selecting Pickup displays the
available pickup groups in the
Details list. Select a pickup group
from the list to enable the Pickup
option
Note: If the Park/Retrieve
feature is being used by
your business, include a
memory key configured with
Park/Retrieve option in all
phone key profiles to
ensure that parked calls
can be retrieved from any
phone.
Pickup
Assign the Pickup option to
a memory key to allow a
user to answer an incoming
call to any member of the
call pickup group.
Note: The Pickup option is
not displayed if there are no
call pickups groups defined.
Final
Administering the phone system 25
Feature
Description
Default Label
Details
Redial List / Dial
Assign the Redial List / Dial
option to a phone to display
the list of recently dialled
calls. The key can also be
used to Dial a number
displayed on the LCD
display (Call lists, Redial
lists, and Directory
displays). This is only
appropriate for Mitel 5304
IP phones.
Redial / Dial
N/A
Transfer /
Conference
Assign the Transfer /
Conference key to a phone
to allow transferring and
conferencing of calls. Press
once to transfer a call and
twice to make a three-way
call. This is only appropriate
for Mitel 5304 IP phones.
Transfer /
Conference
N/A
Twinning on/off
Assign the Twinning on/off
option to a memory key to
allow a user to activate or
deactivate their twinning
feature.
Twinning
Unassigned
An Unassigned memory
key has no action
associated with it.
Unassigned
N/A
Voice Mail
Assign the Voice Mail
option to a memory key to
allow access to the Voice
Mail system. This is only
appropriate for Mitel 5304
IP phones.
Voice Mail
N/A
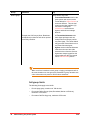
View phone key profiles
To view phone key profiles, follow these steps:
26
1
Select Profiles in the left menu. A list of all call permission and phone key
profiles configured for your system appears.
2
Select a profile from the Name list to view detailed information for the
selected profile.
Administering the phone system
Final
Default phone key profile
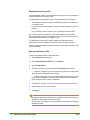
You cannot edit the System Settings default profile. If you do not create and
assign a custom phone key profile to a user or location, or if you unassign a
user or location from a custom phone key profile, the default phone key profile
will be used.
Add a phone key profile
To add a phone key profile, follow these steps:
1
Select Profiles in the left menu.
2
Select Add Phone Key Profile from the Add list.
3
Type a Profile Name.
4
Click Save.
The profiles list appears.
5
Select the profile name you have just created by checking the box and
select Edit Selected.
The Phone Keys Profile Details page appears.
6
Select the phone model from the Phone Model drop-down list.
7
Select the memory key that you want to program by moving the mouse
icon over the button and left-click.
The Program Memory Key Details page appears.
8
Complete the following fields:
•
Feature: Select the feature to be programmed.
• Locked: To prevent a user from changing the selected memory key
configuration, select this check box.
• Label: Type in a description. If no description is typed, the system
default will be applied.
• Details: Select from a drop-down list or type in the required number
without any spaces or characters. Not all features require this field.
You should lock the Line Appearance configurations in the phone key
profile. Line Appearances are required to make and receive phone calls.
9
Click Save.
10 Click Close Window to close the window.
Final
Administering the phone system 27
Your phone key profile is updated.
11 Repeat steps 7-10 for each memory key to be programmed.
12 Assign users to the new profile. (optional)
To cancel your changes, select Close Window, instead of the Save
button in step 9.
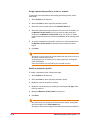
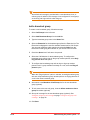
Assign a phone key profile to a user or location
To associate users or locations with existing phone key profiles, follow these
steps:
1
Select Profiles in the left menu.
2
Select the profile name that you want to assign users to by checking the
box and select Edit Selected.
The Phone Key Profile Details page appears.
3
Scroll down the page to the Available Users List.
4
Select the user’s name or location from the Available Users list.
5
Select the right directional arrow button to move the user or location into
the Members of this Profile list. You can move as many users and
locations to the Members of this Profile list as you choose. To select
multiple users and locations, hold down the Ctrl key while selecting each
name.
6
To remove members from the profile, select one or more members from
the Members of this Profile list and then select the left directional arrow
button.
7
Click Save.
Assigning a user or location to a profile applies the profile as soon as the
user or location phone is idle. Unassigning a user or location from a
profile immediately applies the default phone key profile.
Assigning a phone key profiles to users or locations can affect their
existing phone key configurations based on the following rules:
If a key mapping in the new profile is configured as Locked, the changes
will overwrite the existing configuration for that key.
If a key mapping in the new profile is not configured as Locked the
changes will not overwrite the existing configuration for that key.
28
Administering the phone system
Final
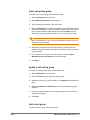
Modify a phone key profile
To modify a phone key profile, follow these steps:
1
Select Profiles in the left menu.
2
Select the profile name that you want to assign users to by checking the
box and select Edit Selected.
The Phone Keys Profile Details page appears.
3
Modify the Profile Name if required.
4
Modify the Membership List if required.
If you have made changes in steps 3 or 4, click Save to save your
changes before moving to step 5.
5
Select the phone model from the Phone Model drop-down list.
6
Select the memory key that you want to program by moving the mouse
icon over the button and left-clicking.
The Program Memory Key Details page appears.
7
Complete the following fields:
•
Feature: Select the feature to be programmed.
• Locked: To prevent a user from changing the selected memory key
configuration, select this check box.You should lock the Line Appearance
configurations in the phone key profile. Line Appearances are required to
make and receive phone calls.
• Label: Type in a description. If no description is typed the system
default will be applied.
• Details: Select from a drop-down list or type in the required number
without any spaces or characters. Not all features require this field.
• Status: Only appears with the Forward features. Select Active or
Inactive. You will be able to Activate or deactivate the feature by pressing
this memory key on the phone once it is programmed.
8
Click Save.
9
Click Close Window to close the window.
Your phone key profile is updated.
10 Repeat steps 6-9 for each memory key to be programmed.
Final
Administering the phone system 29
Saving changes to a profile applies them to the members of the profile as
soon as the member's phone is idle. Changes to key profiles are applied
based on the following rules:
• If a key mapping is designated Locked, changes will overwrite existing
customizations.
• If a key mapping is not designated Locked, changes will not overwrite
existing customizations.
You cannot modify the default phone key profile ‘System Settings default’.
Delete a phone key profile
To permanently delete a profile from the system, follow these steps:
1
Select Profiles in the left menu.
2
Select one or more phone key profiles by checking the corresponding
check boxes. To select all entries in the list, check the check box in the
heading row.
3
Click Delete Selected.
4
Click OK.
You cannot delete the default phone key profile ‘System Settings default’.
You cannot delete a profile with associated members.
Permission profiles
Permission profiles define permissions for users and locations related to
outbound calling. Every user or location is associated with a permission
profile, and the ability to place calls depends on the associated profile. This
section describes permission types and how to create and maintain
permission profiles.
Permission types
The following permission types can be included in a permission profile:
30
Call Type
Definition
Emergency (911)
Calls to the number used to report an emergency. In North
America, dial 911. This permission is active for all users at all
times.
Administering the phone system
Final
Internal
Calls to another extension within the same business.
International
International calls to which long-distance charges apply.
Local (external)
Calls within the local calling area of your business. No longdistance charges apply.
Long Distance
Calls outside the local calling area of your business and outside of
your region. Long-distance charges apply.
Operator Assisted
Calls in which the operator is involved, typically resulting in long
distance charges.
Regional
Calls outside the local calling area of your business and within
your region. Long-distance charges apply.
Toll Free (1-800)
Long distance calls to which no charges apply. Typically, these
numbers begin with 1-800.
Toll Premium
Calls to a toll number to which charges apply. Typically, these
numbers begin with 1-900.
Other
Redirect Inbound Call to
External Number
Allow call coverage, transfer or forward of external calls to an
external phone number. Prerequisite: permission to make the
external call itself.
Select Long Distance
Provider
Include a long distance provider code as part of the dialed digits
for a long distance call. Prerequisite: permission for Long
Distance and/or International calls.
Select Regional Provider
Include a long distance provider code as part of the dialed digits
for long distance calls within your region. Prerequisite: permission
for Regional calls.
Permission can be enabled or disabled based on the following business hours
categories:
•
Open
•
Closed
•
Lunch
•
Special
Your service provider defines the dial pattern for each call type.
View permission profiles
To view permission profiles, follow these steps:
Final
1
Select Profiles in the left menu. A list of all of the permission and phone
key profiles configured for your system appears.
2
Select Name to view detailed information for the profile.
Administering the phone system 31
Default permission profile
The “Unassigned” profile is the default permission profile. It is preconfigured
to allow internal and emergency calls.
The default permission profile is used under the following circumstances:
•
To determine what type of calls are allowed from phones where there is
no logged-in user.
•
If you do not create and assign a custom permission profile for a user or
location.
•
If you unassign a user or location from a custom permission profile.
Use custom permission profiles for users and locations and the default
permission profile to determine what type of calls can be made from phones
and locations where there is no logged-in user.
The default permission profile should contain the minimum possible
permissions to avoid unauthorized calls that have associated charges.
You can modify the default permission profile to include other call types, but it
cannot be deleted.
Add a permission profile
To add a permission profile, follow these steps:
1
Select Profiles in the left menu.
2
Select Add Permission Profile from the Add list.
3
Type a Profile Name.
4
To allow a call type, check the appropriate Call Type check boxes:
• To allow a call type to occur at any time on any day of the week, select
all of the check boxes beside the call type.
• To allow a call type to occur only during certain business hours, select
the check boxes beside the call type that corresponds to the business
hours during which the call type is allowed.
5
To disallow a call type, clear all of the check boxes beside the call type.
6
Repeat steps 4 to 5 for each call type.
7
Click Save.
Emergency and internal call types are enabled by default and cannot be
disabled for all business hours in all profiles.
Phones without a logged-in user are assigned to the default “Unassigned”
permission profile.
32
Administering the phone system
Final
Assign a permission profile to a user or location
To associate users and locations with existing permission profiles, follow
these steps:
1
Select Profiles in the left menu.
2
Select the Name to select a specific permission profile.
3
Select the user or location name in the Available Users list.
4
Select the right directional arrow button to move the user or location into
the Members of this Profile list. You can move as many users and
locations to the Members of this Profile list as you choose. To select
multiple users and locations, hold down the Ctrl key while selecting each
name.
5
To remove members from the profile, select one or more members from
the Members of this Profile list and select the left directional arrow
button.
6
Click Save.
Assigning a user or location to a profile applies the new profile as soon as
the user or location phone is idle.
Unassigning a user or location from a profile applies the “Unassigned”
profile immediately.
Users and locations can only belong to one profile at a time.
Modify a permission profile
To modify a permission profile, follow these steps:
1
Select Profiles in the left menu.
2
Select the Name to select a specific permission profile.
3
Modify the name of the profile if required.
4
Modify the call permissions by checking or clearing the Call Type check
boxes as required.
5
Modify the Members of this Profile list if required.
6
Click Save.
An administrator can modify the default permission profile, Unassigned,
with the exception of the Profile Name field.
Emergency and internal call types are enabled and cannot be modified for
Final
Administering the phone system 33
all Business hours.
Hours of business are configured on the Business Details page.
Delete a permission profile
To permanently delete a profile from the system, follow these steps:
1
Select Profiles in the left menu.
2
Select one or more profiles by checking the corresponding check boxes.
To select all entries in the list, check the check box in the heading row.
3
Click Delete Selected.
4
Click Save.
You cannot delete the default permission profile “Unassigned”.
You cannot delete a profile with associated members.
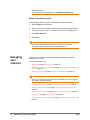
Managing
user
features
This section provides the procedures required to manage the features
available to your users.
For more information, see
•
Reset PIN on page “Reset PIN” on page 35.
•
Enabling and disabling voice mail on page “Enabling and disabling voice
mail” on page 35.
•
Reset voice mail PIN on page “Reset voice mail PIN” on page 36.
The voice mail PIN is not the same as the PIN the user uses to log into
their phone and web interface.
34
•
Configure permissions on page “Configure permissions” on page 36.
•
Assign a phone key profile on page “Assign a phone key profile” on
page 36.
•
Assign a phone number on page “Assign a phone number” on page 37.
•
Login/logout on page “Login/logout” on page 37.
•
Configure language preferences on page “Managing group features” on
page 38.
Administering the phone system
Final
Reset PIN
To reset a user's PIN, follow these steps:
1
Select Users and Locations in the left menu.
2
Select the Last Name to select the user.
3
Select Save and Reset PIN.
Users will receive their extension and PIN by email if your business has
been configured with this option and if the user has a valid email address
configured.
If the new user's PIN is displayed to you, it is your responsibility to
communicate this information to the user. Your service provider
configures the PIN notification method for your company.
For information about the voice mail PIN, see Reset voice mail PIN on
page “Reset voice mail PIN” on page 36..
Enabling and disabling voice mail
To enable or disable voice mail for a user or location, follow these steps:
1
Select Users and Locations in the left menu.
2
Select the Last Name to select the user or location.
3
Choose one of the following:
• To enable voice mail, check the Enable Voice Mail check box in the
Services section.
• To disable voice mail, clear the Enable Voice Mail check box in the
Services section.
4
Click Save.
To enable voice mail for a user or location, there must be voice mail
boxes associated with your business that are available for assignment.
When you disable voice mail for a user or location, the associated voice
mailbox may not become available for assignment until your service
provider has deleted the existing messages and recordings.
Final
Administering the phone system 35
Reset voice mail PIN
Users are able to reset their own voice mailbox PIN through their web
interface. To reset a user's or location's voice mailbox PIN on their behalf,
follow these steps:
1
Edit the user on their behalf - see the section Edit the User on the User's
Behalf on page “Edit user on the user's behalf” on page 18..
2
Follow the user steps to reset the voice mail. Consult the Mitel IP Phone
Reference Guide.
The voice mail PIN is not the same as the PIN the user uses to log into
their phone and web interface. See Reset PIN on page “Reset PIN” on
page 35..
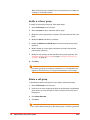
Configure permissions
The permissions profile determines which types of calls users or locations can
make from their telephones.
To configure a permission profile for an existing user or location, follow these
steps:
1
Select Users and Locations in the left menu.
2
Select the Last Name for the selected user or location.
3
Select a permission profile from the Permission Profile Name list in the
Permissions section of the user or location Details page.
4
Click View Profile.
The Permission Profile Details page opens.
5
Click Save.
Assign a phone key profile
This section describes how to assign a phone key profile to an existing user or
location. Using a phone key profile, you can provide a default configuration for
the memory keys on the user or location phone.
To assign a phone key profile, follow these steps:
36
1
Select Users and Locations in the left menu.
2
Select the Last Name for the user or location.
Administering the phone system
Final
3
Select a phone key profile from the Profile Name list in the Phone Keys
section of the user or location Details page. You can view the details of a
phone key profile by first selecting it from the Profile Name list and then
selecting the adjacent View Profile button.
4
Click Save.
Assign a phone number
To assign a phone number to a new user, select a phone number from the
Direct Dial Phone Number list when adding the user. The Direct Dial Phone
Number list contains a list of all phone numbers available to your company
that are unassigned.
To assign a phone number to an existing user, associate the phone number
with the user's extension on the Incoming Call Routing page. Refer to
Incoming call routing on page.
Login/logout
By default, users and locations can log in and log out of phones. To disable
the login/logout feature, lock the user or location to the phone.
To lock a user or location to a phone, follow these steps:
1
Select Users and Locations in the left menu.
2
Select the Last Name for the selected user or location.
• For users, check the User Locked to Phone check box in the User
Information section.
• For locations, check the Location locked to phone check box in the
Location Information section.
3
Click Save.
To unlock a user or location from a phone, follow these steps:
Final
1
Select Users and Locations in the left menu.
2
Select the Last Name for the selected user or location.
3
For users, clear the User Locked to Phone check box in the User
Information section.
4
For locations, clear the Location locked to phone check box in the
Location Information section.
5
Click Save.
Administering the phone system 37
Managing
group
features
Using call group, incoming calls can be routed to multiple users. Each call
group type routes calls to group members differently. Users can join or leave
the call groups to which they belong. Certain types of call groups (Broadcast,
Hunt, and Rollover) are also associated with call coverage so that calls can be
handled even when not answered by a group member. The following table
lists the group types available:
Group
Definition
Key
Broadcast
group
Incoming calls to a broadcast group are
routed to all group members at the same
time causing all available members’ phone
lines to ring simultaneously. The phones
stop ringing once the call has been
answered or forwarded to call coverage.
Broadcast groups provide an equal
opportunity for all group members to
answer group calls.
Call pickup
group
Incoming calls to any member of a call
pickup group ring the member of that group
plus provide notification to other members
(via a flashing pickup key). Any member of
the group can answer the call on behalf of
their co-worker by pressing the pickup key.
The phone stops ringing once the call is
answered or the call is redirected to the
member's call coverage setting. Note that
the extension used to identify the call pickup
group cannot be called.
Call pickup groups allow any member of
a group to answer calls for their coworkers.
Hunt group
(linear)
Incoming calls to a linear hunt group are
routed to each group member in turn, and
always start with the first member listed.
Each phone rings in turn for a prescribed
number of rings. If the call is not answered,
it is passed to the next available member’s
line. This continues until the call is
answered or forwarded to call coverage.
Linear hunt groups ring one phone at a
time, thus establishing a preference for
who will answer a group call.
Hunt group
(circular)
Incoming calls to a circular hunt group are
routed to each member of the group in turn,
and always start with the member following
the last member on the list whose phone
rang. Each phone rings in turn for a
prescribed number of rings. If the call is not
answered, it is passed to the next available
member’s line. This continues until the call
is answered or forwarded to call coverage.
Circular hunt groups share the load of
answering a group call because calls do
not always route to the first member
listed. Phones ring one at a time as the
group call is passed from one member
to the next on the list.
38
Administering the phone system
Final
Group
Definition
Key
Monitor
groups
Incoming calls to the monitor primary group
member can be monitored and picked up by
the monitor secondary group members if
they have a memory key configured to
Monitor Call on their phones. Calls to a
monitor group will cause the monitor
primary and secondary phones to ring until
the call is either answered by a group
member or forwarded to the call coverage
for the monitor primary.
Using monitor call, multiple members
can answer incoming calls for another
user and can be alerted when that user
has available lines. To activate this
group once it has been created, assign
Monitor Call /Monitor -Silent key
mappings for your monitor group’s
secondary members.
The primary group member can have their
phone monitored for activity rather than
their calls. In this instance a secondary
group member must have a memory key
configured as Monitor Phone. When the
primary group member is on a call the
secondary members see the LED next to
programmed memory key light up.
A secondary member that assigns a
Monitor Phone key is able to monitor
when the primary member’s phone is
active as the memory key LED is lit. A
memory key that is programmed as a
Monitor Phone key can also be used as
a speed dial to the monitored user’s
extension.
Incoming calls to a rollover group are routed
to each group member in turn always
starting with the first member in the list until
an available phone is located. The call rings
on this phone until it is answered or
forwarded to call coverage.
Calls to a Rollover group will only be
presented to the first available group
member.
(Monitor Call)
Monitor
groups
(Monitor
Phone)
Rollover group
Final
Administering the phone system 39
Group
Definition
Key
There are two key roles:
Queue group
•
Extends the Call Groups (Hunt, Broadcast
and Rollover) to allow for calls to be queued
on a Busy condition.
Tenant Administrators can be the
same person who serves as the
Tenant Admin for OfficeConnect, or
someone different. This role has
access to the User Interface (UI)
and uses it to designate
OfficeConnect extensions as
Agents, and build and manage
Queues.
All Tenant Administrators also
have Agent privileges and can
accept calls from queues just like
any other Agent. The Tenant Admin
may grant the Tenant Admin role to
any other silhouette Agent.
•
Agents are the individual silhouette
extensions who can have calls
directed to them from the Queues.
Agents are always logged into the
system whenever they are logged
into an OfficeConnect phone.
When a call to a broadcast or hunt group is ringing, subsequent calls to
the same broadcast or hunt group are presented to group members one
call at a time when the previous call has been answered.
Call group limits
The following limits apply to the N240.
40
•
Per site page group, maximum of 100 devices
•
Per tenant Calling Groups (Hunt, Broadcast, Monitor or Rollover),
maximum of 100 users
•
Per tenant Call Pick-Up group, maximum of 50 users
Administering the phone system
Final
View call groups
The Call Groups list page displays a list of all call groups in the system. To
view call groups, select Call Groups in the left menu. A list of all call groups
appears.
Assign users to a call group
To associate users with an existing call group, follow these steps:
1
Select Call Groups in the left menu.
2
Select the Name to select a specific call group.
3
Select the user’s name in the Available Users list.
4
Select the right directional arrow button to move the user into the
Members of Call Group list. You can move as many users to the
Members of Call Group list as you choose. To select multiple users, hold
down the Ctrl key while selecting each name.
5
To remove members from the call group, select one or more members
from the Members of this Call Group list and then select the left
directional arrow button.
6
Click Save.
Users assigned to a broadcast, hunt, or rollover group are logged into the
group and can receive calls by default.
Users assigned to a pickup group are logged into the group and can
answer calls by default.
When assigning users to a monitor group, the monitor secondaries must
configure Monitor Call, Monitor Call Silent, or Monitor Phone memory key
mappings in order for the group behavior to take effect.
When assigning users to a hunt group, you must also configure the After
'x' rings send call to next member list to specify the number of times
each users phone should ring before the call is passed to the next user.
By unassigning a user from a call group, group behavior stops as soon as
a call in progress is completed.
Users can belong to multiple groups.
Lock members to a call group
This section describes how to set up a call group in such a way that the
members cannot leave it. This ensures that the members are aware of all
incoming calls to their call group. This feature applies to broadcast, pickup,
hunt and rollover groups only.
To lock members to a call group, follow these steps:
Final
Administering the phone system 41
1
Select Call Groups in the left menu.
2
Select the Name to select a specific call group.
3
Clear the Allow Members to Leave Group? check box.
4
Click Save.
By default, call group members are not locked to a call group.
Configure call group call coverage
Call group call coverage determines how a call is handled if none of the call
group members answer the call. Call coverage applies only to broadcast,
hunt, and rollover groups. The monitor primary call coverage applies to
incoming calls to a monitor group. For incoming calls to a member of a call
pickup group, the call coverage setting of that member applies. The call
coverage options available are: Employee Voice Mail, Auto Attendant,
Employee, and Another Phone Number.
To configure call group call coverage, follow these steps:
1
Select Call Groups in the left menu.
2
Select the Name to select a specific broadcast, hunt, or rollover call
group.
3
From the Call Coverage section, select one of the following call coverage
options:
• Employee Voice Mail: This directs the call group to the selected
employee’s voice mail box.
• Auto Attendant: This directs the call group call to the auto attendant
selected from the adjacent list.
• Employee: This directs the call group call to the employee selected
from the adjacent list
• Another Phone Number: This directs the call group call to the phone
number in the adjacent text box.
4
Define when call coverage will take effect.
- Broadcast and rollover groups: From the After x rings send
this call group’s calls to list, select the number of times you
want the phone(s) to ring before call coverage takes effect.
- Hunt groups: From the After x unanswered phones list, select
the number of times you would like the call to be transferred from
one member to another before call coverage takes effect.
5
42
Click Save.
Administering the phone system
Final
No default call coverage is provided when a new broadcast, hunt, or
rollover group is added. If call coverage is not configured for a call group,
an incoming call rings until the caller hangs up.
Add a broadcast group
To create a new broadcast group, follow these steps:
1
Select Call Groups in the left menu.
2
Select Add Broadcast Group from the Add list.
3
Type the broadcast group name in the Name field.
4
Select an Extension for the broadcast group from the Extension list. The
Extension list displays the next five available extensions for Call Groups.
You can enter a different valid extension by selecting Other from the
Extension list and typing the extension of your choice in the Text field.
5
Check the Queue box if calls are to be queued.
6
Select the Call Behavior for the broadcast group. To configure the
broadcast group calls to ring on idle group member phones, select Only
ring phones not is use option.
7
To configure the broadcast group calls to ring on all group member
phones even if a group member is already on a call, select the Ring all
phones option.
When the “Ring all phones” option is selected, incoming broadcast group
calls are still queued when group member phones are ringing because of
a call to the same broadcast group.
8
Add names to the Members of Call Group list for the new broadcast
group (optional).
9
To lock users to the new call group, clear the Allow members to leave
group? checkbox (optional).
10 Set up call coverage for the new broadcast group (optional). See
Configure call group call coverage on page “Configure call group call
coverage” on page 42..
11 Click Save.
Final
Administering the phone system 43
If a broadcast group has no members assigned to it, or if all members are
logged out of their phones, the call goes immediately to call coverage.
When a broadcast group is created, it has all call permissions to enable
call coverage to an external number.
Modify a broadcast group
To modify an existing broadcast group, follow these steps:
1
Select Call Groups in the left menu.
2
Select the Name to select a specific broadcast group.
3
Modify the broadcast group name if required. The Name field cannot be
left blank.
4
Modify the Queue box if necessary.
5
Select the Call Behavior for the broadcast group. To configure the
broadcast group calls to ring on idle group member phones, select Only
ring phones not is use option.
6
To configure the broadcast group calls to ring on all group member
phones even if a group member is already on a call, select the Ring all
phones option.
When the “Ring all phones” option is selected, incoming broadcast group
calls are still queued when group member phones are ringing because of
a call to the same broadcast group.
7
Update the Members of Call Group list for the selected broadcast group
(optional).
8
Modify whether or not the group members are locked to the selected
broadcast group (optional)
9
Modify call coverage for the new broadcast group (optional). See
Configure call group call coverage on page “Configure call group call
coverage” on page 42..
10 Click Save.
If a broadcast group has no members assigned to it, or if all members are
logged out of their phones, the call goes immediately to call coverage.
44
Administering the phone system
Final
Add a call pickup group
To create a new call pickup group, follow these steps:
1
Select Call Groups in the left menu.
2
Select Add Pickup Group from the Add list.
3
Type the pickup group name in the Name field.
4
Select an Extension for the call pickup group from the Extension list. The
Extension list displays the next five available extensions for Call Groups.
You can enter a different valid extension by selecting Other from the
Extension list and typing the extension of your choice in the Text field.
Note: The Extension is used for group identification purposes only. The
extension cannot be dialed.
5
Add names to the Members of Call Group list (by selecting from the
Available Users list and then selecting the right arrows) for the new pickup
group (optional).
6
If you choose to lock users to the new call group, clear the Allow
Members to Leave Call Group check box (optional).
7
Click Save.
Modify a call pickup group
To modify an existing pickup group, follow these steps:
1
Select Call Groups in the left menu.
2
Select the Name to select a specific pickup group.
3
Modify the pickup group name if required. The Name field cannot be left
blank.
4
Update the Members of Call Group list for the selected pickup group
(optional).
5
If required, modify whether or not the group members are locked to the
selected pickup group.
6
Click Save.
Add a hunt group
To add a new hunt group, follow these steps:
Final
Administering the phone system 45
1
Select Call Groups in the left menu.
2
Select Add Hunt Group from the Add list.
3
Type the hunt group name in the Name field.
4
Select an Extension for the hunt group from the Extension list.
The Extension list displays the next five available extensions for call
groups. You can enter a different valid extension by selecting Other from
the Extension list and typing the extension of your choice in the Text field.
5
Select the Hunt Group Type from the Type list. Circular Hunt Group is
the default type.
6
Click the Queue checkbox if calls are to be queued.
7
Select the Call Behavior for the hunt group.
8
To configure the hunt group calls to ring on idle group member phones,
select Only ring phones not in use option.
9
To configure the hunt group calls to ring on all group member phones,
even if the group member is already on a call, select the Ring all phones
option.
When “Ring all phones” option is selected, incoming hunt group calls are
still queued when group member phones are ringing because of a call to
the same hunt group. See Managing group features on page “Managing
group features” on page 38..
10 Add names to the Members of Call Group list for the new hunt group
(optional).
11 From the After 'x' rings send call to next member list, select how many
times you would like a hunt group member’s phone to ring before the call
is transferred to the next member (optional).
12 If you choose to lock users to the new call group, clear the Allow
members to leave group? check box (optional).
13 Set up call coverage for the new hunt group (optional). See Configure call
group call coverage on page “Configure call group call coverage” on
page 42..
14 Click Save.
If a hunt group has no members assigned to it, or if all members are
logged out of their phones, the call goes immediately to call coverage.
When a hunt group is created, it has all call permissions to enable call
46
Administering the phone system
Final
coverage to an external number.
Modify a hunt group
To modify an existing hunt group, follow these steps:
1
Select Call Groups in the left menu.
2
Select the Name corresponding to the hunt group that you want to modify.
3
Modify the hunt group name if required. The Name field cannot be left
blank.
4
Modify the hunt group type in the Type list (optional).
5
Modify the Queue checkbox if necessary.
6
Modify the hunt group Call Behavior (optional).
7
To configure the hunt group calls to ring on idle group member phones,
select Only ring phones not is use option.
8
To configure the hunt group calls to ring on all group member phones,
even if the group member is already on a call, select the Ring all phones
option.
When Ring all phones option is selected, incoming hunt group calls are
still queued when group member phones are ringing because of a call to
the same hunt group.
9
Modify the Members of Call Group list for the selected hunt group if
required.
10 If you choose to lock users to the call group, clear the Allow members to
leave group? check box (optional).
11 From the After 'x' rings send call to next member list, select how many
times you would like a hunt group member’s phone to ring before the call
is transferred to the next member (optional).
12 Modify Call Coverage for the selected hunt group (optional).
13 Click Save.
If a hunt group has no members assigned to it, or if all members are
logged out of their phones, the call goes immediately to call coverage.
Final
Administering the phone system 47
Change the order of a hunt group member list
The order in which Hunt Group members appear in the Members of Call
Group list determines the order in which the phones will ring to address the
incoming call.
To change the order of the Members of Call Group list, follow these steps.
1
Select Call Groups in the left menu.
2
Select the Name to choose a specific Hunt Group.
3
Select the Name in the Members of Call Group list that you would like to
move.
4
Press Move Up to move the user up in the list, or press Move Down to
move the user down the list.
5
Click Save.
Add a monitor group
To create a new monitor group, follow these steps:
1
Select Call Groups in the left menu.
2
Select Add Monitor Group from the Add list.
3
Select the Primary User from the list provided. This is the user whose
calls will be monitored by other users. A Monitor group takes the name
and extension of the Monitor primary.
4
Add names to the Members of Call Group list for the new Monitor group
(optional). (The Monitor primary is, by default, a member of the Monitor
group and cannot be removed.) These are the users that will be
monitoring the calls and are referred to as Monitor secondary members.
5
Click Save.
To enable monitor group behavior, Monitor key mappings must be
assigned for your secondary members.
If a monitor group has no members assigned to it, the call is treated as a
regular incoming call to the primary user.
Since the monitor group has the same extension as the monitor primary
user, there is no change to the way calls are made or received for that
user. Their call coverage still applies to their incoming calls. For
administrators, continue to use the primary user's extension (as required)
when configuring auto attendants or incoming call routing.
48
Administering the phone system
Final
Modify a monitor group
To modify the information for an existing monitor group, follow these steps:
1
Select Call Groups in the left menu.
2
Select the Name corresponding to the monitor group that you want to
modify.
3
Modify the Members of Call Group list for the selected monitor group
(optional).
4
Click Save.
If a monitor group has no members assigned to it, the call is treated as a
regular incoming call to the primary user.
Add a rollover group
To create a new rollover group, follow these steps:
1
Select Call Groups in the left menu.
2
Select Add Rollover Group from the Add list.
3
Type the rollover group name in the Name field.
4
Select an Extension for the rollover group from the Extension list. The
Extension list displays the next five available extensions for Call Groups.
You can enter a different valid extension by selecting Other from the
Extension list and typing the extension of your choice in the Text field.
5
Click the Queue checkbox if calls are to be queued.
6
Add names to the Members of Call Group list for the new rollover group
(optional).
7
If you choose to lock users to the new call group, clear the Allow
members to leave group? check box (optional).
8
Set up call coverage for the new rollover group (optional). See Configure
call group call coverage on page “Configure call group call coverage” on
page 42..
9
Click Save.
If a rollover group has no members assigned to it, or if all members are
logged out of their phones, the call goes immediately to call coverage.
Final
Administering the phone system 49
When a rollover group is created it has all call permissions to enable call
coverage to an external number.
Modify a rollover group
To modify an existing rollover group, follow these steps:
1
Select Call Groups in the left menu.
2
Select the Name to select a specific rollover group.
3
Modify the rollover group name if required. The Name field cannot be left
blank.
4
Modify the Queue checkbox if necessary.
5
Update the Members of Call Group list for the selected rollover group
(optional).
6
Modify whether or not the group members are locked to the selected
rollover group (optional).
7
Modify the call coverage for the selected rollover group (optional). See
Configure call group call coverage on page “Configure call group call
coverage” on page 42..
8
Click Save.
If a rollover group has no members assigned to it, or if all members are
logged out of their phones, the call goes immediately to call coverage.
Delete a call group
To permanently delete a call group from the system, follow these steps:
1
Select Call Groups in the left menu.
2
Choose one or more call groups to delete by checking the corresponding
check boxes. To select all entries in the list, check the check box in the
heading row.
3
Click Delete Selected.
4
Click Save.
You cannot delete a Hunt group, Broadcast group, or Rollover group with
50
Administering the phone system
Final
associated members.
You cannot delete a Hunt group, Broadcast group, or Rollover group if
incoming call routing for one of your company phone numbers is
configured to use that call group. To delete the call group in this case, you
must change the incoming call routing configuration for that phone
number to use a different extension. See Incoming call routing on page
“Incoming call routing” on page 76..
If you delete a Monitor group, the associated Monitor Call, Monitor Phone
and Monitor Silent key mappings will revert to an "Unassigned" key
mapping.
If you delete a call pickup group, the associated pickup key mapping will
revert to an "Unassigned" key mapping.
ACD
Applications
Overview
ACD Applications that are visible through these web pages have to be
provisioned on another system, which is used to manage the ACD
Applications. If you have not subscribed to any ACD Applications, ACD
Applications does not appear in the left menu.
The ACD Application is part of an advanced inbound call application that
enables calls to be held with an announcement when there are no available
Agents to answer them.
Once you have provisioned ACD Applications, ACD Applications is available
in the left menu. You can edit permissions, configure incoming call routing,
configure auto attendant menu options with ACD Applications.
Managing Permissions
You can manage permissions by editing the profile.
To edit the ACD Application, follow these steps:
1
Click ACD Applications in the left menu.
2
Click the Name of the application you want to edit.
The system displays the ACD Application Details - Edit page.
Final
3
In the Permissions section, use the drop-down menu to change the
Permission Profile Name.
4
Click Save.
Administering the phone system 51
External
directory/
speed dials
Using the external directory feature, you can create and maintain a directory
of external names and phone numbers relevant to your company. This list is
available from the web administration interface for all users under Company
Directories/External Directory.
The contact information entered here is also available as an option when
configuring memory keys on the phones with the company speed dial feature.
View the external directory/speed dial list
The External Directory/Speed Dial list displays all of the names and phone
numbers that you entered in the external directory.
To view the External Directory/Speed Dial list, select External Directory/
Speed Dials in the left menu. A list of all entries is displayed with the following
column headings: Name, Number, and Email. The items located in the Name
column are hyperlinks to the corresponding External Directory Entry pages.
Search external directory/speed dial list
To search the External Directory/Speed Dial list, follow these steps:
1
Select External Directory/Speed Dials in the left menu.
2
Type a name and/or phone number in the appropriate Name or Number
field.
3
Click Search. If one or more matches are found, the matches are
displayed. If no match is found, the message, “No match found” appears
in the information panel.
4
To restore the list to display all entries, click Show All.
Add an external directory/speed dial entry
To add a new entry to the External Directory/Speed Dial list, follow these
steps:
52
1
Select External Directory/Speed Dials in the left menu.
2
Click Add Entry.
3
Type the contact name you want to assign to the entry in the Name field.
This can be a person or a company associated with the phone number.
4
Type the phone number you want to assign to the external directory/
speed dial entry in the Phone Number field.
5
Type an email address for the external directory/speed dial entry contact
in the Email field (optional).
Administering the phone system
Final
6
Click Save.
7
You can choose to map one of the keys on your telephone to dial this
number or add it to one of your company phone key profiles.
Precede external phone numbers with the appropriate digits as required.
For example, you may need to include the prefix 9 and 1 + Area Code for
long distance numbers.
The maximum number of External Directory entries is 100.
Modify an external directory/speed dial entry
To modify the information for an existing external directory/speed dial entry,
follow these steps:
1
Select External Directory/Speed Dials in the left menu.
2
Select the Name in the Name column corresponding to the speed dial
that you want to modify.
3
Make the changes of your choice in the Name, Phone Number or Email
fields. (Name and Phone Number fields cannot be left blank.)
4
Click Save.
Precede external phone numbers with the appropriate digits as required.
For example, you may need to include the prefix 9 and 1 + Area Code for
long distance numbers.
Delete an external directory/speed dial entry
To permanently remove an external directory/speed dial entry, follow these
steps:
Final
1
Select External Directory/Speed Dials in the left menu.
2
Select one or more entries by checking the corresponding check boxes.
To select all entries in the list, check the check box in the heading row.
3
Click Delete Selected.
4
Click Save.
Administering the phone system 53
Deleting an external directory entry that is being used by a company
speed dial phone key mapping will have the following effect: Customized
phone key mappings revert to the mapping defined in their phone key
profile and phone key mappings in profiles revert to an “Unassigned”
mapping.
Auto
attendant
The auto attendant can automatically receive and direct your incoming calls
without human intervention. The auto attendant is identified by a name and an
extension. Perform Auto Attendant manipulations such as deleting based on
the auto attendant name and extension.
Menus, prompts, and greetings define how the auto attendant responds when
a phone key is pressed. For example, the default choices for the Auto
Attendant main menu are:
•
1-8 = Transfer to Extension
•
9 = Company Directory
•
* = Previous Menu
The auto attendant must have a main menu and can also have additional
submenus depending on user configuration.
A set of recorded prompts describing callers’ choices is associated with each
menu.
Managing the auto attendant
This section describes how to set up and manage the auto attendant.
View auto attendant list
To view the Auto Attendant list, follow these steps:
•
Select Auto Attendant in the left menu.
A page displays the list of the auto attendants configured for your
company. Auto attendants are identified by names and extensions.
View auto attendant details
To view detailed information about a selected auto attendant, follow these
steps:
54
1
Select Auto Attendant in the left menu.
2
Select the auto attendant Name to view detailed configuration
information. The display contains the following information:
Administering the phone system
Final
The General Information section contains the auto attendant name and
extension information.
A checkmark in the Time of Day Greetings check box indicates that time
of day greetings are enabled for the selected auto attendant. When times
of day greetings are enabled, the system will change the initial greeting to
callers, depending on the time of day.
The Auto Attendant Menu and Menu Options section displays a link for
each auto attendant menu. By default, every auto attendant is created
with a main menu. Submenus are created as part of the menu option
configuration.
3
Click Cancel or another option in the left menu to continue.
Add auto attendant
To add a new auto attendant, follow these steps:
1
Select Auto Attendant in the left menu.
2
Click Add Auto Attendant.
3
Type the auto attendant name in the Auto Attendant Name field.
4
Select an Extension for the auto attendant from the Extension list. The
Extension list displays the next five available extensions for auto
attendants. You can enter a different valid extension by selecting Other
from the Extension list and typing the extension of your choice in the text
field provided.
5
Select the language for the auto attendant from the Default Language
list. The language selected determines the language for the default main
menu prompts and error messages. The Default Language list displays
the languages supported by your service provider.
6
Check the Time of Day Greetings check box to turn on the Time of Day
Greetings (optional). Time of day greeting times are as follows:
7
•
Morning: 12:00 A.M. to 11:59 A.M.
•
Afternoon: 12:00 P.M. to 5:59 P.M.
•
Evening: 6:00 P.M. to 11:59 P.M.
Click Save to save the new auto attendant with the default language,
default menu configuration, and default recordings for prompts and
greetings.
The default choices for the Main Menu are as follows:
Final
•
1—8 = Transfer to Extension
•
9 = Company Directory
•
* = Previous Menu
Administering the phone system 55
To configure custom menus and choices, select the Main Menu link.
Modify an auto attendant
To modify an existing auto attendant, follow these steps:
1
Select Auto Attendant in the left menu.
2
Select the auto attendant Name.
3
Make the changes of your choice to Auto Attendant Name or Time of Day
Greeting.
4
Click Save.
Language is modified on the auto attendant menu pages.
If the default Time of Day greetings are being used, they will play in the
language configured for the main menu.
Delete an auto attendant
To delete an auto attendant from the system along with its associated menus,
choices, prompts, and greetings, follow these steps:
1
Select Auto Attendant in the left menu.
2
Select one or more auto attendants by checking the corresponding check
boxes.
3
Click Delete Selected.
4
Click OK.
You cannot delete an auto attendant if incoming call routing for one of
your company phone numbers is configured to use that auto attendant.
To delete the auto attendant in this case, you must change the incoming
call routing configuration for that phone number to use a different
extension.
Do not delete an Auto Attendant with a name of Zero-out. This auto
attendant is used for a special voice mail feature which your service
provider is responsible for configuring.
56
Administering the phone system
Final
Auto attendant menus
This section describes how to set up and manage auto attendant menus.
View auto attendant menu details
To view all the menus and choice configurations for a selected auto attendant,
follow these steps:
1
Select Auto Attendant in the left menu.
2
Select the Name for the auto attendant menu details you want to view.
3
Click View Expanded Tree at the bottom of the page. An expanded tree
view with the Main menu, all submenus and associated choices for the
selected auto attendant is displayed.
Configure auto attendant menu options
This section describes how to set up or modify the options for auto attendant
menus. The menu options define how the system responds when a caller
selects a phone key.
Menu options can be assigned to each of the following phone keys: 1—9, 0, *,
and #.
When configuring an auto attendant menu, consider the extensions that
are assigned to the users and locations. Extension numbers that are
assigned to users must not share digits with phone key numbers that are
used for auto attendant menu options. For example, if you have users
assigned to extensions 200 to 210 and you configure your main auto
attendant menu to use the 2 key to access a broadcast group, callers to
the auto attendant will not be able to reach these users by dialing their
extension directly. Dialing a 2 will immediately send the call to the
broadcast group.
The choices for each phone key are as follows:
ACD Applications
Transfers the caller to a managed ACD Application.
Auto Attendant
Transfers the caller to another specified auto attendant.
Call Group
Transfers the caller to a specified call group.
Extension (dialed)
Transfers the caller to the dialed extension.
First Name Directory
Transfers the caller to the Internal Company Directory, where entries are listed by first
name.
Final
Administering the phone system 57
Invalid Key
Configures the phone key as unassigned. If a caller presses that phone key on the
dial pad, an error message is played.
Last Name Directory
Transfers the caller to the Internal Company Directory, where entries are listed by last
name.
Previous Menu
The caller can move back one menu level.
Submenu
Transfers the caller to another menu under the parent menu.
System Disconnect
Disconnects the caller from the system, terminating the call.
User
Transfers the caller to a specified user.
Voicemail Deposit
Prompts the caller for their extension and then transfers them directly to the voice
mail box associated with that extension for voice mail deposit.
Voicemail Retrieval
Prompts the caller for their extension and then transfers them to their own voice mail
box voice mail retrieval.
To set up or modify auto attendant choices, follow these steps:
1
Select Auto Attendant in the left menu.
2
Select the Name to select an auto attendant from the list.
3
Select the link in the Auto Attendant Menu and Menu Options section
of the page for the auto attendant menu that you want to configure.
4
Enter a name for the menu in the Menu Name field (optional).
5
Type the introductory prompt text for the menu in the Introductory
Prompt field (optional). This additional text is saved and can later be
used to guide you through recording menu prompts.
6
Select the language for the menu from the Language list (if required).
The language selected determines the language for the default menu
prompts and error messages. The Language list displays the languages
supported by your service provider.
7
Select an option from the Send Caller To list for each of the phone keys.
8
Type prompt text for each phone key configured in the associated
Wording for Prompt field (optional). This additional text is saved and can
later be used to guide you through recording menu prompts.
9
Select the number of times that you want the auto attendant menu
prompts to be repeated from the Play menu prompt list.
10 Configure an action for the auto attendant if there is no input from the
caller (for example, if a caller was not using a touch tone phone), after
prompts have been repeated the configured number of times in the Play
58
Administering the phone system
Final
menu prompt list. There are three options: Call Group, System
Disconnect, and User.
11 Click Save.
12 Record a new menu prompt for the affected auto attendant menu. If you
do not record a new menu prompt, callers will not know how to navigate
the auto attendant. Refer to the Record audio prompt and greetings
section on page “Recording audio prompts and greetings” on page 60.
for details.
Add an auto attendant submenu
To set up an auto attendant menu to reference another auto attendant menu,
follow these steps:
1
Select Auto Attendant in the left menu.
2
Select the Name to select an auto attendant from the list.
3
Select the link in the Auto Attendant Menu section of the page for the
auto attendant menu that you want to create a submenu under.
4
Select the Submenu option from the Send Caller To list for the phone
key that you want the new menu to start from.
5
Type prompt text for the Submenu option in the associated Wording for
Prompt field (optional). This text is saved and can later be used to guide
you through recording menu prompts.
6
Click Save.
7
Configure choices for the new submenu.
Submenus are created with default menu options and prompts. By
default, submenus are configured to use the same language as the
parent menu.
Delete an auto attendant submenu
To delete an Auto Attendant submenu, follow these steps:
Final
1
Select Auto Attendant in the left menu.
2
Select the Name to select an auto attendant from the list.
3
Select the link in the Auto Attendant Menu and Menu Options section
of the page for the auto attendant menu that is the parent to the submenu
you want to delete.
Administering the phone system 59
4
Change the Submenu option to another option in the Send Caller To list
for the phone key that starts the submenu you are deleting.
5
Type prompt text for the choice that has replaced the Submenu option in
the associated Wording for Prompt field (optional). This additional text is
saved and can later be used to guide you through recording menu
prompts.
6
Click Save.
7
Re-record your menu prompt to reflect the change in the affected menu.
When you delete a submenu, the prompts that have been recorded for
the submenu are also deleted.
Recording audio prompts and greetings
This section describes how to record a custom greeting or prompt for the auto
attendants you have created.
The maximum length of any auto attendant prompt is 3 minutes.
Once a prompt has been recorded, it cannot be deleted. To change a
prompt, re-record it.
Checking auto attendant name announcement
As a tenant administrator, you can check whether a user has recorded an
auto attendant name announcement. If a user does not have a name
recorded, callers to an auto attendant in your business who navigate to the
auto attendant’s name directory will hear “Unknown subscriber” rather than
the name of the user or location. If the user does not have an auto attendant
name recorded, you can record the name on the user’s behalf. See Record
auto attendant name announcement on page “Record the auto attendant
name announcement” on page 61..
1
Select Users and Locations in the left menu.
A list of all of the users and locations that have been entered into your
system appears.
60
2
Select the Last Name to view detailed information for the user or location.
3
Scroll to the Services category.
Administering the phone system
Final
Beside Auto Attendant Name Announcement: one of two messages
appears:
•
Recorded—an auto attendant name is recorded
•
Not Recorded—an auto attendant name is not recorded
Record the auto attendant name announcement
The tenant administrator can record the auto attendant name announcement
of the user or location. Any enabled user or location phone—such as the
phone of the administrator—can be used to record the announcement of the
user.
1
Select Users and Locations in the left menu.
A list of all of the users and locations that have been entered into your
system appears.
2
Select the Last Name to view detailed information for the user or location.
3
Click Record beside Auto Attendant Name Announcement.
The Record Name Announcement window opens.
4
Type the extension of the phone on which you want to record the auto
attendant name announcement in the Extension to Call field. This
extension can be any enabled user or location extension, such as your
own phone. Auto attendant and call group extensions cannot be used.
5
Click Call.
The phone of the extension you entered in the Extension to Call field will
ring a maximum of five times.
6
When your phone rings, lift the handset to answer.
7
Listen to a brief set of audio instructions: “Please record your message
after the tone. When you are finished, press # for more options”.
8
When you hear the tone, record the user’s name into the handset.
9
When you are finished, press the # key.
The system plays the following set of options:
•
To listen to the recording, press 1.
•
To save the recording, press 2.
•
To re-record, press 3.
•
To exit without saving changes, press *.
10 Press 2 to save the name announcement.
11 Replace the handset.
Final
Administering the phone system 61
12 Click Close on the pop-up window.
Record auto attendant time of day greetings
To record custom time-of-day greetings for the auto attendant, follow these
steps:
1
Select Auto Attendant in the left menu.
2
Select the auto attendant Name to select an auto attendant from the list.
3
Click Record for the time of day greeting that you want to record.
4
Confirm that the extension displayed matches that of the telephone you
will be recording from. Modify the extension if required.
5
Click Call.
6
When the phone rings, pick up the handset.
7
Listen to the instructions and wait for the tone.
8
Record the greeting into the telephone handset.
9
Press the # key when you are finished.
10 Choose from the following options:
•
To replay greeting press 1
•
To save greeting press 2
•
To re-record greeting press 3
•
To exit without saving press *
11 To record additional greetings, press the appropriate Record and Call
button and repeat steps 7 through 10.
12 Replace the telephone handset.
13 Click Close Window to close the Record Prompt window.
Record auto attendant menu prompts
To record custom menu prompts for the auto attendant, follow these steps:
62
1
Select Auto Attendant in the left menu.
2
Select the auto attendant Name to select an auto attendant from the list.
3
Select the Record link adjacent to the menu or submenu for which you
want to record a prompt.
4
Confirm that the extension displayed matches that of the telephone you
are recording from. Modify the extension if required.
Administering the phone system
Final
5
Click Call.
6
When the phone rings, pick up the handset.
7
Listen to the instructions and wait for the tone.
8
Record the prompt into the telephone handset. You can read the prompt
text if you have already entered it.
9
Press the # key when you are finished.
10 Choose from the following options:
•
To replay greeting press 1
•
To save greeting press 2
•
To re-record greeting press 3
•
To exit without saving press *
11 To record additional menu prompts for another menu, press the
appropriate Record link adjacent to the menu of your choice.
12 Click Call, and repeat steps 7 through 10.
13 Replace the telephone handset.
14 Click Close window to close the Record Prompt window.
Record all greetings and menu prompts
To record all of the Auto Attendant menu prompts and time-of-day greetings
from a single page while using prompt text, follow these steps:
Final
1
Select Auto Attendant in the left menu.
2
Select the auto attendant Name to select an auto attendant from the list.
3
Click Save and Record All at the bottom of the page.
4
Confirm that the extension displayed matches that of the telephone you
are recording from. Modify the extension if required.
5
Press the Record button beside the prompt or greeting that you want to
record.
6
When the phone rings, pick up the handset.
7
Listen to the audio instructions, “Please record your message after the
tone. When you are finished, press # for more options”.
8
When you hear the tone, record the prompt into the handset. Use the
prompt text on the Record Prompt page as a reference for what to say.
9
When you are finished, press the # key.
Administering the phone system 63
10 Choose from the following options:
•
To replay the prompt or greeting press 1
•
To save the prompt or greeting press 2
•
To re-record the prompt or greeting press 3
•
To exit without saving press *
11 For each additional greeting or prompt that you want to record, press the
appropriate Record button and repeat steps 7 through 10.
12 Replace the handset.
13 Click Done to close the Record Prompt page.
Example – Create a custom auto attendant
This topic provides an example of how to create a custom auto attendant. The
auto attendant is being created for the fictitious company, Ace Automobiles.
Ace Automobiles specializes in the sales and repair of blue, red, and old cars.
They have divided their sales and service teams based on a blue, red, or old
car specialty.
Prerequisites:
Before setting up the auto attendant for Ace Automobiles, you must do the
following:
•
Confirm the valid extension ranges for users and call groups.
•
Enter all of your employees with telephones as system users.
•
Add a Blue Car Sales Call Group, a Red Car Sales Call Group and an Old
Car Sales Call Group.
Example: Part A – Create the auto attendant
64
1
Select Auto Attendant in the left menu.
2
Click Add Auto Attendant.
3
Type the auto attendant name and extension in the General Information
section.
4
Select English from the Default Language list.
5
Check the Time of Day Greetings check box in the Time of Day Greeting
section to turn on the Time of Day Greetings. Type prompt text in the
fields provided for each Time of Day Greeting.
•
Morning greeting
•
Afternoon greeting
Administering the phone system
Final
•
Evening greeting
Example: Part B – Configure the auto attendant main menu
options
Select the Main Menu link in the Auto Attendant Menu section. This will
automatically save the auto attendant that you created in Part A.
Type text in the Introductory Prompt field for the Main Menu menu prompt:
“Thank you for calling Ace Automobiles.”
Define the auto attendant Main Menu option for each phone Key by selecting
a choice from the Send Caller To list. At the same time, type prompt text in
the Wording for Prompt fields that you can use as a reference when
recording your prompts.
When defining auto attendant phone key options, keep in mind how you
have assigned extensions to your users call groups, and auto attendants.
One example of how the Ace Automobiles auto attendant main menu
could be defined is provided below. The reasons and any limitations for
the menu options selected are also provided.
Detailed Description of Main Menu Configuration
Phone key
Menu Option
Result
Wording for Prompt
1
Extension
Transfers caller to dialed
extension.
2
Extension
Transfers caller to dialed
extension.
3
Extension
Transfers caller to dialed
extension.
4
Extension
Transfers caller to dialed
extension.
5
Extension
Transfers caller to dialed
extension.
6
Submenu
Transfers caller to a submenu.
To transfer to our Sales
Department, please press 6.
7
Submenu
Transfers caller to a submenu.
To transfer to our Service
Department, please press 7.
Final
“If you know the extension of
the person you are calling,
please enter it now.”
Administering the phone system 65
Phone key
Menu Option
Result
Wording for Prompt
8
Invalid Key
The user can leave the dial pad
action unassigned. If a caller
presses that key on the dial pad,
an error message is played.
9
Last Name
Directory
Transfers the caller to the internal
directory where entries are listed
by last name.
To access the Company
Directory please press 9.
0
User
Transfers the caller to a specified
user.
To speak to an operator,
please press 0.
Note: Selecting User displays a
list of users in the Details area
adjacent to the Send Caller To list.
Select the appropriate user from
this list.
*
Previous Menu
The caller can jump back one
menu level.
#
Invalid Key
The user can leave the dial pad
action unassigned. If a caller
presses that key on the dial pad,
an error message is played.
To return to the previous
menu please press *.
Explanation
• Phone keys 1—5 are defined as an Extension option, which allows a
caller to type in the extension for any user to reach them.
- Reason: The valid extension range for users at Ace Automobiles
is 100 – 599.
• Phone key 6 is defined as a Submenu option which will be used to
access a separate menu for the sales team.
- Reason: A submenu was required because there would not be
enough phone keys to allow direct mapping for all users and call
groups on the main menu.
- Limitation: Selection of phone key 6 for the sales submenu means
that call groups cannot be accessed from the main menu by
dialing their extension (the valid extension range for call groups is
600 – 699).
• Phone key 7 is defined as a Submenu option which will be used to
access a separate menu for the service team.
- Reason: A submenu was required because there would not be
enough phone keys to allow direct mapping for all users and call
groups on the main menu.
- Limitation: Selection of phone key "7" for the service submenu
means that if Ace Automobiles had multiple auto attendants, they
66
Administering the phone system
Final
could not be accessed from the main menu by dialing their
extension (the valid extension range for auto attendants: 700 –
899).
• Phone key 9 is defined as a Last Name Directory option to allow a
caller to reach employees by typing in the letters of their last name on the
phone key pad.
- Reason: Provides a means of reaching employees when the
caller does not know their extension.
• Phone key 0 is defined as a User option to allow a caller to transfer
directly to a receptionist.
1
2
- Reason: Provides an easy way to reach a person when the caller
does not want to navigate the auto attendant menu.
Select the number of times that you want the auto attendant menu
prompts to be repeated from the Play menu prompt list.
Define the action that should be taken if the caller to the auto attendant
does not make a phone key selection after the prompts have been
repeated the configured number of times. This could happen, for
example, if the caller is calling from a phone that does not have touchtone capabilities.
• Select User as the action that should be taken if the caller does not
select a phone key. A list of users is displayed adjacent to the list. Select
the appropriate user from this list.
- Reason: If the caller does not or is not able to select a phone key,
they could be transferred to the operator who can then manually
direct their call. If the operator is unavailable, the caller is then
transferred to the operator's call coverage.
3
Click Save to save the main menu configuration.
Example: Part C – Configure your Auto Attendant Sales menu
options
1
Select the first Submenu in the Auto Attendant Menu section.
2
Type a submenu name and prompt text for the Submenu prompt.
Menu Name: Sales Menu
Introductory Prompt: You have reached the Ace Automobiles Sales
Department.
3
Define the auto attendant menu option for each phone Key in the list by
choosing from the Send Caller To list. At the same time, type prompt text
in the Wording for Prompt fields that you can use as a reference when
recording the prompts.
One example of how the Ace Automobiles auto attendant sales menu
could be defined is provided below. In this example, the sales team is
reached via call groups that have been set up according to the specialties
at Ace Automobiles.
Final
Administering the phone system 67
Selecting Call Group displays a list of call groups in the Details area
adjacent to the Send Caller To list. Select the appropriate Call Group
from this list.
Detailed Description of Sales Menu Configuration
68
Phone
key
Menu Option
Result
Wording for Prompt
1
Call group
Transfers the caller to a specified call
group.
To speak with a blue car
sales representative,
please press 1.
2
Call group
Transfers the caller to a specified call
group.
To speak with a red car
sales representative,
please press 2.
3
Call group
Transfers the caller to a specified call
group.
To speak with an old car
sales representative,
please press 3.
4
Invalid Key
The user can leave the dial pad action
unassigned. If a caller presses that key
on the dial pad, an error message is
played.
5
Invalid Key
The user can leave the dial pad action
unassigned. If a caller presses that key
on the dial pad, an error message is
played.
6
Invalid Key
The user can leave the dial pad action
unassigned. If a caller presses that key
on the dial pad, an error message is
played.
7
Invalid Key
The user can leave the dial pad action
unassigned. If a caller presses that key
on the dial pad, an error message is
played.
0
Invalid Key
The user can leave the dial pad action
unassigned. If a caller presses that key
on the dial pad, an error message is
played.
*
Previous
Menu
The caller can move back one menu
level.
Administering the phone system
To return to the previous
menu please press *.
Final
#
Invalid Key
The user can leave the dial pad action
unassigned. If a caller presses that key
on the dial pad, an error message is
played.
1
Select the number of times that you want the auto attendant menu
prompts to be repeated from the Play menu prompt list.
2
Define the action that should be taken if the caller to the auto attendant
does not make a phone key selection. This could happen, for example, if
the caller is unsure of what option to select.
• Select Call Group as the action that should be taken if the caller does
not select a phone key. A list of call groups is displayed adjacent to the
list. Select the appropriate call group from this list.
- Reason: In this case a call group that contains all members of the
call group could be selected. If the caller does not select a phone
key there is still an opportunity for one of the members of the
sales team to take the call.
3
Click Save to save the Sales menu configuration.
Example: Part D – Configure Auto Attendant Service menu
options
1
Select the second Submenu in the Auto Attendant Menu section.
2
Type a submenu name and prompt text for the Submenu prompt.
Menu Name: Service Menu
Introductory Prompt: You have reached the Ace Automobiles Service
Department.
3
Define the auto attendant menu option for each phone Key in the list by
choosing from the Send Caller To list. At the same time, type prompt text
in the Wording for Prompt fields that you can use as a reference when
recording your prompts.
One example of how the Ace Automobiles auto attendant service menu
could be defined is provided below. In this example, callers are directed to
the service team managers according to the specialties at Ace
Automobiles.
Selecting User will display a list of users in the Details area adjacent to
the Send Caller To list. Select the appropriate user from this list.
Detailed Description of Service Menu Configuration
Final
Administering the phone system 69
70
Phone key
Menu
Option
Result
Wording for Prompt
1
User
Transfers caller to a specified user.
To speak with the blue car
service manager, please
press 1.
2
User
Transfers caller to a specified user.
To speak with the red car
service manager, please
press 2.
3
User
Transfers caller to a specified user.
To speak with the old car
service manager, please
press 3.
4
Invalid Key
The user can leave the dial pad
action unassigned. If a caller presses
that key on the dial pad, an error
message is played.
5
Invalid Key
The user can leave the dial pad
action unassigned. If a caller presses
that key on the dial pad, an error
message is played.
6
Invalid Key
The user can leave the dial pad
action unassigned. If a caller presses
that key on the dial pad, an error
message is played.
7
Invalid Key
The user can leave the dial pad
action unassigned. If a caller presses
that key on the dial pad, an error
message is played.
8
Invalid Key
The user can leave the dial pad
action unassigned. If a caller presses
that key on the dial pad, an error
message is played.
9
Invalid Key
The user can leave the dial pad
action unassigned. If a caller presses
that key on the dial pad, an error
message is played.
0
User
The user can leave the dial pad.
action unassigned. If a caller presses
that key on the dial pad, an error
message is played.
*
Previous
Menu
The caller can move back one menu
level.
Administering the phone system
To return to the previous
menu please press *.
Final
Phone key
Menu
Option
Result
Wording for Prompt
#
Invalid Key
The user can leave the dial pad
action unassigned. If a caller presses
that key on the dial pad, an error
message is played.
4
Select the number of times that you want the auto attendant menu
prompts to be played from the Play menu prompt list.
5
Define the action that should be taken if the caller to the auto attendant
does not make a phone key selection. This could happen, for example, if
the caller is unsure of what option to select.
• Select User as the action that should be taken if the caller does not
select a phone key. A list of users is displayed adjacent to the list. Select
the appropriate user from this list.
- Reason: If the caller does not or is not able to select a phone key,
they could be transferred to the service manager who can then
manually direct their call. If the service manager is unavailable,
the caller is then transferred to the service manager's call
coverage.
6
Click Save to save the Service menu configuration.
Example: Part E – Record your greetings and prompts
Final
1
Click Save and Record All at the bottom of the page.
2
Confirm that the extension of the telephone you will be using to record the
prompts and greetings matches the extension in the Extension field. Type
a different extension if required.
3
Press the Record button beside the Morning Greeting.
4
When the phone rings, lift the handset.
5
Listen to the audio instructions: “Please record your message after the
tone. When you are finished, press # for more options”.
6
When you hear the tone, record the prompt into the handset. Use the
prompt text on the Record Prompt page as a reference for what to say.
7
When you are finished, press the # key.
8
Choose from the following options:
•
To replay the prompt or greeting press 1
•
To save the prompt or greeting press 2
•
To re-record the prompt or greeting press 3
•
To exit without saving press *
Administering the phone system 71
9
Press the Record button and repeat steps 6 through 10 for the following:
•
Afternoon Greeting
•
Evening Greeting
•
Main Menu prompt
•
Sales Menu prompt
•
Service Menu prompt
10 Replace the handset
11 Click Done to close the Record Prompt page.
The Ace Automobiles auto attendant is now saved with a custom phone
key option configuration and matching custom prompts and greetings
recordings.
Example: Part F – Test your auto attendant
Test your set-up by calling the extension that you have assigned to the auto
attendant. Listen to the prompts and greetings to ensure that you are satisfied
with them, then select each of the phone keys to ensure they respond as you
expected.
Example: Part G – Access to your auto attendant
To provide access to your auto attendant from an external phone, you can
assign one of your incoming phone numbers to dial directly into the auto
attendant. Alternatively, you can choose to have the person whose phone is
assigned to your main incoming phone number set call coverage to the auto
attendant. See Incoming call routing on page “Incoming call routing” on
page 76..
Example – Create a custom auto attendant for voice
mail access
This section provides an example of how to create a custom auto attendant
that will be used exclusively for voice mail access. This type of auto attendant
is useful when the users at your company are frequently out of the office and
require easy access to their voice mailbox. Also, by having a separate auto
attendant for voicemail access, you do not expose this option to the clients
and customers that call in to your main company auto attendant.
Example: Part A – Create the auto attendant
72
1
Select Auto Attendant in the left menu.
2
Click Add Auto Attendant.
Administering the phone system
Final
3
Type the auto attendant name and extension in the General Information
section.
4
Select English from the Default Language list.
5
Check the Time of Day Greetings check box in the Time of Day Greeting
section to turn on the Time of Day Greetings. Type prompt text in the
fields provided for each Time of Day Greeting.
•
“Good morning.”
•
“Good afternoon.”
•
“Good evening.”
Example: Part B – Configure the auto attendant main menu
options
1
Select the Main Menu link in the Auto Attendant Menu section. This will
automatically save the auto attendant that you created in Part A.
2
Type text in the Introductory Prompt field for the Main Menu menu
prompt:
“You have reached the automated voice mail access menu.”
3
Define the auto attendant Main Menu menu option for each phone Key by
selecting a choice from the Send Caller To list. At the same time type
prompt text in the Wording for Prompt fields that you can use as a
reference when recording your prompts.
Because this auto attendant is being created exclusively for voice mail
access, the configuration for phone keys described below has been
limited to the VoiceMail Deposit and VoiceMail Retrieval options. All other
are keys configured as invalid.
•
Phone key 1 is defined as the VoiceMail Deposit option.
•
Phone Key 2 is defined as the VoiceMail Retrieval option.
•
Phone keys 0, 3-9, * and # are defined as an Invalid Key option.
Detailed Description of Main Menu Configuration
Phone key
1
Final
Menu Option
VoiceMail
Deposit
Result
Wording for Prompt
Prompts the caller for their
extension and then transfers them
to their voicemail box.
“Press 1 for voicemail
deposit.”
Administering the phone system 73
Phone key
Menu Option
Result
2
VoiceMail
Retrieval
The user can leave the dial pad
action unassigned. If a caller
presses that key on the dial pad, an
error message is played.
3
Invalid Key
The user can leave the dial pad
action unassigned. If a caller
presses that key on the dial pad, an
error message is played.
4
Invalid Key
The user can leave the dial pad
action unassigned. If a caller
presses that key on the dial pad, an
error message is played.
5
Invalid Key
The user can leave the dial pad
action unassigned. If a caller
presses that key on the dial pad, an
error message is played.
6
Invalid Key
The user can leave the dial pad
action unassigned. If a caller
presses that key on the dial pad, an
error message is played.
7
Invalid Key
The user can leave the dial pad
action unassigned. If a caller
presses that key on the dial pad, an
error message is played.
8
Invalid Key
The user can leave the dial pad
action unassigned. If a caller
presses that key on the dial pad, an
error message is played.
9
Invalid Key
The user can leave the dial pad
action unassigned. If a caller
presses that key on the dial pad, an
error message is played.
0
Invalid Key
The user can leave the dial pad
action unassigned. If a caller
presses that key on the dial pad, an
error message is played.
*
Invalid Key
The user can leave the dial pad
action unassigned. If a caller
presses that key on the dial pad, an
error message is played.
74
Administering the phone system
Wording for Prompt
“Press 2 for voicemail
retrieval.”
Final
Phone key
#
Menu Option
Result
Invalid Key
Wording for Prompt
The user can leave the dial pad
action unassigned. If a caller
presses that key on the dial pad, an
error message is played.
4
Accept 3 as the default number of times that you want the auto attendant
prompt to be repeated from the Play menu prompt list.
5
Accept the default action of System Disconnect that is configured for the
case when the caller to the auto attendant does not make a selection.
6
Click Save to save the main menu configuration.
Example: Part C – Record your greetings and prompts
1
Click Save and Record All at the bottom of the page.
2
Confirm that the extension of the telephone you will be using to record the
prompts and greetings matches the extension in the Extension field.
Type a different extension if required.
3
Press the Record button beside the Morning Greeting.
4
When the phone rings, lift the handset.
5
Listen to the audio instructions: “Please record your message after the
tone. When you are finished, press # for more options”.
6
When you hear the tone, record the prompt into the handset. Use the
prompt text on the Record Prompt page as a reference for what to say.
7
When you are finished, press the # key.
8
Choose from the following options:
9
•
To replay the prompt or greeting press 1
•
To save the prompt or greeting press 2
•
To re-record the prompt or greeting press 3
•
To exit without saving press *.
Press the Record button and repeat steps 6 through 10 for the following:
•
Afternoon Greeting
•
Evening Greeting
•
Main Menu prompt
10 Replace the handset.
11 Click Done to close the Record Prompt page.
Final
Administering the phone system 75
The voice mail auto attendant is now saved with a custom phone key
option configuration and matching custom prompts and greetings
recordings.
Example: Part D – Test your auto attendant
Test your set-up by calling the extension that you have assigned to your auto
attendant. Listen to the prompts and greetings to ensure that you are satisfied
with them, then select each of the phone keys to ensure they respond as you
expected.
Example: Part E – Access to your auto attendant
To provide access to your auto attendant from an external phone, assign one
of your incoming phone numbers to dial directly into the auto attendant. See
Incoming call routing on page “Incoming call routing” on page 76..
Incoming
call routing
Incoming call routing is used to configure the call destination for each phone
number assigned to your company. You can assign different destinations to
the same phone number based on your business hours. The options available
for call routing are an auto attendant, an employee, a location or a call group.
In addition to business hours, you can define an emergency override
destination (which can be an internal or external number). With a single click,
you can set the call routing for all of your company phone numbers to route to
the emergency override destination(s). You can also individually set your
company numbers to route to the emergency override destination. With a
single click, you can restore the call routing for all your company phone
numbers back to their previous non-override settings.
View incoming call routing details
To view incoming call routing details, select Incoming Call Routing in the left
menu. Your company phone numbers are listed in the Phone Number column.
For the Time of Day routing (Open, Closed, Lunch and Special), the
destination for each phone number within your company is displayed as a
telephone extension adjacent to the phone number. Call destination can be
one of your company auto attendants, users, locations, or call groups.
For the Override routing, the telephone number (as it would be dialed from the
default site of your company) to which calls are routed in the Emergency
Override state is displayed.
Incoming call routing example
76
Phone Number
Open
Closed
Lunch
Special
Override
6134356785
120
700
700
700
96135551234
Administering the phone system
Final
Phone Number
Open
Closed
Lunch
Special
Override
6134356786
135
135
135
135
96135550987
The company in this example can be reached by dialing 6134356785 and
6134356786. The company administrator has configured incoming call
routing for those phone numbers as follows:
•
6134356786 is dedicated to a single user. In an emergency override
situation, the number will route to 96135551234. This was accomplished
by routing this phone number to the user's extension (135) during all
business hours, and routing the phone number to 96135551234 for the
emergency override situation.
•
6134356785 is configured so that it can be handled by an operator during
regular business hours, the company auto attendant during off-hours, and
96135550987 in an emergency override situation. This was accomplished
by routing this phone number to the operator's extension (120) during
"Open" business hours, to the auto attendant extension (700) during
"Closed", "Lunch" and "Special" business hours, and to 96135550987 for
the emergency override situation.
If routing has not been set up for a particular business hours category, the
routing information is blank.
If no routing destinations have been set up for a phone number, then the
number will be enclosed in square brackets "[]".
Configure incoming call routing
Incoming call routing is used to identify a destination for your company phone
numbers. If you do not configure incoming call routing for a phone number,
the number can still be dialed but cannot be answered. The caller will hear
ringing until they choose to end the call.
To configure incoming call routing for a phone number, follow these steps:
1
Select Incoming Call Routing in the left menu.
2
Select the phone number to be configured.
3
In the General Information section, fill in the Name to describe the phone
number (for example, "Main Number").
4
If you want to enable the Emergency Override option, select the
checkbox for Enable Emergency Override Routing. Deselect the
checkbox if you want to disable it.
5
Select a call destination from the following options:
•
Select the Not Assigned option if no destination is required.
• Select the Auto Attendant option to direct the call to an auto
attendant.
Final
Administering the phone system 77
6
Select the auto attendant from the list provided.
7
Select the Calling Group option to direct the call to a call group. Select
the call group from the list provided.
8
Select the Employee/Location option to direct the call to a user or
location. Select the user or location from the list provided.
9
Select the ACD Application option to direct calls to a managed ACD
Application.
10 Select the Other option to direct the call to any other number (including
an external number). If you select the Other option, fill in the Number
field and the Name field (to describe this route).
11 In the Time of Day Routing section, for each of the time of day
categories (OPEN hours, CLOSED hours, LUNCH hours, SPECIAL
hours), select a call destination from the following options:
•
Select the Not Assigned option if no destination is required.
• Select the Auto Attendant option to direct the call to an auto
attendant. Select the auto attendant from the list provided.
• Select the Calling Group option to direct the call to a call group.
Select the call group from the list provided.
• Select the Employee/Location option to direct the call to a user or
location. Select the user or location from the list provided.
12 If you want the same routing for all four time of day categories, fill in the
OPEN hours call destination, then select the checkbox Use this setting for
all time of day routing. The CLOSED, LUNCH and SPECIAL hours
routing will automatically be filled in for you.
13 Click Save.
If the "Not Assigned" option is selected for a phone number, the call is not
routed at all. When the number is dialed, the caller will hear ringing until
they choose the end the call. When incoming call routing is viewed for this
number, the routing information will be blank.
Enable Emergency Override Routing
To enable Emergency Override Routing so that all calls to all of your company
phone numbers (that have emergency override destinations configured) will
be routed to the configured Emergency Override destination, follow these
steps:
78
1
Select Incoming Call Routing in the left menu.
2
Click Enable All Overrides.
Administering the phone system
Final
To enable Emergency Override Routing so that all calls to one of your
company phone numbers will be routed to its configured Emergency Override
destination, follow these steps:
1
Select Incoming Call Routing in the left menu.
2
Select the phone number for which you want calls to be routed to its
configured Emergency Override destination
3
In the Emergency Override section, select the Enable Emergency
Override Routing checkbox.
When Emergency Override is enabled, the main Incoming Call Routing page
will show all the Time of Day call destinations (Open, Closed, Lunch, Special)
as greyed out and the Override destination is displayed in bold.
Disable Emergency Override Routing
To disable Emergency Override Routing so that all call routing returns to the
previous configuration, follow these steps:
1
Select Incoming Call Routing in the left menu.
2
Click Disable All Overrides.
To disable Emergency Override Routing for one of your company phone
numbers, follow these steps:
1
Select Incoming Call Routing in the left menu.
2
Select the phone number for which you want to disable the Emergency
Override Routing.
3
In the Emergency Override section, deselect the Enable Emergency
Override Routing checkbox.
When Emergency Override Routing is disabled, the main Incoming Call
Routing page will show all the Time of Day call destinations (Open, Closed,
Lunch, Special) in bold and the Override destination greyed out.
Example – Configure incoming call routing
This section provides an example of how to configure incoming call routing.
Incoming call routing is being configured for a fictitious company with the
following phone numbers: 6132244444, 6132244445, 6132244446.
Requirements
The company has the following requirements for how their phone numbers
will be used:
•
Final
One phone number will be dedicated to the CEO so that he can be
reached directly.
Administering the phone system 79
•
One phone number will be dedicated to the sales team so that they can
be reached directly. All sales team telephones should ring when this
phone number is dialed.
•
One phone number will be used as the "main" company phone number.
They would like this phone number to be directed to an operator during
regular business hours and the company auto attendant during off-hours.
Pre-requisites
Before configuring incoming call routing for this company, you must do the
following:
•
Add the CEO, the operator and all sales team members into the system.
See Users and locations.
•
Add a call group for the sales team into the system. See Managing group
features.
•
Add an auto attendant into the system. See Auto attendant.
•
Configure the business hour details to match the company's working
hours. See Business hours.
Example: Part A – Configure the CEO's phone number
To configure the system so that 6132244444 is the CEO's phone number,
follow these steps:
1
Select Incoming Call Routing in the left menu.
2
Select the Extension or Click to Set associated with 6132244444 under
any business hour category.
3
Select the Employee/Location option. Select the CEO's name from the
list provided.
4
Check the Use this extension for all hours check box.
5
Click Save.
Example: Part B – Configure the sales team phone number
To configure the system so that 6132244445 is the phone number for the
sales team, follow these steps:
80
1
Select Incoming Call Routing in the left menu.
2
Select the Extension or Click to Set associated with 6132244445 under
any business hour category.
3
Select the Calling Group option. Select the sales team's call group from
the list provided.
4
Check the Use this extension for all hours check box.
Administering the phone system
Final
5
Click Save.
Example: Part C – Configure the "main" company phone
number
To configure the system so that 6132244446 is directed to an operator during
regular business hours, follow these steps:
1
Select Incoming Call Routing in the left menu.
2
Select the Extension or Click to Set associated with 6132244446 under
the Open business hour category.
3
Select the Employee/Location option. Select the operator's name from
the list provided.
4
Click Save.
To configure the system so that 6132244446 is directed to an auto attendant
during off-hours, follow these steps:
Business
hours
Final
1
Select the Extension or Click to Set associated with 6132244446 under
the Closed business hour category.
2
Select the Auto Attendant option. Select the auto attendant from the list
provided.
3
Click Save.
4
Select the Extension or Click to Set associated with 6132244446 under
the Lunch business hour category.
5
Select the Auto Attendant option. Select the auto attendant from the list
provided.
6
Click Save.
7
Select the Extension or Click to Set associated with 6132244446 under
the Special business hour category.
8
Select the Auto Attendant option. Select the auto attendant from the list
provided.
9
Click Save.
Business hour details are used to capture the following information about your
company:
•
The days that your business is open
•
Your regular hours of operation and lunch hour
Administering the phone system 81
•
Special hours of operation
You can configure permissions for users and incoming call routing to be
different for each of the business hour categories.
View business hours details
To view business hours details, follow these steps:
1
Select Business Details in the left menu.
2
Scroll down to the Business Hours – in 24 Hour Time section.
A grid is used to capture the business hours for your company. The grid
has the days of the week (vertical axis) broken down by the hours of
service (horizontal axis). The hours of service are divided into three
categories, Operating Hours, Lunch, and Special. A checkmark indicates
that your company is open for business on a selected day.
Time is displayed using the 24-hour format.
The default values for the Operating Hours are: From: 00:00. To: 24:00.
Configure your business hours details
To configure your business hours details, follow these steps:
1
Select Business Details in the left menu.
2
Scroll down to the Business Hours – in 24 Hour Time section.
3
Check the Open? check box beside each day that your company is open
for business. Clear or leave the Open? check box blank for every day that
your business is closed. The Open? check box can be cleared without
losing the business hours information.
4
Type the From and To hours of service for each day of the week.
If you do not enter information for any of the business hours categories,
Closed is the default.The business hours categories take the following
priority: Special, Lunch, then Operating Hours. This means that if the
configuration indicates that more than one category applies at any
particular time, the higher-priority category takes precedence.
• Time is displayed using the 24-hour format. The time 24:00 (24 hours,
00 minutes) refers to 23:59:59.
82
Administering the phone system
Final
• Hour: Hour of service fields should not exceed 24 hours or be less
than 0 hours. Minute fields should not exceed 60 minutes or be less than
0 minutes. The total time, hours + minutes, should not exceed 24 hours or
be less than 0 minutes. For example, if the hour field = 24, then the
minute field must = 0.
5
Extension
ranges
Click Save.
The phone system has three sets of extension ranges: one for users and
locations, one for auto attendants, and one for call groups.
To view extension ranges, follow these steps:
1
Select Business Details in the left menu.
2
Scroll down to the Extension Management section.
The following fields are displayed:
•
User/Location Min. Displays the first number for phone extensions.
• User/Location Max. Displays the last number available for phone
extensions.
• Call Group Min. Displays the first number in the range available to
use for Call Groups
• Call Group Max. Displays the last number in the range available for
Call Groups.
• Auto Attendant Min. Displays the first number in the range to use for
an Auto Attendant.
• Auto Attendant Max Displays the last number available to use for an
Auto Attendant.
Configure
Ring Tones
Distinctive Ringing gives subscribers the ability to choose between predefined ring tones. Distinctive Ringing lets users set the ringing tone on their
phone to differentiate it from other near-by stations (Distinctive Ringing by
Station), differentiate based on whether the call originated from internal or
external (Internal/External Distinctive Ringing), and differentiate between calls
targeted directly at their extension versus group calls (Call Type Distinctive
Ringing).
The originator of the call is used to determine the Internal/External ringing
type at the terminating device. Group ringing is only used when the phone is
ringing as a result of a group call directly; for example, forwarded group calls
do not cause group ringing. A call gets External treatment only if the
originator of the call is at the Telco level.
Final
Administering the phone system 83
If the ring tone is not configured at the Subscriber level, it defaults to the
Tenant level; if the ring tone is not configured at the Tenant level, it defaults to
the Telco level.
To configure Ring Tones, follow these steps:
1
Click My Phone in the Navigation pane.
2
Click Configure Ring Tones.
The Configuring Ring Tones dialog appears.
3
Choose the Extension for test. (Tenant Administrator only.)
4
From the Internal call direct drop-list, select the ring tone you want to use.
5
From the Internal call via group drop-list, select the ring tone you want to
use.
6
From the External call direct drop-list, select the ring tone you want to
use.
7
From the Internal call via group drop-list, select the ring tone you want to
use.
8
Click Save.
You can click Test to listen to the sound of the ring tone you have chosen.
Configure
hold
announcement
You can select the hold announcement used for callers to your business from
a list of hold announcements provided by your service provider. Hold
announcements are used for external calls only. Internal callers within a site
will not hear the hold announcement.
Custom hold announcements can be added to your system. Your service
provider has a document, System Initial Configuration that contains
instructions for adding your own announcements.
To configure the hold announcement for your business, follow these steps:
1
Select Business Details in the left menu.
2
Scroll down to the Hold Announcement section.
3
Select a hold announcement option from the Hold Announcement list.
4
Click Save.
If you select the System Default option, the hold announcement selected
by your service provider as a default announcement will be played.
84
Administering the phone system
Final
Once provisioned for your business, this announcement on hold becomes the
default announcement for all the users in your business. You can override this
setting on a per user basis by provisioning the user's hold announcement
field. See Add a user on page “Add a user ” on page 12..
Configure
account
code entry
Users can enter account codes against incoming and outgoing calls to
associate those calls with a particular client or account. Once entered,
account codes are logged in the call records kept by your service provider and
can be provided to you on request. You can enable and disable the Account
Code feature for your business and specify the minimum and maximum valid
account code length.
To use the Account Code feature, a user must have a memory key
programmed with the Account Code feature or be using a phone key
profile that has been programmed with the Account Code feature.
Enable account codes
To enable account code entry for your business, follow these steps:
1
Select Business Details in the left menu.
2
Scroll down to the Account Codes section.
3
Select the Enabled option in the Account Codes list.
4
Enter the minimum number of digits that an account code can contain in
the Min Account Code Length field.
5
Enter the maximum number of digits that an account code can contain in
the Max Account Code Length field.
6
Click Save.
Minimum and maximum account code length cannot be less than 1 or
greater than 20.
Disable account codes
To disable account code entry for your business, follow these steps:
Final
1
Select Business Details in the left menu.
2
Scroll down to the Account Codes section.
Administering the phone system 85
Configure
zero-out
destination
3
Select the Disabled option in the Account Codes list.
4
Click Save.
If your service provider has configured this option on the voice mail system,
callers to a voice mailbox would have the option to dial "0" instead of leaving a
voice message. When callers dial "0" they are directed to the zero-out
destination defined for your company. You can define your company's zeroout destination by creating any of the following with the name "zero-out":
•
an auto attendant
•
a call group
•
special user
For an auto attendant, fill in the Auto Attendant Name field as "zero-out".
See “Add auto attendant” on page “Add auto attendant” on page 55..
For a call group (Broadcast, Hunt or Rollover), fill in the Name field as "zeroout". See “Add a broadcast group” on page “Add a broadcast group” on
page 43., “Add a hunt group” on page “Add a hunt group” on page 45., “Add a
rollover group” on page “Add a rollover group” on page 49..
For a special user, fill in the Last Name field as "zero-out". See “Add a user”
on page “Add a user ” on page 12..
Individual users can override the company's zero-out destination. See the
Mitel IP Phone Reference Guide for details.
Site Details
You can view a list of your company’s sites. It is useful to know which site is
the default site. This is because any telephone calls originated by a
subscriber who is not logged in will be made as if the call had been dialled
from the default site.
For example, if a user forwards his or her extension to an external number,
then logs out of the phone, the forwarding is still in effect. Any calls to that
extension will cause an outgoing call to be made as if it was dialled from the
default site. Since your company can have multiple sites that could even be in
different cities, then the call might be considered long distance and may or
may not require a “1” to be prefixed.
To determine your company’s default site, follow these steps:
86
1
Select Business Details in the left menu.
2
Scroll down to the Site Details section.
3
The Site Name with a * beside it is your company’s default site.
Administering the phone system
Final
Phones
The system maintains a list of all of the phones that are plugged in and
connected to the network at your company.
Configure Mitel 5485 paging unit
To configure a Mitel 5485 paging unit for use in your company, follow these
steps:
1
Follow the vendor documentation to physically connect the Mitel 5485
paging unit into your network
2
Add a location in the system. The location extension will be used as the
paging unit's extension. See Add a location on page “Add a location” on
page 15..
3
Select Phone Inventory in the left menu.
4
Select the Phone Label corresponding to the MAC address of the 5485
paging unit.
5
Select the location from the Assigned User/Location list.
6
Click Save.
The paging unit is now available to receive calls. Whenever anyone uses the
paging feature, the paging unit will be one of the devices through which the
page is broadcast.
If you configure the paging unit to have the Handsfree Answerback
feature, then Intercom calls to the paging unit have no time limit. If you do
not configure the paging unit to have the Handsfree Answerback feature,
then the maximum length of time for an Intercom call is the same as the
Paging feature limit.
Unassign phone
To remotely log a user or location out of their telephone, follow these steps:
Final
1
Select Users and Locations in the left menu.
2
Select the Last Name for the selected user or location.
3
Click Unassign.
4
Click Save.
Administering the phone system 87
View phone inventory list
To view all company phones connected to the network, follow these steps:
1
Select Phone Inventory in the left menu.
2
The Phone Inventory List page is displayed with the following columns:
Phone Label, Model, Assigned User/Location and Site.
Print phone inventory list
To print the Phone Inventory list, follow these steps:
1
Select Phone Inventory in the left menu.
2
Click Print List at the bottom of the Information pane. A new browser
window Phone Inventory List will open. It has a printable list of the
phones and associated information.
3
Click Print at the bottom of the list.
4
Click Close Window at the bottom of the list to close the Phone Inventory
Print window.
View/modify phone details
Using this feature, the administrator can view and make changes to phones in
the company’s inventory, including assigning and unassigning users and
locations from their phones.
When a phone is associated with a user or location, the user or location
call permission profile determines which types of calls can be placed from
the phone. When a phone is not associated with a user or location, the
phone uses the default call permissions profile, “Unassigned” to
determine the outbound call permissions.
To view or modify phone details, follow these steps:
88
1
Select Phone Inventory in the left menu.
2
Select the Phone Label corresponding to the phone that you want to
view/modify.
3
Modify the label if required. The label is used to identify the phone and
has a default value corresponding to the MAC address of the phone.
4
Select a user or location from the Assigned User/Location list to assign
the user or location to the phone (optional).
Administering the phone system
Final
5
Select Unassigned from the Assigned User/Location list to unassign
the user or location from the phone (optional).
6
Click Save.
Delete a phone
This section describes how to delete a phone from the system. Once a phone
is deleted, it is permanently disconnected from the system. This means that
the associated user or location is effectively logged out and is no longer able
to receive or make calls.
To delete a phone, follow these steps:
1
Select Phone Inventory in the left menu.
2
Select one or more phones by checking the corresponding check boxes.
To select all entries in the list, select the check box in the heading row.
3
Click Delete Selected.
4
Click OK.
A warning message appears, informing you that the phones selected
must be physically disconnected from the network, or they will automatically be re-discovered and re-added to the inventory.
5
Physically disconnect the phone.
6
Select the OK button to continue with the deletion once you have
physically disconnected the phones. You can select the Cancel button to
stop the deletion. If you selected the OK button, however, the selected
phones are deleted and removed from the phone inventory list.
Reset device
Reset device is used to return a phone or other discovered device to a known
state when it is out of sync with the phone system.
To reset a phone or device, follow these steps:
1
Select Phone Inventory in the left menu.
2
Select the Phone Label corresponding to the phone or device that you
want to view/modify.
3
Click Reset Device.
User and phone configuration information is maintained when you reset a
device.
Final
Administering the phone system 89
Resetting a device may end a call in progress.
Assign phone
It is possible to assign a phone to the user/location's extension. This is
needed when the phone does not have Login/logout capability (such as a port
on an Foreign eXchange Station (FXS) or a Mitel 5485 Paging unit.
For certain types of phones (such as the Mitel 5212 IP phone), the phone
must be assigned to the user/location's extension since the phone does not
have Login/logout capability.
The Mitel 5212 IP phone must first be plugged into the network and allowed to
initialize.
Once the phone has initialized (the display shows "Logged Out"), you can
assign the extension by following these steps:
Fax
1
Add a user/location in to the system. The user/location extension will be
used for this phone. See Add users on page “Add a user ” on page 12..
2
Select Phone Inventory in the left menu.
3
Select the Phone Label corresponding to the device that you want to
configure an extension for. The Phone Label will be the MAC address
shown on a sticker on the back of the phone.
4
Select the user/location from the Assigned User/Location list.
5
Click Save.
Integrate a fax machine into the IP phone system using a FXS gateway.
Typically, a FXS gateway can support one fax machine per port. Each port of
the FXS gateway appears as a separate device in the Phone Inventory list.
From this list, you can view and modify the device details and configure an
extension for your fax machines. Once the FXS gateway is installed and
configured, see Configure fax extension.
Contact your service provider for assistance in the purchase, configuration,
and installation of a FXS gateway.
Configure fax extension
To receive and send faxes, the port of a device that is connected to a fax
machine must have an extension.
To configure an extension for a fax, follow these steps:
1
90
Select Company Settings.
Administering the phone system
Final
2
Select Add a location.
Complete the information required making sure that you assign a
permission profile that will allow the fax to make outgoing calls. The
extension number will be the fax extension.
3
Select Phone Inventory in the left menu.
4
Select the Phone Label corresponding to the device (port) for which you
want to configure an extension for.
5
Select the location from the Assigned User/Location list.
6
Click Save.
To receive external faxes, the fax extension must be associated with one of
your company phone numbers. Refer to Incoming call routing on
page“Incoming call routing” on page 76. for instructions on how to route a
phone number to the location associated with your fax extension.
Select Unassigned from the Assigned User/Location list if you do not
want an extension to be associated with the device (port).
The call permission profile of the location associated with the fax
determines what type of calls can be made from the fax.
Handling
lists
Much of the information presented to you is provided in lists. This section
describes how to sort and print lists.
Sorting lists
To sort a list, choose one of the following options:
•
Select any of the table column headings. The rows in the table are sorted
in ascending order (alphabetical or numeric, depending on the column
heading selected).
•
Select the same heading a second time to reverse the order.
Printing lists
To print a list, follow these steps:
1
Click Print List located at the bottom of the Information pane.
A new browser window will open with a printable version of the list.
Final
Administering the phone system 91
92
2
Sort the list by selecting on any of the column headings.
3
Select the browser window Print button or select the Print command
from the browser menu.
4
Close the Print Browser window.
Administering the phone system
Final
Glossary
A
Auto Attendant
An automated system that directs incoming calls to the appropriate
extensions.
ATM
Asynchronous Transfer Mode. This is a protocol used for high speed
data connections
CallP Server
Call Processing Server. This is a piece of software that provides much
of the intelligence for the OfficeConnect system
Class of Service
an identifier that indicates a type of telephone call. Examples of Class
of Service include "Emergency (911)", "Internal", and "Long Distance".
Conference Server
a device on the network used to provide conferencing services such as
three way calling. This is also called the Bridge Server.
Customer
from the service provider's perspective, this is often used to mean
tenant
DHCP
Dynamic Host Control Protocol. This allows devices on an IP network to
be dynamically allocated their IP Addresses and other information
DHCP Server
the machine on an IP network which allocates IP addresses and other
information to devices on the network.
Dial Plan
a set of entries, which describe what action, the system should take
based on the initial digits dialed (such as external call for "9")
DSL
Digital Subscriber Loop. This is a digital connection to a subscriber
(usually high speed).
DSLAM
Digital Subscriber Loop Access Multiplexor. This is the device that
multiplexes a set of DSL lines together.
FTP
File Transfer Protocol. This is a protocol to allow transfer of files (such
as the software loads for IP phones) over a network.
C
D
F
G
Gateway
Final
the device connecting the IP LAN to the public telephone network. The
gateway contains slots that contain ports that connect to the public
telephone network over PRI groups.
Glossary
93
H
HTML
Hyper Text Markup Language. This is a system of tagging documents
with context information allowing them to be displayed by web
browsers.
HTTP
Hyper Text Transfer Protocol. This is the protocol used to send
information (usually HTML pages) over networks.
ICMP
Internet Control Messaging Protocol. This is a protocol that allows the
Ping command.
IP
Internet Protocol. This is a simple data networking protocol used in the
World Wide Web and many private data networks.
IP Address
A set of 4 numbers that uniquely identify a device on an IP network. In
order for a device to communicate on an IP network, it must have an IP
address. The address is of the form xxx.xxx.xxx.xxx where xxx is a
number in the range 0-255
IP Address Mask
A set of 4 numbers associated with an IP Address used to determine
the size of the subnetwork in which the device can communicate. The
mask is in the form xxx.xxx.xxx.xxx where xxx is a number in the range
0255. When the mask is expressed in binary, the number of 0's at the
end of the mask indicate how large the subnetwork is the more 0's, the
larger the subnetwork
LAN
Local Area Network. This refers to the part of the IP network that
connects the tenant's phones and PCs locally.
I
L
M
media server
a device used to store and play auto attendant greetings,
announcements and prompts for users of the OfficeConnect system.
MIB
Management Information Base. This is a logical database made up of
configuration, status and statistical information. It is transmitted using
the SNMP protocol.
N
94
NMS
Network Management System (or Station). This is a system used to
remotely monitor all components of a network. The most common
protocol used by an NMS to communicate with its network components
is SNMP.
NOC
Network Operations Center. This is typically a location where the
service provider's NMS is running.
NPA
Numbering Plan Area. This is a 3 digit code also known as the Area
Code
Glossary
Final
P
PRI
Primary Rate ISDN. This is a service that provides 23 digital voice
channels plus 1 signaling channel on a standard T1 interface in a
telephone network.
PRI Group
a grouping of PRI channels used for routing information.
Product DHCP Server
The DHCP Server provided as part of the OfficeConnect product
PSAP
Public Safety Answering Point A facility equipped and staffed to receive
911 calls
PSTN
Public Switched Telephone Network.
PVC
Private Virtual Circuit. This is a reserved part of an ATM connection.
RFC
Request For Comments. This is actually used to describe specifications
for protocols and computer industry related issues that are now
considered standard. For example, the standard definition of SNMP is
referred to as RFC1157
Route
A logical entity used to describe the type of calls based on dial plan
(such as Internal, Long Distance etc)
Route Entry
an entity that describes to which PRI group a call should be routed
RTCP
Real Time Control Protocol.
RTP
Real Time Protocol. This is a protocol used for sending messages to
and from the IP Telephones.
Slot (on a gateway)
a single interface on a gateway. The slot contains ports that connect to
PRI groups.
SMDI
Simplified Message Desk Interface. This is a protocol used to
communicate with a voice mail system.
SMDI Port
a number indicating a characteristic of IP messages for the voice mail
system.
SME
Small and Medium Business Enterprises
SMTP
Simple Mail Transfer Protocol. This is a protocol for sending e mail
messages.
SNMP
Simple Network Management Protocol
T1
A standard North American physical wiring interface which provides
twenty four 64 kilobit/second channels for telephone calls.
R
S
T
Final
Glossary
95
TCP
Transmission Control Protocol. This is a layer added onto the IP
protocol (shown as TCP/IP) to provide reliable communication.
telco
Telephone Company. This is a company that purchases the
OfficeConnect solution and sells voice over IP telephone service to
tenants
tenant
a customer of the service provider
tenant administrator
a user id that has the access rights required to perform administrative
functions for a given tenant.
TFTP
Trivial File Transfer Protocol. This is the protocol used by the
OfficeConnect TFTP Server that sends the software load files to IP
phones.
U
UBR
Unspecified Bit Rate. This is a characteristic of a PVC in an ATM
connection. In the OfficeConnect system, it would be used for PC data
traffic.
UDP
User Datagram Protocol. This is a layer added onto the IP protocol
(shown as UDP/IP) to provide a simple way to deliver information.
URL
Universal Resource Locator This is typically a web page such as http://
www.naturalconvergence.com
User
an individual with access to the web interface of the OfficeConnect
product. A user has an associated user id and password/PIN number.
From the perspective of a tenant, a user also has an associated
telephone extension
VBR rt
Variable Bit Rate Real Time. This is a characteristic of a PVC in an ATM
connection. In the OfficeConnect system, it would be used for
telephony traffic
VCI
Virtual Circuit Identifier. This is part of the definition of a PVC in an ATM
connection. A PVC is uniquely identified by its VCI and VPI (usually
written in the form ccc.ppp where ccc is the VCI and ppp is the VPI).
VPI
Virtual Path Identifier. This is part of the definition of a PVC in an ATM
connection. A PVC is uniquely identified by its VCI and VPI (usually
written in the form ccc.ppp where ccc is the VCI and ppp is the VPI).
Voice Mail system
a device used for storage and retrieval of subscriber's voice mail.
V
W
WAN
Wide Area Network. This refers to the part of the network that connects
the service provider to its tenants
Z
96
Glossary
Final
Zone
Final
A logical entity that associates sites with dial plans and CallP servers.
Zones contain route entries that determine the physical routing of
outgoing calls from the system.
Glossary
97
NOTES
98
Notes
Final
Index
Numerics
5485 paging unit 87
A
Account codes
configuring entry 85
description 20
disabling 85
enabling 85
ACD Applications 51
managing permissions 51
Administrator privileges 6
Auto attendant 54
adding 55
adding submenu 59
auto attendant option 57
call group option 57
creating custom, examples 64
custom auto attendant with voice mail,
example 72
default key configurations 54
definition 93
deleting 56
deleting submenu 59
extension (dialed) option 57
first name directory option 57
invalid key option 58
last name directory option 58
managing 54
managing list 54
menu prompts, recording 62
menu, configuring options 57
menus 57
menus, viewing 57
modifying 56
name announcement, checking 60
name announcement, recording 61
previous menu option 58
submenu option 58
system disconnect option 58
time of day greeting 62
user option 58
viewing details 54
voicemail deposit option 58
voicemail retrieval option 58
Final
B
Broadcast groups
adding 43
description 38
modify 44
Business hours 81
details 82
viewing 82
C
call group limits 40
Call groups
assigning 41
call coverage, configuring 42
deleting 50
limits 40
locking members 41
viewing 41
Call Type 32, 33
Company Speed Dial 20
configure ring tones 83
E
Emergency (911) 93
Emergency override
disabling 79
enabling 78
Enabling and disabling voice mail 35
Extension ranges 83
External directory 52
deleting list 53
modifying 53
searching list 52
viewing 52
F
Fax
configuring extension 90
integrating into phone system 90
Forward to AA 21
Forward to Coverage (LED) 21
Forward to Co-worker 21
Forward to Number 22
Forward to Prompt 22
G
Greetings
recording 60
time of day, recording 62
99
Groups
broadcast, adding 43
broadcast, description 38
broadcast, modify 44
call, assigning users 41
call, deleting 50
call, locking members 41
call, viewing 41
hunt, adding 45
hunt, description (circular) 38
hunt, description (linear) 38
hunt, modifying 47
managing features 38
monitor call, description 39
monitor, modifying 49
monitor, phone 39
rollover, adding 49
rollover, description 39
rollover, modifying 50
H
Handsfree Answerback 22
Hold announcements, configuring 84
Hunt groups 41
adding 45
description, circular 38
description, linear 38
modifying 47
I
Incoming call routing 76
configuring 77
configuring, example 79
emergency override, routing, disabling 79
emergency override, routing, enabling 78
viewing details 76
Incoming Calls List 22
Intercom to Co-worker 23
Intercom to Prompt 23
Inventory list, printing phones 88
Inventory list, viewing phones 88
J
Join/Leave Group 23
L
Language settings 4
auto attendant 4
location display 4
user display 4
voice mail box 4
Line appearance 23
Lists
handling 91
100
Index
printing 91
sorting 91
Locations
adding 15
deleting 19
disabling access 17
enabling 17
modifying 16
overview 11
viewing 12, 19
Login/logout 37
Long Distance 93
M
Managing user features 34
Menu prompts, recording 62
Mitel 5485 paging unit, configuring 87
Mitel phones
activating 7
Monitor calls 23
silent 24
Monitor groups
description, call 39
description, phone, linear 39
modifying 49
Monitor phone 24
N
Name announcement
checking 60
recording 61
O
One Touch Speed Dial 24
P
Page 24
Paging unit, configuring 87
Park/Retrieve 25
Permission profiles 30
adding 32
assigning 33
call types 30
configuring 36
default 32
deleting 34
Emergency (911) 30
external 31
internal 31
international 31
long distance 31
modifying 33
operator assisted 31
redirect inbound call to external 31
Final
regional 31
toll free (1-800) 31
toll premium 31
types 30
Phone key profiles 20
22
account codes 20
adding 27
assigning 36
assigning to a user or location 28
default 27
deleting 30
Forward to AA 21
Forward to coverage (LED) 21
Forward to Co-worker (LED) 21
Forward to prompt (LED) 22
Handsfree Answerback 22
incoming call list 22
intercom to co-worker 23
intercom to prompt 23
join/leave group 23
line appearance 23
memory key configuration 20
modifying 29
monitor call (silent) 24
monitor calls 23
monitor phone 24
One Touch Speed Dial 24
options 20
page 24
park/retrieve 25
unassigned 26
viewing 26
Phone numbers, assigning 37
Phone system
administering 6
administering phones 10
customizing 9
fax 90
Phones
activating 7
activating Mitel phones 7
administering to work with other phones
10
administering with other phones 10
deleting 89
details, modifying 88
details, viewing 88
inventory list, printing 88
inventory list, viewing 88
Final
reset 89
unassigning 87
unlocking locations 37
unlocking users 37
PIN 35
voice mail 36
Profiles 19, 31, 33, 34
permission 30
permission, assigning 33
permission, configuring 36
permission, default 32
permission, deleting 34
permission, modifying 33
phone key 20
Prompts, recording 60
Q
Quick start for the phone system 7
R
Recording
audio prompts 60
auto attendant name announcement 61
greetings 60
menu prompts 62
time of day announcement 62
Release 4.0, new features 1
Reset PIN 35
Reset voice mail pin 36
ring tones, configure 83
Rollover groups
adding 49
description 39
modifying 50
S
SNMP 94, 95
Speed dials 52
deleting list 53
modifying 53
searching list 52
viewing list 52
U
User guide, introduction 3
Users
deleting 19
disabling access 17
enabling 17
modifying 16
notifying 7
overview 11
viewing 12, 19
Users and locations 33
Index
101
V
View permission profiles 31
102
Index
W
What’s new, in Release 4.0 1
Final
Feedback on Documentation
We strive to continuously improve our documentation. If you find any errors or omissions in this document
or if you find something which you really like, please let us know about it. Please be specific (section
header, page number, etc) about the part of the document you wish to tell us about.
Please provide the following information:
How can we contact you?
Name _____________________________________________
Email Address ______________________________________
Phone number ______________________________________
For which document is this feedback?
Name of document ___________________________________
Release ____________________________________________
Details of feedback
Section Header _______________________________________
Page number _________________________________________
Comments _____________________________________________________________
______________________________________________________________
______________________________________________________________
______________________________________________________________
______________________________________________________________
______________________________________________________________
You can send comments to [email protected]. If you have a softcopy of this document, you can email
a copy of the document with your comments.
You can also fax this filled-in form to +1 (310) 747-3233. Make sure that the fax is clearly marked as
Documentation Feedback.
Feedback on Documentation
103
NOTES
104 Notes