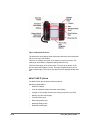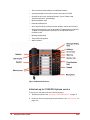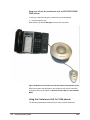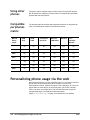
1
OfficeSuite®
Cloud-Based Phone System
Mitel IP Phone User Reference Guide
Release 5.0
Final
Note: The information contained in this document is the property of Broadview Networks Inc.
and is disclosed to you on the condition that you maintain the information strictly confidential.
You are hereby warned that the information disclosed is subject to change without notice or
the assumption of any liability on the part of Broadview Networks Inc.
© 2009-2012 Broadview Networks Inc. All rights reserved.
Contents
Introduction ........................................................................................1
Setting your language ............................................................................1
Setting your language for the web interface ..........................................1
Setting your language for the phone text .............................................2
Language for Voice Mail ..................................................................2
What's new in Release 5.0.1 ...................................................................3
Multiple Business Hours ...................................................................3
Unified Communicator Express (UCE) ..................................................3
Mitel 5320 and 5360 phones .............................................................3
Using the phone system .........................................................................3
Using Mitel 5320/5330/5340/5260 IP phones .........................................4
Mitel 5320 IP phone ..................................................................................... 4
Mitel 5330 IP phone ..................................................................................... 5
Mitel 5340 IP phone ..................................................................................... 6
Mitel 5360 IP phone ..................................................................................... 7
Initial setup for 5320/5330/5340/5360 phone service ............................................. 8
Answering a call on the 5320/5330/5340/5260 phone ............................................. 9
Making a call on the 5320/5330/5340/5260 phone ................................................ 11
Using features via the 5320/5330/5340/5260 phone ............................................. 12
Voice mail on the 5320/5330/5340/5260 phone ................................................... 30
Volume control on the 5320/5330/5340/5260 phone ............................................. 30
Using the Mitel 5224/5324 IP phone .................................................. 31
Mitel 5224/5324 IP Phone ............................................................................. 31
Initial set-up for 5224/5324 phone service ......................................................... 32
Answering a call on the 5224/5324 phone .......................................................... 34
Making a call on the 5224/5324 phone .............................................................. 36
Using features via the 5224/5324 phone ............................................................ 37
Voice mail on the 5224/5324 phone ................................................................. 57
Volume control on the 5224/5324 phone ........................................................... 57
Using the Mitel 5212/5312 IP Phone .................................................. 58
Mitel 5212/5312 IP phone ............................................................................. 58
Initial set-up for Mitel 5212/5312 IP phone service ............................................... 59
Answering a call on the 5212/5312 IP phone ....................................................... 60
Making a call on the 5212/5312 IP phone ........................................................... 62
Using features via the 5212/5312 IP phone ......................................................... 63
Voice mail on 5212/5312 IP phone ................................................................... 80
Volume control on the 5212/5312 IP phone ........................................................ 80
Using Mitel 5304 phones ................................................................ 81
Mitel 5304 IP phone .................................................................................... 82
Initial setup for 5304 phone service ................................................................. 83
Answering a call on the 5304 phone ................................................................. 83
Making a call on the 5304 phone ..................................................................... 85
Using features via the 5304 phone ................................................................... 86
Final
iii
Voice mail on the 5304 phone ...................................................................... 104
Volume control on the 5304 phone ................................................................ 105
Using a headset ......................................................................... 106
Connect and configure the headset ................................................................
Answer a Call with the headset ....................................................................
End a Call with the headset .........................................................................
Mute the headset .....................................................................................
Make a call with the headset .......................................................................
Switch to the handset ................................................................................
106
106
106
106
107
107
Using a Programmable Key Module .................................................. 107
Mitel 5310 IP Conference Unit ........................................................ 107
Using the Conference Unit for 5320/5330/5340/5260 phones ................................. 108
Using the Conference Unit for 5324 phones ...................................................... 112
Using other phones ..................................................................... 116
Compatible peripherals matrix ....................................................... 116
Personalizing phone usage via the web .................................................. 116
Web login ................................................................................ 117
To stop the security alert at log in ................................................................ 118
Forgotten PIN .......................................................................................... 118
Change PIN ............................................................................................ 118
Web logout .............................................................................. 119
Quick set-up ............................................................................. 120
Change user details .................................................................... 121
Record your name for the Auto Attendant ......................................... 121
Permissions .............................................................................. 122
Permission types ...................................................................................... 122
Configure phone ........................................................................ 123
Program memory keys ...............................................................................
Program memory keys on PKM ......................................................................
Programmable memory key features ..............................................................
Select key mapping profile ..........................................................................
Configure Ring Tones .................................................................................
Print phone labels ....................................................................................
124
125
126
134
134
135
Call Coverage ........................................................................... 135
Twinning ................................................................................. 136
Call groups ............................................................................... 137
Join/leave call groups ............................................................................... 137
Agent Presence Control Key .......................................................... 138
Directories ............................................................................... 139
View the internal directory .........................................................................
View the external directory .........................................................................
Sort directory list .....................................................................................
Find a person in the internal directory ............................................................
Find an entry in the external directory ...........................................................
Click to Call ............................................................................................
Print a directory ......................................................................................
140
140
140
140
140
141
141
Dynamic site ............................................................................. 142
Create a dynamic site ................................................................................ 143
Release a dynamic site .............................................................................. 143
iv
Contents
Final
View dynamic site information ..................................................................... 144
Connect your phone on a dynamic site ............................................................ 144
Voice Mail ................................................................................ 144
Enable Message Waiting Indicator ..................................................................
Configure email notification of voice messages .................................................
Configure email forwarding of voice messages ..................................................
Configure dial-0 destination ........................................................................
Configure language for voice mail retrieval ......................................................
Configure timezone for voice mail .................................................................
Reset voice mail PIN .................................................................................
144
145
145
146
147
147
147
Web pages ............................................................................... 148
My settings ............................................................................................. 148
Company directories ................................................................................. 150
Getting more help ............................................................................ 150
Phone Messages ............................................................................... 150
Glossary ......................................................................................... 155
Feedback on Documentation ............................................................... 167
Final
Contents
v
vi
Contents
Final
Introduction
This document is provided as a reference guide for the use and configuration
of your Mitel 5212/5312 IP Phone, Mitel 5224/5324 IP phone, Mitel 5320/
5330/5340/5260 IP phone, and Mitel 5304 IP phone and the phone system
features. The document has two main sections:
1
“Using the phone system” on page 3 provides information on
•
The phones and their features
•
Making and answering calls
•
Using the phones’ features
2
“Personalizing phone usage via the web” on page “Personalizing phone
usage via the web” on page 116 provides information on customizing
your phone based on your personal preference. Information includes how
to
•
Set up your call coverage
•
Program your memory keys
•
Change your PIN
•
Record your name announcement for the auto attendant
•
View your personal information
Customizations are performed using a web interface.
The information in this document is also accessible online in the web
interface by selecting the Help button at the top or bottom of any page.
Context-sensitive help is available by selecting the
icon on any page.
Setting your language
If your system has been set up for multiple languages, you can set the
language for your access to the web interface as well as the phone’s LCD
display.
Setting your
language for
the web
interface
Final
To set your language for the web interface, you need four things: (1) your
extension, (2) your PIN, (3) the Login URL, and (4) access to the Internet
using Internet Explorer 6.0 or later or Firefox 1.5.0.4 or later. These are all
available from your administrator.
You first need to determine the Language Selection URL. Your administrator
will provide you with a Login URL. The Login URL should be of the form:
Introduction 1
https://<Name or IP Address>/webadmin/login/<YourCompany>
Replace the bold part with "select_language" to create the Select Language
URL:
https://<Name or IP Address>/webadmin/select_language/company
For example, if your Login URL is:
https://78.1.2.3/webadmin/login/MyCompany
then the Select Language URL will be
https://78.1.2.3/webadmin/select_language/MyCompany
To change your language for the web interface, follow these steps:
Setting your
language for
the phone
text
Language
for Voice
Mail
2
Setting your language
1
Start your web browser.
2
Enter the Select Language URL you determined above.
3
Choose your language by selecting the appropriate button.
4
Bookmark this page and use it for all future logins to the system.
5
Type your User ID (your extension).
6
Type your PIN.
7
Select the Login button. The Home page should be displayed.
To change your language for the phone text, follow these steps:
1
After logging in to the web interface, select My Personal Details in the
Navigation pane. The Personal Details page is displayed with your
personal details in the Information pane.
2
Select your language from the pull down list in the Language for Phone
field.
3
Select the Save button to save the information.
If you have a voice mail box, the language used for the voice mail box will be
the same as the language that was originally set (by your Administrator when
creating your extension) in the "Language for Phone” field. Modifying the field
does not change the voice mail language. If you wish to change the language
for your voice mail box, see “Configure language for voice mail retrieval” on
page 147.
Final
What's new in Release 5.0.1
The following changes are available in Release 5.0.1:
Multiple
Business
Hours
silhouette now supports Multiple Business Hours. Multi-site Tenants often
have a need to support multiple definitions for Business Hours: each site may
have different opening and closing times. Multiple Business Hours provides
Tenants with the ability to set different business hours for different sites, as
well as managing business hours for DIDs and tenants.
Unified
Communicator
Express (UCE)
silhouette now supports Mitel® Unified Communicator® (UC) Express, a costeffective desktop assistant that seamlessly combines telephony with
integration to Microsoft Outlook, providing users with a range of intelligent call
handling facilities and productivity enhancements.
Mitel 5320
and 5360
phones
silhouette now supports the “Mitel 5320 IP phone” and
“Mitel 5360 IP phone” .
Using the phone system
This section explains your phone features and how to use them after they
have been enabled through the web interface.
The Mitel 5330 and 5340 IP phones provide support for all the user
functionality. The phones also include Memory key label LCD display. The
setup and operation of this phone is described in “Using Mitel 5320/5330/
5340/5260 IP phones” on page 4.
The Mitel 5224/5324 IP Phone has the same functionality without the Memory
key label LCD display. The setup and operation of this phone is described in
“Using the Mitel 5224/5324 IP phone” on page 31.
The Mitel 5212/5312 IP Phone has a smaller set of memory and feature keys
than the others. This phone’s setup and operation are described in “Using the
Mitel 5212/5312 IP Phone” on page 58.
The Mitel 5304 IP Phone is similar to the 5212/5312 IP phone but with less
memory keys and less LEDs. This phone's setup and operation are described
in “Using Mitel 5304 phones” on page 81.
A Mitel 5310 conference unit can also be connected to a Mitel 5224/5324 or
5320/5330/5340/5260 IP phone to provide optimal hands-free sound quality.
Final
What's new in Release 5.0.1 3
See “Mitel 5310 IP Conference Unit” on page “Using the Mitel 5224/5324 IP
phone” on page 31.
Programmable Key Modules (PKMs) can be added to the Mitel 5224/5324 IP
phones to provide additional programmable memory keys - see “Using a
Programmable Key Module” on page 107.
Using Mitel
5320/5330/
5340/5260
IP phones
This section describes the Mitel 5330 and 5340 IP phones.
•
To set up your new phone service, see “Initial setup for 5320/5330/5340/
5360 phone service” on page 8.
•
For a description of the Mitel 5330 IP phone, see “Mitel 5330 IP phone”
on page 5.
•
For a description of the Mitel 5340 IP phone, see “Mitel 5340 IP phone”
on page 6.
•
Other than the different number of programmable memory keys, the
functionality of the Mitel 5330 and 5340 IP phones are the same.
Other topics covered in this section include the following:
•
“Answering a call on the 5320/5330/5340/5260 phone” on page 9
•
“Making a call on the 5320/5330/5340/5260 phone” on page 11
•
“Using features via the 5320/5330/5340/5260 phone” on page 12
•
“Volume control on the 5320/5330/5340/5260 phone” on page 30
•
“Voice mail on the 5320/5330/5340/5260 phone” on page 30.
Mitel 5320 IP phone
The Mitel 5320 Phone has the following features:
4
•
Handsfree speakerphone
•
Date/Time Display
•
Softkeys
•
Information Area Display
•
Memory key label LCD display
•
Fixed function keys
•
Mute and Speaker keys
•
Message Waiting Lamp
•
Dedicated headset jack
•
Do not disturb (DND) mode
Using the phone system
Final
•
Wall mountable
Information
Area
Display
Date/Time
Display
Volume/
Contrast/
Scroll
Message Waiting
Lamp
Speaker
Mute
Softkeys
Fixed
Function
Keys
Memory Keys
& Memory
Key Label
Display
Key Pad
Navigation
Buttons
Figure 1: Mitel 5320 IP phone
Mitel 5330 IP phone
The Mitel 5330 IP phone has the following features:
Handsfree speakerphone
Final
•
Date/Time Display
•
2-line 20-character backlit Information Area Display
•
3 pages of 8 (total 24) multi-function memory keys with color LEDs
•
Memory key label LCD display
•
Fixed function keys
•
Mute and Speaker keys
•
Message Waiting Lamp
•
Dedicated headset jack
Using the phone system 5
•
Wall mountable
Figure 2: Mitel 5330 IP Phone
The Information Area Display shows information about the current telephone
call (such as name and number).
There are three softkeys. The meaning of each softkey is displayed directly
beside the key.
There are three pages of 8 memory keys. The icons at the bottom of the
phone indicate which page is current. The page navigation buttons can be
used to switch pages. The memory key labels are also displayed beside each
one.
Mitel 5340 IP phone
The Mitel 5340 IP phone has the following features:
Handsfree speakerphone
6
•
Date/Time Display
•
2-line 20-character backlit Information Area Display
•
3 pages of 16 (total 48) multi-function memory keys with color LEDs
•
Memory key label LCD display
•
6 Fixed function keys
•
Mute and Speaker keys
•
Message Waiting Lamp
•
Dedicated headset jack
•
Wall mountable
Using the phone system
Final
Figure 3: Mitel 5340 IP Phone
The Information Area Display shows information about the current telephone
call (such as name and number).
There are six softkeys (the three on the right are currently not used). The
meaning of each softkey is displayed directly beside the key.
There are three pages of 16 memory keys. The icons at the bottom of the
phone indicate which page is current. The page navigation buttons can be
used to switch pages. The memory key labels are also displayed beside each
one
Mitel 5360 IP phone
The Mitel 5360 IP phone has the following features:
Handsfree speakerphone
Final
•
Date/Time Display
•
2-line 20-character backlit Information Area Display
•
3 pages of 16 (total 48) multi-function memory keys with color LEDs
•
Memory key label LCD display
•
6 Fixed function keys
•
Mute and Speaker keys
•
Message Waiting Lamp
•
Dedicated headset jack
Using the phone system 7
•
Wall mountable
Message Waiting
Lamp
Date/Time
Display
Volume, Speaker
& Mute Controls
Control
Area
Fixed Function
Keys
List
Area
Keypad
Gadget
Sidebar
Navigation
Keys
Figure 4: Mitel 5360 IP Phone
The Information Area Display shows information about the current telephone
call (such as name and number).
There are six softkeys (the three on the right are currently not used). The
meaning of each softkey is displayed directly beside the key.
There are three pages of 16 memory keys. The icons at the bottom of the
phone indicate which page is current. The page navigation buttons can be
used to switch pages. The memory key labels are also displayed beside each
one
Initial setup for 5320/5330/5340/5360 phone
service
To set up your new phone service, follow these steps:
1
Activate your phone. See “Activating a 5320/5330/5340/5260 phone” on
page 8.
2
Perform a Quick Set-up. See “Quick set-up” on page 120.
Activating a 5320/5330/5340/5260 phone
To activate a phone you need (1) an extension, (2) a phone, and (3) a PIN.
The administrator can provide you with an extension and an initial PIN.
To activate your phone, follow these steps:
1
8
Using the phone system
Disconnect your computer from the network.
Final
2
Plug the phone into the network.
3
Plug the computer into the phone at the port marked PC.
4
Connect one end of the phone power pack into your phone and the other
end into a power outlet.
Note: If your network is configured with Power Over Ethernet (POE), the
above step is not necessary.
5
Wait for the Information Display Area to show "Logged Out" (this may take
30 seconds or more).
6
Press the ACTIVATE softkey.
The Information Display Area will prompt you for your "Extension:"
7
Enter your extension.
8
If you have login/logout privileges, the Information Display Area will
prompt you for your "PIN:"
Enter your PIN, then press the ENTER softkey.
9
If you do not have login/logout privileges, the Information Area Display will
show your extension
Press the YES softkey.
You have now successfully activated the phone, and can make calls.
See “Quick set-up” on page 120 for information about initial settings you
should configure through the web interface.
Answering a call on the 5320/5330/5340/5260
phone
When an incoming call is received on a phone, several things happen: (1) the
phone rings, (2) a Line Appearance flashes, and (3) the Information Area
Display shows the phone number of the caller and, if known, the name of the
caller.
You can answer an incoming call by picking up the handset, pressing the
flashing Line Appearance key, pressing the ANSWER softkey, or by pressing
the
key.
Because the Mitel 5320/5330/5340/5260 IP phone has multiple pages of
programmable memory keys, it is possible that the call could appear on a Line
Appearance key located on a different page from the one being displayed. In
this case, you can still answer the call by picking up the handset, pressing the
ANSWER softkey, or by pressing the
key.
Final
Using the phone system 9
You can pull back a call that has been answered by a twinned target phone by
pressing the corresponding Line Appearance key. See “Twinned calls on the
5320/5330/5340/5260 phone” on page 29
Using the 5320/5330/5340/5260 handset
To answer your phone using the handset, follow these steps:
1
Lift the handset.
Note: If you choose to ignore the incoming call and select a different line
appearance, the line appearance continues to flash but the phone stops
ringing.
To end the call while using the handset, choose one of the following:
•
Press the END softkey.
•
Replace the handset.
Using the 5320/5330/5340/5260 speakerphone
To switch from the handset to the speakerphone during a call, follow these
steps:
1
Press the
2
Replace the handset.
key.
To end a call while using the speakerphone, choose one of the following:
•
Press the END softkey.
•
Press the
key.
Switch from speakerphone to handset on the 5320/5330/
5340/5260 phone
To switch from the speakerphone to the handset during a call, pick up the
handset.
To end the call while using the handset, choose one of the following:
•
Press the END softkey.
•
Replace the handset.
Answering a second call on the 5320/5330/5340/5260 phone
A second incoming call causes three things to happen: (1) the phone rings
once (only if you are using the handset), (2) a line appearance flashes, and
(3) the Information Area Display shows the number and name of the caller, if
10
Using the phone system
Final
known. If the name of the caller is unknown, either the phone number or
"Unknown Caller" is displayed.
To answer a second call, choose one of the following:
•
Press the flashing Line Appearance key. This puts the active call on hold
and answers the second call.
•
End the first call by replacing the handset. The phone will start ringing.
Pick up the handset again to answer the second call.
To switch between two active calls, press the flashing Line Appearance key.
This puts the active call on hold, and activates the other call.
Note: If the display shows )) prior to the number calling, this indicates that
it is a second call.
Answering a call group call on the 5320/5330/5340/5260
phone
When an incoming call to a call group is received on a phone, the second line
of the Information Display Area shows the name of the group that was called.
The first line continues to display the number and name of the caller, if known.
321: Robin Jones
For: Sales Group
You can answer an incoming call group call by using the handset or the
speakerphone.
Making a call on the 5320/5330/5340/5260 phone
To make a call, follow these steps:
1
Lift the handset. This will select the next available Line Appearance. You
can also start dialing the number without lifting the handset. This will
automatically select the next available Line Appearance and operate in
speakerphone mode.
2
To make an internal call, dial the extension. To make an external call, dial
the prefix required for external dialing (usually 9) followed by the number
you want to call.
When you finish dialing the number the call is placed. If you place an internal
call, the Information Area Display shows the extension and name of the
connected party once the call is answered. If you place an external call, the
Information Area Display shows the name of the connected party, or if the
name is unknown, the phone number.
3
Final
To end the call, choose one of the following:
•
Press the END softkey.
•
Replace the handset.
Using the phone system 11
Note: To use the speakerphone for step 1, press an available Line
Appearance key or the
key instead of lifting the handset.
4
To end the call before you have completed dialing, choose one of the
following:
•
Replace the handset if using the handset.
•
Select the
•
Press the END softkey.
key if using the speakerphone.
Making a second call on the 5320/5330/5340/5260 phone
To make a second call while on an active call, follow these steps:
1
Press any available Line Appearance key. This puts the active call on
hold, and provides dial tone for a second call.
2
To make an internal call, dial the extension. To make an external call, dial
the prefix required for external dialing (usually 9) followed by the number
you want to call.
3
When you finish dialing the number the call is placed.
4
If you place an internal call, the Information Area Display shows the
extension and name of the connected party once the call is answered. If
you place an external call, the Information Area Display shows the name
of the connected party, or if the name is unknown, just the phone number.
5
To switch between two active calls, press the flashing Line Appearance
key. This puts the active call on hold, and activates the other call.
Ending one call keeps the second call on hold. To reconnect to the second
call, press the flashing Line Appearance key.
Using features via the 5320/5330/5340/5260 phone
This section explains the features available from your phone. Some of these
features must be pre-programmed in order to be available. To learn how to
program features to keys see “Program memory keys” on page 124.
3-way call on the 5320/5330/5340/5260 phone
Using 3-Way Call, you can set up a phone call among three separate parties.
To activate 3-Way Call, follow these steps:
12
1
While on an active call, press the CONF softkey. This places the first call
on hold, and selects an available Line Appearance. The Information Area
Display prompts you to enter who to "Conf with:"
Using the phone system
Final
2
Enter the phone number of the third party.
3
The system dials the number and displays a "Calling" message along with
the caller ID.
4
When the third party answers the call, the Information Area Display
updates with the caller ID.
5
Press the CONF softkey again. The 3-Way Call is now activated.
Notes: Until the CONF softkey is pressed a second time, the first party will
remain on hold and you can talk with the second party privately.
By putting a 3-Way Call on hold, the other parties can continue talking.
You can use the
key instead of the CONF softkey. When using this
key you must press twice to activate a 3-way call or you will initiate a
transfer instead.
If you want the option to leave the conference and leave the two parties
connected (when both parties are external), you must have the
permission Redirect Inbound Call to External Number enabled.
Once the 3-Way Call is established, you can use the transfer feature to
transfer both parties to another party.
Joining two calls on the 5320/5330/5340/5260 phone
The 3-way call feature allows you to conference together two calls on your
phone's Line appearances. To activate a 3-way call in these circumstances,
follow these steps:
1
While on an active call, press the CONF softkey.
2
Select the Line Appearance of the person on hold that is to be connected.
3
Press the CONF softkey again. The 3-Way Call is now activated.
Account codes on the 5320/5330/5340/5260 phone
Users can enter account codes against incoming and outgoing calls to
associate those calls with a particular client or account. Once entered,
account codes are logged in the call records kept by your service provider and
can be provided to you on request. Your administrator can enable and disable
the Account Code feature for your business and specify the minimum and
maximum valid account code length.
To use the Account Code feature, a user must have a memory key
programmed with the Account Code feature or be using a phone key
profile that has been programmed with the Account Code feature.
Final
Using the phone system 13
Account code entry on the 5320/5330/5340/5260 phone
Account codes can be entered against incoming and outgoing calls to
associate those calls with a particular client or account. Account code entry is
accepted before a call is placed or during a call.
To enter an account code before you place a call, follow these steps:
1
Select the Account Code key.
2
Enter the account number using the phone keypad.
3
Press the CALL softkey to start your call. The next available line
appearance is selected, dial tone is heard and your phone display
updates.
4
Proceed with making your call.
To enter an account code during a call, follow these steps:
1
Select the Account Code key.
2
Enter the account number using the phone keypad. You hear a tone as
you press the phone keys, but the person on the other end does not. The
Information Area Display shows the account code entered.
3
Press the ENTER softkey when you have finished entering the account
code.
Notes: You can re-enter an account code for a call multiple times. The
last account code entered is the account code that will be assigned to the
call.
To cancel the account code entry, press the QUIT softkey.
If you enter an account code with an invalid length, the Information Area
Display briefly shows "Invalid Account Code". Contact your system
administrator to determine the valid account code length for your
business.
You cannot assign an account code to a call once it has been completed.
Account code speed entry on the 5320/5330/5340/5260 phone
Account code entry is accepted before a call is placed or during a call. To use
this feature, it must be enabled for your business and you must have a
memory key programmed with Account Code and a pre-programmed
account code. See “Program memory keys” on page 124.
To enter a pre-programmed account code before you place a call, follow these
steps:
1
14
Using the phone system
Select the Account Code key. The Information Area Display briefly
shows the account code that has been pre-programmed.
Final
2
The next available line appearance is selected, dial tone is heard and
your phone display updates.
3
Proceed with making your call.
To enter a pre-programmed account code during a call, follow these steps:
1
Select the Account Code key. The Information Area Display briefly
shows the account code that has been pre-programmed.
Notes: You can re-enter an account code for a call multiple times. The
last account code entered is the account code that will be assigned to the
call.
To cancel account code entry before the call is placed, replace the
handset (or, if using the speakerphone, press the
key). Account
code speed entry during a call cannot be cancelled.
If the pre-programmed account code has an invalid length, the phone
LCD briefly displays "Invalid Account Code". Contact your system
administrator to determine the valid account code length for your
business.
You cannot assign an account code to a call once it has been completed.
Call Lists on the 5320/5330/5340/5260 phone
Call list on the 5320/5330/5340/5260 phone
Call list keeps a list of the calls that you make and receive. The call list is
accessible from your phone. You can redial any calls that you made from the
call list. See “Redial on the 5320/5330/5340/5260 phone” on page 16. You
may be able to dial a number from your incoming call list if it is supported by
your service provider.
To view the list of incoming calls received, follow these steps:
Final
1
Press the CALLS softkey on your phone. If you have programmed one of
your programmable keys as Incoming Calls List, you can press this key
instead.
The caller's name of the most recent call that you received is displayed. If
the name of the caller is not known, the number will be displayed.
2
Use the
3
Press the TIME softkey if you wish to display the time and date of the call.
4
Press the NUMBER softkey if you wish to display the number of the caller.
5
Press the NAME softkey if you wish to display the name of the caller
again. If the name is not known, this option is not available.
6
Press the QUIT softkey to exit from the call list.
keys to navigate the list.
Using the phone system 15
To call a number from your incoming calls list (only available if dialing from the
incoming call list is supported by your Service Provider):
1
Press the CALLS softkey on your phone (or the Incoming Calls List
programmed key). The caller's name of the most recent call that you
received is displayed.
2
Use the
3
Press the DIAL softkey to make a call to the displayed number.
The next available Line Appearance is selected and the system will
attempt to dial the displayed number by prefixing it with the appropriate
digits for external dialing (usually "9" or "91" depending on configuration).
If the number can be dialed as such, you will hear ringing once the call
has been placed. If the number cannot be dialed as such, the call will fail
and you will have to dial the number manually remembering to include the
proper prefix digits.
keys to navigate the list.
Notes: The position of the call in the call list is displayed in front of the
phone number.
The * symbol beside the position of the call means that the call was not
answered.
If the call was answered by a member of your call pickup group, then the
call will show as unanswered (with a *) on your phone and answered
(without a *) on the call pickup group member's phone that answered the
call.
*CALLS means that there has been at least one unanswered call since
the last time you viewed the list of calls you received.
Redial on the 5320/5330/5340/5260 phone
Using Redial you can view a list of calls that were made and also redial a
number in that list without using the keypad. The maximum amount of
numbers in your redial list is typically ten but is dependant on your service
provider.
To use Redial, follow these steps:
16
1
Press the REDIAL softkey or the
key.
The number that you most recently dialed is displayed.
2
Use the
3
Press the TIME softkey if you wish to display the time and date of the call.
4
Press the NUMBER softkey if you wish to display the number dialed.
Using the phone system
keys to navigate the list (if required).
Final
5
Once the required number is displayed, press the DIAL softkey to make
the call. The next available Line Appearance is selected and you will hear
ringing once the number has been dialed.
Notes: The * symbol beside the position number means that the call was
not answered.
The position of the call in the call list is displayed in front of the phone
number.
Press the QUIT softkey or the
key to exit from the call list.
Call pickup on the 5320/5330/5340/5260 phone
Using the call pickup feature, you can answer incoming calls for other
members of your call pickup group.
To use this feature, you must be a member of a call pickup group and have a
memory key programmed as Pickup. See “Program memory keys” on
page 124.
When a call comes into any member of your call pickup group, their phone will
ring and your Pickup key will flash. To answer the call, follow these steps:
1
Lift the handset.
2
Press the Pickup key.
or
1
Press the Pickup key to answer the call in speaker mode.
You can also join and leave your pickup group with a Join/Leave group key or
via the web interface. When you leave the group, this disables other group
members from picking up your calls; however, you can still pickup other
members' calls.
You cannot pick up calls to a member of your call pickup group if the call
does not result in the member phone ringing. For example, if the called
member is either logged out or has no available Line Appearances, then
you cannot pick up the call.
Company speed dial on the 5320/5330/5340/5260 phone
Using Company Speed Dial, you can call a number from the External
Directory by pressing a single memory key on your phone. To use this feature,
you must have a phone key programmed with Company Speed Dial. See
“Program memory keys” on page 124.
To make a call using the company speed dial, choose one of the following:
Final
Using the phone system 17
•
Press the Company Speed Dial key for the number you want to call. The
system will select the next available Line Appearance for you and activate
the speakerphone.
•
Activate the speakerphone and press the Company Speed Dial key.
•
Select an available Line Appearance. This will activate the
speakerphone. Press the Company Speed Dial key
•
Lift the handset and press the Company Speed Dial key for the number
you want to call.
Directory on the 5320/5330/5340/5260 phone
Using the Directory, you can view the Internal Directory on your phone's LCD
screen and make calls.
You can access the directory with the phone on-hook or off-hook. To view the
directory, follow these steps:
1
Press the MENU softkey.
The phone displays the menu options.
2
Press the DIR softkey.
The system displays the first name in the directory on the first line of the
Information Area Display.
3
Use one of the following options to locate the person that you would like
to call:
• Press the number on the keypad for the appropriate first letter of the
person's last name. For example, press "5" twice for "K".
•
4
Scroll down or up, using the
keys to find the name you want.
Once the correct name is displayed, press the DIAL softkey.
Forwarding your 5320/5330/5340/5260 phone
Using the forwarding features, you can forward your phone by following the
procedures described in the following sections:
•
“Forwarding your 5320/5330/5340/5260 phone to auto attendant” on
page 18
•
“Forwarding your 5320/5330/5340/5260 phone to co-worker” on page 19
•
“Forwarding your 5320/5330/5340/5260 phone to coverage” on page 19
•
“Forwarding your 5320/5330/5340/5260 phone to number” on page 19
•
“Forwarding your 5320/5330/5340/5260 phone to prompt” on page 20.
Forwarding your 5320/5330/5340/5260 phone to auto attendant
Using Forward to Auto Attendant, you can send all incoming calls to a
selected auto attendant. Press the Forward to AA key once to turn the
18
Using the phone system
Final
feature on. Press the key a second time to turn the feature off. The LED on
the programmed key indicates when the phone is being forwarded.
To use this feature, you must have a key programmed with Forward to Auto
Attendant. See “Program memory keys” on page 124.
Note: If you have this feature turned on when you log out of your phone all
your calls will be forwarded to the auto attendant.
Forwarding your 5320/5330/5340/5260 phone to co-worker
Using Forward to Co-worker, you can send all incoming calls to a selected coworker. Press the Forward to Co-worker key once to turn the feature on.
Press the key a second time to turn the feature off. The LED on the
programmed key indicates when the phone is being forwarded.
To use this feature, you must have a key programmed with Forward to Coworker. See “Program memory keys” on page 124.
Note: If you have this feature turned on when you log out of your phone all
your calls will be forwarded to your co-worker.
Forwarding your 5320/5330/5340/5260 phone to coverage
Using Forward to Coverage, you can send all incoming calls to the option you
selected from My Call Coverage. Press the Forward to Coverage key once
to turn the feature on. Press the key a second time to turn the feature off. The
LED on the programmed key indicates when the phone is being forwarded.
To use this feature, you must have a key programmed with Forward to
Coverage. See “Program memory keys” on page 124.
Note: If you have this feature turned on when you log out of your phone all
your calls will be forwarded to coverage.
Forwarding your 5320/5330/5340/5260 phone to number
Using Forward to Number, you can send all incoming calls to a preset phone
number. Press the Forward to Number key once to turn the feature on. Press
the key a second time to turn the feature off. The LED on the programmed key
indicates when the phone is being forwarded.
To use this feature, you must have a key programmed with Forward to
Number. See “Program memory keys” on page 124.
Final
Using the phone system 19
Note: If you forward your phone to an external phone number, you must
have permission to make that external call and Redirect Inbound Call to
External Number permission. See “Permissions” on page 122 for
instructions on how to view your call permissions.
If you have this feature turned on when you log out of your phone all your
calls will be forwarded to the number defined.
Forwarding your 5320/5330/5340/5260 phone to prompt
Using Forward to Prompt, you can send all incoming calls to a phone number
that you have entered via your phone. The LED on the programmed key
indicates when the phone is being forwarded.
To forward to prompt, follow these steps:
1
Press the Forward to Prompt key on your phone. The system will ask
you to enter a phone number.
2
Enter the phone number on the phone keypad.
3
Press the ENTER softkey.
To change the phone number for the forward to prompt, repeat the above
three steps.
To turn forward to prompt off, follow these steps:
1
Press the Forward to Prompt key.
2
Press the FWDOFF softkey.
Notes: To use this feature, you must have a key programmed with
Forward to Prompt. See “Program memory keys” on page 124.
The system stores internal extensions, therefore you do not need to press
the ENTER softkey.
If you forward your phone to an external phone number, you must have
permission to make that external call and Redirect Inbound Call to
External Number permission. See “Permissions” on page 122 for
instructions on how to view your call permissions.
If you have this feature turned on when you log out of your phone all your
calls will be forwarded to the prompt defined.
Handsfree answerback on the 5320/5330/5340/5260 phone
Using Handsfree answerback, you can have intercom calls automatically
answered so that you have a two-way speech connection. See “Intercom to
co-worker on the 5320/5330/5340/5260 phone” on page 21.
Press the Handsfree answerback key to turn the feature on. Press the key a
second time to turn the feature off. The LED on the programmed key indicates
when the Handsfree answerback feature is turned on.
20
Using the phone system
Final
To be able to activate and deactivate this feature with a key, you must have a
key programmed with Handsfree answerback. See “Program memory keys”
on page 124.
You can also enable the feature without a key by checking the box for
Handsfree Answerback on your Personal Details page (see “Change user
details” on page 121).
Hold on the 5320/5330/5340/5260 phone
Using Hold, you can put an active call on hold, and make other calls. The LED
of the Line Appearance key flashes to indicate the call is on hold.
To place a call on hold, follow these steps:
1
While on an active call, press the
2
The indicator light next to the active Line Appearance changes from
green to red and flashes slowly.
3
To remove the call from hold, press the Line Appearance key.
key.
Intercom calls on the 5320/5330/5340/5260 phone
Using the intercom features, you can make a page to a selected co-worker
that is broadcast through the speaker on your co-worker's phone.
Intercom to co-worker on the 5320/5330/5340/5260 phone
Using Intercom to Co-worker, you can make a page to a selected co-worker
that is broadcast through the speaker on your co-worker's phone. Pick up the
handset or select a Line Appearance key, then press the Intercom to Coworker key to start the page to your co-worker. If you press the Intercom to
Co-worker key with no line active, the next available line appearance key will
automatically be selected. Note that if your phone is active on a call or in a
ringing state, you must select an available line appearance key before
pressing the Intercom to Co-worker key.
If your co-worker has the Handsfree Answerback feature configured and
activated, then you will also be able to hear your co-worker speak. (See
“Handsfree answerback on the 5320/5330/5340/5260 phone” on page 20)
To use this feature, you must have a key programmed with Intercom to Coworker. See “Program memory keys” on page 124.
Intercom to prompt on the 5320/5330/5340/5260 phone
Using Intercom to Prompt, you can make a page to any co-worker whose
number you enter on the phone.
To make a call with Intercom to prompt, follow these steps:
1
Final
Press the Intercom to Prompt key on your phone. The system will ask
you to enter a phone number.
Using the phone system 21
If your phone is already active on a call or ringing, you need to press an
available Line Appearance key or put the current call on hold before you can
use the Intercom to Prompt feature.
2
Enter the phone number of your co-worker on the phone keypad.
You will then be connected to your co-worker and you can speak through their
speaker. If your co-worker has the Handsfree Answerback feature
configured and activated, then you will also be able to hear your co-worker
speak. (See “Handsfree answerback on the 5320/5330/5340/5260 phone” on
page 20).
To use this feature, you must have a key programmed with Intercom to
Prompt. See “Program memory keys” on page 124.
Internal 5320/5330/5340/5260 phone settings
To configure internal 5320/5330/5340/5260 phone settings (such as display
brightness and contrast), select the
key and follow the prompts.
Join/Leave group on the 5320/5330/5340/5260 phone
Using the Join/Leave Group feature you can join a Broadcast, Pickup, Hunt or
Rollover call group of which you are a member, using your phone. For
Broadcast, Hunt and Rollover groups, only the phones of members who are
joined in the group will ring when the call group is called. For Call Pickup
groups, other phones in the group will be notified only if the phone being
called is joined in the group. See “Call groups” on page 137.
Press the Join/Leave Group key once to turn the feature on. Press the key a
second time to turn the feature off. The LED on the programmed key indicates
when you are logged into the call group.
To use this feature, you must have a key programmed with Join/Leave
Group. See “Program memory keys” on page 124.
Line Appearance key on the 5320/5330/5340/5260 phone
Line Appearance keys are required in order to receive incoming calls and to
make outgoing calls. The LED on the programmed key indicates the status of
the Line Appearance.
•
Key is unlit - the Line Appearance is available for an incoming or outgoing
call.
•
Key is flashing green with a ring tone - an incoming call is available to be
answered.
•
Key is flashing red without a ring tone - a call is on hold.
•
Key is solid - a call is active. If this is green, then a call is active. If this is
red, then a twinned call is active on the twinned target phone.
When you have multiple Line Appearance keys, they are ordered from bottom
to top, right to left. An incoming call will appear on the first available Line
Appearance key.
22
Using the phone system
Final
Your phone will normally have two or three pre-programmed Line
Appearances. To be able to handle more simultaneous calls, you must
program additional keys with Line Appearance. See “Program memory keys”
on page 124.
Note: You can only program Line Appearance keys on page one of the
three programmable pages.
Login on the 5320/5330/5340/5260 phone
Using Login, you can enter your extension into any phone and take ownership
of that phone. By doing this, you can direct all incoming calls for your
extension to that phone. You must have the appropriate privileges to log out of
a phone.
You can only log in to an unassigned phone (a phone without a user logged
in). If a phone has a user logged in, you can log the user out by following the
procedure described in Logout on the 5320/5330/5340/5260 phone. An
unassigned phone displays "Logged Out".
To log in to a phone, follow these steps:
1
Press the ACTIVATE softkey on an unassigned phone (a phone without a
user logged in)
The system prompts you to enter an extension.
2
Enter your extension.
The system prompts you to enter your PIN.
3
Enter your PIN. Press the # key or the ENTER softkey once you have
finished entering your PIN.
The system verifies that the PIN is valid and then it logs you into the
phone.
Notes: If you log in while you are logged in to another phone, the system
will log you out of the original phone.
You cannot log in or out, or activate a phone, while the phone is on an
active call.
If you are not logged into a phone, all calls to your extension will go
directly to call coverage.
If you have not been assigned the privileges required to log out of your
phone you will not be prompted for a PIN when you log in.
You will not be prompted for a PIN when you log in to a phone with a
location extension.
Logout from the 5320/5330/5340/5260 phone
To log out of a phone, follow these steps when your phone has no calls
connected:
Final
Using the phone system 23
1
Press the MENU softkey.
2
Press the LOGOUT softkey. The phone displays a confirmation message.
3
Press the YES softkey to proceed. The phone will display the message
"Logout successful", confirming that you are logged out of the phone and
the system. Incoming calls will be forwarded to Call Coverage. The phone
returns to a logged out/unassigned idle state.
Notes: If your phone has been locked you cannot log out of the phone.
The LOGOUT softkey is not be displayed on your phone. Contact your
system administrator for assistance.
You cannot log in or out, or activate a phone, while the phone is on an
active call.
You can use the
key instead of the QUIT softkey.
After you have logged out of the phone, callers to your extension will be
directed to your call coverage target. If no call coverage target is set, the
phone will ring until the caller hangs up.
If the primary member of a Monitor Group logs out of the phone, calls to
the Monitor Group will still ring any secondary phones and will redirect to
the primary member's call coverage target after the configured number of
rings.
For more information about Monitor Groups, see “Monitor call on the
5320/5330/5340/5260 phone” on page 25.
If a logged out phone has twinning configured, the twinning target phone
will ring and the call will be redirected to the logged-out phone's call
coverage target after the configured number of rings.
Monitor groups on the 5320/5330/5340/5260 phone
Using the Monitor Groups feature, your calls can be monitored and answered
by other users or you can have your phone monitored for activity. To enable
the Monitor feature, contact your administrator and provide a list of users that
you would like to have monitor your calls or phone. The administrator will
create a Monitor group in your name with the people in your list as members
of the group. There is no other action that needs to be taken on your part.
If you requested to have your calls monitored, calls to one or more of your
Line Appearances will automatically ring on your Monitor group member
phones provided that they have configured the appropriate number of
Monitor Call or Monitor Call Silent keys on their phone.
When a member of your Monitor group has answered one of your calls, the
Line Appearance on your phone will still indicate the state of the call.
•
A flashing key without a ring tone indicates that the call is on hold.
•
A lit key indicates that the Line Appearance is in use.
If you requested to have your phone monitored, when your phone is in use the
group members phones will show a lit LED against the Monitor Phone key
they have configured on their phone.
24
Using the phone system
Final
Notes: If you are part of a Monitor Group, you can put a call on hold and
either the primary group member or other phones in the group can pick up
the call.
Your call coverage still applies when you are in a monitor group.
A Monitor Phone key also acts a speed dial to the monitored extension.
Monitor Groups is only applicable to users who are using Mitel IP phones.
Monitor call on the 5320/5330/5340/5260 phone
Using the Monitor Call or Monitor Call Silent feature, you can monitor and pick
up calls occurring on another user's phone. To use this feature,
•
You must be a member of a Monitor group. A Monitor group defines the
user that is being monitored (primary group member) and which users
can monitor calls for the primary group member (secondary group
members). Only the administrator can add a Monitor group or change the
members of an existing Monitor group.
•
You must have the same number of phone keys programmed with
Monitor Call or Monitor Call Silent as the number of simultaneous calls
that you want to monitor on the primary group member's phone. The
maximum number of simultaneous calls that you can monitor for one
Monitor Primary equals the number of Line Appearances that the Monitor
Primary has programmed on their phone.
For example, if you have one Monitor Call/Monitor Call Silent key
programmed for a Monitor Primary, you will only be able to monitor one
incoming or outgoing call at a time. If you have two Monitor Call/Monitor Call
Silent keys programmed for a Monitor Primary, you will be able to monitor two
incoming or outgoing calls at a time and so on. There is no direct
correspondence between a Monitor Call/Monitor Call Silent key and a Line
Appearance key on the Monitor Primary's phone. The Line Appearance that
the first call occurs on (not necessarily the first Line Appearance) will be
monitored by the first Monitor Call/Monitor Call Silent key, the Line
Appearance that the second call occurs on (not necessarily the second line
appearance) will be monitored by the second Monitor Call/Monitor Call
Silent key and so on. See “Program memory keys” on page 124.
The Monitor Call/Monitor Call Silent key indicates the state of the Line
Appearance on the primary group member's phone that is being monitored.
The only difference between Monitor Call and Monitor Call Silent is that
your phone will not ring to indicate an incoming call to the Primary member.
For example:
Final
•
A flashing Monitor Call key with a ring tone indicates an incoming call to
the Line Appearance.
•
A flashing Monitor Call key without a ring tone indicates that the call is on
hold.
•
A flashing Monitor Call Silent key without a ring tone indicates an
incoming call to the Line Appearance or that the call is on hold.
•
A lit Monitor Call/Monitor Call Silent key indicates that the Line
Appearance is in use.
Using the phone system 25
To answer a call occurring on the primary group member's phone, follow
these steps:
1
When the Monitor Call/Monitor Call Silent key is flashing, lift the handset.
2
Press the Monitor Call/Monitor Call Silent key.
or
1
Press the Monitor Call/Monitor Call Silent key to answer the call in
speaker mode.
Note: By putting a call on hold, either the primary group member or other
Monitor phones can pick up the call.
Monitor phone on the 5320/5330/5340/5260 phone
Using the Monitor Phone feature, your phone can be monitored by other
users. To enable the Monitor Phone feature, contact your administrator and
provide a list of users that you would like to have monitor your phone. The
administrator will create a Monitor group in your name with the people in your
list as members of the group. There is no other action that needs to be taken
on your part. When you are using your phone, members of your call group will
be able to see that the phone is in use provided that they have programmed a
memory key to view activity on your phone.
When you use your phone a member of your Monitor group will see the LED
of the memory key that they have programmed to monitor your phone light up.
Mute on the 5320/5330/5340/5260 phone
Using Mute, you can silence any sound from the phone. This does not prevent
incoming sound from being heard. Press the
key during a call to
activate Mute. The LED on the key indicates when Mute is active.
One touch speed dial on the 5320/5330/5340/5260 phone
Using One Touch Speed Dial, you can make a call to a pre-programmed
number. To use this feature, a programmable key must be programmed as a
One Touch Speed Dial. See “Program memory keys” on page 124.
To use One Touch Speed Dial, choose one of the following:
26
•
Lift the handset and press the One Touch Speed Dial key.
•
Press an available Line Appearance key, to activate the speakerphone,
and then press the One Touch Speed Dial key.
•
Press the One Touch Speed Dial key. This will select an available Line
Appearance and activate the speakerphone.
Using the phone system
Final
Page on the 5320/5330/5340/5260 phone
Using Page, you can send a page to all of the phones at your site. The page is
broadcast through the speaker of each available phone. To use this feature,
you must have a memory key programmed as a Page key. See “Program
memory keys” on page 124.
To page all of the phones at your site, follow these steps:
1
Select a memory key programmed with the Page feature.
2
Your Information Area Display shows "Calling: Site Page" while the
system identifies the available phones at your site.
When the system is ready for you to begin your page, you will hear an
alert tone and the Information Area Display shows the number of phones
being paged.
3
Speak into the handset or the speakerphone.
4
To end the page, you have the following options:
•
Replace the handset if using the handset.
•
Select the
•
Select the END softkey.
key.
Note: A page will not be broadcast on phones that are busy.
If you select Page while there is already a page in progress, the system
will wait until the page in progress is completed before your page is
started. Your Information Area Display will show "Calling: Site Page" and
you will hear ringing while you are waiting.
On the phones receiving a page, the phone LCD screen displays the
name of the user who originated the page and an END softkey. The user
receiving the page can stop the page to their phone by selecting the END
softkey.
Park and retrieve on the 5320/5330/5340/5260 phone
Using Park and Retrieve, you can put a call on hold at a park location so that
it can be retrieved from any other phone at your business. To use this feature,
a memory key must be programmed as a Park/Retrieve key. See “Program
memory keys” on page 124.
To put a call on hold at a park location, follow this step:
1
While on an active call, select a memory key programmed with the Park/
Retrieve feature. The system places the call on hold at a park location.
The park location is displayed on your Information Area Display.
You are no longer connected with the caller and your phone returns to the
idle state.
To retrieve a parked call, follow these steps:
Final
Using the phone system 27
1
From an idle phone, lift the handset. This will select the next available
Line Appearance. Select a memory key programmed with the Park/
Retrieve feature. The Information Area Display prompts you for the "Park
Location:".
2
Enter the required park location using the phone keypad.
The system connects you with the caller who was on hold at the park
location. The Information Area Display shows the caller's name (if known)
or number.
Notes: To cancel the retrieval of the parked call, press the QUIT softkey.
If you enter a park location where there is no caller on hold, the
Information Area Display will briefly show "No Parked Call".
There are nine park locations available (1 through 9). If all park locations
are in use when you try to park a call, the Information Area Display will
briefly show "Park Locations Full" and the call will be placed on hold.
If the call is left parked for 30 seconds, the phone of the person who
parked the call will beep and the Information Area Display will briefly show
"Call parked at: " with the park location number to remind you that a call
that you parked has not been retrieved.
Speaker on the 5320/5330/5340/5260 phone
Using Speaker, you can turn the speakerphone on your phone on and off. To
use Speaker, press the
key.
Transfer call on the 5320/5330/5340/5260 phone
Using Transfer, you can transfer a call from one phone to another. To transfer
a call, follow these steps:
1
While on an active call, press the TRANS softkey. The system places the
call on hold, and the Information Area Display prompts you with the
"Transfer To:" message.
2
Enter the extension or phone number of the person to whom you want to
transfer the call, or press a One-Touch Speed Dial key, or press a Line
Appearance key that has a call on hold.
3
Press the TRANSFER softkey once you hear ringing. You can also press
the TRANSFER softkey after the additional party has answered. The
Information Area Display shows the message "Transfer Complete" for
approximately five seconds before returning to an idle state.
If you enter an invalid extension during a transfer, the Information Area
Display shows "Invalid Extension". To reconnect with the original caller, follow
these steps:
28
1
Press the END softkey.
2
Press the flashing Line Appearance key.
Using the phone system
Final
3
Try to transfer the call again.
If you choose not to complete the transfer, press the QUIT softkey, then press
the flashing Line Appearance key to retrieve the original call.
Note: You can use the
TRANSFER softkey.
key instead of the TRANS or
Transfer to voice mail from the 5320/5330/5340/5260 phone
If your administrator has configured an auto attendant for voice mail deposit,
you can transfer a caller directly to a co-worker's voice mail box.
To transfer a call to voice mail, follow these steps:
1
While on an active call, press the
key or the TRANS softkey. The
system places the call on hold, and the Information Area Display prompts
you with the "Transfer To:" message.
2
Enter the extension of the auto attendant that your administrator has
created for voice mail deposit.
3
Select the auto attendant voice mail deposit option and enter the
extension of the co-worker to whom you are transferring.
4
Press the TRANSFER softkey (or the
key) to complete the
transfer. The Information Area Display shows the message "Transfer
Complete" for approximately five seconds before returning to an idle
state.
Twinned calls on the 5320/5330/5340/5260 phone
If you have configured your phone to be twinned to another external phone
(the twinning target), then incoming calls will simultaneously ring the other
phone as well.
If you answer the call on your desk phone, the twinning target phone will stop
ringing.
If you answer the call on your twinning target phone, the Line Appearance key
on your desk phone will remain lit. To pull back the call to your desk phone,
simply press the corresponding Line Appearance key. The call will be
disconnected from the twinning target phone and you will be connected on
your desk phone.
Note that if neither your desk phone nor the twinning target phone answer an
incoming call, your call coverage setting will determine what happens to the
call (see “Call Coverage” on page 135). If the other phone has a voice
message service associated with it, then your twinning target phone's voice
Final
Using the phone system 29
message service may answer the call first. If you want to avoid this situation,
then you should ensure that your call coverage is configured to answer calls
before the twinning target phone's voice message service.
To toggle twinning on or off, you can use the web interface (see “Twinning” on
page 136) or you can configure a memory key as Twinning On/Off (see
“Program memory keys” on page 124).
Once you have a Twinning On/Off key configured, press the key once to turn
the feature on. Press the key a second time to turn the feature off. The LED
on the programmed key indicates when your twinning is active.
Voice mail on the 5320/5330/5340/5260 phone
Using the
key, you can connect directly to voice mail to retrieve
messages or manage voice mail options such as changing your voice mail
greeting. The Message Waiting Lamp on the phone will light up if messages
are waiting.
If your administrator has created an auto attendant with a voice mail retrieval
option and associated it to an external number, you can access your mail box
from any phone by dialing the external number and then selecting the voice
mail retrieval option. You are prompted for your extension, then connected to
your voice mail box.
Using the web interface, you can control many of the settings for your voice
mailbox. See “Voice Mail” on page 144.
Volume control on the 5320/5330/5340/5260 phone
Use volume control to change ring volume, handset volume, and speaker
volume.
Note: The ring, handset, and speaker volumes return to their default
settings if the phone loses power.
Change ring volume on the 5320/5330/5340/5260 phone
To change the ring volume on your phone, follow these steps:
30
1
From another phone, make a call to your extension.
2
While your phone is ringing, repeatedly press the
volume is at the level you want.
Using the phone system
keys until the ring
Final
Change handset volume on the 5320/5330/5340/5260 phone
To change the volume of the sound you hear through the handset, follow
these steps:
1
Lift the handset. You will hear dial tone.
2
Repeatedly press the
3
Replace the handset.
keys until the volume is at the level you want.
Change speaker volume on the 5320/5330/5340/5260 phone
To change the volume of the sound you hear through the speaker, follow
these steps:
Using the
Mitel 5224/
5324 IP
phone
1
Press the
2
Repeatedly press the
key. You will hear dial tone.
keys until the volume is at the level you want.
This section describes the Mitel 5224 and 5324 IP phones:
•
To set up your new phone service, see “Initial set-up for 5224/5324 phone
service” on page 32.
•
For a description of your phone, see “Mitel 5224/5324 IP Phone” on
page 31.
•
The Mitel 5224 and 5324 IP phone functionality is the same.
Other topics covered in this section include the following:
•
“Answering a call on the 5224/5324 phone” on page 34
•
“Making a call on the 5224/5324 phone” on page 36
•
“Using features via the 5224/5324 phone” on page 37
•
“Volume control on the 5224/5324 phone” on page 57
•
“Voice mail on the 5224/5324 phone” on page 57.
Mitel 5224/5324 IP Phone
The Mitel 5224 IP Phone has the following features:
Final
•
Handsfree speakerphone operation (full duplex)
•
Two-line, 20-character backlit display.
Using the phone system 31
•
Three context-sensitive softkeys for additional features
•
24 programmable multi-function memory keys with color LEDs
•
Six fixed function keys, including Directory, Cancel, Redial, Hold,
Transfer/Conference, and Message
•
Mute and Speaker keys
•
Dedicated headset jack
•
Arrow keys for Ringer Volume/Contrast up/down controls and scrolling
•
Support for peripherals, such as the Mitel IP Programmable Key Module
12, Mitel IP Programmable Key Module 48, and the Mitel 5310 IP
Conference Unit
•
Message waiting lamp
•
Two-position tilting stand
•
Wall mountable
Figure 5: Mitel 5224 IP Phone
Initial set-up for 5224/5324 phone service
To set up your new phone service, follow these steps:
32
1
Activate your phone. See “Activating a 5224/5324 phone” on page 33.
2
Perform a Quick Set-up through the web interface. See “Quick set-up” on
page 120.
Using the phone system
Final
Activating a 5224/5324 phone
To activate a Mitel phone you need (1) an extension number, (2) a phone, and
(3) a PIN. Your administrator can provide you with an extension number and
initial PIN.
To activate your phone, follow these steps:
1
Disconnect your computer from the network.
2
Plug the phone into the network.
3
Plug the computer into the phone at the port marked PC.
4
Connect one end of the phone power pack into your phone and the other
end into a power outlet.
Note: If your network is configured with Power Over Ethernet (POE), the
above step is not necessary.
5
Wait for the phone to display the following (this may take 30 seconds or
more):
Logged Out
ACTIVATE
6
Press the ACTIVATE softkey.
The display will show:
Extension:
QUIT
7
Enter your extension.
8
If you have login/logout privileges, the display will show:
PIN:
ENTER
QUIT
Enter your PIN, then press the ENTER softkey.
9
:
If you do not have login/logout privileges, the display will show
Extension: 314
YES
NO
Press the YES softkey.
:
10 The display will show
Extension: 314
REDIAL CALLS
MENU
You have now successfully activated the phone, and can make calls.
Final
Using the phone system 33
See “Quick set-up” on page 120 for information about initial settings you
should configure through the web interface.
Answering a call on the 5224/5324 phone
When an incoming call is received on a phone, several things happen: (1) the
phone rings, (2) a Line Appearance flashes, and (3) the LCD displays the
phone number of the caller and, if known, the name of the caller.
You can answer an incoming call by picking up the handset, pressing the
flashing Line Appearance key, pressing the ANSWER softkey, or by pressing
the
key.
321: Robin Jones
ANSWER
You can pull back a call that has been answered by a twinned target phone by
pressing the corresponding Line Appearance key. See “Twinned calls on the
5224/5324 phone” on page 56.
Using the 5224/5324 handset
To answer your phone using the handset, follow these steps:
1
Lift the handset.
You have now answered the call. The LCD displays the caller’s number
and name (if known).
321: Robin Jones
TRANS
CONF
END
If you choose to ignore the incoming call and select a different line
appearance, the line appearance continues to flash but the phone stops
ringing.
2
To end the call while using the handset, choose one of the following:
•
Press the END softkey.
•
Replace the handset.
Using the 5224/5324 speakerphone
To switch from the handset to the speakerphone during a call, follow these
steps:
34
1
Press the
2
Replace the handset.
Using the phone system
key.
Final
To end a call while using the speakerphone, choose one of the following:
•
Press the END softkey.
•
Press the
key.
Switching from speakerphone to handset on the 5224/5324
phone
To switch from the speakerphone to the handset during a call, pick up the
handset.
To end the call while using the handset, choose one of the following:
•
Press the END softkey.
•
Replace the handset.
Answering a second call on the 5224/5324 phone
A second incoming call causes three things to happen: (1) the phone rings
once (only if you are using the handset), (2) a line appearance flashes, and
(3) the LCD displays the number and name of the caller, if known. If the name
of the caller is unknown, either the phone number or “Unknown Caller” is
displayed.
))321: Robin Jones
To answer a second call, choose one of the following:
•
Press the flashing Line Appearance key. This puts the active call on hold
and answers the second call.
•
End the first call by replacing the handset. The phone will start ringing.
Pick up the handset again to answer the second call.
To switch between two active calls, press the flashing Line Appearance key.
This puts the active call on hold, and activates the other call.
If the display shows )) prior to the number calling, this indicates that it is a
second call.
Answering a call group call on the 5224/5324 phone
When an incoming call to a call group is received on a phone, the second line
of the phone LCD displays the name of the group that was called. The first
line continues to display the number and name of the caller, if known.
.
321: Robin Jones
For: Sales Group
To answer an incoming call group call, use the handset or speakerphone.
Final
Using the phone system 35
Making a call on the 5224/5324 phone
To make a call, follow these steps:
1
Lift the handset. This will select the next available Line Appearance. You
can also start dialing the number without lifting the handset. This will
automatically select the next available Line Appearance and operate in
speakerphone mode.
REDIAL CALLS
2
DIR
To make an internal call, dial the extension. To make an external call, dial
the prefix required for external dialing (usually “9”) followed by the number
you want to call.
320
When you finish dialing, the number the call will be placed.
Calling: Robin Jones
END
If you place an internal call, your LCD displays the extension and name of
the connected party once the call is answered. If you place an external
call, the LCD displays the name of the connected party, or if the name is
unknown, the phone number.
320: Robin Jones
TRANS
CONF
END
3
To end the call, choose one of the following:
•
Press the END softkey.
•
Replace the handset.
To use the speakerphone for step 1, press an available Line
Appearance key or the
key instead of lifting the handset.
4
To end a call before you have completed dialing, choose one of the
following:
•
Replace the handset if using the handset.
•
Select the
•
Press the End softkey.
key if using the speakerphone.
Making a second call on the 5224/5324 phone
To make a second call, while on an active call, follow these steps:
1
36
Using the phone system
Press any available Line Appearance key. This puts the active call on
hold, and provides dial tone for a second call.
Final
2
To make an internal call, dial the extension. To make an external call, dial
the prefix required for external dialing (usually “9”) followed by the number
you want to call.
320
3
When you finish dialing the number, the call will be placed.
Calling: Robin Jones
END
4
If you place an internal call, your LCD screen displays the extension and
name of the connected party once the call is answered. If you place an
external call, the LCD displays the name of the connected party, or if the
name is unknown, just the phone number.
320: Robin Jones
TRANS
CONF
END
5
To switch between two active calls, press the flashing Line Appearance
key. This puts the active call on hold and activates the other call.
Ending one call keeps the second call on hold. To reconnect to the second
call, press the flashing Line Appearance key.
Using features via the 5224/5324 phone
This section explains the features available from your phone. Some of these
features must be pre-programmed in order to be available. To learn how to
program features to keys, see “Program memory keys” on page 124.
3-way call on the 5224/5324 phone
Using 3-Way Call, you can set up a phone call among three separate parties.
To activate 3-Way Call, follow these steps:
Final
1
While on an active call, press the CONF softkey. This places the first call
on hold, and selects an available Line Appearance. The LCD screen
displays:
Conf with:
DIR
QUIT
2
Enter the phone number of the third party.
3
The system dials the number and displays a “Calling” message along with
the caller ID on the first line of the LCD screen.
Calling:Lesley Gr
QUIT
4
When the third party answers the call, the LCD will show that a
connection is established.
Lesley Greene
Using the phone system 37
CONF
5
QUIT
Press the CONF softkey again. The 3-Way Call is now activated. The
LCD displays:
3-Way Call
TRANSFER
END
Until the CONF softkey is pressed a second time, the first party will
remain on hold and you can talk with the second party privately.
By putting a 3-Way Call on hold, the other parties can continue talking.
You can use the
key instead of the CONF softkey. When using
this key you must press twice to activate a 3-way call or you will initiate a
transfer instead.
If you want the option to leave the conference and leave the two parties
connected (when both parties are external), you must have the
permission Redirect Inbound Call to External Number enabled.
Once the 3-Way Call is established, you can use the transfer feature to
transfer both parties to another party.
Joining two calls on the 5224/5324 phone
The 3-way call feature allows you to conference together two calls on your
phone's line appearances. To activate a 3-way call in these circumstances,
follow these steps:
1
While on an active call, press the CONF softkey.
2
Select the Line Appearance of the person on hold that is to be connected.
3
Press the CONF softkey again. The 3-Way Call is now activated.
Account codes on the 5224/5324 phone
Users can enter account codes against incoming and outgoing calls to
associate those calls with a particular client or account. Once entered,
account codes are logged in the call records kept by your service provider and
can be provided to you on request. Your administrator can enable and disable
the Account Code feature for your business and specify the minimum and
maximum valid account code length.
To use the Account Code feature, a user must have a memory key
programmed with the Account Code feature or be using a phone key
profile that has been programmed with the Account Code feature.
38
Using the phone system
Final
Account code entry on the 5224/5324 phone
Account codes can be entered against incoming and outgoing calls to
associate those calls with a particular client or account. Account code entry is
accepted before a call is placed or during a call.
To enter an account code before you place a call, follow these steps:
1
Select the Account Code key. The LCD displays:
Account Code:
CALL
QUIT
2
Enter the account number using the phone keypad. The LCD displays the
account code entered:
Account Code: 1234
CALL
QUIT
3
Press the CALL softkey to start your call. The next available line
appearance is selected, dial tone is heard and your phone LCD updates.
4
Proceed with making your call.
To enter an account code during a call, follow these steps:
1
Select the Account Code key. The LCD displays:
Account Code:
ENTER
QUIT
2
Enter the account number using the phone keypad. You hear a tone as
you press the phone keys, but the person on the other end does not. The
LCD displays the account code entered:
Account Code:1234
ENTER
QUIT
3
Press the ENTER softkey when you have finished entering the account
code.
You can re-enter an account code for a call multiple times. The last
account code entered is the account code that will be assigned to the call.
If you enter an account code with an invalid length, the phone LCD briefly
displays "Invalid Account Code". Contact your system administrator to
determine the valid account code length for your business.
You cannot assign an account code to a call once it has been completed.
Account code speed entry on the 5224/5324 phone
Account code entry is accepted before a call is placed or during a call. To use
this feature, it must be enabled for your business, and you must have a
memory key programmed with Account Code and a pre-programmed
account code.
To enter a pre-programmed account code before you place a call, follow these
steps:
Final
Using the phone system 39
1
Select the Account Code key. The LCD briefly displays the account code
that has been pre-programmed:
Account Code: 45678
2
The next available line appearance is selected, dial tone is heard and
your phone LCD updates.
REDIAL
3
CALLS
DIR
Proceed with making your call.
To enter a pre-programmed account code during a call, follow these steps:
•
Select the Account Code key. The LCD briefly displays the account code
that has been pre-programmed:
Account Code: 45678
You can re-enter an account code for a call multiple times. The last
account code entered is the account code that will be assigned to the call.
To cancel account code entry before the call is placed, replace the
handset (or, if using the speakerphone, press the
code speed entry during a call cannot be cancelled.
key. Account
If the pre-programmed account code has an invalid length, the phone LCD
briefly displays "Invalid Account Code". Contact your system administrator to
determine the valid account code length for your business.
You cannot assign an account code to a call after it has been completed.
Call lists on the 5224/5324 phone
Call list on the 5224/5324 phone
Call list keeps a list of the calls that you make and receive. The call list is
accessible from your phone. You can redial any calls that you made from the
call list. See “Redial on the 5224/5324 phone” on page 42. You may be able
to dial a number from your incoming call list if it is supported by your service
provider.
40
Using the phone system
Final
To view the list of incoming calls received, follow these steps:
1
Press the CALLS softkey on your phone. If you have programmed one of
your programmable keys as Incoming Calls List, you can press this key
instead.
The most recent call that you received is displayed.
1: John Doe
DIAL
TIME
QUIT
If the name of the caller is not known, the number will be displayed.
2
Use the
3
Press the TIME softkey if you wish to display time and date of the call.
4
Press the NUMBER softkey if you wish to display the number of the caller.
5
Press the NAME softkey if you wish to display the name of the caller
again. If the name is not known, this option is not available.
6
Press the QUIT softkey to exit from the call list.
keys to navigate the list.
To call a number from your incoming calls list, follow these steps (only
available if dialing from the incoming call list is supported by your Service
Provider):
1
Press the CALLS softkey on your phone (or the Incoming Calls List
programmed key).
The most recent call that you received is displayed.
1: John Doe
DIAL
TIME
QUIT
2
Use the
3
Press the DIAL softkey to make a call to the displayed number.
keys to navigate the list.
The next available Line Appearance is selected and the system will
attempt to dial the displayed number by prefixing it with the appropriate
digits for external dialing (usually "9" or "91" depending on configuration).
If the number can be dialed as such, you will hear ringing once the call
has been placed. If the number cannot be dialed as such, the call will fail
and you will have to dial the number manually, including the proper prefix
digits
The position of the call in the call list is displayed in front of the phone
number.
The * symbol beside the position of the call means that the call was not
answered.
Final
Using the phone system 41
If the call was answered by a member of your call pickup group, then the
call will show as unanswered (with a *) on your phone and answered
(without a *) on the call pickup group member's phone that answered the
call.
*CALLS means that there has been at least one unanswered call since
the last time you viewed the list of calls you received.
Redial on the 5224/5324 phone
Using Redial you can view a list of calls that were made and also redial a
number in that list without using the keypad. The maximum amount of
numbers in your redial list is typically ten but is dependent on your service
provider.
To use Redial, follow these steps:
1
Press the REDIAL softkey on your phone, or press
.
The number that you most recently dialed is displayed.
*1: 9-605-223-7865
DIAL
TIME
QUIT
2
Use the
3
Press the TIME softkey if you wish to display the time and date of the call.
4
Press the NUMBER softkey if you wish to display the number dialed.
5
Once the required number is displayed, press the DIAL softkey to make
the call. The next available Line Appearance is selected and you will hear
ringing once the number has been dialed.
keys to navigate the list (if required).
The * symbol beside the position number means that the call was not
answered.
The position of the call in the call list is displayed in front of the phone
number.
Press the QUIT softkey to exit from the call list or press
.
Call pickup on the 5224/5324 phone
Using the call pickup feature, you can answer incoming calls for other
members of your call pickup group.
To use this feature, you must be a member of a call pickup group and have a
memory key programmed as Pickup.
When a call comes into any member of your call pickup group, their phone will
ring and your Pickup key will flash. To answer the call, follow these steps:
42
Using the phone system
Final
1
Lift the handset.
2
Press the Pickup key.
or
1
Press the Pickup key to answer the call in speaker mode.
You can also join and leave your pickup group with a Join/Leave group key or
via the web interface. When you leave the group, this disables other group
members from picking up your calls; however, you can still pickup other
members' calls. See “Join/Leave group on the 5224/5324 phone” on page 48
and “Join/leave call groups” on page 137.
You cannot pick up calls to a member of your call pickup group if the call
does not result in the member phone ringing. For example, if the called
member is either logged out or has no available Line Appearances, then
you cannot pick up the call.
Company speed dial on the 5224/5324 phone
Using Company Speed Dial, you can call a number from the External
Directory by pressing a single memory key on your phone. To use this feature,
you must have a phone key programmed with Company Speed Dial. See
“Program memory keys” on page 124.
To make a call using the company speed dial, choose one of the following:
•
Press the Company Speed Dial key for the number you want to call. The
system selects the next available Line Appearance for you and activates
the speakerphone.
•
Activate the speakerphone and press the Company Speed Dial key.
•
Select an available Line Appearance. This activates the speakerphone.
Press the Company Speed Dial key.
•
Lift the handset and press the Company Speed Dial key for the number
you want to call.
Directory on the 5224/5324 phone
Using the Directory, you can view the Internal Directory of your company on
your phone’s LCD screen and make calls.
You can access the directory with the phone on-hook or off-hook. To view the
directory, follow these steps:
1
Press the MENU softkey.
The phone displays the menu options.
MENU
LOGOUT
DIR
QUIT
Final
Using the phone system 43
2
Press the DIR softkey. The system displays the first name in the directory
on the first line of the LCD.
You can also press the
Andrews Kim
DIAL
NUMBER
3
key to access the Directory.
QUIT
Use one of the following options to locate the person that you would like
to call:
• Press the number on the keypad for the appropriate first letter of the
person’s last name. For example, press “5” twice for “K”.
K: Kennedy Pat
DIAL
NUMBER
QUIT
•
Scroll down or up, using the
Knowles Erin
DIAL
NUMBER
4
keys to find the name you want.
QUIT
When the correct name is displayed, press the DIAL softkey.
Press the NUMBER softkey to display the extension.
Press the NAME softkey to display the name again.
If you have initiated a call but not started dialing yet, the phone LCD will
display the DIR softkey in place of the MENU softkey.
REDIAL CALLS
DIR
Proceed by selecting the DIR softkey.
Forwarding your 5224/5324 phone
You can forward your phone by using any of the forwarding features. In each
case, you must program a memory key with the appropriate feature. See
“Program memory keys” on page 124.
You can forward your phone by following the procedure described in the
following sections:
44
•
“Forward your 5224/5324 phone to auto attendant” on page 45
•
“Forward your 5224/5324 phone to co-worker” on page 45
•
“Forward your 5224/5324 phone to coverage” on page 45
•
“Forward your 5224/5324 phone to number” on page 46
Using the phone system
Final
•
“Forward your 5224/5324 phone to prompt” on page 46
Forward your 5224/5324 phone to auto attendant
Using Forward to Auto Attendant, you can send all incoming calls to a
selected auto attendant. Press the Forward to AA key once to turn the
feature on. Press the key a second time to turn the feature off. The LED on
the programmed key indicates when the phone is being forwarded.
To use this feature, you must have a memory key programmed with Forward
to AA.
If you have this feature turned on when you log out of your phone all your
calls will be forwarded to the auto attendant.
Forward your 5224/5324 phone to co-worker
Using Forward to Co-worker, you can send all incoming calls to a selected coworker. Press the Forward to Co-worker key once to turn the feature on.
Press the key a second time to turn the feature off. The LED on the
programmed key indicates when the phone is being forwarded.
To use this feature, you must have a memory key programmed with Forward
to Co-worker.
If you have this feature turned on when you log out of your phone all your
calls will be forwarded to your co-worker.
Forward your 5224/5324 phone to coverage
Using Forward to Coverage, you can send all incoming calls to the option you
selected for your call coverage, e.g., auto attendant, voice mail, another
number. (See “Call Coverage” on page 135). Press the Forward to
Coverage key once to turn the feature on. Press the key a second time to turn
the feature off. The LED on the programmed key indicates when the phone is
being forwarded.
To use this feature, you must have a memory key programmed with Forward
to Coverage.
If you have this feature turned on when you log out of your phone all your
calls will be forwarded to coverage.
Final
Using the phone system 45
Forward your 5224/5324 phone to number
Using Forward to Number, you can send all incoming calls to a preset phone
number. Press the Forward to Number key once to turn the feature on. Press
the key a second time to turn the feature off. The LED on the programmed key
indicates when the phone is being forwarded.
To use this feature, you must have a memory key programmed with Forward
to Number.
If you forward a phone to an external phone number, you must have
permission to make that external call and Redirect Inbound Call to
External Number permission. See “Permissions” on page 122 for
instructions on how to view your call permissions.
If you have this feature turned on when you log out of your phone all your
calls will be forwarded to the defined number.
Forward your 5224/5324 phone to prompt
Using Forward to Prompt, you can send all incoming calls to a phone number
that you have entered via your phone. The LED on the programmed key
indicates when the phone is being forwarded.
To forward to prompt, follow these steps:
1
Press the Forward to Prompt key on your phone. The system will ask
you to enter a phone number.
2
Enter the phone number on the phone keypad.
3
Press the ENTER softkey.
To change the phone number for the forward to prompt, repeat the above
three steps.
1
To turn forward to prompt off, follow these steps:
2
Press the Forward to Prompt key.
3
Press the FWDOFF softkey.
To use this feature, you must have a key programmed with Forward to
Prompt.
The system stores internal extensions, therefore you do not need to press
the ENTER softkey.
If you forward a phone to an external phone number, you must have
permission to make that external call and Redirect Inbound Call to
External Number permission. See “Permissions” on page 122 for
46
Using the phone system
Final
instructions on how to view your call permissions.
If you have this feature turned on when you log out of your phone all your
calls will be forwarded to the defined prompt.
Handsfree answerback on the 5224/5324 phone
Using Handsfree answerback, you can have intercom calls automatically
answered so that you have a two-way speech connection. See “Intercom
Calls on the 5224/5324 phone” on page 47.
Press the Handsfree answerback key to turn the feature on. Press the key a
second time to turn the feature off. The LED on the programmed key indicates
when the Handsfree answerback feature is turned on.
To be able to activate and deactivate this feature with a key, you must have a
key programmed with Handsfree answerback.
You can also enable the feature without a key by checking the box for
Handsfree answerback on your Personal Details page. See “Forgotten PIN”
on page 118.
Hold on the 5224/5324 phone
Using Hold, you can put an active call on hold, and make other calls. The Line
Appearance key will flash to indicate the call is on hold.
To place a call on hold, follow these steps:
1
While on an active call, press the
2
The indicator light next to the active Line Appearance changes from
green to red and flashes slowly.
3
To remove the call from hold, press the Line Appearance key.
key.
Intercom Calls on the 5224/5324 phone
Intercom to co-worker on the 5224/5324 phone
Using Intercom to Co-worker, you can make a page to a selected co-worker
that is broadcast through the speaker on your co-worker's phone. Pick up the
handset or select a Line Appearance key, then press the Intercom to Coworker key to start the page to your co-worker. If you press the Intercom to
Co-worker key with no line active, the next available line appearance key will
automatically be selected. Note that if your phone is active on a call or in a
ringing state, you must select an available line appearance key before
pressing the Intercom to Co-worker key.
Final
Using the phone system 47
If your co-worker has the Handsfree Answerback feature configured and
activated, then you will also be able to hear your co-worker speak. See
“Handsfree answerback on the 5224/5324 phone” on page 47.
To use this feature, you must have a key programmed with Intercom to Coworker.
Intercom to prompt on the 5224/5324 phone
Using Intercom to Prompt, you can make a page to any co-worker whose
number you enter on the phone.
To make a call with Intercom to prompt, follow these steps:
1
Press the Intercom to Prompt key on your phone. The system will ask
you to enter a phone number.
If your phone is already active on a call or ringing, you need to press an
available Line Appearance key or put the current call on hold before you
can use the Intercom to Prompt feature.
2
Enter the phone number of your co-worker on the phone keypad.
You will then be connected to your co-worker and you can speak through
their speaker. If your co-worker has the Handsfree Answerback feature
configured and activated, then you will also be able to hear your coworker speak. See “Handsfree answerback on the 5224/5324 phone” on
page 47.
To use this feature, you must have a key programmed with Intercom to
Prompt.
Join/Leave group on the 5224/5324 phone
Using the Join/Leave Group feature you can join a Broadcast, Call Pickup,
Hunt, or Rollover call group of which you are a member, using your phone.
For Broadcast, Hunt and Rollover groups, only the phones of members who
are joined in the group ring when the call group is called. For Call Pickup
groups, other phones in the group will be notified only if the phone being
called is joined in the group. Press the Join/Leave Group key once to turn
the feature on. Press the key a second time to turn the feature off. The LED
on the programmed key indicates when you are logged into the call group.
To use this feature, you must have a key programmed with Join/Leave
Group.
Line appearance on the 5224/5324 phone
Line Appearance keys are required in order to receive incoming calls and to
make outgoing calls. The LED on the programmed key indicates the status of
the Line Appearance.
•
48
Using the phone system
Key is unlit – the Line Appearance is available for an incoming or
outgoing call.
Final
•
Key is flashing green with a ring tone – an incoming call is available to be
answered.
•
Key is flashing red without a ring tone – a call is on hold.
•
Key is solid – If this is green, then a call is active. If this is red, then a
twinned call is active on the twinned target phone.
When you have multiple Line Appearance keys, they are ordered from bottom
to top, right to left. An incoming call will appear on the first available Line
Appearance key.
Your phone will normally have two or three pre-programmed Line
Appearances. To be able to handle more simultaneous calls, you must
program additional keys with Line Appearance.
Login on the 5224/5324 phone
Using Login, you can enter your extension into any phone and take ownership
of the phone. By doing this, you can direct all incoming calls for your
extension to that phone. You must have the appropriate privileges to be able
to log out of a phone.
You can only log in to an unassigned phone (a phone without a user logged
in). If a phone has a user logged in, you can log the user out by following
procedure in “Logout from the 5224/5324 phone” on page 50. An unassigned
phone shows the following on its display:
Logged Out
ACTIVATE
To log in to a phone, follow these steps:
1
Press the ACTIVATE softkey on an unassigned phone (a phone without a
user logged in).
Extension:
QUIT
2
Enter your extension.
Extension: 314
QUIT
PIN:
ENTER
3
4
Enter your PIN.
PIN: *****
ENTER
QUIT
QUIT
Press the # key or the ENTER softkey once you have finished entering
your PIN.
The system verifies that the PIN is valid and then it logs you into the
phone.
Extension: 314
REDIAL CALLS MENU
Final
Using the phone system 49
If you log in while you are logged in to another phone, the system will log
you out of the original phone.
You cannot log in or out, or activate a phone, while the phone is on an
active call.
If you are not logged into a phone, all calls to your extension go directly to
call coverage.
If you have not been assigned the privileges required to log out of your
phone, you are not prompted for a PIN when you log in.
You are not prompted for a PIN when you log in to a phone with a location
extension.
Logout from the 5224/5324 phone
To log out of a phone, follow these steps when your phone has no calls
connected. At the start, the display should display the following:
Extension: 314
REDIAL CALLS
MENU
1
Press the MENU softkey.
MENU
LOGOUT
DIR
QUIT
2
Press the LOGOUT softkey
.
The LCD displays a confirmation message.
Confirm Logout
YES
3
.
NO
Press the YES softkey to proceed. The LCD will display the message
“Logout successful”, confirming that you are logged out of the phone and
the system. Incoming calls will be forwarded to Call Coverage. The
display will return to a logged out/unassigned idle state
Logout Successful
Logged Out
ACTIVATE
If your phone has been locked you cannot log out of the phone. The
LOGOUT softkey will not be displayed on your phone. Contact your
system administrator for assistance.
You cannot log in or out, or activate a phone, while the phone is on an
active call.
You can press the
key instead of the QUIT softkey.
After you have logged out of the phone, callers to your extension will be
directed to your call coverage target. If no call coverage target is set, the
phone will ring until the caller hangs up.
If the primary member of a Monitor Group logs out of the phone, calls to
50
Using the phone system
Final
the Monitor Group will still ring any secondary phones and will redirect to
the primary member’s call coverage target after the configured number of
rings.
For more information about Monitor Groups, see “Monitor groups on the
5224/5324 phone” on page 51.
If a logged out phone has twinning configured, the twinning target phone
will ring and the call will be redirected to the logged-out phone’s call
coverage target after the configured number of rings.
Monitor groups on the 5224/5324 phone
Using the Monitor Groups feature, your calls can be monitored and answered
by other users or you can have your phone monitored for activity. To enable
the Monitor feature, contact your administrator and provide a list of users that
you would like to have monitor your calls or phone. The administrator will
create a Monitor group in your name with the people in your list as members
of the group. There is no other action that needs to be taken on your part.
If you requested to have your calls monitored, calls to one or more of your
Line Appearances will automatically ring on your Monitor group member
phones provided that they have configured the appropriate number of
Monitor Calls or Monitor Call Silent keys on their phone.
When a member of your Monitor group has answered one of your calls, the
Line Appearance on your phone will still indicate the state of the call.
•
A flashing key without a ring tone indicates that the call is on hold.
•
A lit key indicates that the Line Appearance is in use.
If you requested to have your phone monitored, when your phone is in use the
group member’s phones will show a lit LED against the Monitor Phone key
they have configured on their phone.
If you are part of a Monitor group, you can put a call on hold and either the
primary group member or other phones in the group can pick up the call.
Your call coverage still applies when you are in a monitor group.
A Monitor Phone key also acts a speed dial to the monitored extension.
Monitor Groups is only applicable to users who are using Mitel IP phones.
Monitor call on the 5224/5324 phone
Using the Monitor Call or Monitor Call Silent feature, you can monitor and pick
up calls occurring on another user’s phone. To use this feature,
Final
•
You must be a member of a Monitor group. A Monitor group defines the
user that is being monitored (primary group member) and which users
can monitor calls for the primary group member (secondary group
members). Only the administrator can add a Monitor group or change the
members of an existing Monitor group.
•
You must have the same number of phone keys programmed with
Monitor Call or Monitor Call Silent as the number of simultaneous calls
Using the phone system 51
that you want to monitor on the primary group member's phone. The
maximum number of simultaneous calls that you can monitor for one
Monitor Primary equals the number of Line Appearances that the Monitor
Primary has programmed on their phone.
For example, if you have one Monitor Call/Monitor Call Silent key
programmed for a Monitor Primary, you will only be able to monitor one
incoming or outgoing call at a time. If you have two Monitor Call/Monitor Call
Silent keys programmed for a Monitor Primary, you will be able to monitor two
incoming or outgoing calls at a time and so on. There is no direct
correspondence between a Monitor Call/Monitor Call Silent key and a Line
Appearance key on the Monitor Primary's phone. The Line Appearance that
the first call occurs on (not necessarily the first Line Appearance) will be
monitored by the first Monitor Call/Monitor Call Silent key; the Line
Appearance that the second call occurs on (not necessarily the second line
appearance) will be monitored by the second Monitor Call/Monitor Call
Silent key and so on.
The Monitor Call/Monitor Call Silent key indicates the state of the Line
Appearance on the primary group member’s phone that is being monitored.
The only difference between Monitor Call and Monitor Call Silent is that
your phone will not ring to indicate an incoming call to the Primary member.
For example:
•
A flashing Monitor Call key with a ring tone indicates an incoming call to
the Line Appearance.
•
A flashing Monitor Call key without a ring tone indicates that the call is on
hold.
•
A flashing Monitor Call Silent key without a ring tone indicates an
incoming call to the Line Appearance or that the call is on hold.
•
A lit Monitor Call/Monitor Call Silent key indicates that the Line
Appearance is in use.
To answer a call occurring on the primary group member's phone, follow
these steps:
1
When the Monitor Call/Monitor Call Silent key is flashing, lift the
handset.
2
Press the Monitor Call/Monitor Call Silent key
or
1
Press the Monitor Call/Monitor Call Silent key to answer the call in
speaker mode.
By putting a call on hold, either the primary group member or other
Monitor phones can pick up the call.
52
Using the phone system
Final
Monitor Phone on the 5224/5324 phone
Using the Monitor Phone feature, your phone activity can be monitored by
other users. To enable the Monitor Phone feature, contact your administrator
and provide a list of users that you would like to have monitor your phone. The
administrator will create a Monitor group in your name with the people in your
list as members of the group. There is no other action that needs to be taken
on your part. When you are using your phone members of your call group will
be able to see that the phone is in use provided that they have programmed a
memory key to view activity on your phone.
When you use your phone a member of your Monitor group will see the LED
of the memory key that they have programmed to monitor your phone light up.
Mute on the 5224/5324 phone
Using Mute you can silence any sound from the phone. This does not prevent
incoming sound from being heard. Press the
key during a call to
activate Mute. The LED on the key indicates when Mute is active.
One-Touch speed dial on the 5224/5324 phone
Using One-Touch Speed Dial, you can make a call to a pre-programmed
number. To use this feature, a programmable key must be programmed as a
One-Touch Speed Dial.
To use One Touch Speed Dial, choose one of the following:
•
Lift the handset and press the One Touch Speed Dial key.
•
Press an available Line Appearance key, to activate the speakerphone,
and then press the One Touch Speed Dial key.
•
Press the One Touch Speed Dial key. This will select an available Line
Appearance and activate the speakerphone.
Page on the 5224/5324 phone
Using Page, you can send a page to all of the phones at your site. The page is
broadcast through the speaker of each available phone. To use this feature,
you must have a memory key programmed as a Page key.
To page all of the phones at your site, follow these steps:
1
Select a memory key programmed with the Page feature.
Your phone LCD displays "Calling: Site Page" while the system identifies
the available phones at your site.
Calling: Site Page
2
Final
When the system is ready for you to begin your page, you will hear an
alert tone and the phone LCD screen displays the number of phones
being paged.
Paging: 7 of 10
Using the phone system 53
END
3
Speak into the handset or the speakerphone.
4
To end the page, you have the following options:
•
Replace the handset if using the handset.
•
Select the
•
Select the END softkey.
key.
A page is not broadcast on phones that are busy.
If you select Page while there is already a page in progress, the system
waits until the page in progress is completed before your page is started.
Your phone displays "Calling: Site Page" and you hear ringing while you
are waiting.
On the phones receiving a page, the phone LCD screen displays the
name of the user who originated the page and an END softkey. The user
receiving the page can stop the page to their phone by selecting the END
softkey.
Page from: Karen Gr
END
Park and retrieve on the 5224/5324 phone
Using Park and Retrieve, you can put a call on hold at a park location so that
it can be retrieved from any other phone at your business. To use this feature,
a memory key must be programmed as a Park/Retrieve key
To put a call on hold at a park location, follow this step:
1
While on an active call, select a memory key programmed with the Park/
Retrieve feature. The system places the call on hold at a park location.
The park location is displayed on your phone LCD.
Parked at: 4
You are no longer connected with the caller and your phone returns to the
idle state.
To retrieve a parked call, follow these steps:
54
1
From an idle phone, lift the handset. This will select the next available
Line Appearance. Select a memory key programmed with the Park/
Retrieve feature. The phone LCD screen displays:
Park Location:
QUIT
2
Enter the required park location using the phone keypad.
Using the phone system
Final
The system connects you with the caller who was on hold at the park
location. The LCD screen now displays the caller’s name (if known) or
number.
Robin Jones
TRANS
CONF
END
.
To cancel the retrieval of the parked call, press the QUIT softkey.
If you enter a park location where there is no caller on hold, the phone
LCD will briefly display "No Parked Call".
There are nine park locations available (1 through 9). If all park locations
are in use when you try to park a call, the phone LCD will briefly display
"Park Locations Full" and the call will be placed on hold.
If the call is left parked for 30 seconds, the phone of the person who
parked the call will beep and the phone’s LCD will briefly display "Call
parked at: " with the park location number to remind you that the call has
not been retrieved.
Speaker on the 5224/5324 phone
Using Speaker, you can turn the speakerphone on your phone on and off. To
use Speaker, press the
key.
Transfer call on the 5224/5324 phone
Using Transfer, you can transfer a call from one phone to another. To transfer
a call, follow these steps:
1
While on an active call, press the TRANS softkey. The system places the
call on hold, and the LCD screen displays:
Transfer To:
DIR
2
QUIT
Enter the extension or phone number of the person to whom you want to
transfer the call, or press a One-Touch Speed Dial key, or press a Line
Appearance key that has a call on hold.
Transfer To:415
QUIT
3
Press the TRANSFER softkey once you hear ringing. You can also press
the TRANSFER softkey after the additional party has answered. The LCD
screen displays the message “Transfer Complete” for approximately five
seconds before returning to an idle state.
If you enter an invalid extension during a transfer, the LCD screen displays
“Invalid Extension”. To reconnect with the caller, follow these steps:
Final
1
Press the END softkey.
2
Press the flashing Line Appearance key.
Using the phone system 55
3
Try to transfer the call again.
If you choose not to complete the transfer, press the QUIT softkey, then
press the flashing Line Appearance key to retrieve the original call.
You can use the
softkey.
key instead of the TRANS or TRANSFER
Transferring a call to voice mail from the 5224/5324 phone
If your administrator has configured an auto attendant for voice mail deposit,
you can transfer a call directly to a co-workers voice mail box.
To transfer a call to voice mail, follow these steps:
1
While on an active call, press the
key, or the TRANS softkey.
The system places the call on hold, and the LCD will display:
Transfer To:
DIR
QUIT
2
Enter the extension of the auto attendant that your administrator has
created for voice mail deposit.
Transfer To: 701
QUIT
3
Select the auto attendant voice mail deposit option and enter the
extension of the co-worker to whom you are transferring.
4
Select the TRANSFER softkey (or the
key) to complete the
transfer. The LCD displays the message “Transfer Complete” for
approximately five seconds before returning to an idle state.
Twinned calls on the 5224/5324 phone
If you have configured your phone to be twinned to another phone (the
twinning target), then incoming calls will ring at the same time on the other
phone. See “Twinning” on page 136 for details on how to configure the
twinning option for your phone.
If you answer the call on your desk phone, the twinning target phone will stop
ringing.
If you answer the call on your twinning target phone, the Line Appearance key
on your desk phone will remain lit. To pull back the call to your desk phone,
simply press the corresponding Line Appearance key. The call disconnects
from the twinning target phone and connects to the desk phone.
56
Using the phone system
Final
Note that if neither your desk phone nor the twinning target phone answers an
incoming call, your call coverage setting will determine what happens to the
call. If the other phone has a voice message service associated with it, then
your twinning target phone's voice message service may answer the call first.
If you want to avoid this situation, then you should ensure that your call
coverage is configured to answer calls before the twinning target phone voice
mail service.
To toggle twinning on or off, you can use the web interface or you can
configure a memory key as Twinning On/Off (see “Program memory keys”
on page 124).
Once you have a Twinning On/Off key configured, press the key once to turn
the feature on. Press the key a second time to turn the feature off. The LED
on the programmed key indicates when your twinning is active.
Voice mail on the 5224/5324 phone
Using the
key, you can connect directly to voice mail to retrieve
messages or manage voice mail options such as changing your voice mail
greeting. The Message Waiting Lamp on the phone will light up if messages
are waiting.
If your administrator has created an auto attendant with a voice mail retrieval
option and associated it to an external number, you can access your mail box
from any phone by dialing the external number and then selecting the voice
mail retrieval option. You are prompted for your extension, then connected to
your voice mail box.
Using the web interface, you can control many of the settings for your voice
mailbox. See “Voice Mail” on page 144.
Volume control on the 5224/5324 phone
Use volume control to change ring volume, handset volume, and speaker
volume.
The ring, handset, and speaker volumes return to their default settings if
the phone loses connectivity to power.
Changing ring volume on the 5224/5324 phone
To change the ring volume on your phone, follow these steps:
1
Final
From another phone, make a call to you extension.
Using the phone system 57
2
While your phone is ringing, repeatedly press the
volume is at the level you want.
key until the ring
Changing handset volume on the 5224/5324 phone
To change the volume of the sound you hear through the handset, follow
these steps:
1
Lift the handset. You will hear dial tone.
2
Repeatedly press the
3
Replace the handset.
key until the volume is at the level you want.
Changing speaker volume on the 5224/5324 phone
To change the volume of the sound you hear through the speaker, follow
these steps:
Using the
Mitel 5212/
5312 IP
Phone
1
Press the
2
Repeatedly press the
key. You will hear dial tone.
keys until the volume is at the level you want.
This section describes the Mitel 5212/5312 IP phones.
•
To set up your new phone service, see “Initial set-up for Mitel 5212/5312
IP phone service” on page 59.
•
For a description of your phone, see “Mitel 5212/5312 IP phone” on
page 58.
•
The Mitel 5212 and 5312 IP phone functionality is the same.
Other topics covered in this section include the following:
•
“Answering a call on the 5212/5312 IP phone” on page 60
•
“Making a call on the 5212/5312 IP phone” on page 62
•
“Using features via the 5212/5312 IP phone” on page 63
•
“Volume control on the 5212/5312 IP phone” on page 80
•
“Voice mail on 5212/5312 IP phone” on page 80.
Mitel 5212/5312 IP phone
The Mitel 5212/5312 IP phone has the following features:
•
58
Using the phone system
Handsfree speaker phone (half duplex)
Final
•
2-line, 20-character backlit LCD display
•
12 multi-function memory keys with color LEDs
•
6 fixed function keys, including Directory, Cancel, Redial, Hold, Transfer/
Conference, and Message
•
Mute and Speaker keys
•
Dedicated headset jack
•
Wall mountable
Figure 6: Mitel 5212/5312 IP Phone
Initial set-up for Mitel 5212/5312 IP phone service
To set up your new phone service, follow these steps:
1
Activate your phone. See “Activating a Mitel 5212/5312 IP phone” on
page 59.
2
Perform a Quick Set-up. See “Quick set-up” on page 120.
Activating a Mitel 5212/5312 IP phone
To activate a 5212/5312 phone you must physically connect the phone, then
log in with your extension and PIN number.
To activate your phone, follow these steps:
Final
Using the phone system 59
1
Unplug your computer from the network.
2
Plug the phone into the network (through the supplied power pack or from
power over the Ethernet; consult the documentation provided in the box).
3
Plug the computer into the phone.
4
Plug the phone power pack into an outlet.
5
Wait for the phone to display the following (this may take 30 seconds or
more):
LOGGED OUT
*00 to Login
6
Enter *00. The phone will display the following:
Extension:
7
Enter your extension. The phone will display the following:
PIN:
Enter pin press #
8
Enter your PIN, then the # key. The phone will display the following:
Extension: 314
You have now successfully activated the phone, and can make calls.
Answering a call on the 5212/5312 IP phone
When an incoming call is received on a phone, several things happen: (1) the
phone rings, (2) a Line Appearance flashes, and (3) the LCD displays the
phone number of the caller and, if know, the name of the caller.
321: Robin Jones
You can answer an incoming call by using the handset or the speakerphone.
You can pull back a call that has been answered by a twinned target phone by
pressing the corresponding Line Appearance key. See “Twinned Calls on the
5212/5312 IP phone” on page 79.
Using the 5212/5312 handset
To answer your phone using the handset, follow these steps:
1
60
Using the phone system
Lift the handset.
Final
•
Alternatively, you may choose to use one of the following methods:
- Press the flashing Line Appearance key.
- Press the
key.
You have now answered the call. The LCD displays the caller's name (if
known).
321: Robin Jones
If you choose to ignore the incoming call and select a different line
appearance, the line appearance continues to flash but the phone stops
ringing.
Using the 5212/5312 speakerphone
To switch from the handset to the speakerphone during a call, follow these
steps:
1
Press the
2
Replace the handset.
3
To end a call while using the speakerphone, press the
key.
key.
Switch from speakerphone to handset on the 5212/5312
phone
To switch from the speakerphone to the handset during a call, pick up the
handset.
To end the call while using the handset, replace the handset.
Answering a second call on the 5212/5312 IP phone
A second incoming call causes three things to happen: (1) the phone rings
once (only if you are using the handset), (2) a line appearance flashes, and
(3) the LCD displays the number and the name of the caller, if the caller is
known.
))321: Robin Jones
To answer a second call, choose one of the following:
•
Final
Press the flashing Line Appearance key. This puts the active call on hold
and answers the second call.
Using the phone system 61
•
End the first call by replacing the handset. The phone will start ringing.
Pick up the handset again to answer the second call.
To switch between two active calls, press the flashing Line Appearance key.
This puts the active call on hold, and activates the other call.
If the display shows )) prior to the number calling, this indicates that it is a
second call.
Making a call on the 5212/5312 IP phone
To make a call, follow these steps:
1
Lift the handset. This will select the next available Line Appearance. You
can also start dialing the number without lifting the handset. This will
automatically select the next available Line Appearance and operate in
speakerphone mode.
2
To make an internal call, dial the extension. To make an external call, dial
the prefix required for external dialing (usually 9) followed by the number
you want to call.
320
When you finish dialing the number, the call is placed.
Calling: Robin Jones
If you place an internal call, your LCD displays the extension and name of
the connected party once the call is answered. If you place an external
call, the LCD screen displays the name of the connected party, or if the
name is unknown, the phone number.
320: Robin Jones
3
To end the call, replace the handset.
To use the speakerphone for step 1, press an available Line Appearance
key or the
•
To end the call before you have completed dialing, choose one of the
following:
•
62
Using the phone system
key instead of lifting the handset.
Replace the handset if using the handset.
Final
•
Select the
key if using the speakerphone.
Making a second call on the 5212/5312 IP phone
To make a second call while on an active call, follow these steps:
1
Press any available Line Appearance key. This puts the active call on
hold and provides dial tone for a second call.
2
To make an internal call, dial the extension. To make an external call, dial
the prefix required for external dialing (usually 9) followed by the number
you want to call.
320
3
When you finish dialing the number, the call is placed.
Calling: Robin Jones
4
If you place an internal call, the LCD displays the extension and name of
the connected party once the call is answered. If you place an external
call, the LCD screen displays the name of the connected party, or if the
name is unknown, just the phone number.
320: Robin Jones
5
To switch between two active calls, press the flashing Line Appearance
key. This puts the active call on hold and activates the other call.
Ending one call keeps the second call on hold. To reconnect to the second
call, press the flashing Line Appearance key.
Using features via the 5212/5312 IP phone
This section explains the features available from your 5212 IP phone. Some
of these features must be pre-programmed in order to be available. To learn
how to program features to keys, see “Program memory keys” on page 124.
3-way call on the 5212/5312 IP phone
Using 3-Way Call, you can set up a phone call among three separate parties.
To activate 3-Way Call, follow these steps:
1
Final
While on an active call, press the
key twice. This places the first
call on hold, and selects an available Line Appearance. The LCD screen
displays:
Using the phone system 63
Conf with:
2
Enter the phone number of the third party.
The system dials the number and displays a "Calling" message along with
the caller ID on the first line of the LCD screen.
Calling: Lesley Greene
3
When the third party answers the call, the LCD shows that a connection is
established.
Lesley Greene
4
Press the
screen displays:.
3-Way Call
key again. The 3-Way Call is now activated. The LCD
Until the
key is pressed again, the first party will remain on hold
and you can talk with the second party privately.
By putting a 3-Way Call on hold, the other parties can continue talking.
If you want the option to leave the conference and leave the two parties’
connected (when both parties are external), you must have the
permission Redirect Inbound Call to External Number enabled.
Once the 3-Way Call is established, you can use the transfer feature to
transfer both parties to another party.
Joining two calls on the 5212/5312 IP phone
The 3-way call feature allows you to conference together two calls on your
phone's Line appearances. To activate a 3-way call in these circumstances,
follow these steps:
64
1
While on an active call, press the
2
Select the Line Appearance of the person on hold that is to be connected.
3
Press the
Using the phone system
key twice.
key again. The 3-Way Call is now activated.
Final
Account codes on the 5212/5312 IP phone
Account codes can be entered against incoming and outgoing calls to
associate those calls with a particular client or account. Account code entry is
accepted before a call is placed or during a call. You must have a memory key
programmed with Account Code.
Account code entry on the 5212/5312 IP phone
To enter an account code before you place a call, follow these steps:
1
Select the Account Code key. The LCD displays:
Account Code:
2
Enter the account number using the phone keypad. The LCD displays the
account code entered:
Account Code: 1234
3
Press the # key to start your call. The next available line appearance is
selected, dial tone is heard and your phone LCD updates.
4
Proceed with making your call.
To enter an account code during a call, follow these steps:
1
Select the Account Code key. The LCD displays:
Account Code:
2
Enter the account number using the phone keypad. You hear a tone as
you press the phone keys, but the person on the other end does not. The
LCD displays the account code entered:
Account Code: 1234
3
Press the # key when you have finished entering the account code.
You can re-enter an account code for a call multiple times. The last
account code entered is the account code that will be assigned to the call.
If you enter an account code with an invalid length, the phone LCD briefly
displays "Invalid Account Code". Contact your system administrator to
determine the valid account code length for your business.
You cannot assign an account code to a call once it has been completed.
Account code speed entry on the 5212/5312 IP phone
Account code entry is accepted before a call is placed or during a call. To use
this feature, it must be enabled for your business and you must have a
Final
Using the phone system 65
memory key programmed with Account Code and a pre-programmed
account code.
To enter a pre-programmed account code before you place a call, follow these
steps:
1
Select the Account Code key. The LCD briefly displays the account code
that has been pre-programmed:
Account Code: 45678
2
The next available line appearance is selected, dial tone is heard and
your phone LCD updates.
3
Proceed with making your call.
To enter a pre-programmed account code during a call, follow this step:
1
Select the Account Code key. The LCD briefly displays the account code
that has been pre-programmed:
Account: 45678
You can re-enter an account code for a call multiple times. The last
account code entered is the account code that will be assigned to the call.
To cancel account code entry before the call is placed, replace the handset (or
press the
key if using the speakerphone). Account code speed entry
during a call cannot be cancelled.
If the pre-programmed account code has an invalid length, the phone LCD
briefly displays "Invalid Account Code". Contact your system administrator to
determine the valid account code length for your business.
You cannot assign an account code to a call once it has been completed.
Call list on the 5212/5312 phone
Call list keeps a list of the calls that you make and receive. The call list is
accessible from your phone. You can redial any calls that you made from the
call list. See “Redial on the 5212/5312 IP phone” on page 67. You may be
able to dial a number from your incoming call list if it is supported by your
service provider.
To use the feature, you must first have one of your programmable memory
keys programmed as an Incoming Calls List key.
To view the list of incoming calls received, follow these steps with your phone
on-hook:
1
66
Using the phone system
Press the Incoming Calls List key on your phone. The most recent call
that you received is displayed:
1: 754-4536
Final
2
Use the
3
Press the Incoming Calls List key to exit from the call list.
keys to navigate the list.
To call a number from your incoming calls list:
1
Press the Incoming Calls List programmed key. The most recent call
that you received is displayed:
1: 754-4536
2
Use the
3
Press the
keys to navigate the list.
key to make a call to the displayed number.
If you are on-hook, the next available Line Appearance is selected and
the speakerphone is activated. The system will attempt to dial the
displayed number by prefixing it with the appropriate digits for external
dialing (usually "9" or "91" depending on configuration). If the number can
be dialed as such, you will hear ringing once the call has been placed. If
the number cannot be dialed as such, the call will fail and you will have to
dial the number manually remembering to include the proper prefix digits.
The position of the call in the call list is displayed in front of the phone
number.
The * symbol beside the position of the call means that the call was not
answered.
If the call was answered by a member of your call pickup group, then the
call will show as unanswered (with a *) on your phone and answered
(without a *) on the call pickup group member's phone that answered the
call.
Redial on the 5212/5312 IP phone
Using the
key, you can view a list of calls that were made and also
redial a number in that list without using the keypad. The maximum amount of
numbers in your redial list is typically ten but is dependent on your service
provider.
To use Redial, follow these steps:
1
Final
Press the
key.
Using the phone system 67
The number that you most recently dialed is displayed:
*1: 9-605-223-7865
2
Use the Arrow keys to navigate the list (if required).
3
Once the required number is displayed, press the
key to make
the call. The next available Line Appearance is selected and you will hear
ringing once the number has been dialed.
* means that the call was not answered. The position of the call in the call
list is displayed in front of the phone number. Press the
exit from the call list.
key to
Call pickup on the 5212/5312 phone
Using the call pickup feature, you can answer incoming calls for other
members of your call pickup group.
To use this feature, you must be a member of a call pickup group and have a
memory key programmed as Pickup.
When a call comes into any member of your call pickup group, their phone will
ring and your Pickup key will flash. To answer the call, follow these steps:
1
Lift the handset.
2
Press the Pickup key.
or
1
Press the Pickup key to answer the call in speaker mode.
You can also join and leave your pickup group with a Join/Leave group key or
via the web interface. When you leave the group, this disables other group
members from picking up your calls; however, you can still pickup other
members' calls. See “Join/Leave group on the 5212/5312 IP phone” on
page 73 and “Join/leave call groups” on page 137.
You cannot pick up calls to a member of your call pickup group if the call
does not result in the member phone ringing. For example, if the called
member is either logged out or has no available Line Appearances, then
you cannot pick up the call.
68
Using the phone system
Final
Company speed dial on the 5212/5312 IP phone
Using Company Speed Dial, you can call a number from the External
Directory by pressing a single memory key on your phone. To use this feature,
you must have a phone key programmed with Company Speed Dial.
To make a call using the company speed dial, choose one of the following:
•
Press the Company Speed Dial key for the number you want to call. The
system will select the next available Line Appearance for you and activate
the speakerphone.
•
Activate the speakerphone and press the Company Speed Dial key.
•
Select an available Line Appearance. This will activate the
speakerphone. Press the Company Speed Dial key
•
Lift the handset and press the Company Speed Dial key for the number
you want to call.
Directory on the 5212/5312 IP phone
Using the Directory, you can view the Internal Directory on your phone's LCD
screen and make calls.
You can access the directory with the phone on-hook or off-hook. To view the
directory, follow these steps:
1
Press the
2
Use one of the following options to locate the person that you would like
to call:
Andrews Kim
•
Press the number on the keypad for the appropriate first letter of the
person's last name. For example, press "5" twice for "K":
K: Kennedy Pat
•
Scroll down or up, using the Arrow keys, to find the name you want:
Knowles Erin
3
Once the correct name is displayed, press the
.
key.
key to dial the
number.
Forwarding your 5212/5312 IP phone
You can forward your phone by using any of the forwarding features. In each
case, you must program a memory key with the appropriate feature. See
“Program memory keys” on page 124.
You can forward your phone by following the procedure described in the
following sections:
Final
Using the phone system 69
•
“Forward your 5212/5312 IP phone to auto attendant” on page 70
•
“Forward your 5212/5312 IP phone to co-worker” on page 70
•
“Forward your 5212/5312 IP phone to coverage” on page 70
•
“Forward your 5212/5312 IP phone to number” on page 71
•
“Forward your 5212/5312 IP phone to prompt” on page 71
Forward your 5212/5312 IP phone to auto attendant
Using Forward to Auto Attendant, you can send all incoming calls to a
selected auto attendant. Press the Forward to AA key once to turn the
feature on. Press the key a second time to turn the feature off. The LED on
the programmed key indicates when the phone is being forwarded.
To use this feature, you must have a key programmed with Forward to AA.
If you have this feature turned on when you log out of your phone, all your
calls will be forwarded to the auto attendant.
Forward your 5212/5312 IP phone to co-worker
Using Forward to Co-worker, you can send all incoming calls to a selected coworker. Press the Forward to Co-worker key once to turn the feature on.
Press the key a second time to turn the feature off. The LED on the
programmed key indicates when the phone is being forwarded.
To use this feature, you must have a key programmed with Forward to Coworker.
If you have this feature turned on when you log out of your phone all your
calls will be forwarded to your co-worker.
Forward your 5212/5312 IP phone to coverage
Using Forward to Coverage, you can send all incoming calls to the option you
selected for your Call Coverage (see “Call Coverage” on page 135). Press
the Forward to Coverage key once to turn the feature on. Press the key a
second time to turn the feature off. The LED on the programmed key indicates
when the phone is being forwarded.
To use this feature, you must have a key programmed with Forward to
Coverage.
If you have this feature turned on when you log out of your phone all your
calls will be forwarded to coverage.
70
Using the phone system
Final
Forward your 5212/5312 IP phone to number
Using Forward to Number, you can send all incoming calls to a preset phone
number. Press the Forward to Number key once to turn the feature on. Press
the key a second time to turn the feature off. The LED on the programmed key
indicates when the phone is being forwarded.
To use this feature, you must have a key programmed with Forward to
Number.
If you forward your phone to an external phone number, you must have
permission to make that external call and Redirect Inbound Call to
External Number permission. For instructions about how to view your call
permissions, see “Permissions” on page 122.
If you have this feature turned on when you log out of your phone, all your
calls will be forwarded to the number defined.
Forward your 5212/5312 IP phone to prompt
Using Forward to Prompt, you can send all incoming calls to a phone number
that you have entered via your phone. The LED on the programmed key
indicates when the phone is being forwarded.
To forward to prompt, follow these steps:
1
Press the Forward to Prompt key on your phone. The system will ask
you to enter a phone number.
2
Enter the phone number on the phone keypad.
3
Press the # key on the keypad.
To change the phone number for the forward to prompt, repeat the above
three steps.
To turn forward to prompt off, follow these steps:
1
Press the Forward to Prompt key.
2
Press the # key on the keypad.
To use this feature, you must have a key programmed with Forward to
Prompt.
The system stores internal extensions, therefore you do not need to press
the # key for extensions.
If you forward a phone to an external phone number, you must have
permission to make that external call and Redirect Inbound Call to
External Number permission. See “Permissions” on page 122 for
instructions on how to view your call permissions.
Final
Using the phone system 71
If you have this feature turned on when you log out of your phone all your
calls will be forwarded to the numbered you entered.
Handsfree answerback on the 5212/5312 phone
Using Handsfree answerback, you can have intercom calls automatically
answered so that you have a two-way speech connection. See “Intercom calls
on the 5212/5312 phone” on page 72.
Press the Handsfree answerback key to turn the feature on. Press the key a
second time to turn the feature off. The LED on the programmed key indicates
when the Handsfree answerback feature is turned on.
To be able to activate and deactivate this feature with a key, you must have a
key programmed with Handsfree answerback. See “Program memory keys”
on page 124.
You can also enable the feature without a key by checking the box for
Handsfree answerback on your Personal Details page. See “Change user
details” on page 121.
Hold on the 5212/5312 IP phone
Using Hold, you can put an active call on hold, and make other calls. The LED
of the Line Appearance key flashes to indicate the call is on hold.
To place a call on hold, follow these steps:
1
While on an active call, press the
key.
The indicator light next to the active Line Appearance changes from
green to red and flashes slowly.
2
To remove the call from hold, press the Line Appearance key.
Intercom calls on the 5212/5312 phone
You can make intercom calls to a co-worker and to a prompt.
Intercom to co-worker on the 5212/5312 phone
Using Intercom to Co-worker, you can make a page to a selected co-worker
that is broadcast through the speaker on your co-worker's phone. Pick up the
handset or select a Line Appearance key, then press the Intercom to Coworker key to start the page to your co-worker. If you press the Intercom to
Co-worker key with no line active, the next available line appearance key will
automatically be selected. Note that if your phone is active on a call or in a
ringing state, you must select an available line appearance key before
pressing the Intercom to Co-worker key.
72
Using the phone system
Final
If your co-worker has the Handsfree Answerback feature configured and
activated, then you will also be able to hear your co-worker speak. See
“Handsfree answerback on the 5212/5312 phone” on page 72.
To use this feature, you must have a key programmed with Intercom to Coworker. See “Program memory keys” on page 124.
Intercom to prompt on the 5212/5312 phone
Using Intercom to Prompt, you can make a page to any co-worker whose
number you enter on the phone.
To make a call with Intercom to prompt, follow these steps:
1
Press the Intercom to Prompt key on your phone. The system will ask
you to enter a phone number.
If your phone is already active on a call or ringing, press an available Line
Appearance key or put the current call on hold before you can use the
Intercom to Prompt feature.
2
Enter the phone number of your co-worker on the phone keypad.
You will then be connected to your co-worker and you can speak through
their speaker. If your co-worker has the Handsfree Answerback feature
configured and activated, then you will also be able to hear your coworker speak. See “Handsfree answerback on the 5212/5312 phone” on
page 72.
To use this feature, you must have a key programmed with Intercom to
Prompt.
Join/Leave group on the 5212/5312 IP phone
Using the Join/Leave Group feature you can join a Broadcast, Call Pickup,
Hunt, or Rollover call group of which you are a member, using your phone.
For Broadcast, Hunt and Rollover groups, only the phones of members who
are joined in the group will ring when the call group is called. For Call Pickup
groups, other phones in the group will be notified only if the phone being
called is joined in the group.
Press the Join/Leave Group key once to turn the feature on. Press the key a
second time to turn the feature off. The LED on the programmed key indicates
when you are logged into the call group.
To use this feature, you must have a key programmed with Join/Leave
Group.
Line appearance on the 5212/5312 IP phone
Line Appearance keys are required in order to receive incoming calls and to
make outgoing calls. The LED on the programmed key indicates the status of
the Line Appearance.
•
Final
Key is unlit - the Line Appearance is available for an incoming or outgoing
call.
Using the phone system 73
•
Key is flashing green with a ring tone - an incoming call is available to be
answered.
•
Key is flashing red without a ring tone - a call is on hold.
•
Key is solid - If this is green, then a call is active. If this is red, then a
twinned call is active on the twinned target phone.
When you have multiple Line Appearance keys, they are ordered from bottom
to top. An incoming call will appear on the first available Line Appearance key.
Your phone will normally have two or three pre-programmed Line
Appearances. To be able to handle more simultaneous calls, you must
program additional keys with Line Appearance.
Monitor Groups on 5212/5312 IP phone
Using the Monitor Groups feature, your calls can be monitored and answered
by other users or you can have your phone monitored for activity. To enable
the Monitor feature, contact your administrator and provide a list of users that
you would like to have monitor your calls or phone. The administrator will
create a Monitor group in your name with the people in your list as members
of the group. There is no other action that needs to be taken on your part.
If you requested to have your calls monitored, calls to one or more of your
Line Appearances will automatically ring on your Monitor group member
phones provided that they have configured the appropriate number of
Monitor Calls or Monitor Call Silent keys on their phone.
When a member of your Monitor group has answered one of your calls, the
Line Appearance on your phone will still indicate the state of the call.
•
A flashing key without a ring tone indicates that the call is on hold.
•
A lit key indicates that the Line Appearance is in use.
If you requested to have your phone monitored, when your phone is in use the
group members phones will show a lit LED against the Monitor Phone key
they have configured on their phone.
By putting a call on hold, either the primary group member or other
phones in the group can pick up the call.
Your call coverage still applies when you are in a monitor group.
A Monitor Phone key also acts a speed dial to the monitored extension.
Monitor Groups is only applicable to users who are using Mitel IP phones.
Monitor Call on the 5212/5312 IP phone
Using the Monitor Call or Monitor Call Silent feature, you can monitor and pick
up calls occurring on another user's phone.
To use this feature:
•
74
Using the phone system
You must be a member of a Monitor group. A Monitor group defines the
user that is being monitored (primary group member) and which users
can monitor calls for the primary group member (secondary group
Final
members). Only the administrator can add a Monitor group or change the
members of an existing Monitor group.
•
You must have the same number of phone keys programmed with
Monitor Call or Monitor Call Silent as the number of simultaneous calls
that you want to monitor on the primary group member's phone. The
maximum number of simultaneous calls that you can monitor for one
Monitor Primary equals the number of Line Appearances that the Monitor
Primary has programmed on their phone.
For example, if you have one Monitor Call/Monitor Call Silent key
programmed for a Monitor Primary, you will only be able to monitor one
incoming or outgoing call at a time. If you have two Monitor Call/Monitor Call
Silent keys programmed for a Monitor Primary, you will be able to monitor two
incoming or outgoing calls at a time and so on. There is no direct
correspondence between a Monitor Call/Monitor Call Silent key and a Line
Appearance key on the Monitor Primary's phone. The Line Appearance that
the first call occurs on (not necessarily the first Line Appearance) will be
monitored by the first Monitor Call/Monitor Call Silent key, the Line
Appearance that the second call occurs on (not necessarily the second line
appearance) will be monitored by the second Monitor Call/Monitor Call
Silent key and so on.
The Monitor Call/Monitor Call Silent key indicates the state of the Line
Appearance on the primary group members phone that is being monitored.
The only difference between Monitor Call and Monitor Call Silent is that
your phone will not ring to indicate an incoming call to the Primary member.
For example:
• A flashing Monitor Call key with a ring tone indicates an incoming call
to the Line Appearance.
• A flashing Monitor Call key without a ring tone indicates that the call is
on hold.
• A flashing Monitor Call Silent key without a ring tone indicates an
incoming call to the Line Appearance or that the call is on hold.
• A lit Monitor Call/Monitor Call Silent key indicates that the Line
Appearance is in use.
To pick up a call occurring on the primary group member's phone, follow these
steps:
1
When the Monitor Call/Monitor Call Silent key is flashing, lift the
handset.
2
Press the Monitor Call/Monitor Call Silent key.
or
•
Press the Monitor Call/Monitor Call Silent key to answer the call in
speaker mode.
By putting a call on hold, either the primary group member or other
Monitor phones can pick up the call.
Final
Using the phone system 75
Monitor Phone on 5212/5312 IP phone
Using the Monitor Phone feature, your phone can be monitored by other
users. To enable the Monitor Phone feature, contact your administrator and
provide a list of users that you would like to have monitor your phone. The
administrator will create a Monitor group in your name with the people in your
list as members of the group. There is no other action that needs to be taken
on your part. When you are using your phone members of your call group will
be able to see that the phone is in use provided that they have programmed a
memory key to view activity on your phone.
When you use your phone a member of your Monitor group will see the LED
of the memory key that they have programmed to monitor your phone light up.
Mute on the 5212/5312 IP phone
Using Mute, you can silence any sound from the phone. This does not prevent
incoming sound from being heard. Press the
key during a call to
activate Mute. The LED on the key indicates when Mute is active.
One touch speed dial on the 5212/5312 IP phone
Using One Touch Speed Dial, you can make a call to a pre-programmed
number. To use this feature, a programmable key must be programmed as a
One Touch Speed Dial.
To use One Touch Speed Dial, choose one of the following:
•
Lift the handset and press the One Touch Speed Dial key.
•
Press an available Line Appearance key, to activate the speakerphone,
and then press the One Touch Speed Dial key.
•
Press the One Touch Speed Dial key. This will select an available Line
Appearance and activate the speakerphone.
Page on the 5212/5312 IP phone
Using Page, you can send a page to all of the phones at your site. The page is
broadcast through the speaker of each available phone. To use this feature,
you must have a memory key programmed as a Page key.
To page all of the phones at your site, follow these steps:
1
Select a memory key programmed with the Page feature.
Your phone LCD screen displays "Calling: Site Page" while the system
identifies the available phones at your site.
Calling: Site Page
2
76
Using the phone system
When the system is ready for you to begin your page, you will hear an
alert tone and the phone LCD screen displays the number of phones
being paged.
Final
Paging: 7 of 10
3
Speak into the handset or the speakerphone.
4
To end the page, you have the following options:
•
Replace the handset if using the handset.
•
Select the
key if using the speakerphone.
A page is not broadcast on phones that are busy.
If you select Page while there is already a page in progress, the system
waits until the page in progress is completed before your page is started.
Your phone displays "Calling: Site Page" and you hear ringing while you
are waiting.
Park and retrieve on the 5212/5312 IP phone
Using Park and Retrieve, you can put a call on hold at a park location so that
it can be retrieved from any other phone at your business. To use this feature,
a memory key must be programmed as a Park/Retrieve key.
To put a call on hold at a park location, follow these steps:
1
While on an active call, select a memory key programmed with the Park/
Retrieve feature.
The system places the call on hold at a park location. The park location is
displayed on your phone LCD screen:
Parked at: 4
You are no longer connected with the caller and your phone returns to the
idle state.
To retrieve a parked call, follow these steps:
1
From an idle phone, lift the handset.
This will select the next available Line Appearance. Select a memory key
programmed with the Park/Retrieve feature. The phone LCD screen
displays:
Park Location:
2
Final
Enter the required park location using the phone keypad.
Using the phone system 77
The system connects you with the caller who was on hold at the park
location. The LCD screen now displays the caller's name (if known) or
number.
Robin Jones
To cancel the retrieval of the parked call, press the
key.
If you enter a park location where there is no caller on hold, the phone
LCD will briefly display "No Parked Call".
There are nine park locations available (1 through 9). If all park locations
are in use when you try to park a call, the phone LCD will briefly display
"Park Locations Full" and the call will be placed on hold.
If the call is left parked for 30 seconds, the phone of the person who
parked the call will beep and the phone’s LCD will briefly display "Call
parked at: " with the park location number to remind you that the call has
not been retrieved.
Speaker on the 5212/5312 IP phone
Using Speaker, you can turn the speakerphone on your phone on and off. To
use Speaker, press the
key.
Transfer call on the 5212/5312 IP phone
Using Transfer, you can transfer a call from one phone to another. To transfer
a call, follow these steps:
1
While on an active call, press the
key. The system places the
call on hold, and the LCD screen displays:
Transfer To:
2
Enter the extension or phone number of the person to whom you wish to
transfer, or press a One-Touch Speed Dial button.
Transfer To: 415
3
78
Using the phone system
Press the
key once you hear ringing. The LCD screen displays
the message "Transfer Complete" for approximately five seconds before
returning to an idle state.
Final
Instead of pressing the
key immediately you can wait until the
destination answers and then press the
key.
If you enter an invalid extension during a transfer, the LCD screen displays
"Invalid Extension". To reconnect with the caller, follow these steps:
1
Press the
2
Press the flashing Line Appearance key.
3
Try to transfer the call again.
key.
If you choose not to complete the transfer, press the
key, then
press the flashing Line Appearance key to retrieve the original call.
Transfer to voice mail from the 5212/5312 IP phone
If your administrator has configured an auto attendant for voice mail deposit,
you can transfer a caller directly to a co-worker's voice mail box.
To transfer a call to voice mail, follow these steps:
1
While on an active call, press the
key. The system places the
call on hold, and the LCD screen displays:
Transfer To:
2
Enter the extension of the auto attendant that your administrator has
created for voice mail deposit.
3
Select the auto attendant voice mail deposit option and enter the
extension of the co-worker to whom you are transferring.
4
Press the
key to complete the transfer. The LCD displays the
message "Transfer Complete" for approximately five seconds before
returning to an idle state.
Twinned Calls on the 5212/5312 IP phone
If you have configured your phone to be twinned to another external phone
(the twinning target), then incoming calls will ring the other phone as well. See
“Twinning” on page 136 for details on how to configure the twinning option for
your phone
If you answer the call on your desk phone, the twinning target phone will stop
ringing.
Final
Using the phone system 79
If you answer the call on your twinning target phone, the Line Appearance key
on your desk phone will remain lit. To pull back the call to your desk phone,
simply press the corresponding Line Appearance key. The call will be dropped
from the twinning target phone and you will be connected on your desk
phone.
Note that if neither your desk phone nor the twinning target phone answers an
incoming call, your call coverage setting will determine what happens to the
call (See “Call Coverage” on page 135). If the other phone has a voice
message service associated with it, then your twinning target phone's voice
message service may answer the call first. If you want to avoid this situation,
then you should ensure that your call coverage is configured to answer calls
before the twinning target phone’s voice message service.
To toggle twinning on or off, you can use the web interface (see “Twinning” on
page 136) or you can configure a memory key as Twinning On/Off (see
“Program memory keys” on page 124).
Once you have a Twinning On/Off key configured, press the key once to turn
the feature on. Press the key a second time to turn the feature off. The LED
on the programmed key indicates when your twinning is active.
Voice mail on 5212/5312 IP phone
To access your voice mail box for message retrieval or mail box
administration such as changing your voice mail greeting or password, press
the
key and follow the audio instructions.
If your administrator has created an auto attendant with a voice mail retrieval
option and associated it to an external number, you can access your mail box
from any phone by dialing the external number and then selecting the voice
mail retrieval option. You are prompted for your extension, then connected to
your voice mail box.
Volume control on the 5212/5312 IP phone
Use volume control to change ring volume, handset volume, and speaker
volume.
The ring, handset, and speaker volumes return to their default settings if
the phone loses power.
Change ring volume on the 5212/5312 IP phone
To change the ring volume on your phone, follow these steps:
1
80
Using the phone system
From another phone, make a call to your extension.
Final
2
While it is ringing, repeatedly press the
keys until the ring volume
is at the level you want.
Change handset volume on 5212/5312 IP phone
To change the volume of the sound you hear through the handset, follow
these steps:
1
Lift the handset. You will hear dial tone.
2
Repeatedly press the
keys until the volume is at the level you
want.
3
Replace the handset.
Change speaker volume on 5212/5312 IP phone
To change the volume of the sound you hear through the speaker, follow
these steps:
1
Press the Speaker
2
Repeatedly press the
button. You will hear dial tone.
keys until the volume is at the level you
want.
Using Mitel
5304 phones
This section describes the Mitel 5304 IP phones.
•
To set up your new phone service, see “Initial setup for 5304 phone
service” on page 83.
•
For a description of your phone, see “Mitel 5304 IP phone” on page 82.
Other topics covered in this section include the following:
Final
•
“Answering a call on the 5304 phone” on page 83
•
“Making a call on the 5304 phone” on page 85
•
“Using features via the 5304 phone” on page 86
•
“Volume control on the 5304 phone” on page 105
•
“Voice mail on the 5304 phone” on page 104
Using the phone system 81
Mitel 5304 IP phone
The Mitel 5304 IP phone has the following features:
•
Nine (9) programmable keys
- Two (2) Programmable keys with LEDs. These are dedicated as
Line Appearance keys.
- Seven (7) Programmable keys without LEDs
•
Lamp for Messaging waiting and alerting
•
Speaker (however, no microphone)
•
Supports G.711 and G729
•
Sets conform to new ROHS Standards
•
Power Over Ethernet (POE) powered
The 5304 does not support 5412, 5448 PKMs nor does it support the 5310
conference unit.
Figure 7: Mitel 5304 IP phone
82
Using the phone system
Final
Initial setup for 5304 phone service
To set up your new phone service, follow these steps:
•
Activate your phone. See “Activating a 5304 phone” on page 83.
•
Perform a Quick Set-up. See “Quick set-up” on page 120.
Activating a 5304 phone
To activate a 5304 phone you must physically connect the phone, then log in
with your extension and PIN number.
To activate your phone, follow these steps:
1
Unplug your computer from the network.
2
Plug the phone into the network (through the supplied power pack consult the documentation provided in the box).
3
Plug the computer into the phone.
4
Plug the phone power pack into an outlet.
5
Wait for the phone to display the following (this may take 30 seconds or
more):
LOGGED OUT
*00 to Login
6
Enter *00. The phone will display the following:
Extension:
7
Enter your extension. The phone will display the following:
PIN:
Enter pin press #
8
Enter your PIN, then the # key. The phone will display the following:
Extension: 314
You have now successfully activated the phone, and can make calls.
Answering a call on the 5304 phone
When an incoming call is received on a phone, several things happen: (1) the
phone rings, (2) a Line Appearance flashes, and (3) the LCD displays the
phone number of the caller and, if know, the name of the caller.
Final
Using the phone system 83
321: Robin Jones
You can answer an incoming call by using the handset or the speakerphone.
See “Using the 5304 handset” on page 84 and “Using the 5304
speakerphone” on page 84.
You can pull back a call that has been answered by a twinned target phone by
pressing the corresponding Line Appearance key. See “Twinned Calls on the
5304 phone” on page 104.
Using the 5304 handset
To answer your phone using the handset, follow these steps:
1
Lift the handset.
Alternatively, you may choose to use one of the following methods:
•
Press the flashing Line Appearance key.
•
Pick up the handset.
You have now answered the call. The LCD displays the caller's name (if
known).
321: Robin Jones
If you choose to ignore the incoming call and select a different line
appearance, the line appearance continues to flash, but the phone stops
ringing.
Using the 5304 speakerphone
To answer a call on the speakerphone, follow these steps:
1
Press the flashing Line Appearance key.
2
Note that there is no microphone on the 5304 set (only in the handset), so
you are effectively muted.
To end a call while using the speakerphone, lift then replace the handset.
Switch from speakerphone to handset on the 5304 phone
84
•
To switch from the speakerphone to the handset during a call, pick up the
handset.
•
To end the call while using the handset, replace the handset.
Using the phone system
Final
Answering a second call on the 5304 phone
A second incoming call causes three things to happen: (1) the phone rings
once (only if you are using the handset), (2) a line appearance flashes, and
(3) the LCD displays the number and name of the caller, if known.
))321: Robin Jones
To answer a second call, choose one of the following:
•
Press the flashing Line Appearance key. This puts the active call on hold
and answers the second call.
•
End the first call by replacing the handset. The phone will start ringing.
Pick up the handset again to answer the second call.
To switch between two active calls, press the flashing Line Appearance key.
This puts the active call on hold and activates the other call.
If the display shows )) prior to the number calling, this indicates that it is a
second call.
Making a call on the 5304 phone
To make a call, follow these steps:
1
Lift the handset. This will select the next available Line Appearance.
2
To make an internal call, dial the extension. To make an external call, dial
the prefix required for external dialing (usually 9) followed by the number
you want to call.
320
When you finish dialing the number the call is placed.
Calling: Robin Jones
If you place an internal call, your LCD displays the extension and name of
the connected party once the call is answered. If you place an external
call, the LCD screen displays the name of the connected party, or if the
name is unknown, the phone number.
320: Robin Jones
3
Final
To end the call, replace the handset.
Using the phone system 85
To end the call before you have completed dialing, replace the handset.
Making a second call on the 5304 phone
To make a second call while on an active call, follow these steps:
1
Press any available Line Appearance key. This puts the active call on
hold, and provides dial tone for a second call.
2
To make an internal call, dial the extension. To make an external call, dial
the prefix required for external dialing (usually 9) followed by the number
you want to call
320
3
When you finish dialing the number the call is placed.
Calling: Robin Jones
4
If you place an internal call, the LCD displays the extension and name of
the connected party once the call is answered. If you place an external
call, the LCD screen displays the name of the connected party, or if the
name is unknown, just the phone number.
320: Robin Jones
5
To switch between two active calls, press the flashing Line Appearance
key. This puts the active call on hold, and activates the other call.
Ending one call keeps the second call on hold. To reconnect to the second
call, press the flashing Line Appearance key.
Using features via the 5304 phone
This section explains the features available from your phone. Some of these
features must be pre-programmed in order to be available. To learn how to
program features to keys, see “Program memory keys” on page 124.
3-way call on the 5304 phone
Using 3-Way Call, you can set up a phone call among three separate parties.
You must have a Transfer/Conference memory key programmed to use this
feature. See “Program memory keys” on page 124.
86
Using the phone system
Final
To activate 3-Way Call, follow these steps:
1
While on an active call, press the Transfer/Conference key twice. This
places the first call on hold, and selects an available Line Appearance.
The LCD screen displays:
Conf with:
2
Enter the phone number of the third party. The system dials the number
and displays a "Calling" message along with the caller ID on the first line
of the LCD screen.
Calling: Lesley Gr
3
When the third party answers the call, the LCD shows that a connection is
established.
Lesley Greene
4
Press Transfer/Conference key again. The 3-Way Call is now activated.
The LCD screen displays:
3-Way Call
Until the Transfer/Conference key is pressed again, the first party will
remain on hold and you can talk with the second party privately.
By putting a 3-Way Call on hold, the other parties can continue talking.
If you want the option to leave the conference and leave the two party's
connected (when both parties are external), you must have the
permission Redirect Inbound Call to External Number enabled.
Once the 3-Way Call is established, you can use the Transfer feature to
transfer both parties to another party.
Final
Using the phone system 87
Joining two calls on the 5304 phone
The 3-way call feature allows you to conference together two calls on your
phone's Line appearances. You must have a Transfer/Conference memory
key programmed to use this feature. See “Program memory keys” on
page 124.
To activate a 3-way call in these circumstances, follow these steps:
1
While on an active call, press the Transfer/Conference key twice.
2
Select the Line Appearance of the person on hold that is to be connected.
3
Press the Transfer/Conference key again. The 3-Way Call is now
activated.
Account codes on the 5304 phone
Account codes can be entered against incoming and outgoing calls to
associate those calls with a particular client or account. Account code entry is
accepted before a call is placed or during a call. You must have a memory key
programmed with the Account Code feature.
Account code entry on the 5304 phone
To enter an account code before you place a call, follow these steps:
1
Select the Account Code key. The LCD displays:
Account Code:
2
Enter the account number using the phone keypad. The LCD displays the
account code entered:.
Account Code: 1234
3
Press the # key to start your call. The next available line appearance is
selected, dial tone is heard and your phone LCD updates.
4
Proceed with making your call.
To enter an account code during a call, follow these steps:
88
1
Select the Account Code key. The LCD displays:
Account Code:
2
Enter the account number using the phone keypad. You hear a tone as
you press the phone keys, but the person on the other end does not. The
LCD displays the account code entered:
Account Code: 1234
Using the phone system
Final
3
Press the # key when you have finished entering the account code.
You can re-enter an account code for a call multiple times. The last
account code entered is the account code that will be assigned to the call.
If you enter an account code with an invalid length, the phone LCD briefly
displays "Invalid Account Code". Contact your system administrator to
determine the valid account code length for your business.
You cannot assign an account code to a call once it has been completed.
Account code speed entry on the 5304 phone
Account code entry is accepted before a call is placed or during a call. To use
this feature, it must be enabled for your business and you must have a
memory key programmed with Account Code and a pre-programmed
account code. See “Program memory keys” on page 124.
To enter a pre-programmed account code before you place a call, follow these
steps:
1
Select the Account Code key. The LCD briefly displays the account code
that has been pre-programmed:
Account Code: 45678
2
The next available line appearance is selected, dial tone is heard and
your phone LCD updates.
3
Proceed with making your call.
To enter a pre-programmed account code during a call, follow these steps:
1
Select the Account Code key. The LCD briefly displays the account code
that has been pre-programmed:
Account Code: 45678
You can re-enter an account code for a call multiple times. The last
account code entered is the account code that will be assigned to the call.
Final
Using the phone system 89
To cancel account code entry before the call is placed, replace the
handset. Account code speed entry during a call cannot be cancelled.
If the pre-programmed account code has an invalid length, the phone
LCD briefly displays "Invalid Account Code". Contact your system
administrator to determine the valid account code length for your
business.
You cannot assign an account code to a call once it has been completed.
Call lists on the 5304 phone
Call list on the 5304 phone
Call list keeps a list of the calls that you make and receive. The call list is
accessible from your phone. You can redial any calls that you made from the
call list. See “Redial on the 5304 phone” on page 91. You may be able to dial
a number from your incoming call list if it is supported by your service
provider.
To use the feature, you must first have one of your programmable memory
keys programmed as an Incoming Calls List key and another programmed
as Redial List/Dial. See “Program memory keys” on page 124.
To view the list of incoming calls received, follow these steps with your phone
on-hook:
1
Press the Incoming Calls List key on your phone. The most recent call
that you received is displayed:
1: 754-4536
2
Use arrow/scroll keys to navigate the list.
3
Press the Incoming Calls List key to exit from the call list.
To call a number from your incoming calls list:
90
1
Press the Incoming Calls List programmed key. The most recent call that
you received is displayed:
1: 754-4536
2
Use the arrow/scroll keys to navigate the list.
Using the phone system
Final
3
Press the Redial List/Dial key to make a call to the displayed number.
If you are on-hook, the next available Line Appearance is selected and the
speakerphone is activated. The system will attempt to dial the displayed
number by prefixing it with the appropriate digits for external dialing (usually
"9" or "91" depending on configuration). If the number can be dialed as such,
you will hear ringing once the call has been placed. If the number cannot be
dialed as such, the call will fail and you will have to dial the number manually
remembering to include the proper prefix digits.
The position of the call in the call list is displayed in front of the phone
number.
* beside the position of the call means that the call was not answered.
If the call was answered by a member of your call pickup group, then the
call will show as unanswered (with a *) on your phone and answered
(without a *) on the call pickup group member's phone that answered the
call.
Redial on the 5304 phone
You must program a Redial List/Dial memory key to be able to use this
feature. See “Program memory keys” on page 124.
Using the Redial List/Dial key, you can view a list of calls that were made and
also redial a number in that list without using the keypad. The maximum
amount of numbers in your redial list is typically ten but is dependant on your
service provider.
To use Redial, follow these steps:
Final
1
Press the Redial List/Dial key.
The number that you most recently dialed is displayed.
*1: 9-605-223-7865
2
Use the arrow/scroll keys to navigate the list (if required).
3
Once the required number is displayed, press the Redial List/Dial key to
make the call. If you are on-hook, the next available Line Appearance is
selected and the speakerphone is activated. You will hear ringing once
the number has been dialed.
Using the phone system 91
* means that the call was not answered.
The position of the call in the call list is displayed in front of the phone
number.
Lift and replace the handset to exit from the call list.
Call pickup on the 5304 phone
Using the call pickup feature, you can answer incoming calls for other
members of your call pickup group.
To use this feature, you must be a member of a call pickup group and have a
memory key programmed as Pickup. See “Program memory keys” on
page 124.
When a call comes into any member of your call pickup group, their phone will
ring. To answer the call, follow these steps:
1
Lift the handset.
2
Press the Pickup key.
You can also join and leave your pickup group with a Join/Leave group key or
via the web interface. When you leave the group, this disables other group
members from picking up your calls; however, you can still pickup other
members' calls. See “Join/Leave group on the 5304 phone” on page 97 and
“Join/leave call groups” on page 137.
You cannot pick up calls to a member of your call pickup group if the call
does not result in the member phone ringing. For example, if the called
member is either logged out or has no available Line Appearances, then
you cannot pick up the call.
Company speed dial on the 5304 phone
Using Company Speed Dial, you can call a number from the External
Directory by pressing a single memory key on your phone. To use this feature,
you must have a phone key programmed with Company Speed Dial. See
“Program memory keys” on page 124.
To make a call using the company speed dial, lift the handset and press the
Company Speed Dial key for the number you want to call.
92
Using the phone system
Final
Directory on the 5304 phone
Using the directory, you can view the internal directory on your phone's LCD
screen and make calls.
To view the directory, you must first have one of your programmable memory
keys programmed as a Directory key. To dial a number from the directory list,
you must have another programmable memory key programmed as a Redial
List/Dial key. See “Program memory keys” on page 124.
You can access the directory with the phone on-hook or off-hook. To use the
directory, follow these steps:
1
Press the Directory key.
Andrews Kim
2
Use one of the following options to locate the person that you would like
to call:
- Press the number on the keypad for the appropriate first letter of
the person's last name. For example, press "5" twice for "K".
K: Kennedy Pat
- Scroll down or up, using the Arrow keys, to find the name you
want.
Knowles Erin
3
Once the correct name is displayed, press the Redial List/Dial key.
Forwarding the 5304 phone
Using the following features, you can forward your phone:
•
“Forward the 5304 phone to auto attendant” on page 93
•
“Forward your 5304 phone to co-worker” on page 94
•
“Forward your 5304 phone to coverage” on page 94
•
“Forward your 5304 phone to number” on page 94
•
“Forward your 5304 phone to prompt” on page 95
Forward the 5304 phone to auto attendant
Using Forward to Auto Attendant, you can send all incoming calls to a
selected auto attendant. Press the Forward to AA key once to turn the
feature on. Press the key a second time to turn the feature off. The display will
briefly show that the forwarding has been turned on. Note that there is no
permanent visual indication to show that your phone is in a forwarded state.
Final
Using the phone system 93
To use this feature, you must have a key programmed with Forward to AA.
See “Program memory keys” on page 124.
If you have this feature turned on when you log out of your phone all your
calls will be forwarded to the auto attendant.
Forward your 5304 phone to co-worker
Using Forward to Co-worker, you can send all incoming calls to a selected coworker. Press the Forward to Co-worker key once to turn the feature on.
Press the key a second time to turn the feature off. The display will briefly
show that the forwarding has been turned on. Note that there is no permanent
visual indication to show that your phone is in a forwarded state.
To use this feature, you must have a key programmed with Forward to Coworker. See “Program memory keys” on page 124.
If you have this feature turned on when you log out of your phone all your
calls will be forwarded to your co-worker.
Forward your 5304 phone to coverage
Using Forward to Coverage, you can send all incoming calls to the option you
selected from My Call Coverage. Press the Forward to Coverage key once
to turn the feature on. Press the key a second time to turn the feature off. The
display will briefly show that the forwarding has been turned on. Note that
there is no permanent visual indication to show that your phone is in a
forwarded state.
To use this feature, you must have a key programmed with Forward to
Coverage. See “Program memory keys” on page 124.
If you have this feature turned on when you log out of your phone all your
calls will be forwarded to coverage.
Forward your 5304 phone to number
Using Forward to Number, you can send all incoming calls to a preset phone
number. Press the Forward to Number key once to turn the feature on. Press
the key a second time to turn the feature off. The display will briefly show that
the forwarding has been turned on. Note that there is no permanent visual
indication to show that your phone is in a forwarded state.
To use this feature, you must have a key programmed with Forward to
Number. See “Program memory keys” on page 124.
94
Using the phone system
Final
If you forward your phone to an external phone number, you must have
permission to make that external call and Redirect Inbound Call to
External Number permission. See “Permissions” on page 122 for
instructions on how to view your call permissions.
If you have this feature turned on when you log out of your phone all your
calls will be forwarded to the number defined.
Forward your 5304 phone to prompt
Using Forward to prompt, you can send all incoming calls to a phone number
that you have entered via your phone. The display will briefly show that the
forwarding has been turned on. Note that there is no permanent visual
indication to show that your phone is in a forwarded state.
To forward to prompt, follow the steps:
1
Press the Forward to Prompt key on your phone. The system will ask
you to enter a phone number.
2
Enter the phone number on the phone keypad.
3
Press the # key on the keypad.
To change the phone number for the forward to prompt, repeat the above
three steps.
To turn forward to prompt off, follow these steps:
1
Press the Forward to Prompt key.
2
Press the # key on the keypad.
To use this feature, you must have a key programmed with Forward to
Prompt.
The system stores internal extensions; therefore, you do not need to
press the # key for extensions.
If you forward a phone to an external phone number, you must have
permission to make that external call and Redirect Inbound Call to
External Number permission. See “Permissions” on page 122 for
instructions on how to view your call permissions.
Final
Using the phone system 95
If you have this feature turned on when you log out of your phone, all your
calls will be forwarded to the number you entered.
Handsfree answerback on the 5304 phone
Using Handsfree answerback, you can have intercom calls automatically
answered on your phone. See “Intercom to co-worker on the 5304 phone” on
page 96. Since there is no handsfree microphone in the phone, you must lift
the handset to be able to speak to the caller.
Press the Handsfree answerback key to turn the feature on. Press the key a
second time to turn the feature off. The display will briefly show that the
Handsfree answerback feature has been turned on or off. Note that there is
no permanent visual indication to show that the Handsfree answerback
feature is turned on.
To be able to activate and deactivate this feature with a key, you must have a
key programmed with Handsfree answerback. See “Program memory keys”
on page 124.
You can also enable the feature without a key by checking the box for
Handsfree Answerback on your Personal Details page (see “Change user
details” on page 121).
Hold on the 5304 phone
Using Hold, you can put an active call on hold, and make other calls. The LED
of the Line Appearance key flashes to indicate the call is on hold.
To place a call on hold, follow these steps:
1
While on an active call, press another Line Appearance key.
2
The indicator light next to the originally active Line Appearance flashes
slowly.
3
To remove the call from hold, press the original Line Appearance key.
Intercom calls on the 5304 phone
Intercom to co-worker on the 5304 phone
Using Intercom to Co-worker, you can make a page to a selected co-worker
that is broadcast through the speaker on your co-worker's phone. Pick up the
handset or select a Line Appearance key, then press the Intercom to Coworker key to start the page to your co-worker. If you press the Intercom to
Co-worker key with no line active, the next available Line Appearance key
will automatically be selected. Note that if your phone is active on a call or in a
ringing state, you must select an available Line Appearance key before
pressing the Intercom to Co-worker key.
In all cases, you must lift the handset to be able to speak to your co-worker.
96
Using the phone system
Final
If your co-worker has the Handsfree Answerback feature configured and
activated, then you will also be able to hear your co-worker speak. (See
“Handsfree answerback on the 5304 phone” on page 96)
To use this feature, you must have a key programmed with Intercom to Coworker. See “Program memory keys” on page 124.
Intercom to prompt on the 5304 phone
Using Intercom to Prompt, you can make a page to any co-worker whose
number you enter on the phone.
To make a call with Intercom to prompt, follow these steps:
1
Lift the handset.
2
Press the Intercom to Prompt key on your phone. The system will ask
you to enter a phone number.
If your phone is already active on a call or ringing, you need to press an
available Line Appearance key or put the current call on hold before you
can use the Intercom to Prompt feature.
3
Enter the phone number of your co-worker on the phone keypad.
You will then be connected to your co-worker and you can speak through their
speaker. If your co-worker has the Handsfree Answerback feature
configured and activated, then you will also be able to hear your co-worker
speak. (See “Handsfree answerback on the 5304 phone” on page 96).
To use this feature, you must have a key programmed with Intercom to
Prompt. See “Program memory keys” on page 124.
Join/Leave group on the 5304 phone
Using the Join/Leave group feature, you can join or leave a Broadcast, Call
Pickup, Hunt, or Rollover call group of which you are a member, using your
phone. For Broadcast, Hunt and Rollover groups, only the phones of
members who are joined in the group will ring when the call group is called.
For Call Pickup groups, other phones in the group will be notified only if the
phone being called is joined in the group. See “Call groups” on page 137.
Press the Join/Leave Group key once to turn the feature on. Press the key a
second time to turn the feature off. The display will briefly show whether you
successfully joined or left the group. Note that there is no permanent visual
indication to show that your phone is in a group.
To use this feature, you must have a key programmed with Join/Leave
Group. See “Program memory keys” on page 124.
Line Appearance key on the 5304 phone
Line Appearance keys are required in order to receive incoming calls and to
make outgoing calls. The LED on the programmed key indicates the status of
the Line Appearance.
Final
Using the phone system 97
•
Key is unlit - the Line Appearance is available for an incoming or outgoing
call.
•
Key is flashing with a ring tone - an incoming call is available to be
answered.
•
Key is flashing without a ring tone - a call is on hold.
•
Key is solid - a call is active or a twinned call is active on the twinned
target phone.
When you have multiple Line Appearance keys, they are ordered from bottom
to top. An incoming call will appear on the first available Line Appearance key.
Your phone will normally have two pre-programmed Line Appearances. To be
able to handle more simultaneous calls, you must program additional keys
with Line Appearance. See “Program memory keys” on page 124.
Only the first two (bottom two) programmable memory keys on the 5304
phone have LEDs. You can still program other programmable memory keys
as Line Appearances; however, any additional Line Appearance keys will
have no visual indication of its state.
Monitor Groups on the 5304 phone
Using the Monitor Groups feature, your calls can be monitored and answered
by other users or you can have your phone monitored for activity. To enable
the Monitor feature, contact your administrator and provide a list of users that
you would like to have monitor your calls or phone. The administrator will
create a Monitor group in your name with the people in your list as members
of the group. There is no other action that needs to be taken on your part.
If you requested to have your calls monitored, calls to one or more of your
Line Appearances will automatically ring on your Monitor group member
phones provided that they have configured the appropriate number of
Monitor Call or Monitor Call Silent keys on their phone. See “Monitor Call
on the 5304 phone” on page 99.
When a member of your Monitor group has answered one of your calls, the
Line Appearance on your phone will still indicate the state of the call.
•
A flashing key without a ring tone indicates that the call is on hold.
•
A lit key indicates that the Line Appearance is in use.
If you requested to have your phone monitored, when your phone is in use the
group members phones will show a lit LED against the Monitor Phone key
they have configured on their phone.
By putting a call on hold, either the primary group member or other
phones in the group can pick up the call.
Your call coverage still applies when you are in a monitor group.
98
Using the phone system
Final
A Monitor Phone key also acts a speed dial to the monitored extension.
Monitor Groups is only applicable to users who are using Mitel IP phones.
Monitor Call on the 5304 phone
Using the Monitor Call or Monitor Call Silent feature, you can monitor and pick
up calls occurring on another user's phone. To use this feature,
•
You must be a member of a Monitor group. A Monitor group defines the
user that is being monitored (primary group member) and which users
can monitor calls for the primary group member (secondary group
members). Only the administrator can add a Monitor group or change the
members of an existing Monitor group.
•
You must have the same number of phone keys programmed with
Monitor Call or Monitor Call Silent as the number of simultaneous calls
that you want to monitor on the primary group member's phone. The
maximum number of simultaneous calls that you can monitor for one
Monitor Primary equals the number of Line Appearances that the Monitor
Primary has programmed on their phone.
For example, if you have one Monitor Call/Monitor Call Silent key
programmed for a Monitor Primary, you will only be able to monitor one
incoming or outgoing call at a time. If you have two Monitor Call/Monitor Call
Silent keys programmed for a Monitor Primary, you will be able to monitor two
incoming or outgoing calls at a time and so on. There is no direct
correspondence between a Monitor Call/Monitor Call Silent key and a Line
Appearance key on the Monitor Primary's phone. The Line Appearance that
the first call occurs on (not necessarily the first Line Appearance) will be
monitored by the first Monitor Call/Monitor Call Silent key, the Line
Appearance that the second call occurs on (not necessarily the second line
appearance) will be monitored by the second Monitor Call/Monitor Call
Silent key and so on. See “Program memory keys” on page 124.
Because the programmable memory keys on the 5304 phone do not have
LEDs, only the Monitor Call key is appropriate and it is only useful for
answering calls. When a call comes into the Primary member of the Monitor
group, your phone will ring but your Line Appearance keys will not flash.
To pick up a call occurring on the primary group member's phone, follow these
steps:
1
Lift the handset.
2
Press the Monitor Call key.
or
1
Final
Press the Monitor Call key to answer the call in speaker mode. (Note
that since there is no microphone, the call will be effectively muted until
you pick up the handset.)
Using the phone system 99
By putting a call on hold, either the primary group member or other
Monitor phones can pick up the call.
Monitor Phone on the 5304 phone
Using the Monitor Phone feature, your phone can be monitored by other
users. To enable the Monitor Phone feature, contact your administrator and
provide a list of users that you would like to have monitor your phone. The
administrator will create a Monitor group in your name with the people in your
list as members of the group. There is no other action that needs to be taken
on your part. When you are using your phone members of your call group will
be able to see that the phone is in use provided that they have programmed a
memory key to view activity on your phone.
When you use your phone a member of your Monitor group will see the LED
of the memory key that they have programmed to monitor your phone light up.
Although the Monitor Phone key can be programmed on a 5304 phone, the
monitoring capability does not apply because the programmable memory
keys do not have LEDs. However, the ability to use the Monitor Phone key as
a speed dial key will work without the LED.
Mute on the 5304 phone
Since the 5304 phone does not have a handsfree microphone, the phone is
effectively muted (no sound is transmitted to the other party) whenever the
handset is on-hook. This does not prevent incoming sound from being heard.
One touch speed dial on the 5304 phone
Using One Touch Speed Dial, you can make a call to a pre-programmed
number. To use this feature, a programmable key must be programmed as a
One Touch Speed Dial. See “Program memory keys” on page 124.
To use One Touch Speed Dial, choose one of the following:
•
Lift the handset and press the One Touch Speed Dial key.
•
Press an available Line Appearance key, to activate the speakerphone,
and then press the One Touch Speed Dial key. Note that the call is
effectively muted until you pick up the handset.
•
Press the One Touch Speed Dial key. This will select an available Line
Appearance and activate the speakerphone. Note that the call is
effectively muted until you pick up the handset.
Page on the 5304 phone
Using Page, you can send a page to all of the phones at your site. The page is
broadcast through the speaker of each available phone. To use this feature,
100
Using the phone system
Final
you must have a memory key programmed as a Page key. See “Program
memory keys” on page 124.
To page all of the phones at your site, follow these steps:
1
Lift the handset
2
Select a memory key programmed with the Page feature.
3
Your phone LCD screen displays "Calling: Site Page" while the system
identifies the available phones at your site.
Calling: Site Page
When the system is ready for you to begin your page, you will hear an
alert tone and the phone LCD screen displays the number of phones
being paged.
Paging: 7 of 10
4
Speak into the handset.
To end the page, replace the handset.
A page will not be broadcast on phones that are busy.
If you select Page while there is already a page in progress, the system
will wait until the page in progress is completed before your page is
started. Your phone will display "Calling: Site Page" and you will hear
ringing while you are waiting.
Park and retrieve on the 5304 phone
Using Park and Retrieve, you can put a call on hold at a park location so that
it can be retrieved from any other phone at your business. To use this feature,
a memory key must be programmed as a Park/Retrieve key. See “Program
memory keys” on page 124.
To put a call on hold at a park location, follow these steps:
1
Final
While on an active call, select a memory key programmed with the Park/
Retrieve feature. The system places the call on hold at a park location.
The park location is displayed on your phone LCD screen.
Parked at: 4
Using the phone system 101
You are no longer connected with the caller and your phone returns to the
idle state.
To retrieve a parked call, follow these steps:
1
From an idle phone, lift the handset. This will select the next available
Line Appearance. Select a memory key programmed with the Park/
Retrieve feature. The phone LCD screen displays:
Park Location:
2
Enter the required park location using the phone keypad.
The system connects you with the caller who was on hold at the park
location. The LCD screen now displays the caller's name (if known) or
number.
Robin Jones
To cancel the retrieval of the parked call, replace the handset.
If you enter a park location where there is no caller on hold, the phone
LCD will briefly display "No Parked Call".
There are nine park locations available (1 through 9). If all park locations
are in use when you try to park a call, the phone LCD will briefly display
"Park Locations Full" and the call will be placed on hold.
If the call is left parked for 30 seconds, the phone of the person who
parked the call will beep and the phone's LCD will briefly display "Call
parked at: " with the park location number to remind you that the call that
you parked has not been retrieved.
Speaker on the 5304 phone
To use the speaker on your phone, select a Line Appearance key while the
handset is on-hook. Note that since there is no handsfree microphone, this
effectively mutes the call.
102
Using the phone system
Final
Transfer call on the 5304 phone
You must program a Transfer/Conference memory key to be able to use this
feature. See “Program memory keys” on page 124.
Using Transfer, you can transfer a call from one phone to another. To transfer
a call, follow these steps:
1
While on an active call, press the Transfer/Conference key. The system
places the call on hold, and the LCD screen displays:
Transfer To:
2
Enter the extension or phone number of the person to whom you wish to
transfer, or press a One-Touch Speed Dial button.
Transfer To: 415
3
Press the Transfer/Conference key once you hear ringing. The LCD
screen displays the message "Transfer Complete" for approximately five
seconds before returning to an idle state.
Instead of pressing the Transfer/Conference key immediately, you can
wait until the destination answers and then press the key.
If you enter an invalid extension during a transfer, the LCD screen displays
"Invalid Extension". To reconnect with the caller, follow these steps:
1
Press the flashing Line Appearance key.
2
Try to transfer the call again.
Transfer to voice mail from the 5304 phone
You must program a Transfer/Conference memory key to be able to use this
feature. See “Program memory keys” on page 124.
If your administrator has configured an auto attendant for voice mail deposit,
you can transfer a caller directly to a co-worker's voice mail box.
To transfer a call to voice mail, follow these steps:
Final
1
While on an active call, press the Transfer/Conference key. The system
places the call on hold, and the LCD screen displays:
Transfer To:
2
Enter the extension of the auto attendant that your administrator has
created for voice mail deposit.
Transfer To: 701
Using the phone system 103
3
Select the auto attendant voice mail deposit option and enter the
extension of the co-worker to whom you are transferring.
4
Press the Transfer/Conference key to complete the transfer. The LCD
displays the message "Transfer Complete" for approximately five seconds
before returning to an idle state.
Twinned Calls on the 5304 phone
If you have configured your phone to be twinned to another external phone
(the twinning target), then incoming calls will simultaneously ring the other
phone as well. See “Twinning” on page 136 for details on how to configure
the twinning option for your phone.
If you answer the call on your desk phone, the twinning target phone will stop
ringing.
If you answer the call on your twinning target phone, the Line Appearance key
on your desk phone will remain lit. To pull back the call to your desk phone,
simply press the corresponding Line Appearance key. The call will be
disconnected from the twinning target phone and you will be connected on
your desk phone.
Note that if neither your desk phone nor the twinning target phone answers an
incoming call, your call coverage setting will determine what happens to the
call (See “Call Coverage” on page 135.). If the other phone has a voice
message service associated with it, then your twinning target phone's voice
message service may answer the call first. If you want to avoid this situation,
then you should ensure that your call coverage is configured to answer calls
before the twinning target phone's voice message service.
To toggle twinning on or off, you can use the web interface (see “Twinning” on
page 136) or you can configure a memory key as Twinning On/Off (see
“Program memory keys” on page 124).
Once you have a Twinning On/Off key configured, press the key once to turn
the feature on. Press the key a second time to turn the feature off. The display
will briefly show whether your twinning has been turned on or off. Note that
there is no permanent visual indication to show that your twinning is on.
Voice mail on the 5304 phone
You must have a Voice Mail memory key programmed to use this feature.
See “Program memory keys” on page 124.
To access your voice mail box for message retrieval or mail box
administration such as changing your voice mail greeting or password, press
the Voice Mail key and follow the audio instructions.
If your administrator has created an auto attendant with a voice mail retrieval
option and associated it to an external number, you can access your mail box
from any phone by dialing the external number and then selecting the voice
104
Using the phone system
Final
mail retrieval option. You are prompted for your extension, then connected to
your voice mail box.
Using the web interface, you can control many of the settings for your voice
mailbox. See “Voice Mail” on page 144.
Volume control on the 5304 phone
Use volume control to change ring volume, handset volume, and speaker
volume.
The ring, handset, and speaker volumes return to their default settings if
the phone loses power.
Change ring volume on the 5304 phone
To change the ring volume on your phone, follow these steps:
1
From another phone, make a call to your extension.
2
While it is ringing, repeatedly press the scroll/arrow keys until the ring
volume is at the level you want.
Change handset volume on the 5304 phone
To change the volume of the sound you hear through the handset, follow
these steps:
1
Lift the handset. You will hear dial tone.
2
Repeatedly press the scroll/arrow keys until the volume is at the level you
want.
3
Replace the handset.
Change speaker volume on the 5304 phone
To change the volume of the sound you hear through the speaker, follow
these steps:
Final
1
With the handset on-hook, press an idle Line Appearance key. You will
hear dial tone.
2
Repeatedly press the scroll/arrow keys until the volume is at the level you
want.
Using the phone system 105
Using a
headset
The Mitel 5212, 5224, 5312, 5324, 5330, and 5340 IP phones support the use
of specially designed headsets made by Plantronics. The following headset
types are available:
•
Monaural over-the ear
•
Binaural over-the head with voice tube
•
Binaural over the head with noise canceling microphone
Some headsets are all supplied with a control switch that can be used to mute
the microphone.
Connect and configure the headset
To connect the headset to the Mitel 5320/5330/5340/5260, 5224/5324 or
5212/5312 IP phone, follow these steps:
1
Plug the headset into the headset jack on the back of the set.
2
Remove the handset from the cradle. You can hook it over the top of the
set cradle.
3
If using a Mitel 5320/5330/5340/5260 or 5224/5324 IP phone, press the
DIR softkey, then the QUIT softkey to take the phone to an on-hook (or
idle) state.
If using a Mitel 5212/5312 IP phone, press the
key, then press the
key to take the phone to an onhook (or idle) state.
Answer a Call with the headset
To answer a call while using the headset, press the Line Appearance key or
the ANSWER softkey.
End a Call with the headset
To end a call while using the headset on the Mitel 5224/5324 or 5320/5330/
5340/5260 IP phone, press the END softkey
To end a call while using the headset on the Mitel 5212/5312 IP phone, press
the
key.
Mute the headset
To mute the microphone, press and hold the control switch if it has one.
106
Using the phone system
Final
Make a call with the headset
To make a call while using the headset, press a Line Appearance key and dial
the number. line. You can also use dial, directory dial, and speed dial features.
See the section for making a call for your phone model in this guide.
Switch to the handset
To divert the operation back to the handset, the user can either
Using a
Programmab
le Key
Module
•
Disconnect the headset from the phones jack or
•
Use an external headset adapter box which has a dedicated headset/
handset switch.
A Programmable Key Module (PKM) provides additional memory keys to
those provided on your phone. The system supports the Mitel 5412 PKM
which provides an extra 12 additional memory keys and the Mitel 5448 PKM
which provides an additional 48 memory keys. If required you can have up to
two 5448 PKM units on one phone.
The PKMs can be attached to Mitel 5224 or 5324 IP phones.
To attach the PKM, follow the instructions that are provided in the box.
To program the memory keys on the PKM, see “Program memory keys on
PKM” on page 125.
Mitel 5310
IP
Conference
Unit
The Mitel 5310 IP Conference Unit connects to the headset port of the Mitel
5224, 5324, 5330, or 5340 IP Phone and is designed to provide optimal
performance in any office to a maximum of 15 feet by 25 feet (4.5 meters by
7.6 meters).
Note that there are two different conference unit types - one type connects to
Mitel 5224 IP phone, the other connects to Mitel 5324/5320/5330/5340/5260
IP phones
To attach the Mitel 5310 IP conference unit, follow the instructions in the box.
For Mitel 5320/5330/5340/5260 IP phones, you will need to program a
memory key as a conference unit key in order to use the conference unit. See
“Program memory keys” on page 124.
Features of the conference unit include:
Final
•
Acoustic beam-forming technology to locate the direction of speech
•
Noise reduction and automatic gain control to eliminate background noise
•
Presentation mode that locks the microphone array to the current speaker
Using the phone system 107
•
Seven dual color LEDs that provide visual confirmation that the unit has
picked up the speaker’s voice.
•
Power supply from a 24V DC wall adapter
•
Side-control unit with fixed function keys
•
Optional mouse controller is available
Using the Conference Unit for 5320/5330/5340/
5260 phones
Set up the Conference Unit on 5320/5330/5340/5260 phones
Follow these steps to configure the conference unit on the Mitel 5320/5330/
5340/5260 IP Phone.
1
Connect the unit as per the instructions in the box.
2
Program one of the programmable memory keys as a Conference Unit
key. See “Program memory keys” on page 124.
Once programmed, the Conference Unit key label will appear beside the
programmed memory key as well as its state (which is initially Off).
Whenever you press the Conference Unit memory key, it starts up the
Conference Unit application. The Conference Unit application disables your
page keys and changes the function of your memory keys. The new
meanings of your memory keys are displayed on the labels beside them.
To close the Conference Unit application, press the key labelled Close. This
closes the application (although it does not turn off the conference unit) and
the memory keys return to their programmed states.
Make a call from the Conference Unit on 5320/5330/5340/
5260 phones
Follow these steps to make a call from the phone connected to the
conference unit.
1
Make a speakerphone call by dialing with the handset onhook.
2
Wait for the other party to answer the call.
3
Once the other party has answered the call, press the Conference Unit
memory key.
This starts the Conference Unit application and displays the new settings
for your memory keys.
4
108
Using the phone system
Press the memory key labelled Turn On.
Final
5
To close the Conference Unit application and still leave the conference
unit on, press the memory key labelled Close.
The memory keys return to their programmed states and the label for the
Conference Unit memory key displays "Conference Unit (On)".
6
To return to the Conference Unit application, press the Conference Unit
memory key.
Answer a call on the Conference Unit on 5320/5330/5340/
5260 phones
To answer an incoming call to your phone with the conference unit, follow
these steps while the phone is ringing:
1
Press the Conference Unit memory key to start the Conference Unit
application.
2
Press the memory key labelled Turn On.
Using hold on the Conference Unit on 5320/5330/5340/5260
phones
To put a call on hold when using the Conference Unit, follow these steps:
1
Press the
key.
To take a call off hold when using the Conference Unit, follow these steps:
1
If you are still running the Conference Unit application, press the key
labelled "Close".
2
Press the flashing Line Appearance key to take the call off hold.
3
Press the Conference Unit memory key to start the Conference Unit
application.
4
Press the key labelled Turn On.
Switch between speakerphone and the conference unit on
5320/5330/5340/5260 phones
Note that your handset must be onhook (i.e. you must be in speakerphone
mode) to use the conference unit.
Follow these steps to switch a call from speakerphone mode to the
conference unit:
Final
1
Press the Conference Unit memory key to start the Conference Unit
application.
2
Press the key labelled Turn On.
Using the phone system 109
Follow these steps to switch a call from the conference unit to the
speakerphone:
1
If you are running the Conference Unit application, press the key labelled
Close.
2
Press the
3
Press the flashing Line Appearance key to take the call off hold.
key.
Switch between handset and the conference unit on 5320/
5330/5340/5260 phones
Note that your handset must be onhook (i.e. you must be in speakerphone
mode) to use the conference unit.
Follow these steps to switch a call from the handset to the conference unit:
1
Press the
2
Replace the handset in the cradle.
3
Press the flashing Line Appearance key to take the call off hold and
switch to speakerphone mode.
4
Press the Conference Unit memory key to start the Conference Unit
application.
5
Press the key labelled Turn On.
key.
Follow this step to switch a call from the conference unit to the handset:
1
Lift the handset.
Adjust volume on the conference unit on 5320/5330/5340/
5260 phones
To adjust the volume on the conference unit, follow these steps:
1
If the Conference Unit application is not currently running, press the
Conference Unit memory key to start the Conference Unit application.
2
Adjust the volume by pressing the keys labelled Volume Up and Volume
Down.
Note that the Arrow keys cannot be used to adjust the volume while using the
conference unit. These keys only apply to the handset and speakerphone
mode.
110
Using the phone system
Final
Use Presentation mode on 5320/5330/5340/5260 phones
The 5310 Conference Unit has multiple directional microphones around the
disk. Based on sound that it detects, it turns on the microphone pointing in
that direction. As different speakers talk, it changes which microphone is on.
Presentation mode allows you to lock the unit so that the microphone
currently on stays on, thereby removing potential background noise.
To turn on Presentation mode while using the conference unit, follow these
steps:
1
If not currently running the Conference Unit application, press the
Conference Unit memory key to start the Conference Unit application.
2
Press the key labelled Presentation Mode.
The LED beside the memory key turns on to indicate that you are in
Presentation mode.
To turn off Presentation mode while using the conference unit, follow these
steps:
1
If not currently running the Conference Unit application, press the
Conference Unit memory key to start the Conference Unit application.
2
Press the key labelled Presentation Mode.
The LED beside the memory key turns off to indicate that you are not in
Presentation mode.
Mute the call on the conference unit on 5320/5330/5340/
5260 phones
To mute a call while using the conference unit, follow these steps:
1
If not currently running the Conference Unit application, press the
Conference Unit memory key to start the Conference Unit application.
2
Press the key labelled Mute.
The LED beside the memory key turns on to indicate that you are Muted.
To un-mute a call while using the conference unit, follow these steps:
1
If not currently running the Conference Unit application, press the
Conference Unit memory key to start the Conference Unit application.
2
Press the key labelled Mute.
The LED beside the memory key turns off to indicate that you are not
muted.
Final
Using the phone system 111
Hang up a call on the conference unit on 5320/5330/5340/
5260 phones
To hang up a call while using the conference unit, follow this step:
1
Press the speaker key.
Note that the key labelled Hang Up does not have any effect.
Figure 8: Mitel 5310 IP Conference unit with sidecar and optional mouse
When connected to the 5224 phone, the conference unit can be controlled
using the buttons on the sidecar for On/Off, Volume, Mute and Presentation
Mode.
Using the Conference Unit for 5324 phones
The following explanations assume that you have a mouse attachment.
112
Using the phone system
Final
Set up the Conference Unit on 5324 phones
Follow these steps to configure the conference unit on the Mitel 5324 IP
Phone.
1
Connect the unit as per the instructions in the box.
2
Connect the mouse to be able to control the operation of the conference
unit.
Figure 9: shows various keys on the conference unit mouse:
Figure 9: Mitel 5310 IP Conference unit with mouse
Make a call from the Conference Unit on 5324 phones
Follow these steps to make a call from the phone connected to the
conference unit.
1
Make a speakerphone call by dialing with the handset onhook.
2
Wait for the other party to answer the call.
3
Once the other party has answered the call, press the Power On/Off
button on the mouse.
Answer a call on the Conference Unit on 5324 phones
To answer an incoming call to your phone with the conference unit, follow this
step while the phone is ringing:
1
Final
Press the Power On/Off button on the mouse.
Using the phone system 113
Using hold on the Conference Unit on 5324 phones
To put a call on hold when using the Conference Unit, follow these steps:
1
Press the
key.
To take a call off hold when using the Conference Unit, follow these steps:
1
Press the flashing Line Appearance key to take the call off hold.
2
Press the Power On/Off button on the mouse.
Switch between speakerphone and the conference unit on
5324 phones
Follow this step to switch a call from speakerphone mode to the conference
unit:
1
Press the Power On/Off button on the mouse.
Follow this step to switch a call from the conference unit to the speakerphone:
1
Press the
key.
Switch between handset and the conference unit on 5324
phones
Note that your handset must be onhook (i.e. you must be in speakerphone
mode) to use the conference unit.
Follow these steps to switch a call from the handset to the conference unit:
1
Press the
key.
This switches the call to the speakerphone. You can replace the handset
at this point. It will not release the call.
2
Press the Power On/Off button on the mouse.
Follow this step to switch a call from the conference unit to the handset:
1
Lift the handset.
Adjust volume on the conference unit on 5324 phones
To adjust the volume on the conference unit while talking on a call, follow this
step:
1
Adjust the volume by pressing the Volume Up/Down keys on the mouse.
Note that the Arrow keys cannot be used to adjust the volume while using the
conference unit with the mouse attachment. These keys only apply to the
handset and speakerphone mode.
114
Using the phone system
Final
Use Presentation mode on 5324 phones
The 5310 Conference Unit has multiple directional microphones around the
disk. Based on sound that it detects, it turns on the microphone pointing in
that direction. As different speakers talk, it changes which microphone is on.
Presentation mode allows you to lock the unit so that the microphone
currently on stays on, thereby removing potential background noise.
To turn on Presentation mode while using the conference unit, follow this step:
1
Press the Presentation Mode key on the mouse.
The key light turns on to indicate that you are in Presentation mode.
To turn off Presentation mode while using the conference unit, follow this step:
1
Press the Presentation Mode key on the mouse.
The key light turns off to indicate that you are not in Presentation mode.
Mute the call on the conference unit on 5324 phones
To mute a call while using the conference unit, follow this step:
1
Press the Mute key on the mouse.
The key light turns on to indicate that you are Muted.
To un-mute a call while using the conference unit, follow this step:
1
Press the Mute key on the mouse.
The LED beside the memory key turns off to indicate that you are not
muted.
Hang up a call on the conference unit on 5324 phones
To hang up a call while using the conference unit, follow this step:
1
If the handset is not in the cradle, replace the handset.
2
Press the Power On/Off button on the mouse.
Using the conference unit on 5324 phones without the
mouse
If you are using the conference unit for 5324 phones without the mouse
attachment, then the conference unit becomes a replacement for the built-in
speakerphone. When in a talking state, if you press the
key, this turns
on or off the conference unit. When the conference unit is on, then the arrow
keys (for volume) and the
key apply to the conference unit. You cannot
use the Presentation Mode feature without the mouse attachment.
Final
Using the phone system 115
Using other
phones
Compatible
peripherals
matrix
Mitel IP
Phone
model
PKM
5412
This phone system supports usage of other phones using the SIP protocol.
Not all features are supported on other phones. Consult the documentation
provided with the other phones.
The following table summarizes which peripheral devices are supported for
each of the listed phone models in the left hand column.
PKM
5448
Conference
Unit 5310
Wireless
LAN Stand
Headset
Line
Interface
Module
5212
No
No
No
Yes
Yes
No
5224
Yes
Yes
Yes
Yes
Yes
Yes
5304
No
No
No
No
No
No
5312
No
No
No
Yes
Yes
No
5324
Yes
Yes
Yes
Yes
Yes
Yes
5330
No
No
Yes
Yes
Yes
No
5340
No
No
Yes
Yes
Yes
No
Personalizing phone usage via the web
Using Internet Explorer 6 or later or Mozilla Firefox 1.5.0.4 or later, individual
phone users can personalize their phone systems using the web
administration interface. With the exception of the Login page, all of the web
pages share the same layout. On each web page, you will see a header,
footer, a left pane, and a right pane. The left pane shows the choices for
navigating the pages. The right pane shows the details.
Figure 6: “User Home page” on page 117 illustrates the user window:
116
Personalizing phone usage via the web
Final
Figure 10: User Home page
You should always use the appropriate left hand menu link or button or link on
your screen to navigate through the web interface. You should never use the
"Back" button on your browser since the information and actions from a
previous page may no longer be valid.
Web login
To log in to the web administration interface, you need four things: (1) your
extension, (2) your PIN, (3) the Login URL, and (4) a web browser (Internet
Explorer 6.0 or later or Firefox 1.5.0.4 or later) which connects to the Internet.
These are all available from your administrator.
To log in to the web administration interface, follow these steps:
1
Type the Login URL in a web browser.
2
Type your User ID (your extension) in the Login screen. Check the
Remember my User ID check box to avoid entering this information each
time you log in. To disable this option, deselect the Remember my User
ID check box.
3
Type your PIN.
4
Select the Login button.
If you are logged into the application and attempt to log in again, the
application logs you out of the first session and logs you in to a new
session. The system displays the message, "System has detected older
Final
Personalizing phone usage via the web 117
open session for this user”, which has been invalidated upon current
login.
You will be logged out of the web if your computer is idle for 30 minutes or
more.
To stop the security alert at log in
A Security Alert may appear when you log in if the security certificate that is
being used has not been identified as a trusted source on your computer. If
you trust the source and do not want to see the Security Alert each time you
log in, follow these steps:
1
Select the View Certificate button on the Security Alert window.
2
Select the Install Certificate button on the Certificate window.
3
Follow the install certificate prompts.
4
Select the OK button on the Certificate window.
5
Select the Yes button on the Security Alert window.
Forgotten PIN
If you forget your PIN, a new one can be sent to you by email.
To request a new PIN, follow these steps on the login page:
1
Type your User ID.
2
Select Forgot Your PIN?
A new PIN will be sent to the email address specified on your My
Personal Details page. If you do not receive an email with your PIN,
contact your administrator.
You will not receive a new PIN by email if you have not entered a valid
email address on your Personal Details page or if your company has not
been configured for email PIN notification. Contact your system
administrator to request a new PIN.
Change PIN
Your PIN is used for logging into your phone as well as logging into the web
interface. To change your PIN, follow these steps:
1
118
Select My Personal Details in the Navigation pane.
Personalizing phone usage via the web
Final
2
Select the Save and Change PIN button at the bottom of the page. A
Change PIN pop-up window will be displayed.
3
Type your old PIN.
4
Type a new PIN.
5
Type the new PIN again.
6
Select the Save button.
You will be returned to the My Personal Details page appears with the
message “Successfully Saved” confirming that your PIN has been
changed.
The Change PIN window refreshes, clearing all fields, and displaying an
error message in the following cases:
• You enter an invalid old PIN. The error message will read, “Invalid old
PIN.”
• You enter a new PIN that does not meet the criteria. The error
message will read, “New PIN is not valid according to the specified rules.”
• The new PIN you re-typed does not match the new PIN. The error
message will read, “Please correctly re-type your PIN.”
A PIN must consist of between four to ten digits. A PIN is numeric and
must not contain spaces, letters, or special characters. Your new PIN
cannot be the same as your old PIN.
This PIN is not the same as the PIN used for voice mail. See “Reset voice
mail PIN” on page 147 for details on how to change your voice mail PIN.
Web logout
To log out of the Web, follow these steps:
1
Select Logout in a Global Navigation menu bar from any screen in the
application.
2
The Logout page will be displayed, with the message, “You are now
successfully logged out of application name.” A link to the Login page is
provided.
Closing all browser windows automatically logs you out of the Web. You
will be logged out of the Web if your computer is idle for 30 minutes or
Final
Personalizing phone usage via the web 119
more.
Quick set-up
To quickly set up your phone service, follow the steps provided below:
To record your name for the Auto Attendant Name prompt, follow these steps:
1
Log in to the web interface (see “Web login” on page 117).
2
Select the My Personal Details option in the navigation pane.
3
Select the Record button on the Personal Details page.
A Record Prompt pop-up window is displayed. Confirm that the extension
displayed matches that of the phone you will be using. If the extension
does not match, type the appropriate extension.
4
Select the Call button.
5
When your phone rings, lift your handset to answer.
6
Listen to a brief set of audio instructions, "Please record your message
after the tone. When you are finished, press "#" for more options."
7
When you hear the tone, say your name into the handset to record your
name announcement.
8
Press the # key when you are finished.
9
Choose from the following options:
•
To replay greeting press 1.
•
To save greeting press 2.
•
To re-record greeting press 3.
•
To exit without saving press *.
10 Press 2 to save the name announcement.
11 Replace the handset.
12 Select the Close button on the pop-up window.
To set-up Call Coverage, follow these steps:
120
1
Select My Call Coverage in the navigation pane.
2
Select one of the following options: My Voice Mail, My Auto Attendant, My
Co-worker, or Another Phone Number.
3
If you selected My Auto Attendant, choose an auto attendant from the
drop-down list. If you selected My Co-Worker, choose a co-worker from
Personalizing phone usage via the web
Final
the drop-down list. If you selected Another Phone Number, enter a
phone number for call coverage.
4
Choose the number of rings.
5
Select the Save button to save the information.
External numbers entered as Another Phone Number for Call Coverage
must include the appropriate prefix for external dialing. This prefix is
usually the number "9". Contact the system administrator for assistance.
Change user
details
Record your
name for
the Auto
Attendant
All user details, except extensions and permissions, can be changed.
To change your personal user details, follow these steps:
1
Select My Personal Details in the Navigation pane. The Personal Details
page is displayed with your personal details in the My Information
section.
2
Make the changes of your choice in the following fields: First Name, Last
Name, Email, Home Phone, Mobile Phone, Language for Phone and
Handsfree Answerback. You cannot make changes to the Extension field.
3
Select the Save button to save the information.
Callers hear your recorded name announcement as confirmation when they
use the auto attendant name directory to contact you.
The recorded announcement is for the auto attendant. It is not your voice
mail greeting.
To record, or re-record your name announcement, follow these steps:
1
Log in to the web administration interface.
2
Select Personal Details in the left menu.
3
Select the Record button in the Automated Attendant Prompt section.
A Record Prompt pop-up window is displayed.
4
Final
Confirm that the extension displayed matches the phone you want to use.
If the extension is not the same, enter an alternate extension.
Personalizing phone usage via the web 121
5
Select the Call button.
6
When your phone rings, lift the handset to answer.
7
Listen to a brief set of audio instructions: “Please record your message
after the tone. When you are finished, press # for more options”.
8
When you hear the tone, record your name into the handset.
9
When you are finished, press the # key.
The system plays the following set of options:
•
To listen to the recording, press 1.
•
To save the recording, press 2.
•
To re-record, press 3.
•
To exit without saving changes, press *.
10 Press 2 to save the name announcement.
11 Replace the handset.
12 Select the Close button on the pop-up window.
Permissions
Permissions control what types of calls you can make at different times.
To view your permissions, follow these steps:
1
Select My Personal Details in the navigation pane.
2
The Personal Details page will be displayed. Your permissions can be
found in the My Permissions section of the page.
3
Permission types are displayed in a table on the vertical axis, and
Business Hours on the horizontal.
Only the system administrator can change permissions and business
hours.
Permission types
The permission types are shown in Table 1
Table 1: Permission types
Call Type
122
Definition
Personalizing phone usage via the web
Final
Table 1: Permission types
Emergency (911)
Calls to the number used to report an emergency. In North
America, this number is 911. This permission is active for all
users at all times.
Internal
Calls to another extension within the same business.
International
International calls to which long-distance charges apply.
Local (external)
Calls within the local calling area of your business. No longdistance charges apply.
Long Distance
Calls outside the local calling area of your business and outside
of your region. Long-distance charges apply.
Operator Assisted
Calls in which the operator is involved, typically resulting in
long-distance charges.
Regional
Calls outside the local calling area of your business and within
your region. Long-distance charges apply.
Toll Free (1-800)
Long-distance calls to which no charges apply. Typically, these
numbers begin with 1-800.
Toll Premium
Calls to a toll number to which charges apply. Typically, these
numbers begin with 1-900.
Other
Redirect inbound call to external
number
Allow call coverage, three-way calls, transfer or forward of
external calls to an external phone number. Prerequisite:
permission to make the external call itself.
Select Long Distance Provider
Include a long-distance provider code as part of the dialed
digits for a long distance call. Prerequisite: permission for Long
Distance and/or International calls.
Select Regional Provider
Include a long-distance provider code as part of the dialed
digits for a long-distance call within your region. Prerequisite:
permission for Regional calls.
Configure
phone
Final
To view your phone’s current configuration, select My Phone in the
Navigation pane.
The following options are provided to make configuring your phone easier:
•
Program memory keys to quickly activate features from the phone. See
“Program memory keys” on page 124.
•
Select a key mapping profile to configure keys. See “Select key mapping
profile” on page 134.
Personalizing phone usage via the web 123
•
Print phone labels for all the programmed phone keys. See “Print phone
labels” on page 135.
Program memory keys
Any features that you that you assign to the memory keys will remain
associated with your extension regardless of which phone model you log into.
This means that if you program memory keys on the web interface when
selecting a model with a large number of programmable memory keys (such
as the Mitel 5224 IP phone), and then log in to a model that has fewer
programmable memory keys (such as the Mitel 5212 IP Phone), then some of
the keys (the left hand column) will not be visible to you (although any of the
programmed memory keys could be active).
To program features to memory keys, follow these steps:
1
Select My Phone in the left menu.
The My Phone page appears.
2
Select the phone model from the Phone Model drop-down list. The
phone model that you are currently logged into will have an * beside the
name.
Supported phone models include: Mitel 5212 IP Phone, Mitel 5224 IP
Phone, Mitel 5304 IP Phone, Mitel 5312 IP Phone, Mitel 5324 IP Phone,
Mitel 5330 IP Phone, and Mitel 5340 IP phone.
3
For Mitel 5320/5330/5340/5260 phones, select the appropriate Page
number.
4
Select the memory key that you want to program by selecting the
appropriate button icon.
The Program Memory Key Details page appears.
124
5
Complete the following fields (See “Programmable memory key features”
on page 126 for a description of each of the features):
•
Feature: Select the feature to be programmed.
•
Label: (Optional) Type in a description. If no description is typed the
system default will be applied.
•
Details: Select from a drop-down list or type in the required number
without any spaces or characters. Not all features require this field.
•
Status: (Only appears with the Forward features). Select Active or
Inactive. You will be able to activate or deactivate the feature by pressing
this memory key on the phone once it is programmed.
6
Select the Save button to save the information.
7
Select the Close Window button to close the window.
Personalizing phone usage via the web
Final
Your phone key profile is updated.
8
Repeat steps 3-7 for each memory key to be programmed.
To cancel your changes, select the Close Window button instead of the
Save button in step 6.
Program memory keys on PKM
To program the memory keys on a Programmable Key Module (PKM), follow
these steps:
1
Select My Phone in the left menu.
The My Phone page appears.
2
Select the PKM module from the Phone Model drop-down list.
Your options are: Mitel 5412 PKM, Mitel 5448 PKM-1, or Mitel 5448 PKM2. Only choose the Mitel 5448 PKM -2 if this is the second PKM unit to be
attached to the phone. You should not combine a 5412 PKM with a 5448
PKM as this is not a supported configuration.
3
If you are programming a Mitel 5448 PKM, select the section of keys that
you want to program. The choice is Left Bank or Right Bank.
4
Select the memory key that you want to program by moving the mouse
over the button and left-click.
The Program Memory Key Details page appears.
5
Complete the following fields:
• Feature: Select the feature to be programmed. You cannot program a
Line Appearance on a PKM.
• Label: (Optional) Type in a description. If no description is typed the
system default will be applied.
• Details: Select from a drop-down list or type in the required number
without any spaces or characters. Not all features require this field.
• Status: Only appears with certain features. Select Active or Inactive.
You will be able to activate or deactivate the feature by pressing this
memory key on the phone once it is programmed.
6
Select the Save button to save the information or select the Close
Window button to cancel your changes.
7
Select the Close Window button to close the window.
Your phone key profile is updated.
Final
Personalizing phone usage via the web 125
8
Repeat steps 3-7 for each memory key to be programmed.
To cancel your changes, select the Close Window button instead of the
Save button in step 6.
The LEDs on the PKM are the same as on the phone except that they are
always red.
Programmable memory key features
Table 1 shows the features available to program on a memory key by a user
and a description of the fields required. Only the memory keys on your phone
can be custom configured. Options that require an LED memory key are
labeled LED.
Table 2: Programmable memory key options
Feature
Description
Default
Label
Details
Status
Default
Assign the default option if you have
customized a preset key configuration
and want to return a previously
customized key back to its default value.
Unassigned
N/A
N/A
ACD Login/
Out
Assign ACD Agent Log In/Out key if
you have Callfinity ACDs and Minet
phones and are an Agent.
ACD Log In/
Out
N/A
N/A
126
Personalizing phone usage via the web
Final
Table 2: Programmable memory key options
Feature
Description
Default
Label
Account
Code
Assign the Account Code option to a
memory key to associate an account
code to a call before or during the call.
Account
Code
Details
1
Leave the
details box
blank if you
want to be
prompted for an
account code
after selecting
the Account
Code key.
2
Type an account
code if you want
the Account
Code key to
behave like an
Account Code
Speed Dial key.
In this case
when you select
the Account
Code key, the
account code
that you entered
is automatically
assigned to the
call.
Note: The Account Code option is not
displayed if the Account Codes feature is
not enabled for your business.
Company
Speed Dial
Assign the Company Speed Dial option to
a memory key to dial one of the phone
numbers in your External Directory by
pressing the memory key.
Status
N/A
Select one of the
names from this list to
enable the Company
Speed Dial option.
N/A
Note: The Company Speed Dial option is
displayed if the administrator has
configured the system with speed dials.
Conference
Unit (LED)
Assign the Conference Unit option to a
memory key to provide control of the
conference unit if connected to a Mitel
5320/5330/5340/5260 IP phone.
Conference
Unit
N/A
N/A
Directory
Assign the Directory option to a memory
key to access the internal directory. This
is only appropriate for Mitel 5304 IP
phones.
Directory
N/A
N/A
Final
Personalizing phone usage via the web 127
Table 2: Programmable memory key options
Feature
Description
Default
Label
Details
Status
Forward to
AA (LED)
Assign the Forward to AA (Auto
Attendant) option to a memory key to
forward all incoming calls to the Auto
Attendant. To turn the Forward to AA
feature on and off, select the associated
memory key. When the memory key LED
is lit, the feature is enabled.
Forward to
(AA number)
Select one of the Auto
Attendants from this
list to enable the
Forward to AA option.
Select
Active
or
Inactive
Note: This option is displayed when the
administrator has configured the system
with auto attendants.
Forward to
Co-worker
(LED)
Assign the Forward to Co-worker option
to a memory key to forward all incoming
calls to a co-worker. To turn the Forward
to Co-worker feature on and off, select
the associated memory key. When the
memory key LED is lit, the feature is
enabled.
Forward to
***(Extension
number)
Select a user from
this list to enable the
Forward to Co-worker
option.
Select
Active
or
Inactive
Forward to
Coverage
(LED)
Assign the Forward to Coverage option to
a memory key to forward all incoming
calls directly to the call coverage you
have set up. To turn the Forward to
Coverage feature on and off, select the
associated memory key. When the
memory key LED is lit, the feature is
enabled.
Forward to
Coverage
None
Select
Active
or
Inactive
Forward to
Number
(LED)
Assign the Forward to Number option to a
memory key to forward all incoming calls
to a user defined phone number. To turn
the Forward to Number feature on and
off, select the associated memory key.
When the memory key LED is lit, the
feature is enabled.
Forward to
*****(number
entered in
details field)
Type the phone
number that you want
to have your calls
forwarded to into the
text box to enable the
Forward to Number
option.
Select
Active
or
Inactive
Note: If you forward
your phone to an
external phone
number, you must
have permission to
make that external
call and Redirect
Inbound Call to
External Number
permission.
128
Personalizing phone usage via the web
Final
Table 2: Programmable memory key options
Feature
Description
Default
Label
Details
Status
Forward to
Prompt
(LED)
Assign the Forward to Prompt option to a
memory key to forward all incoming calls
to a user defined phone number. To turn
the Forward to Prompt feature on, select
the associated memory key and, using
the phone keypad, type in the number to
which you would like to have your calls
forwarded. When the memory key LED is
lit, the feature is enabled. To turn the
Forward to Prompt feature off, select the
associated memory key and then the
FWDOFF softkey or the # key on the
telephone keypad.
Forward to
*****(number
entered in
details field)
Type the phone
number that you want
to have your calls
forwarded to into the
details box.
Select
Active
or
Inactive
Assign the Handsfree Answerback option
to a memory key so that your phone can
automatically answer an intercom call
and set up a two-way speech path.
Handsfree
Answerback
N/A
Select
Active
or
Inactive
Handsfree
Answerbac
k (LED)
Note: If you forward
your phone to an
external phone
number, you must
have permission to
make that external
call and Redirect
Inbound Call to
External Number
permission.
Note: This option is displayed if the
administrator has made it available to
you.
Incoming
Calls List
Assign the Incoming Calls List option to a
memory key to allow you to see the list of
recently received incoming calls to your
extension. This has the same function as
the CALLS softkey.
Incoming
Calls List
N/A
N/A
Intercom to
Co-Worker
(LED)
Assign the Intercom to Co-Worker option
to a memory key to allow you to make a
page directly to a co-worker's phone.
Intercom to
*** (Coworker's
extension)
Select a user from
this list to enable the
Intercom to CoWorker option.
N/A
Intercom to
Prompt
(LED)
Assign the Intercom to Prompt option to a
memory key to allow you to make a page
to a co-worker's number that you enter
from your phone’s keypad after pressing
the key.
Intercom to
Prompt
N/A
N/A
Join/Leave
Group
(LED)
Assign the Join/Leave Group option to a
memory key to join and leave the
selected Call Group by selecting the
programmed memory key. The memory
key LED is lit when you have joined the
selected Call Group.
Join/leave
Group
Select a Call Group
from this list to enable
the Join/Leave Group
option.
N/A
Final
Note: The Join/
Leave Group option is
not displayed if you
are not a member of a
call group.
Personalizing phone usage via the web 129
Table 2: Programmable memory key options
Feature
Description
Default
Label
Details
Status
Line
Appearanc
e (LED)
Assign the Line Appearance option to a
memory key to have a phone line from
which you can receive calls, place calls
and keep calls on hold.
Line
(followed by
a number)
Note: You cannot
program a Line
Appearance on a
PKM.
N/A
Note: Line Appearances are ordered
bottom to top, right to left. Incoming calls
will be presented on the first available
Line Appearance based on the above
order.
130
Personalizing phone usage via the web
Note: You cannot
program a Line
Appearance on pages
two or three of a Mitel
5340 IP Phone.
Final
Table 2: Programmable memory key options
Feature
Description
Default
Label
Details
Status
Monitor
Call (LED)
Assign the Monitor Call option to a
memory key to monitor and answer calls
occurring on another user’s phone. For
5224/5324 phones, see “Monitor call on
the 5224/5324 phone” on page 51. For
the 5212/5312 phone, see “Monitor Call
on the 5212/5312 IP phone” on
page 74. For the 5304 phone, see
“Monitor Call on the 5304 phone” on
page 99. For the 5320/5330/5340/5260
phone, see “Monitor call on the 5320/
5330/5340/5260 phone” on page 25.
Note that a Monitor Call Silent option is
also available.
Monitor Call
***
(extension
number of
user
monitored)
Select the name of
the user this key will
be monitoring.
N/A
Note: The Monitor
call option is not
displayed if you are
not a member of a
monitor group.
Note: Program the same number of
Monitor Call keys as the number of
simultaneous calls that you want to
monitor on the other user's phone. The
maximum number of simultaneous calls
that can be monitored equals the number
of Line Appearances the other user has
programmed on their phone. When you
program multiple Monitor Call keys for the
same Monitor group, they are ordered
bottom to top, right to left. The first
Monitor Call key will monitor the first call
placed or received by the other user (not
necessarily the first Line Appearance)
and so on.
Example: Number of Line Appearances
programmed on the "monitored" user's
phone: 4
Monitor Call keys programmed: 2
1. The "monitored" user selects his fourth
Line Appearance to make a call when
none of his other Line Appearances are in
use. The first Monitor Call key is used to
monitor this call.
2. An incoming call is received on the
"monitored" user’s first Line Appearance
while the fourth Line Appearance is still in
use. The second Monitor Call key is used
to monitor this call.
3. A second incoming call is received on
the "monitored" user’s second Line
Appearance while first and fourth Line
Appearances still in use. This call is not
monitored as there are only two Monitor
Call keys programmed and they are both
in use.
Final
Personalizing phone usage via the web 131
Table 2: Programmable memory key options
Feature
Description
Monitor
Call Silent
(LED)
Assign the Monitor Call Silent option to a
memory key to monitor and answer calls
occurring on another user’s phone. For
5224/5324 phones, see “Monitor call
on the 5224/5324 phone” on
page 51. For the 5212/5312 phone, see
Default
Label
Monitor Call
Silent ***
(extension
number of user
monitored)
“Monitor Call on the 5212/5312 IP
phone” on page 74. For the 5304
phone, see “Monitor Call on the 5304
phone” on page 99. For the 5320/5330/
5340/5260 phone, see “Monitor call on
the 5320/5330/5340/5260 phone” on
Details
Select the name of
the user this key will
be monitoring. If the
list is empty you
cannot program this
feature to a key.
Note: The Monitor
Call Silent option is
not displayed if you
are not a member of
a monitor group.
Status
N/A
page 25.
Note that a Monitor Call option is also
available.
Note: Monitor Call Silent behaves the
same as Monitor Call with the exception
that ringing is not used to indicate an
incoming call. The Monitor Call Silent
option can be used together with or
independent of the Monitor Call option.
Refer to the Monitor Call entry in this
table for details related to programming
this option.
Monitor
Phone
(LED)
Assign the Monitor Phone option to a
memory key to monitor another user’s
phone to see when their phone is active.
Any key that is assigned to monitor
another phone also acts as a speed-dial
to that phone.
Note:
Monitor Phone does not allow you to
pick-up calls on another user’s line.
One Touch
Speed Dial
Assign the One Touch Speed Dial option
to a memory key to dial a user defined
phone number by pressing the
associated memory key.
Page
Assign the Page option to a memory key
so that you can send a page to all of the
phones at your site. The page is
broadcast through the speaker of each
available phone.
132
Personalizing phone usage via the web
Monitor phone
*** (extension
number of
user)
Select the name of
the user this key will
be monitoring.
Note:
The Monitor phone
option is not
displayed if you are
not a member of a
monitor group.
Type the phone
number that you
want to dial to enable
the One Touch
Speed Dial option.
Page
None
N/A
N/A
N/A
Final
Table 2: Programmable memory key options
Feature
Description
Park/
Retrieve
Assign the Park/Retrieve option to a
memory key to put a call on hold at a
park location such that it can be
retrieved from any other phone at your
business that has a memory key
configured with the Park/Retrieve option.
When you are on an active call, selecting
a memory key programmed with the
Park/Retrieve feature will park the call.
When your phone is idle, selecting a
memory key programmed with the Park/
Retrieve feature will allow you to retrieve
a parked call by entering the park
location.
Pickup
Assign the Pickup option to a memory
key to allow you to answer an incoming
call to any member of the call pickup
group.
Redial List
/ Dial
Assign the Redial List / Dial option to a
phone to display the list of recently
dialled calls. The key can also be used to
Dial a number displayed on the LCD
display (Call lists, Redial lists, and
Directory displays). This is only
appropriate for Mitel 5304 IP phones.
Transfer /
Conferenc
e
Assign the Transfer / Conference key to
a phone to allow transferring and
conferencing of calls. Press once to
transfer a call and twice to make a threeway call. This is only appropriate for
Mitel 5304 IP phones.
Twinning
On/Off
(LED)
Assign the Twinning On/Off option to a
memory key to allow you to activate or
deactivate your twinning feature.
Unassigne
d
Final
An Unassigned memory key has no
action associated with it.
Default
Label
Park/Retrieve
Pickup
Details
None
Selecting Pickup
displays the available
pickup groups in the
Details list. Select a
pickup group from
the list to enable the
Pickup option
Note: The Pickup
option is not
displayed if you are
not a member of a
call pickup
group.
Redial List /
Dial
N/A
Transfer /
Conference
N/A
Twinning On/
Off
N/A
Unassigned
None
Status
N/A
N/A
N/A
N/A
Select
Active or
Inactive
N/A
Personalizing phone usage via the web 133
Table 2: Programmable memory key options
Feature
Voice Mail
Description
Default
Label
Assign the Voice Mail option to a memory
key to allow access to the Voice Mail
system. This is only appropriate for Mitel
5304 IP phones.
Voice Mail
Details
N/A
Status
N/A
Select key mapping profile
To help with the programming of your phone keys, choose a key mapping
profile with a number of pre-programmed keys. Selecting a Key Mapping
Profile will remove any programming you may have done to your memory
keys.
To select a Key Mapping Profile, follow these steps:
1
Select My Phone in the Navigation pane.
2
Select a Key Profile from the Current Key Profile drop-down list.
3
Select the Reset button.
Your memory keys will be updated to contain the set of keys defined in the
key profile.
Configure Ring Tones
Distinctive Ringing gives subscribers the ability to choose between predefined ring tones. Distinctive Ringing lets users set the ringing tone on their
phone to differentiate it from other near-by stations (Distinctive Ringing by
Station), differentiate based on whether the call originated from internal or
external (Internal/External Distinctive Ringing), and differentiate between calls
targeted directly at their extension versus group calls (Call Type Distinctive
Ringing).
The originator of the call is used to determine the Internal/External ringing
type at the terminating device. Group ringing is only used when the phone is
ringing as a result of a group call directly; for example, forwarded group calls
do not cause group ringing. A call gets External treatment only if the originator
of the call is at the Telco level.
If the ring tone is not configured at the Subscriber level, it defaults to the
Tenant level; if the ring tone is not configured at the Tenant level, it defaults to
the Telco level.
To configure Ring Tones, follow these steps:
134
1
Click My Phone in the Navigation pane.
2
Click Configure Ring Tones.
Personalizing phone usage via the web
Final
The Configuring Ring Tones dialog appears.
3
Choose the Extension for test. (Tenant Administrator only.)
4
From the Internal call direct drop-list, select the ring tone you want to use.
5
From the Internal call via group drop-list, select the ring tone you want to
use.
6
From the External call direct drop-list, select the ring tone you want to
use.
7
From the Internal call via group drop-list, select the ring tone you want to
use.
8
Click Save.
You can click Test to listen to the sound of the ring tone you have chosen.
Print phone labels
Using Print Phone Labels, you can customize and print labels for the
programmable keys on your phone.
1
Select My Phone in the Navigation pane.
2
Select the Print Key Labels button at the bottom of the Information pane.
A new window will open. A PDF Template file will open with templates and
instructions for the phone labels.
Note that each box has a limited space. If the label for that key exceeds
the size available, a + sign will appear next to the key. Reduce the
number of characters in the label to eliminate the + sign.
3
Customize the labels and select the Print icon.
You can cut out the labels and insert them under the plastic covers on
your phone.
You can save the file to your local drive for future use.
4
Call
Coverage
Final
Close the browser window.
Using Call Coverage, you can decide how your calls should be handled when
you cannot answer them, including when you are logged out of your phone.
To view your Call Coverage options, select the My Call Coverage option in
Personalizing phone usage via the web 135
the Navigation pane. If allowed for your phone, this page also allows you to
set the twinning option which allows you to ring another phone (such as your
cell phone) simultaneously with your desk phone.
To set-up or change Call Coverage, follow these steps:
1
Select one of the following options:
•
My Voice Mail
•
Auto Attendant, and select an Auto Attendant from the drop-down list
•
My Co-worker, and select a Co-worker from the drop-down list
•
Another Phone Number, and enter a phone number (including 9 if it is an
outside call).
2
Select how many times you want the phone to ring before going to the
coverage option.
3
Select the Save button to save the information.
4
To disable Call Coverage, select the No Call Coverage checkbox and
then select the Save button to save the information.
If you log out of your phone, the call coverage option that you last set up
will apply unless you had call forwarding turned on.
If the Call Coverage option of your choice no longer exists (an Auto
Attendant or Co-worker), your call coverage will default to No Call
Coverage.
If you cannot select My Voice Mail, it is because your phone has not been
configured for voice mail. See the system administrator.
If you configure your call coverage to an external phone number you must
have permission to make that external call and Redirect Inbound Call to
External Number permission.
Twinning
If the option is allowed by your administrator, you can configure twinning
which allows you to ring another phone (such as your cell phone)
simultaneously with your desk phone. To view your Twinning options, select
the My Call Coverage option in the Navigation pane.
Follow these steps to set your twinning parameters:
136
1
Select the Activate Twinning checkbox
2
In the Twinning Target field, enter the phone number of the phone you
want to ring in addition to your desk phone. Enter the number as you
would normally dial it from your desk phone, including prefix digits.
3
Enter the maximum number of simultaneous calls you want sent to your
twinning target in the Maximum # of simultaneous calls to Target field.
Personalizing phone usage via the web
Final
Note that your desk phone can receive as many simultaneous calls as its
number of Line Appearance keys.
4
Select the Save button to save the information
Do not configure your Twinning Target to be your own company
phone number.
Call groups
Incoming calls to a call group have the opportunity to be answered by any
member of the call group. The way the call is presented to the group
members depends on the call group type. The five types of call groups are as
follows:
•
Broadcast group — all phones in the group ring simultaneously.
•
Pickup group - calls to any member of the group can be answered by
any other member who presses their pickup key.
•
Monitor group - all phones in the group ring simultaneously when a call
comes in to the primary member of the group.
•
Hunt group — phones in the group ring in sequence.
•
Rollover group — first available phone in the group rings.
In all cases, the first phone that picks up answers the call and stops the other
phones from ringing or being notified.
To view call groups of which you are a member, select My Call Groups in the
Navigation pane.
To view the members of a particular call group, select the Name of the call
group from the list.
Only the administrator can add a call group, or change the members of an
existing call group.
Join/leave call groups
You can join and leave a call group of which you are a member if the call
group has been configured to allow joining and leaving. For Broadcast, Hunt
and Rollover groups, only the phones of members who are joined in the group
will ring when the call group is called. For Call Pickup groups, other phones in
the group will be notified only if the phone being called is joined in the group.
To join or leave a call group of which you are a member using the web
interface, follow these steps:
1
Final
Select My Call Groups in the Navigation pane.
Personalizing phone usage via the web 137
Your status for each call group will be displayed in the Status column.
2
Select In Group to leave or Out of Group to join.
Join and leave steps apply to Broadcast, Call Pickup, Hunt and Rollover
groups only.
If your status is not displayed as a link, it means that you do not have
permission to leave the call group. Selecting this status will not cause a
change. See the administrator.
You can also join/leave a call group (except a Monitor group) via a
programmed join/leave memory key on your phone.
Agent
Presence
Control Key
If a tenant has Callfinity ACDs and Minet phones, users can program a key
called ACD Agent Log In/Out on the My Phone page. After programming
this key, the state defaults to active. See Figure 11: ACD Agent Log In/Out.
To program the "ACD Agent Log In/Out” key, follow these steps:
1
From the My Settings page, select View and edit programmable keys
on My Phone.
2
Choose the button you want to assign the feature to.
The system returns the Program Memory Key Details pop-up window.
138
3
From the Feature drop-down list, select ACD Login/Logout.
4
Apply a label.
5
Click Save.
Personalizing phone usage via the web
Final
Figure 11: ACD Agent Log In/Out
Directories
Final
The phone system has two directories: the Internal Directory and the External
Directory. Using each directory, you can
•
sort users
•
find users
Personalizing phone usage via the web 139
•
call users
•
print the directory
View the internal directory
To view the Internal Directory, select Internal Directory in the Navigation
pane.
View the external directory
To view the External Directory, select External Directory in the Navigation
pane.
Sort directory list
You can sort a directory from either directory page.
To sort a list, select the column header of the field that you want to sort on. To
reverse the sorting order, select the column header a second time.
Find a person in the internal directory
To find a person, follow these steps:
1
Select Internal Directory in the Navigation pane.
2
Type a First Name or Last Name in the appropriate field. You can enter
the first few letters followed by a “*” to search for multiple names starting
with the same letters.
3
Select the Search button.
Your search results are displayed. If there are multiple results, you can
sort the results.
To restore the entire directory list, select the Show All button.
Find an entry in the external directory
To find an entry in the external directory, follow these steps:
1
140
Select External Directory in the Navigation pane.
Personalizing phone usage via the web
Final
2
Type a Name or Phone Number in the appropriate field. You can enter the
first few letters/numbers followed by a “*” to search for multiple entries.
3
Select the Search button.
Your search results are displayed. If there are multiple results, you can
sort the results.
To restore the entire directory list, select the Show All button.
Click to Call
To call a person or entry in the internal or external directory, follow these
steps:
1
Select Internal Directory or External Directory in the Navigation pane.
2
Select a Phone Number or Extension to select a specific person or
entry.
A Calling pop-up window is displayed with the Originating Extension set
to your extension.
3
Confirm that the Destination Number displayed matches the phone
number you want to use. If the number is not the same, enter an alternate
number.
4
Select the Call button.
The call is initiated on the selected phone in speaker mode.
When the party you are calling answers the call, you can continue the call
in speaker mode or you can lift the handset.
If your call is not answered, terminate the call on your phone by lifting and
replacing the handset or by selecting the Speaker key.
Print a directory
To print a directory, follow these steps:
1
Select Internal Directory or External Directory in the Navigation pane.
Sorting the directory first will control the order of users in the printed
directory.
Final
Personalizing phone usage via the web 141
Dynamic site
2
Select the Print List button to display a printable version of the directory.
3
Select Print button in the browser window.
4
Return to the directory by selecting the Close Window button.
The Dynamic Site Support feature allows telephone users to create their own
dynamic site from any location with an IP connection to the service provider.
The service provider can provision this capability for any telephone user. Your
company administrator cannot provision this capability.
If this capability is enabled, you will be presented with an extra web page "My Dynamic Site" on the web interface. By logging in to the web interface
and selecting this new page, you will then be presented with the option to
create a dynamic site or to release one. This capability requires that you have
a specially configured phone provided by your service provider.
When you select the button to create a dynamic site, the system automatically
detects the router to which your computer is connected and then provisions a
site using that router address. You then re-boot your phone (disconnect and
reconnect the power). It will obtain an IP address locally and then register with
the phone service using the newly created dynamic site. The site persists as
long as you are connected. If your phone is disconnected, the site will persist
for a certain amount of time (typically 1 hour after the phone is disconnected
and a minimum of 2 hours after the site was created).
When you select the button to release a dynamic site, the system deletes that
site and logs out any user logged in at that site.
For information purposes, the "My Dynamic Site" page displays the IP
address of your computer. It also displays the IP address of your dynamic site
(the router address) if you have created one.
The following screen shows the controls and information displayed on the My
Dynamic Site page:
142
Personalizing phone usage via the web
Final
.
Figure 12: Dynamic site page
Create a dynamic site
To create a dynamic site, follow these steps:
1
Select My Dynamic Site in the left menu.
2
Select the Create Dynamic Site button.
This will create a dynamic site based on the current location of your
computer. If you already have a site associated with a different location, it
will be released before any new site is created.
Release a dynamic site
To release a dynamic site, follow these steps:
1
Select My Dynamic Site in the left menu.
2
Select the Release Dynamic Site button.
This will delete your current dynamic site regardless of where you are
currently connected. It will also log you out from your phone.
Final
Personalizing phone usage via the web 143
View dynamic site information
To view your current dynamic site information, select My Dynamic Site in the
left menu.
At the bottom of the page, you will see a line that specifies the address from
which you are currently connected. This indicates the IP address of the
computer from which you are currently logged in.This could be at your
dynamic site or at a regular static site of your company.
At the bottom of the page, you will also see a line that specifies the dynamic
site IP address. This will display the address of your dynamic site (the
address of the router to which your computer is connected) or blank if you do
not currently have a dynamic site.
Connect your phone on a dynamic site
Follow the normal steps to connect your phone on the network defined as
your dynamic site.
If you connect your phone to a network that is not the one defined for your
dynamic site, your phone will display “Not a Valid Site”.
Once your phone is connected, follow the normal steps to log in.
Voice Mail
The voice mail system provides voice messaging capabilities and various
features that you can control through the web interface.
If this capability is enabled and you have a voice mailbox, you will be
presented with an extra web page - "My Voice Mail" on the web interface. By
logging in to the web interface and selecting this new page, you will then be
presented with the various features that you can control.
You can access your voicemail system from your phone as well. See “Voice
mail on 5212/5312 IP phone” on page 80, “Voice mail on the 5224/5324
phone” on page 57, “Voice mail on the 5320/5330/5340/5260 phone” on
page 30, and “Voice mail on the 5304 phone” on page 104.
Enable Message Waiting Indicator
To enable the Message Waiting Indicator lamp on your phone, follow these
steps:
144
1
Select My Voice Mail in the left menu.
2
In the Receiving Voice Mail section, check the checkbox for Use phone
Message Waiting Indicator.
3
Select the Save button to save the information.
Personalizing phone usage via the web
Final
If this is enabled, your phone's Message Waiting lamp will be on whenever
you have a phone message waiting for you.
To disable the Message Waiting Indicator lamp on your phone, follow these
steps:
1
Select My Voice Mail in the left menu.
2
In the Receiving Voice Mail section, uncheck the checkbox for Use
phone Message Waiting Indicator.
3
Select the Save button to save the information.
Configure email notification of voice messages
To configure the system to send you an email whenever a voice message is
deposited in your voice mailbox, follow these steps:
1
Select My Voice Mail in the left menu.
2
In the Receiving Voice Mail section, check the box for Send a
notification to this email address.
3
Fill in the email address to which you want the notifications sent.
4
Select the Save button to save the information.
Note that this only sends a notification to your email address. It does not send
the voice message. To configure the sending of the voice message, see
“Configure email forwarding of voice messages” on page 145.
To configure the system so that it does not send you an email whenever a
voice message is deposited in your voice mailbox, follow these steps:
1
Select My Voice Mail in the left menu.
2
In the Receiving Voice Mail section, uncheck the box for Send a
notification to this email address.
3
Select the Save button to save the information.
Configure email forwarding of voice messages
To configure the system to send you an email containing the voice message
when it is deposited in your voice mailbox, follow these steps:
Final
1
Select My Voice Mail in the left menu.
2
In the Receiving Voice Mail section, check the box for Send a copy of
the Voice Mail as an email attachment to this email address.
3
Select delete or keep to indicate if you want a copy of the voice mail kept
on the voice mail system. If you select keep, then you will also be able to
retrieve the message using your phone's message retrieval key. See
Personalizing phone usage via the web 145
“Voice mail on 5212/5312 IP phone” on page 80, “Voice mail on the 5224/
5324 phone” on page 57, “Voice mail on the 5320/5330/5340/5260
phone” on page 30 and “Voice mail on the 5304 phone” on page 104.
4
Fill in the email address to which you want the voice message sent.
5
Select the Save button to save the information.
If you configure your voice mails to be emailed and deleted from the voice
mail system, then you must also disable the Message Waiting Indicator.
See “Enable Message Waiting Indicator” on page 144.
To configure the system so that it does not send you an email containing the
voice message when it is deposited in your voice mailbox, follow these steps:
1
Select My Voice Mail in the left menu.
2
In the Receiving Voice Mail section, uncheck the box for Send a copy of
the Voice Mail as an email attachment to this email address.
3
Select the Save button to save the information.
Configure dial-0 destination
To configure the system so that callers to your voice mailbox can press "0" to
be redirected to a specific number, follow these steps:
1
Select My Voice Mail in the left menu.
2
In the Dial-0 destination section, check the box for Enable dial-0
option.
3
Select one of the following:
•
The default configured by my administrator
•
My Co-worker, and select a Co-worker from the drop-down list
•
Call Group, and select a Call Group from the drop-down list.
• Auto Attendant, and select an Auto Attendant from the drop-down
list
4
Select the Save button to save the information.
To configure the system so that callers to your voice mailbox cannot press "0"
to be redirected, follow these steps:
146
1
Select My Voice Mail in the left menu.
2
In the Dial-0 destination section, uncheck the box for Enable dial-0
option.
3
Select the Save button to save the information.
Personalizing phone usage via the web
Final
Configure language for voice mail retrieval
To configure the language that is used when you retrieve your messages,
follow these steps:
1
Select My Voice Mail in the left menu.
2
In the Language section, select the appropriate language from the pulldown list.
3
Select the Save button to save the information.
Note that this does not affect the language that is used for callers to your
voice mailbox. Callers to your voice mailbox will hear system prompts in the
language or languages specified for your company. Contact your Service
Provider if you wish to change this.
For other language settings, see “Setting your language” on page 1.
Configure timezone for voice mail
When retrieving and playing back your voice messages, the system may
indicate the date and time when the messages were deposited. To configure
the timezone that the system uses for playback of your voice messages,
follow these steps:
1
Select My Voice Mail in the left menu.
2
In the Time Zone section, select the appropriate timezone from the pulldown list.
3
Select the Save button to save the information.
Reset voice mail PIN
To reset your voice mail PIN, follow these steps:
1
Select My Voice Mail in the left menu.
2
In the Voice Mail PIN section, enter your new PIN in each of the two
boxes.
3
Select the Save button to save the information.
Your voice mail PIN must be between four and ten digits.
Note that this is not the same as the PIN which is used for logging into
your phone and the web interface. See “Change PIN” on page 118.
Final
Personalizing phone usage via the web 147
Note that if your browser is configured to auto-fill the fields for resetting
the PIN, it may fill in the other PIN which is used for logging into the web
interface. To avoid this, clear the field and fill in the correct Voice mail PIN
value.
Web pages
This section describes the web administration pages.
My settings
The My Settings page acts as your home page, and is the first page you see
when you log in. You will find a number of quick links listed here for common
user actions:
•
View and edit my personal details - See “Change user details” on
page 121.
•
Change my PIN - See “Change PIN” on page 118.
•
View and edit programmable keys on my phone - See “Configure phone”
on page 123.
•
View and edit call coverage options - See “Call Coverage” on page 135.
•
View the internal directory - See “View the internal directory” on
page 140.
•
View the external directory - See “View the external directory” on
page 140.
•
View my call groups - See “Call groups” on page 137.
My personal details
Using the My Personal Details page, you can perform the following tasks:
•
View and edit your personal data including your name, email, home
phone number, and mobile phone number. See“Change user details” on
page 121.
•
Record your name announcement. See “Record your name for the Auto
Attendant” on page 121.
•
View your call permissions See “Permissions” on page 122.
•
Change your PIN. See “Change PIN” on page 118.
My phone
Using the My Phone page, you can perform the following tasks:
148
Personalizing phone usage via the web
Final
•
View and change the settings of your phone keys. See “Program memory
keys” on page 124.
•
Select a default profile. See “Select key mapping profile” on page 134.
•
Print phone key labels. See “Print phone labels” on page 135.
For users of non-Mitel phones, refer to the phone documentation for details
regarding its configuration.
My call coverage
Using the My Call Coverage page, you can perform the following tasks:
•
View and change your call coverage settings. See “Call Coverage” on
page 135.
•
If allowed for your phone, you can also view and edit your twinning
options. See “Twinning” on page 136.
My call groups
Using the My Call Groups page, you can perform the following tasks:
•
View all Call Groups to which you belong. See “Call groups” on
page 137.
•
View the members of Call Groups to which you belong. See “Call groups”
on page 137.
•
Join and leave Call Groups. See “Join/leave call groups” on page 137.
My dynamic site
If you have the dynamic site capability enabled for you, you can use the My
Dynamic Site page to perform the following tasks:
•
Create a dynamic site. See “Create a dynamic site” on page 143.
•
Release a dynamic site. See “Release a dynamic site” on page 143.
•
View current dynamic site information. See “View dynamic site
information” on page 144. See “Dynamic site” on page 142 for more
information about dynamic sites.
My voice mail
If the voice mail capability is enabled and you have a voice mailbox, you will
be presented with an extra web page - "My Voice Mail" on the web interface.
By logging in to the web interface and selecting this new page, you will then
be presented with the various features that you can control.
You can configure the following:
Final
•
Your Message Waiting Indicator (MWI) - See “Enable Message Waiting
Indicator” on page 144.
•
Email notification of voice message - See “Configure email notification of
voice messages” on page 145.
Personalizing phone usage via the web 149
•
Email forwarding of voice messages - See “Configure email forwarding of
voice messages” on page 145.
•
Your dial-0 destination - See “Configure dial-0 destination” on page 146.
•
The language used for voice mail retrieval - See “Configure language for
voice mail retrieval” on page 147.
•
The timezone used for playback of voice message information - See
“Configure timezone for voice mail” on page 147.
•
Reset your voicemail PIN - See “Reset voice mail PIN” on page 147.
Company directories
Internal directory
Using the Internal Directory page, you can search for and view all internal
users and locations.
External directory
Using the External Directory page, you can search and view all entries in the
External Directory/Speed Dials list.
Getting more help
Select Getting more help at the top of the Help window to access additional
help.
Phone Messages
The LCD on the phones will display various messages that can indicate
problems that are occurring. The purpose of this section is to provide the most
common messages and the possible causes.
Phone Message
Extension ***
---
Cause
Resolution
Phone has lost its link to the
call server.
Check your phone connection.
Contact your system administrator.
Where the first - is flashing
150
Getting more help
Final
Phone Message
Cause
Resolution
Call not allowed
The user does not have the
correct call permissions to
make the call..
“Permissions” on page 122.
Check your call permissions. See
Contact your system administrator.
User will also hear fast busy
tone.
The device called is busy on
a different call
Try the call again at a later time.
Invalid Extension
The extension dialed is not
valid.
Check the number and dial the
correct extension.
Subscriber
Unavailable
The person being called is
logged out and has not set
up call coverage
Try the call at a later time.
The device at the extension
dialed does not currently
have a connection.
Try the call again at a later time. If
the problem persists contact your
system administrator.
The device being called has
been disabled.
Contact your system administrator.
The maximum number of
times that the call can be
forwarded has been reached.
Advise caller that you are unable to
forward the call.
There is no Line Appearance
Available.
Disconnect a call on one of your
Line Appearance keys currently in
use, then try again.
or
Program an additional Line
Appearance key (see “Program
memory keys” on page 124).
Busy
User will hear a busy tone.
User will hear a busy tone.
Device Offline
User will hear a busy tone.
Device Disabled
User will hear fast busy
tone.
Call Forward Max
Reached
User will hear busy tone.
No Lines Available
User will hear busy tone.
Final
Phone Messages 151
Phone Message
Cause
Resolution
Call not allowed
The user does not have the
correct call permissions to
make the call..
“Permissions” on page 122.
Check your call permissions. See
Contact your system administrator.
User will also hear fast busy
tone.
The device called is busy on
a different call
Try the call again at a later time.
Invalid Extension
The extension dialed is not
valid.
Check the number and dial the
correct extension.
Subscriber
Unavailable
The person being called is
logged out and has not set
up call coverage
Try the call at a later time.
The device at the extension
dialed does not currently
have a connection.
Try the call again at a later time. If
the problem persists contact your
system administrator.
The device being called has
been disabled.
Contact your system administrator.
The maximum number of
times that the call can be
forwarded has been reached.
Advise caller that you are unable to
forward the call.
There is no Line Appearance
Available.
Disconnect a call on one of your
Line Appearance keys currently in
use, then try again.
or
Program an additional Line
Appearance key (see “Program
memory keys” on page 124).
Busy
User will hear a busy tone.
User will hear a busy tone.
Device Offline
User will hear a busy tone.
Device Disabled
User will hear fast busy
tone.
Call Forward Max
Reached
User will hear busy tone.
No Lines Available
User will hear busy tone.
152
Phone Messages
Final
Phone Message
Cause
Resolution
Invalid Feature Code
The user has entered an
incorrect feature access
code.
Check the access code and try the
call again.
This will normally be seen
when trying to page.
Try the page again at a later time
and/or contact your system
administrator.
User will hear a fast busy
tone.
All Phones Busy
User will hear a busy tone.
Own Number
Final
User dialed the same
extension number as that of
the device they are dialing
from.
Phone Messages 153
154
Phone Messages
Final
Glossary
A
Auto Attendant
An automated system that directs incoming calls to the appropriate
extensions.
ATM
Asynchronous Transfer Mode. This is a protocol used for high speed
data connections
CallP Server
Call Processing Server. This is a piece of software that provides much
of the intelligence for the silhouette system
Class of Service
an identifier that indicates a type of telephone call. Examples of Class
of Service include "Emergency (911)", "Internal", and "Long Distance".
Conference Server
a device on the network used to provide conferencing services such as
three way calling. This is also called the Bridge Server.
Customer
from the service provider's perspective, this is often used to mean
tenant
DHCP
Dynamic Host Control Protocol. This allows devices on an IP network to
be dynamically allocated their IP Addresses and other information
DHCP Server
the machine on an IP network which allocates IP addresses and other
information to devices on the network.
Dial Plan
a set of entries, which describe what action, the system should take
based on the initial digits dialed (such as external call for "9")
DSL
Digital Subscriber Loop. This is a digital connection to a subscriber
(usually high speed).
DSLAM
Digital Subscriber Loop Access Multiplexor. This is the device that
multiplexes a set of DSL lines together.
FTP
File Transfer Protocol. This is a protocol to allow transfer of files (such
as the software loads for IP phones) over a network.
C
D
F
G
Gateway
Final
the device connecting the IP LAN to the public telephone network. The
gateway contains slots that contain ports that connect to the public
telephone network over PRI groups.
155
H
HTML
Hyper Text Markup Language. This is a system of tagging documents
with context information allowing them to be displayed by web
browsers.
HTTP
Hyper Text Transfer Protocol. This is the protocol used to send
information (usually HTML pages) over networks.
ICMP
Internet Control Messaging Protocol. This is a protocol that allows the
Ping command.
IP
Internet Protocol. This is a simple data networking protocol used in the
World Wide Web and many private data networks.
IP Address
A set of 4 numbers that uniquely identify a device on an IP network. In
order for a device to communicate on an IP network, it must have an IP
address. The address is of the form xxx.xxx.xxx.xxx where xxx is a
number in the range 0-255
IP Address Mask
A set of 4 numbers associated with an IP Address used to determine
the size of the subnetwork in which the device can communicate. The
mask is in the form xxx.xxx.xxx.xxx where xxx is a number in the range
0255. When the mask is expressed in binary, the number of 0's at the
end of the mask indicate how large the subnetwork is the more 0's, the
larger the subnetwork
LAN
Local Area Network. This refers to the part of the IP network that
connects the tenant's phones and PCs locally.
I
L
M
media server
a device used to store and play auto attendant greetings,
announcements and prompts for users of the silhouette system.
MIB
Management Information Base. This is a logical database made up of
configuration, status and statistical information. It is transmitted using
the SNMP protocol.
N
NMS
Network Management System (or Station). This is a system used to
remotely monitor all components of a network. The most common
protocol used by an NMS to communicate with its network components
is SNMP.
NOC
Network Operations Center. This is typically a location where the
service provider's NMS is running.
NPA
Numbering Plan Area. This is a 3 digit code also known as the Area
Code
P
156
Glossary
Final
PRI
Primary Rate ISDN. This is a service that provides 23 digital voice
channels plus 1 signaling channel on a standard T1 interface in a
telephone network.
PRI Group
a grouping of PRI channels used for routing information.
Product DHCP Server
The DHCP Server provided as part of the silhouette product
PSAP
Public Safety Answering Point A facility equipped and staffed to receive
911 calls
PSTN
Public Switched Telephone Network.
PVC
Private Virtual Circuit. This is a reserved part of an ATM connection.
RFC
Request For Comments. This is actually used to describe specifications
for protocols and computer industry related issues that are now
considered standard. For example, the standard definition of SNMP is
referred to as RFC1157
Route
A logical entity used to describe the type of calls based on dial plan
(such as Internal, Long Distance, etc)
Route Entry
an entity that describes to which PRI group a call should be routed
RTCP
Real Time Control Protocol.
RTP
Real Time Protocol. This is a protocol used for sending messages to
and from the IP Telephones.
silhouette
the product provided by Broadview Networks Inc. to provide telephone
service in a small business IP data network
Slot (on a gateway)
a single interface on a gateway. The slot contains ports that connect to
PRI groups.
SMDI
Simplified Message Desk Interface. This is a protocol used to
communicate with a voice mail system.
SMDI Port
a number indicating a characteristic of IP messages for the voice mail
system.
SME
Small and Medium Business Enterprises
SMTP
Simple Mail Transfer Protocol. This is a protocol for sending e mail
messages.
SNMP
Simple Network Management Protocol
T1
A standard North American physical wiring interface which provides
twenty four 64 kilobit/second channels for telephone calls.
R
S
T
Final
Glossary
157
TCP
Transmission Control Protocol. This is a layer added onto the IP
protocol (shown as TCP/IP) to provide reliable communication.
telco
Telephone Company. This is a company that purchases the silhouette
solution and sells voice over IP telephone service to tenants
tenant
a customer of the service provider
tenant administrator
a user id that has the access rights required to perform administrative
functions for a given tenant.
TFTP
Trivial File Transfer Protocol. This is the protocol used by the silhouette
TFTP Server that sends the software load files to IP phones.
U
UBR
Unspecified Bit Rate. This is a characteristic of a PVC in an ATM
connection. In the silhouette system, it would be used for PC data
traffic.
UDP
User Datagram Protocol. This is a layer added onto the IP protocol
(shown as UDP/IP) to provide a simple way to deliver information.
URL
Universal Resource Locator This is typically a web page such as http://
www.broadviewnet.com
User
an individual with access to the web interface of the silhouette product.
A user has an associated user id and password/PIN number. From the
perspective of a tenant, a user also has an associated telephone
extension
VBR rt
Variable Bit Rate Real Time. This is a characteristic of a PVC in an ATM
connection. In the silhouette system, it would be used for telephony
traffic
VCI
Virtual Circuit Identifier. This is part of the definition of a PVC in an ATM
connection. A PVC is uniquely identified by its VCI and VPI (usually
written in the form ccc.ppp where ccc is the VCI and ppp is the VPI).
VPI
Virtual Path Identifier. This is part of the definition of a PVC in an ATM
connection. A PVC is uniquely identified by its VCI and VPI (usually
written in the form ccc.ppp where ccc is the VCI and ppp is the VPI).
Voice Mail system
a device used for storage and retrieval of subscriber's voice mail.
V
W
WAN
Wide Area Network. This refers to the part of the network that connects
the service provider to its tenants
Zone
A logical entity that associates sites with dial plans and CallP servers.
Zones contain route entries that determine the physical routing of
outgoing calls from the system.
Z
158
Glossary
Final
159
Glossary
Final
160
Glossary
Final
Index
Numerics
3-way call
5212/5312 IP phone 63
5224/5324 IP phones 37
5304 IP phone 86
5330/5340 IP phone 12
5212/5312 IP phone 58
3-way call 63
account codes 65
account codes speed entry 65
activating 59
answering calls 60
call groups join/leave 73
company speed dial 69
directory 69
forward to auto attendant 70
forward to coverage 70
forward to coworker 70
forward to number 71
forward to prompt 71
handset volume 81
handset, using 60
hold 72
intercom to co-worker 72
intercom to prompt 73
joining two calls 64
line appearance 73
making a call 62
monitor groups 74
mute 76
one touch speed dial 76
page 76
redial 67
ring volume 80
second call, answering 61
setting up 59
speaker 78
speaker volume 81
speakerphone 61
transferring a call 78
transferring a call to voice mail 79
twinning 79
voice mail 80
5224/5324 IP phone 31
3-way call 37
Final
account codes 38
activating 33
answering 34
answering second call 35
company speed dial 43
Directory 43
handset 34
handset volume 58
hold 47
Intercom to co-worker 47
join/leave group 48
joining two calls 38
line appearance 48
login 49
logout 50
making a call 36
making a second call 36
monitoring groups 51
mute 53
one-touch speed dial 53
page 53
park/retrieve 54
redial 42
ring volume 57
setting up 31
speaker 55
speaker volume 58
transfer call to voice mail 56
twinning 56
voice mail 57
5304 IP phone
3-way call 86
account codes 88
account codes speed entry 89
activating 83
answering calls 83
call groups join/leave 97
company speed dial 92
directory 93
features 86
forward to auto attendant 93
forward to coverage 94
forward to co-worker 94
forward to number 94
forward to prompt 95
161
forwarding calls 93
handset 84
handset volume 105
handset, using 84
hold 96
intercom to co-worker 96
intercom to prompt 97
joining two calls 88
line appearance 97
making a call 85
monitor groups 98
mute 100
one touch speed dial 100
page 100
redial 90
ring volume 105
second call answering 85
second call, making 86
setting up 83
speaker 102
speaker volume 105
transferring a call 103
transferring a call to voice mail 103
twinning 104
using 81
voice mail 104
5324 phone
conference unit 112
5330 IP phone 5
5330/5340 IP phone 4
3-way call 12
account codes 13
account codes speed entry 14
activating 8
answering calls 9
call groups join/leave 22
company speed dial 17
directory 18
forward to auto attendant 18
forward to coverage 19
forward to coworker 19
forward to number 19
forward to prompt 20
handset volume 31
handset, using 10
hold 21
intercom to co-worker 21
intercom to prompt 21
joining two calls 13
line appearance 22
162
Index
making a call 11
monitor groups 24
mute 26
one touch speed dial 26
page 27
redial 16
ring volume 30
second call, answering 10
setting up 8
speaker 28
speaker volume 31
speakerphone 10
transferring a call 28
transferring a call to voice mail 29
twinning 29
voice mail 30
5330/5340 phone
conference unit 108
5340 IP Phone 6, 7
5412 PKM 107
5448 PKM 107, 125
A
Account codes
5212/5312 IP phone 65
5224/5324 IP phone 38
5304 IP phone 88
5330/5340 IP phone 13
description 127
speed entry on 5212/5312 IP phone 65
speed entry on 5224/5324 IP phones 39
speed entry on 5304 IP phone 89
speed entry on 5330/5340 IP phone 14
Activating IP phones
5212/5312 IP phone 59
5224/5324 IP phone 33
5304 IP phone 83
5330/5340 IP phone 8
Agent Presence Control Key 138
Answering a second call
5212/5312 IP phone 61
5224/5324 IP phone 35
5304 IP phone 85
5330/5340 IP phone 10
Answering calls
5212/5312 IP phone 60
5224/5324 IP phone 34
5304 IP phone 83
5330/5340 IP phone 9
ATM 155, 157, 158
Auto Attendant
Final
recording name 121
auto attendant 155, 156
C
Call coverage 135, 136
5212/5312 IP phone 70
5224/5324 IP phone 45
5304 IP phone 94
5330/5340 IP phone 19
options 135
Call groups 137
join/leave on 5212/5312 IP phone 73
join/leave on 5224/5324 IP phone 48
join/leave on 5304 IP phone 97
join/leave on 5330/5340 IP phone 22
Call lists
viewing on 5224/5324 IP phones 40
Calls 123
Click to Call 141
Company directories
description 139
external 150
external, speed dial 127
finding person in external 140
finding person in internal 140
internal 150
printing 141
Company speed dial
5212/5312 IP phone 69
5224/5324 IP phones 43
5304 IP phone 92
5330/5340 IP phone 17
description 127
Conference Unit for 5324 phones 112
Conference Unit for 5330/5340 phones 108
Configure phone 123
Control Switch 106
D
DHCP 155, 157
dial plan 157
Directories 139
Directory 140, 141
5212/5312 IP phone 69
5224/5324 IP phone 43
5304 IP phone 93
5330/5340 IP phone 18
company 150
Dynamic site support 142
creating 143
releasing 143
viewing 144
Final
E
Emergency (911) 155
External directory, viewing 140
F
form 156, 158
Forward to auto attendant 128
5212/5312 IP phone 70
5224/5324 IP phone 45
5304 IP phone 93
5330/5340 IP phone 18
Forward to coverage 19, 70, 94, 128
5212/5312 IP phone 70
5224/5324 IP phone 45
5304 IP phone 94
5330/5340 IP phone 19
Forward to co-worker 128
5212/5312 IP phone 70
5224/5324 IP phone 45
5304 IP phone 94
5330/5340 IP phone 19
Forward to number 128
5212/5312 IP phone 71
5224/5324 IP phone 46
5304 IP phone 94
5330/5340 IP phone 19
Forward to prompt 129
5212/5312 IP phone 71
5224/5324 IP phone 46
5304 IP phone 95
5330/5340 IP phone 20
Forwarding options
5224/5324 IP phone 44
G
Gateway 155
gateway 155, 157
H
Handset
using on 5212/5312 IP phone 60
using on 5224/5324 IP phone 34
using on 5304 IP phone 84
using on 5330/5340 IP phone 10
Handset volume
5212/5312 IP phone 81
5224/5324 IP phone 58
5304 IP phone 105
5330/5340 IP phone 31
Handsfree answerback
5224/5324 IP phone 47
description 129
Headset 106
Index
163
configuring 106
connecting 106
using 106
Hold
5212/5312 IP phone 72
5224/5324 IP phone 47
5304 IP phone 96
5330/5340 IP phone 21
I
Incoming calls list 129
Intercom to co-worker
5212/5312 IP phone 72
5224/5324 IP phone 47
5304 IP phone 96
5330/5340 IP phone 21
description 129
Intercom to prompt
5212/5312 IP phone 73
5224/5324 IP phone 48
5304 IP phone 97
5330/5340 IP phone 21
description 129
Internal directory, viewing 140
IP address 156
J
Join call group
using web interface 137
Join group
5212/5312 IP phone 73
5224/5324 IP phone 48
5304 IP phone 97
5330/5340 IP phone 22
Join/Leave Group 129
Joining two calls
5212/5312 IP phone 64
5224/5324 IP phone 38
5304 IP phone 88
5330/5340 IP phone 13
K
Key programmable features 126
L
Leave group
5212/5312 IP phone 73
5224/5324 IP phone 48
5304 IP phone 97
5330/5340 IP phone 22
using web interface 137
Line Appearance 130
Line appearance
5212/5312 IP phone 73
164
Index
5224/5324 IP phone 48
5304 IP phone 97
5330/5340 IP phone 22
Log Out of the web 119
Login 1, 116, 117, 119
5224/5324 IP phone 49
Logout 119
5224/5324 IP phone 50
Long Distance 155, 157
M
Making a call
5212/5312 IP phone 62
5224/5324 IP phone 36
5304 IP phone 85
5330/5340 IP phone 11
Making a second call
5224/5324 IP phone 36
Memory keys
programming features 123
Message 150
Messages
5224/5324 IP phone 57
Mitel 5310 IP Conference Unit 107
Mitel IP phones
5212/5312
See 5212/5312 IP phone.
5224/5324
See 5224/5324 IP phone.
5330/5340
See 5330/5340 IP phone.
Monitor Call Silent
definition 132
Monitor Groups
5212/5312 IP phone 74
5224/5324 IP phone 51
5304 IP phone 98
5330/5340 IP phone 24
Monitor Phone
definition 132
Mute
5212/5312 IP phone 76
5224/5324 IP phone 53
5304 IP phone 100
5330/5340 IP phone 26
My call coverage web page 149
My call groups web page 149
My Dynamic Site
feature 142
web page 142
My personal details, web page 148
Final
My settings, web page 148
O
One touch speed dial
5212/5312 IP phone 76
5224/5324 IP phone 53
5304 IP phone 100
5330/5340 IP phone 26
definition 132
P
Page 132
5212/5312 IP phone 76
5224/5324 IP phone 53
5304 IP phone 100
5330/5340 IP phone 27
Park/retrieve
5224/5324 IP phone 54
definition 133
Permission types 122
Permissions 122
Personalizing phone usage via the web 116
Phone messages 150
PIN
changing 118
forgotten 118
PKM
Mitel 5412 107
Mitel 5448 107
using 107
PRI 155, 157
Printing
directory 141
key labels 124
phone labels 135
Programmable Key Module. See PKM.
PSAP 157
PSTN 157
Public Safety Answering Point 157
PVC 157, 158
R
Recording
auto attendant name 121
Redial
5212/5312 IP phone 67
5224/5324 IP phone 42
5304 IP phone 90
5330/5340 IP phone 16
route 158
S
Second call answering
5212/5312 IP phone 61
Final
5224/5324 IP phone 35
5304 IP phone 85
5330/5340 IP phone 10
security alert, stopping 118
Select key mapping profile 134
servers 158
Setting up
5212/5312 IP phone 59
5224/5324 IP phone 31
5304 IP phone 83
5330/5340 IP phone 8
SMDI Port 157
SNMP 156, 157
Sort directory list 140
Speaker 58, 61
5212/5312 IP phone 78
5212/5312 speakerphone 61
5224/5324 IP phone 55
5304 IP phone 102
5330/5340 IP phone 28
5330/5340 speakerphone 10
Speaker volume
5212/5312 IP phone 81
5224/5324 IP phone 58
5304 IP phone 105
5330/5340 IP phone 31
Speakerphone to handset switch
5212/5312 IP phone 61
5224/5324 IP phone 35
T
Transferring a call
5212/5312 IP phone 78
5304 IP phone 103
5330/5340 IP phone 28
Transferring a call to voice mail
5212/5312 IP phone 79
5224/5324 IP phone 56
5304 IP phone 103
5330/5340 IP phone 29
Twinning
5212/5312 IP phone 79
5224/5324 IP phone 56
5304 IP phone 104
5330/5340 IP phone 29
U
User details, changing 121
V
Voice mail
5212/5312 IP phone 80
5304 IP phone 104
Index
165
5330/5340 IP phone 30
voice mail 157, 158
Volume
ring on 5212/5312 IP phone 80
ring on 5224/5324 IP phone 57
ring on 5304 IP phone 105
ring on 5330/5340 IP phone 30
166
Index
speaker on 5224/5324 IP phone 58
W
Web login 117, 118
forgotten PIN 118
PIN, changing 118
Web logout 119
Web pages 148
Final
Feedback on Documentation
We strive to continuously improve our documentation. If you find any errors or omissions in this document
or if you find something which you really like, please let us know about it. Please be specific (section
header, page number, etc) about the part of the document you wish to tell us about.
Please provide the following information:
How can we contact you?
Name _____________________________________________
Email Address ______________________________________
Phone number ______________________________________
For which document is this feedback?
Name of document ___________________________________
Release ____________________________________________
Details of feedback
Section Header _______________________________________
Page number _________________________________________
Comments _____________________________________________________________
______________________________________________________________
______________________________________________________________
______________________________________________________________
______________________________________________________________
______________________________________________________________
You can fax this filled-in form to +1 (613) 280-2030. Make sure that the fax is clearly marked as
Documentation Feedback.
Feedback on Documentation
167
NOTES
168 Notes