1
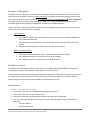
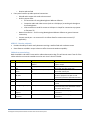
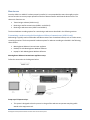
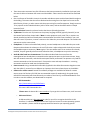
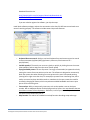
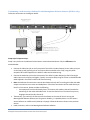
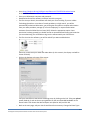
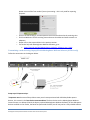
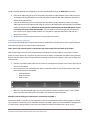
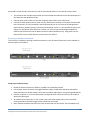
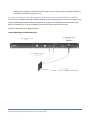
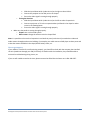
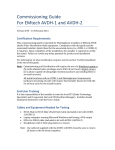
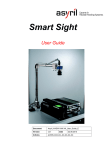
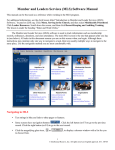
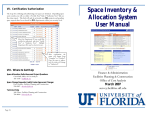
Meetinghouse Audio/Video Distribution Hub User Guide February 2013 Table of Contents Purpose of this guide .............................................................................................................................................. 2 Product overview .................................................................................................................................................... 2 Key features ............................................................................................................................................................ 2 AVDH-1 – Transmit & receive unit .................................................................................................................. 2 AVDH-2 – Receive-only unit ............................................................................................................................ 3 Cables & accessories bag ................................................................................................................................ 3 How to use .............................................................................................................................................................. 4 Transmitting a webcast using the Meetinghouse Webcast Communicator (AVDH-1 only) ........................... 4 Transmitting a webcast using a desktop PC with Meetinghouse Webcast Software (AVDH-1 only) ............. 9 Transmitting a webcast using a laptop PC with Meetinghouse Webcast Software (AVDH-1 only).............. 11 Additional camera scenarios ......................................................................................................................... 12 Receiving a satellite transmission ................................................................................................................. 13 Receiving a webcast using the Meetinghouse Webcast Receiver or laptop (AVDH-1 or AVDH-2) .............. 14 How to get support ....................................................................................................................................... 16 Meetinghouse Audio/Video Distribution Hub User Guide rev 0.9a February 2013 1 Purpose of this guide The purpose of this user guide is to educate stake technology specialists and other technical users on how to operate and use the AVDH-1 and AVDH-2 after installation. This guide assumes that the units have previously been properly installed, tested and certified, as arranged by the local Facility Manager (FM). Stakes should not undertake this permanent equipment installation on their own – always coordinate through the FM. The installation guide and wiring diagram (intended for installers) are available separately. There are still some factors that could vary between locations, depending on the local setup. Those scenarios will be covered in the documentation, including: Camera options: 1. Permanently-installed camera in chapel with control cable run and connected to AVDH-1 (this is the recommended setup) 2. Other camera (not mounted) that is connected to the camera input jack at the back of the chapel 3. Multiple cameras feeding into a video mixer, located near the AVDH-1 Webcast hardware options: 1. Meetinghouse Webcast Communicator – permanently wired into the AVDH-1 2. User-supplied desktop PC, connected into front panel of AVDH-1 3. User-supplied laptop PC, connected into front panel of AVDH-1 Product overview The AVDH-1 and AVDH-2 were created in response to user feedback regarding the difficulty of temporarily wiring webcast equipment into audio and video feeds in the satellite closet. These products provide permanently-wired solutions that automatically route audio and video signals properly according to the function selected. This eliminates the need to disconnect cables in the satellite closet for webcast events, and will provide greater reliability and decreased set-up time. Key features AVDH-1 – Transmit & receive unit • Permanent connections to meetinghouse video distribution system • Permanent connections to chapel audio system • Permanent connections to Meetinghouse Webcast Communicator (if applicable) • User can easily select between three primary functions, and audio/video routing is automatically switched: o Transmit webcast o Receive satellite feed Meetinghouse Audio/Video Distribution Hub User Guide rev 0.9a February 2013 2 • o Receive webcast feed Front-panel interface provides optional connections: o Video & audio output with audio volume control o Auxiliary inputs allow: PC connections for using Meetinghouse Webcast Software Composite audio and video sources (such as a DVD player) to send signal throughout the meetinghouse VGA connection to send PC content to VGA port in chapel for connection to projector or flat-panel TV o Network connection – for PC running Meetinghouse Webcast Software or general Internet connectivity o Camera control port – to connect a PC via USB to allow for remote camera control (if applicable) AVDH-2 – Receive-only unit • Provides the ability to switch easily between receiving a satellite feed and a webcast stream • Same features as AVDH-1 except it does not offer the transmit webcast capability Cables & accessories bag Both the AVDH-1 and AVDH-2 come with a cable and accessories bag. This will contain most if not all of the cables and other accessories needed to use the unit. Here’s what is included: Qty 1 Description RCA to RCA yellow 1 3.5mm stereo to dual RCA 3.5mm stereo to 3.5mm stereo VGA HD-15M to VGA HD-15M 1 1 Port(s) on AVDH to connect to Outputs / Video Out or Aux In / Video In Outputs / Audio Out, Aux In / Audio In Outputs / Audio Out, Aux In / Audio In Aux In / VGA In 1 1 Cat6 RJ-45 to RJ-45 USB A to USB B Network Camera Control 1 VGA right-angle coupler Aux In / VGA In 2 F Female to BNC Male adapters F81 barrel F to F connector n/a 1 n/a Meetinghouse Audio/Video Distribution Hub User Guide rev 0.9a February 2013 How it’s used Connect video devices to the AVDH for input or output Audio input or output between AVDH and a device with dual RCA audio jacks Audio input or output between AVDH and a device with 3.5mm jack Connect PC to AVDH to send webcast stream to projector in chapel via VGA connection (limited to 1024x768 resolution) Connect PC to AVDH to get Internet Connect PC to AVDH for remote camera control Use with the VGA cable (above) to make a connection that points downward to allow the cabinet door to close Use as needed for adapting F to BNC connectors Use as needed for adapting barrel F to F connectors 3 How to use Once the AVDH-1 or AVDH-2 has been properly installed, it is recommended that users thoroughly test the various functions to ensure proper operation and also to become familiar with how the device works. The three main functions are: • • • Transmitting a webcast (AVDH-1 only) Receiving a satellite transmission (AVDH-1 and AVDH-2) Receiving a webcast stream (AVDH-1 and AVDH-2) The three hardware encoding options for transmitting a webcast are described in the following sections. Transmitting a webcast using the Meetinghouse Webcast Communicator (AVDH-1 only) Webcasting is typically used to send audio and video streams from a broadcast location, such as a stake center, to outlying locations. The three potential hardware options for webcast encoding are detailed in the following three sections. • • • Meetinghouse Webcast Communicator appliance Desktop PC with Meetinghouse Webcast Software Laptop PC with Meetinghouse Webcast Software Meetinghouse Webcast Communicator appliance setup Follow the connections in the diagrams below. Setup steps & important tips: • This system is designed so that the person in charge of the webcast can operate everything while seated at the equipment rack. Meetinghouse Audio/Video Distribution Hub User Guide rev 0.9a February 2013 4 • • • • • • • • These instructions assume a Sony EVI-D70 camera has been permanently installed in the chapel, with the control cable run between the camera and the AVDH-1. Other camera scenarios will be described below. One nice feature of the AVDH-1 setup is that audio and video streams are distributed back throughout the building. This means that the camera feed and audio coming from the chapel can be sent to the Relief Society, Primary, or other rooms with the proper wiring for overflow purposes. Simply connect a TV or projector to the video distribution jacks in those rooms, and set the audio switch to Chapel instead of Local. Source Selection: Rotate the selector knob to the Camera (Encoding) position. TV/Monitor: Tune the rack TV/monitor to the primary language channel (typically channel 3) to see the camera feed and hear chapel audio. *Note: in most equipment racks, small TVs or monitors are already installed and will have already been connected when the AVDH-1 was installed. If your rack does not have a TV/monitor, connect a monitor to the Video Out port under Outputs. This enables the operator to see the camera view. Headphones: To listen to the audio feed privately, connect headphones to the Audio Out port under Outputs and turn down the volume on the rack TV/monitor. Adjust volume with the knob just next to the headphone port as necessary. *Note: again, in the case where small TVs or monitors are already installed, they will generally also have audio routed to them, so headphones may not be necessary. Audio & video feeds into Communicator: The audio and video feeds that come from the meetinghouse have already been connected into the appropriate ports on the Communicator, along with the network connection, and should remain permanently connected. The operator only needs to execute commands on the Communicator’s front panel to start and stop the webcast – no wiring connections need to be made into the Communicator. Camera control: Using a standard A-B USB cable (supplied in the cables & accessories bag that comes with the AVDH-1), connect from a USB port on a laptop to the Camera Control port on the AVDH-1. Software for camera control: Several free software packages are available that allow for remote camera control of the Sony EVI-D70 (the recommended camera for webcasting). One good choice, called D70 Commander (which was written by a member of the Church), can be downloaded for free. In order to use this software, two downloads are required: o D70 Commander: http://www.cwshop.com/LDSSoftware File name is D70 Commander vX.X *Please note: the above URL is case-sensitive. If you type this in all lower-case, it will not work. o USB control driver: A USB control driver is also required in order for your PC to recognize the AVDH-1 USB interface. It’s called the Keyspan driver from Tripp-Lite. Drivers for various operating systems are available – please choose the appropriate driver based on your operating system. Meetinghouse Audio/Video Distribution Hub User Guide rev 0.9a February 2013 5 Download from this site: http://www.tripplite.com/en/support/downloads/downloads-bymodel.cfm?txtKeyword=USA-19HS If you are asked to register the software, just skip that step. Install both software packages, and test the connection to the Sony EVI-D70 camera and make sure control is working properly. The software includes several important features: o o o o o Keyboard & mouse control: Ability to use both keyboard keys and mouse control to control camera movement (up/down/left/right/zoom in/zoom out, also known as PTZ – pan/tilt/zoom) Variable speeds: PTZ controls can move very slowly or quickly by clicking close to the center (slow speed) or further away from the center (faster speed) 6 programmable presets: The use of presets is strongly recommended, as opposed to slowly moving the camera from one position to the next. The software is designed to momentarily blank the camera shot when switching from one preset to the next. Slow-paced panning (moving left to right across the choir, for example) may seem like an interesting shot, but in reality can cause less-than-desirable results on a webcast. A slow pan creates the need for constantly-changing full frames, which may exhaust available bandwidth and cause a poor picture for the receiving sites. Text overlays: Ability to temporarily insert text, such as the speaker name or the hymn number. Not an adequate solution for displaying words to hymns. You must deselect the text check box to remove it from displaying – otherwise, it will stay on even after you delete the text itself or even disconnect your PC. Help function: The author has included a nice help function describing setup and usage. Meetinghouse Audio/Video Distribution Hub User Guide rev 0.9a February 2013 6 Operation: • • • • • • • Test the webcast well in advance of the actual event. If possible, conduct the test on the same day of week and same time of day to approximate Internet conditions. Disable all other Internet access in the meetinghouse. This is a crucial step. If you fail to do this, you are likely to have failures with your webcast. Many members carry smartphones or tablets, and when they come to the meeting, their devices automatically connect to the meetinghouse wireless Internet due to previous connections they’ve made at church. Members will use those devices to check email or browse websites, which will decrease the bandwidth available for the webcast and cause problems. Users commonly report that testing during the week worked fine, but they had issues during the broadcast – the difference is all the people who come to the meeting with mobile devices that connect to the network. A software solution that will allow users to turn off the wireless access on the Cisco 881W firewall should be delivered in 2013. Until then, temporarily bypass the firewall (only for the duration of the webcast) and make sure no other Internet connections are available, especially the wireless access points in the building (the Cisco 881W firewall also has a built-in wireless access point). The suggested method for the bypass (may vary by building) is to connect the feed from the Internet Service Provider (ISP) modem (which generally goes directly into the 881W and then into a network switch) directly into the port into which the webcast encoder is connected, making sure that all other Ethernet ports in the building are not connected to the Internet. Make sure the 881W firewall is not in the chain. It is not needed for webcast traffic – a direct connection to the ISP works just fine. After the event, immediately reconnect the firewall. Turn on monitor that is connected to the AVDH-1. Connect headphones to the AVDH-1 (optional). Connect laptop with camera control software installed to USB port, as described above. Test camera control software and ensure it is functioning properly. o Turn on the rack monitor/TV (this is where you will view the camera feed). o Connect your PC which has the camera control software and USB driver installed to the USB Camera Control port on the front of the AVDH-1, using the USB A-B cable supplied with the AVDH-1 in the cables and accessories bag. o Launch the D70 Commander software. Within the software, create and test desired presets. o Type in desired text overlays and test. *Remember: the text overlays will stay on the camera view until you deselected the “Show” checkbox next to the text. Power on the Meetinghouse Webcast Communicator (top right button) and start the encoding stream. o Select Create Webcast from the main menu. o Select or create the Unit ID. o Enter your six-digit event ID. o Select Video Source (always Composite-1). o Select the Webcast Quality that worked the best during testing. o Select Webcast (or if doing testing, select Test). o There is a ~60-second buffer from the time the webcast starts until the receiving sites get the feed. This helps to minimize transmission issues. The Test mode referred to has only a 10-15 Meetinghouse Audio/Video Distribution Hub User Guide rev 0.9a February 2013 7 • • • • • • second buffer, which allows for easier testing and adjustment of audio levels. Be sure to switch back to the regular Create Webcast mode for the actual event – the buffer is an important safeguard. o For further details on using the Communicator, visit this page: https://www.lds.org/callings/melchizedek-priesthood/records-and-technologysupport/using-webcast-communicator?lang=eng Have someone stand at the pulpit and read something. Communicate via cell phone with the receiving sites to ensure that both video and audio transmissions are acceptable. Provide instructions to your receiving locations on how to view the webcast: o Email the webcast URL to your receiving locations. Use the following format: http://webcast.lds.org/xxxxxx-yyyyyy where xxxxxx = unit ID number and yyyyyy = event ID number o The remote locations should do the following: Connect a Windows PC to the meetinghouse internet Connect the same PC to a projector Connect the headset jack of the PC to the EJ-8 or EJ-10 (“crab box”), and then to a microphone XLR jack in the chapel Open Windows Media Player. Hit ctrl-u to bring up the pop-up window that allows for URL entry. Enter the webcast URL specified above. Stream will take 60 seconds to begin playback if encoding in the regular webcast mode. Alternatively, the receiving site can click on the webcast URL supplied to them in the email, which will launch a browser and usually open Windows Media Player and start the stream. However, this only works on Windows PCs, and, depending on the browser configuration, may not launch Windows Media Player but instead attempt to download a file, which can be confusing. So the ctrl-u function described in the previous step is often the most reliable. Enable audio backup: o This is a very important setup step. As we all know, the Internet is not 100% reliable. If you lose connectivity at the broadcast site during the meeting, obviously the receiving sites will no longer be able to see or hear. Having an audio backup in place will at least allow the receiving sites to hear the meeting proceedings even if they cannot see the video stream, which is certainly far better than nothing at all. Steps are described on the LDS Tech Wiki site at https://tech.lds.org/wiki/Audio_backup_solutions_for_Church_broadcasts. Important tip: when the meeting ends, do not immediately stop the webcast stream on the transmit side. Let it go for at least 60 extra seconds. The stream for the receiving sites will immediately stop when the transmit side stops, which means the receiving sites will miss out on the last 60 seconds of the meeting due to the buffer. When the meeting is over, push X on the Meetinghouse Webcast Communicator to end the stream. Select Shutdown from the main menu. Meetinghouse Audio/Video Distribution Hub User Guide rev 0.9a February 2013 8 Transmitting a webcast using a desktop PC with Meetinghouse Webcast Software (AVDH-1 only) Follow the connections in the diagram below. Setup steps & important tips: Setup is very similar to the Webcast Communicator scenario described above. Only the differences are outlined below: • • • • • Connect the Video Out jack on the front panel of the AVDH-1 (under Outputs) to the video input jack on the Osprey card (typically part of an octopus cable connected to the card), using the yellow composite RCA cable supplied in the AVDH-1 cables and accessories bag. Connect the Audio Out jack on the front panel of the AVDH-1 (under Outputs) to the left and right audio inputs on the Osprey card (again, typically an octopus cable) using the 3.5mm-to-dual RCA audio cable supplied in the AVDH-1 cables and accessories bag. Note: the Webcast Communicator scenario described previously calls for making the video and audio outputs connections to a monitor and headphones. Since those connections will be made directly to the PC in this scenario, please consider the following: o Your equipment rack should already have a TV monitor with speakers that will provide live monitoring for the video and audio feeds. To view the feed turn on TV and tune to primary language channel (usually channel 3). Theoretically, you could run the camera control software on the same PC that is running the Meetinghouse Webcast Software, but for greater reliability, it is probably best to run the camera control software on a different PC (desktop or laptop). Follow the directions shown in the previous section. Install, authorize, and run the Meetinghouse Webcast Software: Meetinghouse Audio/Video Distribution Hub User Guide rev 0.9a February 2013 9 o Go to https://webcast.lds.org/V3/SignIn.aspx?ReturnUrl=%2fv3%2fclientdownload to download the software. Enter your LDS Account username and password. Download and install the software, and then launch the program. The first time you launch, the software will check your current calling. If you are a Stake Technology Specialist or a member of a stake presidency or high council, you will be automatically authorized. Otherwise, you will be given the option to request authorization from your stake president, manager (if a Church employee), or request authorization assistance from the Global Service Center (GSC). Select the appropriate option. Once permission has been granted (you should receive an automated email letting you know that you are authorized), you will be able to log into the software with your LDS Account. The first time into the software, you will be asked if you want to add a device: o Select Yes, and choose your audio and video device (in this scenario, the Osprey card will be chosen for both). Click on the Settings at the top of the screen: o Test your connection to the Church streaming server by clicking on the link. Take your upload speed, divide by 2, and use that as your guideline for the recommended bandwidth in the Presets table. Then choose the desired aspect ratio (16x9 or 4x3) and click OK. Back on the main page, edit your Unit ID and Event ID as necessary. Change the Event Type – o o o o Meetinghouse Audio/Video Distribution Hub User Guide rev 0.9a February 2013 10 please use one of the Test modes if you are just testing – this is only used for reporting purposes. o o o o Click on the URL to copy it, and then paste it into an email and send to the receiving sites. Click Start Webcast. Call the receiving sites and ensure that video and audio streams are adequate. Please refer to the steps and hints in the previous section. For further help with Meetinghouse Webcast Software, go to: https://tech.lds.org/wiki/Meetinghouse_Webcast_Software_User_Guide Transmitting a webcast using a laptop PC with Meetinghouse Webcast Software (AVDH-1 only) Follow the connections in the diagram below. Setup steps & important tips: *Important note: because of the problems many users have experienced with USB video/audio capture devices, this scenario is the last-choice recommendation. The best choices are the Meetinghouse Webcast Communicator or a desktop PC with the Osprey card and Meetinghouse Webcast Software. Of the USB capture devices available on the market, the Roxio has performed the best, but still may not be a fully-reliable solution. Meetinghouse Audio/Video Distribution Hub User Guide rev 0.9a February 2013 11 Setup is virtually identical to the desktop PC scenario described above. Only the differences are listed: • • • Connect the Video Out jack on the front panel of the AVDH-1 (under Outputs) to the video input jack on the pigtail of the USB capture card, using the yellow composite RCA cable supplied in the AVDH-1 cables and accessories bag. Connect the Audio Out jack on the front panel of the AVDH-1 (under Outputs) to the left and right audio inputs on the USB capture card using the 3.5mm-to-dual RCA audio cable supplied in the AVDH-1 cables and accessories bag. One of the most frequently-reported problems with USB capture devices is that they will capture video but not audio. You may need to try connecting to the microphone or line-in jack on your laptop instead; however, this may deliver improper audio levels and also may cause lip sync issues. Please refer to the other steps and hints in the previous two sections. Additional camera scenarios The scenarios described above assume a permanently-installed Sony EVI-D70 camera in the chapel. However, other camera scenarios can also be easily made to work. Other camera (not mounted) that is connected to the camera input jack at the back of the chapel Most chapels offer a camera input jack somewhere toward the rear of the chapel. In many cases, you may prefer to have a camera on a tripod set up at the back of the chapel, centered with the podium (this generally delivers the best camera shot, since permanently-mounted cameras tend to deliver a side view). To make this scenario work: • • • Connect a composite video cable from the camera’s composite output port to the camera input jack at the rear of the chapel. In the equipment rack, mounted either above or below the AVDH-1, you will find a panel with 3 BNC barrel connectors that are labeled: o Installed Camera o Auxiliary Camera o AVDH-1 Input Make sure that the included cable connects from Auxiliary Camera to AVDH-1 Input. In the installed camera scenario, the cable will be connected to the Installed Camera connector. Multiple cameras feeding into a video mixer, located near the AVDH-1 Some stakes prefer to use two or more cameras in order to accommodate multiple viewing angles, etc. While this is certainly not necessary for a successful webcast, the AVDH-1 setup can accommodate this arrangement if a video mixer is being utilized. Church HQ recommends the Roland VR-3 video mixer, which can be Meetinghouse Audio/Video Distribution Hub User Guide rev 0.9a February 2013 12 purchased from Poll Sound in Salt Lake City, Utah at a discounted LDS price. To make this scenario work: • • • This presumes that multiple camera cable runs have already been pulled from the desired locations in the chapel into the equipment closet. Connect those camera cable runs into the composite video inputs on the video mixer. Connect the video output from the mixer into the AVDH Input connector on the panel with the 3 BNC barrel connectors. This will provide the video feed necessary for any of the three encoding options (Communicator, desktop, laptop). If you have the Roland VR-3 mixer, it is also possible to connect the USB port on the Roland mixer directly to a USB port on a PC running the Meetinghouse Webcast Software (the software will see the Roland as both a video and audio source). Bring audio into the Roland mixer from the Audio Out port on the front of the AVDH-1. Receiving a satellite transmission This function is used when receiving a satellite transmission, such as General Conference, and is available on both the AVDH-1 and AVDH-2. Setup steps & important tips: • • • • • Rotate the selector knob on the AVDH-1 or AVDH-2 to the Satellite position. In the chapel, locate the switch that toggles between regular chapel audio operation and satellite mode, and switch to satellite mode. Ensure that the satellite audio feed is coming through adequately. Connect a projector or TV to the video output jack (typically BNC or RCA connector) in the chapel to display the video signal. As needed, connect projectors or TVs in other rooms with video output jacks (such as the Relief Society) and switch the audio toggle switch to feed from the chapel. Note: Satellite broadcasts cannot be sent over the VGA cable into the chapel. The VGA adapter only Meetinghouse Audio/Video Distribution Hub User Guide rev 0.9a February 2013 13 adapts VGA to composite, not the other way around. So you’ll need to use the composite video jack in the chapel to connect to a projector or TV. Receiving a webcast using the Meetinghouse Webcast Receiver or laptop (AVDH-1 or AVDH-2) This function is used when receiving a webcast stream from a transmitting site, such as stake conference, using either the Meetinghouse Webcast Receiver appliance or a laptop, and is available on both the AVDH-1 and AVDH-2. The Receiver is no longer available for purchase, but many locations still have one. Follow the connections in the diagrams below. Using the Meetinghouse Webcast Receiver Meetinghouse Audio/Video Distribution Hub User Guide rev 0.9a February 2013 14 Using a laptop computer Setup steps & important tips: • • • • • • Rotate the selector knob on the AVDH-1 or AVDH-2 to the AUX/Streaming position. If using a Receiver, connect its video output port to the Composite In port (under Aux In) on the front panel of the AVDH-1 or AVDH-2, using the yellow composite cable supplied in the cables and accessories bag. If using a laptop, connect from the laptop’s VGA port to the VGA In port (under Aux In) on the front panel of the AVDH-1 or AVDH-2, using the VGA cable supplied in the cables and accessories bag. Using the supplied 3.5mm-3.5mm audio cable, connect from the audio output port (Receiver) or headset port (laptop) to the Audio In port (under Aux In) on the front of the AVDH-1 or AVDH-2. Connect the Receiver or laptop’s network port to the network port on the front of the AVDH-1 or AVDH-2. *Very important: if using a laptop, turn off its wireless connection (typically with a hardware switch or software setting) to ensure that only the wired connection is being used. Do not use a wireless connection to receive a webcast stream. Wired connections are always recommended. Connect up the display device (projector or TV) in the room where the stream will be viewed (chapel, Relief Society room, etc.): o If using a laptop: the installation guide for the AVDH-1 or AVDH-2 recommends that the installers run a VGA cable from the back of the unit into the podium in the chapel. If this step was followed in your building, you can send a higher-quality video signal from your laptop which is connected to the AVDH into a projector in the chapel. However, the maximum resolution through this connection is 1024x768. You must set the output of your laptop to this resolution, or it will not display properly. Meetinghouse Audio/Video Distribution Hub User Guide rev 0.9a February 2013 15 • Slide the Input Select switch (under Aux In) to the right to select VGA In. Connect the projector to the VGA port in the chapel. Ensure the video signal is coming through properly. o If using the Receiver: Slide the Input Select switch (under Aux In) to the left to select Composite In. Connect a projector or TV to the composite video jack found in the chapel or other rooms in the meetinghouse. Ensure the video signal is coming through properly. Make sure that audio is coming through properly: o Chapel: turn on the sound system. o Other rooms: change the selector switch to chapel feed. Note: it is possible to also use the Composite In and Audio In ports (under Aux In) to send other video and audio content throughout the entire building. For example, you could connect a DVD player to these ports and make that content available in the chapel, Relief Society room, etc. How to get support If your AVDH-1 or AVDH-2 is not functioning properly, you should first check with the company that installed the unit (coordinate through your FM). Since they are familiar with the installation, they should be able to assist with troubleshooting wiring issues, etc. If you are still unable to resolve the issue, please contact the Global Service Center at +1-801-240-4357. Meetinghouse Audio/Video Distribution Hub User Guide rev 0.9a February 2013 16