1
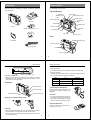
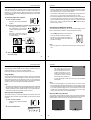
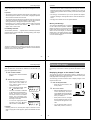
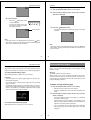
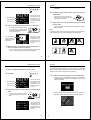
Introduction
Congratulations upon your selection of the QV-70 LCD Digital Camera. The QV-70 comes with its own built-in liquid crystal color monitor
that let’s you instantly view the pictures you take.
LCD Digital Camera
QV-70
To get the most out of the QV-70, be sure to carefully read this
manual and follow the instructions contained in it.
Owner’s Manual
DE
L
/PR
OT
EC
T
ON
ZO
OM
DIS
P
MO
DE
+
PO
WE
R
/OF
F
–
RE
C
PL
AY
LC
ON D
/OF
F
英
2
Contents
Precautions .......................................................... 5
Using Auto Play .................................................................. 42
Protecting Memory Pages .................................................. 44
Hiding Protected Memory Pages ........................................ 47
Unpacking ............................................................. 9
General Guide .................................................... 10
Top and Display ..................................................................
Lens ....................................................................................
Bottom ................................................................................
Terminals ............................................................................
Deleting Memory Pages .................................... 48
10
10
11
11
To delete a single memory page ........................................ 48
To delete all unprotected memory pages ........................... 51
Connecting to Other Devices ............................ 54
The camera terminals ......................................................... 54
Power Supply ..................................................... 13
Using the Camera with a Connected Device ...... 55
To load batteries ................................................................. 13
Using AC Power ................................................................. 18
Troubleshooting ................................................. 61
Recording Images .............................................. 20
To record an image .............................................................
How to avoid hand movement… .........................................
Fluorescent Lighting ...........................................................
Shooting images outdoors ..................................................
NORMAL/MACRO Switch ..................................................
Exposure Adjustment ..........................................................
Changing the Aperture Setting ...........................................
Record Mode Displays ........................................................
Using the Self-Timer ...........................................................
Specifications ..................................................... 68
20
22
23
23
24
25
26
27
31
About the camera’s backlight… ....................... 70
• CASIO COMPUTER CO., LTD. assumes no responsibility for any
damage or loss resulting from the use of this manual.
• CASIO COMPUTER CO., LTD. assumes no responsibility for any
loss or claims by third parties which may arise through the use of
the QV-70.
Playing Back Images ......................................... 32
Displaying Images on the Camera’s LCD ...........................
Displaying Images on a TV Screen ....................................
Displaying the Memory Page Number ................................
Producing a Multi-Page Display ..........................................
Using the Zoom Function ....................................................
32
34
35
36
40
• CASIO COMPUTER CO., LTD. assumes no responsibility for any
damage or loss caused by deletion of data as a result of malfunction, repairs, or battery replacement. Be sure to back up all important data on other media to protect against its loss.
3
4
Precautions
LCD Digital Camera
General Precautions
• Physical damage and malfunction of this unit can cause the image
data stored in its memory to be deleted. Be sure to always keep
backup copies of data by transferring them to personal computer
memory.
Be sure to observe the following important precautions whenever using the QV-70. All references in this manual to “this camera” and “the
camera” refer to the CASIO QV-70 Digital Camera.
• Never open the battery compartment cover, disconnect the AC
adaptor from the camera or unplug it from the wall socket while the
“WAIT” message is on the LCD. Doing so will not only make storage
of the current image impossible, it can also corrupt other image data
already stored in camera memory.
• Never try to take pictures or use the built-in display while operating
a motor vehicle or while walking. Doing so creates the danger of
serious accident.
• Never try to open the case of the camera or attempt your own repairs. High-voltage internal components create the risk of electrical
shock when exposed. Always leave maintenance and repair work
up to authorized CASIO service providers.
MEMORY ERROR message
Any of the following can cause data stored in the camera’s memory to
become corrupted.
• Keep the camera away from water and other liquids, and never let it
get wet. Moisture creates the danger of fire and electrical shock.
Never use the camera outdoors in the rain or snow, at the seashore
or beach, in the bathroom, etc.
• Removal of batteries or disconnection of the AC adaptor during a
record or data communication operation
• Disconnection of the connecting cable during data communication
• Should foreign matter or water ever get into the unit, immediately
turn power off, unplug the AC adaptor from the power outlet, and
contact your dealer or nearest CASIO service provider. Using the
unit under these conditions creates the danger of fire and electrical
shock.
• Continued use while battery power is low
• Other incorrect operation
In each of the above cases, further operation of the camera becomes
impossible and one of the messages shown below eventually appears to inform you of the problem. See “Messages” on page 67 for
details on what you should do when one of these messages appears.
• Should you ever notice smoke or a strange odor coming out of the
unit, immediately turn power off and unplug the AC adaptor from the
power outlet. Using the unit under these conditions creates the danger of fire and electrical shock. After making sure there is no more
smoke coming from the unit, take it to your nearest CASIO service
provider for repair. Never attempt your own maintenance.
• If the unit’s case should ever become cracked due to dropping it or
otherwise subjecting it to rough treatment, immediately turn power
off, unplug the AC adaptor from the power outlet, and contact your
nearest CASIO service provider.
• Never use the unit inside of an air craft or in any other areas where
its use is prohibited. Doing so can result in an accident.
MEMORY ERROR
#1
YES→ +
NO →CALL TECH
SUPPORT!
MEMORY ERROR
#2
CONSULT
THE OWNER'S
MANUAL!
MEMORY ERROR
#3
CONSULT
THE OWNER'S
MANUAL!
Memory Error #1
Memory Error #2
Memory Error #3
See page 67
5
Contact your dealer or an authorized
CASIO service provider.
6
Precautions
LCD Digital Camera
Operating conditions
GUIDELINES LAID DOWN BY FCC RULES FOR USE OF
THIS UNIT IN THE U.S.A. (not applicable to other areas).
• This camera is designed for use in temperatures ranging from 0°C
to 40°C (32°F to 104°F).
This device complies with Part 15 of the FCC Rules. Operation is
subject to the following two conditions: (1) this device may not cause
harmful interference, and (2) this device must accept any interference
received, including interference that may cause undesired operation.
• Do not use or keep the camera in the following areas.
— In areas subject to direct sunlight
— In areas subject to high humidity or dust
— Near air conditioners, heaters, or other areas subject to temperature extremes
NOTICE
This equipment has been tested and found to comply with the limits for a Class B peripheral, pursuant to Part 15 of the FCC Rules.
These limits are designed to provide reasonable protection
against harmful interference in a residential installation. This
equipment generates, uses and can radiate radio frequency energy and, if not installed and used in accordance with the instructions, may cause harmful interference to radio communications.
However, there is no guarantee that interference will not occur in a
particular installation. If this equipment does cause harmful interference to radio or television reception, which can be determined
by turning the equipment off and on, the user is encouraged to try
to correct the interference by one or more of the following measures:
• Reorient or relocate the receiving antenna.
• Increase the separation between the equipment and receiver.
• Connect the equipment into an outlet on a circuit different from
that to which the receiver is connected.
• Consult the dealer or an experienced radio/TV technician for
help.
FCC WARNING
Changes or modifications not expressly approved by the party responsible for compliance could void the user's authority to operate
the equipment.
Properly shielded cables with ferrite core must be used for connection to host computer and/or peripherals in order to meet FCC
emission limits.
— Inside of a closed vehicle, especially one parked in the sun
— In areas subject to strong vibration
Condensation
• When you bring the camera indoors on a cold day or otherwise expose it to a sudden change of temperature, there is the possibility
that condensation can form on the exterior or on interior components. Condensation can cause malfunction of the camera, so you
should avoid exposing it to conditions that might cause condensation.
• To keep condensation from forming, place the camera into a plastic
bag before moving it into a location that is much warmer or colder
than your current location. Leave it in the plastic bag until the air
inside the bag has a chance to reach the same temperature as the
new location. If condensation does form, remove the batteries from
the camera and leave the battery compartment cover open for a few
hours.
THE SPECIAL VIDEO CABLE THAT COMES WITH THE CAMERA ----- THE CAMERA TO A VIDEO IN TERMINAL OF A COMPUTER
THE SPECIAL CONNECTION CABLE THAT COMES WITH QV-Link SOFTWARE ----- THE CAMERA TO A PROPER TERMINAL OF A COMPUTER
7
8
Unpacking
General
Guide
Getting
Acquainted
Check to make sure that all of the items shown below are included
with your camera. If something is missing, contact your dealer as
soon as possible.
The following illustrations show the names of each component, button and switch on the camera.
Top and Display
ZOOM button
–
/PROTECT
(Timer/Protect)
button
DISP (Display) button
MODE button
/PRO
ON
PO
WER
F
/OF
+
MO
DE
DISP
DE
L
/PRO
TECT
ZO
OM
DEL (Delete) button
DEL
TECT
ZOOM
DISP
MOD
[+] (Forward)
button
E
+
ON POW
/OFF
ER
Soft case
–
Viewfinder
Shutter button
Operation indicator
Camera
RE
C
[–] (Reverse)
button
PL
AY
Alkaline batteries (AA-size × 3)
LC
POWER switch
ON D
/OFF
LCD
LCD button
Function switch
Lens
Manual
NORMAL/MACRO switch
–
ON
/OFF
PO
WER
+
MO
DE
L
/PRO
TECT
ZO
OM
Wrist Strap
DE
DISP
Self-timer indicator
Special video cable
Lens
Aperture switch
9
Bottom
10
General Guide
Getting Acquainted
Tripod hole
Self-timer Indicator and Operation Indicator
• Self-timer Indicator
This indicator flashes when the camera’s self-timer is activated.
• Operation Indicator
This indicator stays lit while power is on. Its color changes as shown
below to indicate various operating conditions.
Battery compartment cover
BRIGHT (brightness) control
• BRIGHT control adjusts the brightness of the image on the LCD.
The brightness is set at the factory to the optimum setting, and normally does not need adjustment.
Terminals
Color
Lit
Flashing
Green
Power on
Recording
Orange
Exposure warning
Battery warning
Red
Memory full
—
–
ON POW
/OF
ER
F
+
MO
DE
DISP
DE
L
/PRO
MO
TECT
ZO
OM
AC Power terminal
Connecting the Wrist Strap
Pass the wrist strap through the hole on
the side of the camera as shown in the
illustration.
DIGITAL terminal
VIDEO OUT terminal
PO
OFF
WE
DE
+
R
–
RE
C
PL
AY
LC
D
/OF
ON
F
Terminal panel cover
Important!
• To avoid possible damage caused by
accidently dropping the camera, be
sure to use the wrist strap to secure the
camera to your wrist whenever using it.
Opening the Terminal Panel Cover
Using the Soft Case
Keep the camera in its soft case to protect it when not in use.
Important!
• When closing the terminal panel cover, make sure that the plugs on
the inside of the cover align with and enter the terminals.
• Never forcibly pull on or twist the terminal panel cover. Undue force
can damage the cover.
11
12
E
MOD
M
DIS
+
P
ZOO
–
ER
POW
FF
ON/O
Power Supply
Getting Acquainted
3.
The camera features a two-way power supply that lets you use either
batteries (AA-size Alkaline or Lithium) or household AC current.
Close the battery compartment cover.
To load batteries
Be sure that camera power is turned off whenever loading or replacing batteries.
1.
Slide the battery compartment cover in the direction indicated by the arrow in the illustration.
While pressing the stopper, slide the case in the direction
indicated by the arrow.
Battery Handling Precautions
Incorrect use or handling of batteries can cause them to leak or burst
and seriously damage your camera. Be sure to note the following
important precautions to avoid problems with batteries.
Insert three batteries.
+
–
2.
Caution
Be sure to use Alkaline or Lithium batteries. Never use
manganese batteries (see precautions on the next page).
•
Make sure that the positive + and negative - ends of the
batteries are facing correctly.
13
• Use only LR6 (AM-3) type alkaline or
FR6 type lithium dry cell batteries
with this camera. Never mix old batteries with new ones. Failure to do so
can result in bursting or leaking of
batteries, creating the danger of fire
or personal injury.
• Always make sure that the positive
[+] and negative [–] ends of the batteries are facing correctly, as noted
by the markings on the camera itself.
Improper loading of batteries can result in bursting or leaking of batteries,
creating the danger of personal injury
or soiling of objects nearby.
14
Getting Acquainted
Power Supply
Low Battery Indicator
• Remove batteries from the camera if you do not plan to use it for
more than two weeks.
A low battery indicator (
) appears on the LCD and the operation
indicator flashes orange whenever remaining battery power drops
below a certain level.
• Never recharge batteries, never allow direct connection between
two ends of a battery, and never try to take batteries apart.
• Do not expose batteries to direct heat or dispose of them by burning. Doing so can create the danger of explosion.
• Never mix batteries of different types.
• Dead batteries are susceptible to leakage, which can cause serious
damage to your camera. Remove batteries from the camera as
soon as you notice they are dead.
• The batteries that power this camera normally become warm when
they lose power. This does not indicate malfunction.
The above indications mean that the camera will soon turn off automatically if you continue using it. Replace all three camera batteries
with new ones as soon as possible.
Standard Battery Life
The battery life reference values given below indicate the amount of
time at standard temperature (25°C) until power automatically turns
off due to battery failure. They do not represent a guarantee that batteries will perform for any amount of time. Actual battery life depends
on the battery brand, when the battery was manufactured, and ambient temperature where the battery is being used.
LCD ON*
LCD OFF*
REC
(one image per
10 seconds)
LR6(AM3)AA-size
alkaline batteries
400
images
1,600
images
FR6 AA-size
lithium batteries
800
images
2,200
images
PLAY
(Auto Play)
LR6(AM3)AA-size
alkaline batteries
70
minutes
270
minutes
FR6 AA-size
lithium batteries
150
minutes
440
minutes
Flash Memory
The camera features flash memory for storage of images. Flash
memory does not require electrical power to store data, so image
data is retained in memory even when you turn camera power off. If
batteries go dead, simply load a set of new batteries or connect the
AC adaptor and you will be able to view images in camera memory.
* Values in these columns are approximations intended for reference only.
15
16
Getting Acquainted
Power Supply
Auto Power Off
Using AC Power
Power automatically turns off whenever you do not perform any camera operation for a period of time. Power turns off after about one
minute in the Record Mode or after about three minutes in the Playback Mode.
To power the camera from standard AC power, use the optional AC
adaptor (AD-C67).
AC power terminal
AC adaptor
–
ON/ POWE
OFF
R
+
DIS
P
/PR
OT
EC
T
MO
DE
ZO
OM
POWER
ON/OFF
DE
L
• To restore power, simply slide the POWER switch to the right as
you normally do.
–
AC outlet
Important!
The Auto Power Off function does not operate under the following
conditions.
Caution
• During Auto Play (page 42)
• When operations are being performed on a computer connected to
the camera via the camera’s DIGITAL terminal.
• Whenever the AC adaptor is connected to the camera.
17
18
Recording
Operation
Power Supply
Caution
AC Adaptor precautions
• Never use an electrical outlet whose
voltage is outside the rating marked
on the camera. Doing so can create
the danger of fire,malfunction,or
electrical shock. Use only the optional AC adaptor specified for this
camera.
• Should the cord of the AC adaptor
become damaged (exposed internal
wiring or shorts), request a replacement from an authorized CASIO service provider. A damaged AC adaptor cord creates the danger of fire,
malfunction,or electrical shock.
• Always be sure to use the AD-C67
AC adaptor only. Using any other AC
adaptor can cause damage to the
camera not covered by the warranty.
• When unplugging the AC adaptor
from the wall socket, be sure to
grasp the adaptor (not the cord).
• Avoid an undue bending, pulling,
and twisting of the AC adaptor's
cord, and never try to lengthen the
cord by splicing it with other wire.
Images
The following procedure provides the basic steps for recording an
image.
To record an image
1.
Enter the Record Mode.
•
2.
• Be sure to switch power off before connecting or disconnecting the
adaptor.
• Always turn camera power off before disconnecting the AC adaptor,
even if the camera has batteries installed. If you don't, the camera
will turn off automatically when you disconnect the AC adaptor.
Even so, you run the risk of damaging the camera whenever you
disconnect the AC adaptor without first turning power off.
• The AC adaptor may become warm to the touch after extended periods of use. This is normal and is not cause for alarm.
3.
• After use turn off the power switch of the camera and unplug adaptor from the AC outlet.
REC
Slide the function switch to the
REC position.
Turn on the camera.
PLAY
•
Slide the POWER switch in the direction indicated by the arrow.
•
The POWER switch automatically
slides back to its original position
when you release it.
•
When power comes on, the image of the object that is in
front of the camera’s lens appears on the LCD.
•
You can perform steps 1 and 2 in either order (1 then 2, or 2
then 1).
Set the NORMAL/MACRO switch to
tion.
•
POWER
ON/OFF
–
(NORMAL) posi-
If the object whose image you are
recording is about 15 centimeters
from the lens (about 6 inches), set
the NORMAL/MACRO switch to
(MACRO). See page 24 for
details on using this switch.
Note
• The camera is designed to refresh the image on the LCD about
seven times per second. Because of this, you may experience a
feeling of jerkiness in the changing image if you move the camera
quickly. This is normal and does not indicate malfunction.
19
20
Recording Images
Operation
4. Record the image.
•
Compose the image you want to
record while viewing it on the
LCD.
•
It is best to look at the LCD directly, and not from an angle.
•
If you plan to use the viewfinder to
compose the image, press the
LCD button to turn off the LCD.
•
You can use the camera to take the next picture after the
“WAIT” message disappears or after the operation indicator
stops flashing green.
•
Here you could change the function switch to the PLAY position and view the image you just recorded.
•
Note that turning off the camera’s LCD helps to conserve
battery power.
REC
PLAY
LCD
ON/OFF
Caution
• Never remove the camera’s batteries while the “WAIT” message is on the LCD or the operation indicator is flashing
green. Doing so not only cancels storage of the image being
recorded, it can also corrupt other image data already
stored in camera memory.
The area of the image recorded
by the camera may differ slightly
from the area that appears within
the viewfinder. For more precise
image composition, use the LCD
monitor screen instead of the
viewfinder.
How to avoid hand movement…
•
When using the MACRO setting, the field of view of the
viewfinder is very different from the area that is photographed. Because of this, you should always use the
camera’s LCD monitor screen to compose images when using the MACRO position.
•
Take care that your finger is not blocking the lens.
•
When the image is situated on the LCD as you want it, press
the shutter button.
•
Press the shutter button lightly to avoid moving the camera.
See page 22 for information on how to avoid hand movement.
•
•
Any hand movement when you press the shutter button can causes
blurring of the recorded image. Note the following points on avoiding
hand movement.
• Make sure there is no excessive movement of the image of the object on the LCD.
• Use a tripod whenever possible when recording images in dim lighting. The camera automatically adjusts shutter speed in accordance
with the brightness of the object whose image is being recorded.
Shutter speed is quite slow for dimly lit objects, increasing the possibility of blurring caused by hand movement.
The message “WAIT” appears on the LCD for about six seconds along with the image that was recorded when you
pressed the shutter button. You can use the camera to take
the next picture after the “WAIT” message disappears.
21
22
Operation
Recording Images
Fluorescent Lighting
NORMAL/MACRO Switch
The NORMAL/MACRO switch tells the camera how much distance there will be between
the lens and the object whose image you are
recording. The following table describes the
conditions covered by each switch setting.
When using the MACRO setting, the field of
view of the viewfinder is very different from
the area that is photographed. Because of
this, you should always use the camera’s
LCD monitor screen to compose images
when using the MACRO position.
Fluorescent lighting actually flickers at a frequency that cannot be
detected by the human eye. When using the camera indoors under
such lighting, you may experience some brightness or color problems
with recorded images. The actual extent of the problems depends on
what cycle of the fluorescent light’s flicker is occurring when the
camera’s shutter actually releases. For best results, use a commercially available video lights.
Shooting Images Outdoors
(NORMAL)
Switch position
Strong direct or reflected sunlight can cause recorded images to take
on a greenish tinge. This is due to the characteristics of the camera’s
charge-coupled device (CCD), and it does not indicate malfunction of
the camera. One way you can try to minimize this problem is to set
the aperture to [●] (F8).
Aperture F2.8(○)
F8 (●)
(MACRO)
0.6 to 3.0 meters
For portraits taken
indoors
(2.0~9.8 feet)
12 to 14 cm
For close ups taken
indoors
(4.7"~5.5")
0.4 meters to ∞
For general outdoor
images
(1.3 feet~)
10 to 18 cm
For outdoor close-ups
(3.9"~7.1")
The above figures indicate the distance from the lens protection filter
to the subject.
* See page 26 for details on how to change the aperture.
F2.8(○)
F8(●)
12∼14cm
(4.7"∼5.5")
10∼18cm
(3.9"∼7.1")
MACRO
0.6∼3.0m
(2.0∼9.8 feet)
0.4m∼
(1.3 feet∼)
NORMAL
23
24
∞
Recording Images
Operation
Exposure Adjustment
Notes
This camera features an automatic exposure (AE) function that automatically changes the shutter speed in accordance with lighting. In
addition, you can also manually adjust the exposure to compensate
for backlighting, indirect indoor lighting, dark backgrounds, and other
special conditions.
• Exposure adjustment is generally expressed in terms of an exposure adjustment value. The exposure adjustment value is always
set to zero whenever you turn on the camera.
To manually adjust the exposure
• The exposure adjustment value automatically reverts to zero whenever the shutter button is pressed. You can manually reset the exposure adjustment value by using [+] and [–] to change the value
back to zero, which is indicated when the + – indicator disappears from the monitor.
• The exposure adjustment value is changed by 0.25EV with each
press of [+] or [–]. The range of the value is -2EV to +2EV.
REC
1.
Enter the Record Mode.
•
2.
Set the function switch to the REC
position.
PLAY
Use the [+] and [–] buttons to manually adjust the exposure.
•
•
Pressing [+] makes the image on
the LCD brighter. Use it to adjust
for dim indoor lighting and backlighting.
DISP
Changing the Aperture Setting
MODE
+
POWER
ON/OFF
There are two aperture settings you can use to match lighting conditions. Use the aperture switch to change the aperture setting.
–
Pressing [–] makes the image on
the LCD darker. Use it to adjust
for bright sunlight.
• Use the [●] (F8) setting to decrease exposure. This setting works best outdoors.
• Use the [○] (F2.8) setting to increase exposure. This setting works best indoor and
with back lit images.
【+】
+–
Note
• Also see page 28 for information about exposure warning indicators.
【−】
+–
3.
After adjusting the exposure, press the shutter button to
record the image.
25
26
Operation
Recording Images
Record Mode Displays
•
The image number appears in
the upper right corner of the
LCD. It indicates the number of
the next image that will be recorded. The number 21, for example, indicates that there are
20 images in memory, and the
next image will be number 21.
•
To clear the image number from the LCD, press the DISP
button again.
The following provides details on the images, indicators and messages that appear on the LCD in the Record Mode.
If the LCD is turned off, press the LCD button to turn it on.
Image Display
An image of the object that is picked up by the camera’s lens appears
on the LCD. The camera is designed to refresh the image on the LCD
about seven times per second. Because of this, you may experience
a feeling of jerkiness in the changing image if you move the camera
quickly. This is normal and does not indicate malfunction.
Note
• The LCD image that appears in the Playback Mode is more detailed
than the image produced in the Record Mode. Because of this, you
should consider the Record Mode image to be a reasonable facsimile of the image that is actually stored in memory.
• Note that turning display of the image number on and off in the
Record Mode also affects the display of the memory page number
in the Playback Mode (page 35), and the zoom area indicator used
in the zoom operation (page 40). If you turn display of the image
number off in the Record Mode, for example, the memory page
number will not be shown in the Playback Mode.
Displaying the Image Number
Exposure Warning Indicators
The image number is a value that indicates the number of the next
image that will be recorded. Up to 96 images can be stored in camera
memory.
An exposure warning indicator appear on the LCD and the operation
indicator lights orange whenever the light being picked up by the lens
would result in under exposure or over exposure of an image.
Note
1.
Enter the Record Mode.
REC
•
Set the function switch to the REC
position.
PLAY
2.
Press the DISP button.
/PROTECT ZOOM
DISP
MODE
+
Under exposure
27
28
Over exposure
Recording Images
Operation
Important!
• Note that power will turn off quicker if you are using the optional
Connection Kit for data communications through the camera’s
DIGITAL terminal when the low battery condition occurs. This is to
protect against problems due to sudden power failure during data
transfer.
• The exposure warning indicators also appear when lighting is outside the range of the camera. In such a case, changing the aperture
will not clear the indicator from the LCD.
• We strongly recommend that you use the optional AC adaptor
whenever sending or receiving data over the camera’s DIGITAL terminal.
• The manual exposure adjustment procedure (page 25) cannot be
used when an exposure warning indicator is on the LCD. Clear the
warning indicator by changing the aperture switch setting.
• See page 13 for details on how to replace batteries.
• Pressing the [+] or [–] button to adjust exposure while an exposure
warning indicator is on the LCD causes a + – exposure value to
appear. This is an EV value.
Memory Full Message
Use the procedure described on page 26 to change the aperture or
change the lighting of the image so the indicator disappears from the
LCD.
The message “MEMORY FULL” appears
on the LCD and the operation indicator
flashes red whenever you press the shutter
button while camera memory is full. If you
want to record more images, you must first
delete some of the images already stored
in camera memory. See page 48 for details
on how to delete images.
Low Battery Indicator
The low battery indicator ( ) appears on the LCD and the operation
indicator flashes orange whenever remaining battery power drops
below a certain level.
The above indications mean that the camera will soon turn off automatically if you continue using it. Replace all three camera batteries
with new ones as soon as possible.
29
30
Playing
Operation
Recording Images
Using the Self-Timer
This section describes how to recall and view images stored in camera memory. If the LCD is turned off, press the LCD button to turn it
on.
With the Self-Timer, the shutter is released 10 seconds after you
/PROTECT button.
press the
1.
Displaying Images on the Camera’s LCD
Enter the Record Mode.
•
Set the function switch to the REC
position.
Back Images
REC
The camera can store up to 96 images in memory. Images are sequentially numbered from 1 through 96. Think of camera memory like
a 96-page album of the images you record.
PLAY
2.
The following procedure describes how to display images on the
camera’s built-in LCD.
Start the Self-Timer operation.
•
•
•
•
Place the camera securely on a
tripod, desk or other stable surface, with the image to be recorded in the LCD.
After composing the image, press
/PROTECT button.
the
The timer countdown is indicated
by the flashing of the Self-timer indicator. The image on the LCD
also clears when the countdown
begins. The LCD image reappears after shutter is released and
the image is recorded.
To cancel on ongoing Self-Timer
/PROoperation, press the
TECT button or shutter button.
1.
Enter the Playback Mode.
REC
•
/PROTECT ZOOM
DISP
MODE
2.
+
PLAY
Turn on the camera.
•
Self-timer indicator
/PROTECT ZOOM
DISP
Important!
• If battery power is low, camera power may turn off while a countdown is in progress. If this happens, replace the batteries with new
ones.
31
32
Slide the POWER switch in the direction indicated by the arrow.
The POWER switch automatically
slides back to its original position
when you release it.
•
When power comes on, the page
that was displayed when you last
turned power off appears on the
LCD.
•
You can perform steps 1 and 2 in
either order (1 then 2, or 2 then 1).
MODE
+
Slide the function switch to the
PLAY position.
POWER
ON/OFF
–
Playing Back Images
3.
Operation
Displaying Images on a TV Screen
Scroll through the memory pages until the image you want
to view is displayed.
•
Use the special video cable that comes with the camera to connect it
to a television as illustrated below, and you can then view the images
stored in camera memory on the TV’s screen.
Note that turning off the camera’s LCD helps to conserve battery
power.
Press [+] to display the next memory page or [–] to display
the previous memory page.
【+】
【+】
【−】
【−】
Important!
• The camera can be connected only to a TV that is equipped with a
VIDEO IN terminal.
• Make sure that the power of both the camera and the TV are turned
off when making connections.
• The signal output through this camera's VIDEO OUT terminal is an
NTSC signal. An image output through this terminal will not look
normal if the camera is connected to a PAL or other type of TV or
video deck.
Leaving the same image displayed on a TV or computer CRT
screen for very long periods can cause that image to “burn in,” leaving a ghost of the image even after the original image is cleared. Be
sure not to leave an image on a TV or CRT screen for long periods.
Notes
• If you set the function switch to PLAY after recording an image, that
image appears on the LCD first.
• The message “MEMORY EMPTY” appears on the LCD if there are
no images stored in memory when you enter the Playback Mode.
TV
VIDEO OUT terminal
VIDEO IN terminal
–
ON POWE
/OF
R
F
+
DIS
/PR
OT
EC
T
ZO
P
MO
DE
OM
R
L
L
DE
INPUT
VIDEO
AUDIO
Accessory video cable
After connecting the camera and TV, set the
channel of the TV to the channel used for
video input.
33
34
Operation
Playing Back Images
After connecting the camera and TV, use the same procedures as
those described under “Displaying Images on the Camera’s LCD” on
page 32.
Notes
Important!
• The letter “P” next to the memory page number indicates that page
is “protected” and cannot be deleted. See page 44 for details about
protecting memory pages.
• Note that only images already stored in camera memory can be
viewed on the TV screen. If you change to the camera’s Record
Mode, the image picked up by the camera’s lens will not appear on
the TV screen.
• Note that turning display of the memory page number on and off in
the Playback Mode also affects the display of the image number in
the Record Mode (page 27), and the zoom area indicator used in
the zoom operation (page 40).
Displaying the Memory Page Number
Producing a Multi-Page Display
The memory page number is a value in the upper right corner of the
LCD that indicates the number of the currently shown memory page.
Four or nine memory pages can be displayed at the same time. This
feature can be used to display multiple memory pages on the
camera’s built-in LCD, or on the screen of a connected TV.
1.
Enter the Playback Mode.
1.
2.
REC
•
Set the function switch to the
PLAY position.
PLAY
2.
Enter the Playback Mode and turn on the camera.
Switch to multi-page display.
•
Press the MODE button to
change between the different display formats.
•
Each press of MODE changes the
display format in the following sequence.
•
You cannot use the multi-page
display while protected memory
pages are hidden (page 47).
Press the DISP button.
/PROTECT ZOOM
DISP
MODE
+
•
The memory page number appears in the upper right corner of
the LCD.
•
To clear the memory page number from the LCD, press the DISP
button again.
35
36
REC
PLAY
/PROTECT ZOOM
DISP
MODE
+
Playing Back Images
Operation
Selecting a Memory Page in a Multi-Page Display
You can use the following procedure to select one of the memory
pages in a multi-page display. Then when you return to the 1-page
display, the memory page you selected will be the one displayed. The
following procedure uses the 4-page display as an example, but you
can use the same procedure with the 9-page display.
1.
In the Playback Mode, press the MODE button.
* The memory page that is shown on the screen when you
change to the 4-page or 9-page format is in the first (upper
left) position in the multi-page display.
3.
/PROTECT ZOOM
•
Use [+] (forward) and [–] (back) to scroll through the memory
pages. Pages are scrolled one, four, or nine at a time, depending on the display format you are using.
1
2
3
4
【+】
【−】
5
6
7
8
【+】
【−】
9
2.
10
Press the DISP button.
•
This causes a white line to appear
under the first (upper left) page.
This white line indicates the
memory page that is currently selected.
•
If you do not perform any operation for about 10 seconds, the
white line disappears from the display.
11
Note
• The brightness of the images on a multi-page display may differ
slightly from the brightness when a single image is shown. This is
because the camera automatically uses the brightness setting for
the brightest image contained in the multi-page display for all of the
images.
37
38
Operation
Playing Back Images
Using the Zoom Function
Move the white line to the memory page that you want to
select.
•
Press [+] to move the line to the
right or [–] to move it to the left. In
this example, press [+] three
times or [–] once.
This function lets you select a specific part of a stored image and
enlarge it to twice its normal size.
【+】 X 3
1.
2.
Display an image.
Press the ZOOM button to zoom in on the center of the image.
•
4.
This changes to the 4-page display.
In this example, we will select this page.
Unused pages are colored gray.
3.
MODE
+
Scroll through the pages on the display.
•
DISP
The center of the image is enlarged to twice its normal size.
Press the ZOOM button.
•
The image in the selected
memory page appears as a 1page display.
/PROTECT ZOOM
DISP
MODE
+
3.
Change the position of the zoom area.
•
4.
39
40
You can use [+] and [–] to change the position of the zoom
area in the sequence shown on page 41.
Press the ZOOM button again to return the image to its
original size.
Playing Back Images
Operation
Using Auto Play
Changing the Location of the Zoom Area
Auto play lets you automatically scroll through the camera’s memory
pages quickly and easily. You can specify the speed of the scroll.
【+】
【+】
【+】
Important!
【+】
【+】
【+】
【+】
【+】
【+】
• The camera’s Auto Power Off function (page 17) does not function
while an auto play operation is in progress. If you forget to turn the
camera off, there is the danger that auto play will continue until batteries are dead. To avoid this, make sure that you stop the auto play
operation and turn the camera off when you finish viewing.
To start the auto play operation
1.
2.
• Pressing [–] moves the zoom area in the opposite direction.
Notes
• If the page number is displayed in the upper right corner of the
screen when you perform a zoom operation, the number is replaced
by a zoom area indicator. This indicator shows you what part of the
image is currently enlarged on the display. You can turn the zoom
area indicator on and off by pressing the DISP button.
Enter the Playback Mode and turn on the camera.
Start the auto play operation.
•
Hold down the [+] and [–] buttons until the message “AUTO
PLAY START” appears.
•
There must be at least two images (two pages) recorded in
memory to use the auto play operation. Otherwise, the
“AUTO PLAY START” message will not appear on the display.
•
After about one second, this message disappears and the
auto play operation starts.
Zoom area indicator
• Note that turning display of the zoom area indicator on and off during a zoom operation also affects the display of the image number
in the Record Mode (page 27), and the memory page number in the
Playback Mode (page 35).
41
42
Operation
Playing Back Images
Protecting Memory Pages
You can protect specific memory pages to ensure that they are not
accidently deleted.
3 seconds
•
3.
3 seconds
To protect a page
1.
Auto play continues to loop through the memory pages. This
means that when it reaches the last page, it starts again
from the first page.
Enter the Playback Mode and turn on the camera.
•
Slide the function switch to the PLAY position.
•
Slide the POWER switch in the direction indicated by the
arrow.
•
If the page number is not shown in
the upper right of the page, press
DISP.
Press the shutter button to stop the auto play operation.
•
Pressing any button stops the
auto play operation.
+
–
•
•
Note that the buttons of the camera do not operate while a page
change operation is in progress.
Make sure that an image is shown
on the display when you press a
button to stop the auto play operation.
/PROTECT ZOOM
DISP
MODE
+
Page number
You can also use auto play with the multi-page display.
Change to the multi-page display first, and then start auto
play.
2.
Scroll through the memory pages until the one you want to
protect is displayed.
•
•
43
44
Press [+] to display the next
memory page or [–] to display the
previous memory page.
You cannot protect or unprotect
memory pages while protected
memory pages are hidden (page
47).
DISP
MODE
+
POWER
ON/OFF
–
Playing Back Images
Operation
To unprotect a page
3.
1.
Enter the Playback Mode and turn on the camera.
2.
Scroll through the memory pages until the one you want to
unprotect is displayed.
3.
Press the
Protect the page.
•
•
/PROTECT button
Press the
to protect the page.
/PROTECT ZOOM
DISP
MODE
+
The letter “P” appears to the right
of the page number to indicate
that page is protected.
•
Protect indicator
/PROTECT button.
The letter “P” disappears, indicating that page is no longer
protected.
Note
/PRO• If the page number is not displayed when you press the
TECT button, the page number along the protect indicator appears
about a second after you press the button.
Note
/PRO• If the page number is not displayed when you press the
TECT button, the page number appears about a second after you
press the button.
45
46
Deleting
Operation
Playing Back Images
Hiding Protected Memory Pages
Memory Pages
Use the procedures described in this section to delete memory
pages. You can delete individual pages, or all the pages currently
stored in memory.
This function makes it possible for you to hide protected memory
pages so their images do not appear on the monitor during playback.
Warning!
To hide protected memory pages
The delete operation cannot be undone!
While holding down the [+] button, turn on the camera.
Before performing any of the procedures described in this section,
make sure that you really do not need the images recorded on the
memory pages you are deleting. Be especially careful when you are
using the all delete operation.
Important!
• You cannot protect or unprotect pages (pages 44~46) while protected pages are hidden.
• You cannot display multiple images (page 36) while protected
pages are hidden.
To delete a single memory page
• The following message appears on the monitor when you hide protected memory pages and all pages currently in memory are protected. It also appears if you delete all unprotected memory pages
while protected memory pages are hidden.
1.
2.
Enter the Playback Mode and turn on the camera.
•
Slide the function switch to the PLAY position.
•
Slide the POWER switch in the direction indicated by the
arrow.
Scroll through the memory pages until the one you want to
delete is displayed.
•
Press [+] to display the next memory page or [–] to display
the previous memory page.
•
Remember that you cannot delete a protected page. If the
page you want to delete is protected, use the procedure on
page 46 to unprotect it before proceeding.
•
You cannot delete memory pages while using multi-page
display (page 36), zoom function (page 40), or auto play
(page 42).
To unhide protected memory pages
While holding down the [–] button, turn on the camera.
47
48
Deleting Memory Pages
3.
Press DEL.
/PROTECT ZOOM
DISP
Operation
•
MODE
To abort the delete operation without deleting anything,
press DEL.
DEL
6.
One-page delete
All page delete
Exit this screen
4.
•
7.
Press the [+] button to specify deletion of a single page.
•
If the page you selected in step 2
is protected, the contents of the
nearest unprotected page appear
in the above screen.
DISP
•
+
• Deleting a page causes the remaining pages to be renumbered.
Blank pages are not left inserted between non-blank pages.
1
2
3
Make sure that you really want to delete the page that contains the contents shown on the display.
1
2
3
•
4
You can use [+] and [–] to change the memory page. When
you do, protected pages are skipped (not displayed).
49
50
Deleting Memory Pages
Operation
To delete all unprotected memory pages
1.
Enter the Playback Mode and turn on the camera.
2.
Press DEL.
/PROTECT ZOOM
Warning!
DISP
The following operation deletes all unprotected memory pages and
cannot be undone. Make sure that you do not need any of the images
stored in memory before performing this operation.
MODE
4.
DEL
One-page delete
All page delete
Exit this screen
3.
After you are finished deleting pages, press DEL to exit the
delete operation.
Note
–
ON/OFF
+
–
Repeat steps 5 and 6 as many times as you want to delete
memory pages.
MODE
POWER
Pressing the shutter button deletes the page you selected and
displays the next page.
* This screen clears
automatically from
the display if you do
not perform any operation for about 30
seconds.
The contents of the
memory page you
displayed in step 2
appear here.
5.
* This screen clears
automatically from
the display if you do
not perform any operation for about 30
seconds.
To delete the page whose contents are shown, press the
shutter button.
To delete all unprotected pages, press the shutter button.
•
If there were no protected pages in memory, the message
“MEMORY EMPTY” appears on the display after all memory
pages are deleted.
•
If there were protected pages in memory, they are the only
pages that remain after the delete operation is complete.
* This screen clears
automatically from
the display if you do
not perform any operation for about 30
seconds.
Press the [–] button to specify deletion of all unprotected
pages.
•
To abort the delete operation
without deleting anything, press
DEL.
DISP
MODE
+
POWER
ON/OFF
–
* This screen clears
automatically from
the display if you do
not perform any operation for about 30
seconds.
51
52
Connecting
Other
Connecting
to Other to
Devices
Deleting Memory Pages
•
Devices
The camera terminals
The message shown below appears on the monitor screen
whenever you try to delete all memory pages while there are
protected pages in memory and those pages are hidden.
The following describes which the camera terminal you should use
for each type of connection.
VIDEO OUT – Use this terminal when connecting to the VIDEO IN
terminal of a TV, video tape deck, video printer, or
other similar devices. Use the special video cable
that comes with the camera for such connections.
VIDEO IN
terminal of other
device
–
ON
VIDEO OUT
terminal
PO
WE
R
F
/OF
+
DIS
P
DE
L
/PR
OT
EC
T
MO
DE
ZO
OM
INPUT
L
R
VIDEO
AUDIO
Special video
cable that comes
with camera
DIGITAL – Use this terminal to connect to a personal computer (requires optional Connection Kit), another CASIO Digital
Camera, or a QV Color Printer. The illustration below
shows how to connect to another digital camera.
DIGITAL terminal*
–
PO
WE
R
/OF
F
ON
+
DIS
P
DE
L
/PR
OT
EC
T
DIGITAL terminal
–
ON
PO
WE
R
/OF
F
MO
DE
+
DIS
P
ZO
OM
DE
L
/PR
OT
EC
T
MO
DE
ZO
OM
Connecting
cable*
*The type of connecting cable you should use depends on the type
and shape of the terminals equipped on the digital camera you are
connecting to. See pages 57 through 59 for details.
53
54
Using the Camera with a Connected Device
Connecting to Other Devices
• Page numbers (page 27) are also recorded on the video tape if they
are turned on. Be sure to turn off display of page numbers if you do
not want them in the taped images.
The following section provides specific information on how you can
use the camera after connecting to various types of devices. In each
case, the camera terminal you should connect to is indicated in the
title as VIDEO and DIGITAL .
• If the low battery indicator (page 29) is displayed while you are recording to video tape, it will also be recorded with the image. If this
happens, either replace batteries or use the AC adaptor.
Important!
• Make sure that the power of all devices is turned off before connecting them.
• You should also check the owner’s manuals of the device you are
connecting to the camera for precautions and other information.
Video Printer
Television
To print camera images on a Video Printer
You can use Video Printer to print copies of images in camera
memory.
VIDEO
• See page 34 of this manual for details about connecting to a television and displaying images from camera memory on a TV screen.
Video Tape Deck
VIDEO
1. Use the special video cable that comes with the camera to connect
to the VIDEO IN terminal of the video printer.
2. Set up the video printer to print images input through its VIDEO IN
terminal.
VIDEO
• Consult the owner’s guide that comes with the video printer for details about how to set up for printing.
You can use the video tape deck to record images from the camera.
To record camera images on video tape
3. Enter the camera Playback Mode and display the image you want
to print.
1. Use the special video cable that comes with the camera to connect
to the VIDEO IN terminal of the video tape deck.
4. Start the video printer’s print operation.
2. Set up the video tape deck to record images input through its
VIDEO IN terminal.
• Page numbers (page 27) are also included on the print if they are
turned on. Be sure to turn off display of page numbers if you do not
want them in the print.
• Consult the owner’s guide that comes with the tape deck for details
about how to set up for recording.
• If the low battery indicator (page 29) is displayed while you are printing, it will also be printed with the image. If this happens, either
replace batteries or use the AC adaptor.
3. Enter the camera Playback Mode and start the video deck record
operation.
• It is probably best to use auto play when recording camera images
to video tape, because it changes pages automatically at a preset
speed.
55
56
Using the Camera with a Connected Device
Connecting to Other Devices
Connecting to another CASIO Digital Camera
4. Use the [+] and [–] buttons to move the pointer to the send icon.
DIGITAL
5. After you make the setting you want, press the shutter button
again.
You can connect the camera to another CASIO digital camera and
exchange image data between them. Connect the DIGITAL terminals
of the two cameras using the optionally available SB-62 connecting
cable.
• Pressing the shutter button sends the selected image to the other
camera.
• You can send only one image at a time. To send more images,
repeat steps 2 through 5.
To connect the two cameras
1. Turn both cameras off.
To receive data to this camera from another camera
2. Connect the two cameras by plugging the optional SB-62 connection cable into their DIGITAL terminals.
1. Set the function switches of both cameras to PLAY.
3. Turn both cameras on.
2. Use the [+] and [–] buttons of other camera to find the image you
want to receive.
To send data from this camera to another camera
• You cannot receive images between two cameras while either of
their function switches is set to REC.
1. Set the function switches of both cameras to PLAY.
• You cannot receive multi-page display or zoomed images.
2. Use the [+] and [–] buttons of this camera to find the image you
want to send.
• If you try to receive a multi-page display or zoomed images, other
camera’s monitor automatically changes to normal display of page
1.
• You cannot send images between two cameras while either of their
function switches is set to REC.
3. Press the shutter button of this camera.
• You cannot send images while using the multi-page display or
zoom function.
3. Press the shutter button of this camera.
Send icon
Receive icon
Return to previous display
Send icon
Receive icon
4. Use the [+] and [–] buttons to move the pointer to the receive icon.
Return to previous display
• As soon as you perform the above step, all of the buttons and controls on the other camera become disabled.
57
58
Connecting to Other Devices
Using the Camera with a Connected Device
5. After you make the setting you want, press the shutter button
again.
Computer (Using QV-Link Software and a Connection
Cable) DIGITAL
• Pressing the shutter button receives the selected image from the
other camera.
The optionally available QV-Link Software and connection cable
lets you transfer images from your digital camera to a personal computer. The following are the models of QV-Link software that support this camera.
* You can receive only one image at a time. To send more images,
repeat steps 2 through 5.
Windows Version: LK-10V/LK-1/LK-1A
Important!
Macintosh Version: LK-2V/LK-2/LK-2A
Never disconnect the cable, turn power off, or change the function
switch setting while a data communication operation is in progress.
Doing so can damage the camera.
Computer (Video Capture)
You can use the special video cable that comes with the camera to
connect directly to the VIDEO IN terminal of a personal computer
equipped with video capture capabilities.
How data transfer affects resolution
• QV-70
QV-700 ................................................... NORMAL
• QV-70
QV-700 ................................................... NORMAL
• QV-70
QV-100/QV-120/QV-200/QV-300 .......... NORMAL
• QV-70
QV-100/QV-120/QV-200/QV-300 .......... NORMAL
QUARTER
To transfer camera images to a personal computer (video
capture)
NORMAL
1. Use the special video cable that comes with the camera to connect
to the VIDEO IN terminal of the computer.
FINE
NORMAL
NORMAL
VIDEO
2. Enter the camera Playback Mode and display the image you want
to send.
←
←
• QV-70 ← QV-10/QV-10A/QV-11/QV-30/QV-70 .... NORMAL ← NORMAL
3. Perform the required operation on the computer.
Connecting to a QV Color Printer of Digital Photo
Printer DIGITAL
• Consult the owner’s guide that comes with the computer or its video
capture board for details about how to set up to capture images.
You can connect this camera to a CASIO QV Color Printer or Digital
Photo Printer and print out images that are in camera memory. Use
the communication cable that comes with the printer to connect the
camera’s DIGITAL terminal to the printer’s terminal.
Important!
• With this configuration, you cannot send images from the personal
computer to the camera.
Applicable printer models: CASIO QG-100, DP-8000
• The camera can be connected directly to a personal computer or
video capture board that is equipped with a VIDEO IN terminal
(RCA pin jack). It cannot be connected directly to an S-VIDEO
terminal.
• After connecting to a printer, turn on camera power and slide the
function switch to the PLAY position. See the documentation that
comes with the printer you are using for details on its operation.
59
60
Troubleshooting
Symptom
Action
Symptom
1. Batteries not loaded 1. Correctly load batteries (page 13).
correctly.
2. Replace batteries with
2. Dead batteries
new ones (page 13).
3. U s e o n l y r e c o m 3. Wrong AC adaptor
mended AC adaptor .
Recorded image Strong direct or reflected Change aperture setting
h a s g r e e n i s h sunlight
to [●] (F8). Note that this
tinge.
condition is due to CCD
characteristics, and does
not indicate camera malfunction.
indicator Power will automatically Replace all three batteries with a set of new ones
turn off shortly.
on LCD
(page 13).
Recording
N o r e c o r d i n g Function switch sets to Set function switch to
REC.
w h e n s h u t t e r PLAY.
button is pressed
Replace all three batteries with a set of new ones
(page 13).
indicator on Over exposure
LCD
Change aperture switch
setting to [●] (page 26).
indicator on Under exposure
LCD
Change aperture switch
setting to [○] (page 26).
61
Reference
Action
Symptom
Action
Camera is con- 1. Function switch set to 1. Set function switch to
nected to a TV,
REC
PLAY (page 32).
but LCD monitor 2. Incorrect camera-TV 2. Connect correctly uscontents do not
connection
ing the special video
appear on TV
cable that comes with
screen.
the camera (page 34).
3. Wrong TV channel
3. S e l e c t t h e c o r r e c t
channel for video playback. See the TV’s
user documentation for
details.
Color of recorded 1. Reflection from sun- 1. Reorient the camera
image is strange.
light or light from anso that light is not shinother source
ing directly into lens.
2. Difference between 2. This difference does
Record Mode and
not indicate a problem
Playback Mode charor malfunction.
acteristics.
Playback
Probable Cause
All pages do not Protected memory pages Unhide protected memoappear during are hidden.
ry pages (page 47).
auto play.
• Macro photography
For more precise image composition, use
the LCD monitor
screen instead of the
viewfinder.
• Aiming at an angle that
is diagonal to the
viewfinder’s optical
axis.
It is best to point the
lens directly at the subject, and not at an
angle.
Playback
Recording
Probable Cause
Part of the im- 1. Blocking of the lens 1. Hold the camera corwhen recording.
age is missing.
rectly, making sure
that your finger or the
wrist strap is not blocking the lens.
2. Failure to correctly 2. Take particular care
center the object when
under the following
aiming through the
conditions, which can
viewfinder.
cause the recorded image to be slightly different from the image that
appears in the viewfinder.
62
Troubleshooting
Symptom
Action
Poor color and Indoor fluorescent lighting Shoot under incandesbrightness when
cent or other non-fluoresindoors
cent lighting (page 23).
Sudden power 1. O p e r a t i o n o f A u t o 1. Turn power back on.
failure
Power Off
2. Replace all three bat2. Low battery power
teries with a set of new
Use of manganese
ones (page 13).
batteries.
Replace manganese
batteries with alkaline
batteries.
P o w e r f a i l u r e Low battery power
during self-timer
operation
Probable Cause
Poor LCD image I n c o r r e c t N O R M A L / Use NORMAL for scenMACRO switch setting ery and group photos,
focus
and MACRO for closeups (page 24).
Recording
Power Supply
No power
Probable Cause
Reference
S o m e i m a g e s Protected memory pages Unhide protected memoare missing.
are hidden.
ry pages by holding down
[–] while turning power on
(page 47).
C a n n o t u s e Protected memory pages Unhide protected memomulti-page dis- are hidden.
ry pages by holding down
play.
[–] while turning power on
(page 47).
No [+]/[–] button Button operation during Wait until an image is on
operation during page change
the LCD before performmulti-page dising a button operation.
play
Cannot protect Protected memory pages Unhide protected memomemory pages. are hidden.
ry pages by holding down
[–] while turning power on
(page 47).
C a n n o t s t a r t O n l y o n e i m a g e i n Auto play can be used
auto play opera- memory
only when there are two
tion
or more images in camera memory.
63
64
Troubleshooting
Action
Playback
Probable Cause
ALL DATA IS Protected memory pages Unhide protected memory pages by holding down
PROTECTED! are hidden.
[–] while turning power on
Stays on moni(page 47).
tor and images
do not appear.
Deletion
Symptom
Reference
Delete operation 1. All pages are pro- 1. Unprotect the page
tected.
you want to delete
does not start
(page 46).
when DEL is
2. M u l t i - p a g e d i s p l a y 2. Change to a normalpressed.
(page 36) or zoom dissize, 1-page display
play (page 40)
format.
Symptom
Other
Action
C a n n o t e x - 1. Incorrect cable con- 1. C o n n e c t c o r r e c t l y
change data be(page 57).
nection
tween two cam- 2. Camera connected to 2. Turn power on after
eras
connecting cable.
is not turned on.
3. Function switch sets to 3. Set function switch to
PLAY (page 32).
REC.
Other
All buttons and Malfunction due to static Remove batteries and
switches do not electrical charge or strong disconnect the AC adapimpact
tor if you are using one.
operate.
Restore power and turn
the camera on. If this
does not work, contact
your dealer or an authorized CASIO service provider.
Very bright or Wrong BRIGHT setting
very dark LCD
image
Probable Cause
Adjust the BRIGHT setting (page 11).
No buttons or Malfunction due to expos- Remove batteries and/or
switches oper- ing camera to electro- unplug the AC adaptor.
static charge.
Reload batteries and/or
ate.
plug in AC adaptor and try
operation again.
Cannot transfer 1. S e n d i n g c a m e r a ’ s 1. Correct the situation
data (error
and try again.
memory is empty.
k e e p s o c c u r - 2. Receiving camera’s 2. Correct the situation
ring)
and try again.
memory is full
3. Receiving camera’s 3. C h a n g e f u n c t i o n
switch setting of refunction switch is in
ceiving camera to
REC position.
PLAY (page 32).
4. The message “ALL 4. The sending camera’s
protected memory
DATA IS PROTECTpages are hidden. UnED” is on the monitor
hide protected memory
of the sending camera.
pages by holding down
[–] while turning power
on (page 47).
5. Replace batteries or
5. Low battery
use the AC adaptor
(page 13).
6. Disconnection of cable 6. Securely reconnect the
cable.
during data communication
K e y s o f c o n - Connected camera op- Normal operation will renected camera eration is disabled during turn when you exit data
are disabled.
communications by pressdata communications.
ing EXIT.
LCD monitor is Incorrect BRIGHT setting A d j u s t t h e B R I G H T
(brightness) setting.
too bright or too
dark.
65
66
Specifications
Reference
Messages
MEMORY FULL
General
Recording System ... Digital (JPEG based)
All 96 memory pages are used. Pages must be deleted (page 48) before further recording is possible.
Signal System ......... NTSC
Recording Medium .. Built-in 2MB flash memory
MEMORY EMPTY
No images are stored in memory.
MEMORY ERROR
#1
YES → +
NO → CALL TECH
SUPPORT!
Problem with internal memory. Perform the following
procedure.
1. Press [+].
ERROR RESET
Number of Pages .... 96
Delete Functions ..... Single page; All pages (with page protect feature)
Imaging Device ....... 1/5-inch CCD (Total Number of Pixels: 250,000)
Lens ........................ Fixed focus with macro position; F2.8/f = 5.2mm
YES → SHUTTER
Aperture .................. F2.8/F8 manual switching
NO → CALL TECH
SUPPORT
Focal Length ........... F2.8/NORMAL : 0.6m to 3.0m/2.0 to 9.8 feet
F2.8/MACRO : 12cm to 14cm/4.7" to 5.5"
F8/NORMAL : 0.4m to ∞/1.3feet to ∞
F8/MACRO
: 10cm to 18cm/3.9" to 7.1"
(from lens protection filter)
2. After checking that the ERROR RESET message
is on the display, press the shutter button to perform a system reset or turn power off if you do not
want to perform a system reset. The display should
return to normal after the system reset is complete.
• Never turn off power while the system reset is in
progress! Doing so will damage camera memory
are require servicing by an authorized service
provider!
• Be sure to power the camera using the AC adaptor or a new set of alkaline or lithium batteries.
Weak batteries or manganese batteries can result in a power failure while the system reset operation is in progress, causing damage to camera memory.
Important!
• System reset can result in a change in the order of
images stored in camera memory.
• Corrupted images may be lost entirely.
• If image data is partially corrupted, parts of the image may not be recoverable.
Light Metering ......... TTL center point by photographic element
Exposure Metering .. Aperture priority AE
Exposure Range ..... EV +6 to 18
Exposure Adjustment ... -2EV to +2EV
Shutter System ....... Electronic
Shutter Speed ......... 1/8 to 1/4000 second
White Balance ......... Automatic
Self-timer ................. 10-second
Monitor .................... 61,380-pixel 1.8-inch TFT low-glare color LCD;
doubles as finder
Terminals ................ DIGITAL; VIDEO OUT; DC IN 6V
Power Supply .......... Batteries (AA-size Alkaline or Lithium batteries X 3)/
AC Adaptor (AD-C67)
Power Consumption .. 3.2 W
MEMORY ERROR
Problem with internal memory. Contact your dealer or
#2~#3
an authorized CASIO service provider.
CONSULT THE
OWNER’S MANUAL!
67
68
About
Reference
Battery Life
the camera’s backlight…
LCD ON*
LCD OFF*
• The camera is equipped with a fluorescent light source to provide
the back lighting for its LCD.
REC
(one image per
10 seconds)
LR6(AM3)AA-size
alkaline batteries
400
images
1,600
images
• The normal service life of the backlight is approximately six years,
when the camera is used for about two hours a day.
FR6 AA-size
lithium batteries
800
images
2,200
images
PLAY
(Auto Play)
LR6(AM3)AA-size
alkaline batteries
70
minutes
270
minutes
• Should the LCD image appear abnormally dark, take the camera to
your dealer or an authorized CASIO service provider to have the
light source replaced. Note that you will be charged for this replacement.
FR6 AA-size
lithium batteries
150
minutes
440
minutes
• Under very cold conditions, the backlight may require more time
than normal to light, or reddish bands may appear in the image.
These conditions do not indicate malfunction, and normal operation
should return at higher temperatures.
* Values in these columns are approximations intended for reference only.
Dimensions ............. 66(H) X 103(W) X 34(D)mm /
2.6" (H) X 4.0" (W) X 1.3" (D)
Weight ..................... Approximately 150g / 5.3oz (excluding batteries)
Accessories ............. Wrist strap; soft case; special video cable; Alkaline
batteries (LR6 X 3); owner’s manual
• The liquid crystal panel built into this camera is the product of precision engineering, with an effective pixel rate of 99.99%. This also
means, however that 0.01% of the pixels can be expected to fail to
light or to remain lit at all times.
69
70