1
,
.-
OWNER'S INSTRUCTION MANUAL
I
,
16mm Sound Projector
" NST·0/1 1213
NT·0/1 1213 '
When the show must go on.
NST·O/1/2/3-NT·O/1/2/3
Simple Operation
Easy Maintenance
Trouble-Free Use
This Operator's Manual is easy to read, informative and helpful .
Please read it carefully. Before you try it your way, please try it
our way.
CONTENTS
Page
1
Spec ifi cat io ns
2~ 4
Main parts of the projector . .. . . . . . . . . . .. . .. .. . . . . . . ... . .
5~7
Sett i ng up . . . . . . . . . . . . . . . . . .
. . . .... . . . . . . . ' . .
8~9
Thread in g instruct ions . . . . . . . .. . . . . .. . .. .. . . . .. . ... . . .
1 0~ 11
ProJ ect ing. . . .
. . . .... . .
12
Rew indin g.
13 ~ 1 4
Changin g lamps
15
Hi -low lamp sw it ch . .
16
Si len t fi 1m ope rati ons
17
Spa re parts and accessories . . . . . ... . . .. . . . .. .. . .
18 ~ 20
Spec ial app l icat i ons .
(a) Us in g projecto r as a P.A. syst em
18
19
(b) Mag net ic so und t rack 'playback (N ST -2/3 , NT -2 /3)
(c ) Magnet ic sou nd track reco rdin g (N ST -3 , NT-3 ) .
19
(d) Special dua l vo lt age appl icat io ns
. . . ... .. . . .. . ,
20
(e) 50 Hz to 60H z co nversi o ns
20
21
Clea ning and Mainte nance .
. 22 ~ 23
Operator troub le shootin g gu ide
IMPORTANT SAFEGUARDS
When using your E IKI 16mm projector, basic safety precautions
should always be followed, including the following:
1. Read and understand all instructions.
2. Close supervision is necessary when any equipment is used
by or near children . Do not leave projector unattended
while in use.
3. Care must be taken as burns can occur when changing lamp.
Use lamp ejection lever provided to avoid possibil ity of
burns from a hot lamp.
4 . Do not operate projector with a damaged cord or if projector
has been dropped or damaged - until it has been examined
by a qualified service technician.
5. Do not let the cord hang over edge of the table or counter
or touch hot surfaces.
6. If an extension cord is necessary, a cord with a suitable
current rating should be used. Cords rated for less amperage
than the projector may overheat. Care should be taken to
arrange the cord so that it will not be tripped over or
pulled.
7. Always unplug projector from electrical outlet when not in
use. Never yank cord to pull plug from outlet. Grasp plug
and pull to disconnect.
8. Let projector cool completely before putting away. Return
cord to cord storage space provided when storing projector.
9 . To protect against electrical shock hazards, do not operate
this projector in the rain or when wet.
IMPORTANT SAFEGUARDS (cont'd)
10. To avoid electric shock hazard, do not disassemble this
projector, but refer to a qualified service technician when
service or repair work is required. Improper repairs or
reassembly can cause electric shock hazard when the projector is used subsequently.
11 . Do not open lamphouse cover when projector motor is
running.
12. Observe the caution plate by rear cover latch "DISCON NECT POWER SUPPLY BEFORE OPENING".
13 . Do not look directly at an operating lamp with unprotected
eyes.
14. Observe the caution plate inside of lamphousein g.
"DISCONNECT POWER BEFORE REPLACING LAMPS" .
SAVE THESE INSTRUCTIONS
SPECIFICATIONS
N ST M ode ls
Reel-to-Reel Automatic Th read ing
NT
Self Threading
M odels
Power Source
Projectors available
50, 60Hz, dual
from
100 to
240V
(sw it chabl e) vo ltage also
available
Typical power consumption
430-450W
Lamp
Tungsten halogen 24V-250W (type ELC)
Exciter lamp
4V , 0.75 amp (type BRK)
Standard lens
50mm (2") f 1.2, 6-element coated
Resolution
Excess of 160 lines per mm (center)
Shutter
2 bladed or 3 bladed
Motor
Induction with capac itor
Film speed
24 and lS F PS, sound and silent
Loop restorer
Automatic
Lamp brightness
1200LX (900 Lumen max)
Reverse projection
Yes
Still picture
Yes
Rewind
High-speed without reel change
Reel capacity
600m (2000ft)
Speaker
Model 0 type, 12.5cm (5") internal speaker
only
Model 1 & 2, with two
12 .5cm (5") re-
movable front cover speakers and 12.5cm
(5") internal speaker
Mod el 3 type, two 12.5cm (5") removable
front cover speakers
Amplifier
Solid sta te 20W RMS
Tone Control
Treble and bass separate con trols
Size
29cm x 35cm x35cm (ll.4"x 13 .S "x 13 .S")
Weight
16.5kg (36.4 Ibs)
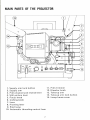
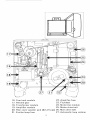
MAIN PARTS OF THE PROJECTOR
o
---------
1. Supply arm lock button
2. Supply arm
3. Film channel and rewind lever
4. Still picture lever
5. Focus knob
6. Inching knob
7. Lens
8. Framing lever
9 . Pilot lamp
10. Automatic threading control lever
2
11.
12.
13.
14.
15.
Film trimmer
Elevator knob
Take-up arm
Take-up arm lock button
Lamp house cover
~-----------------------~
16.
17.
18.
19.
20.
21.
Cam tank module
22.
Rewind gear
23.
Transformer module
24.
Amplifier module
25.
Rear cover speaker jack (0/1/2 type) 26.
Exciter lamp fuse
27.
3
Amplifier fuse
Flywheel
Motor-fan module
Motor drive belt
Main drive belt
Automatic loop restorer
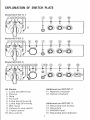
EXPLANATION OF SWITCH PLATE
Model NST tNT -0, 1
7
o
~ 'I
Model NST /NT-2
Model NST /NT-3
•
@6»o6)pBJo
Additional on NST/NT-2
11. Magnetic playback
12. Optical playback
All Models
1. Lamp low (Reverse)
2. Reverse
3. Stop
4. Forward
5. Lamp low (Forward)
6. Lamp high (Forward)
7. MIC input
8. Volume & amp switch
9. Treble control
1 o. Bas~ control
Additional on NST/NT-3
13. Recording lock button
14. Recording
15. PHONO input
16. Recording level indicator
4
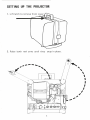
SETTING UP THE PROJECTOR
2. Raise both reel arms until they snap in place.
5
3. Set funct ion switch to STOP pos it ion ,
e•*
4, Connec t power p lug to proper outlet ,
5, To turn lamp on, rotate funct io n
switch to th e FORWARD lamp
on positi on,
6 , Po sit ion pro jector for th e appropri ate siz e image as desired , Adjust
elevator knob to achi eve th e requ ired image height , (S ee ch art below
for appro p ri at e lens, di st ance and screen size,)
SCREEN SIZ E CHARTS IN METERS
Dis tance
3m
Le ns
38mm
H
W
H
50
W
40
0.56
0.76
I, 107.58
,15
0.43
0 ,57
5,76
7,72
65
SCR EEN SI ZE CHARTS IN INCHES
Len s
!
~
I"
--l,S"
2,0"
3.0"
---4 .0"
8'
[ 10'
I
12'
15'
20:
I
25'
30'
35'
4 0'
I
45'
H , 2'2" I 2'9" 1 3'4" ! 4 '2" 15T' 1 6' 11" 1 8' 4 " I g'g"
I
I
'!!. 1 32!..:.:... ! ,,:J:8" 1 4'5" 1 5T' 1 7'5" l g '4" 1 11'3" 1'3' 1"
7'5"
H 1'5"
1' 10 " 2'2" ! 2'9"
3'8"
4 '1"
5'1"
6'6"
8' 4 "
11 '3"
W I I ' ll " ! 2'5" i 2' 11" ! 3'8" , 4 ' 11 " 6'2" 1 7'6"
8'9" 10'0"
6 '3"
4 '2", 4 ' 10" 5'7"
2'1"
2 '9 " [ 3 '5 "
[ "4" [ "8"
7' 5"
8 '5"
5'7" 6 '6"
1'10" 2'2"
4'8"
2'9"
3'8"
r
I
!
~[
HI
W,
~f
!
I
I
I
! 2'3"
2'9"
3'8"
! 1'8"
2' 1"
2'9"
, 3' 1"
i 2'3"
6
3'3"
3'8"
2'5"
3'3"
I 3'8"
2'9"
~ 4" 1 "
I
f
4'2"
5'7"
3'1"
4 '2"
50'
60'
I
r--;'f:t
12'5"
I 75' 1 100 '
I I
I,
I
6 ' 11" 8 '4" [ ' 0'5" [ '3'11 "
9'4" 11 '3" 14'0" 18'9 "
4 '7"
6' 11 " ! 9'3"
~:~:: 9'4" , 12'6"
I 6'2"
3'5"
4 '2" [ 5'2"
6' 11 "
4'8"
5'1"
7'0 "
9'4"
I
j
7 . Adjust fo cus for cl ean and sharply illumin at ed screen.
~~~~~--------FOCUSKNOB
8 . Return function switch to STOP.
NOTE:
Make sure the flywheel (see Page 3, No. 23) be installed before
operating.
7
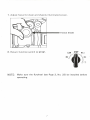
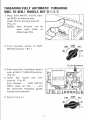
THREADING :FULLY AUTOMATIC THREADING
(REEL-TO- REEL) MODELS NST -0/1/2/3
1. Place EIKI-MATIC AUTO takeup REE L on take-up arm.
Insert film in trimmer and cut.
(Fig. A)
NOTE: New trimmer can be
used
with Estar or
Mylar-base film.
2. Turn function switch to FOR WARD position ( e:J )
FI LM CHANNEL
3. Push automatic threading control
lever to SE LF -TH READ position.
(Fig. B).
4. Insert film lead er into film
channel. (Fig. B)
Film threads . . . EIKI MATIC
REEL takes up film . . . and
the automatic threading guides
release automatically.
5. Switch lamp on .
8
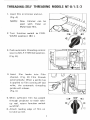
THREADING: SELF THREADING MODELS NT -0/1/2/3
1. Insert film in trimmer and cut.
(Fig. A)
NOTE:
New trimmer can
used with
Estar
Mylar-base film .
be
or
2. Turn function switch to FOR WARD position ( 4('.1 ).
3. Push automatic threading control
lever to SE LF -T H READ position.
(Fig. B).
4. Insert film leader into Film
channel. (Fig. B) Film threads
automatically. When a gentle tug
is applied to film coming off last
roller, the automatic threading
guides will release.
(Fig. C)
5. When sufficient film has passed
through projector to reach takeup reel, return function switch
to STOP .
6. Attach leading edge of film on
to take-up reel.
9
PROJECTING
1. Turn function switch to FORWARD position (.r.g ) and
LAMP on position ( ~~ , (]~ ).
2. Focus picture. Frame film by
adjusting the framing lever.
(Fig. A)
3. Turn volume switch on and adjust
tone controls .
4. For STILL PICTURE, depress
STILL PICTURE LEVER (Fig .
B). (Focus adjustment may be
necessary.) If shutter has stopped
in front of picture, it may be
moved by turning inching knob
either direction until picture
shows on screen.
STOP
5. For REVERSE PROJECTION,
turn function switch from STOP
position to R EVE RSE ( t.~ )
and LAMP on Position ( ~E ).
6. When film is completed, turn function switch to FORWARD position
( 4rJJ ) and let motor run until all film is on the take-up reel.
10
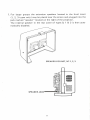
7. For larger groups the extension speakers located in the front cover
(1, 2, 3 types only) may be placed near the screen and plugged into the
jack marked "speaker" located on the right of the projector.
The internal speaker in the rear cover of types 0, 1 & 2 is then automatically disabled.
o
SPEAKER FOR NST, NT-1, 2, 3
11111111111
1111111 "II
11111111111
SPEAKERJACK--------~~~
\-I-..II..-JLJ1...lL---r-
11
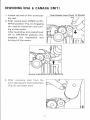
REWINDING (USA & CANADA ONlY)
1. Attach tail end of film to the supply reel.
2. Push rewind lever DOWN to REWIND position (Fig. A) . Engaging
the rewind mechanism and turning on the motor.
After rewinding, turn rewind lever
UP to OPERATE position. Disengaging the mechanism and
turning off the motor.
Push Rewind Lever Down To Rewind
Return rewind lever UP to OPERATE
3. After removing reels from the
arms, depress arm locking buttons
(Fig. B) and lower arms.
12
CHANGING LAMPS
e. *
Disconnect power cord.
PROJECTION LAMP
(ELC/24V 250W)
To open the lamp house door, remove the lock screw and pullout from
the top of the lamp house.
J:"=_~..~~-""---- LAMP-HOUSE LOCK SCREW
Remove the black heat shield, by
pulling straight towards you . (Fig. B)
(Caution shield may be not)
Push to left ejection lever imme diatey above lamp and Lamp will
come out (Fig.C) . Be sure replace ment lamp snaps into place.
Proper sea ting of lamp is essential.
13
The lamp position may be adjusted
for maximum evenness of illumina .tion, allowing for small variations in
lamps.
LAMP ADJUST
SCREW
II'
(BRK/4V O.75A)
EXCITER LAMP
Pullout on black exciter lamp cover
(Fig. E) .
Push in on lamp and turn counterclockwise to remove.
Insert new lamp with notch on
base flange in upper right position,
turn clockwise, clean fingerprints
from lamp, and replace cover.
Close lamp house door and replace
lock-in screw.
14
HI-LO LAMP SWITCH
LAMP HI-LOW SWITCH (for maximum life)
By switching to LOW position ( i(j ~ )
. you r lamp will last 3 times longer
and even in this LOW position t he
lamp output will be minimum 675
lumens.
The HIGH position ( (] ~ ) shou ld
be used for larger aud iences, or
when room li ght is too bright.
In HI G H posit ion the projector
li ght will be about 900 lumens on
the screen.
15
SILENT FILM OPERATIONS
e••
DISCONNECT POWER SUPPL Y CORD
SOUND
Shutter
SILENT
==~I
Shutter _ __
f--_ _
Motor
If------- Motor
This is changed by slipping the motor drive belt to the alternate set of
pulleys.
Open rear cover. Turn inching knob at the same time guiding the belt first
to the smaller motor pulley then to the larger shutter pulley. Change back
to sound speed by reversing the above procedure.
(Note . No silent speed on 50/60Hz models.)
16
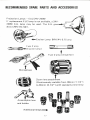
RECOMMENDED SPARE PARTS AND ACCESSORI ES
Projection Lamps - E LC/ 24 V 250W
I f replacement E LC lamp is not available, a 24V 200W EJ L lamp may be used. The EJ L gives'"
about 20% less light.
"'Exciter Lamp BRK / 4V 0.75 amp
;=r --- (;=~
Fuse 2 amp
(E---4S... (Exciter lamp)
t
Fuse 2 amp (Amplifier)
•
Zoom lens attachment
(Continuously variable from 38mm (1 -1/ 2")
to 65mm (2 -1/2") with standard prime lens)
,
Additional lenses-+
17
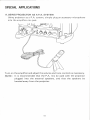
SPECIAL APPLICATIONS
A. USING PROJECTOR AS A P.A. SYSTEM
Using projector as a P.A. system, simply plug an accessory microphone
into the amplifier mic jack.
Turn on the amplifier and adjust the volume and tone controls as necessary.
NOTE: It is recommended that the P.A. mic be used with the projector
plugged into the external speakers, and that the speakers be
located away from the projector.
18
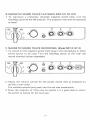
B. MAGNETIC SOUND TRACK PLAYBACK (NST-2/3, NT-2/3)
1. To reproduce a previously recorded magnetic sound track, turn the
Opt/ Mag switch to the (M) position. The projector may then be operated
as usual.
STOP
(}
(]c
(]~
()
~ ".
@)
C. MAGNETIC SOUND TRACK RECORDING. (Model NST-3, NT-3)
1. To record on the magnetic sound track plug in the microphone or other
sound source to be used. Turn the Opt/ Mag switch to (R) with the
record interlock button depressed.
.,
STOP
(]c
(]c
(]~
cO
M '(
@)
P I-tO t . O
@
a 6)o62?eJ
(jll)
~
?:
o
2. Adjust the volume control for the proper record level as indicated on
the Rec Level meter.
The indicator should only peak into the red area occasionally.
3. Since the majority of films may be optical it is a good idea to return
the switch to optical for the next user.
19
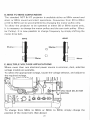
D.50HZ TO 60HZ CONVERSION
The standard NST & NT projector is available either as 50Hz sound and
silent or 60Hz sound and silent operations. Conversion from 50 to 60Hz
or 60 to 50Hz can be accomplished by changing the motor pulley only.
To allow the projector to be operated at either 50 or 60Hz sound only,
it is necessary to change the motor pulley and the cam tank pulley (Shut ter Pulley). It is now possible to change frequency by simply shifting the
motor drive belt.
60HZ
50HZ
Shutter
= =-=:=::jl
Shutter---
c)
=====Motor
Motor
E. MULTIPLE VOLTAGE APPLICATIONS
Where more than one electrical power source is common, dual, selective
voltage models are available.
To select the appropriate voltage, locate the voltage selector, and adjust to
the required voltage.
o
II~C-)'-..)~~J
To change from 50Hz to 60Hz or 60Hz to 50Hz, simply change the
position of the motor belt. (See above)
20
CLEANING AND MAINTENANCE
The ElK I projector has been designed to provide years of trouble free
services .
. All maintenance such as lubrications and adjustments should be referred
to a qualified EIKI service technician.
To keep your projector looking and operating like new the following
items should be checked and cleaned by the operator.
1. Lens - Clean with soft lens tissue.
~~"~~~-SPROCKET
I~~~~~~"~~"APERTUREPLATE
ie,..,.......-++....~- FI LM SHOE
2. Film gate and aperture plate - Remove and clean with a soft brush.
3. Film rollers - Clean and wipe dry with isopropyl alcohol.
4 . Sound focus lens - Brush or blow off dust and lint.
5. Projector : Wipe off with a damp cloth and keep closed when projector
is not in use.
The front elevator feet should always be up before transporting or storing the projector.
Do not oil or lubricate any part of this projector. Refer to your authorized
EIKI dealer.
21
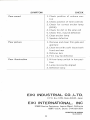
OPERATOR TROUBLESHOOTING GUIDE
CHECK
SYMPTOM
-------r
1. Be sure proje ctor is p lu gged in
No power to motor or lamp
(Pilot lamp not on)
and t he out let has power
2. Check power cord
3. Motor· thermal fuse is defect iv e
or motor module is not p lu gged
in
Motor runs but film doesn't
1. Motor belt off or broken
advance
2. Check position of stil l picture
lever
Motor ru ns too fast or too slow
1. Belt not o n the correct mo t or
pulley
--J.-~
~ooetso~;~:~;~:nadvances, lamp
II
:
~~~~;~~~ 1::;~Ch
not in lamp
3. Transformer m o dule lamp p lu g
Won't thread properly
I discon nected or defective
~ chann el and re w ind
I not in the operate position
lever
, 2. F il m gate not proper ly closed
3. The automat i c threading co nt ro l
lever not pushed to the thread
pos iti o n
No sound (Excite r lamp on)
1. Amp lifier vo lume contro l not
turn ed up
2. On magnetic playback models
make
sure
switch
is in
the
correc t position
3. 2 amp amplifier fuse defective
No sound (Exciter lamp not on)
1. Amplifier vo lum e control not
turned on
2. Defective exciter lamp
3 . 2 amp exciter lamp fuse defective
4. Amplifier not p lugg ed in
22
CHECK
SYMPTOM
Poor sound
1. Check position of volume control
2. Chec~ position of tone controls
3. Check for correct exciter lamp
(BRK)
4 . Check for dirt in the solar cell
5. Check film, may be defective
6 . Clean exciter lamp
7. Speaker defective
Poor picture
1. Remove and clean film gate and
aperture
2. Clean lens with a soft tissue both
front and rear
3. Refocus lens
4. Film may be defective
Poor illumination
1. Hi-low lamp switch in low position
2. Lamp incorrectly aligned
3. Defective lamp
EIKI INDUSTRIAL CO.,L TO.
C.P.O. Box 1229, Osaka 530-91, Japan
EIKI INTERNATIONAL, INC
27882 Camino Capistrano, Laguna Niguel, California
92677 U.S.A. phone: (714) 831-2511
PRINTED IN JAPAN
58.8.5000(5)
23
MEMO
MEMO
r
MEMO
MEMO