Download Delphi Display Systems IMS-9000 User`s manual
Transcript
Delphi Display Systems, Inc. RDC-SFWESQWK100
Page 1 of 6
Order Confirmation System (OCS)
Configuration Tool
Quick Reference Guide for
E-Series Displays
Revision Date: July 29, 2005
Version: 1.00
Part Number: RDC-SFWESQWK100
Delphi Display Systems, Inc.
PROPRIETARY INFORMATION
Copyright © 2005 - Delphi Display Systems, Inc.
All Rights Reserved
Confidential Document:
Do not copy or distribute without written permission from Delphi Display Systems, Inc.
Copyright ©2005. [Unpublished Work]. All rights reserved.
Delphi Display Systems, Inc. RDC-SFWESQWK100
Page 2 of 6
Table of Contents
1
INTRODUCTION ...............................................................................................................................................3
2
UNISTALLING ...................................................................................................................................................4
3
INSTALLING ......................................................................................................................................................4
3.1
3.2
3.3
LAUNCH THE OCS CONFIGURATION TOOL .....................................................................................................4
CONNECT TO THE OCS UNIT ..........................................................................................................................4
CHECK OCS STATUS ......................................................................................................................................5
4
SET OCS TIME...................................................................................................................................................5
5
REMOVE AN IMAGE FROM THE SLIDE SHOW.......................................................................................5
6
ADD AN IMAGE TO THE SLIDE SHOW ......................................................................................................6
7
IMAGE SPECS....................................................................................................................................................6
8
CHANGE HISTORY ..........................................................................................................................................6
Table of Figures
FIGURE 1 – GENERIC LAYOUT OF PROPERLY WIRED SYSTEM ........................................................................................3
Confidential Document:
Do not copy or distribute without written permission from Delphi Display Systems, Inc.
Copyright ©2005. [Unpublished Work]. All rights reserved.
Delphi Display Systems, Inc. RDC-SFWESQWK100
Page 3 of 6
1 Introduction
This guide is intended as a supplement to the OCS Configuration Tool User’s Manual. It provides an overview of certain
common tasks which may be performed using the OCS Configuration Tool. For more detailed information, refer to the OCS
Configuration Tool User’s Manual.
Figure 1 – Generic Layout of Properly Wired System
The Figure above shows what a properly wired system should look like. It details where you would plug in a serial
cable if you are using a back office computer to run the Delphi Configuration Tool as well as detailing what is
needed if you are dialing into the system using a remote computer at a different location. The Delphi Intelligent
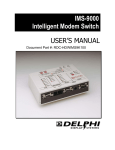
Modem Switch (IMS9000) is typically installed on a wall inside the office at each store.
Please contact Delphi Technical Support if you have any questions or need any assistance at any point while
following the instructions contained within this document at 1-800-456-0060.
Confidential Document:
Do not copy or distribute without written permission from Delphi Display Systems, Inc.
Copyright ©2005. [Unpublished Work]. All rights reserved.
Delphi Display Systems, Inc. RDC-SFWESQWK100
Page 4 of 6
2 Unistalling
To uninstall the software, use the Add/Remove Programs functionality built into Windows® by double-clicking on the
Add/Remove Programs icon in Control Panel, (see your Windows® documentation for help with this), or simply insert the OCS
Configuraton Tool CD into your CD-ROM drive and run the setup program. In any case, when the OCS Configuration Tool
Setup dialog appears, select the Remove option and click Next. Follow the on-screen instructions to remove the application
from your computer.
In addition to uninstalling the software, it is recommended that you back up any existing OCS data. This can be done by
renaming the folder located at C:\OCS on your hard disk to some other name, such as C:\OCSBackup. This will preserve
existing data without interfering with any subsequent installations of the OCS Configuration Tool software.
3 Installing
To install the OCS Configuration Tool software, insert the Installation CD into the CD-ROM drive on your computer. In most
cases, the installation will begin automatically. If it does not begin automatically, click the Start button, select Run... and enter
"D:\setup" (where D: is the drive containing the installation CD) in the Open edit box in the Run dialog. Click OK to start the
installation process. Follow the instructions on the screen to complete the installation process. If you already have a version of
the OCS Configuration Tool installed on your machine, Click the Repair radio button, and then click the Next button, to reinstall the application. Alternatively, you may click the Remove radio button to first uninstall the existing application.
3.1
Launch the OCS Configuration Tool
1.
2.
3.
4.
3.2
To start a program, click the Start button.
Click on Programs
Click on Delphi Display Systems or whatever you named the program group during the initial installation
of the program.
Click on OCS Configuration Tool or whatever you named the program during initial installation to start
the program.
Connect to the OCS Unit
Before connecting to the OCS unit for the first time, you will need to set the COM port, baud rate, and flow control to be used
during the connection. Use the System Configuration
toolbar button to initialize these settings.
Direct Connection (connect to OCS using RS232 serial cable)
1. Using the Delphi IMS9000 Intelligent Modem Switch, connect a 9-pin (straight thru) serial cable from the COM port
on your PC or laptop computer to the “PC” port on the IMS.
2. Run the OCS Configuration Tool software
3.
4.
Click on the Direct Connection
toolbar button to establish a connection to the OCS unit.
If OCS status is displayed in the Output window, the connection was successful.
Dial-up Connection (to use phone line to connect from offsite location)
1. In order for a dial-up connection to work, the IMS (located at the store) must have a phone line connected to it.
2. Run the OCS Configuration Tool.
toolbar control (if no stores are
3.
Select a store to dial in to, using the Choose a Store
available, you will need to add them using the System Configuration dialog.
4.
Click the Dial
toolbar button to begin calling the OCS unit. In the Output window, you should see several
messages indicating a dial-up connection is being attempted.
If OCS status is displayed in the Output window, the connection was successful.
5.
Confidential Document:
Do not copy or distribute without written permission from Delphi Display Systems, Inc.
Copyright ©2005. [Unpublished Work]. All rights reserved.
Delphi Display Systems, Inc. RDC-SFWESQWK100
3.3
Page 5 of 6
Check OCS Status
At any time while connected to the OCS unit, click the OCS Status
toolbar button.
A successful check of OCS status will result in a message similar to this one being displayed in the Output window:
OCS:MaiTreD – V7.55:GEN(WV) [May 20, 2002, 14:21:55] 14:59 6-3-2002 (1024x768)
or
OCS:Loader – V1.14 [June 18, 2001, 22:08:07]
where
OCS:MaiTreD
V7.55:GEN(WV)
May 20, 2002, 14:21:55
14:59 6-3-2002
1024x768
OCS:Loader
V1.14
June 18, 2001, 22:08:07
describes the POS interface,
indicates the Delphi POS interface version,
indicates the Application built date,
indicates the current OCS date/time,
specifies the OCS display size (in pixels).
indicates the Delphi Loader Application,
indicates the Delphi Loader Application version,
indicates the Application built date.
4 Set OCS Time
3.
4.
toolbar button.
At any time while connected to the OCS unit, click the System Configuration
On the Settings tab of the System Configuration dialog, set the Date and Time values in the OCS System Time
section to the values you want to set on the OCS unit (these fields default to the current date/time of the computer on
which the OCS Configuration Tool is running, but may be changed to any valid values). When modifying the time, be
sure to use military, or 24-hour, time. For example 2:00 p.m. is denoted as 14:00.
Click the Set OCS System Time button to set the OCS date and time.
Click OK to close the dialog.
5.
Click the OCS Status
1.
2.
toolbar button, to make sure the OCS date and time got updated correctly.
5 Remove an Image from the Slide Show
1.
Click the Retrieve OCS Data
2.
Make the Changes
toolbar button to retrieve OCS data
Click on the Dayparts
toolbar button to display the Dayparts dialog. On the Select Dayparts tab of the dialog,
click on the daypart which contains the image, and then click the Modify button to edit the daypart. In the Define
Daypart dialog, click on the image you want to delete in the Active Daypart Items list, and then click the Remove
button to remove it from the daypart. Click the Save button to close the dialog, and then click OK again to close the
Dayparts dialog.
3.
Update the OCS the OCS unit with the new data
Click the Update Remote OCS toolbar button
to display the Update OCS dialog. Check only the OCS.ini and
the daypart (.dpt) file that you changed, to minimize the amount of time needed to transfer the data, and click the
Update Now button to update the OCS unit with the new data.
Confidential Document:
Do not copy or distribute without written permission from Delphi Display Systems, Inc.
Copyright ©2005. [Unpublished Work]. All rights reserved.
Delphi Display Systems, Inc. RDC-SFWESQWK100
Page 6 of 6
6 Add an Image to the Slide Show
Adding an image to a slide show is strikingly similar to removing an image from a slide show, however you must first make sure
that the image is saved to you local computer in the correct place. To do this, simply copy the image from whatever source;
email, CD from Worldwide, etc. Next paste it into the following location: C:\Program Files\Delphi Display
Systems\OCS\Images. If an image is not in this folder, it may not be available for use on the display. Now you may proceed to
the following steps.
**Please make sure that the image is within the specs detailed in Section 7 of this
document. If it does not, then the image may not appear on your display**
1.
Click on the Retrieve OCS Data
2.
Make the Changes
toolbar button to retrieve OCS data.
As before, click on the Dayparts
toolbar button, to display the Dayparts dialog. On the Select Dayparts tab of
the dialog, click on the daypart which contains the image, and then click the Modify button to edit the daypart. From
the list of Available Daypart Items, click on the image that you want to add to the daypart, and then click the Add
button to preview the image in the Edit an Image Item dialog and add it to the Active Daypart Items list. Click
OK/Save to close the Edit an Image Item, Define Daypart, and Dayparts dialogs.
3.
Update the OCS the OCS unit with the new data
Click the Update Remote OCS toolbar button
to display the Update OCS dialog. Check only the OCS.ini, the daypart
(.dpt) and the image files that you changed or added, to minimize the amount of time needed to transfer the data, and click the
Update Now button to update the OCS unit with the new data.
7 Image Specs
For an image to be able to display properly on your Delphi OCS, it must meet the following criteria.
JPEG Format
Orientation
Mode
Width
Height
File Size
Image Quality
Image Name
Baseline (“Standard”)
Landscape
RGB Color, 8 bits / channel
1024 Pixels (for slideshow image); 320 Pixels (for sidebar image)
768 Pixels
< 300K Bytes Recommended (based on image quality selected)
Med. to High Quality (8+ image quality in Adobe Photoshop)
8 characters or less***************
8 Change History
Change
Initial Release
Version
V1.0
Date
7/29/05
Author
K. Mather
Confidential Document:
Do not copy or distribute without written permission from Delphi Display Systems, Inc.
Copyright ©2005. [Unpublished Work]. All rights reserved.


