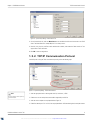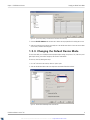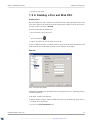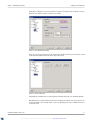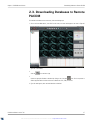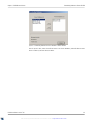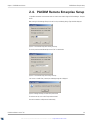
1
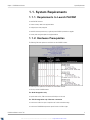
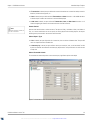
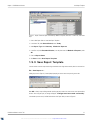
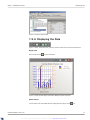
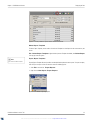
1 SMALL COFF....0.99
2 LG POP........1.99
1 EGG SAND......2.50
SUB-TOTAL.....5.48
TAX....0.82
TOTAL.....6.30
VOID
TOTAL.....0.00
CASHR...........TH6
TR..001-01-22-05 11:39
PACDM
TM
PAC Data Manager v 7.02
©2008 i³DVR International Inc.
The contents of this user manual are protected under copyrights and
computer program laws.
INNOVATIONS AT THE SPEED OF THOUGHT ™
PACDM User Manual - Version 7.02
by Bob Hoang, Training Manager, Mykone Saunders, Creative Producer, and Sandy Cao, Technical Writer
Copyright © 2008 i³DVR International Inc.
All rights reserved. No part of this manual may be reproduced or transmitted in any form or by any means, electronic or mechanical, including photocopying, recording, or by any information storage or retrieval
system, without the prior written permission of the copyright owner and the publisher.
• i³DVR has no control over the type of data available from the POS interface products provided by others.
• The i³DVR components identified within this document provide means of capturing transaction data for use by the SRX family of digital video recording/transmission products.
• The PACDM™ components translate the data into a useable format by the i³Server or SRX-PRO and permits associating transaction data with specific cameras.
• i³DVR assumes no responsibility for the amount and type of information available, the operation, non-operation, or erroneous operation of these third party products.
• The actual configuration and equipment required may vary based upon the specific POS. i³DVR recommends contacting your local POS representative for your specific configuration.
XML to PDF by RenderX XEP XSL-FO Formatter, visit us at http://www.renderx.com/
Table of Contents
1. PACDM Server Software .................................................................................................................................. 1
1.1. System Requirements ........................................................................................................................... 2
1.1.1. Requirements to Launch PACDM ..................................................................................................... 2
1.1.2. Hardware Prerequisites ............................................................................................................... 2
1.1.3. Software Requirements ............................................................................................................... 3
1.2. Introduction to PACDM ......................................................................................................................... 4
1.3. System Setup for Integration ................................................................................................................... 6
1.3.1. Serial Communication Protocol ....................................................................................................... 6
1.3.2. TCP/IP Communication Protocol ...................................................................................................... 8
1.3.3. Changing the Default Device Mode ................................................................................................... 9
1.3.4. Enabling a Port and Web PAC ....................................................................................................... 10
1.4. Quick Search ................................................................................................................................... 12
1.4.1. Quick Item Search Result ............................................................................................................ 13
1.4.2. Exporting Data ....................................................................................................................... 14
1.5. Custom Search/Reports ........................................................................................................................ 16
1.5.1. Visual Counting Report Templates ................................................................................................... 17
1.5.2. Create New Report Template ....................................................................................................... 17
1.5.3. Save Report Template ............................................................................................................... 21
1.5.4. Displaying the Data .................................................................................................................. 22
1.5.5. Customize Menu ..................................................................................................................... 25
1.5.6. Database Menu ...................................................................................................................... 26
1.5.7. Export Database ..................................................................................................................... 29
1.5.8. Synchronize Database ............................................................................................................... 32
1.6. Exception Reporting ........................................................................................................................... 34
1.6.1. Email Setup .......................................................................................................................... 37
2. PACDM Remote Software ............................................................................................................................... 40
2.1. Regular Remote PACDM Installation .......................................................................................................... 41
2.2. Quick Search on Remote PACDM .............................................................................................................. 45
2.3. Downloading Databases to Remote PACDM .................................................................................................. 47
2.4. PACDM Remote Enterprise Setup ............................................................................................................. 49
3. Appendix ................................................................................................................................................. 51
3.1. Password Setup for i³SRX-Pro ................................................................................................................. 52
3.2. Text Overlay Setup for i³SRX-Pro .............................................................................................................. 53
3.3. List of Integrations ............................................................................................................................. 54
3.4. Frequently Asked Questions ................................................................................................................... 57
XML to PDF by RenderX XEP XSL-FO Formatter, visit us at http://www.renderx.com/
1
PACDM Server Software
Topics Covered
• System Requirements
• Introduction to PACDM
• System Setup for Integration
• Quick Search
• Custom Search/Reports
• Exception Reporting
Point of Sale, ATM (Automated Teller Machine), and Card Access Data Manager (PACDM™) is a search tool designed to
be used in conjunction with i³Server or SRX-Pro software. Its primary purpose is to allow any peripheral device such as
a POS cash register, ATM, or Card Access reader integrate with the i³Server or SRX-Pro software. PACDM™'s integration
with a third party product, such as the peripheral devices mentioned earlier, will allow the data collected from the device
to be overlaid onto or viewed on the side of the live video capture. This data is collected, stored, and can also be searched
in real time.
The tools that PACDM™ offer provide users with the ability to create different reports based on the data collected from
the integrated systems. The user also has the ability to present the report in a table or graphical view. Using PACDM™
also makes it possible to export selected data to a printable file format or to various other data file formats.
PAC Data Manager can be accessed on a local machine or remotely via the remote mode. In order to run PACDM™, the
software must be installed onto the i³Server or SRX-Pro software. Data can be managed remotely from one or more
servers using the i³Remote or SRX-Pro Remote software.
i³DVR application programs can be found on: http://files.123ip.com/
Please contact technical support for more information on locating the desired PACDM™ software version. Microsoft
patches and updates files Microsoft DotNetfx.exe, Microsoft MDAC-TYPE.exe, and Windows Service Packs should be
downloaded from Microsoft website.
For security reasons, users will be required to contact the i³DVR Tech Support team to obtain the required login and
password information.
Contact Information:
i³DVR International Inc. • 780 Birchmount Road, Unit 16 • Scarborough, Ontario • Canada M1K 5H4
416.261.2266 (Tel) • 1.877.877.7241 (Toll Free Tech Line) • 416.759.7776 (Fax) • Email: [email protected]
XML to PDF by RenderX XEP XSL-FO Formatter, visit us at http://www.renderx.com/
Chapter 1. PACDM Server Software
System Requirements
1.1. System Requirements
1.1.1. Requirements to Launch PACDM
• Install PACDM™ software
• Connect necessary cables for the peripheral device
• Configure System Setup Integration
• Install SPK (software protection key) - applies only when PACDM is purchased as an upgrade
• Correctly select the right template for the peripheral device
1.1.2. Hardware Prerequisites
The Following i³DVR Series products are certified for use with PACDM™ software:
The Following SRX-Pro products are certified for use with PACDM™ software:
• SPK Key to activate PACDM™software
For Serial Integration only:
• Specific cables for POS, ATM or Card Access (USB COM port or SIIG card)
For TCP/IP Integration only: Ethernet connection
• A minimum of 20 GB of free space is required on the D:\ drive for database storage
• A minimum of 512MB RAM and processor speed of Pentium 4-1.8GHz or higher
PACDM User Manual - Version 7.02
XML to PDF by RenderX XEP XSL-FO Formatter, visit us at http://www.renderx.com/
2
Chapter 1. PACDM Server Software
Software Requirements
Before beginning installation, all hardware peripherals should be properly attached from the POS peripheral device to an
i³DVR Server.
1.1.3. Software Requirements
OS: Windows XP or Window XP Embedded
The following is a list of the required software applications to be installed:
• Microsoft DotNetfx.exe Version 3.0
• Microsoft MDAC-TYPE.exe
i³DVR application programs:
• i³Server or SRX-Pro Server
• i³Remote or SRX-Pro Remote
For remote viewing: PACDM™ Regular Remote (Relation based on one to one) or PACDM™ Enterprise Remote (Relation
based on one to many)
• Microsoft Access (Optional - used for troubleshooting)
All required Microsoft patches and i³DVR application software are available for download from the i³DVR FTP site. (Microsoft
operating system and application software are not available for download.) All software should be downloaded directly
onto the DVR system or transferred to a CD.
PACDM User Manual - Version 7.02
XML to PDF by RenderX XEP XSL-FO Formatter, visit us at http://www.renderx.com/
3
Chapter 1. PACDM Server Software
Introduction to PACDM
1.2. Introduction to PACDM
After clicking on the PAC icon,
on the SRX-Pro main screen, the following window will appear:
Figure 1 - Basic user graphic interface for PAC Data Management
This function allows integration between the PAC Data Manager and other peripheral devices. Setup for external data
(POS and CA) can be done on the PACDM™ Setup page.
A left-click on any one of the following Menu Bar items will give you the following drop-down menus:
Figure 2 - Drop-down menu for the "File" menu
Figure 3 - Drop-down menu for the "View" menu
Figure 4 - Drop-down menu for the "Tools" menu
Figure 5 - Drop-down menu for the "Help" menu
Changing the View of the Tool Bar
PACDM User Manual - Version 7.02
XML to PDF by RenderX XEP XSL-FO Formatter, visit us at http://www.renderx.com/
4
Chapter 1. PACDM Server Software
Introduction to PACDM
The user has the option to change the view of the Tool Bar to his/her preference. The first option the user has is the
choice between: Show the Tool Bar or Hide the Tool Bar
There are two ways to do this:
1. Go to the View menu, hover over the Toolbar option until the Standard option appears to its right.
Figure 6 - Standard option from the 'View' Menu
2. Right-click on any part of the Toolbar, a menu will appear displaying the 'Standard' option (this method only applies
when the Toolbar is visible).
Figure 7 - Standard option by Right-clicking on the Toolbar
When a "checkmark" is beside the Standard option, the user has selected to view the Toolbar. When the "checkmark"
is not beside the Standard option, the Toolbar is hidden.
The second option the user has is the choice between: View buttons only or View buttons with a short descriptive label.
To do this, Right-click on any part of the Toolbar, a menu will appear displaying the 'View buttons only' option (this is
the same menu mentioned earlier).
If the 'View buttons only' option is selected, only buttons will be shown.
Figure 8 - View buttons only function selected
PACDM User Manual - Version 7.02
XML to PDF by RenderX XEP XSL-FO Formatter, visit us at http://www.renderx.com/
5
Chapter 1. PACDM Server Software
System Setup for Integration
1.3. System Setup for Integration
Setup - System Setup
To set up communication with the peripheral device, under the Tools menu found on the Menu bar, select "System
Setup":
Figure 9- System Setup Menu
Step 1 - Automatic Login
A login dialog will appear. For security purposes, users have to confirm access rights to the PAC communication setup
page. A login is required to create a new user name and password. If the user cannot recall the password, open
D://PAC/Data/user.pwd and delete the file.
Figure 10 - User Login dialog
Step 2 - PAC System Setup configuration
After the validation of the login information, an automatic System Setup configuration page will be displayed. If the
serial COM port communication protocol is to be used, perform the following steps for the System Setup configuration:
1.3.1. Serial Communication Protocol
i³DVR utilizes two types of serial connection.
• Through serial port integration with 2, 4, or 8 inputs.
• USB to serial converter with 1, 2, 4, or 8 serial outputs
USB to serial converters need the appropriate driver, please call the Technical Support team for a username and password
to access the FTP site to download the driver. Another method of acquiring the driver is under D:\backup\drivers
PACDM User Manual - Version 7.02
XML to PDF by RenderX XEP XSL-FO Formatter, visit us at http://www.renderx.com/
6
Chapter 1. PACDM Server Software
Serial Communication Protocol
Figure 11 - System Setup dialog - Serial Communication General Tab
1. Select the availability of the COM port, that is to be used for text overlay display by clicking it
Note
A working COM port is required in order for
the software to use an external device.
2. Enable Port to be used
3. Select proper text overlay area. A single camera can have up to 2 boxes of text overlay
4. Select the type of system for the integration to take place (drop down menu), for example POS or CA (Card Access)
5.
Specify the template file used to modify the transaction data by clicking the
used for both the text overlay and search functionality.
button. This is the template to be
Figure 12 - List of different templates
6. Select the camera/channel number that the text overlay will be placed upon
7. Select the Unit ID if POS server sends data from all registers to only one PACDM™ port
PACDM User Manual - Version 7.02
XML to PDF by RenderX XEP XSL-FO Formatter, visit us at http://www.renderx.com/
7
Chapter 1. PACDM Server Software
TCP/IP Communication Protocol
Figure 13 - System Setup Dialog - Communication Tab
8. On the Communication tab, select the Baud rate that the outside device will use for data transfer to the i³DVR
Server. The default Baud rate is usually 9600, but it is not always correct.
9. Data bits, Parity, Stop bits, and Flow control should remain as default, unless otherwise. Please consult our Tech
support team for more information.
10. Click OK to save the configurations
1.3.2. TCP/IP Communication Protocol
If the DVR system is using the TCP/IP communication protocol, perform the following steps:
Figure 14 - System Setup Dialog - TCP/IP Communication
1. Select the appropriate device to be integrated with POS, Card Access, or ATM
Note
The ‘POS IP address’ selection applies only
to the HDS template.
2. Enable one or two text overlay box(es) that would be supported by the SRX-Pro
3. Select the correct template for the peripheral devices (Figure 12)
4. Enable Port (default port is 5111 or 6111) from the peripheral device. UDP (broadcasting data) is usually left uncheck
PACDM User Manual - Version 7.02
XML to PDF by RenderX XEP XSL-FO Formatter, visit us at http://www.renderx.com/
8
Chapter 1. PACDM Server Software
Changing the Default Device Mode
Figure 15 - System Setup dialog - Communication Tab Camera Text box setup
5. Check the POS IP Address box and enter the IP address that the peripheral device is sending the text from
6. Under the Communication tab, select the text overlay box to the desired camera location. If there are two text boxes
on one camera, a different menu will appear.
1.3.3. Changing the Default Device Mode
The user has the ability to set PACDM to one default peripheral device setting, the options are: POS, Card Access, Intelligent People Counting, License Plate Recognition, and Automatic Teller Machine.
The user may do this by following these steps:
1. Go to the Tools menu on the menu bar, select the 'Options' option
2. Select the desired default device mode in the drop-down menu labeled 'Default Device Mode'
Figure 16 - Default Device Mode drop-down menu selection
PACDM User Manual - Version 7.02
XML to PDF by RenderX XEP XSL-FO Formatter, visit us at http://www.renderx.com/
9
Chapter 1. PACDM Server Software
Enabling a Port and Web PAC
3. Click 'Apply' to save changes
1.3.4. Enabling a Port and Web PAC
Enabling a Port
When the user enables a Port, data is “redirected” to a box window on the side, instead of appearing directly on the video
as text overlay. However, the box window on the side will not appear unless the 'Disable Text Overlay' option, found on
the i³Server or SRX-Pro main screen, is checked.
This option can be located by the following steps:
1. Click on the i³Server or SRX-Pro main screen
2.
Click on the Setup button,
3. Under the 'Text Overlay' tab, check the 'Disable Text Overlay' box
If the port is enabled and the function in “Enable Text Overlay” is checked, the side box will not be visible, but data will
still be collected and search will be available. The default Port is 7444 however it can be changed.
Web PAC
Figure 17 - Web Server setup window
Enabling Web PAC will allow users to view PACDM remotely via Internet Explorer 6.0 and 7.0. The following information
is needed to setup Web PAC:
• URL address - the address of the web server
• Database connection information - needed to establish initial connection with the database and includes: Server IP,
Port Number, User ID and Password
To start, click on the Test Connection button.
PACDM User Manual - Version 7.02
XML to PDF by RenderX XEP XSL-FO Formatter, visit us at http://www.renderx.com/
10
Chapter 1. PACDM Server Software
Enabling a Port and Web PAC
Sending data to a Web server is a two-way communication, registration is needed for every PACDM server in order to
gain access to the database. A public IP of the DVR in use is needed.
Figure 18 - 'Local' Web PAC setup window
'What is my IP' is a link to an internet site that will provide the DVR's IP address. Please note that in some cases, a PACID
can be automatically updated, however this does not apply to all situations.
Figure 19 - 'Services' of Web PAC
Downloading data to the Web server is a process registered as a Windows service and is also controlled by Windows.
When Windows starts, it will automatically start this service in the background. However, there is also an option to start
this service manually(if it has not already started), to stop it (for upgrading purposes, or just to disable this function) or
to restart the service.
PACDM User Manual - Version 7.02
XML to PDF by RenderX XEP XSL-FO Formatter, visit us at http://www.renderx.com/
11
Chapter 1. PACDM Server Software
Quick Search
1.4. Quick Search
Figure 20 – Shows the Quick Item Search function
To search for a particular item by description:
1. Click on the Quick Search button indicated on Figure 20
2. Enter the item description in the Item Description text box, or
3. Select Item description(s) in the list box
4. Click on the Search button
To search for a particular item by price:
1. Check the Item Price box
2. Select the operator (equal, greater than, etc…)
3. Enter the amount in the $ text box
4. Click on the Search button
Figure 21 – Search Interval
To search for items by time interval:
1. Select the desired device Date/Time used for the search (DVR Date/Time or POS Date/Time)
2. Select a start time and end time to perform a search between the indicated time interval
Date parameters can be selected from a specific hour to a specific date/time range (Today, Yesterday, etc…).
PACDM User Manual - Version 7.02
XML to PDF by RenderX XEP XSL-FO Formatter, visit us at http://www.renderx.com/
12
Chapter 1. PACDM Server Software
Quick Item Search Result
Only enabled when using the custom time interval indicated in #2
1.4.1. Quick Item Search Result
While performing a search, there are certain situations that will fare the following message(s):
Figure 22 – Results returned too many matching Records
Figure 23 – Results returned no matching Records
Figure 24 – Results of Quick Item Search
To refresh, hide or show the search period, clear, export or close the Quick Search results, use the following buttons illustrated in Figure 25
Figure 25 – Refresh, Search Period, Clear, Export, and Close functions respectively
Within the grid, the results of the search will be returned. The following options are available:
Camera icon - By clicking the camera icon,
the user will be able to view available video captures with text
overlay from the transactions chosen. For more information refer to the Play Back DVR Search section of the manual.
Details - By double left-clicking on
item/transaction
, the user will be provided with the detailed presentation of the current
PACDM User Manual - Version 7.02
XML to PDF by RenderX XEP XSL-FO Formatter, visit us at http://www.renderx.com/
13
Chapter 1. PACDM Server Software
Exporting Data
Figure 26 – 'Details' shows transactions with details
To view more details on the Receipt check the “View Receipts Before and After” box
Figure 27 – Simple View shows Items/transactions with limited history information (before and after)
1.4.2. Exporting Data
Figure 28 – Export Function
The function to Export data provides the user with the option to transfer the results of a data search or a search report
in text, XML, Excel, and Word format. The ability to export to different formats exists in both Quick Search mode and
Custom Report mode for all data searches including reported results.
Formats that may be chosen are:
PACDM User Manual - Version 7.02
XML to PDF by RenderX XEP XSL-FO Formatter, visit us at http://www.renderx.com/
14
Chapter 1. PACDM Server Software
Exporting Data
1. XML
2. Microsoft Word 9.0 (or higher)
3. Microsoft Excel 9.0 (or higher)
4. Text
The exporting file can be transferred into other folders on the local area network. If Microsoft Office is not available, options
for exporting to Excel and Word will be disabled.
Figure 29 – Exporting data dialog
Note
If there is no data return for selected criteria
– an alert box message will be shown indicating there is no data to be exported.
PACDM User Manual - Version 7.02
XML to PDF by RenderX XEP XSL-FO Formatter, visit us at http://www.renderx.com/
15
Chapter 1. PACDM Server Software
Custom Search/Reports
1.5. Custom Search/Reports
Custom search provides the ability to develop more detailed reports using a Report Template. Report templates can be
provided at different levels of detail such as item level, transaction level, or sub item level. Custom reports also allow a
user to see all details pertaining to a transaction in Table or Graphic view.
To start a custom search, click the Reports menu below
Figure 30 – Reports Menu
Figure 31 – Systems Reports and User (Custom) Reports
After installation – the user will be able to see a list of default report templates. When double clicking on the POS Reports,
the window on the right will appear for the specific report. At the bottom, different tabs appear, each for the specific
report type. The following are the available Report templates:
• List Report (Transaction level) - Includes all transactions in a list form with detailed information on the
transaction
• List Report (Item level) - Includes all transactions in a list form with detailed information on the transaction
as well as the detailed description of each item found within the transactions.
• Summary Report (Transaction level): summarized by Channel No. - Includes all transactions
categorized into the channel # the data was originally collected from. In addition, this report also displays the number
of transactions that occurred in each channel along with the sum of these transactions.
• Summary Report (Item level): summarized by Channel No. - Includes all transactions categorized into the channel # the data was originally collected from much like the previous report; however, this report
displays the number of items sold rather than number of transactions. It also includes the sum of all items within each
channel.
PACDM User Manual - Version 7.02
XML to PDF by RenderX XEP XSL-FO Formatter, visit us at http://www.renderx.com/
16
Chapter 1. PACDM Server Software
Visual Counting Report Templates
• Summary Report (Transaction level): summarized by Method of Payment - Includes
all transactions categorized into the method of payment the transactions were paid with. In addition, this report also
displays the total number of transactions paid with each method of payment along with the total paid in each method.
• Summary Report (Item level): summarized by Method of Payment - Includes all transactions
categorized into the method of payment the transaction were paid with much like the previous report, however, this
report displays the number of items paid with each method of payment along with the total paid in each method.
1.5.1. Visual Counting Report Templates
Visual Counting Reports are reports that integrate the innovative Visual Count technology. Visual Count allows users to
draw detection zones, which are specific areas that are monitored for human and vehicle motion. Users are able to count
the number of humans or cars that pass through the detection zone and this information is used to develop the Visual
Counting Reports.
With Visual Counting Reports, users can compare:
1. The number of cars that pass by the Drive Through window with the amount or number of transactions
2. The number of customers served with the amount or number of transactions
Figure 32 – Visual Counting Reports folder
Default Report Templates use pre-selected search parameters to create an automatic report for viewing. These reports
cannot be deleted, imported, or exported (features such as delete, import and export can be referenced in this manual).
PACDM comes with a variety of reports: Drive Through, Register, and Q Time. The reports only work if these modules
are purchased or as an upgrade.
1.5.2. Create New Report Template
Below the list of System Reports, follows a folder named User Reports. This is used to store all the users Custom Reports.
There are two methods to create a New Report Template:
1. Move cursor directly over the User Reports folder and right click - select New Report.
PACDM User Manual - Version 7.02
XML to PDF by RenderX XEP XSL-FO Formatter, visit us at http://www.renderx.com/
17
Chapter 1. PACDM Server Software
Create New Report Template
Figure 33 - First method of creating a New Report Template
2. Click on the File menu at the very top of the window - select New Report
Figure 34- Second method of creating a New Report Template
PACDM User Manual - Version 7.02
XML to PDF by RenderX XEP XSL-FO Formatter, visit us at http://www.renderx.com/
18
Chapter 1. PACDM Server Software
Create New Report Template
Figure 35 – New Report Guide window will appear every time a New Report template is created, unless disabled. To
exit this window, click Close.
Figure 36 – Custom Search Dialog – General Tab contains Search Period, Detail Level and Report Type
Select Detail level
Choose between Transaction, Item, and Sub Item (e.g. A hamburger has sub items; such as cheese, bacon,
etc.)
PACDM User Manual - Version 7.02
XML to PDF by RenderX XEP XSL-FO Formatter, visit us at http://www.renderx.com/
19
Chapter 1. PACDM Server Software
Create New Report Template
• If Transaction is selected, the report will contain transaction information such as transaction number, transaction
date/time, information about payment, etc...
• If Item is selected, the report will contain both Transaction and Item information. I.e. all available data about
an item description as well as the transactions for the item will be displayed.
• If Sub Item is selected, the report will contain Transaction, Item, and Sub Item information. I.e. all
information regarding sub items but also information about the item and transactions.
Search Period
Note
If no sub item information is available, this
option will not be available.
Select the time interval in which to conduct the search. The options are Today, Last Number of Hours, Last Number of
Days, or a Custom Interval where the user can specify the starting day/time and the ending day/time. (See chapter
Searching items by time Interval in the manual for more information)
Select Report Type
• If List is selected, the report will provide a list of transactions, items or sub items in datasheet view. The report will
consist of a Simple View and an Extended View.
• If Summary by is selected, the report will be a summary of transactions, items, or sub items based. The field
by which to summarize can be selected in the Summary by drop down box. The report will consist of a Grid View and
a Graph View.
Select Extended Criteria
To narrow down the search and produce a more accurate report, using different queries can be helpful.
Figure 37 – Custom Search – Filters Tab contains Extended Criteria fields
PACDM User Manual - Version 7.02
XML to PDF by RenderX XEP XSL-FO Formatter, visit us at http://www.renderx.com/
20
Chapter 1. PACDM Server Software
Save Report Template
Figure 38 – Sample Transaction Report Summarized by Method of Payment (Grid view). To obtain this, follow these
steps:
1. Create a New Report (Refer to Create New Report Template)
2. In the General Tab, Under Search Period, choose Today
3. Under Report Type select Summary - Method of Payment
4. In the Filters tab, under Extended Criteria, in the drop-down menu for Method of Payment, select
All
5. Enter new Report Name
6. Click Save or follow ‘Save Report Template’
1.5.3. Save Report Template
If the user wishes to save the report results using the selected criteria using another method, select from the menu bar:
File - Save Report as...
A dialog box, shown in Figure 39, is then displayed prompting the user to name the report using the text box.
Figure 39 – Saving Report Name Dialog
When OK is clicked, a report will be generated containing the query results of the custom search at the requested date
and time. After saving the report, the message will appear: "Changes have been saved successfully"
If the viewed report was saved, it will be listed under the User Report folder, as shown in Figure 42
PACDM User Manual - Version 7.02
XML to PDF by RenderX XEP XSL-FO Formatter, visit us at http://www.renderx.com/
21
Chapter 1. PACDM Server Software
Displaying the Data
Figure 40 – New Report Template added
1.5.4. Displaying the Data
Figure 41 – Refresh, Search Period, Clear, Export Data, Grid View, Graphic View, and Close button respectively
Graph View
Click the Graph View icon,
to get the result below:
Figure 42 – Sample Transaction Report Summarized by Method of Payment (Graph view)
Search Period
If the user wishes to see more detailed information regarding the search period, click the
PACDM User Manual - Version 7.02
XML to PDF by RenderX XEP XSL-FO Formatter, visit us at http://www.renderx.com/
icon:
22
Chapter 1. PACDM Server Software
Displaying the Data
Figure 43 – Summary Method of Payment shown with the Search Period
Delete Report Template
To delete a Report Template, the user needs to first select the Template from User Report list and on the menu bar, then
choose:
File - Delete Report Template or Right click directly over the Template to be deleted, select Delete Report
in the pop up menu that appears
Export Report Template
Note
Users cannot delete default Templates
Exporting Report Template will make it possible to use already defined templates with other systems. To export a template,
select the report to export and from the menu bar choose the following options:
1. Select File on the menu bar - Export Reports
2. Right click over User Report - Export Reports
Figure 44 - First method of Exporting Reports
PACDM User Manual - Version 7.02
XML to PDF by RenderX XEP XSL-FO Formatter, visit us at http://www.renderx.com/
23
Chapter 1. PACDM Server Software
Displaying the Data
Figure 45 - Second method of Exporting Reports
The exported report has an extension of .paccrit. This file can be copied to another machine and then imported to another
PACDM™.
Import Report Template
If another system is being used and the same reports need to be viewed on the newer system, import the existing templates
into the new PACDM™ by either:
1. Selecting File on the menu bar - Import Reports or
Figure 46 - First method of Importing Reports
2. Right click over User Report - Import Reports
Figure 47 - Second method of Importing Reports
PACDM User Manual - Version 7.02
XML to PDF by RenderX XEP XSL-FO Formatter, visit us at http://www.renderx.com/
24
Chapter 1. PACDM Server Software
Customize Menu
The default extension for imported report templates is: .paccrit
Play Back DVR Search
All searchable data is displayed in the table view. A simple playback search is conducted by clicking the camera icon
in the first column of the results grid of a Quick Item Search or a Custom List Report.
Figure 48 – Detail of Results grid showing the Camera icon
Play Back DVR Search is possible in both SRX-Pro Server and SRX-Pro Remote systems.
1.5.5. Customize Menu
This function allows users to define search parameters in Single/Multi-system Database Fields
The default Database Field parameters are based on the specific POS machine integrated. The parameters will be
presented to the user divided into Numeric fields and Alphabetical fields. The user can select the search parameters that
will be available on the Custom Search user interface. The end user can also change the Database Field names. To accomplish this, on the menu bar, select:
Tools - Database Utilities - Field Name
Figure 49 – Tools Menu
PACDM User Manual - Version 7.02
XML to PDF by RenderX XEP XSL-FO Formatter, visit us at http://www.renderx.com/
25
Chapter 1. PACDM Server Software
Database Menu
Figure 50 – Customize Database Fields
Column: Is Used
• Allows the user to select the items to be presented in the Customer Report.
Column: Fixed Database Name
• This field describes database field names.
Column: Customized Name
• The user has the ability to change the name of the Database Field to make it more user-friendly when building a Custom
Search.
• The Database Field Names on the left are those selected for use by a specific POS. The Customized Name,
on the right, is the name that will appear on the main screen of the application and on the column headers of the report
grids.
1.5.6. Database Menu
The Database menu provides the option to backup PACDM™ data to a remote location. The basic tools provided in this
menu are Compact Database, Export Database and Synchronize Database.
PACDM User Manual - Version 7.02
XML to PDF by RenderX XEP XSL-FO Formatter, visit us at http://www.renderx.com/
26
Chapter 1. PACDM Server Software
Database Menu
Figure 51 – Database menu
Compact Databases
In certain situations, such as the need to export the existing database to another device, it may prove useful to compact
the database prior to exporting. This can be accomplished by selecting on the menu bar:
Tools - Database Utilities -
Compact Database
This will result in the display of the following dialog box.
Figure 52 – Compact Databases dialog box
Click Browse for files…
The following dialog box will be displayed:
PACDM User Manual - Version 7.02
XML to PDF by RenderX XEP XSL-FO Formatter, visit us at http://www.renderx.com/
27
Chapter 1. PACDM Server Software
Database Menu
Figure 53 – Open File dialog box
After selecting a file, the Compact Databases dialog box will display the following:
Figure 54 – Compact Database dialog box with a database file selected
To proceed, click Compact.
Once the process is finished, the dialog box will change to:
Figure 55 – Compact Databases dialog box after Compaction is completed
Special Cases:
If ReportingDb.mdb is selected, the following message is displayed:
PACDM User Manual - Version 7.02
XML to PDF by RenderX XEP XSL-FO Formatter, visit us at http://www.renderx.com/
28
Chapter 1. PACDM Server Software
Export Database
Figure 56 – Warning – Cannot Compact running database
If today’s database is selected, the following message is displayed:
Nois selected by default. If the PAC parser is not running, the user can choose to compact these databases.
Figure 57 – Warning – Cannot Compact today’s database
1.5.7. Export Database
It is possible to export daily databases to another computer or device. In order to export database, on the menu bar select:
Tools - Database Utilities -
Export Databases
The following dialog box will be displayed:
Figure 58 – Export Databases dialog
Click Browse for files… The following dialog box is displayed:
PACDM User Manual - Version 7.02
XML to PDF by RenderX XEP XSL-FO Formatter, visit us at http://www.renderx.com/
29
Chapter 1. PACDM Server Software
Export Database
Figure 59 – Open File dialog box
After selecting a file, the following dialog box will be displayed:
Figure 60 – Export Databases dialog box with a selected database to export
After selecting Browse for destination folder, the following dialog box is displayed:
PACDM User Manual - Version 7.02
XML to PDF by RenderX XEP XSL-FO Formatter, visit us at http://www.renderx.com/
30
Chapter 1. PACDM Server Software
Export Database
Figure 61 – Browse for Folder dialog
Select the folder where the database file is to be exported.
Figure 62 – Export Databases dialog box with selected database and selected destination
Figure 63 – Message indicating Database was successfully exported
If there is a database file with the same name in the destination folder, the following message is displayed:
PACDM User Manual - Version 7.02
XML to PDF by RenderX XEP XSL-FO Formatter, visit us at http://www.renderx.com/
31
Chapter 1. PACDM Server Software
Synchronize Database
Figure 64 – Message indicating Database already exist
The user can choose to overwrite the file by selecting “Yes” or cancel the export of the file by selecting “No”.
1.5.8. Synchronize Database
To refresh current values such as Item Description or Method of Payment and be able to see only those
values that are currently used, on the menu bar select:
Tools - Database Utilities -
Synchronize Database
This will reload the drop-down list where the user can select the criteria in the left panel of Search Criteria to ensure that
all data from the database is available for search.
The following message will appear:
Figure 65 – Message indicating Synchronization may take a few minutes
To continue, click “Yes”. The window below will appear to show the progress of the Synchronization
Figure 66 – Progress of the Synchronization
If the Synchronization process has been completed, the following message will be displayed.
Figure 67 – Message indicating successful Synchronization
If any old data is found, the following message will appear:
PACDM User Manual - Version 7.02
XML to PDF by RenderX XEP XSL-FO Formatter, visit us at http://www.renderx.com/
32
Chapter 1. PACDM Server Software
Synchronize Database
Figure 68 – Message indicating some old item descriptions were found
PACDM User Manual - Version 7.02
XML to PDF by RenderX XEP XSL-FO Formatter, visit us at http://www.renderx.com/
33
Chapter 1. PACDM Server Software
Exception Reporting
1.6. Exception Reporting
The user must click Synchronization to update the defined exception within the database. Users also have to select an
Item(s) and an Exception(s) to get the result.
A search with exception criteria must begin with the selection of the Item level for searching.
Figure 69 – Selection for Exceptions search
Figure 70 – Shows the results of a custom report search done within an Exception
PACDM User Manual - Version 7.02
XML to PDF by RenderX XEP XSL-FO Formatter, visit us at http://www.renderx.com/
34
Chapter 1. PACDM Server Software
Exception Reporting
Define Exceptions
An exception is an event which occurs when certain conditions, determined by the user, are met. Exceptions can be used
to trigger an alarm which can subsequently notify a user of a suspicious anomaly by email. To define an exception:
Figure 71 – Define Exceptions menu
Defining exceptions allows the user to search for specific items for which exceptions occurred.
This will display the following dialog:
Figure 72 – Exceptions Dialog
The first time the program is executed, the grid will be empty. To add new exceptions, click Add.
The screen illustrated in Figure 57 will be shown.
PACDM User Manual - Version 7.02
XML to PDF by RenderX XEP XSL-FO Formatter, visit us at http://www.renderx.com/
35
Chapter 1. PACDM Server Software
Exception Reporting
Figure 73 – Add/Edit Exception Definition
The following exception parameters are available:
1. The section Interval allows the user to define the valid search interval for the exception.
2. Camera gives the option to choose on which camera the user wants to follow the exceptions.
3. Maximum Hits allows the user to specify the number of exception items to display. This option is also important
for user notification as it defines the number of occurrences
4. The option Description is followed by a drop down menu, thereby allowing the user to select the exception
item.
5. The drop-down menu, Related To allows the user to select Previous Item, Next Item, or Whole Transaction. This
will allow the user to indicate which item to display relative to the exception item selected. For example, selecting
Previous Item with an Exception Item of Void will display the item previous to a void transaction when a search is
conducted.
6. E-mail Setup allows the user to set up one or more emails for the server to send an email to when an exception
has been triggered. The user interface allows the user to add user, delete user, or change the previous email address/components. Information such as the SMTP server, IP address, port number and user login/password (refer to
the Figure 48 for detail description) must be set up before a new user can be added or deleted.
Edit Exception
It is possible to change the parameters for an exception by selecting the row containing the exception to be modified and
clicking Edit.
When a line is selected, the line becomes blue.
PACDM User Manual - Version 7.02
XML to PDF by RenderX XEP XSL-FO Formatter, visit us at http://www.renderx.com/
36
Chapter 1. PACDM Server Software
Email Setup
Figure 74 – Selected row on Exceptions Definition
Deleting one of the Exception Definitions
Figure 75 – Deletion confirmation of the selected row
Select the definition to be deleted. Click Delete.
The following message to the left will appear. Answer Yes to continue.
To delete all exceptions: Click Delete All.
1.6.1. Email Setup
Email Setup is mostly used for Exception Setup. Basic SMTP information must be set up before user can add/delete new
user. In setting up the basic SMTP information the user is allowed to change this information at any time. On the menu
bar, click on:
Define Exception - Add -Email Setup or Tools -Options -Email Setup
Figure 76 – E-mail Setup Window
PACDM User Manual - Version 7.02
XML to PDF by RenderX XEP XSL-FO Formatter, visit us at http://www.renderx.com/
37
Chapter 1. PACDM Server Software
Email Setup
To change the basic SMTP information for the Server
1. Click Email Setup
2. The user will be prompted to input or change the Full Name, Email Address, IP address, Port number, Login method,
User Name and Password (if necessary)
3. When the required information has been inputted, the grayed out 'Apply' button will have turned into an active
Apply button. Click Apply or Ok, to save all changes
Figure 77 - Edit STMP information of the recipient
4. The user is allowed to add new addresses to which emails will be sent when an exception is triggered. The user first
needs to add one or multiple emails. Once this has been done, the user can choose a specific address for specific exceptions.
Figure 78 – Adding New Users window
To add a new email address
PACDM User Manual - Version 7.02
XML to PDF by RenderX XEP XSL-FO Formatter, visit us at http://www.renderx.com/
38
Chapter 1. PACDM Server Software
Email Setup
1. Click Add User
2. Enter the username and email address in the appropriate fields
3. Click Save to implement the changes
Figure 79 – Adding New Recipient window
To delete an email address
1. Click the email address to be removed
2. Click Delete User
3. A confirmation message will appear to confirm the deletion. Click Yes.
Figure 80 – Deletion confirmation window
PACDM User Manual - Version 7.02
XML to PDF by RenderX XEP XSL-FO Formatter, visit us at http://www.renderx.com/
39
2
PACDM Remote Software
Topics Covered
• Regular Remote PACDM Installation
• Quick Search on Remote PACDM
• Downloading Databases to Remote PACDM
• PACDM Remote Enterprise Setup
XML to PDF by RenderX XEP XSL-FO Formatter, visit us at http://www.renderx.com/
Chapter 2. PACDM Remote Software
Regular Remote PACDM Installation
2.1. Regular Remote PACDM Installation
After downloading these programs from the i³DVR FTP site, double click PACDM_Remote-Regular V7.02.exe or
PACDM_Remote-Enterprise V7.02.exe. Both programs must download data from the i³Server or SRX-Pro first before
any comparison can be done. The software can only connect to one site at a time and download daily data one at a time.
PACDM™ Remote Regular allows users to compare data from PACDM™ from just one location whereas the enterprise
solution allows data comparison from many sites.
Figure 81 – PACDM Remote-Enterprise and PACDM Remote-Regular software
To install:
Note
PACDM™ remote only works if the i3Remote or SRX-Pro Remote software is installed on the client PC.
1. Ensure that the server is not running. To exit from the server use Ctrl+Alt+Shift+F4 (only if you are “master user”)
2. Ensure that the SPK key is inserted into the USB port located in the back or front of the DVR system.
3. Choose the desired version of PACDM™ located on the i³DVR ftp site. Download and run the executable file.
4. When prompted, designate a folder in which to install the program. Answer the installation messages with the appropriate response to continue with the installation.
5. The PACID is a seven-character name identifier for the server. This name is used to identify the server when using
the remote capabilities of the PACDM™ software. Enter a unique name for the server in the dialog box. It is recommended that the serial number for the DVR be used.
6. A successful installation will result in a message indicating a successful installation.
Figure 82 – PACDM™ Remote Access window
PACDM User Manual - Version 7.02
XML to PDF by RenderX XEP XSL-FO Formatter, visit us at http://www.renderx.com/
41
Chapter 2. PACDM Remote Software
Regular Remote PACDM Installation
Figure 83 – Installation Complete window
To validate the installation, go to Start Menu and click Control Panel - Add/Remove Programs. If the
application was installed successfully there will be an application program entry as shown below:
Figure 84 – Control Panel – Add/Remove Programs window
Installation of the SRX-Pro Remote and PACDM™ Remote
Installation of PACDM™ software requires the installation of SRX-Pro Remote software on a remote desktop computer.
1. Download SRX-Pro Remote software available from the FTP site (http://files.123ip.com)
2. Run the executable program by double clicking on the setup file. The installation program is located in the directory:
/i3DVR Remote/Data1
3. A series of installation messages will appear. Provide the required responses to complete the installation.
4. A completed installation will result in the message “Installation is completed successfully”.
Installing the Regular Remote PACDM™ application program
1. One server can be remotely searched after installing the Regular Remote PACDM™ in conjunction with installation
of the SRX-Pro Remote software. Viewing one server database does not require the CD Key.
2. Download and run the PAC DM_Remote-Regular V7.02.exe from the FTP site. Please contact Technical Support for
more information.
PACDM User Manual - Version 7.02
XML to PDF by RenderX XEP XSL-FO Formatter, visit us at http://www.renderx.com/
42
Chapter 2. PACDM Remote Software
Regular Remote PACDM Installation
3. Accept the agreement and proceed with the installation. The program will be stored by default in the directory
D:\RPAC. It is suggested that the recommended default drive be used.
Note
If default drive is not available, Install will
be disabled. Use Browse... to select any
available drive.
Figure 85 – Installation Destination setup window
4. W4. When the PACDM™ Remote software has completed installation, a message will be displayed indicating a successful installation.
Figure 86 – PACDM™ Remote Setup completed
Installing the PACDM™ Enterprise Remote application program
1. If remote viewing and search capabilities are required for more than one machine, download and install the PACDM™
Enterprise Remote. Please uninstall any previous versions of PACDM™ Regular Remote
on the system.
2. Download and run the PAC DM_Remote-Enterprise V7.02.exe file from the folder found in the FTP site. Contact
Technical Support for more information.
3. Follow the steps in the installation Wizard setup to continue with the installation. Specify the desired installation
folder.
4. When the PACDM™ Remote Regular software has completed installation, a message will be displayed indicating a
successful installation.
For security reasons, users will be required to contact i³DVR to obtain a CD key in order to run the PAC Data Manager
Enterprise for the initial installation.
PACDM User Manual - Version 7.02
XML to PDF by RenderX XEP XSL-FO Formatter, visit us at http://www.renderx.com/
43
Chapter 2. PACDM Remote Software
Regular Remote PACDM Installation
When using PACDM™ with i³SRX-Pro, please consider the following notes on compatibility:
Version of
i³Server/SRX-Pro
Version of PACDM™
Compatibility issues
i³Server 2.47
PACDM™ 3.03
No issues observed
i³Server 2.47
PACDM™ 3.04 and 4.01
The check box Show TCP/IP text
overlay on the Text overlay tab on the
Server must be checked.
i³Server 4.01
PACDM™ 3.03
i³Server 4.01 with PACDM™ 3.03 =
no issues observer for TCP/IP POS.
However, COM port conflict message
is displayed for serial POS
i³Server 4.01
PACDM™ 3.04 and 4.01
No issues observed
SRX-Pro 1.25.xx
PACDM™ 6.01 and 7.01
No issues observed
SRX-Pro 1.28.xx
PACDM™ 6.01 and 7.01
No issues observed
SRX-Pro 1.30.xx (including Lite and
Ultra Lite)
PACDM™ 6.01 and 7.01
No issues observed
SRX-Pro 1.40.xx
PACDM™ 6.01 and 7.01
No issues observed
PACDM User Manual - Version 7.02
XML to PDF by RenderX XEP XSL-FO Formatter, visit us at http://www.renderx.com/
44
Chapter 2. PACDM Remote Software
Quick Search on Remote PACDM
2.2. Quick Search on Remote PACDM
Figure 87– Quick Item Search tab in Remote mode
PAC ID (server data identification) is needed when connecting remotely. Before conducting a search on a remote server(s),
it is necessary to download the database from the server(s) to be searched.
Figure 88 – Results of a **Clear** Quick Item Search on a remote server
For remote searching, it is important to specify a PACID for the server to search. In Regular Remote mode, it is only
possible to search one PACID at a time.
In the Report Type tab, the user can also select PACID as a field by which to summarize the results.
PACDM User Manual - Version 7.02
XML to PDF by RenderX XEP XSL-FO Formatter, visit us at http://www.renderx.com/
45
Chapter 2. PACDM Remote Software
Quick Search on Remote PACDM
Figure 89 – New Report Template Summarized by PACID
PACDM User Manual - Version 7.02
XML to PDF by RenderX XEP XSL-FO Formatter, visit us at http://www.renderx.com/
46
Chapter 2. PACDM Remote Software
Downloading Databases to Remote PACDM
2.3. Downloading Databases to Remote
PACDM
To download the database(s) from the server(s), follow the following steps:
1. Click on the Search Mode button, on the SRX-Pro main screen, the screen should appear as the screen in Figure 90.
Figure 90 – Search Mode
2.
Select the
tab on the bottom right
3.
Choose the appropriate Database to download by clicking on one of the three
icons. Each icon represents a
different peripheral device in which the data was collected from (POS, ATM, Card Access)
4. Figure 91 should appear, select the desired database to download
PACDM User Manual - Version 7.02
XML to PDF by RenderX XEP XSL-FO Formatter, visit us at http://www.renderx.com/
47
Chapter 2. PACDM Remote Software
Downloading Databases to Remote PACDM
Figure 91 – Downloading Databases from Server database to Remote database
After this process is done, remote Server will have access to the Server’s database(s), which will allow the remote
Server to conduct any search the Server(s) are able to.
PACDM User Manual - Version 7.02
XML to PDF by RenderX XEP XSL-FO Formatter, visit us at http://www.renderx.com/
48
Chapter 2. PACDM Remote Software
PACDM Remote Enterprise Setup
2.4. PACDM Remote Enterprise Setup
It is possible to search back on more than one server at a time in remote mode if using the PAC Data Manager – Enterprise
version.
When running PAC Data Manager Enterprise for the first time, the following dialog in Figure 89 will be displayed:
Figure 92 – Serial Number dialog before entering the CD key
The CD Key must be entered followed by the word “PAC” as shown below.
Figure 93 – Serial Number dialog after entering the CD key
If an incorrect or invalid CD key is entered, the following message box is displayed:
Figure 94 – Message indicating an invalid CD key was entered
The software can only run if a valid CD key has been entered.
Data can be searched on multiple servers simultaneously.
PACDM User Manual - Version 7.02
XML to PDF by RenderX XEP XSL-FO Formatter, visit us at http://www.renderx.com/
49
Chapter 2. PACDM Remote Software
PACDM Remote Enterprise Setup
Figure 95 – Sample Quick Item Search with data received from two servers
Figure 96 – Sample Custom Transaction Report with data received from two servers
PACDM User Manual - Version 7.02
XML to PDF by RenderX XEP XSL-FO Formatter, visit us at http://www.renderx.com/
50
3
Appendix
Topics Covered
• Password Setup for i³SRX-Pro
• Text Overlay Setup for i³SRX-Pro
• List of Integrations
• Frequently Asked Questions
XML to PDF by RenderX XEP XSL-FO Formatter, visit us at http://www.renderx.com/
Chapter 3. Appendix
Password Setup for i³SRX-Pro
3.1. Password Setup for i³SRX-Pro
Using PACDM™ software requires setup in the SRX-Pro system environment. This appendix describes the setup process
on the SRX-Pro Server to allow the user to use the PACDM™ software.
To set up Password and New user account:
1.
Click on the Setup Mode icon,
on the SRX-Pro main screen
2. Select the User Management tab
3. The screen below in Figure 97 should appear
4. Click on the
icon to setup password and add user
5. Enter New Username, Password and confirm it
6. Make sure that the PAC : Enable check box is enabled
7. Click Add User
Figure 97 – Password Setup Window
In order to change the setup for text overlay, a user must be logged in with POS text overlay rights. To confirm that the
user has the required access rights for text overlay every login:
Click on the “+” next to the user (i.e. i3dvr) - in the drop down menu select “+” next to Setup: Enable - Text
overlay should be Modifiable
PACDM User Manual - Version 7.02
XML to PDF by RenderX XEP XSL-FO Formatter, visit us at http://www.renderx.com/
52
Chapter 3. Appendix
Text Overlay Setup for i³SRX-Pro
3.2. Text Overlay Setup for i³SRX-Pro
1.
Click on the Setup Mode icon,
on the SRX-Pro main screen
2. Select the Text Overlay tab
3. The screen below in Figure 98 should appear
4.
5.
Select a Channel # to apply settings to by clicking on the Browse
button
To apply settings to more than one channel, click on
to select the channels.
Figure 98 – Text Overlay Setup Window
PACDM User Manual - Version 7.02
XML to PDF by RenderX XEP XSL-FO Formatter, visit us at http://www.renderx.com/
53
Chapter 3. Appendix
List of Integrations
3.3. List of Integrations
No. Card Access Template Name:
Type of Communication
Note
1
V1.00_KeyScan.tpl
Serial Port
Multi-Channel
2
V1.00_AxiomIII.tpl
TCP/IP
3
V1.00_Integra32.tpl
TCP/IP
4
V1.00_AxiomV.tpl
TCP/IP
5
V1.00_BioMetricScanMaster.tpl
Serial Port
6
V1.00_SensorSoft.tpl
Serial Port
No. POS Template
Type of Communication
1
V1.00_ACS(NCR).tpl
UDP Protocol
2
V1.00_ActiSoft.tpl
TCP/IP
3
V1.00_Aloha_Serial.tpl
Serial Port
4
V1.00_AutoZone.tpl
Serial Port
5
V1.00_Aurora.tpl
Serial Port
6
V1.00_BreakPoint.tpl
TCP/IP
7
V1.00_Bulloch.tpl
Serial Port
8
V1.00_ClerViewPOS_V4.02.tpl
TCP/IP
9
V1.00_CLR.tpl
TCP/IP
10
V1.00_CNC.tpl
Serial Port
11
V1.00_Datasym.tpl
Serial Port
12
V1.00_Demo.tpl
Serial Port
13
V1.00_G-Site(Gilbarco).tpl
Serial Port
14
V1.00_G-Passport(PrinterPort).tpl
Serial Port
15
V1.00_G-Passport(PoleDisplay).tpl
Serial Port
16
V1.00_Electralogics.tpl
Serial Port
17
V1.00_GasBoy(NBS).tpl
Serial Port
18
V1.00_Logivision(TCP).tpl
TCP/IP
19
V1.00_Logivision(French).tpl
Serial Port
20
V1.00_IBM_Progressive.tpl
Serial Port
21
V1.00_Logivision.tpl
Serial Port
22
V1.00_Micros9700(TCP)_V3.0.tpl
TCP/IP
Multi channel
23
V1.00_Micros9700(TCP)_V2.8.tpl
TCP/IP
Multi channel
24
V1.00_Micros3700.tpl
Serial Port
25
V1.00_MaitreD.tpl
TCP/IP
26
V1.00_MSI(No_Start).tpl
Serial Port
27
V1.00_MSI(C_Start).tpl
Serial Port
28
V1.00_NCR7402.tpl
Serial Port
29
V1.00_NCR7448.tpl
Serial Port
PACDM User Manual - Version 7.02
XML to PDF by RenderX XEP XSL-FO Formatter, visit us at http://www.renderx.com/
Note
Multi channel
Multi channel
54
Chapter 3. Appendix
List of Integrations
30
V1.00_NCR7453.tpl
Serial Port
31
V1.00_NCR7456.tpl
Serial Port
32
V1.00_NCR7458.tpl
Serial Port
33
V1.00_NCRDocumentor(TCP).tpl
TCP/IP
34
V1.00_NCRScanMaster(DOS).tpl
Serial Port
35
V1.00_NCRScanMaster.tpl
Serial Port
36
V1.00_Panasonic5000.tpl
Serial Port
37
V1.00_Panasonic5500_7500.tpl
Serial Port
38
V1.00_Panasonic7750.tpl
Serial Port
39
V1.00_PennyLane.tpl
Serial Port
40
V1.01_PennyLaneTCP.tpl
TCP/IP
41
V1.00_Pinnacle.tpl
Serial Port
42
V1.00_PinnacleV8.3.tpl
Serial Port
43
V1.00_Progressive(IBM).tpl
Serial Port
44
V1.00_Radiant(MC).tpl
Serial Port
Multi channel
45
V1.00_Radiant_M100.tpl
Serial Port
Multi channel
46
V1.00_Radiant(Printer).tpl
Serial Port
Multi channel
47
V1.00_Radiant_Citgo3441100.tpl
Serial Port
48
V1.00_Radiant.tpl
Serial Port
49
V1.00_RadiantT160(Poledisplay).tpl
Serial Port
50
V1.00_Rapidfire.tpl
Serial Port
51
V1.00_RestaurantMan.tpl
Serial Port
52
V1.01_RubyVerifone.tpl
Serial Port
53
V1.00_SamSungER650.tpl
Serial Port
54
V1.00_Sharp3000.tpl
Serial Port
Multi channel
55
V1.00_Sharp600.tpl
Serial Port,
Multi channel
56
V1.00_Sharp700.tpl
Serial Port,
Multi channel
57
V1.00_Sharp770.tpl
Serial Port
58
V1.00_Spirit2000.tpl
Serial Port
59
V1.00_StoreNext.tpl
Serial Port
60
V1.00_Synercom.tpl
Serial Port
61
V1.00_TVS1066.tpl
Serial Port
62
V1.00_TVS2110.tpl
Serial Port
63
V1.00_Uniwell670F.tpl
Serial Port
64
V1.00_Uniwell1870.tpl
Serial Port
65
V1.00_VerifoneTopaz.tpl
Serial Port
Multi channel
66
V1.00_Uniwell7505.tpl
Serial Port
Multi channel
67
V1.01_WayneNucleus.tpl
Serial Port
Multi channel
68
V1.00_WayneNucleusOS2.tpl
Serial Port
Multi channel
PACDM User Manual - Version 7.02
XML to PDF by RenderX XEP XSL-FO Formatter, visit us at http://www.renderx.com/
Multi channel
Multi channel
55
Chapter 3. Appendix
List of Integrations
69
V1.00_Micros9700(Serial)
Serial Port
70
V1.00_ActivantCentralServer
Serial Port
71
V1.00_OmniCashV3.5
Serial Port
72
V1.00_Zonal-Aztec2.8.2.4
Serial Port
73
V1.00_G-Site(GilbarcoFrench)
Serial Port
74
V1.00_radiant43.1035-epson_thermal_printer_m129c Serial Port
75
V1.00_XLV(Auditlok).tpl
Serial Port
No. ATM Template Name:
Type of Communication
1
V1.00_ATM(Oklahoma).tpl
TCP/IP
2
V1.00_ATM(PeoplesBank).tpl
TCP/IP
3
V1.00_ATM(Redstone).tpl
TCP/IP
No. POS XML Template Name:
Type of Communication
1
V1.00_Xpient(XML).xsl
TCP/IP
2
V1.00_Volante(XML).xsl
TCP/IP
3
V1.00_StarPlus(XML) .xsl
TCP/IP
4
V1.00_Radiant(XML).xsl
TCP/IP
5
V1.00_POSITouch(XML).xsl
TCP/IP
6
V1.00_IBMSurePOS500(XML).xsl
UDP
7
V1.00_HDS(XML).xsl
TCP/IP
8
V1.00_DineAmix(XML).xsl
TCP/IP
9
V1.00_ISS45(XML).xsl
TCP/IP
PACDM User Manual - Version 7.02
XML to PDF by RenderX XEP XSL-FO Formatter, visit us at http://www.renderx.com/
Notes
Notes
56
Chapter 3. Appendix
Frequently Asked Questions
3.4. Frequently Asked Questions
Before calling our technical support line 1.877.877.7241, to troubleshoot PACDM™ the following steps should be considered
to solve some of your technical issues.
What type of communications we use for text overlay?
Answer: Serial and network TCP/IP
What port number are we using in TCP/IP for socket connection?
Answer: The default is 5111; however, remember that i³Server setup needs to enable TCP/IP connection on Text Overlay
and requires a reboot of the server. For the PACDM™ latest version, v7.01, this is no longer required because it is always
on.
I have completed the setup, but I don't get text overlay. Why?
Answer: Usually this situation occurs with connection issues. Check for the following: is the unit physically disconnected?
Are the wrong ports being used? Have you checked the pins on your cable? Etc.
Answer the following questions:
1. Is my pin layout correct for this peripheral device?
2. Did I install the PACDM™ software?
3. Did I select the appropriate text overlay template?
4. Did I select the correct COM Port or TCP/IP port?
5. Did I restart my i³Server?
6. Did I connect the SPK key (software protection key)?
7. Did I enable Text Overlay on live mode and search mode under Text Overlay setup in i³Server?
I get text overlay, but I don't see data in PACDM™. Why?
Answer: Under SRX-Pro Server User Management setup the user might not have the PACDM™ privilege.
How do I show text overlay on only part of the video?
Answer: Under setup - Text Overlay, adjust the red box on video.
How long does the text overlay stay on screen?
Answer: The staying time of the text displayed can be adjusted in setup.
How do I setup my POS terminals to connect to your DVR?
Answer: It is always best to have the POS technicians setup the POS, as it is a liability issue if we have our technician
do it. Generally the information on how to set up is gathered in documents from dealers/company/manufacturers, and
from request for integration phase.
What is needed to get my POS integrated?
PACDM User Manual - Version 7.02
XML to PDF by RenderX XEP XSL-FO Formatter, visit us at http://www.renderx.com/
57
Chapter 3. Appendix
Frequently Asked Questions
Answer: There is a form from the PACDM™ department that needs to be filled out with information on communication
type, contact person, version of POS, etc. You can also email [email protected].
Does the POS software have additional cost to enable text insertion?
Answer: It depends on the maker of the POS hardware/software. Some do require fees to activate certain features and
some are included in the package. Cost varies between companies and dealers.
Why was everything working a week ago, and now the data is no longer captured.
Answer: If any updates have been done on the POS, a new data capture is required to see if data format has changed.
The templates are sensitive on how data is formatted.
How do I do data capturing?
Answer: In C:\i3dvr server folder, there is a file named "datac.exe" which captures data from serial ports and TCP/IP.
Refer to the manual on how to use this program.
Does the POS server/terminal require feedback to continue data feeding?
Answer: Unique to certain POS's, which have some sort of flow control on the data communication, we need to customize
PACDM™ to send feedback on all data sent to the DVR, for example Micro9700 and RDS/HDS. Other POS devices need
a reply from the DVR, thus using I3-P75 (Panasonic 7750) would help this situation.
Where can I get the updated/new version of PACDM™?
Answer: Tech Support can provide username and password to get the software from our FTP site. Please contact our
technical support line 1.877.877.7241.
What is the maximum length of cable I can run from the POS to i³Server?
Answer: Since the voltage is low, i³DVR recommends the cable should be no longer than 75 feet.
What type of cable should I use to integrate with the POS and i³Server?
Answer: i³DVR recommends 18 AWG cable or Cat-5 UTP.
I have this cable and its only 3 ft long. The register is 40 ft away from the DVR,
how do I extend it?
Answer: Splice the cable that is going to the DVR and extend it.
I installed PACDM™ and I’m getting an error "database not recognized, local mode
not available", what do I do?
Answer: Make sure PACDM™ POS Server is installed. Make sure MDAC is installed.
I'm getting text overlay but I get nothing in the database.
Answer: Make sure that the correct template is being used. Otherwise the template needs to be worked on and data
will need to be collected.
Which version of PACDM™ works with which version of i³Server?
• PAC 3.01 works with i³Server Version 2.09 – 2.31
• PAC 3.03 works with i³Server Version 2.47
PACDM User Manual - Version 7.02
XML to PDF by RenderX XEP XSL-FO Formatter, visit us at http://www.renderx.com/
58
Chapter 3. Appendix
Frequently Asked Questions
• PAC 3.04 works with i³Server Version 4.01
• PAC 7.01 and higher works with the SRX-Pro series
PACDM User Manual - Version 7.02
XML to PDF by RenderX XEP XSL-FO Formatter, visit us at http://www.renderx.com/
59