1
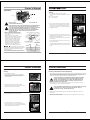
4000W Generator Topic Page Limited Warrant y 3 S a fet y G u i d e l i n e s 5 G e n e r a l Pr e c a u t i o n s 6 Battery 15 Assembly 16 Operation 17 Spark Plug Service 22 Inspection, Cleaning, Maintenance and Storage 23 Installation 29 Compliance 31 Speci fications 32 General Par ts Listing 33 WARNING! READ AND UNDERSTAND ALL SAFETY PRECAUTIONS IN THIS MANUAL BEFORE OPERATING. FAILURE TO COMPLY WITH INSTRUCTIONS IN THIS MANUAL COULD RESULT IN PERSONAL INJURY, PROPERTY DAMAGE, AND/ OR VOIDING OF YOUR WARRANTY. ALL-POWER WILL NOT BE LIABLE FOR ANY DAMAGE BECAUSE OF FAILURE TO FOLLOW THESE INSTRUCTIONS. 2 6^ULY»Z4HU\HS 3PTP[LK>HYYHU[` (SS7V^LY^HYYHU[Z[V[OLVYPNPUHSW\YJOHZLY^OV\ZLZ[OLWYVK\J[PUHJVUZ\TLY HWWSPJH[PVUWLYZVUHSYLZPKLU[PHSVYOV\ZLOVSK\ZHNL[OH[HSSWYVK\J[ZJV]LYLK\UKLY[OPZ ^HYYHU[`HYLMYLLMYVTKLMLJ[ZPUTH[LYPHSHUK^VYRTHUZOPWMVYVUL`LHYMYVT[OLKH[LVM W\YJOHZL(SSWYVK\J[ZJV]LYLKI`[OPZSPTP[LK^HYYHU[`^OPJOHYL\ZLKPUJVTTLYJPHSHWWSPJH[PVUZ PLPUJVTLWYVK\JPUNHYL^HYYHU[LK[VILMYLLVMKLMLJ[ZPUTH[LYPHSHUK^VYRTHUZOPWMVY KH`ZMYVT[OLKH[LVMVYPNPUHSW\YJOHZL7YVK\J[ZJV]LYLK\UKLY[OPZ^HYYHU[`PUJS\KLHPY JVTWYLZZVYZHPY[VVSZZLY]PJLWHY[ZWYLZZ\YL^HZOLYZHUKNLULYH[VYZ (SS7V^LY^PSSYLWHPYVYYLWSHJLH[(SS7V^LYZVSLVW[PVUWYVK\J[ZVY JVTWVULU[Z^OPJOOH]LMHPSLK^P[OPU[OL^HYYHU[`WLYPVK:LY]PJL^PSSILZJOLSK\SLKHJJVYKPUN [V[OLUVYTHS^VYRMSV^HUKI\ZPULZZOV\YZH[[OLZLY]PJLJLU[LYSVJH[PVUHUK[OLH]HPSPIPSP[`VM YLWSHJLTLU[WHY[Z(SSKLJPZPVUZVM(SS7V^LY^P[OYLNHYK[V[OPZSPTP[LK^HYYHU[`ZOHSSIL MPUHS ;OPZ^HYYHU[`NP]LZ`V\ZWLJPMPJSLNHSYPNO[ZHUK`V\TH`HSZVOH]LV[OLYYPNO[Z^OPJO]HY`MYVT Z[H[L[VZ[H[L 9,:765:0)030;@6-690.05(37<9*/(:,9PUP[PHS<ZLY! ;VWYVJLZZH^HYYHU[`JSHPTVU[OPZWYVK\J[+656;YL[\YUP[LT[V[OLYL[HPSLY;OLWYVK\J[T\Z[ ILL]HS\H[LKI`HU(\[OVYPaLK>HYYHU[`:LY]PJL*LU[LY-VY[OLSVJH[PVUVM[OLULHYLZ[(\[OVYPaLK >HYYHU[`:LY]PJL*LU[LYJHSS 9L[HPUVYPNPUHSJHZOYLNPZ[LYZHSLZYLJLPW[HZWYVVMVMW\YJOHZLMVY^HYYHU[`[V^VYR <ZLYLHZVUHISLJHYLPU[OLVWLYH[PVUHUKTHPU[LUHUJLVM[OLWYVK\J[HZKLZJYPILKPU[OL6^ULY»Z 4HU\HSZ +LSP]LYVYZOPW[OLWYVK\J[[V[OL(\[OVYPaLK>HYYHU[`:LY]PJL*LU[LY-YLPNO[JVZ[ZPMHU`T\Z[ ILWHPKI`[OLW\YJOHZLY 0M[OLW\YJOHZLYKVLZUV[YLJLP]LZH[PZMHJ[VY`YLZ\S[ZMVYT[OL(\[OVYPaLK>HYYHU[`:LYJP]L *LU[LY[OLW\YJOZLYZOV\SKJVU[HJ[(SS7V^LY 4000W Generator Owner’s Manual 4000W Generator General Precautions (cont’d) General Precautions (cont’d) Mechanical (cont’d) Extension Cord • Do not operate the generator with safety guards removed. While the generator is running, do not attempt to reach around the safety guard for maintenance or any other reason. If an extension cord (not included) is used, make sure to use only UL approved cords having the correct gauge and length according to the following table: • Keep hands, arms, long hair, loose clothing, and jewelry away from moving parts. Be aware that when engine parts are moving fast they cannot be seen clearly. Nameplate Amps (@ full load) Cord Lengths 0 ft.- 50 ft. 50 ft.-100 ft. 100 ft.-150 ft. 150 ft.-200 ft. • Keep access doors on enclosures closed and locked when access is not required. • When working on or around the generator always wear protective clothing including ANSI approved safety gloves, safety eye goggles, and safety hat. • Do not alter or adjust any part of the generator that is assembled and supplied by the manufacturer. • Always follow and complete scheduled engine and generator maintenance. 0-5 5.1 - 8 16 AWG 16 AWG 16 AWG 14 AWG 12 AWG 10 AWG 12 AWG - 8.1 - 12 12.1 - 15 15 - 20 14 AWG 12 AWG 10 AWG 12 AWG 10 AWG 10 AWG - - Chemicals • Avoid contact with hot fuel, oil, exhaust fumes, and hot solid surfaces. • Avoid body contact with fuels, oils, and lubricants used in the generator. If swallowed, seek medical treatment immediately. Do not induce vomiting if fuel is swallowed. For skin contact, immediately wash with soap and water. For eye contact, immediately flush eyes with clean water and seek medical attention. Noise • Prolonged exposure to noise levels above 68 DBA is hazardous to hearing. Always wear ANSI approved ear protection when operating or working around the generator when it is running. 14 13 Owner’s Manual 4000W Generator Assembly Battery This product does not need a battery. Unpacking 1. Remove the generator and loose parts box from the carton. 2. Compare the accessory with the inventory list below. Loose Parts (Wheel kit and handle) Check all loose parts against the following list. Contact your dealer toll free at 888.896.6881 if any of the loose parts shown are not included with your generator Hardware Check: Your Hardware Kit should include: 1) Two Handles with bolts, nuts, pin with chain and brackets 2) One axle shaft with bolts and nuts 3) Two washers 4) Two cotter pins 5) One generator leg with bolts and nuts 6) Two wheels 4 1 3 5 2 15 16 6 6^ULY»Z 4HU\HS 6WLYH[PVU 6WLYH[PVU JVU[»K :[HY[PUN ;\YU[OLLUNPULZ^P[JO[V[OL65WVZP[PVU ;OLLUNPULZ^P[JOLUHISLZHUKKPZHISLZ[OLPNUP[PVU Z`Z[LT 6--!;VZ[VW[OLLUNPUL 65!;VY\U[OLLUNPUL Choke lever Handle Oil plug Air filter Recoil Start 56;,! ;/, 7(9;: 30:;,+ ()6=, (9, /,37-<3 -69 36*(;05. ;/, *65;963: 4,5;065,+ ),36> *(<;065! 79069 ;6 -09:; <:05. ;/, .,5,9(;69 ;/, ,5.05, 4<:; ), -033,+ >0;/ 6036-(/0./ 8<(30;@ :(, > .9(+, ,5.05, 603 ;6 +6 :6 <5:*9,> (5+ 9,46=, ;/, ,5.05,»: 603 +07:;0*2 36*(;,+ (; ;/, )6;;64 6- ;/, ,5.05, *9(52*(:, -033 ;/, ,5.05,»: *9(52*(:, <5;03 ;/, 603 3,=,3 0: 3,=,3 >0;/ ;/, <77,9 4(92,+ 305, 65 ;/, +07:;0*2 ;/,5 :*9,> ;/, +07:;0*2 )(*2 05;6 ;/, 603 -033 /63, )LMVYL :[HY[PUN [OL .LULYH[VY ;OLM\LS]HS]LPZSVJH[LK\UKLY[OLM\LS[HUR>OLU [OL]HS]LSL]LYPZPU[OL65WVZP[PVUM\LSPZHSSV^LK [VMSV^MYVT[OLM\LS[HUR[V[OLJHYI\YL[VY)LZ\Y [VYL[\YU[OLM\LS]HS]LSL]LY[V[OL6--WVZP[PVUHM[LY Z[VWWPUN[OLLUNPUL 6-- 65 -\LS[HURJHWHJP[`!3NHSSVUZ *OLJR [OH[ [OL LUNPUL WV^LY Z^P[JO PZ PU P[Z ¸6--¹WVZP[PVU )LMVYL [OLMPYZ[ \ZL YLTV]L [OL M\LS [HUR JHW HUK MPSS [OL M\LS [HUR ^P[O \USLHKLK NHZVSPUL >OLU M\LSPUN IL Z\YL [OH[ [OL M\LS Z[YHPULY PZ PU WSHJL 9LWSHJL [OL M\LS [HUR JHW ;OLYLHM[LY JOLJR [OL LUNPUL»Z M\LS NH\NL MVY [OL HTV\U[ VM \USLHKLK NHZVSPUL PU [OL M\LS [HUR 0M ULJLZZHY` YLMPSS [OL M\LS [HUR ^P[O \USLHKLK NHZVSPUL" [OL NLULYH[VY T\Z[ IL [\YULK VMM HUK JVVSLK KV^U ILMVYL YLMPSSPUN [OL M\LS [HUR ;VZ[HY[HJVSKLUNPULTV]L[OLJOVRLSL]LY[V[OL *36:,+WVZP[PVU;VYLZ[HY[H^HYTLUNPULSLH]L[OL JOVRLSL]LYPU[OL67,5WVZP[PVU ;OLJOVRLSL]LYVWLUZHUKJSVZLZ[OLJOVRL]HS]LPU [OLJHYI\YL[VY ;OL*36:,+WVZP[PVULUYPJOLZ[OLM\LSTP_[\YLMYVT Z[HY[PUNHJVSKLUNPUL *OVRLSL]LY ;OL67,5WVZP[PVUWYV]PKLZ[OLJVYYLJ[M\LSTP_[\YL MVYVWLYH[PVUHM[LYZ[HY[PUNHUKMVYYLZ[HY[PUNH^HYT LUNPUL <ZLNHZVSPUL^P[OHW\TWVJ[HULYH[PUNVM VYOPNOLY >LYLJVTTLUK\USLHKLKNHZVSPUNILJH\ZLP[WYVK\JLZ ML^LYLUNPULHUKZWHYRWS\NKLWVZP[ZHUKL_[LUKZ L_OH\Z[Z`Z[LTSPML 5L]LY\ZLZ[HSLVYJVU[HTPUH[LKNHZVSPULVYVPSNHZVSPUL TP_[\YL(]VPKNL[[PUNKPY[VY^H[LYPU[OLM\LS[HUR 6^ULY»Z 4HU\HS 4000W Generator 6WLYH[PVU JVU[»K Operation (cont’d) :[HY[PUN Powering 120 Volt AC Tools And Equipment: 6WLYH[L[OL9LJVPS:[HY[LY! 7\SS[OLZ[HY[LYNYPWSPNO[S`\U[PS`V\MLLSYLZPZ[HUJL [OLUW\SSIYPZRS`9L[\YU[OLZ[HY[LYNYPWNLU[S` 7\SSPUN[OLZ[HY[LYNYPWVWLYH[LZ[OLYLJVPSZ[HY[LY[V JYHUR[OLLUNPUL 1. Prior to powering tools and equipment, make sure the generator’s rated voltage, and amperage capacity (120 V AC @ 27.5 AMPs) is adequate to supply all electrical loads that the unit will power. If powering exceeds the generator’s capacity, it may be necessary to group one or more of the tools and/or equipment for connection to a separate generator. :[HY[LY.YPW CAUTION: ATTEMPTING TO POWER SENSITIVE ELECTRONIC EQUIPMENT WITHOUT THE USE OF AN APPROVED LINE CONDITIONER MAY CAUSE DAMAGE TO THE EQUIPMENT. ALL-POWER IS NOT RESPONSIBLE FOR ANY DIRECT OR INDIRECT DAMAGE CAUSED BY FAILURE TO USE AN APPROVED LINE CONDITIONER. *OVRL3L]LY 0M[OLJOVRLOHZILLUTV]LK[V[OL*36:,+ WVZP[PVU[VZ[HY[[OLLUNPULNYHK\HSS`TV]LP[[V[OL 67,5WVZP[PVUHZ[OLLUNPUL^HYTZ\W 2. Once the generator is running, simply connect the power cords of 120 volt AC powered tools and equipment into the 120 volt AC dual outlets. 65 67,5 NOTE: THE GENERATOR FEATURES AN AC NON-FUSE THERMAL PROTECTOR TO PROTECT THE AC CIRCUIT IN CASE OF AN OVERLOAD. SHOULD AN OVERLOAD OCCUR, THE BREAKER WILL POP. 3. Disconnect all electrical powered tools and equipment from the generator’s 120 volt AC duel outlets. :[VWWPUN,UNPUL ;\YU[OLLUNPULZ^P[JO[V[OL6--WVZP[PVU 4. After the engine and generator have completely cooled, store generator in a safe, clean, dry location (if not already installed). ;\YU[OLM\LS]HS]LSL]LY[V[OL6--WVZP[PVU >OLU[OLLUNPULPZUV[PU\ZLSLH]L[OLM\LS]HS]LPU [OL6--WVZP[PVU[VWYL]LU[JHYI\YL[VYMSVVKPUNHUK[V YLK\JL[OLWVZZPIPSP[`VMM\LSSLHRHNL 6-65 20 Owner’s Manual Operation (cont’d) 4000W Generator Spark Plug Service Powering 12 Volt DC tools and Equipment: 1. Prior to powering tools and equipment, make sure the generator’s rated voltage, and amperage capacity (12V DC) is adequate to supply all electrical loads that the unit will power. If powering exceeds the generator’s capacity, it may be necessary to group one or more of the tools and/or equipment for connection to a separate generator. In order to service the spark plug, you will need a spark plug wrench (commercially available). Recommended spark plugs: NHSP LD F7TC or NGKBPRGES but we recommend our OEM spark plug. To ensure proper engine operation, the spark plug must be properly gapped and free of deposits. 2. Connect the power cord of a 12 VDC powered tool or equipment to the DC Terminals. CAUTION: MAKE SURE TO CONNECT THE POSITIVE (+) LEAD OF THE POWER CORD TO THE POSITIVE (+) TERMINAL ON THE GENERATOR, AND CONNECT THE NEGATIVE (-) LEAD OF THE POWER CORD TO THE NEGATIVE (-) TERMINAL ON THE GENERATOR. 1. Remove the spark plug cap. 2. Clean any dirt from around the spark plug base. 3. Use a spark plug wrench to remove the spark plug. THE 12V DC IS FOR BATTERY CHARGING ONLY. 4. Visually inspect the spark plug. Discard it if the insulator is cracked or chipped. Clean the spark plug with a wire brush if it is to be reused. 5. Measure the plug gap with a feeler gauge.(Correct as necessary by carefully bending the side electrode.) The gap should be : 0.70-0.80 mm (0.028-0.031in) 6. Check that the spark plug washer is in good condition. 7. After the spark plug is seated, tighten with a spark plug in by hand to prevent cross-threading. 8 . After the spark plug is seated, tighten with a spark plug wrench to compress the washer. NOTE: THE SPARK PLUG MUST BE SECURELY TIGHTENED. AN IMPROPERLY TIGHTENED SPARK PLUG CAN BECOME VERY HOT AND COULD DAMAGE THE ENGINE. NEVER USE SPARK PLUGS WHICH HAVE AN IMPROPER HEAT RANGE. USE ONLY RECOMMENDED SPARK PLUS OR EQUIVALENT. 22 21 Owner’s Manual Inspection, Cleaning, and Maintenance 4000W Generator Fuel Sediment Cup Cleaning WARNING! ALWAYS MAKE SURE THE ENGINE POWER SWITCH (2) IS IN ITS “OFF” POSITION. DISCONNECT THE SPARK PLUG WIRE FROM THE ENGINE. AND ALLOW SUFFICIENT TIME FOR THE ENGINE AND GENERATOR TO COMPLETELY COOL BEFORE PERFORMING ANY INSPECTIONS, MAINTENANCE, OR CLEANING. 23 The sediment cup prevents dirt or water which may be in the fuel tank from entering the carburetor. If the engine has not been run for a long time, the sediment cup should be cleaned. 1. Turn the fuel valve to the OFF position. Remove the sedement cup, and O-ring. 2. Clean the sediment cup, and O-ring, in nonflammable or high flash point solvent. 3. Reinstall O-ring, and sediment cup. 4. Turn the fuel valve ON and check for leaks. 24 Owner’s Manual Maintenance Guide 4000W Generator Air cleaner service Periodic maintenance and adjustment is necessary to keep the generator in good operating condition. WARNING! Exhaust gas contains poisonous carbon monoxide. Shut off the engine before performing any maintenance. If the engine must be run, make sure the areas is well ventilated. A dirty air cleaner will restrict air flow to the carburetor. To prevent carburetor malfuncion, service the air cleaner regularly. Service more frequently when operating the generator in extremely dusty areas. WARNING! Using gasoline or flammable solvent to clean the filter element can cause a fire or explosion. Use only soapy water or nonflammable solvent. • Before each use, inspect the generator. Check for: NOTE: Never run the generator without the air cleaner. Rapid engine wear will result. - Loose screws - Misaligned or binding moving parts - Cracked or broken parts - Damaged electrical wiring - Any other condition that may affect safe operation. 1. Unsnap the air cleaner cover clips, remove the air cleaner cover, and remove the element. • If an engine problem occurs, have it checked by a qualified service technician before further use. Do not use damaged equipment. • Before each use, make sure the engine’s oil and gas levels are adequate. If necessary, fill the crankcase until the oil level is even with the oil hill hole and/or fill the fuel tank. 2. Wash the element in a solution of household detergent and warm water, then rinse thoroughly, or wash in nonflammable or high flash point solvent. Allow the element to dry thorughly. • Before each use, remove all debris with a soft brush, rag, or vacuum. • Lubricate all moving parts using a premium quality, lightweight machine oil. • Every 50 hours of use, drain the old engine oil and replace with a high a high quality SAE 10W-30 grade engine oil. 3. Soak the element in clean engine oil and squeeze out the excess oil. The engine will smoke during initial start-up if too much oil is left in the element. Upper Level 4. Reinstall the air cleaner element and the cover. • Every 300 hours of use, have a qualified, certified technician perform thorough maintenance on the generator and engine. • For long term storage, either drain fuel into suitable container or add a fuel preservative/ stabilizer (not included) to prevent fuel breakdown. 25 26 Owner’s Manual 4000W Generator Transporting/Storage 27 28 Owner’s Manual 4000W Generator Installation (cont’d) Installation NOTE: PRIOR TO POWERING TOOLS AND EQUIPMENT MAKE SURE THE GENERATOR’S RATED VOLTAGE, WATTAGE AND AMPERAGE CAPACITY IS ADEQUATE TO SUPPLY ALL ELECTRICAL LOADS THAT THE UNIT WILL POWER. IF POWERING EXCEEDS THE GENERATOR’S CAPACITY, IT MAY BE NECESSARY TO GROUP ONE OR MORE OF THE TOOLS AND/OR EQUIPMENT FOR CONNECTION TO A SEPARATE GENERATOR. Supporting and Mounting Mount the generator on a concrete slab capable of supporting the weight of the generator. The slab must extend on all sides beyond the frame by at least one foot. Contact a cement contractor for slab specifications if necessary. Attach the frame to the concrete slab using 3/8” diameter expansion anchor bolts (not supplied). Grounding Electrical and other permits may be required for the installation of emergency power systems. Investigate your local building and electrical codes before installing this unit. Installation must be completed by licensed contractors. WARNING! THE GENERATOR WEIGHS APPROXIMATELY 100 POUNDS. USE CARE AND THE PROPER LIFTING OR HOISTING EQUIPMENT WHEN MOVING IT TO THE INSTALLATION LOCATION. ALWAYS CONNECT HOIST LINES TO THE FRAME OF THE GENERATOR. General Location NOTE: IT IS RECOMMENDED THAT ONLY A TRAINED AND LICENSED ELECTRICIAN PERFORM THIS PROCEDURE Connect a #6 AWG grounding wire (not included) from the ground connector (8) on the generator to a grounding rod (not included) that has been driven at least 24 inches deep into the earth. The grounding rod must be an earth-driven copper or brass rod (electrode) which can adequately ground the generator. • Make sure to locate and install the generator outdoors where cooling air is readily available. • Install the generator so that the air inlets and outlets are not blocked by obstructions such as bushes, trees, or snow drifts. Locating it in the path of heavy winds or snowdrifts may require the placement of a barrier for protection. In normal weather conditions, the air vent should face the prevailing wind direction. • Install the generator on a concrete slab or other area where rain drainage or flood waters can not reach it. • Generator placement should allow four feet of access to all sides for maintenance. • Place the generator as close as possible to the electrical tools and equipment being powered to reduce the length of extension cords. 30 29 > .LULYH[VY *VTWSPHUJL <50;,+ :;(;,: ,5=09654,5;(3 796;,*;065 (.,5*@ >(:/05.;65 +* Owner’s Manual Specifications AC electrical Current Output 120V AC @ 27.5A 60Hz 4VKLS @LHY *LY[PMJH[L VM *VUMVYTP[` 4HU\MHJ[\YLY! Jiangsu Jiangdong Group Co., Ltd. *LY[PMPJH[L 5\TILY! JDG-NRSI-10-09 ,MMLJ[P]L +H[L! 12/23/2009 Continuous/rated Wattage 3,300 Peak Wattage 4,000 Outlet Four 120V outlets, One 120V twist-lock +H[L 0ZZ\LK! 12/23/2009 4LYY`SPU AH^4VU +PYLJ[VY *VTWSPHUJLHUK0UUV]H[PVU:[YH[LNPLZ+P]PZPVU 6MMPJL VM ;YHUZWVY[H[PVU HUK (PY 8\HSP[` 7\YZ\HU[ [V :LJ[PVU VM *SLHU (PY (J[ <:* ZLJ[PVU HUK *-9 HUK Z\IQLJ[ [V [OL [LYTZ HUK JVUKP[PVUZ WYLZJYPILK PU [OVZL WYV]PZPVUZ [OPZ JLY[PMPJH[L VM JVUMVYTP[` PZ OLYLI` PZZ\LK MVY [OL MVSSV^PUN ZTHSS UVUYVHK LUNPUL MHTPS` TVYL M\SS` KLZJYPILK PU [OL KVJ\TLU[H[PVU YLX\PYLK I` *-9 HUK WYVK\JLK PU [OL Z[H[LK TVKLS `LHY DC electrical 12V Gasoline engine Type ;OPZ JLY[PMPJH[L VM JVUMVYTP[` JV]LYZ VUS` [OVZL UL^ ZTHSS UVUYVHK LUNPULZ ^OPJO JVUMVYT PU HSS TH[LYPHS YLZWLJ[Z [V [OL KLZPNU ZWLJPMPJH[PVUZ KLZJYPILK PU [OL KVJ\TLU[H[PVU YLX\PYLK I` *-9 HUK ^OPJO HYL WYVK\JLK K\YPUN [OL TVKLS `LHY Z[H[LK VU [OPZ JLY[PMPJH[L ;OPZ JLY[PMPJH[L VM JVUMVYTP[` KVLZ UV[ JV]LY ZTHSS UVUYVHK LUNPULZ PTWVY[LK WYPVY [V [OL LMMLJ[P]L KH[L VM [OL JLY[PMPJH[L :4(33 56596(+ ,5.05, -(403@! AJDGS.1961GA 0[ PZH[LYT VM [OPZ JLY[PMPJH[L [OH[ [OL THU\MHJ[\YLY ZOHSS JVUZLU[ [V HSS PUZWLJ[PVUZ KLZJYPILK PU *-9 HUK HUK H\[OVYPaLK PUH^HYYHU[ VY JV\Y[ VYKLY -HPS\YL [V JVTWS` ^P[O [OL YLX\PYLTLU[Z VM Z\JOH^HYYHU[ VY JV\Y[ VYKLY TH` SLHK [V YL]VJH[PVU VY Z\ZWLUZPVU VM [OPZ JLY[PMPJH[L MVY YLHZVUZ ZWLJPMPLK PU *-9 0[ PZ HSZVH[LYT VM [OPZ JLY[PMP JH[L [OH[ [OPZ JLY[PMPJH[L TH` IL YL]VRLK VY Z\ZWLUKLK VY YLUKLYLK ]VPK HI PUP[PV MVY V[OLY YLHZVUZ ZWLJPMPLK PU *-9 7HY[ 8.3 A 4-cycle OHV air-cooled recoil start Displacement 208cc Oil capacity 0.63 quart (0.6liter) EPA approved yes Fuel ;OPZ JLY[PMPJH[L KVLZ UV[ JV]LY ZTHSS UVUYVHK LUNPULZ ZVSK VMMLYLK MVY ZHSL VY PU[YVK\JLK VY KLSP]LYLK MVY PU[YVK\J[PVU PU[V JVTTLYJL PU [OL <: WYPVY [V [OL LMMLJ[P]L KH[L VM [OL JLY[PMPJH[L Type Unleaded gasoline Capacity 4 gallons Running time 8 hours (approx.) on 1/2 load Fuel gauge included Weight Approximate weight 107 lbs. 32